1
Version 5.1
October 2003
HOBLink X11 Software and Documentation 2003 HOB
Phone: 49 911/96 66-161 Fax: 49 911/96 66-299 (The first two digits are the country code for Germany - 49)
All information contained in this User Manual is subject to change without notice. The content of this User Manual does not establish
grounds for obligation or responsibility of any kind on the part of HOB.
All rights are reserved. The reprinting or duplication of this User Manual, or any part hereof, is prohibited.
The HOBLink X11 software and documentation were thoroughly tested and proof read. Nevertheless, HOB cannot assume liability for
damages or losses or any kind that may occur through the use of the software.
Trademarks:
Ethernet is a trademark of the Xerox Corporation
i386, i486 are trademarks of the INTEL Corporation
Microsoft Windows, Windows for Workgroups are trademarks of the Microsoft Corporation
Motif is a trademark of the Open Group
NetWare is a trademark of Novell, Inc.
OPEN LOOK is a trademark of AT&T
PC-NFS is a trademark of Sun Microsystems, Inc.
Unix is a registered trademark of UNIX System Laboratories, Inc. (Subsidiary of Novell, Inc.)
X Window System is a trademark of the Open Group
All other products or names are trademarks or registered trademarks of their respective owners.
Table of Contents
1
Introduction
1.1
2
6
How the X Server Works ..................................................................................................................... 6
System Requirements
7
2.1
PC Hardware and Software................................................................................................................. 7
2.2
Host ..................................................................................................................................................... 7
2.3
Network ............................................................................................................................................... 7
3
Installing HOBLink X11
8
3.1
Installation - from CD........................................................................................................................... 8
3.2
Installation - from Web ...................................................................................................................... 10
3.3
Updating and Deinstalling.................................................................................................................. 10
4
HOBLink X11 Session Types
12
4.1
X Session .......................................................................................................................................... 12
4.2
LPR Session...................................................................................................................................... 12
4.3
LPD Session...................................................................................................................................... 13
5
Connection Types
5.1
14
X11 Connection Types ...................................................................................................................... 14
5.1.1 REXEC / RSH / RLOGIN / SSH ................................................................................................. 14
5.1.2 Passive....................................................................................................................................... 15
5.1.3 XDMCP ...................................................................................................................................... 15
5.2
VT Connection Types ........................................................................................................................ 16
5.2.1 Demohost (VT)........................................................................................................................... 16
5.2.2 Direct .......................................................................................................................................... 16
5.2.3 Modem ....................................................................................................................................... 16
5.2.4 Telnet ......................................................................................................................................... 17
6
The HOBLink Session Manager
18
7
Installation Types
19
7.1
Local Installation ................................................................................................................................ 19
7.2
Server-based Installation with HOB Enterprise Access..................................................................... 19
8
The HOBLink Session Editor
8.1
20
The Session Editor, Connection Scheme Settings............................................................................ 21
8.1.1 The Connection Tab................................................................................................................... 21
8.1.2 The XDMCP Tab........................................................................................................................ 22
8.1.3 The REXEC/RSH/RLOGIN/SSH Tab......................................................................................... 23
8.2
The Session Editor, Remote Command Line Settings ...................................................................... 24
8.3
The Session Editor, Access Control Settings .................................................................................... 24
8.4
The Session Editor, Display Settings................................................................................................. 25
8.4.1 The Display Tab ......................................................................................................................... 25
8.4.2 The Extra Settings Tab............................................................................................................... 26
8.4.3 The Fonts Tab ............................................................................................................................ 26
8.4.4 The Color Depth Tab.................................................................................................................. 27
8.4.5 The Clipboard Tab...................................................................................................................... 27
8.5
Input Devices ..................................................................................................................................... 27
8.6
Macro................................................................................................................................................. 27
8.7
Color .................................................................................................................................................. 28
8.8
Other.................................................................................................................................................. 28
8.8.1 User-defined options tab ............................................................................................................ 28
8.8.2 Others tab................................................................................................................................... 28
9
FTP
29
9.1
Starting and Closing the FTP Program.............................................................................................. 29
9.2
Establishing a Connection to an FTP Server..................................................................................... 29
9.2.1 Creating and Saving a User Profile ............................................................................................ 30
10
Win-Ping
32
10.1
Starting and Closing the "Win-Ping" Program ................................................................................... 32
10.2
The Win-Ping Tool Bar ...................................................................................................................... 33
11
Index
35
HOBLink X11 _________________________________________________________________ Introduction
About this User Manual
This User Manual describes the installation, configuration and use of the HOBLink Terminal Edition
component "HOBLink X11" on a 32-bit IBM PC (AT, PS/2 or compatible) using a Windows operating system.
Connectivity from
5
Introduction _________________________________________________________________ HOBLink X11
1 Introduction
HOBLink X11, a component of HOBLink Terminal Edition, is an integrated PC X Server package that turns
your Windows PC into an X Window terminal. With HOBLink X11, you can work simultaneously with several
graphical applications (X Clients) that are executed on different network nodes. A heterogeneous network
appears on your monitor as a unified computer system.
1.1 How the X Server Works
In this section some of the terms used in this User Manual are defined. Also described is the function of the
HOBLink X11 X Server.
The "X Window System" software, which runs on an X Terminal and is controlled by monitor, keyboard and
mouse, is called the X Server. The X Server communicates with one or more applications (X Clients) which
are located on a host computer. Any computer that supports the X Protocol can serve as host.
In this User Manual the term "window" is used frequently. There are three types:
• Microsoft Windows
• X Client Windows (also referred to as X Clients)
• The X Session Window
Windows created by programs that run using "Microsoft Windows" are referred to as Microsoft Windows.
Windows created by X Client applications are referred to as X Clients.
A Window Manager is a special X Client. This is a program that manages the windows on your server
monitor. With HOBLink X11 you can choose whether you want to use Microsoft Windows as X Window
Manager or a window manager program that runs on the host, for example, Motif (mwm) or OPEN LOOK
(olwm).
X Clients can be displayed in three modes:
• The Multiple Window Mode provides two options for the display of X Clients, either with the local or
the remote window manager.
• In Single Window Mode all X Clients are displayed within a single window of the so called "X Session
Window."
• In Full Screen Mode all X Clients are displayed outside of the GUI "Microsoft Windows" and the
Window Manager appears in full screen mode. The first X Client that you start is usually a remote
terminal emulation (xterm) or a remote window manager.
6
Connectivity from
HOBLink X11 _________________________________________________________System Requirements
2 System Requirements
Your system must fulfill the requirements found below in order to install and use HOBLink X11 on it
2.1 PC Hardware and Software
•
Connection to a TCP/IP network
•
Microsoft Windows 32-bit operating system
•
At least 4 MB RAM and 60 MB hard disk memory
•
There are no other HOBLink X11-specific hardware requirements; you only need to meet the
requirements of the operating system.
2.2 Host
•
TCP/IP protocol
•
Optional: server support for FTP and TFTP
•
Virtual terminal protocol Telnet and/or
•
xdm Client with XDMCP Support and/or
•
RSH and/or REXEC
•
X applications (Clients); e.g. xterm, mwm, etc.
•
Optional: server support for the "Berkeley Line Printer" protocol
2.3 Network
HOBLink X11 runs on any network that supports the TCP/IP Protocol. As the X protocol requires a large
amount of bandwidth, use on a LAN is to be preferred to use over the Internet.
Connectivity from
7
Installing HOBLink X11________________________________________________________ HOBLink X11
3 Installing HOBLink X11
Prior to installing HOBLink X11, it is essential that a 32-bit Windows operating system and at least one
network card have been properly installed. You need at least 4 MB working memory and about 60 MB hard
disk memory (if all character sets are to be installed) in your system.
When updating, you should always uninstall the older version before installing the update. You will find
instructions regarding deinstallation under "Updating and Deinstalling" on page 10.
HOBLink X11 can be installed either directly from a CD or from a server upon which the program was
previously installed. The following describes the installation procedure for HOBLink X11.
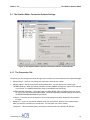
3.1 Installation - from CD
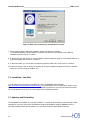
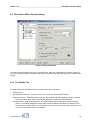
1. Put the Installation CD in the CD ROM drive.
2. The following window appears:
Figure 1: HOBLink Software CD Image
8
Connectivity from
HOBLink X11 ________________________________________________________Installing HOBLink X11
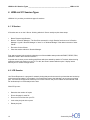
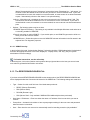
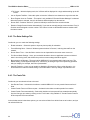
3. Click on "Install Software" and, in the window that then opens, click on "HOB products for Unix" and then
"HOBLink X11 5.1." You can select the program language in the scroll field at the bottom right. English is
selected as default. If you want a different language (either French or German), select it now. Then click on
"Install."
Figure 2: HOBLink TE Installation window*
*The installation language depends on the OS language:
This screenshot was made from a PC running a German version of Windows 2000
4. A window opens displaying the license agreement. You must accept the terms of this agreement to
continue the installation.
5. After accepting the license terms, a window will open displaying a checkbox for HOBLink X11. Click on
"Continue."
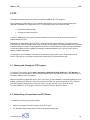
6. Now a window opens in which the installation type can be entered. You can install either a "Tryout" version
that can be used for thirty days, or, if you have a product key, select the "Full version" and enter your
product key. If you select the trial version, you can enter a product key at a later time to enable the
software permanently. Click on "Continue."
Connectivity from
9
Installing HOBLink X11________________________________________________________ HOBLink X11
Figure 3: Enter your product key to activate the full version.
7. Now a window opens in which the installation path can be entered. As default,
"C:\Programs\HOBLink\Terminal Edition" is selected. Use either the default path or set a different
installation path and click on "Continue."
8. In the window that now opens, you can set whether a personal program group is to be created (default), or
a general program group. Click on "Continue."
9. In the next window, you can accept or change the program's folder name. Then click on "Continue."
10. In the next window, click on "Return to windows" to close the installation program and return to windows,
where you can now configure HOBLink X11.
3.2 Installation - from Web
You can install a free trial version of HOBLink X11 from the HOB Downloads Website
(http://www.hob.de/testlauf/products/X11W32.htm). From this website, you can download a .zip file to your
machine and install HOBLink X11 from this. The installation procedure is very much the same as from the
CD, except that the .zip file first has to be unzipped to the installation location.
3.3 Updating and Deinstalling
The deinstallation of HOBLink X11, like the installation, is carried out automatically for the most part. When
updating you can opt to execute the deinstallation using the deinstallation program. Always remove a
previously installed version before updating. You can also execute the deinstallation manually:
10
Connectivity from
HOBLink X11 ________________________________________________________Installing HOBLink X11
1. Open the Windows Control Panel
2. Select "Software"
3. Select HOBLink X11 and click on the field "Add/Remove" in order to start the deinstallation.
The deinstallation removes all HOBLink X11 program files. Only the files that you created while using the
program will not be deleted, to include the user directory. The advantage here is that you can continue to use
the previous configuration after an update. If these files are no longer to be used, they can be safely deleted
after the deinstallation process has been performed.
Connectivity from
11
HOBLink X11 Session Types ___________________________________________________ HOBLink X11
4 HOBLink X11 Session Types
HOBLink X11 provides you with three types of sessions:
4.1 X Session
X Sessions are run on the X Server. Working with the X Server usually requires these steps:
•
Start a Remote Login Session
•
Start an "X Session Manager." The first Client executed in a Login Session functions as an X Session
Manager. A good X Session Manager is "xterm" or a "Window Manager." Both allow execution of other
Clients
•
Execution of other Clients
•
Close the session with the X Session Manager.
First, start a remote login session by selecting one of the available startup methods XDMCP, REXEC, RSH,
RLOGIN or SSH in the Connection scheme.
A special case is when you are working with Clients which are started by another X Terminal, without having
started a remote login session on your PC. For this, the Client is started with the option "-display" which
defines your PC screen as target server.
4.2 LPR Session
Line Printer Requester is a program for network printing that permits access to the printers that are hooked up
to the remote host system in your network. You must have access to the host that is to process your printing
jobs. The host has to support the "Berkeley Line Printer Protocol" and your PC Name must be entered in the
file /etc/hosts.equiv or /etc/hosts.lpd at the host.
With LPR you can:
•
Determine the number of copies
•
Print a title page for each file
•
Print one or more files from your PC
•
Look at the print jobs in the queue
•
Delete print jobs
12
Connectivity from
HOBLink X11 ___________________________________________________ HOBLink X11 Session Types
4.3 LPD Session
The HOBLink Line Printer Daemon (LPD) enables you to configure a Network Print Server to which a PC in a
TCP/IP Network can then have access.
HOBLink LPD must be installed on the Windows PC to which the printer, functioning as the Network Print
Server, is connected. The HOBLink LPD counterpart, the Line Printer Requester, must be installed on all PCs
that share access to the network printer. This Line Printer Requester sends out broadcast messages in the
network to the Printer Daemon, to which the print data can be output When the HOBLink LPD identifies itself
to the network, it accepts the print data which is then output on the connected printer.
Connectivity from
13
Connection Types ____________________________________________________________ HOBLink X11
5 Connection Types
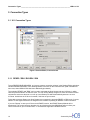
5.1 X11 Connection Types
Figure 4: Session Editor, Connection tab
5.1.1 REXEC / RSH / RLOGIN / SSH
To use REXEC/RSH/RLOGIN/SSH, you have to create a connection scheme in the Session Editor and select
"REXEC/RSH/RLOGIN/SSH" in the “Starting Method” scroll box on the connection tab. (SSH is available at
extra cost, when HOBLink SSH has been additionally purchased.)
The methods "REXEC" and "RSH" can be used to automate the Host Access and start X Clients, in which
case the protocols REXEC or RSH are used. You can use this Startup Program to enter an individual control
command to execute at the host or to call up a local Startup File which automatically starts one or more
X Clients. At this time the X Server is started, if this has not yet occurred.
To be able to execute Startup your Host System has to support the protocols REXEC or RSH, and, of course,
REXEC or RSH rights will have to be assigned to the machine requesting an REXEC or RSH connection.
If you use "Startup" to start your X Server and XDMCP is active, the XDMCP Startup Method will be
deactivated. This occurs because otherwise it is very likely that the Host XDM Script will run before your
control command or your command does – if the host also supports the XDMCP Protocol.
14
Connectivity from
HOBLink X11 ____________________________________________________________ Connection Types
The Session dialogs REXEC and RSH are very similar. Both require a host name, a user name(User ID) and
a control command or the name of a local control command file. The REXEC additionally requires a user
password.
The login with the "RLOGIN" method also requires a password. This setting starts the login and immediately
executes the given command.
5.1.1.1 Security issues
When REXEC or RSH rights are assigned to a particular machine, anyone having access to that machine can
execute REXEC or RSH commands on your system. These two protocols do not offer any user authentication
possibilities. XDMCP, on the other hand, offers both user authentication and authorization possibilities, and is
thus the more secure of the three protocols. For more information, see 8.1.2, The XDMCP Tab, and 8.1.2.1,
XDMCP Security.
5.1.2 Passive
Although the use of XDMCP is recommended, it is sometimes necessary to start Clients without XDMCP; for
example, if the software on the Host System does not support XDMCP. In this situation you can execute
X Clients within a Telnet or VT session. First the X server has to be started in passive mode, then login to the
host with a Telnet (or VT) session, set your DISPLAY environment variable and start the X client program.
5.1.3 XDMCP
To use XDMCP, you have to create a Connection scheme in the Session Editor and enable the check box
"Use XDMCP" in the tab box XDMCP. After restarting the X Server, XDMCP begins an display manager
process which runs on a host. Then the display manager process starts the remote login session as follows:
•
An optional recognition procedure is executed, in the display manager a verification takes place to verify if
the X Server is authorized to execute.
•
A "Session Key" is created which is used for subsequent client checks.
•
A user name or password is requested, in order to verify the user's authorization.
•
An Initialization Program is executed. This then carries out the desktop environment.
Common desktop environments are CDE, KDE, Gnome.
For more information, see 8.1.2, The XDMCP Tab, and 8.1.2.1, XDMCP Security.
Connectivity from
15
Connection Types ____________________________________________________________ HOBLink X11
5.2 VT Connection Types
5.2.1 Demohost (VT)
To use a Demohost connection, you have to enter a file in *.DAT format.
The Demohost provides a type of connection that you can use for demonstration purposes or employee
training which does not require a physically existent host connection.
1.
Launch the HOBLink session from which you call up the desired host application that you want to use for
employee training.
2.
Press Start in the Windows Start menu and select Programs>HOBLink Terminal Edition>Administration
Tools
3.
Execute the Internal HOBLink Tracer.
4.
Select the running session under item 1 and press Connect.
5.
Press Start Trace.
6.
Go through all the procedures that you want to teach employees during the training.
7.
After conclusion of procedures, close the session.
8.
Go to Internal HOBLink Tracer.
9.
Press Stop Trace.
10.
Press Convert....
11.
Press More... and enable with "Convert to Demohost." Confirm with OK.
12.
Press Convert.
13.
To use the created Demohost file *.DAT, start the HOBLink Session Editor.
14.
Set up a Connection scheme with the connection type "Demo-Host (VT)."
15.
Select the created Demohost file (*.DAT) under "Data File."
16.
Run this "Offline" session for the employee training.
5.2.2 Direct
Using this connection type you can set up a connection to an ASCII host (e.g. a BBS or 3270/5250 host
system) via a null modem cable or establish a direct connection over a protocol converter.
5.2.3 Modem
16
Connectivity from
HOBLink X11 ____________________________________________________________ Connection Types
This connection type lets you establish a connection to a host over a modem line.
5.2.4 Telnet
Telnet via VT is an application which uses TCP/IP (Transmission Control Protocol/Internet Protocol) and
activates remote login at an ASCII host. TCP/IP provides connectivity functions for local area networks (LANs)
as well as wide area networks (WANs), including data routing between LANs and WANs.
Telnet requires an TCP/IP stack that supports the Windows Sockets v. 1.1 interface.
Connectivity from
17
The HOBLink Session Manager_________________________________________________ HOBLink X11
6 The HOBLink Session Manager
Sessions are created, managed, and run in or from the Session Manager, the control center for all sessions.
The Session Editor is also called up from the Session Manager. The Session Manager provides a clear
overview of all available sessions.
Provided that your system administrator has granted you the required user rights (only applicable if HOB
Enterprise Access is also installed), you can carry out the following procedures relevant to HOBLink Sessions:
•
Start existing sessions ("Run" button).
•
Close open sessions ("Close" button).
•
Create new sessions ("New" button).
•
Clone existing sessions ("Clone" button).
•
Open the HOBLink Session Editor to edit schemes and save their session-specific settings (Click on the
"Edit…" button).
•
Group sessions (Use the "Edit All..." button). This button is available only when at least two sessions in
the window are selected. To select multiple sessions, hold down the [Shift] key when clicking on the
sessions in the Session Manager: As soon as more than one session is selected, the "Edit…" button will
change to the "Edit All…" button all.
•
Modify schemes for all session in HOBLink Session Editor ("Edit All…" button). This button is available
only when at least two sessions in the window are selected (multiple selection by pressing [Shift] in
addition).
•
Remove existing sessions from the list ("Delete" button).
•
During the installation the following symbol is created for the Session Manager in the taskbar . As an
alternative to using the buttons above, you can press this button by right-clicking the mouse to execute
session commands via a context menu.
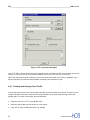
Figure 5: The HOBLink Session Manager
18
Connectivity from
HOBLink X11 ____________________________________________________________ Installation Types
7 Installation Types
7.1 Local Installation
If HOBLink X11 is installed on the local system, all settings that were configured in the schemes of the
Session Editor will also be stored on the local system. Before you can start a session, you first need to
configure a valid connection for the host connection in the corresponding schemes.
When starting HOBLink X11 for the first time, the session assistant helps you configure this connection. The
session assistant appears immediately when you start HOBLink Terminal Edition. It accompanies you through
the tasks ahead and helps you make a successful session configuration.
At the end of this process you will be in the HOBLink Session Editor, which you can exit with Close. In the
HOBLink Session Manager window the name of the newly created session configuration appears selected.
Press "Run" to start the session.
7.2 Server-based Installation with HOB Enterprise Access
Running HOBLink as a server based version requires installation of the HOB Enterprise Access software,
available at an extra fee.
If this variation is installed, all user settings will be stored in a database on a server. As soon as HOBLink is
started, a dialog appears which connects you with the database on the EA Server. Log in with a valid user
name and password to download the necessary user settings from this location when starting HOBLink. You
will receive this information from your system administrator.
Then you can either establish a connection to the host using the Session Manager or, with the appropriate
configuration done by your system administrator, a HOBLink Session is started immediately after you log in.
If no user is available with which you can log in, and your system administrator authorized you to create users,
you can create a user yourself.
In this case, the corresponding dialog appears to accompany you through the execution of this procedure.
After completing this process, you can establish a connection with the HOB EA Server.
Connectivity from
19
The HOBLink Session Editor ___________________________________________________ HOBLink X11
8 The HOBLink Session Editor
The HOBLink Session Editor is used to perform the following operations (If HOBLink X11 has been installed
together with HOB Enterprise Access, your system administrator will have to assign you the right to edit these
items):
•
Edit the settings of a selected scheme in the window pane displayed on the right.
•
Create a new scheme (New).
•
Remove an existing scheme (Delete).
•
Set the scheme to be used for the connection setup (Set). The scheme name will then appear in bold
lettering.
•
Cancel current changes to a scheme before closing the Session Editor (Undo).
•
Restore the default settings for a scheme (Default).
All modifications in a scheme are incorporated and saved when the Session Editor is closed.
The scheme types are displayed in the left pane in a tree structure on multiple levels. It is necessary to open a
particular level to view its contents.
20
Connectivity from
HOBLink X11 ___________________________________________________ The HOBLink Session Editor
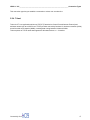
8.1 The Session Editor, Connection Scheme Settings
Figure 6: The Session Editor: X session, Connection scheme, Connection tab.
8.1.1 The Connection Tab
On this tab you can configure the connection type of the X session you have selected in the Session Manager.
•
Scheme Name: – Here you can change the connection's name and/or number.
•
Starting method – Set the connection's starting method here. You can choose one of three types:
• XDMCP (Default) – When this starting method is selected, XDMCP will begin an "xdm Process" that will
run on a host. The XDMCP settings are made on the XDMCP tab (see below).
• REXEC/RSH/RLOGIN/SSH – Select this option to enable REXEC, RSH, or RLOGIN. SSH can only be
set if you have also purchased HOBLink SSH. The REXEC/RSH/RLOGIN/SSH settings are made on
the REXEC/RSH/RLOGIN/SSH tab (see below).
• Passive – This mode is used to start the X server in the background, which will wait for connections to
be made.
•
Multiple IPs – If your PC has several network cards, you can set the IP address of the network card to
which you want the connection to be made here. You can select one of three modes:
• Automatic – This is the default setting. Connections can be made to any available IP address.
Connectivity from
21
The HOBLink Session Editor ___________________________________________________ HOBLink X11
• Select at run time – With this setting, a list of available IP addresses will be displayed as the connection
is to be made. Select the desired IP address from this list.
• Select now – Select this option to enter a specific IP address to which the connection for this scheme is
to be made.
•
Options – The two options "Exit after disconnect" (session closes automatically after being disconnected
from the host) and "Do not allow automatic server reset" (disables server reset) can be activated or
deactivated here.
•
Line Tracer – Select "Enable Line Tracing" here to enable line tracing for error diagnostics. When this
option is activated, the trace can be adjusted by selecting or deselecting the two options "Trace font
servers" and Trace XDMCP."
8.1.2 The XDMCP Tab
Figure 7: Session Editor, XDMCP tab
The XDMCP tab will appear in place of the REXEC/RSH/RLOGIN/SSH tab when XDMCP is selected as
starting method. This is where the following XDMCP settings are made:
•
XDMCP Mode: – Set the desired XDMCP mode in this scroll field. There are three modes to choose from:
• Query – If this mode is selected, a connection will be made to the host set in the "Connect to Host:" field
below.
• Broadcast – If this mode is selected, the "Connect to Host" field will be hidden, and a radio button
22
Connectivity from
HOBLink X11 ___________________________________________________ The HOBLink Session Editor
labeled "Automatically connect to first answer," along with a button "Broadcast List…" will appear. You
will have to enter the desired servers into this list if you want to use the broadcast mode. If your host
is located behind a router, this method is not recommended, as most routers do not allow broadcasts
to pass. "Automatically connect to first answer" is an optional setting.
• Indirect – With this mode, a broadcast is sent to the host entered in the "Connect to Host:" field. This
host will then send another broadcast to one or more hosts to run the X connection. If your host is
located behind a router, this method is not recommended, as most routers do not allow broadcasts to
pass.
•
Options – The following options can be set here:
• XDM/CDE Special Processing – This setting is only available in the Multiple Windows mode and acts as
a controlling variable for XDM/CDE.
• Reset X connection on exiting XDMCP – If you set this option, a new XDMCP logon session will be run
when you exit the current X session.
• XDM/CDM trace – Select this option to record all XDM/CDE-relevant information in the file named in the
adjacent field. For diagnostic purposes.
8.1.2.1 XDMCP Security
In the third field of this tab, “Authentication Settings,” select the checkbox “XDM-Authentication/ Authorization”
and enter the appropriate values in the fields “Display-ID,” “Display Class,” and “Key” (ask your system
administrator for these settings).
For further instructions, see the online help
In the dialog box, click on the question mark symbol at the top-right and then on the item you want to know
more about to get detailed information on that item.
8.1.3 The REXEC/RSH/RLOGIN/SSH Tab
If you have selected REXEC/RSH/RLOGIN/SSH as the startup method, the REXEC/RSH/RLOGIN/SSH tab
will be displayed behind the Connection tab instead of the XDMCP tab. The following settings are made here:
•
Type: – Select from this scroll field one of the listed startup methods:
•
REXEC (Remote Executable)
•
RSH (Remote Shell)
•
RLOGIN (Remote Login)
•
SSH (Secure Shell – Only available if HOBLink SSH additionally has been purchased)
•
Host Name / IP Address: – Enter here either the name or IP address of the host to which you want to
connect.
•
Prompt User – Activate this checkbox to have a prompt appear asking for the user name and password
when the session is launched.
•
User: – Enter here the user name to be automatically used for launching a session (only available if
Connectivity from
23
The HOBLink Session Editor ___________________________________________________ HOBLink X11
"Prompt User" is deactivated).
•
Password: – Enter here the password to be automatically used for launching a session (only available if
"Prompt User" is deactivated. Not available for the RSH start type).
•
Create Log File: – Activate this checkbox to generate a log file when you execute a control command or a
startup file. This log file contains all startup information and any error messages that the host or client
would normally display. This file is stored in the path “USERPROFILE\hob\te\5.1." USERPROFILE is a
Windows Environment Variable.
•
Exit after timeout of … seconds – Enter here the time in seconds (default value 10) that has to elapse
before the socket will be closed if no command is executed.
•
Do not run X-Server – Select this Checkbox to prevent the X server from starting automatically.
•
Hide X-Startup – The X startup window will not be displayed if this checkbox is selected, and the
command selected in the remote command line will be executed automatically. This checkbox is
deactivated as default and the command selected in the remote command line, if any, has to be manually
launched from the X Startup window.. For more information on remote command lines and the X Startup
window, see 8.2, The Session Editor, Remote Command Line Settings, below.
8.2 The Session Editor, Remote Command Line Settings
Double click on the "Remote Command Line" item in the X-Session tree structure and click on the button
"New" to open the Select Command window, and select a command file to be entered into the X Startup
window. When the X session is started in the appropriate mode and "Hide X-Startup" has not been activated
on the REXEC/RSH/RLOGIN/SSH tab, the X Startup window will appear when the corresponding session is
launched and you can manually execute the command file or enter a command line and execute that. If "Hide
X-Startup" has been activated, the set command file and/or command line entered in this window will be
executed automatically.
8.3 The Session Editor, Access Control Settings
For the configuration of Access Control, the following tab boxes are available:
•
Host Access – Here you establish all host access-relevant settings.
•
Hosts – Here you determine all settings relevant to authentication.
For further instructions, see the online help
In the dialog box, click on the question mark symbol at the top-right and then on the item you want to know
more about to get detailed information on that item.
24
Connectivity from
HOBLink X11 ___________________________________________________ The HOBLink Session Editor
8.4 The Session Editor, Display Settings
Figure 8: Display scheme tab
The session's display settings are made on these five tabs, which are displayed when the folder "Display" or
one of the "Display" sessions contained in that folder are selected in the right-hand pane of the session Editor
window.
8.4.1 The Display Tab
The basic settings for the display scheme are made on this tab, for example:
•
Scheme Name
•
Window Mode at Startup: – In this scroll field, you can set one of three window modes:
• Multiple Windows – When this option is selected, the scroll field "Window Manager" below is activated
and you can there select either "Local Window Manager" or "Remote Window Manager."
• Single Window – With this display mode, all X Client windows will be displayed in a single X Session
window. The window management and all other X Window Manager functions are controlled in this
window, which is started at the host. The familiar "Look and Feel” of the host is thus preserved, but at
a cost of increased data traffic on the network.
Connectivity from
25
The HOBLink Session Editor ___________________________________________________ HOBLink X11
• Full Screen – With this display mode, the X Clients will be displayed in a single window taking up the full
screen.
•
Icon on System TaskBar – Select this option to have the X Session icon shown as a tray on the task bar.
•
Show Program Icons on Taskbar – This option is only available if "Remote Window Manager" is selected.
When this option is selected, icons for all sessions will be displayed on the task bar.
•
Screen Size – Deselect "Size to fit" (active as default) to set the size if the session window.
•
Deselect "Assign Screen Number Automatically" if you want to manually assign screen numbers. Every X
Session can be assigned a screen number. This is done in order to differentiate between sessions with
the same content.
8.4.2 The Extra Settings Tab
On this tab, you can: make the following settings
•
Enable animation – Select this option to improve picture quality for animation.
•
Forced Backing Store – Stores X Window system windows "off-screen," reducing data traffic on the
network.
•
Screen Saver Time: – Use this field to set the time to elapse before the screen saver comes on.
•
Full Screen Mode Settings – Here, you can decide whether to have an application's screen minimized
when it is not being used, and whether the previous screen settings should be applied.
•
Byte sequence in Bitmaps – The way in which HOBLink X11 processes graphic data is set here. The
Default setting, "Least Significant Byte First," should only be changed if you are experiencing problems
with your display, for example, bad color representation.
•
OpenGL Extension – Here you can enable or disable the GL extension. When using this option, it is
recommended to retain the default setting "Use double Buffer" and only change it if problems occur.
8.4.3 The Fonts Tab
On this tab you can select the fonts to be used.
•
Use Pseudo Fonts – Activate this checkbox to enable HOBLink X11 to use pseudo fonts as well as X
fonts.
•
Create Pseudo Fonts on XClient request – Activate this checkbox to enable pseudo font creation.
•
Create Pseudo Fonts automatically – Select this checkbox to have pseudo fonts created automatically
from the font type you select by clicking on the "Font" button. Only available if " Create Pseudo Fonts on
XClient request" has been selected.
In the window section below these options, you can select a folder from which fonts are to be taken, and you
can edit the folder list.
26
Connectivity from
HOBLink X11 ___________________________________________________ The HOBLink Session Editor
8.4.4 The Color Depth Tab
Set the color depth for your session here.
8.4.5 The Clipboard Tab
Set the buffer mode for the clipboard here. Windows will then copy text and images to this clipboard, i.e., for
copy & paste operations. You will have to select the buffer mode your X client is using (usually, this is
"PRIMARY," but you may have to experiment with the list of buffers to find the correct one).
•
Auto Copy X Selection – This command copies text and images from the X selection to the Windows
clipboard. Use an X Client Session procedure to select the data you want to copy. The data from the
clipboard can be inserted and stored in all other Windows applications that support paste operations.
•
Copy on Focus Loss – Copies the X Selection to the clipboard once the window that contains the
selection loses focus.
•
Auto Paste X Selection – Copies the X Selection to the clipboard once the window that contains the
selection loses focus.
8.5 Input Devices
Double click on the "Input Devices" item in the X-Session tree structure and click on the button "New" to open
the Input Devices tab. On this tab you can select and/or configure your input devices, for example, the
keyboard format.
For further instructions, see the online help
In the dialog box, click on the question mark symbol at the top-right and then on the item you want to know
more about to get detailed information on that item.
8.6 Macro
Double click on the "Macro" item in the X-Session tree structure and click on the button "New" to open the
Macro tab. On this tab you can select an available macro from the list or add macros to the list by clicking the
"Add" button and selecting one or more of the listed macros.
For further instructions, see the online help
In the dialog box, click on the question mark symbol at the top-right and then on the item you want to know
Connectivity from
27
The HOBLink Session Editor ___________________________________________________ HOBLink X11
more about to get detailed information on that item.
8.7 Color
If you would like to change the way colors are displayed with X11, you can adjust the colors here.
For further instructions, see the online help
In the dialog box, click on the question mark symbol at the top-right and then on the item you want to know
more about to get detailed information on that item.
8.8 Other
8.8.1 User-defined options tab
Schemes with user-defined options can be created by clicking on the menu item others and then the button
"New" and entering the name in the "Value" field. For example, to prevent the PC "bell" from ringing too often,
the option "SilentBell" can be entered in the "Option" field and one of the following values in the "Value" field:
SilentBell = 0 – All bells enabled.
SilentBell = 1 – Disables "XServer system" bell, i.e., bell during connection, disconnection, timeouts, error
logging, etc.
SilentBell = 2 – Disable keyboard bell
SilentBell = 4 – Disable clipboard bell
SilentBell = 255 – Disable all bells
Entries made here are case-sensitive.
Any changes made, or options entered, here, can influence the functionality of all programs on your PC
or workstation. It is recommended that only experienced users make changes here, and only if necessary!
8.8.2 Others tab
You can select any or all of the ten options listed here. As default, only "Use old keysyms" (use old key
symbols, i.e., those from versions of X older than Release 6.6) is activated.
28
Connectivity from
HOBLink X11 ________________________________________________________________________ FTP
9 FTP
This chapter describes how to launch and work with the HOBLink X11 FTP program.
FTP is a program for file transfer. You can transfer files between your PC and a remote host using the
"ARPANET Standard File Transfer Protocol." FTP can transfer files in two different formats:
• In ASCII format for text files
• In Image format for binary files
In order for HOBLink X11 to be able to communicate with a remote host, the host has to have a server
implementation from FTP.
Regarding its surface design, the FTP Client is nearly identical to Windows Explorer. This typical explorer
"Look and Feel" makes for usage which is just as intuitive as it is simple. The substantial difference in contrast
to Windows Explorer is that you can establish a connection to HOB FTP Servers and access their databases.
For files and folders you have multiplex processing procedures available to you, such as: insert, rename,
delete, overwrite and append.
It is possible to execute multiple FTP Sessions simultaneously if you open a new FTP Window for each
session. This way you can access the same host several times or access different hosts.
9.1 Starting and Closing the FTP Program
To start the FTP program, click on Start > Programs > HOBLink Terminal Edition 5.1 > FTP Browser, or
on "HobFtp.exe" in the HOBLink Terminal Edition installation folder (as default, the folder "Terminal Edition" in
the folder "HOBLink" under "Programs."
With the command "Connect with Server" in the "File" menu, you can establish a connection between your PC
and the remote Host-FTP-Server. Click on this command to open the "Connect with Server (FTP)" window,
enter the IP address of the server to which you want to connect and click on the "Connect" button.
To close HOBLink X11 FTP program, select the command "Exit" from the menu "Server."
9.2 Establishing a Connection to an FTP Server
To establish a connection, proceed as follows:
1. Select the command "Connect to Server" in the "File" menu.
2. The dialog box shown below opens. Enter the necessary settings here.
Connectivity from
29
FTP ________________________________________________________________________ HOBLink X11
Figure 9: FTP Connection Dialog Box
In the "FTP URL or Server Name" field, enter either the name or IP address of the server to which you want to
connect, or, if there is a list of server names available, select one from it, and click on "Connect."
When "Use Anonymous Login" is selected, you do not have to enter either a user name or password. If you
want to login with your username and password, deactivate "Use Anonymous Login."
9.2.1 Creating and Saving a User Profile
You can also select a name in the "User profile" field after you have created a user profile. This way, you can
configure different connections, save them and easily call them up any time, without having to enter your
settings again. To create a user profile, proceed as follows:
1. Select the menu item “FTP” in the Options menu
2. Select the options that you want to save in a user profile.
3. Click "OK" to close the dialog and save your settings.
30
Connectivity from
HOBLink X11 ________________________________________________________________________ FTP
4. Select “Connect to Server” in the File menu
5. Select the options that you want to save in a user profile.
6. Click "Save."
7. Enter a name for the user profile.
8. Click "OK" to close the displayed dialog.
If you select this user profile at any time and click "Connect," all settings saved to this profile will be used to
establish the connection.
For further information on the use of the FTP program, please refer to the online help.
Connectivity from
31
Win-Ping____________________________________________________________________ HOBLink X11
10 Win-Ping
This chapter describes how to start and execute the HOBLink X11 Program "HOBLink Ping."
With the "Ping" program you can test whether the TCP/IP-Transfer-Protocol is installed and configured
correctly. Win-Ping is used for the detection of hardware problems in the network and those resulting from
incompatible configurations. Win-Ping enables you to check the physical connection to the remote host.
Win-Ping can only communicate with one remote host at a time. Nonetheless, if each session is connected
with a different host, you can have multiple Win-Ping-Sessions running in separate windows simultaneously.
10.1 Starting and Closing the "Win-Ping" Program
To start Win-Ping, click on Start > Programs > HOBLink Terminal Edition 5.1 > Ping, or on "WPing.exe" in
the HOBLink Terminal Edition installation folder (as default, the folder "Terminal Edition" in the folder
"HOBLink" under "Programs."
Upon execution of a Win-Ping session, information about the partner, the current packet and the data transfer
is shown in the application window.
To close Win-Ping, double click on the system menu field (in the upper left hand corner) of the Win-PingWindow. Alternatively, you can select the command "Exit" in the menu "Commands."
32
Connectivity from
HOBLink X11 ____________________________________________________________________Win-Ping
10.2 The Win-Ping Tool Bar
Figure 10:Win-Ping – Information on the completed ping is displayed.
The Win-Ping tool bar contains the menus:
•
File – Click on the "Exit" command to close Win-Ping
•
Options – Select the menu item "Configure Ping…" to open the configuration dialog box, The menu
items "Start" and "Stop" are used to launch and terminate the ping process ("Stop" is useful when a
continuous ping is being used).
•
Help – Click here to see product information.
The "Configure Ping…"dialog box in the Options menu contains the following fields and control boxes:
•
IP Address / Host Name Enter the Network Name or the IP Address of the host for which the physical
connection is to be checked. If you click on the arrow next to the field, a list with the Host Definitions from
your "hosts" file will appear. To select a host, click here on the desired entry.
•
Packet Size – Enter the packet size.
•
No. of Packets – Enter the number of data packets that are to be sent.
•
Continuous Ping – Activate this check box to use a continuous ping test.
Connectivity from
33
Win-Ping____________________________________________________________________ HOBLink X11
10.2.1.1 Menu Option "Start"
The menu item "Start" opens a Win-Ping session with the host that has been entered in the dialog box "WinPing Setup." Your PC then sends a series of data packets to the host. If the connection between the PC and
the host is established, the PC receives an answer after each data packet has been sent. As soon as WinPing receives an answer packet from the host, the message "Ping completed" is issued. When you receive
this message, you know that the TCP/IP transfer is set up correctly.
In case any hardware problems occur, please check whether your cable connections are made properly and
if your host can "ping" back to your PC.
10.2.1.2 Menu Option "Stop"
The menu "Stop" ends the connection with the remote host.
34
Connectivity from
HOBLink X11 _______________________________________________________________________ Index
11 Index
IP Address / Host Name · 33
A
K
ARPANET · 29
ASCII Format · 29
Keyboard · 6
B
M
Binary Files · 29
Microsoft Windows · 6
Monitor · 6
C
Motif · 6
Mouse · 6
Cable Connection · 34
Multiple Window Mode · 6
Clients · 7
mwm · 6, 7
Commands · 32
Configure Ping · 33
N
D
Network · 7
Network Card · 8
Data Packets · 34
No. of Packets · 33
F
O
File · 33
olwm · 6
FTP · 29
OPEN LOOK · 6
Full Screen Mode · 6
Options · 33
Function · 6
H
P
Packet Size · 33
Hardware Problems · 34
heterogeneous Network · 6
R
Host · 7
Requirements · 7
I
REXEC · 7
Image Format · 29
Installation from CD · 8
Connectivity from
35
Index_______________________________________________________________________ HOBLink X11
S
W
Serial Connection · 7
Window · 6
Single Window Mode · 6
Window Manager · 6
Start · 34
Win-Ping · 32
Stop · 34
System Menu Field · 32
X
System Requirements · 7
X Client · 6
T
X Client Windows · 6
X Protocol · 6
Telnet · 7
X Server · 6
Terms · 6
X Session Window · 6
Text Files · 29
X Terminal · 6
Trademark · 2
X Window System · 6
XDMCP · 7
xterm · 7
36
Connectivity from