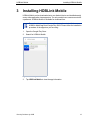
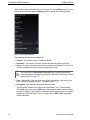
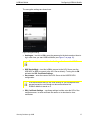
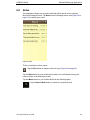
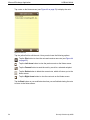
1
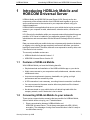
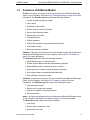
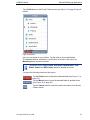
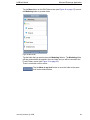
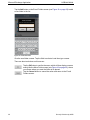
User Guide HOBLink Mobile for Android Software version: 1.2 Issue: August 2015 HOBLink Mobile Software and Documentation - Legal Notice Contact: HOB GmbH & Co. KG Schwadermuehlstr. 3 90556 Cadolzburg Germany Represented by: Klaus Brandstätter, Zoran Adamovic Phone: + 49 9103 715 0 Fax: + 49 9103 715 271 E-mail: [email protected] Register of Companies: Entered in the Registry of Companies, Registry Court: Amtsgericht Fürth, Registration Number: HRA 5180 Tax ID: Sales Tax Identification Number according to Section 27a Sales Tax Act: DE 132 747 002 Responsible for content according to Section 55 Paragraph 2 Interstate Broadcasting Agreement: Klaus Brandstätter, Zoran Adamovic, Schwadermuehlstr. 3, 90556 Cadolzburg, Germany. Disclaimer All rights are reserved. Reproduction of editorial or pictorial contents without express permission is prohibited. HOBLink Mobile software and documentation have been tested and reviewed. Nevertheless, HOB will not be liable for any loss or damage whatsoever arising from the use of any information or particulars in, or any error in, or omission from this document. All information in this document is subject to change without notice, and does not represent a commitment on the part of HOB. Liability for content The contents of this publication were created with great care and diligence. While we keep it as up-to-date as practicable, we cannot take any responsibility for the accuracy and completeness of the contents of this publication. As a service provider we are responsible for our own content in this publication under the general laws according to Section 7 paragraph 1 of the TMG. According to Chapters 8 to 10 of the TMG we are not obliged as a service provider to monitor transmitted or stored information not created by us, or to investigate circumstances that indicate illegal activity. Obligations to remove or block the use of information under the general laws remain unaffected. Liability is only possible however from the date of a specific infringement being made known to us. Upon notification of such violations, the content will be removed immediately. Liability for links This publication may contain links to external websites over which we have no control. Therefore we cannot accept any responsibility for their content. The respective provider or operator of the website pages to which there are links is always responsible for the content of the linked pages. The linked sites were checked at the time of linking for possible violations of the law. At the time the link was created in this publication, no illegal or harmful contents had been identified. A continuous and on-going examination of the linked pages is unreasonable without concrete evidence of a violation. Upon notification of any violations, such links will be removed immediately. Copyright The contents and works on these pages created by the author are subject to German copyright law. Reproducing, copying, modifying, adapting, distributing or any kind of exploiting of this material outside the realms of copyright require the prior written consent of the respective author or creator. The downloading of, and making copies of, these materials is only permitted for the intended use. Where contents of this publication have not been created by the author, the copyright of the third parties responsible for these contents shall be upheld. In particular any contents created by a third party are marked as such. If you become aware of any copyright infringement within this publication, we kindly ask to be provided with this information. Upon notification of any such violation, the concerned content will be removed immediately. Trademarks Microsoft Exchange Server is a trademark of Microsoft Corporation. All other product names, company names and service names may be trademarks, registered trademarks or service marks of their respective corporations or owners, even if they are not specifically marked as such. Issued: August 31, 2015 2 Security Solutions by HOB Purpose of this Guide This guide is designed to provide users with detailed information concerning HOBLink Mobile and to help them make the best possible use of the application. The procedures for configuring the individual software components are documented in detail with step-by-step instructions. Symbols and Conventions This guide uses certain conventions and abbreviations which are explained here: This symbol indicates useful tips that can make your work easier. This symbol indicates additional informative text. This symbol indicates an important tip or procedure that may have far-reaching effects. Please consider carefully the consequences of any changes and settings you make here. References to program commands, options and buttons are printed in Bold, for example: select the command Open. Cross-references to section headings and figures with numbers are marked in color as follows: Chapter 5. Information and Support. File names and text to be entered by the user are printed in Courier New. This input is – unless otherwise mentioned - case sensitive. In this documentation, HOB-specific terminology is abbreviated as follows: HOB-specific Terminology Abbreviation HOB WebSecureProxy HOB WSP HOBCOM Universal Server HCU Server Security Solutions by HOB 3 4 Security Solutions by HOB Contents 1 Introducing HOBLink Mobile and HOBCOM Universal Server 7 1.1 Features of HOBLink Mobile ......................................................................... 7 1.2 Connecting HOBLink Mobile to your network ................................................ 7 1.3 Functions of HOBLink Mobile ........................................................................ 9 2 System Requirements 11 3 Installing HOBLink Mobile 13 4 Configuring HOBLink Mobile 15 5 Getting Started 19 6 Microsoft Exchange Application 21 6.1 Exchange Settings ....................................................................................... 22 6.2 E-mails ......................................................................................................... 24 6.3 Calendar ...................................................................................................... 36 6.4 Notifications ................................................................................................. 47 6.5 Contacts ...................................................................................................... 48 6.6 Notes ........................................................................................................... 53 7 Frequently Asked Questions 57 8 Information and Support 59 Security Solutions by HOB 5 6 Security Solutions by HOB HOBLink Mobile 1 Introducing HOBLink Mobile and HOBCOM Universal Server Introducing HOBLink Mobile and HOBCOM Universal Server HOBLink Mobile and HOBCOM Universal Server (HCU Server) are the two components of the software solution from HOB that work together to give you secure mobile access to the resources in your corporate network using your Android smartphone. HOBLink Mobile is an application that runs on your mobile device to give you secure access to your corporate e-mails, attachments, calendar entries, contacts and notes. HCU Server is the installation within your corporate network that makes this access possible. HCU Server is installed in your enterprise network (LAN) by your IT administrators and communicates with the Microsoft Exchange Server to retrieve data. Data you access with your mobile device are not permanently stored on the device, so logging out or closing the app completely removes all data from your device, leaving no trace behind. Therefore, data are never exposed to security risks, even if the device is lost or stolen. The currently available versions are: 1.1 HOBLink Mobile for Android Version 1.2 HOBCOM Universal Server Version 2.3 Features of HOBLink Mobile With HOBLink Mobile you have the following benefits: 1.2 Simple download and installation of the HOBLink Mobile app on your device Highly secure access to your corporate e-mails, attachments, calendar entries, contacts and notes Low resource requirements (memory, bandwidth, etc.) giving you high performance and low connectivity costs A VPN connection is not necessary, a working Internet connection is sufficient You can reconnect to the same session without any data loss if the Internet connection is interrupted No data are stored on your mobile device: all data is kept safe within the company network, even if the device is lost or stolen Connecting HOBLink Mobile to your network There are two communication scenarios that are possible for HOBLink Mobile, either of which will be set up by your IT administrators: 1. Direct communication between HOBLink Mobile and HOBCOM Universal Server. This is always encrypted with AES (128 bit) encryption. The advantage of using direct communication is that it is easy to use and offers security. Security Solutions by HOB 7 Introducing HOBLink Mobile and HOBCOM Universal Server HOBLink Mobile Figure 1: Diagram of Direct Communication 2. Communication between HOBLink Mobile and HOBCOM Universal Server over the HOB RD VPN WebSecureProxy (HOB WSP). HOB RD VPN is a software solution that is specially designed to give you secure remote access over the Internet to the resources in your corporate network. HOB WSP is the central server component of HOB RD VPN. The advantage of using communication over the HOB WSP is that it offers an even higher level of security requiring certificates. In addition, it is also encrypted with SSL. HOB WebSecureProxy is not included in the HOBLink Mobile solution. HOB WSP can be obtained at an additional cost. If your company uses HOB WSP, please contact your IT administrator for configuration details. Figure 2: Diagram of Communication over the HOB WSP 8 Security Solutions by HOB HOBLink Mobile 1.3 Introducing HOBLink Mobile and HOBCOM Universal Server Functions of HOBLink Mobile E-mails – this gives you access to all of your e-mails on the Microsoft Exchange Server of your company. See Section 6.1 Exchange Settings on page 22 for more information. The E-mails application offers the following functions: Create, forward and reply to e-mails Flag e-mails Hide/show e-mail details Delete, move or create new folders Move e-mails between folders Short preview of e-mails View attachments Custom signature Search for recipients in personal/corporate directory Load further e-mails Receive e-mails for invitations Calendar – this gives you access to all of your calendar entries and invitations on the Microsoft Exchange Server of your company. See Section 6.3 Calendar on page 36 for more information. The Calendar application offers the following functions: Month/Day/List view of calendar entries Create, edit and delete calendar entries/meeting requests Add availability status, invitees and notes to entries Quick search for invitees in personal/corporate directory Set invitation state as accepted/tentative/declined Set notification settings for events Contacts – this gives you access to all of your contacts on the Microsoft Exchange Server of your company. See Section 6.5 Contacts on page 48 for more information. The Contacts application offers the following functions: View personal contacts Delete, edit or create new contacts Search for contacts in corporate directory Set sorting order Notes – this gives you access to all of your notes on the Microsoft Exchange Server of your company. See Section 6.6 Notes on page 53 for more information. The Notes application offers the following functions: View notes Delete, edit or create new notes Send notes via e-mail Security Solutions by HOB 9 Introducing HOBLink Mobile and HOBCOM Universal Server 10 HOBLink Mobile Security Solutions by HOB HOBLink Mobile 2 System Requirements System Requirements HOBLink Mobile is the client component of the secure mobile access software solution from HOB. HOBLink Mobile supports all Android smartphones. HOBLink Mobile requires the following Android operating systems to be installed: Android 4.0.3 or later Security Solutions by HOB 11 System Requirements 12 HOBLink Mobile Security Solutions by HOB HOBLink Mobile 3 Installing HOBLink Mobile Installing HOBLink Mobile HOBLink Mobile can be downloaded onto your Android device and installed exactly as any other application via an app store. You only need to have a user account with a password. HOBLink Mobile is available for download free. For explanation purposes, we are showing you how to install the HOBLink Mobile app from Google Play Store. Please follow the installation procedure of the app store you are using. 1. Open the Google Play Store. 2. Search for HOBLink Mobile. Figure 3: Search for App 3. Tap HOBLink Mobile to view the app information. Security Solutions by HOB 13 Installing HOBLink Mobile HOBLink Mobile Figure 4: App Information 4. Tap Install to download the app. Once the download process is complete, you can see the HOBLink Mobile icon on the screen of your mobile device. Figure 5: HOBLink Mobile App Icon If you cannot see this icon, or have any problems during the download process, please contact your IT administrator. 14 Security Solutions by HOB HOBLink Mobile 4 Configuring HOBLink Mobile Configuring HOBLink Mobile To configure your HOBLink Mobile connection, tap the HOBLink Mobile app icon (see Figure 5 on page 14). Figure 6: Logon Tap the Menu button on your mobile device while on the Logon screen to display the following buttons: Tap the About button to view information about the installed version of the HOBLink Mobile app, along with contact details for HOB. Tap the Settings button to display the HOBLink Mobile Settings screen (see Figure 7 on page 16). Security Solutions by HOB 15 Configuring HOBLink Mobile HOBLink Mobile While on the Logon screen (see Figure 6 on page 15), tap the Menu button on your mobile device and then tap the Settings button to display the following screen: Figure 7: HOBLink Mobile Settings The following settings can be made here: Version – the current version of HOBLink Mobile. Username – the name of the user (this can be edited by tapping the field). Server – the server that the mobile should connect to and where HCU Server is currently installed (this can be edited by tapping the field). The values set for Username and Server will be saved as the default values and will be automatically entered into the fields on the Logon screen (see Figure 6 on page 15). Port – the number of the port to be used for the connection to the server (this can be edited by tapping the field). The default port is 5099. Encryption – the method of encryption currently used. The encryption method to be used will be specified by your IT administrator. The default encryption level is AES and is used when a client connects directly to the HCU Server. If the connection between the client and the server is made through the HOB WSP (see Figure 2 on page 8) then AES + SSL encryption must be selected. 16 Security Solutions by HOB HOBLink Mobile Configuring HOBLink Mobile The encryption settings are shown here. Figure 8: Encryption Settings Autologon – turn this to ON to save the password to the device and not have to log in each time you start HOBLink Mobile (see Figure 7 on page 16). The administrator must allow the Autologon function on the HCU Server. WSP Socks Mode – turn this to ON to connect to the HCU Server over the HOB WSP or OFF to connect to the HCU Server directly. Turning this to ON activates the SSL Certificate Settings. Servername – enter the name of the HCU Server in the HOB RD VPN configuration. HOB recommends that you use code locking on your smartphone as a general precaution even though no data communicated via HOBLink Mobile is stored on it. SSL Certificate Settings – use these settings to either enter the URL of the certificate server, to enter certificate file names or to download or clear certificates. Security Solutions by HOB 17 Configuring HOBLink Mobile 18 HOBLink Mobile Security Solutions by HOB HOBLink Mobile 5 Getting Started Getting Started In order to use HOBLink Mobile, you must be authenticated. Therefore, you must enter your username, password and the server IP/DNS on the Logon screen. Ask your IT administrator for this information. Your logon data will already be in your user account on the HOBCOM Universal Server. Usernames and passwords are case sensitive and are limited to a maximum length of 126 characters. This information must also be compatible with the conventions of your network. Tap the HOBLink Mobile app icon to display the Logon screen. Figure 9: Logon Enter your username, password and the server IP/DNS and then tap OK. Following successful authentication, the Exchange screen is displayed. See Chapter 6 Microsoft Exchange Application on page 21 for more information. Security Solutions by HOB 19 Getting Started 20 HOBLink Mobile Security Solutions by HOB HOBLink Mobile 6 Microsoft Exchange Application Microsoft Exchange Application After logging on (see Figure 9 on page 19), the Exchange screen of HOBLink Mobile appears. Here you can access your e-mail, calendar, contacts, notes and logoff from the session. Figure 10: Exchange Here you have access to the following: E-mails – see Section 6.2 E-mails on page 24. Calendar – see Section 6.3 Calendar on page 36. Contacts – see Section 6.5 Contacts on page 48. Notes – see Section 6.6 Notes on page 53. Tap the Menu button on your mobile device to display the following options: Tap the Logoff button to return to the Logon screen. Tap the Exchange Settings button to go to the Exchange Settings screen (see Figure 11 on page 22). You can also use the Back button on your device to logoff. Security Solutions by HOB 21 Microsoft Exchange Application 6.1 HOBLink Mobile Exchange Settings While on the Exchange screen (see Figure 10 on page 21), tap the Menu button on your mobile device and then tap the Exchange Settings button to determine settings for e-mail, contacts, autologin and change your passwords. Figure 11: Exchange Settings Scroll down for the rest of the settings. Figure 12: Exchange Settings Continued The following settings can be made here: E-mails 22 Preview – set the length of the preview of an e-mail to None, 1, 2, 3, 4 or 5 lines. Show – set the amount of e-mails to be displayed initially (25, 50, 75, 100, 200, 500 or 1000). This setting applies to all e-mail folders. More e-mails can be reloaded within the E-mails application. E-mail Details – select whether the e-mail details are shown or not by selecting the checkbox. Security Solutions by HOB HOBLink Mobile Microsoft Exchange Application After Delete – select which e-mail is shown after an e-mail has been deleted (Show Previous or Show Next). Signature – enter a signature for your e-mails. The signature is shown in this field. Contacts Sort Order – select how your contacts are sorted; either First, Last or Last, First. Display Order – select how your contacts are displayed; either First, Last or Last, First. Password Change HLM Password – here you can change your password for HOBLink Mobile (see Figure 13 below). Change Domain Password – here you can change your domain password. This displays the same screen as Change HLM Password. Figure 13: Change HOBLink Mobile Password Enter your old password, a new password and then confirm the new password. Tap Set new password to finalize the change. Proceed in the same manner to change your domain password. Autologon At the bottom of the Exchange Settings Continued screen (see Figure 12 on page 22), you can disable the autologon function with a simple tap. You will then be required to log in each time you access the E-mails application. Security Solutions by HOB 23 Microsoft Exchange Application 6.2 HOBLink Mobile E-mails The E-mails application provides access to your e-mail account on the Microsoft Exchange Server of your enterprise network. The application gives you access to all your e-mail functionality and folders. Data you receive or send using this application are NOT stored on your mobile device; instead the application connects to the HOBCOM Universal Server, which then connects to Microsoft Exchange, where the data are stored. The following functions are available in E-mails: Delete, move or create new e-mails Flag e-mails Forward or reply to e-mails Refresh to check for new e-mails Move e-mails between folders View attachments Delete, move or create new folders Search for recipients in personal or corporate directories Tap E-mails on the Exchange screen (see Figure 10 on page 21) and the Authentication screen will appear where you will be prompted to enter your Microsoft Exchange password. Figure 14: Authentication When you are finished entering your password, you have two options: Tap OK to log on. 24 Security Solutions by HOB HOBLink Mobile Microsoft Exchange Application Save Tap Save to save your password, meaning that you will not have to enter it every time you connect to the Microsoft Exchange Server. The password can also be saved under the Exchange Settings (see Figure 12 on page 22). The Save field only appears if your IT administrator has allowed saving the password for a specific user. The password is saved on the HCU Server and not on your device. After entering your password on the Authentication screen (see Figure 14 on page 24), the E-mail Folders screen is displayed. Figure 15: E-mail Folders Here you manage your e-mails and e-mail folders. The number to the right of a folder is the number of new and unread e-mails currently in that folder (there is, for example, currently 1 unread e-mail in the Inbox). There is also one button on this screen: Tap the Edit button to move or delete folders (see Figure 16 on page 27). Tap the Menu button on your mobile device to display the following buttons: Tap the Refresh button to retrieve new e-mails from the server. Security Solutions by HOB 25 Microsoft Exchange Application HOBLink Mobile Tap the Add button to create new folders (see Figure 19 on page 30). Tap the Compose button to write a new e-mail (see Figure 21 on page 33). 26 Security Solutions by HOB HOBLink Mobile Microsoft Exchange Application Tap the Edit button on the E-mail Folders screen (see Figure 15 on page 25) to edit folders: Figure 16: Edit Folder Here you can delete or move folders. Tap the folder to be moved/deleted. The selected folder is indicated by a red symbol on the left. In this case, the Marketing folder has been selected. The default folders (Inbox, Drafts, Sent Items, Deleted Items, Junk E-Mail, Outbox and RSS-Feeds) cannot be deleted or moved. You have the following buttons on this screen: Tap the Delete button to delete the selected folder (see Figure 17 on page 28). Tap the Move button to move the selected folder to another folder (see Figure 18 on page 29). Tap the Cancel button to cancel the action and return to the E-mail Folders screen. Security Solutions by HOB 27 Microsoft Exchange Application HOBLink Mobile Tap the Delete button on the Edit Folder screen (see Figure 16 on page 27) to delete the selected folder. Figure 17: Delete Folder Here you have the following options: Tap the Delete button to delete the selected folder and return to the Edit Folder screen. Tap the Back button to return to the Edit Folder screen. Tap the Cancel button to cancel the action and return to the E-mail Folders screen (see Figure 15 on page 25). 28 Security Solutions by HOB HOBLink Mobile Microsoft Exchange Application Tap the Move button on the Edit Folder screen (see Figure 16 on page 27) to move the Marketing folder to another folder. Figure 18: Move Folder Tap the folder that you want to place the Marketing folder in. The Marketing folder will then automatically be placed in the new folder and you will be returned to the E-mail Folders screen (see Figure 15 on page 25). There is one button on this screen: Tap the Move to top level button to move the folder to the same level as the default folders. Security Solutions by HOB 29 Microsoft Exchange Application HOBLink Mobile Tap the Add button on the E-mail Folders screen (see Figure 15 on page 25) to add a new folder to the list. Figure 19: Create New Folder Give the new folder a name. Tap the field to activate it and then type a name. There are also two buttons on this screen: Tap the OK button to confirm the name, which will then display a screen exactly like the Move Folder screen (see Figure 18 on page 29), where you choose where you want the folder to be placed. Tap the Cancel button to cancel the action and return to the E-mail Folders screen. 30 Security Solutions by HOB HOBLink Mobile Microsoft Exchange Application Inbox For explanation purposes, we are showing you the Inbox folder. The other e-mail folders have the same options. Tap a folder on the E-mail Folders screen (see Figure 15 on page 25) to open it. Figure 20: Inbox Here you see a list of all e-mails received on the Microsoft Exchange Server of your company. New and unread e-mails are indicated by a blue symbol to the left. Icons that appear on this screen are as follows: Shows that an e-mail that has been marked as to-do is done. Shows that an e-mail has been marked as to-do. Shows that an e-mail has been replied to. Shows that an e-mail contains an attachment. Shows that an e-mail has high importance. Shows that an e-mail has low importance. Shows that an event request has been received. Security Solutions by HOB 31 Microsoft Exchange Application HOBLink Mobile Shows that an event is accepted. Shows that an event is declined. Shows that an event is tentative. There is one button on the Inbox screen: Tap the Edit button at the top of the screen to delete or move e-mails to other folders in the same way as the Edit button on the Edit Folder screen (see Figure 16 on page 27). Tap the Menu button on your mobile device to display the following buttons: Tap the Refresh button to retrieve new e-mails from the server. Tap the Search button to search the server for a particular e-mail, name, etc. in a folder. Tap the Compose button to write a new e-mail (see Figure 23 on page 35). 32 Security Solutions by HOB HOBLink Mobile Microsoft Exchange Application Tap an e-mail on the Inbox screen (see Figure 20 on page 31) to open it. Figure 21: Example E-mail The buttons on this screen have the following functions: Tap the Up button to move to the previous e-mail on the Inbox screen. Tap the Down button to move to the next e-mail on the Inbox screen. Tap the Menu button on your mobile device to display the following buttons: Tap the Compose button to write a new e-mail (see Figure 23 on page 35). Tap the Delete button to delete the displayed e-mail, which will return you to either the previous or the next e-mail in the list depending on what settings you made on the Exchange Settings screen (see Figure 11 on page 22). Tap the Reply button to reply to the e-mail. You may also edit the e-mail or add new text before replying. Tap the Flag button to mark an e-mail as to-do. Tap the Move button to move the e-mail to a different folder on the E-mail Folders screen (see Figure 15 on page 25). Security Solutions by HOB 33 Microsoft Exchange Application HOBLink Mobile Tap the Forward button to forward the e-mail. You can edit the e-mail or add new text before forwarding. Tap Hide on the Example E-mail screen (see Figure 21 on page 33) to hide the To field. Tap the From or To fields to display the contact’s e-mail addresses. Figure 22: Contact’s E-mail Addresses Tap an e-mail address to write a new e-mail to the contact. Tap the Back button on your mobile device to return to the Example E-mail screen. Other options in the e-mail text: Attachments – if there is an attachment in an e-mail, it will be shown at the bottom (as can be seen on the Example E-mail screen). Tap the attachment to view it. All document types supported by Android can be viewed in this manner. Opened attachments are temporarily saved to the HOBLink Mobile cache. The application used to view attachments must support this feature. 34 Hyperlinks – if there is a hyperlink in an e-mail, tap the hyperlink to open it in your web browser. Tap and hold to open the hyperlink, copy it or cancel and go back to the e-mail. If you copy a hyperlink, you can paste it into other applications outside of HOBLink Mobile. Telephone numbers – if there is a telephone number in an e-mail, tap it for the option to add the number to an existing/new contact, copy the number or cancel and return to the e-mail. If you copy a number, you can also paste it into applications outside of HOBLink Mobile. You can also call the number by tapping on it. Security Solutions by HOB HOBLink Mobile Microsoft Exchange Application While on the Inbox screen (see Figure 20 on page 31), tap the Menu button on your mobile device and then tap the Compose button to compose a new e-mail. Figure 23: Compose E-mail Example Enter the name of the recipient in the To field. The following fields contain entries for Cc/Bcc, From addressees and the Subject of the e-mail. The text for the e-mail is entered in the field below Subject. There is also one button on this screen: Tap the Send button to send the e-mail and return to the Inbox screen. Tap the Menu button on your mobile device to display the following buttons: Tap the Save draft button to save the draft and return to the Inbox screen. Tap the Delete draft button to delete the draft and return to the Inbox screen. Tap the Cancel button to cancel the action. Security Solutions by HOB 35 Microsoft Exchange Application 6.3 HOBLink Mobile Calendar The Calendar application provides access to all of your events and invitations on the Microsoft Exchange Server of your company. The calendar offers the following features: View calendar entries according to a list, day or month display Create, delete and edit calendar entries and meeting requests Set your availability, invite other to meetings and write notes as reminders Search for invitees in personal and corporate directories Set an invitation state as accepted, tentative or declined Tap Calendar on the Exchange screen (see Figure 10 on page 21) to display the calendar. Figure 24: Calendar The month view is the default view for the calendar. See Month View on page 43 for more information. You have the following buttons on this screen: Tap the Plus button to add new events to the calendar (see Figure 25 on page 37). Tap the Back button to view the previous month. Tap the Forward button to view the next month. The buttons at the bottom of the screen change the view of the calendar and display invitations. For detailed information on the functions of these buttons, see Section 6.3.1 Calendar View on page 41. You can also view, edit or delete past, present or future events by tapping a date and then tapping the event in the list. 36 Security Solutions by HOB HOBLink Mobile Microsoft Exchange Application Dates with events will have a small colored icon displaying the number of events on that day. The colors that are used have the following meanings: Green – events for today Red – future events Blue – past events Pink – events occurring next month Light blue – events that occurred in the previous month Tap the Plus button on the Calendar screen (see Figure 24 on page 36) to create a new event. Figure 25: New Event Here you set the following: Title – give the event a name. Location – state the location for the event. Starts – enter the time that the event will start. Ends – enter the time that the event will end. All-day – tap this field to turn the event into an all-day event, which will deactivate the time fields. Invitees – add invitees to the event (see Figure 26 on page 38). Availability – set your availability for the event (see Figure 28 on page 40). Notes – attach a note to the event (see Figure 29 on page 41). Tap the Done button once you are finished to save the event. Security Solutions by HOB 37 Microsoft Exchange Application HOBLink Mobile Tap the Invitees field on the New Event screen (see Figure 25 on page 37) to search for invitees for the event. Figure 26: Search for Invitees Specify who should attend the event. Type the name of the invitee in the search field at the top of the screen. Tap a name in the list to select it. There is one button on this screen: Tap the Cancel button to stop searching for invitees. 38 Security Solutions by HOB HOBLink Mobile Microsoft Exchange Application Tap a name from the list on the Search for Invitees screen (see Figure 26 on page 38) to display a list of selected invitees. Figure 27: Add Invitees Invitees that have been added to the event are displayed here. Use the search bar again to add additional invitees to this list. You have the following options on this screen: Tap the Done button to save the selections and return to the New Event screen (see Figure 25 on page 37). Tap the Remove button to remove the invitee from the list. Security Solutions by HOB 39 Microsoft Exchange Application HOBLink Mobile Tap the Availability field on the New Event screen (see Figure 25 on page 37) to display the following screen. Figure 28: Availability Set your availability for the event, either Busy, Free, Tentative or Out of office. This can be useful, for example, if you are setting up events for others that you yourself do not plan to attend. 40 Security Solutions by HOB HOBLink Mobile Microsoft Exchange Application If there are any requirements or reminders for an event, tap the Notes field on the New Event screen (see Figure 25 on page 37) to create a note: Figure 29: Notes for Event Tap the field to write a note for the event. There is also one button on this screen: Tap the Done button to save the note and return to the New Event screen (see Figure 25 on page 37). 6.3.1 Calendar View The buttons at the bottom of the Calendar screen (see Figure 24 on page 36) change the view of the calendar and display invitations. Figure 30: Calendar Buttons These buttons have the following functions: Tap the Today button to return to the current day from the highlighted date. Tap the List button to view a list of all of the events for the selected day or month, depending on which view (Day or Month) you were previously (see Figure 31 on page 42). Tap the Day button to view a list of all of the events for the selected day (see Figure 32 on page 43). Tap the Month button to return to the Calendar screen. Tap the Invitations button to view a list of all invitations you have received (see Figure 33 on page 44). The number of new invitations is displayed on the button. Security Solutions by HOB 41 Microsoft Exchange Application HOBLink Mobile List View Tap the List button on the Calendar screen (see Figure 24 on page 36) to display a list of all events for the current day or month, depending on which view (Day or Month) you were previously. Figure 31: List View Tap events in the list to view, edit or delete them. The buttons on this screen have the following functions: Tap the Plus button to create a new event (see Figure 25 on page 37). Tap the Today button to return to the current day from the highlighted date. Tap the List button to view a list of all of the events for the current day or month, depending on which view (Day or Month) you were previously. Tap the Day button to view a list of all of the events for the selected day (see Figure 32 on page 43). Tap the Month button to return to the Calendar screen. Tap the Invitations button to view a list of all invitations you have received (see Figure 33 on page 44). The number of new invitations will appear in place of the arrow. 42 Security Solutions by HOB HOBLink Mobile Microsoft Exchange Application Day View Tap the Day button on the Calendar screen (see Figure 24 on page 36) to display the selected day and a list of events on that day. Figure 32: Day View Tap events in the list to view, edit or delete them. The buttons on this screen have the following functions: Tap the Plus button to create a new event (see Figure 25 on page 37). Tap the Today button to return to the current day from the highlighted date. Tap the List button to view a list of all of the events for the current day or month, depending on which view (Day or Month) you were previously. Tap the Day button to view a list of all of the events for the selected day. Tap the Month button to return to the Calendar screen. Tap the Invitations button to view a list of all invitations you have received (see Figure 33 on page 44). The number of new invitations will appear in place of the arrow. Month View Tap the Month button on the Calendar screen (see Figure 24 on page 36) to display the calendar for the selected month. Colored icons indicate scheduled events for the days of that month. The Month view is the default view for the calendar. Security Solutions by HOB 43 Microsoft Exchange Application HOBLink Mobile 6.3.2 Invitations The Invitations button on the Calendar screen (Figure 24 on page 36) displays invitations you have received. If you have received an invitation, the number of invitations received will be displayed in place of the arrow. Tap the Invitations button to display the following screen. Figure 33: Invitations A list of all invitations received is displayed. A blue symbol next to an invitation indicates that it is new. Tap an invitation to display the event details, as shown in Figure 34 on page 45. There is one button on this screen: Tap the Done button to return to the Calendar screen. 44 Security Solutions by HOB HOBLink Mobile Microsoft Exchange Application Tap an invitation on the Invitations screen (see Figure 33 on page 44) to display the event details. Figure 34: Invitation Info Here you have the following options: Tap the Accept button to accept the invitation and return to the Invitations screen. Tap the Maybe button to say maybe to the invitation and return to the Invitations screen. Tap the Decline button to decline the invitation and return to the Invitations screen. You can also tap the Back button on your mobile device to return to the Invitations screen without making any changes. Security Solutions by HOB 45 Microsoft Exchange Application HOBLink Mobile Depending on the option chosen on the Invitation Info screen (see Figure 34 on page 45), your status for the event will be displayed to the right of the invitation. Figure 35: Invitation Status The status for this invitation is accepted; however, you may return to this screen at any time to change your status. There is one button on this screen: Tap the Done button when you are finished to return to the Calendar screen (see Figure 24 on page 36). 46 Security Solutions by HOB HOBLink Mobile 6.4 Microsoft Exchange Application Notifications HOBLink Mobile supports notifications for calendar events and invitations. Notifications must first be enabled on your smartphone. To enable them, go to Settings > Apps > HOBLink Mobile. Figure 36: HOBLink Mobile App Info Make sure that the Show notifications checkbox is enabled. Once notifications have been enabled, you will be able to receive them for calendar events and invitations that you have received. Notifications appear at the time configured in Microsoft Outlook. Notifications are updated every time HOBLink Mobile is started or reactivated from the background. A HOBLink Mobile notification in the notification bar can be seen in Figure 37 on page 48. Security Solutions by HOB 47 Microsoft Exchange Application HOBLink Mobile Figure 37: Notifications Tap the notification to open the HOBLink Mobile app to the Logon screen (see Figure 6 on page 15).The notification will be accompanied by the sound or vibration configured on your device. The time period set for when notifications appear is configured on the Exchange Server. The default time period is 15 minutes. No data or sensitive information is included in the notification. 6.5 Contacts Here you manage your contacts and their information, all of which is stored on the Microsoft Exchange Server of your network. You can do the following in Contacts: 48 View contacts Delete, edit or create new contacts Search for contacts in the corporate directory Select an e-mail address from a contact to send them an e-mail Call contacts Security Solutions by HOB HOBLink Mobile Microsoft Exchange Application Tap Contacts on the Exchange screen (see Figure 10 on page 21) to display a list of all contacts. Figure 38: Contacts You can search for contacts using the search bar or by scrolling through the list. If you have created folders in Microsoft Exchange, these will be displayed instead of the list of contacts. Tap the folder to see that folder’s contents. Folders cannot be created within HOBLink Mobile. Tap a contact to display, edit or delete their details (see Figure 39 on page 50). Global Address List – this is the address book currently stored on the Microsoft Exchange Server of your company. Outlook Address Book – here you can access all the information currently stored in your Microsoft Outlook address book on the Microsoft Exchange Server of your company. You also have the following options on the Contacts screen: Tap the Plus button to add a new contact (see Figure 41 on page 52). You can also tap the Back button on your mobile device to return to the Exchange screen. Security Solutions by HOB 49 Microsoft Exchange Application HOBLink Mobile Once you have selected a contact on the Contacts screen, you can access any information that you have entered for them and update, edit or delete it. Figure 39: Contact Info Here you can do the following: Tap a telephone number to call the contact if you are using a phone. Tap an e-mail address to write an e-mail to the contact. Tap a homepage to open the contact’s homepage in your web browser. There is also one button on this screen: Tap the Edit button to edit the contact’s information (see Figure 40 on page 51). 50 Security Solutions by HOB HOBLink Mobile Microsoft Exchange Application Tap the Edit button on the Contact Info screen (see Figure 39 on page 50) to edit the contact’s information. Figure 40: Edit Contact Tap a field to open it for editing and then enter your changes. The buttons on this screen have the following functions: Tap the Add button to add new fields to the contact’s information. Tap the Delete button to delete the field. Tap the Done button when you are finished to save the changes and return to the Contact Info screen. Tap the Menu button on your mobile device for the following button: Tap the Delete Contact button to delete the contact entirely. Security Solutions by HOB 51 Microsoft Exchange Application HOBLink Mobile Tap the Plus button on the Contacts screen (see Figure 38 on page 49) to create a new contact. Figure 41: New Contact Enter the information for the new contact. Tap a field to display the keyboard. You also have the following buttons on this screen: Tap the Add button to add a new address or new fields to the contact’s information (such as job title and department, birthday or anniversary. You can also add an instant messenger username or a note for the contact). Tap the Done button to save the changes and return to the Contacts screen. 52 Security Solutions by HOB HOBLink Mobile 6.6 Microsoft Exchange Application Notes This application allows you to create notes that will be stored on the company Microsoft Exchange Server. Tap Notes on the Exchange screen (see Figure 10 on page 21) to display your notes. Figure 42: Notes There is one button on this screen: Tap the Plus button to create a new note (see Figure 44 on page 55). Tap the Back button on your mobile device when you are finished viewing your notes to return to the Exchange screen. Tap the Menu button on your mobile device for the following option: Tap the Search Note button to search for a particular note. Security Solutions by HOB 53 Microsoft Exchange Application HOBLink Mobile Tap a note on the Notes screen (see Figure 42 on page 53) to display the note: Figure 43: Note Text Tap the yellow field to edit the note. Here you also have the following options: Tap the Plus button to close the note and create a new note (see Figure 44 on page 55). Tap the Left Arrow button to view the previous note on the Notes screen. Tap the Forward button to send the note by e-mail to a selected recipient. Tap the Delete button to delete the current note, which will return you to the Notes screen. Tap the Right Arrow button to view the next note on the Notes screen. Tap the Back button on your mobile device when you are finished viewing the note to return to the Notes screen. 54 Security Solutions by HOB HOBLink Mobile Microsoft Exchange Application Tap the Plus button on the Notes screen (see Figure 42 on page 53) to create a new note. Figure 44: New Note Tap the yellow field to activate it and then type your note. There is also one button on this screen: Tap the Done button when you are finished to save the note and return to the Notes screen. Tap the Back button on your mobile device to return to the Notes screen without saving the note. Security Solutions by HOB 55 Microsoft Exchange Application 56 HOBLink Mobile Security Solutions by HOB HOBLink Mobile 7 Frequently Asked Questions Frequently Asked Questions 1. How can the password of a user be changed? Users can change the password themselves in the client under the application Prefs. Your IT administrator can also reset your password if, for example, you have forgotten it. 2. What is the difference between disconnecting and logging off from a session? If you disconnect a session, it will be restored the next time you log in and you can continue to work from the place you were before. If you log off from a session, it is terminated and a new session will be started the next time you log in. 3. Is the communication between the HOBLink Mobile app and the HOBCOM Universal Server encrypted? Yes, it is always AES encrypted. Security Solutions by HOB 57 Frequently Asked Questions 58 HOBLink Mobile Security Solutions by HOB HOBLink Mobile 8 Information and Support Information and Support If you would like further information about HOBLink Mobile or if you need product support, please contact us at: U.S.A. and Canada General Enquiries: Phone: + 1 866 914 9970 Fax: + 49 9103 715 3299 E-mail: [email protected] Web: www.hobsoft.com Technical Support: Phone: + 1 866 914 9970 Fax: + 49 9103 715 3299 E-mail: [email protected] Germany General Enquiries: Phone: + 49 9103 715 0 Fax: + 49 9103 715 3271 E-mail: [email protected] Web: www.hob.de Technical Support: Phone: + 49 9103 715 3161 Fax: + 49 9103 715 3299 E-mail: [email protected] Other Countries General Enquiries: Phone: + 49 9103 715 3103 Fax: + 49 9103 715 3299 E-mail: [email protected] Web: www.hobsoft.com Technical Support: Phone: + 49 9103 715 3103 Fax: + 49 9103 715 3299 E-mail: [email protected] Security Solutions by HOB 59