1
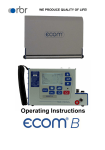
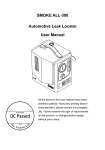
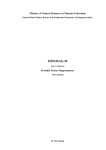
WE PRODUCE QUALITY OF LIFE!
Operating Instructions
Index
1. Application and components
2. Design ecom-DP
3. Connection of components
4. Initialisation
4.1. Power supply
4.2. Accumulator charging
4.3. Clock set
5. Numerical indication
5.1. Zeroing pressure sensors
8
5.2. Freezing measurement values
5.3. Min. / Max. measurement values
5.4. Printout measurement values
5.5. Contrast and display backlit
6. Control programmes
6.1. Setup
6.2. Pressure check
6.3. Preliminary check
6.4. Main check
6.5. Usability check
7. Set clock
8. Internal instrument settings
8.1. Switch on/off key beep
8.2. Pressure Auto -> 0 by start
8.3. Choose printer (ecom-P)
8.4. Battery loading
8.5. Display damping
8.6. Pressure unit
9. Sensor setup
10. View service info
11. Data logger program „ecom-DP Logger“
12. Technical data ecom-DP
13. Maintenance tip
Page 2
Page
3
4
5
6
6
6
8
9
9
9
10
11
12
13
14
17
17
18
18
18
18
19
20
20
21
22
23
ecom-DPK
1. Application and components
By works at gas pipes please respect
the legal safety instructions!
The ecom-DPK easies tightness tests at gas pipes networks. Besides draught
and gas pressure measurements, preliminary and main checks as well as leakage volume determination according to DVGW-TRGI can be performed. The following components belong to the ecom-DPK set:
Standard
ecom-DP
Handy differential pressure instrument with
automatic check programmes
3 connection hoses
each 1.2 m long with
quick-fitting
Compressed-air pump
for build-up of test pressure in gas pipe
Conic test stopples
1/2“ - 3/4“ and
3/4" – 1 1/4",
for usability and
pressure tests
Crosspiece with safety valve
for flexible connection
by various measurement duties
High-pressure test
stopples
3/8“ to 1/2“ and
3/8“ to 3/4“
with quick-fitting
One-pipe counter cap
with swivel nut R 2" and
quick fittings for
usability and pressure
tests
Option
Detector
ecom-LSG
for identification of
leakages also to hardly
accessible installations
thanks to swan-neck
ecom-DPK
Infrared
thermal printer
for documentation
of test results
Page 3
2. Design ecom-DP
IR interface
(for IR printer)
Connections
Pmax = 1500 hPa
Function keys
(current function is
shown on display)
Connections (Option)
Pmax = 1500 hPa
oder Pmax = 70 hPa
Graphic display
Cursor keys
Connection
loading unit
OK-key
Page 4
ON/OFF key
ecom-DPK
3. Connections
Please connect the components as shown on below plan.
Compressed-air
pump
Connection hose
(Pump - Crosspiece)
Safety valve
Connection hose
(ecom-DP - Crosspiece)
Anschluss „+“ wählen
Crospiece
ecom-DP
Connections for:
Conic test stopple
or
One-pipe counter pipe
or
High-pressure test stopple
Connection hose
(Gas system - Crosspiece)
ecom-DPK
Page 5
4. Initialisation
4.1. Power supply
The ecom-DP is powered by 3 batteries or 3 accumulators. The following types can be used to operate the
instrument:
- Battery
- or
- or
1,5 V AA (Mignon)
1,2 V AA NiCd (nickel cadmium)
1,2 V AA NiMh (metal hydride)
If you are using a battery charger, please adjust the
function „Bat. Loading“ (see chapter 6.4.)
Open the battery compartment and insert the batteries.
Be careful to ensure proper polarity. If using the rechargeable battery type, it will be necessary to fully
charge the batteries prior to initial use (approx. 4 hours).
The voltage of the batteries is monitored by the DP and
will indicate a low battery condition by approx. 3.3 V by
beeping and flashing a signal on the LCD display. If the
voltage sinks (approx. 3 V) so the ecom-DP will automatically switch off.
Battery warning
4.2. Battery charging
The battery charging procedure is monitored by the
ecom-DP. Once connected to AC power, the instrument
switches on. During the charging procedure, a BATTERY indicator will be shown on the LCD display. Once
the battery is fully charged, the BATTERY indicator on
the display will blink. It is possible to operate the ecomDP on AC power during the charging procedure by
pressing the <ON> button.
4.3. Setting clock
The internal clock and the internal RAM memory of the
ecom-DP are buffered via a capacitor. If the instrument
is without current supply during more than approx. 10
minutes, the recorded information gets lost. Before using the ecom-DP for the first time, adjust the internal
clock and delete the internal RAM memory.
Page 6
ecom-DPK
Press <ON> to switch on the ecom-DP.
The instrument displays the following:
Clock set
Delete RAM
Press OK to continue!
- Press twice the <OK> key and the measurement value
menu will be displayed.
- Press <F2> (wrench symbol) to call up the menu „Instrument settings“.
- With the cursor keys <UP/DOWN> scroll until the
menu point “Set clock”.
- Press <OK> to activate.
Date and time can be set as follows:
1. Select with the cursor keys <RIGHT/LEFT> the position to be changed (corresponding field blinks).
2. Adjust the correct numbers with the cursor keys
<UP/DOWN>.
3. Press <OK> to confirm correct date and time settings.
ecom-DPK
Page 7
5. Numerical indication
If „Pressure Auto -> O by start“ is set on
„YES“ (Chapter 8.2), so the internal pressure sensor should be flown with pressure first after the switch-on of the instrument, as they are zeroed during
said switch-on procedure.
After switch-on, the specifications of the pressure sensor will be displayed: denomination, measurement
range and connection seizure (+/-). Press <OK> to
access to the measurement value menu.
1. Before making measurements, the instrument must have
adapted the ambient temperature!
2. Make sure, that the ambient temperature remains constant
during measurement!
5.1. Zeroing the internal pressure sensor
As the difference pressure sensor can drift because of
its sensitivity in the zero point (also by attaching to metal surfaces by magnetic holder), it is possible to reset
the zero point.
- Press <F4> (DP1) to zero the value of the pressure
sensor.
Different functions can be called up with the function
key <F1>. The current seizure of the other function keys
(<F2> - <F4>) is shown on the display. Press one time
<F1> to display the functions „Hold“, „Min/Max“ and
„Print“.
5.2. Freezing of measurement value
- Press <F2> (Hold) to „freeze“ that measurement value
displayed at the time the key is pressed (active function
= Hold indication blinks).
- Press again <F2> (Hold) to quit the „freezing“ and the
current value will be displayed.
Page 8
ecom-DPK
5.3. Minimal / Maximal measurement values
With <F3> (Min/Max) the determined minimal and maximal values since unit switch-on (or deleting via „CLR“)
can be called up.
- Press one time <F3> (Min/Max) to view the lowest
determined values (Min/Max blinks).
- Press <F2> (CLR) to delete the minimal values (new
scanning begins).
- Press again <F3> (Min) to view the highest values
(Min/Max blinks).
- Press <F2> (CLR) to delete the highest values (new
scanning begins).
- Press one more time <F3> (Max) to quit the menu.
5.4. Measurement values printout
Press <F4> (Print) to transmit the current measurement
values via the infrared interface to the IR printer (option).
Condition hereto is a trouble free connection (direct
sight) between the sending diode at the front of the instrument and the receiving diode of the printer. The
distance between both instruments should not exceed
40 cm (1.3 foot), otherwise a trouble free transmission is
not warranted at any time.
ecom-DP
----------------------------------Date
Time
05.10.01 12:12:50
----------------------------------∆P
0.0 (hPa)
----------------------------------min
max
∆P
-0.1
0.1 (hPa)
----------------------------------rbr Messtechnik
Am Grossen Teich 2
58640 Iserlohn
Tel. 02371-9455
5.5. Contrast adjustment and lighting
Basing on the previous function seizure, the functions
„LUMI“ and „Light“ are displayed after pressing <F1>.
The graphic display of the ecom-DP can be adjusted to
different visual conditions. The contrast can be adjusted
in 5 steps (each key pressing = one step) while pressing
<F3> (LUMI). Additionally the backlighting of the display
can be activated while pressing <F4> (Light).
ecom-DPK
Page 9
6. Check programs
1. Use only air or inert gas for check !
2. Respect the „Technical Rules for
Gas installations“!
Call up the pre-programmed measurement routines
„Preliminary Check“, Main Check“ and „Usability Check“
in the menu <F3> (PROC).
Parameters to each measurement routine can be adjusted in the menu „Setup“.
6.1. Setup
Scroll with <UP/DOWN> until the menu “Setup”. Press
<OK> to activate the menu. The following parameters
can be adjusted for the corresponding measurement
routine:
Pressure Check
- Stabilisation time (1 - 10 min, default: 1 min)
- Measurement time (10 - 120 min, default: 5 min)
Preliminary Check
- Stabilisation time (1 - 10 min, default: 1 min)
- Measurement time (10 - 120 min, default: 10 min)
- Test pressure (900 - 1200 hPa, default: 1000 hPa)
Main Check
- Stabilisation time (1 - 10 min, default: 1 min)
- Measurement time (10 - 120 min, default: 10 min)
- Test pressure (90 - 160 hPa, default: 110 hPa)
Usability check
- Stabilisation time (1 - 270 min, default: 1 min)
- Measurement time (10 - 240 min, default: 10 min)
- Test pressure (20 - 160 hPa, default: 50 hPa)
- Max. operation pressure (10 - 100 hPa, default: 20 hPa)
- Air pressure (800 - 1200 hPa, default: 1013 hPa)
Each parameter can be adjusted the same way:
1. Select the parameter with <UP/DOWN>.
2. Press <OK> to activate.
3. Use the cursor keys <RIGHT/LEFT> to select the
position to be changed (corresponding field blinks).
Page 10
ecom-DPK
4. Adjust the correct figure using <UP/DOWN>.
5. Press <OK> to confirm the corrected value.
6.2. Pressure check
Proceed as follows:
1. Close the conduit with a suitable adapter (test stopple, high-pressure stopple or one-pipe counter cap).
2. Connect the components a described in chapter 3.
3. Scroll with <UP/DOWN> until the menu „Pressure
check“. Activate with <OK>-Taste.
4. With the compressed-air pump create the preadjusted test pressure (the unit beeps as soon as the
pressure level is achieved).
5. Interrupt the connection to the air pump (switch-off
the ball valve).
6. Wait for stabilisation time (if the pressure remains in
the range „test pressure +/- 10% during stabilisation
time, so the measurement time will start).
7. Once the measurement time is over, the result is
displayed and can be sent to the IR printer (option) thus
pressing <F2> (Print) .
8. If the menu „Pressure Check“ is selected again, so
the result can be called up with <F1> (as long as the
ecom-DP is on) or a new measurement can be started
with <OK>.
ecom-DPK
Page 11
6.3. Preliminary check
The preliminary check acc. to DVGW – TRGI Process
Instructions G 600 by pipes (operation pressure up to
100 hPa) is registered as a measurement routine in the
ecom-DP.
Proceed as follows:
1. Close the conduit with a suitable adapter (test stopple, high-pressure stopple or one-pipe counter cap).
2. Connect the components a described in chapter 3.
3. Scroll with <UP/DOWN> until the menu „Preliminary
check“. Activate with <OK>-Taste.
4. With the compressed-air pump create the preadjusted test pressure (the unit beeps as soon as the
pressure level is achieved).
5. Interrupt the connection to the air pump (switch-off
the ball valve).
6. Wait for stabilisation time (if the pressure remains in
the range „test pressure +/- 10% during stabilisation
time, so the measurement time will start).
7. Once the measurement time is over, the result is
displayed and can be sent to the IR printer (option) thus
pressing <F2> (Print) .
8. If the menu „Preliminary Check“ is selected again, so
the result can be called up with <F1> (as long as the
ecom-DP is on) or a new measurement can be started
with <OK>.
Page 12
ecom-DPK
6.4. Main Check
The main check acc. to DVGW – TRGI Process Instructions G 600 by conduits (operation pressure up to 100
hPa) is registered as a measurement routine in the
ecom-DP. Proceed as follows:
1. Close the conduit with a suitable adapter (test stopple, high-pressure stopple or one-pipe counter cap).
2. Connect the components a described in chapter 3.
3. Scroll with <UP/DOWN> until the menu „Main
Check“. Activate with <OK>-Taste.
4. With the compressed-air pump create the preadjusted test pressure (the unit beeps as soon as the
pressure level is achieved).
5. Interrupt the connection to the air pump (switch-off
the ball valve).
6. Wait for stabilisation time (if the pressure remains in
the range „test pressure +/- 10% during stabilisation
time, so the measurement time will start).
7. Once the measurement time is over, the result is
displayed and can be sent to the IR printer (option) thus
pressing <F2> (Print).
8. If the menu „Main Check“ is selected again, so the
result can be called up with <F1> (as long as the ecomDP is on) or a new measurement can be started with
<OK>.
ecom-DPK
Page 13
6.5. Usability Check
The usability check acc. to DVGW – TRGI Process form G 624 by conduits is
memorised as a measurement routine by the ecom-DP. The calculation of the
leak rate happens automatically according to the following equation and corresponds herewith to the procedure of the DVGW-TRGI Process Form G 624:
VB = V/TM * ((PA + P1)/(PA + P2)-1) * PB/P1 * f
with: VB = Gas leak volume in operation state (l/h)
V = Pipe content in litres
TM= Measurement duration in hours
PA= Barometer stand in hPa
P1 = Test pressure at meas. beginning in hPa
P2 = Test pressure at measurement end in hPa
PB = Maximal gas operation pressure in hPa
f = Factor for consideration of gas type
Proceed as follows:
1. Close the conduit with a suitable adapter (test stopple, high-pressure stopple or one-pipe counter cap).
2. Connect the components a described in chapter 3.
3. Scroll with <UP/DOWN> until the menu „Suitability/Leak rate“. Activate with <OK>.
4. The pipe volume to be checked (V) is needed for the
calculation of the leak rate. The ecom-DP offers two
input possibilities:
a. Direct input of pipe volume after having pressed
<F1> (ADD) (by repeated input the value will be
added).
Page 14
ecom-DPK
b. The ecom-DP will calculate the pipe volume in
sections basing on the diameter and the length for
thread pipe acc. to DIN 2440 (middle heavy):
- Press <F2> (CAL).
- Use <UP/DOWN> to select the pipe diameter (1/2“
to 4“) and confirm with <OK>.
- Select pipe length with the cursor keys and confirm
with <OK>.
- The volume for thread pipe acc. to DIN 2440 (medium heavy) will be calculated and added.
- Repeat procedure until all pipes sections are registered.
5. Quit the volume input with <OK>.
6. The maximal operation pressure adjusted in the setup (PB) will be displayed. If need be, the value can be
changed using the cursor keys. Confirm the value with
<OK>.
7. The air pressure (PA) adjusted in the setup is displayed. If need be, the value can be changed using the
cursor keys. Confirm with <OK>.
ecom-DPK
Page 15
8. Use <UP/DOWN> to select the used gas type (f) and
confirm with <OK>. The following gas types are recorded with their respective factors:
Natural gas
Air
City gas
Propane
Butane
Hydrogen
9. With the compressed-air pump create the preadjusted test pressure (the unit beeps as soon as the
pressure level is achieved).
10. Interrupt the connection to the air pump (switch-off
the ball valve).
11. Wait for stabilisation time (if the pressure remains in
the range „test pressure +/- 10% during stabilisation
time, so the measurement time will start).
12. Once the measurement time is over, the result is
displayed and can be sent to the IR printer (option)
pressing <F2> (Print) .
13. If the menu „Usability Check“ is selected again, so
the result can be called up with <F1> (as long as the
ecom-DP is on) or a new measurement can be started
with <OK>.
Page 16
ecom-DPK
7. Clock set
- Scroll with <UP/DOWN> until the menu point “Set
clock”.
- Press <OK> to activate. Date and time can be adjusted as follows:
1. Select with <RIGHT/LEFT> the position to be
changed (corresponding field blinks).
2. Adjust the correct figures using <UP/DOWN>.
3. Confirm with <OK>.
8. Internal instrument settings
Further instrument settings can be performed in the
menu “Internal”. Press <OK> to access this menu.
8.1. Key beep on/off switch
- With the cursor keys <UP/DOWN> scroll until the
menu point “Key beep”.
- Activate with <OK>.
- With the cursor keys <RIGHT/LEFT> modify the adjustment (YES or NO).
- Confirm with <OK>.
ecom-DPK
Page 17
8.2. Pressure Auto -> 0 by start
The ecom-DP normally zeroes the internal pressure
sensor during switch-on (adjustment „YES“). If the instrument is to remain connected to a pressure source,
so this adjustment can be modified:
- Scroll with the cursor keys <UP/DOWN> until the
menu point “Pressure auto -> 0 by start”.
- Press <OK> to activate.
- Use the cursor keys <RIGHT/LEFT> to modify the
adjustment (YES or NO).
- Confirm the modification with <OK>.
8.3. Choose printer (ecom-P)
Please choose the used printer as follows:
- Scroll with the cursor keys <UP/DOWN> until the
menu point “ecom-P”.
- Press <OK> to activate.
- Use the cursor keys <RIGHT/LEFT> to modify the
adjustment (YES = printer ecom-P or NO = printer HP
82240B).
- Confirm the modification with <OK>.
8.4. Battery loading
The ecom-DP is able to work with rechargeable batteries and AC power (option):
- Scroll with the cursor keys <UP/DOWN> until the
menu point “Battery loading”.
- Press <OK> to activate.
- Use the cursor keys <RIGHT/LEFT> to modify the
adjustment (YES = using AC power for charging batteries or NO = no AC power used).
- Confirm the modification with <OK>.
8.5. Display damping
The display damping can be adjusted to various measurement duties. 7 damping steps can be selected (1 =
no damping; 7 = high damping).
Page 18
ecom-DPK
Additionally the damping steps 3 - 7 enable the selection of a damping progression. This means:
not progressive:
by massive pressure changes the display does not
react faster than by small pressure changes
low progressive:
by massive pressure changes the display reacts
somewhat faster than by small pressure changes.
high progressive:
by massive pressure changes the display reacts much
faster than by small pressure changes.
- To change the adjustment, scroll with the keys
<UP/DOWN> until the menu point “Damping”.
- Press <OK> to activate.
- Adjust the desired damping step using the cursor keys
<RIGHT/LEFT>.
- Press <OK> to confirm.
8.6. Pressure unit
The measuring unit of the internal pressure sensor can
be changed. The following units are selectable:
Hectopascal
Centimetre water column
Millimetre mercury column
Pound per square inch
Inch water column
Inch mercury column
hPa
cmH2O
mmHg
PSI
“H2O
“Hg
For modification:
- Scroll with the cursor keys <UP/DOWN> until the
menu point “Pressure unit”.
- Press <OK> to activate.
- Use the cursor keys <RIGHT/LEFT> to adjust the desired unit for the pressure sensor.
- Press <OK> to confirm.
- Press <F2> (ESC) to quit the menu “Internal”.
ecom-DPK
Page 19
9. Sensor setup
The sensors in the instrument are given factory specified designations that can be changed by the user. Using the <UP/DOWN> cursor keys, scroll to “Sensor setup” menu. Press <OK>. Using the <UP/DOWN> cursor
keys, select the sensor to be renamed and enter the
edit function by pressing <OK>.
A maximum of 6 characters (letters, numbers and special characters) can be used in the sensor designation.
Using the <UP/DOWN> cursor keys, select the position
to be changed (sign blinks). Use the <UP/DOWN> cursor keys to select the character that should stand on
this position.
Starting from the current one and using the <UP> key,
the following characters are stored in the instrument in
the following succession:
Blank sign
A-Z
a-z
Ä -Ü
ä-ß
0-9
Special characters
Once the renaming procedure is complete, press <OK>
to store.
10. View service information
- Use the cursor keys <UP/DOWN> to scroll thru until
the menu point “Service”.
- Press <OK> and an info window will be opened in
which the address and phone number of the competent
service centre as well as the instrument version (e.g.
rbr-ECOM V1.4) will be displayed.
Page 20
ecom-DPK
11. Data logger program „ecom-DP Logger“
The measured value process of the ecom-DP can be logged with the help of the
data logger program „ecom-DP Logger “. The program can be loaded free of
charge from the download area of the rbr homepage www.rbr.de. To transfer the
data a USB cable (kind becomes. - No.: 55818) and a driver (free download from
www.rbr.de) is needed. The measured value rows can be stored in the xls format
(Excel).
The USB cable can be used as the power supply for
the ecom DP. Therefore the function „Battery loading“
must be adjusted on „no“ when using
1,5 V AA (Mignon) batteries (see 8.4.)!
ecom-DPK
Page 21
12. Technical Data ecom-DP
Power supply:
- Battery: 3 x 1,5 V AA (Mignon)
- or:
3 x 1,2 V AA NiCd (nickel cadmium)
- or:
3 x 1,2 V AA NiMh (metal hydride)
- Internal loading unit
- Connection via 1.3 mm hollow plug
- Loading current approx. 500 mA
Power consumption:
- With backlit approx. 90 mA
- Without backlit approx. 45 mA
- Operation time depending on used power supply
Display:
- Graphic display
- Resolution 128 x 64 pixel
- Window approx. 43 x 28 mm
Operation:
(menu-monitored)
- 4 cursor keys
- 1 confirmation key
- 4 function keys
- 1 ON/OFF key
Differential pressure
measurement:
- Pressure range +/- 1500 hPa (mbar) or
- Pressure range +/- 70 hPa (mbar)
Resolution:
- 0.1 hPa or
- 0.01 hPa
Accuracy:
- < 3% of measurement value
Internal clock:
- Adjustment via menu and keyboard
- Buffer for battery change only (approx. 1 minute)
Dimensions (LxWxH):
- Approx. 170 x 75 x 35 mm
Weight:
- Complete approx. 300 g
Ambient temperature: - 0 to 50 °C
Page 22
ecom-DPK
13. Maintenance tip
To secure the accuracy of your measuring instrument we recommend the annual
check by an authorized ecom partner. In the case of strong demand (e.g. permanent several hours of measurement per day, rough conditions etc.) shorter intervals between checks should be selected - please contact your ecom partner. All
ecom partners are listed under www.rbr.de.
Subject to technical changes
V3.0 11.2014
rbr Messtechnik GmbH
Am Großen Teich 2
D-58640 Iserlohn
Telefon: +49 (0) 23 71 - 9 45-5
Telefax: +49 (0) 23 71 - 4 03 05
Internet: http://www.rbr.de
eMail: [email protected]
ecom-DPK
Page 23