1
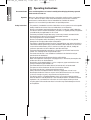
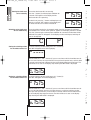
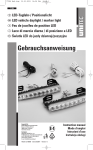
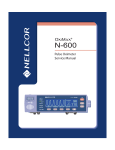
76307 Bed_A5_120605:Lay 76 307 14.06.2012 13:23 Uhr Seite 1 Model-Nr. AT596 Battery-operated windscreen de-icer PLUS 12 V Operating instructions Hergestellt für: INTER-UNION Technohandel GmbH Klaus-von-Klitzing-Str. 2 76829 Landau · Germany www.inter-union.de Stand 01/2012 Version 1.0 ᪿ♺ 21 PAP 76307 Bed_A5_120605:Lay 14.06.2012 GB 13:23 Uhr Seite 6 Operating Instructions A warm welcome Please read through the user's manual carefully before bringing the battery-operated windscreen de-icer into use. Important Before use, please observe all the warnings, precautions and instructions contained in this user's manual as well as those of the vehicle battery manufacturer and of the manufacturers of other devices that are intended to be used with this device. Keep this user's manual with your documents for possible questions. Safety instructions • This product is intended for use with 12 Volt direct current systems or for rechargeable battery mode. Do not connect it to 6 or 24 Volt direct current batteries. • Do not use the battery-operated windscreen de-icer if a switch or cable is defective. • This device contains a built-in lead battery. The device is supplied partially charged but it should be fully charged before it is first used. • The battery should be charged after every use or every 2 months to extend its life. • Do not operate this device in the vicinity of flammable materials. • The charging time must not be exceeded. • Do not use the product whilst the battery is being charged since this may lead to damage to the charging cable and/or to the product. • The vehicle's voltage must be present in the cigarette lighter even when the ignition is switched off and the ignition key has been removed so that the device can access the current of the vehicle battery. If this is not the case with your vehicle, a bridge for continuous operation can be installed in a specialist workshop. • The battery-operated windscreen de-icer cannot heat up the entire interior of the vehicle. It is used only for de-icing the windscreen. • The windscreen de-icer is not suitable for installation in the interior but only for attachment to the dashboard. • Please do not operate the windscreen de-icer whilst driving. • When not in operation or during the charging process in the vehicle, do not place the windscreen de-icer on the dashboard. • Do not place any flammable objects such as sunglasses, paper and the like in the vicinity of the battery-operated de-icer. • The minimum distance from other devices (at least 20 cm) is to be observed. • The apertures of the windscreen de-icer must never be covered. • The windscreen de-icer is to be protected from moisture. • Always disconnect the device from the electricity supply when it is not in use. • Do not open the device. There are no parts in this device that the user can change. If the user changes any parts, no guarantee can be given for this. • This device contains a sealed lead battery that is secure against tipping and that, when the device is to be disposed of, is also to be disposed of in accordance with the regulations. You can find out the instructions for correct disposal from your local recycling point. Failure to observe these instructions may lead to damage or the risk of an explosion. 1 1 1 1 1 1 1 1 1 T b i Y V t g t A w c T s t p p r t C a w 76307 Bed_A5_120605:Lay 1. 2. 3. 4. 5. 6. 7. 8. 9. 10. 11. 12. 13. 14. 15. 16. 17. 18. 14.06.2012 Fan aperture LED work light LED light, On/Off switch Direct current charging socket Main "I-O" switch of the windscreen de-icer Cool/Hot switch Control buttons 11 Display Charging indicator (Red) 10 0 Operating indicator (Green) 9 Indicator for switching to external power mode (Yellow) Adjustable stand 12 Volt socket 1 Connection socket for 12 Volt mode Connection cable with 15 A fuse (for continuous operation) Timer battery compartment Mains connector: for charging the rechargeable battery via 230 Volt supply Charging cable: for charging the rechargeable battery via 12 Volt supply. 13:23 Uhr Seite 7 16 13 1 6 5 4 14 3 12 2 8 7 15 17 18 To use the windscreen de-icer in rechargeable battery mode, it must be fully charged before use. Please charge the product without delay after every use. Observe the safety instructions given here. You can charge the rechargeable battery with the 12 Volt charging cable or with the 230 Volt mains connection cable. For this, the mains connection cable or the charging cable is to be connected to the charging socket (4) and to the electricity source. The red LED charging indicator (9) lights up during the charging process. As soon as the rechargeable battery is fully charged, disconnect the windscreen de-icer from the mains supply. Attention: Do not operate the windscreen de-icer during the charging process. For the windscreen de-icer to be brought into use, the mains connection cable (17) or the mains connection cable (18) must be removed. Rechargeable battery mode To use the windscreen de-icer in 12 Volt mode, connect the windscreen de-icer to the socket of the cigarette lighter in your vehicle. For this use the charging cable (15) for continuous operation and the charging socket (14). The ignition must be switched to steady plus to permit longer use (depending on the battery type/temperature). 12 Volt mode Place the windscreen de-icer on the dashboard behind your vehicle's windscreen. Put the power plug (15) into the 12 Volt cigarette lighter socket or use the windscreen de-icer in rechargeable battery mode. Select the "I" setting on the ON/OFF SWITCH (5). With this setting the green indicator comes on and the windscreen de-icer is ready to operate. Use the COOL/HOT switch (6) to choose between cool and hot air. Here "Cool" stands for cool air and "Heat" for hot air. Now you can start the windscreen de-icer manually or automatically with the timer. Use of the windscreen de-icer 76307 Bed_A5_120605:Lay Starting the windscreen de-icer manually 14.06.2012 13:23 Uhr Seite 8 To start the windscreen de-icer manually, press the "+" button (7) and keep it pressed down for 3 seconds. "ON" appears on the display and the windscreen de-icer is operating. To switch it off, press the "-" button and keep it pressed down for 3 seconds. "OFF" appears on the display and the windscreen de-icer has been switched off. Switching on the windscreen de-icer automatically OFF 1515 1515 To use the windscreen de-icer in automatic mode, press the "S" button (7) and keep it pressed down for 3 seconds. If the symbol "C" appears on the display, the timer is locked. Press the "S" button again and keep it pressed down for 3 seconds and the timer will be unlocked. The symbol "P" will appear on the display and the switching on/switching off time can be adjusted. C Setting the switching on time for the windscreen de-icer ON P To set the switching on time, briefly press the "+" button (7). Now "ON" will appear on the flashing display. ON ---- With the aid of the "+“ and "-“ buttons (7) you can set a time at which the windscreen deicer is to start. You must first input the hour. Once you have input the hours, wait for about 3 seconds until the minutes indicator flashes on the display. Now input the minutes. The time will be set as soon as the display stops flashing and "OFF AUTO" is displayed. OFF AUTO Setting the switching off time for the windscreen de-icer 1515 To set the switching off time, briefly press the "-" button (7). Now "OFF" will appear on the flashing display. OFF 1 2 T s T p p 1 2 3 4 T t C s 1515 With the aid of the "+“ and "-“ buttons (7) you can set a time at which the windscreen deicer is to be switched off. You must first input the hours as with the switching on time. Once you have input the hours, wait for about 3 seconds until the minutes indicator flashes on the display. Now input the minutes. The time will be set as soon as the display stops flashing and "OFF AUTO" is displayed. OFF AUTO T a " m s s s 1515 T S 1 L L M C 76307 Bed_A5_120605:Lay 14.06.2012 13:23 Uhr Seite 9 To set the time, briefly press the "S“ button. Now the hours indicator flashes on the display as already described for the switching on/switching off time. The time can be set with the "+“ and "-“ buttons (7). Once you have input the hours, wait for about 3 seconds until the minutes indicator flashes on the display. Now input the minutes. The time will be set as soon as the display stops flashing and "OFF AUTO" is displayed. As a last step, the input is stored. To do this, press the "S“ button and keep it pressed down for 3 seconds until the symbol "C" appears on the display. Setting the time 1. Do NOT switch off the main switch (5) of the windscreen de-icer, otherwise the windscreen de-icer will not switch on at the preselected time. 2. Since the operating time in rechargeable battery mode is limited, you can put the windscreen de-icer in the cigarette lighter socket of your vehicle if you would like to extend the operating time. For this use the connection cable (15) for continuous operation and the 12 Volt charging socket (14). If the battery voltage of the windscreen de-icer drops, this will be replenished from the electricity in your vehicle battery. The yellow LED indicator (11) is lit during operation. Operation i automatic mode The windscreen de-icer has a "battery monitoring function" with which problem-free starting of the vehicle is assured i.e. the vehicle battery cannot be discharged. The de-icer also has a LED work light (2). To activate it, please select the "Light" switch position on the LED On/Off switch (3). To switch the light off, please select the "LED" switch position. In addition, 12 Volt devices of any kind may be operated via the built-in 12 Volt socket (13). Additional functions 1. Check whether the contacts in the vehicle's 12 Volt socket are clean and clean them if necessary. 2. Check in the vehicle's fuse block whether the fuse used for the 12 Volt socket is intact. Replace it if necessary. 3. Check whether the fuse on the windscreen de-icer’s electric cable is intact. Replace it if necessary. 4. If no display appears on the timer and the windscreen de-icer cannot be SWITCHED ON, the timer battery for continuous operation must be replaced. The windscreen de-icer is not working! The timer battery may be replaced if the battery compartment (18) is unscrewed. Install the same type of battery, 3 V CR2032, and tighten the screws. Replacing the timer battery Clean the device when it is disconnected from the electricity supply with a slightly damp, soft cloth. Prevent moisture from penetrating the device. Cleaning instructions At the end of its useful life, do not dispose of this product in the household waste. You can obtain more details from your public authority waste disposal body. Pb Note: Disposal instructions At the end of their useful lives, do not dispose of the disposable and rechargeable batteries in the household waste but at the points set up for the return of used batteries. Built-in battery: Timer battery: Supply current: 12 Volt socket: LED work light: Length of the electric cable: Mains plug charging time: Car power plug charging time: Rechargeable 12 Volt 7 Ah lead battery 3 V CR2032 Max. 8 Amp 12 Volt direct current, max. 10 Amp 2 x white LEDs 1 metre with 15 Amp blade fuse 17-18 hours for charging with a 230 V mains plug 6-8 hours for charging with a 12 V car power plug Technical data