1
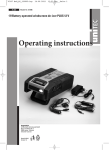
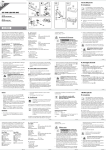
77082 Bed._110714:Lay
14.07.2011
14:19 Uhr
Seite 1
77 082
D LED-Tagfahrlicht
LED vehicle daylight
F Feu de jour LED
I Luce di marcia diurna a LED
Światła LED do jazdy dziennej
Gebrauchsanweisung
Hergestellt für:
INTER-UNION Technohandel GmbH
Klaus-von-Klitzing-Straße 2
76829 Landau · Germany
www.inter-union.de
E4
Modell: NS820 · Stand: 07/2011 · Version: 1.0
20
PAP
Instruction manual
Mode d’emploi
Istruzioni d’uso
Instrukcja obsługi
77082 Bed._110714:Lay
14.07.2011
14:19 Uhr
Seite 2
D
Bedienungs- und Sicherheitshinweise
Willkommen
Sicherheitshinweis
Technische Daten:
Gebrauchsanweisung
Entsorgungshinweis
Reinigung
Dieses LED Tagfahrlicht von UNITEC ist sehr sorgfältig konstruiert und hergestellt worden, damit es immer zuverlässig arbeitet. Bevor Sie das LED Tagfahrlicht benutzen, lesen Sie bitte diese Hinweise genau durch; Sie erfahren darin
alles, was Sie wissen und beachten müssen, damit das LED Tagfahrlicht Ihnen
viele Jahre lang gute Dienste leistet. Bewahren Sie diese Hinweise für spätere
Anfragen bitte auf.
Bitte die zulässige Montagebreite und -höhe
Abb. 1
beachten (siehe Abb. 1). Der Abstand zwischen
den beiden LED Tagfahrlichtern muss mindestens
600 mm betragen. Der maximale Abstand von
400 mm vom Ende der LED Tagfahrlichter bis zur
Außenkante des Kotflügels muss eingehalten
werden. Der Mindestabstand des LED Tagfahrlichts zur Fahrbahn muss mind. 250 mm betragen.
Die max. Montagehöhe beträgt 1500 mm zur Fahrbahn. Beide LED Tagfahrlichter müssen die gleichen Abstände zur Außenkante
des Fahrzeugs und Boden einhalten.
Bitte die Battereie während den Arbeiten an der Elektrik abklemmen,
da es ansonsten zu einem Kurzschluss oder auch zu Verletzungen kommen
kann. Sollten während der Montage Unklarheiten oder Bedenken hinsichtlich
der persönlichen Fähigkeiten auftreten, wenden Sie sich bitte an eine
Fachwerkstatt.
Geeignet für 12V DC Betrieb.
Abb. 2
LED-Leistung ca. 4,2 Watt
gelbes Kabel
Nach Montage des LED Tagfahrlichts an
entsprechender Stelle Ihres Fahrzeuges,
Starter
nach den Vorgaben aus Abbildung 1, folgt
click
click
nun der Anschluss an der Bordelektronik.
schwarzes Kabel
rotes Kabel
Hierzu beachten Sie bitte den angegebenen Schaltplan (Abbildung 2).
1. Befestigen Sie die gelbe Leitung
am + (plus) Kabel eines Standlichtes.
2. Verbinden Sie das schwarze Kabel mit
dem – (minus) Pol der Batterie, oder einem geeigneten Massepunkt der
Karosserie.
3. Das rote Kabel wird direkt mit dem + (plus) Pol der Batterie verbunden.
4. Wählen Sie für die Elektronikbox (Starter) einen geeigneten Befestigungspunkt
und fixieren diese mit geeigneten Schrauben oder Klammern. Kabel und
Elektronikbox (Starter) müssen außer Reichweite von drehenden oder beweglichen Teilen im Motorraum befestigt werden und dürfen nicht durch Motor
oder Kühlsystem zu stark erhitzt werden.
5. Verbinden Sie die beiden Stecker der Tagfahrleuchte mit den Buchsen der
Elektronikbox (Starter).
Bitte beachten Sie, dass das LED-Tagfahrlicht nur bei laufendem Motor einwandfrei funktioniert. Bei der Erstinstallation leuchtet das LED Tagfahrlicht ca.
30 Sekunden zum Test und erlischt dann, sofern der Motor des KFZ nicht läuft.
Gegebenenfalls kann die Installation des LED Tagfahrlichts zu Störungen bzw.
Fehlermeldungen der Bordüberwachung (Bordcomputer) führen. In diesem Fall
suchen Sie bitte eine Fachwerkstatt auf. Diese kann den Fehler dann ggf. ausschalten bzw. beheben.
Nach der erfolgreichen Installation, sollte das LED Tagfahrlicht bei Einschalten
des Motors funktionieren. Im Nachgang bitten wir Sie noch zu prüfen,
ob die LED-Tagfahrleuchte bei Einschalten des herkömmlichen Abblendlichts
abschaltet.
Entsorgen Sie dieses Produkt nach der Lebensdauer nicht im Hausmüll, sondern
führen Sie dieses Produkt einer fachgerechten Entsorgung zu. Ihr Öffentlicher
Entsorgungsträger hilft Ihnen gerne weiter.
Verwenden Sie zur Reinigung nur Wasser, milde Seife und ein weiches Tuch.
Verwenden Sie keine Lösungsmittel wie Spiritus oder Benzin. Lösungsmittel
können das Material angreifen.
77082 Bed._110714:Lay
14.07.2011
14:19 Uhr
Seite 3
GB
Operating and safety instructions
This UNITEC LED daytime running lamp has been very carefully designed and
manufactured so that it always works reliably. Before using the LED daytime
running lamp, please read through the instructions carefully. Here you will find
everything that you need to know and observe so that your LED daytime running
lamp will give you many years of good service. Please retain these instructions
in case you need to consult them later.
Please observe the permitted fitting width and
Fig. 1
height (see Fig. 1). The distance between the two
LED daytime running lamps must be at least
600 mm. The maximum distance of 400 mm from
the end of each LED daytime running lamp to the
outside edge of the mudguards must be observed.
The minimum distance of each LED daytime
running lamp to the carriageway must be at least
250 mm. The max. fitting height is 1,500 mm to the
carriageway. The two LED daytime running lamps must be fitted at the same
distances from the outside edge of the vehicle and the ground.
Please disconnect the battery terminals whilst working on the electrics since
a short circuit or even injury might otherwise occur. If during fitting you have
any uncertainties or concerns about your personal abilities, please contact a
specialist garage.
Suitable for 12 V DC operation.
Fig. 2
LED output about 4.2 Watt
Yellow cable
Once the LED daytime running lamp has
been fitted in the appropriate position on
Starter
your vehicle in accordance with the
click
click
instructions in Figure 1, it now has to be
Black cable
Red cable
connected to the onboard electronics.
To this end please observe the circuit
diagram provided (Figure 2).
1. Attach the yellow lead to the
+ (positive) cable of a sidelight.
2. Connect the black cable to the – (negative) terminal of the battery or to
a suitable earthing point on the bodywork.
3. The red cable is connected directly to the + (positive) terminal of the battery.
4. Choose a suitable attachment point for the electronics box (starter) and attach
it with suitable screws or brackets. The cable and electronics box (starter)
must be attached out of the range of rotating or moving parts in the engine
compartment and must not be subject to excessive heat from the engine or
the cooling system.
5. Connect both connectors of the daytime running lamp to the sockets of the
electronics box (starter).
Please note that the LED daytime running lamp only works properly when the
engine is running. When first installed, the LED daytime running lamp comes on
for about 30 seconds as a test and it goes out as soon as the motor vehicle’s
engine stops.
It may occur that the installation of the LED daytime running lamp leads to
faults or error messages on the onboard monitoring system (onboard computer).
If this occurs, please contact a specialist garage. The garage can then if
necessary remove or correct the fault.
Once successfully installed, the LED daytime running lamp should operate when
the engine is switched on. After that we would ask you to continue to check
whether or not the LED daytime running lamp switches off when the original
dipped headlights are switched on.
At the end of its useful life, do not dispose of this product in the domestic waste
but take this product for professional disposal. Your public waste disposal
authority will be happy to give you any further assistance.
For cleaning use only water, mild soap and a soft cloth. Do not use solvents
such as spirit or petrol. Solvents may corrode the material.
Welcome
Safety instructions
Technical data:
User instructions
Disposal instructions
Cleaning
77082 Bed._110714:Lay
14.07.2011
14:19 Uhr
Seite 4
F
Instructions d'utilisation et consignes de
sécurité
Bienvenue
Ce feu de jour LED UNITEC est le fruit d’une conception et d’une fabrication
très minutieuses afin qu’il fonctionne toujours de manière fiable. Avant d’utiliser
le feu de jour LED, veuillez lire attentivement ces indications ; elles vous
apprendront tout ce que vous devez savoir et observer afin que le feu de jour
LED vous offre de bons services durant de nombreuses années. Veuillez
conserver ces indications pour les consultations ultérieures.
Consigne de sécurité Veuillez respecter la largeur et la hauteur de
Ill. 1
montage autorisées (cf. ill. 1). L’écart minimal
entre les deux feux de jour LED doit être de
600 mm. L’écart maximal de 400 mm entre
l’extrémité des feux de jour LED et le bord extérieur du garde-boue doit être respecté. L’écart
minimal du feu de jour LED par rapport à la
chaussée doit être de 250 mm. La hauteur de
montage max. par rapport à la chaussée est de
1500 mm. Les deux feux de jour LED doivent respecter les mêmes écartements
par rapport au bord extérieur du véhicule et au sol.
Veuillez mettre la batterie hors tension lors des travaux car sinon un
court-circuit peut se produire ou des blessures peuvent survenir. Si vous
rencontrez des incertitudes ou des doutes quant aux aptitudes personnelles
durant le montage, veuillez vous adresser à un atelier spécialisé.
Données techniques : Approprié pour un fonctionnement
Ill. 2
sur courant continu 12V.
Câble jaune
Puissance de la LED env. 4,2 watts
Mode d’emploi Après le montage du feu de jour LED
Starter
à l’endroit souhaité de votre véhicule
clic
clic
conformément aux indications de l’illuCâble noir
Câble rouge
stration 1, procédez au raccordement à
l’électronique embarquée. Pour ce faire,
veuillez suivre le plan électrique indiqué
(illustration 2).
1. Fixez le câble jaune au fil + (plus) d’un
feu de position.
2. Raccordez le câble noir à la borne – (moins) de la batterie ou à un point de
masse approprié de la carrosserie.
3. Le câble rouge se raccorde directement au pôle + (plus) de la batterie.
4. Pour le boitier électronique (starter), choisissez un point de fixation approprié
et fixez-le au moyen de vis ou d’attaches ad hoc. Le câble et le boitier
électronique (starter) doivent être fixés à distance des pièces rotatives ou
mobiles dans le compartiment moteur et ne peuvent subir un échauffement
trop important par le moteur ou le système de refroidissement.
5. Insérez les deux fiches du feu de jour dans les prises femelles du boitier
électronique (starter).
Veuillez observer que le feu de jour LED fonctionne uniquement sans souci
lorsque le moteur tourne. Lors de la première installation, le feu de jour LED
s’allume durant environ 30 secondes en guise de test et s’éteint ensuite si le
moteur du véhicule ne tourne pas.
Le cas échéant, l’installation du feu de jour LED peut engendrer des perturbations ou des messages d’erreur au niveau de la surveillance embarquée
(ordinateur de bord). Dans ce cas, veuillez vous adressez à un atelier spécialisé.
Ce dernier est en mesure d'effacer l’erreur ou de la résoudre.
Après une installation réussie, le feu de jour LED doit fonctionner lorsque vous
mettez le moteur en marche. Nous vous prions encore de vérifier ultérieurement
si le feu de jour LED s’éteint lorsque vous allumez les feux de croisement
traditionnels.
Consignes pour le Ne vous débarrassez pas du produit usagé dans les ordures ménagères
traitement des déchets mais déposez-le auprès d’un point de collecte approprié. Votre agent public
responsable des déchets vous aidera volontiers.
Nettoyage Pour le nettoyage, utilisez uniquement de l’eau, du savon doux et un chiffon
doux. N’utilisez aucun solvant comme l’alcool ou l’essence. Les solvants
peuvent attaquer le matériel.
77082 Bed._110714:Lay
14.07.2011
14:19 Uhr
Seite 5
I
Istruzioni per l’uso e avvertenze sulla
sicurezza
Questa luce per marcia diurna a LED UNITEC è stata concepita e fabbricata con
estrema accuratezza per garantire sempre la massima affidabilità di funzionamento. Prima di utilizzare la luce per marcia diurna a LED, leggere attentamente
le presenti indicazioni; contengono tutto ciò che è necessario sapere e osservare affinché la luce per marcia diurna a LED funzioni perfettamente per numerosi
anni. Conservare le presenti indicazioni per una consultazione successiva.
Si prega di rispettare la larghezza e l’altezza di
Fig. 1
montaggio consentite (vedere la fig. 1). La distanza
tra le due luci per marcia diurna a LED deve corrispondere ad almeno 600 mm. Rispettare la distanza
massima di 400 mm tra la fine delle luci per marcia
diurna a LED e il bordo esterno del parafango. La
distanza minima della luce per marcia diurna a LED
dalla carreggiata deve corrispondere ad almeno
250 mm. La massima altezza di montaggio dalla
carreggiata corrisponde a 1500 mm. Entrambe le luci per marcia diurna a LED
devono rispettare la stessa distanza dal bordo esterno del veicolo e dal terreno.
Quando si eseguono interventi sull’impianto elettrico staccare la batteria, altrimenti si possono verificare corto circuiti e si rischia di infortunarsi. Se durante il
montaggio si dovesse dubitare della propria capacità di eseguire l’installazione,
rivolgersi a un’officina specializzata.
Idonea per il funzionamento 12V DC.
Fig. 2
Potenza LED: ca. 4,2 Watt
cavo giallo
Al montaggio della luce per marcia
diurna a LED nel rispettivo punto del
starter
proprio veicolo - conformemente alle
click
click
prescrizioni della figura 1 - segue il
cavo nero
cavo rosso
collegamento all’impianto elettronico di
bordo. A questo proposito osservare lo
schema elettrico indicato (figura 2).
1. Fissare il cavo giallo al cavo + (positivo)
di una delle luci di posizione.
2. Collegare il cavo nero al polo – (negativo) della batteria o a un punto
di massa idoneo della carrozzeria.
3. Collegare il cavo rosso direttamente al polo + (positivo) della batteria.
4. Scegliere un punto di fissaggio adeguato per la centralina elettronica (starter)
e fissarla con una vite o morsetti idonei. Cavo e centralina elettronica (starter)
devono essere fissati nel vano motore, lontano da parti mobili o rotanti, e non
devono essere eccessivamente esposti al calore proveniente dal motore o dal
sistema di raffreddamento.
5. Collegare le due spine delle luci per marcia diurna alle prese della centralina
elettronica (starter).
Si prega di osservare che la luce per marcia diurna a LED funziona ineccepibilmente solo quando il motore è in funzione. Durante la prima installazione la luce
per marcia diurna a LED si illumina per ca. 30 secondi ai fini di test e poi si
spegne - a meno che il motore del veicolo non sia in funzione.
L’installazione della luce per marcia diurna a LED potrebbe provocare disturbi
o segnalazioni di errore sul dispositivo di sorveglianza di bordo (computer di
bordo). In questo caso rivolgersi a un’officina specializzata che può disattivare
o eliminare la disfunzione.
A installazione avvenuta la luce per marcia diurna a LED dovrebbe funzionare
non appena si accende il motore. Infine controllare se la luce per marcia diurna
a LED si spegne all’accensione della luce anabbagliante tradizionale.
Al termine della vita utile non smaltire il prodotto assieme ai rifiuti domestici,
ma provvedere a uno smaltimento corretto. L’ente pubblico per lo smaltimento
competente fornirà le informazioni necessarie.
Per pulire il prodotto utilizzare solo acqua, un detergente delicato e un
panno morbido. Non utilizzare solventi come alcol o benzina. I solventi possono
intaccare il materiale.
Benvenuti
Indicazione
per la sicurezza
Dati tecnici:
Istruzioni per l’uso
Indicazione
per lo smaltimento
Pulizia
77082 Bed._110714:Lay
14.07.2011
14:19 Uhr
Seite 6
PL
Instrukcja obsługi oraz wskazówki
Witamy
Wskazówki dotyczące
bezpieczeństwa
Dane techniczne:
Instrukcja obsługi
Wskazówka dotycząca
utylizacji
Czyszczenie:
Światła LED do jazdy dziennej firmy UNITEC zostały starannie skonstruowane
i wyprodukowane, tak aby zawsze niezawodnie działały. Przed użyciem świateł
LED do jazdy dziennej należy dokładnie zapoznać się z niniejszymi wskazówkami.
Zawierają one wszystko, co użytkownik powinien wiedzieć i czego powinien
przestrzegać, tak aby produkt mógł dobrze służyć przez wiele lat. Zachować
wskazówki do późniejszego wglądu.
Przestrzegać dopuszczalnej szerokości i wysokości Rys. 1
montażowej (patrz rys. 1). Odstęp pomiędzy
oboma światłami LED do jazdy dziennej powinien
wynosić przynajmniej 600 mm. Nie należy przekraczać maksymalnego odstępu 400 mm, mierzonego od końca świateł LED do jazdy dziennej do
krawędzi zewnętrznej błotnika. Minimalny odstęp
świateł LED do jazdy dziennej od jezdni powinien
wynosić 250 mm. Maksymalna wysokość montażu
wynosi 1500 mm od jezdni. Obie lampy świateł LED do jazdy dziennej muszą
znajdować się w tej samej odległości od krawędzi zewnętrznej pojazdu i podłoża.
W trakcie prac przy układzie elektrycznym należy odłączyć akumulator,
w przeciwnym razie może dojść do zwarcia lub obrażeń. Jeżeli podczas montażu
pojawią się wątpliwości dotyczące własnych umiejętności, należy zwrócić się do
specjalistycznego warsztatu samochodowego.
Przeznaczony do pracy z 12V prąd stały.
Rys. 2
Moc diody LED ok. 4,2 W
żółty kabel
Po zamontowaniu świateł LED do jazdy
dziennej w odpowiednim miejscu pojazdu,
rozrusznik
zgodnie z instrukcjami z rysunku 1,
kliknięcie
kliknięcie
następuje podłączenie ich do układu
czarny kabel
czerwony kabel
elektronicznego pojazdu. W tym celu
należy przestrzegać podanego schematu
połączeń (rysunek 2).
1. Zamocować żółty przewód do kabla
+ (plus) światła postojowego.
2. Połączyć czarny kabel z biegunem – (minus) akumulatora lub odpowiednim
punktem masy na karoserii.
3. Czerwony kabel łączony jest bezpośrednio z biegunem + (plus) akumulatora.
4. Do zamocowania skrzynki elektronicznej (rozrusznik) należy wybrać właściwe
miejsce i użyć do tego odpowiednich śrub i zacisków. Kable i skrzynkę
elektroniczną (rozrusznik) należy zamocować tak, aby znajdowały się z dala
od zasięgu obracających się lub ruchomych części w komorze silnika oraz nie
nagrzewały się mocno od silnika lub układu chłodzenia.
5. Podłączyć obie wtyczki lampy świateł do jazdy dziennej do gniazd skrzynki
elektronicznej (rozrusznik).
Należy uwzględnić to, że światła LED do jazdy dziennej działają prawidłowo
wyłącznie przy uruchomionym silniku. Przy pierwszej instalacji światła LED do
jazdy dziennej świecą się na próbę przez ok. 30 sekund, a następnie gasną, jeżeli
silnik pojazdu nie pracuje.
Czasem zainstalowanie świateł LED do jazdy dziennej może prowadzić do
zakłóceń lub komunikatów o błędzie w układzie kontrolnym pojazdu (komputerze
pokładowym). W takim wypadku należy zgłosić się do specjalistycznego
warsztatu, w którym komunikat o błędzie zostanie wyłączony lub błąd usunięty.
Po pomyślnym przeprowadzeniu instalacji, światła LED do jazdy dziennej
powinny zacząć działać w momencie uruchomienia silnika. Dodatkowo należy
sprawdzić, czy lampa świateł LED do jazdy dziennej wyłącza się w momencie
włączenia tradycyjnych świateł mijania.
Zużytego produktu nie wyrzucać wraz z domowymi odpadami, lecz oddać go do
odpowiedniego miejsca utylizacji. Organ odpowiedzialny za utylizację w danym
rejonie udzieli Państwu informacji.
Do czyszczenia używać tylko wody, delikatnego mydła i miękkiej ściereczki. Nie
stosować rozpuszczalników takich jak spirytus czy benzyna. Rozpuszczalniki mogą
uszkodzić materiał.