1
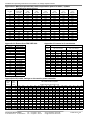
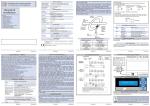
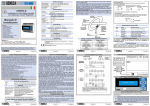
Installation and Operating Instructions for Automatic Low Voltage Capacitor Banks
Installation and Operating Instructions
for Automatic Low Voltage Capacitor Banks
1
2.2.1
Safety
Work on and servicing of the capacitor banks may only be
performed by specialised electricians.
1.1
Special features of capacitors
Terminals of capacitors and connected conductors and
equipment within the power factor correction system are to be
regarded as live parts even when being switched off (residual
charge).
1.2
LV HRC fuses
Never use fuse inserts and fuse disconnectors to switch
capacitors on or off.
1.3
Current transformers / Power factor controller
It is essential to short circuit the secondary side of the current
transformer before disconnecting the power factor correction
system. This is performed by a short circuiting bridge on
terminals K-L on the control terminal strip.
1.4
Assembly and installation
Prior to installation, please check that the delivery is complete
and free from damages by transport.
Do not perform any unauthorised modifications, particularly to
the controller and the ventilation system.
In case of a later power extension within the same cubicle or
enclosure, it might be necessary to add a temperature
supervision device as well as ventilation fans.
2.1
Some types of capacitor banks do not contain any overcurrent
protection facilities for the capacitor steps. In these cases,
use the ratings stated on the type plate for the fuses.
Recommendations for the cross sections of the connecting
lines can be found in Appendix 2. Please take into account
local regulations, local conditions, specifications and any
planned increases of compensation power.
Ensure that the temperature is as low as possible and that
there is sufficient air supply. Maintain the specified ambient
temperatures for the system. Note that the system itself
increases the ambient temperature.
Check before setting up the system that the permissible floor
load is not exceeded. The system is to be set up without
vibration and fastened in position if necessary.
Requirements for connection
The rated voltage of the capacitor bank must comply with the
rated voltage of the network. Connect the system in
accordance with the attached wiring diagram.
Incorrect connections are the most frequent reason for
commissioning problems.
CONDO B017 1004
2.2.2
Measuring connections
The current transformer to be used has to be designed for
measuring purposes, not for protection purposes.
The secondary rated current of the current transformer must
comply with the permissible input current of the controller
(usually 5A).
The cross section of the current transformer connecting lines
has to be determined to suit the rated power of the current
transformer (see Appendix A3). The additional power
consumption of the relevant measuring input on the reactive
power controller can be found in the attached description of
the controller (app. 2VA for the 5A input of controllers RVC
and RVT.).
2.3
Installation site
Automatic capacitor banks are suitable for indoor installation
and normal operating conditions according to EN 60439,
IEC 60439 and VDE 0660 Part 500 (Low voltage switchgear
and controlgear assemblies). The following ambient
temperatures apply:
+ 40°C
Maximum
+ 35°C
Average over 24 hours
- 10°C
Minimum
2.2
In special cases, e.g. with reinforced versions of reactors,
higher rated fuses are to be used. Details can then be found
in the system documentation.
Transport
Capacitor cubicles with reactors have a high center of gravity
and can tip over. Take special care when handling the
capacitor bank. Even a slight tilt can cause the cubicles to tip
over. When handling by crane, the load on the lifting lugs
must be vertical.
2
Power connection
Fuses or short circuit current limiting circuit breakers are to be
used for overcurrent protection of the connecting lines. These
items should generally be selected in such a way that 1,43
times the rated current of the system can be continuously
carried. The maximum permissible rated compensation power
in relation to the overcurrent protection devices can be found
in Appendix A1.
Installation
The capacitor bank has to be connected in accordance with
the circuit diagram supplied.
2.3.1
Measuring connections
Never operate current transformers with open terminals.
The measuring system of the reactive power controller must
determine the reactive power at the measuring point. Its
conductors are connected to a current transformer which
completely measures the total load to be compensated
including the current of the capacitor bank.
The side of the current transformer designated “K/P1” must
face the feeding side, and the side designated “L/P2” must
face the load side. The secondary terminals of the current
transformer are designated “k/S1” and “l/S2”. They have to be
connected to the terminals of the compensation system with
corresponding marking.
Install the current transformer in the specified phase in
accordance with the wiring diagram and designate this phase
“L1/R”. Identify the other phases (“L2/S”) and (“L3/T”) of the
network with a rotary field indicator, taking into account that
the field rotation has to be clockwise.
Condensator Dominit GmbH
1
Installation and Operating Instructions for Automatic Low Voltage Capacitor Banks
2.3.2
Power connections
3.1.1.2 Manual parameter setting of RVC
The capacitor bank has to be connected to the network with
the correct phases and with a clockwise rotating field.
Connect the PE and N conductors or PEN conductor to the
terminals provided in the capacitor bank.
Press the “Mode”-button until “MAN SET” and the parameter
cos ϕ is displayed. Choose the desired value with “+” and “-“
buttons. Press the “Mode”-button twice until the parameter
“c/k” is displayed. Calculate and enter the C/k value:
Q c
or see Appendix A4
C / k = ( 0 .6 . . .0 .7 ) ⋅
U ⋅
The connection between PE and N is necessary in a TN-C
system, otherwise it has to be removed.
Refit all covers.
2.3.3
Fault signalling system
For external use of the alarm signals of the power factor
controller there is a pair of terminals (M, M) in the control
terminal bar of the capacitor bank. These terminals are
connected with a floating contact which is closed if
• the desired cos ϕ is not reached (Target cos ϕ for RVC,
Alarm cos ϕ for RVT)
• A voltage disconnection is present
• An alarm threshold is violated (RVC, RVT)
• The internal temperature of the controller is above 85°C
Please also refer to the controller manual.
3
Commissioning
Check the electrical and mechanical connections. Perform a
visual check before commissioning the system.
• Have all tools been removed?
• Have all covers been refitted?
3.1
Setting the reactive power controller
and energizing the system
To start the commissioning open the short circuit bridges on
the CT terminals and the terminals k and l of the control
terminal bar. Switch on the overcurrent protection of the
Control voltage circuit and energize the capacitor bank. The
controller display becomes active. The following procedure
depends on the type of controller.
The majority of nowadays available power factor controllers
provide an automatic self-programming function, please refer
to the controller manual. If the automatic programming fails
the programming must be made manually. For this procedure
please refer to the controller manual.
In order to achieve a short commissioning even when manual
programming is necessary the controllers are preprogrammed during the factory test except the values for
current sensitivity and desired cos ϕ.
The switching sequence or switching program should not be
changed, as the optimum program has already been set at
the factory. Modification may become necessary in
exceptional cases only, e.g. when the system is expanded.
3.1.1
Parameter setting of RVC controllers
3.1.1.1 Automatic setup of RVC
Press the “Mode”-button twice until “AUTO SET” is displayed.
Press “-“ and “+” button simultaneously for 5 seconds. “AU” is
flashing and the automatic procedure switches ON and OFF
steps several times.
After the automatic setup is finished the target cos ϕ must be
set to the desired value (
means inductive,
means
capacitive). Finally the controller must be set back to
automatic mode. Push “Mode” button several times until
“AUTO” appears.
2
3 ⋅ k
Qc
U
is the smallest capacitor steps power (kvar)
is the rated system voltage (kV) at the point of
installation of the current transformer
k
is the ratio of the current transformer, e.g.
100A/5A=20
Set back the controller to automatic mode by pushing “Mode”
button several times until “AUTO” appears.
3.1.2
Parameter setting of RVT controllers
When an RVT controller is energized for the first time the “Set
language” menu is displayed. Choose the desired language
with the arrow buttons and confirm with “OK” button.
3.1.2.1 Automatic setup of RVT
Choose in the “Welcome” menu “Settings”, then “Change
mode” and then “Set”. Press the “OK”-button to confirm, then
choose “Commissioning”, then “Automatic” and confirm. After
the automatic programming is finished the target cos ϕ must
be set. Finally the controller must be set back to automatic
mode. Choose “Change mode”, then “Automatic” and
confirm.)
3.1.2.2 Manual parameter setting of RVT
Choose in the “Welcome” menu “Settings”, then “Change
mode” and then “Set”. Confirm with “OK”-button, then choose
“Commissioning”, then “Guided” and confirm. Enter the ratio
of the current transformer (Iprimary/Isecondary). Confirm the
following parameters up to target cos ϕ. Set the target cos ϕ
to desired value. Finally the controller must be set back to
automatic mode. Choose “Change mode” and confirm
“Automatic”.)
3.2
Operation of the bank
The switching delay time is set to 40 seconds during factory
test or in automatic programming of RVC and RVT
automatically. Shortening the switching delay time can lead to
damage. The switching time or switching delay time is to be
set to minimum 60 seconds for systems in EMV environments
classified as “residential areas”.
After returning to automatic bank mode:
• When correctly connected and when there is a need for
compensation, the reactive power controller indicates that
it will activate a capacitor step.
• The capacitor steps are connected in accordance with the
set switching delay time until the specified cosϕ is
achieved.
Note: Automatic capacitor banks contain discharge facilities
which achieve discharge to 10% of rated voltage or less
within 40 seconds of a capacitor being switched off.
Note: Capacitors must be discharged to at least 10% of rated
voltage before reconnection, and therefore:
• do not operate contactors manually,
• do not reduce the switching delay times,
• do not perform any work on the control circuit when it is
live.
Condensator Dominit GmbH
CONDO B017 1004
Installation and Operating Instructions for Automatic Low Voltage Capacitor Banks
3.3
Functional testing
4.2
A functional test of the system and potentially necessary
troubleshooting are described in the controller manual. For
RVC see chapters “Testing”, “Error messages” and
“Troubleshooting”. For RVT see chapters 4.2.5 and A3.
Note: Too many steps switched on can lead to overcompensation, i.e. increased voltage, particularly under low
load. Not sufficient compensation power switched on can lead
to overloading of the feeder, particularly under heavy load.
If the system fails the functional test see Chapter 4.
4
Troubleshooting
Please observe the notes on safety (Chapter 1) and on
discharging of capacitors (Chapter 3.1).
4.1
Reactive power controller
Refer to the controller manual. For RVC see chapters
“Testing”, “Error messages” and “Troubleshooting”. For RVT
see chapters 4.2.5 and A3.
Common problems and possible reasons:
a) The reactive power controller signals a fault and demands
more compensation power.
b) The reactive power controller signals a fault and wants to
switch off capacitor steps.
c) The reactive power controller does not switch steps on or
off although there are different loads, or it does not appear
to switch correctly.
• Is the capacitor bank connected as specified in the
wiring diagram? Have any subsequent modifications
been performed at site? See also Chapters 2.3.1 and 2.3.2.
• Is the cosϕ setpoint correct?
• Is the expected current transformer current flowing?
• Have fuses for the control/measuring current tripped?
• Has a fuse in the feeder or for the capacitor steps
tripped?
• Are the capacitor contactors in the specified switching
positions?
Fault signals can be acknowledged and cleared.
For a), also clarify the following:
• Is there a significant loss of capacitance in any
capacitor step?
For b), also clarify the following:
• Are there further capacitors in the system?
For c), also clarify the following:
• Has the switching delay time or zero voltage blocking
time (approx. 90 s) already expired?
• Is the reactive power controller set to automatic mode?
• Are controller parameters set correctly (see chapter 3.1)?
d) In spite of relatively constant inductive load, the system
switches relatively often.
• Are controller parameters set correctly (see chapter 3.1)?
e) A fault is signalled although the system is functioning perfectly.
• A temporary but high reactive power demand may
have led to a fault signal.
The fault signal can be acknowledged and cleared.
f) The reactive power controller indicates that steps are
switched on, but the relevant contactors have not
switched.
• Check the wiring between contactors and controller.
g) An alarm is indicated.
Refer to the controller manual. For RVC see chapter “Alarm
and protection”. For RVT see chapters 4.2.3.2. (Protections),
4.2.3.4. (Alarm) and 4.3. (Alarm logging).
CONDO B017 1004
Other observations
a) Overcurrent protection systems (fuses) for capacitor steps
trip.
• Are fuses with the correct rated current fitted?
• Are the discharge devices okay?
• Is the switching delay time of the reactive power
controller set correctly?
• Is there a short circuit or short circuit to the enclosure?
Do the contactors occasionally “chatter”?
b) Contactors are not working.
• Are the contactor coils damaged?
• Have the corresponding fuses tripped?
See also the items under a)
c) Capacitor breakdown.
• Have there been unusual or new load or network
situations in the recent period?
• Have the conditions for heat dissipation of the
capacitor bank or from the point of installation been
fundamentally changed?
• Is the reactive power controller working correctly?
See also the items under a) and b).
5
Maintenance recommendations
Your capacitor bank is an investment whose function you can
monitor and ensure by regular maintenance. If you cannot
perform the recommended maintenance work yourself, our
sales offices will be pleased to provide assistance.
Please observe the notes on safety (Chapter 1) and on
discharging capacitors (Chapter 3.1).
5.1
Contacts
Defective contacts in capacitor circuits can cause sparkling
whose high frequency oscillations overload the capacitors. It
is therefore recommended that all contacts (fuses, screw and
plug connections, terminals) in capacitor banks be checked
during inspection and fastened if found to be vibrating. When
the switching frequency is extremely high, also check the
switching contacts in the capacitor contactors.
5.2
Air supply
The air intake and outlet openings and any filter tissues are to
be checked for contamination and cleaned if necessary. In
capacitor banks with fans, check the function and control of
fans regularly.
5.3
Discharge devices
Defective discharge systems can lead to impermissible loads
for almost all the equipment in the capacitor bank. It is
therefore advisable to check their function during inspections.
The amount of work required is not much:
• Switch the capacitor step on.
• Switch the capacitor step off.
• After at least 40 seconds measure the voltage between all
the capacitor terminals on the relevant contactor:
When the discharge device is functioning correctly, a residual
(DC) voltage of less 0.1 x rated voltage is measured.
If the discharge system is defective, a residual (DC)
voltage of >>0.1 x rated voltage, which can be over 1 kV
in extreme cases, may be measured.
5.4
Control function
Performance of a functional test as set out in Chapter 3.2 is
recommended to verify the control function of the
compensation system.
Condensator Dominit GmbH
3
Installation and Operating Instructions for Automatic Low Voltage Capacitor Banks
Appendix A1 Maximum permissible rated compensation power for 400 V, 3-phase
in relation to external fuses
Fuse
LV HRC
A
16
20
25
35
50
63
80
100
125
160
200
250
315
400
500
630
800
without reactor
or (LA) (LB)
max. kvar
7,6
9,7
11,7
16,7
24,2
30,0
39
48
60
78
100
125
158
200
250
315
400
with reactor
L057
max. kvar
8,3
10,3
12,5
17,3
25,2
31,7
40
50
63
81
104
130
164
208
260
328
416
with reactor
L070
max. kvar
9,0
11,0
14,0
19,4
27,7
34,5
44
55
68
88
113
141
178
226
283
356
452
with reactor
L125
max. kvar
9,0
11,1
14,0
20,0
28,4
35,7
45
57
71
91
117
146
185
234
293
369
469
with reactor
L140
max. kvar
9,0
11,1
14,0
20,0
28,4
35,7
45
57
71
91
117
146
185
234
293
369
469
with reactor
LL1
max. kvar
9,0
11,0
14,0
19,4
27,7
34,5
44
55
68
88
113
141
178
226
283
356
452
with reactor
LL2
max.kvar
8,3
10,3
13,2
18,0
25,6
32,5
41
52
65
83
107
133
168
213
267
336
426
For other rated voltages: 230 V: Values / 1,73; 525 V: Values / 0,76; 690 V: Values / 0,58.
Appendix A2 Extract from DIN VDE 0100.
Fuse
LV HRC
A
16
25
35
50
63
80
100
125
160
200
250
315
400
500
630
800
Appendix A3 Losses in Cu-conductors
Terminal
cross section
mm²
Length
4 x 2,5
4x4
4x6
4 x 10
4 x 16
3 x 25/16
3 x 35/16
3 x 50/25
3 x 70/35
3 x 95/50
3 x 120/70
3 x 185/95
2 || 3 x 95/50
2 || 3 x 120/70
2 || 3 x 185/95
2 || 3 x 240/120
5m
10m
15m
20m
30m
40m
50m
60m
80m
100m
120m
150m
200m
250m
300m
500m
Losses [W]
for 5 A
for 1 A
with cross section
with cross section
1,5mm² 2,5mm² 4,0mm² 1,5mm² 2,5mm² 4,0mm²
2,9
1,8
1,1
0,1
0,1
0,0
5,8
3,5
2,2
0,2
0,1
0,1
8,8
5,3
3,3
0,4
0,2
0,1
11,7
7,0
4,4
0,5
0,3
0,2
17,5
10,5
6,6
0,7
0,4
0,3
23,3
14,0
8,8
0,9
0,6
0,4
29,2
17,5
10,9
1,2
0,7
0,4
35,0
21,0
13,1
1,4
0,8
0,5
46,7
28,0
17,5
1,9
1,1
0,7
35,0
21,9
2,3
1,4
0,9
42,0
26,3
2,8
1,7
1,1
32,8
3,5
2,1
1,3
43,8
4,7
2,8
1,8
5,8
3,5
2,2
7,0
4,2
2,6
11,7
7,0
4,4
Appendix A4:C/k value settings on the reactive power controller
Current
transformer
A
50/5
100/5
150/5
200/5
300/5
400/5
500/5
600/5
800/5
1000/5
1500/5
2000/5
2500/5
3000/5
Current
transformer
ratio
k
10
20
30
40
60
80
100
120
160
200
300
400
500
600
C/k values for 400 V, 3-phase
2,5
0,25
0,13
0,08
0,06
3,3
0,33
0,17
0,11
0,08
0,06
5
0,50
0,25
0,17
0,13
0,08
0,06
0,05
6,7
0,67
0,34
0,22
0,17
0,11
0,08
0,07
0,06
8,3
10
0,42
0,28
0,21
0,14
0,10
0,08
0,07
0,05
0,50
0,33
0,25
0,17
0,13
0,10
0,08
0,06
0,05
smallest capacitor step power in kvar
12,5
15 16,7
20
25
0,63
0,42
0,31
0,21
0,16
0,13
0,10
0,08
0,06
0,75
0,50
0,38
0,25
0,19
0,15
0,13
0,09
0,08
0,05
0,56
0,42
0,28
0,21
0,17
0,14
0,10
0,08
0,06
0,67
0,50
0,33
0,25
0,20
0,17
0,13
0,10
0,07
0,05
0,63
0,42
0,31
0,25
0,21
0,16
0,13
0,08
0,06
0,05
30
33,3
40
50
60
100
0,75
0,50
0,38
0,30
0,25
0,19
0,15
0,10
0,08
0,06
0,05
0,56
0,42
0,33
0,28
0,21
0,17
0,11
0,08
0,07
0,06
0,67
0,50
0,40
0,33
0,25
0,20
0,13
0,10
0,08
0,07
0,63
0,50
0,42
0,31
0,25
0,17
0,13
0,10
0,08
0,75
0,60
0,50
0,38
0,30
0,20
0,15
0,12
0,10
0,63
0,50
0,33
0,25
0,20
0,17
For other rated voltages: 230 V: Values x 1,73; 525 V: Values x 0,76; 690 V: Values x 0,58.
Condensator Dominit GmbH
An der Bremecke 8 . D-59929 Brilon
Tel.: +49 (0)2961 / 782-0
Fax. +49 (0)2961 / 782-36
www.condensator-dominit.de
[email protected]
CONDO B017 1004
4