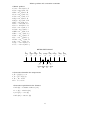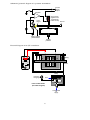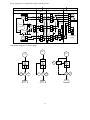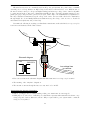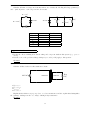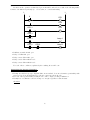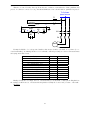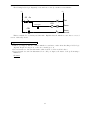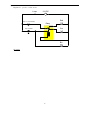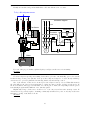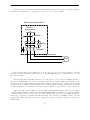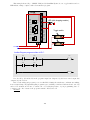
1
INST 230 (Motor Controls), section 1
Lab
Reversing three-phase motor starter circuit and PLC trainer construction: Question 91, completed
objectives due by the end of day 4, section 2
PLC trainer details: Question 92
Feedback questions
Questions 81 through 90. “Feedback questions” serve as practice problems for upcoming exams and are
completely optional. Your instructor will evaluate your answers and return detailed notes to you in response.
Please submit them to your instructor at the end of day 4.
Exam
Day 4 of next section – only a simple calculator may be used!
Specific objectives for the “mastery” exam:
• Electricity Review: Calculate voltages and currents in a DC series-parallel resistor circuit given source
and resistor values
• Sketch proper wire connections for a relay control circuit
• Determine status of a relay logic circuit given a schematic diagram and switch stimulus conditions
• Calculate either the full-load current or the horsepower of an electric motor (single-phase) given the line
voltage and one of the other parameters
• Solve for a specified variable in an algebraic formula
• Determine the possibility of suggested faults in a simple circuit given measured values (voltage, current),
a schematic diagram, and reported symptoms
• INST241 Review: Identify (American) wire colors for different thermocouple types
• INST251 Review: Determine the effect of a component fault or condition change in a single-loop
controlled process
• INST260 Review: Convert between different numeration systems (decimal, binary, hexadecimal, octal)
Recommended daily schedule
Day 1
Theory session topic: Introduction to second-year program objectives, industry expectations
Questions 1 through 20; answer questions 1-4 in preparation for discussion (remainder for practice)
Take INST200 practice mastery exam
Note: Continuing students (i.e. those who have taken other INST200-level courses) may
skip this introductory classroom session and focus on obtaining their PLC components in
preparation for the INST231 course. All students need to attend the lab portion of Day 1,
though!
Day 2
Theory session topic: AC power systems
Questions 21 through 40; answer questions 21-29 in preparation for discussion (remainder for practice)
1
Day 3
Theory session topic: AC electric motors and electrical workplace safety
Note: you will need access to the latest version of the NFPA 70E Standard for Electrical Safety in the
Workplace in order to answer several of today’s questions!
Questions 41 through 60; answer questions 41-48 in preparation for discussion (remainder for practice)
Day 4
Theory session topic: Relay circuits and motor controls
Questions 61 through 80; answer questions 61-69 in preparation for discussion (remainder for practice)
Feedback questions (81 through 90) are optional and may be submitted for review at the end of the day
2
How To . . .
Access the worksheets and textbook: go to the Socratic Instrumentation website located at
http://www.ibiblio.org/kuphaldt/socratic/sinst to find worksheets for every 2nd-year course section
organized by quarter, as well as both the latest “stable” and “development” versions of the Lessons In
Industrial Instrumentation textbook. Download and save these documents to your computer.
Maximize your learning: come to school prepared each and every day – this means completing all your
homework before class starts. Use every minute of class and lab time productively. Follow all the tips
outlined in “Question 0” (in every course worksheet) as well as your instructor’s advice. Don’t ask anyone
to help you solve a problem until you have made every reasonable effort to solve it on your own.
Identify upcoming assignments and deadlines: read the first page of each course worksheet.
Relate course days to calendar dates: reference the calendar spreadsheet file (calendar.xlsx), found
on the BTC campus Y: network drive. A printed copy is posted in the Instrumentation classroom.
Locate industry documents assigned for reading: use the Instrumentation Reference provided by
your instructor (on CD-ROM and on the BTC campus Y: network drive). There you will find a file named
00 index OPEN THIS FILE.html readable with any internet browser. Click on the “Quick-Start Links” to
access assigned reading documents, organized per course, in the order they are assigned.
Study for the exams: Mastery exams assess specific skills critically important to your success, listed near
the top of the front page of each course worksheet for your review. Familiarize yourself with this list and pay
close attention when those topics appear in homework and practice problems. Proportional exams feature
problems you haven’t seen before that are solvable using general principles learned throughout the current and
previous courses, for which the only adequate preparation is independent problem-solving practice every day.
Answer the “feedback questions” (practice exams) in each course section to hone your problem-solving skills,
as these are similar in scope and complexity to proportional exams. Answer these feedback independently
(i.e. no help from classmates) in order to most accurately assess your readiness.
Calculate course grades: download the “Course Grading Spreadsheet” (grades template.xlsx) from
the Socratic Instrumentation website, or from the BTC campus Y: network drive. Enter your quiz scores,
test scores, lab scores, and attendance data into this Excel spreadsheet and it will calculate your course
grade. You may compare your calculated grades against your instructors’ records at any time.
Identify courses to register for: read the “Sequence” page found in each worksheet.
Identify scholarship opportunities: check your BTC email in-box daily.
Identify job openings: regularly monitor job-search websites. Set up informational interviews at
workplaces you are interested in. Participate in jobshadows and internships. Apply to jobs long before
graduation, as some employers take months to respond! Check your BTC email account daily, because your
instructor broadcast-emails job postings to all students as employers submit them to BTC.
Impress employers: sign the FERPA release form granting your instructors permission to share academic
records, then make sure your performance is worth sharing. Document your project and problem-solving
experiences for reference during interviews. Honor all your commitments.
Begin your career: participate in jobshadows and internships while in school to gain experience and
references. Take the first Instrumentation job that pays the bills, and give that employer at least two years
of good work to pay them back for the investment they have made in you. Employers look at delayed
employment, as well as short employment spans, very negatively. Failure to pass a drug test is an immediate
disqualifier, as is falsifying any information. Criminal records may also be a problem.
file howto
3
General Values and Expectations
Success in this career requires: professional integrity, resourcefulness, persistence, close attention to
detail, and intellectual curiosity. Poor judgment spells disaster in this career, which is why employer
background checks (including social media and criminal records) and drug testing are common. The good
news is that character and clear thinking are malleable traits: unlike intelligence, these qualities can be
acquired and improved with effort. This is what you are in school to do – increase your “human capital”
which is the sum of all knowledge, skills, and traits valuable in the marketplace.
Mastery: You must master the fundamentals of your chosen profession. “Mastery” assessments challenge
you to demonstrate 100% competence (with multiple opportunities to re-try). Failure to complete any
mastery objective(s) by the deadline date caps your grade at a C−. Failure to complete by the end of the
next school day results in a failing (F) grade.
Punctuality and Attendance: You are expected to arrive on time and be “on-task” all day just as you
would for a job. Each student has 12 hours of “sick time” per quarter applicable to absences not verifiably
employment-related, school-related, weather-related, or required by law. Each student must confer with the
instructor to apply these hours to any missed time – this is not done automatically. Students may donate
unused “sick time” to whomever they specifically choose. You must contact your instructor and lab team
members immediately if you know you will be late or absent or must leave early. Absence on an exam day
will result in a zero score for that exam, unless due to a documented emergency.
Time Management: You are expected to budget and prioritize your time, just as you will be on the job.
You will need to reserve enough time outside of school to complete homework, and strategically apply your
time during school hours toward limited resources (e.g. lab equipment). Frivolous activities (e.g. games,
social networking, internet surfing) are unacceptable when work is unfinished. Trips to the cafeteria for food
or coffee, smoke breaks, etc. must not interfere with team participation.
Independent Study: This career is marked by continuous technological development and ongoing change,
which is why self-directed learning is ultimately more important to your future success than specific
knowledge. To acquire and hone this skill, all second-year Instrumentation courses follow an “inverted”
model where lecture is replaced by independent study, and class time is devoted to addressing your questions
and demonstrating your learning. Most students require a minimum of 3 hours daily study time outside of
school. Arriving unprepared (e.g. homework incomplete) is unprofessional and counter-productive. Question
0 of every worksheet lists practical study tips.
Independent Problem-Solving: The best instrument technicians are versatile problem-solvers. General
problem-solving is arguably the most valuable skill you can possess for this career, and it can only be built
through persistent effort. This is why you must take every reasonable measure to solve problems on your own
before seeking help. It is okay to be perplexed by an assignment, but you are expected to apply problemsolving strategies given to you (see Question 0) and to precisely identify where you are confused so your
instructor will be able to offer targeted help. Asking classmates to solve problems for you is folly – this
includes having others break the problem down into simple steps. The point is to learn how to think on your
own. When troubleshooting systems in lab you are expected to run diagnostic tests (e.g. using a multimeter
instead of visually seeking circuit faults), as well as consult the equipment manual(s) before seeking help.
Initiative: No single habit predicts your success or failure in this career better than personal initiative, which
is why your instructor will demand you do for yourself rather than rely on others to do for you. Examples
include setting up and using your BTC email account to communicate with your instructor(s), consulting
manuals for technical information before asking for help, regularly checking the course calendar and
assignment deadlines, avoiding procrastination, fixing small problems before they become larger problems,
etc. If you find your performance compromised by poor understanding of prior course subjects, re-read those
textbook sections and use the practice materials made available to you on the Socratic Instrumentation
website – don’t wait for anyone else to diagnose your need and offer help.
4
General Values and Expectations (continued)
Safety: You are expected to work safely in the lab just as you will be on the job. This includes wearing
proper attire (safety glasses and closed-toed shoes in the lab at all times), implementing lock-out/tag-out
procedures when working on circuits with exposed conductors over 30 volts, using ladders to access elevated
locations, and correctly using all tools. If you need to use an unfamiliar tool, see the instructor for directions.
Orderliness: You are expected to keep your work area clean and orderly just as you will be on the job.
This includes discarding trash and returning tools at the end of every lab session, and participating in all
scheduled lab clean-up sessions. If you identify failed equipment in the lab, label that equipment with a
detailed description of its symptoms.
Teamwork: You will work in instructor-assigned teams to complete lab assignments, just as you will work
in teams to complete complex assignments on the job. As part of a team, you must keep your teammates
informed of your whereabouts in the event you must step away from the lab or will be absent for any reason.
Any student regularly compromising team performance through lack of participation, absence, tardiness,
disrespect, or other disruptive behavior(s) will be removed from the team and required to complete all
labwork individually for the remainder of the quarter. The same is true for students found relying on
teammates to do their work for them.
Cooperation: The structure of these courses naturally lends itself to cooperation between students. Working
together, students significantly impact each others’ learning. You are expected to take this role seriously,
offering real help when needed and not absolving classmates of their responsibility to think for themselves or
to do their own work. Solving problems for classmates and/or explaining to them what they can easily read
on their own is unacceptable because these actions circumvent learning. The best form of help you can give
to your struggling classmates is to share with them your tips on independent learning and problem-solving,
for example asking questions leading to solutions rather than simply providing solutions for them.
Grades: Employers prize trustworthy, hard working, knowledgeable, resourceful problem-solvers. The grade
you receive in any course is but a partial measure of these traits. What matters most are the traits
themselves, which is why your instructor maintains detailed student records (including individual exam
scores, attendance, tardiness, and behavioral comments) and will share these records with employers if
you have signed the FERPA release form. You are welcome to see your records at any time, and to
compare calculated grades with your own records (i.e. the grade spreadsheet available to all students).
You should expect employers to scrutinize your records on attendance and character, and also challenge you
with technical questions when considering you for employment.
Representation: You are an ambassador for this program. Your actions, whether on tours, during a
jobshadow or internship, or while employed, can open or shut doors of opportunity for other students. Most
of the job opportunities open to you as a BTC graduate were earned by the good work of previous graduates,
and as such you owe them a debt of gratitude. Future graduates depend on you to do the same.
Responsibility For Actions: If you lose or damage college property (e.g. lab equipment), you must find,
repair, or help replace it. If you represent BTC poorly to employers (e.g. during a tour or an internship),
you must make amends. The general rule here is this: “If you break it, you fix it!”
Non-negotiable terms: disciplinary action, up to and including immediate failure of a course, will
result from academic dishonesty (e.g. cheating, plagiarism), willful safety violations, theft, harassment,
intoxication, destruction of property, or willful disruption of the learning (work) environment. Such offenses
are grounds for immediate termination in this career, and as such will not be tolerated here.
file expectations
5
Course Syllabus
INSTRUCTOR CONTACT INFORMATION:
Tony Kuphaldt
(360)-752-8477 [office phone]
(360)-752-7277 [fax]
[email protected]
DEPT/COURSE #: INST 230
CREDITS: 3
Lecture Hours: 10
Lab Hours: 50
Work-based Hours: 0
COURSE TITLE: Motor Controls
COURSE DESCRIPTION: In this course you will learn how to wire, configure, and use electromechanical
contactors to control electric motors and other discrete (on/off) control elements for real processes. You will
also learn how to wire, configure, and use variable-frequency motor controls to use three-phase AC motors as
final control elements. Prerequisite courses: ELTR145 (Digital 2) and MATH&141 (Precalculus 1) with
a minimum grade of “C”
COURSE OUTCOMES: Commission, analyze, and efficiently diagnose motor control systems
incorporating electromechanical relays and variable-frequency drive (VFD) units.
COURSE OUTCOME ASSESSMENT: Motor control system commissioning, analysis, and diagnosis
outcomes are ensured by measuring student performance against mastery standards, as documented in the
Student Performance Objectives. Failure to meet all mastery standards by the next scheduled exam day will
result in a failing grade for the course.
6
STUDENT PERFORMANCE OBJECTIVES:
• Without references or notes, within a limited time (3 hours total for each exam session), independently
perform the following tasks. Multiple re-tries are allowed on mastery (100% accuracy) objectives, each
with a different set of problems:
→ Calculate voltages and currents in a DC series-parallel resistor circuit given source and resistor values,
with 100% accuracy (mastery)
→ Sketch proper wire connections for a relay control circuit given a pictorial or schematic diagram of
the components, with 100% accuracy (mastery)
→ Determine status of a relay logic circuit given a schematic diagram and switch stimulus conditions,
with 100% accuracy (mastery)
→ Calculate current and horsepower ratings of a single-phase electrical motor for a given line voltage
with 100% accuracy (mastery)
→ Solve for specified variables in algebraic formulae, with 100% accuracy (mastery)
→ Determine the possibility of suggested faults in a simple circuit given measured values (voltage,
current), a schematic diagram, and reported symptoms, with 100% accuracy (mastery)
→ Predict the response of electric motor control systems to component faults and changes in process
conditions, given pictorial and/or schematic illustrations
→ Sketch proper power and signal connections between individual motor control components to fulfill
a specified control system function, given pictorial and/or schematic illustrations of those instruments
• In a team environment and with full access to references, notes, and instructor assistance, perform the
following tasks:
→ Demonstrate proper use of safety equipment and application of safe procedures while using power
tools, and working on live systems
→ Communicate effectively with teammates to plan work, arrange for absences, and share responsibilities
in completing all labwork
→ Construct and commission a three-phase reversing motor starter system
→ Connect three power transformers together to form a three-phase transformer bank with specified
configuration (e.g. Delta-Delta, Delta-Wye)
→ Generate an accurate wiring diagram compliant with industry standards documenting your team’s
motor control system
→ Construct and test a PLC “trainer” board utilizing a small PLC connected to input switches and
indicator lamps
• Independently perform the following tasks on a functioning motor starter system with 100% accuracy
(mastery). Multiple re-tries are allowed with different specifications/conditions each time):
→ Properly wire a start/stop motor control circuit, given components randomly selected by the
instructor
→ Test for ground faults in a motor starter system using an insulation tester (“megger”)
→ Demonstrate how to secure power to a motor starter using proper lock-out and testing procedures
→ Diagnose a random fault placed in another team’s motor control system by the instructor within
a limited time using no test equipment except a multimeter, logically justifying your steps in the
instructor’s direct presence
COURSE OUTLINE: A course calendar in electronic format (Excel spreadsheet) resides on the Y:
network drive, and also in printed paper format in classroom DMC130, for convenient student access. This
calendar is updated to reflect schedule changes resulting from employer recruiting visits, interviews, and
other impromptu events. Course worksheets provide comprehensive lists of all course assignments and
activities, with the first page outlining the schedule and sequencing of topics and assignment due dates.
These worksheets are available in PDF format at http://www.ibiblio.org/kuphaldt/socratic/sinst
• INST230 Section 1 (Motors and relay controls): 5 days theory and labwork
• INST230 Section 2 (Solid-state motor controls): 4 days theory and labwork + 1 day for
mastery/proportional Exams
7
METHODS OF INSTRUCTION: Course structure and methods are intentionally designed to develop
critical-thinking and life-long learning abilities, continually placing the student in an active rather than a
passive role.
• Independent study: daily worksheet questions specify reading assignments, problems to solve, and
experiments to perform in preparation (before) classroom theory sessions. Open-note quizzes and work
inspections ensure accountability for this essential preparatory work. The purpose of this is to convey
information and basic concepts, so valuable class time isn’t wasted transmitting bare facts, and also to
foster the independent research ability necessary for self-directed learning in your career.
• Classroom sessions: a combination of Socratic discussion, short lectures, small-group problem-solving,
and hands-on demonstrations/experiments review and illuminate concepts covered in the preparatory
questions. The purpose of this is to develop problem-solving skills, strengthen conceptual understanding,
and practice both quantitative and qualitative analysis techniques.
• Lab activities: an emphasis on constructing and documenting working projects (real instrumentation
and control systems) to illuminate theoretical knowledge with practical contexts. Special projects
off-campus or in different areas of campus (e.g. BTC’s Fish Hatchery) are encouraged. Hands-on
troubleshooting exercises build diagnostic skills.
• Feedback questions: sets of practice problems at the end of each course section challenge your
knowledge and problem-solving ability in current as as well as first year (Electronics) subjects. These
are optional assignments, counting neither for nor against your grade. Their purpose is to provide you
and your instructor with direct feedback on what you have learned.
STUDENT ASSIGNMENTS/REQUIREMENTS: All assignments for this course are thoroughly
documented in the following course worksheets located at:
http://www.ibiblio.org/kuphaldt/socratic/sinst/index.html
• INST230 sec1.pdf
• INST230 sec2.pdf
8
EVALUATION AND GRADING STANDARDS: (out of 100% for the course grade)
• Completion of all mastery objectives = 50%
• Mastery exam score (first attempt) = 10%
• Proportional exam score = 30%
• Lab questions = 10%
• Quiz penalty = -1% per failed quiz
• Tardiness penalty = -1% per incident (1 “free” tardy per course)
• Attendance penalty = -1% per hour (12 hours “sick time” per quarter)
• Extra credit = +5% per project (assigned by instructor based on individual learning needs)
All grades are criterion-referenced (i.e. no grading on a “curve”)
100% ≥ A ≥ 95%
90% > B+ ≥ 86%
80% > C+ ≥ 76%
70% > D+ ≥ 66%
95% > A- ≥ 90%
86% > B ≥ 83%
76% > C ≥ 73%
66% > D ≥ 63%
83% > B- ≥ 80%
73% > C- ≥ 70% (minimum passing course grade)
63% > D- ≥ 60%
60% > F
A graded “preparatory” quiz at the start of each classroom session gauges your independent learning
prior to the session. A graded “summary” quiz at the conclusion of each classroom session gauges your
comprehension of important concepts covered during that session. If absent during part or all of a classroom
session, you may receive credit by passing comparable quizzes afterward or by having your preparatory work
(reading outlines, work done answering questions) thoroughly reviewed prior to the absence.
Absence on a scheduled exam day will result in a 0% score for the proportional exam unless you provide
documented evidence of an unavoidable emergency.
If you fail a mastery exam, you must re-take a different version of that mastery exam on a different
day. Multiple re-tries are allowed, on a different version of the exam each re-try. There is no penalty levied
on your course grade for re-taking mastery exams, but failure to successfully pass a mastery exam by the
due date (i.e. by the date of the next exam in the course sequence) will result in a failing grade (F) for the
course.
If any other “mastery” objectives are not completed by their specified deadlines, your overall grade
for the course will be capped at 70% (C- grade), and you will have one more school day to complete the
unfinished objectives. Failure to complete those mastery objectives by the end of that extra day (except in
the case of documented, unavoidable emergencies) will result in a failing grade (F) for the course.
“Lab questions” are assessed by individual questioning, at any date after the respective lab objective
(mastery) has been completed by your team. These questions serve to guide your completion of each lab
exercise and confirm participation of each individual student. Grading is as follows: full credit for thorough,
correct answers; half credit for partially correct answers; and zero credit for major conceptual errors. All
lab questions must be answered by the due date of the lab exercise.
Extra credit opportunities exist for each course, and may be assigned to students upon request. The
student and the instructor will first review the student’s performance on feedback questions, homework,
exams, and any other relevant indicators in order to identify areas of conceptual or practical weakness. Then,
both will work together to select an appropriate extra credit activity focusing on those identified weaknesses,
for the purpose of strengthening the student’s competence. A due date will be assigned (typically two weeks
following the request), which must be honored in order for any credit to be earned from the activity. Extra
credit may be denied at the instructor’s discretion if the student has not invested the necessary preparatory
effort to perform well (e.g. lack of preparation for daily class sessions, poor attendance, no feedback questions
submitted, etc.).
9
REQUIRED STUDENT SUPPLIES AND MATERIALS:
• Course worksheets available for download in PDF format
• Lessons in Industrial Instrumentation textbook, available for download in PDF format
→ Access worksheets and book at: http://www.ibiblio.org/kuphaldt/socratic/sinst
• Ampacity ratings of wire from the National Electrical Code (NFPA 70) reference, available for free online
viewing at http://www.nfpa.org
• NFPA 70E “Standard for Electrical Safety in the Workplace”
• Spiral-bound notebook for reading annotation, homework documentation, and note-taking.
• Instrumentation reference CD-ROM (free, from instructor). This disk contains many tutorials and
datasheets in PDF format to supplement your textbook(s).
• Tool kit (see detailed list)
• Simple scientific calculator (non-programmable, non-graphing, no unit conversions, no numeration
system conversions), TI-30Xa or TI-30XIIS recommended
ADDITIONAL INSTRUCTIONAL RESOURCES:
• The BTC Library hosts a substantial collection of textbooks and references on the subject of
Instrumentation, as well as links in its online catalog to free Instrumentation e-book resources available
on the Internet.
• “BTCInstrumentation” channel on YouTube (http://www.youtube.com/BTCInstrumentation), hosts
a variety of short video tutorials and demonstrations on instrumentation.
• ISA Student Section at BTC meets regularly to set up industry tours, raise funds for scholarships,
and serve as a general resource for Instrumentation students. Membership in the ISA is $10 per year,
payable to the national ISA organization. Membership includes a complementary subscription to InTech
magazine.
• ISA website (http://www.isa.org) provides all of its standards in electronic format, many of which
are freely available to ISA members.
• Cad Standard (CadStd) or similar AutoCAD-like drafting software (useful for sketching loop and
wiring diagrams). Cad Standard is a simplified clone of AutoCAD, and is freely available at:
http://www.cadstd.com
CAMPUS EMERGENCIES: If an emergency arises, your instructor may inform you of actions to
follow. You are responsible for knowing emergency evacuation routes from your classroom. If police or
university officials order you to evacuate, do so calmly and assist those needing help. You may receive
emergency information alerts via the building enunciation system, text message, email, or BTC’s webpage
(http://www.btc.ctc.edu), Facebook or Twitter. Refer to the emergency flipchart in the lab room (located
on the main control panel) for more information on specific types of emergencies.
ACCOMMODATIONS: If you think you could benefit from classroom accommodations for a disability
(physical, mental, emotional, or learning), please contact our Accessibility Resources office. Call (360)-7528345, email [email protected], or stop by the AR Office in the Admissions and Student Resource Center
(ASRC), Room 106, College Services Building
file INST230syllabus
10
Sequence of second-year Instrumentation courses
Core Electronics -- 3 qtrs
including MATH 141 (Precalculus 1)
(Only if 4th quarter was Summer: INST23x)
INST 200 -- 1 wk
Intro. to Instrumentation
Prerequisite for all INST24x,
INST25x, and INST26x courses
Summer quarter
Fall quarter
Winter quarter
Offered 1st week of
Fall, Winter, and
Spring quarters
Spring quarter
INST 230 -- 3 cr
INST 240 -- 6 cr
INST 250 -- 5 cr
INST 260 -- 4 cr
Motor Controls
Pressure/Level Measurement
Final Control Elements
Data Acquisition Systems
INST 231 -- 3 cr
INST 241 -- 6 cr
INST 251 -- 5 cr
INST 262 -- 5 cr
PLC Programming
Temp./Flow Measurement
PID Control
DCS and Fieldbus
INST 232 -- 3 cr
INST 242 -- 5 cr
INST 252 -- 4 cr
INST 263 -- 5 cr
Loop Tuning
Control Strategies
PLC Systems
Analytical Measurement
INST 233 -- 3 cr
CHEM&161 -- 5 cr
Protective Relays (elective)
Chemistry
ENGT 134 -- 5 cr
CAD 1: Basics
Prerequisite for INST206
All courses
completed?
Yes
INST 205 -- 1 cr
Job Prep I
No
INST 206 -- 1 cr
Job Prep II
Graduate!!!
11
Offered 1st week of
Fall, Winter, and
Spring quarters
The particular sequence of courses you take during the second year depends on when you complete all
first-year courses and enter the second year. Since students enter the second year of Instrumentation at four
different times (beginnings of Summer, Fall, Winter, and Spring quarters), the particular course sequence
for any student will likely be different from the course sequence of classmates.
Some second-year courses are only offered in particular quarters with those quarters not having to be
in sequence, while others are offered three out of the four quarters and must be taken in sequence. The
following layout shows four typical course sequences for second-year Instrumentation students, depending on
when they first enter the second year of the program:
Possible course schedules depending on date of entry into 2nd year
Beginning in Summer
July
Summer quarter
Beginning in Fall
Sept.
Intro. to Instrumentation
Intro. to Instrumentation
Intro. to Instrumentation
INST 231 -- 3 cr
INST 240 -- 6 cr
INST 250 -- 5 cr
INST 260 -- 4 cr
PLC Programming
Pressure/Level Measurement
Final Control Elements
Data Acquisition Systems
Protective Relays (elective)
Fall quarter
Dec.
Jan.
INST 251 -- 5 cr
INST 262 -- 5 cr
PID Control
DCS and Fieldbus
INST 242 -- 5 cr
INST 252 -- 4 cr
INST 263 -- 5 cr
Loop Tuning
Control Strategies
Analytical Measurement
CHEM&161 -- 5 cr
Winter quarter
Intro. to Instrumentation
INST 240 -- 6 cr
INST 250 -- 5 cr
Pressure/Level Measurement
INST 241 -- 6 cr
Mar.
April
Chemistry
Spring quarter
ENGT 134 -- 5 cr
June
July
CAD 1: Basics
Summer quarter
INST 230 -- 3 cr
Final Control Elements
INST 205 -- 1 cr
Job Prep I
INST 251 -- 5 cr
INST 260 -- 4 cr
INST 231 -- 3 cr
Temp./Flow Measurement
PID Control
Data Acquisition Systems
PLC Programming
INST 242 -- 5 cr
INST 252 -- 4 cr
INST 262 -- 5 cr
INST 232 -- 3 cr
Loop Tuning
DCS and Fieldbus
CHEM&161 -- 5 cr
INST 263 -- 5 cr
Chemistry
Control Strategies
Analytical Measurement
Winter quarter
Mar.
April
ENGT 134 -- 5 cr
Spring quarter
June
CAD 1: Basics
Motor Controls
PLC Systems
INST 233 -- 3 cr
Aug.
Sept.
Protective Relays (elective)
Fall quarter
Final Control Elements
INST 206 -- 1 cr
Job Prep II
INST 251 -- 5 cr
INST 260 -- 4 cr
INST 230 -- 3 cr
INST 240 -- 6 cr
PID Control
Data Acquisition Systems
Motor Controls
Pressure/Level Measurement
INST 252 -- 4 cr
INST 262 -- 5 cr
INST 231 -- 3 cr
INST 241 -- 6 cr
Loop Tuning
DCS and Fieldbus
PLC Programming
Temp./Flow Measurement
CHEM&161 -- 5 cr
INST 263 -- 5 cr
INST 232 -- 3 cr
Chemistry
Control Strategies
Spring quarter
INST 206 -- 1 cr
Job Prep II
July
Summer quarter
INST 230 -- 3 cr
Data Acquisition Systems
Motor Controls
INST 262 -- 5 cr
DCS and Fieldbus
INST 263 -- 5 cr
INST 232 -- 3 cr
Sept.
Jan.
Analytical Measurement
Winter quarter
INST 206 -- 1 cr
Job Prep II
Fall quarter
INST 250 -- 5 cr
INST 231 -- 3 cr
INST 240 -- 6 cr
INST 251 -- 5 cr
PLC Programming
Pressure/Level Measurement
PID Control
INST 241 -- 6 cr
INST 252 -- 4 cr
Temp./Flow Measurement
Loop Tuning
INST 233 -- 3 cr
Aug.
Protective Relays (elective)
INST 242 -- 5 cr
Dec.
INST 206 -- 1 cr
Job Prep II
PLC Systems
ENGT 134 -- 5 cr
Graduation!
INST 233 -- 3 cr
Aug.
INST 205 -- 1 cr
Job Prep I
Summer quarter
PLC Systems
CAD 1: Basics
INST 260 -- 4 cr
CAD 1: Basics
July
ENGT 134 -- 5 cr
June
Control Strategies
June
INST 241 -- 6 cr
Temp./Flow Measurement
INST 205 -- 1 cr
Job Prep I
INST 250 -- 5 cr
April
Spring quarter
Motor Controls
INST 205 -- 1 cr
Job Prep I
Mar.
April
INST 200 -- 1 wk
INST 200 -- 1 wk
Jan.
Winter quarter
INST 200 -- 1 wk
INST 233 -- 3 cr
Dec.
Jan.
INST 200 -- 1 wk
PLC Systems
Sept.
Fall quarter
Beginning in Spring
INST 230 -- 3 cr
INST 232 -- 3 cr
Aug.
Beginning in Winter
Final Control Elements
INST 242 -- 5 cr
Protective Relays (elective)
Dec.
Graduation!
Analytical Measurement
Graduation!
file sequence
12
CHEM&161 -- 5 cr
Mar.
Chemistry
Graduation!
General tool and supply list
Wrenches
• Combination (box- and open-end) wrench set, 1/4” to 3/4” – the most important wrench sizes are 7/16”,
1/2”, 9/16”, and 5/8”; get these immediately!
• Adjustable wrench, 6” handle (sometimes called “Crescent” wrench)
• Hex wrench (“Allen” wrench) set, fractional – 1/16” to 3/8”
• Optional: Hex wrench (“Allen” wrench) set, metric – 1.5 mm to 10 mm
• Optional: Miniature combination wrench set, 3/32” to 1/4” (sometimes called an “ignition wrench” set)
Note: when turning any threaded fastener, one should choose a tool engaging the maximum amount of
surface area on the fastener’s head in order to reduce stress on that fastener. (e.g. Using box-end wrenches
instead of adjustable wrenches; using the proper size and type of screwdriver; never using any tool that mars
the fastener such as pliers or vise-grips unless absolutely necessary.)
Pliers
• Needle-nose pliers
• Tongue-and-groove pliers (sometimes called “Channel-lock” pliers)
• Diagonal wire cutters (sometimes called “dikes”)
Screwdrivers
• Slotted, 1/8” and 1/4” shaft
• Phillips, #1 and #2
• Jeweler’s screwdriver set
• Optional: Magnetic multi-bit screwdriver (e.g. Klein Tools model 70035)
Electrical
• Multimeter, Fluke model 87-IV or better
• Alligator-clip jumper wires
• Soldering iron (10 to 40 watt) and rosin-core solder
• Resistor, potentiometer, diode assortments (from first-year lab kits)
• Package of insulated compression-style fork terminals (14 to 18 AWG wire size, #10 stud size)
• Wire strippers/terminal crimpers for 10 AWG to 18 AWG wire and insulated terminals
• Optional: ratcheting terminal crimp tool (e.g. Paladin 1305, Ferrules Direct FDT10011, or equivalent)
Safety
• Safety glasses or goggles (available at BTC bookstore)
• Earplugs (available at BTC bookstore)
Miscellaneous
• Simple scientific calculator (non-programmable, non-graphing, no conversions), TI-30Xa or TI-30XIIS
recommended. Required for some exams!
• Masking tape (for making temporary labels)
• Permanent marker pen
• Teflon pipe tape
• Utility knife
• Tape measure, 12 feet minimum
• Flashlight
An inexpensive source of tools is your local pawn shop. Look for tools with unlimited lifetime guarantees
(e.g. Sears “Craftsman” brand). Check for BTC student discounts as well!
file tools
13
Methods of instruction
This course develops self-instructional and diagnostic skills by placing students in situations where they
are required to research and think independently. In all portions of the curriculum, the goal is to avoid a
passive learning environment, favoring instead active engagement of the learner through reading, reflection,
problem-solving, and experimental activities. The curriculum may be roughly divided into two portions:
theory and practical.
Theory
In the theory portion of each course, students independently research subjects prior to entering the
classroom for discussion. This means working through all the day’s assigned questions as completely as
possible. This usually requires a fair amount of technical reading, and may also require setting up and
running simple experiments. At the start of the classroom session, the instructor will check each student’s
preparation with a quiz. Students then spend the rest of the classroom time working in groups and directly
with the instructor to thoroughly answer all questions assigned for that day, articulate problem-solving
strategies, and to approach the questions from multiple perspectives. To put it simply: fact-gathering
happens outside of class and is the individual responsibility of each student, so that class time may be
devoted to the more complex tasks of critical thinking and problem solving where the instructor’s attention
is best applied.
Classroom theory sessions usually begin with either a brief Q&A discussion or with a “Virtual
Troubleshooting” session where the instructor shows one of the day’s diagnostic question diagrams while
students propose diagnostic tests and the instructor tells those students what the test results would be
given some imagined (“virtual”) fault scenario, writing the test results on the board where all can see. The
students then attempt to identify the nature and location of the fault, based on the test results.
Each student is free to leave the classroom when they have completely worked through all problems and
have answered a “summary” quiz designed to gauge their learning during the theory session. If a student
finishes ahead of time, they are free to leave, or may help tutor classmates who need extra help.
The express goal of this “inverted classroom” teaching methodology is to help each student cultivate
critical-thinking and problem-solving skills, and to sharpen their abilities as independent learners. While
this approach may be very new to you, it is more realistic and beneficial to the type of work done in
instrumentation, where critical thinking, problem-solving, and independent learning are “must-have” skills.
14
Lab
In the lab portion of each course, students work in teams to install, configure, document, calibrate, and
troubleshoot working instrument loop systems. Each lab exercise focuses on a different type of instrument,
with a eight-day period typically allotted for completion. An ordinary lab session might look like this:
(1) Start of practical (lab) session: announcements and planning
(a) The instructor makes general announcements to all students
(b) The instructor works with team to plan that day’s goals, making sure each team member has a
clear idea of what they should accomplish
(2) Teams work on lab unit completion according to recommended schedule:
(First day) Select and bench-test instrument(s)
(One day) Connect instrument(s) into a complete loop
(One day) Each team member drafts their own loop documentation, inspection done as a team (with
instructor)
(One or two days) Each team member calibrates/configures the instrument(s)
(Remaining days, up to last) Each team member troubleshoots the instrument loop
(3) End of practical (lab) session: debriefing where each team reports on their work to the whole class
Troubleshooting assessments must meet the following guidelines:
• Troubleshooting must be performed on a system the student did not build themselves. This forces
students to rely on another team’s documentation rather than their own memory of how the system was
built.
• Each student must individually demonstrate proper troubleshooting technique.
• Simply finding the fault is not good enough. Each student must consistently demonstrate sound
reasoning while troubleshooting.
• If a student fails to properly diagnose the system fault, they must attempt (as many times as necessary)
with different scenarios until they do, reviewing any mistakes with the instructor after each failed
attempt.
file instructional
15
Distance delivery methods
Sometimes the demands of life prevent students from attending college 6 hours per day. In such cases,
there exist alternatives to the normal 8:00 AM to 3:00 PM class/lab schedule, allowing students to complete
coursework in non-traditional ways, at a “distance” from the college campus proper.
For such “distance” students, the same worksheets, lab activities, exams, and academic standards still
apply. Instead of working in small groups and in teams to complete theory and lab sections, though, students
participating in an alternative fashion must do all the work themselves. Participation via teleconferencing,
video- or audio-recorded small-group sessions, and such is encouraged and supported.
There is no recording of hours attended or tardiness for students participating in this manner. The pace
of the course is likewise determined by the “distance” student. Experience has shown that it is a benefit for
“distance” students to maintain the same pace as their on-campus classmates whenever possible.
In lieu of small-group activities and class discussions, comprehension of the theory portion of each course
will be ensured by completing and submitting detailed answers for all worksheet questions, not just passing
daily quizzes as is the standard for conventional students. The instructor will discuss any incomplete and/or
incorrect worksheet answers with the student, and ask that those questions be re-answered by the student
to correct any misunderstandings before moving on.
Labwork is perhaps the most difficult portion of the curriculum for a “distance” student to complete,
since the equipment used in Instrumentation is typically too large and expensive to leave the school lab
facility. “Distance” students must find a way to complete the required lab activities, either by arranging
time in the school lab facility and/or completing activities on equivalent equipment outside of school (e.g.
at their place of employment, if applicable). Labwork completed outside of school must be validated by a
supervisor and/or documented via photograph or videorecording.
Conventional students may opt to switch to “distance” mode at any time. This has proven to be a
benefit to students whose lives are disrupted by catastrophic events. Likewise, “distance” students may
switch back to conventional mode if and when their schedules permit. Although the existence of alternative
modes of student participation is a great benefit for students with challenging schedules, it requires a greater
investment of time and a greater level of self-discipline than the traditional mode where the student attends
school for 6 hours every day. No student should consider the “distance” mode of learning a way to have
more free time to themselves, because they will actually spend more time engaged in the coursework than
if they attend school on a regular schedule. It exists merely for the sake of those who cannot attend during
regular school hours, as an alternative to course withdrawal.
file distance
16
Metric prefixes and conversion constants
•
•
•
•
•
•
•
•
•
•
•
•
•
•
•
•
•
•
•
•
•
Metric prefixes
Yotta = 1024 Symbol: Y
Zeta = 1021 Symbol: Z
Exa = 1018 Symbol: E
Peta = 1015 Symbol: P
Tera = 1012 Symbol: T
Giga = 109 Symbol: G
Mega = 106 Symbol: M
Kilo = 103 Symbol: k
Hecto = 102 Symbol: h
Deca = 101 Symbol: da
Deci = 10−1 Symbol: d
Centi = 10−2 Symbol: c
Milli = 10−3 Symbol: m
Micro = 10−6 Symbol: µ
Nano = 10−9 Symbol: n
Pico = 10−12 Symbol: p
Femto = 10−15 Symbol: f
Atto = 10−18 Symbol: a
Zepto = 10−21 Symbol: z
Yocto = 10−24 Symbol: y
METRIC PREFIX SCALE
T
tera
1012
G
M
giga mega
109
106
k
kilo
103
(none)
100
m
µ
milli micro
10-3 10-6
102 101 10-1 10-2
hecto deca deci centi
h
da
d
c
•
•
•
•
•
Conversion formulae for temperature
F = (o C)(9/5) + 32
o
C = (o F - 32)(5/9)
o
R = o F + 459.67
K = o C + 273.15
o
Conversion equivalencies for distance
1 inch (in) = 2.540000 centimeter (cm)
1 foot (ft) = 12 inches (in)
1 yard (yd) = 3 feet (ft)
1 mile (mi) = 5280 feet (ft)
17
n
nano
10-9
p
pico
10-12
Conversion equivalencies for volume
1 gallon (gal) = 231.0 cubic inches (in3 ) = 4 quarts (qt) = 8 pints (pt) = 128 fluid ounces (fl. oz.)
= 3.7854 liters (l)
1 milliliter (ml) = 1 cubic centimeter (cm3 )
Conversion equivalencies for velocity
1 mile per hour (mi/h) = 88 feet per minute (ft/m) = 1.46667 feet per second (ft/s) = 1.60934
kilometer per hour (km/h) = 0.44704 meter per second (m/s) = 0.868976 knot (knot – international)
Conversion equivalencies for mass
1 pound (lbm) = 0.45359 kilogram (kg) = 0.031081 slugs
Conversion equivalencies for force
1 pound-force (lbf) = 4.44822 newton (N)
Conversion equivalencies for area
1 acre = 43560 square feet (ft2 ) = 4840 square yards (yd2 ) = 4046.86 square meters (m2 )
Conversion equivalencies for common pressure units (either all gauge or all absolute)
1 pound per square inch (PSI) = 2.03602 inches of mercury (in. Hg) = 27.6799 inches of water (in.
W.C.) = 6.894757 kilo-pascals (kPa) = 0.06894757 bar
1 bar = 100 kilo-pascals (kPa) = 14.504 pounds per square inch (PSI)
Conversion equivalencies for absolute pressure units (only)
1 atmosphere (Atm) = 14.7 pounds per square inch absolute (PSIA) = 101.325 kilo-pascals absolute
(kPaA) = 1.01325 bar (bar) = 760 millimeters of mercury absolute (mmHgA) = 760 torr (torr)
Conversion equivalencies for energy or work
1 british thermal unit (Btu – “International Table”) = 251.996 calories (cal – “International Table”)
= 1055.06 joules (J) = 1055.06 watt-seconds (W-s) = 0.293071 watt-hour (W-hr) = 1.05506 x 10¹⁰
ergs (erg) = 778.169 foot-pound-force (ft-lbf)
Conversion equivalencies for power
1 horsepower (hp – 550 ft-lbf/s) = 745.7 watts (W) = 2544.43 british thermal units per hour
(Btu/hr) = 0.0760181 boiler horsepower (hp – boiler)
Acceleration of gravity (free fall), Earth standard
9.806650 meters per second per second (m/s2 ) = 32.1740 feet per second per second (ft/s2 )
18
Physical constants
Speed of light in a vacuum (c) = 2.9979 × 10⁸ meters per second (m/s) = 186,281 miles per second
(mi/s)
Avogadro’s number (NA ) = 6.022 × 10²³ per mole (mol−1 )
Electronic charge (e) = 1.602 × 10⁻¹⁹ Coulomb (C)
Boltzmann’s constant (k) = 1.38 × 10⁻²³ Joules per Kelvin (J/K)
Stefan-Boltzmann constant (σ) = 5.67 × 10⁻⁸ Watts per square meter-Kelvin4 (W/m2 ·K4 )
Molar gas constant (R) = 8.314 Joules per mole-Kelvin (J/mol-K)
Properties of Water
Freezing point at sea level = 32o F = 0o C
Boiling point at sea level = 212o F = 100o C
Density of water at 4o C = 1000 kg/m3 = 1 g/cm3 = 1 kg/liter = 62.428 lb/ft3 = 1.94 slugs/ft3
Specific heat of water at 14o C = 1.00002 calories/g·o C = 1 BTU/lb·o F = 4.1869 Joules/g·o C
Specific heat of ice ≈ 0.5 calories/g·o C
Specific heat of steam ≈ 0.48 calories/g·o C
Absolute viscosity of water at 20o C = 1.0019 centipoise (cp) = 0.0010019 Pascal-seconds (Pa·s)
Surface tension of water (in contact with air) at 18o C = 73.05 dynes/cm
pH of pure water at 25o C = 7.0 (pH scale = 0 to 14)
Properties of Dry Air at sea level
Density of dry air at 20o C and 760 torr = 1.204 mg/cm3 = 1.204 kg/m3 = 0.075 lb/ft3 = 0.00235
slugs/ft3
Absolute viscosity of dry air at 20o C and 760 torr = 0.018 centipoise (cp) = 1.8 × 10⁻⁵ Pascalseconds (Pa·s)
file conversion constants
19
Question 0
How to get the most out of academic reading:
• Articulate your thoughts as you read (i.e. “have a conversation” with the author). This will develop
metacognition: active supervision of your own thoughts. Write your thoughts as you read, noting
points of agreement, disagreement, confusion, epiphanies, and connections between different concepts
or applications. These notes should also document important math formulae, explaining in your own
words what each formula means and the proper units of measurement used.
• Outline, don’t highlight! Writing your own summary or outline is a far more effective way to comprehend
a text than simply underlining and highlighting key words. A suggested ratio is one sentence of your
own thoughts per paragraph of text read. Note points of disagreement or confusion to explore later.
• Work through all mathematical exercises shown within the text, to ensure you understand all the steps.
• Imagine explaining concepts you’ve just learned to someone else. Teaching forces you to distill concepts
to their essence, thereby clarifying those concepts, revealing assumptions, and exposing misconceptions.
Your goal is to create the simplest explanation that is still technically accurate.
• Write your own questions based on what you read, as though you are a teacher preparing to test
students’ comprehension of the subject matter.
How to effectively problem-solve and troubleshoot:
• Study principles, not procedures. Don’t be satisfied with merely knowing how to compute solutions –
learn why those solutions work. In mathematical problem-solving this means being able to identify the
practical meaning (and units of measurement) of every intermediate calculation. In other words, every
step of your solution should make logical sense.
• Sketch a diagram to help visualize the problem. When building a real system, always prototype it on
paper and analyze its function before constructing it.
• Identify what it is you need to solve, identify all relevant data, identify all units of measurement, identify
any general principles or formulae linking the given information to the solution, and then identify any
“missing pieces” to a solution. Annotate all diagrams with this data.
• Perform “thought experiments” to explore the effects of different conditions for theoretical problems.
When troubleshooting real systems, perform diagnostic tests rather than visually inspecting for faults.
• Simplify the problem and solve that simplified problem to identify strategies applicable to the original
problem (e.g. change quantitative to qualitative, or visa-versa; substitute easier numerical values;
eliminate confusing details; add details to eliminate unknowns; consider simple limiting cases; apply an
analogy). Often you can add or remove components in a malfunctioning system to simplify it as well
and better identify the nature and location of the problem.
• Work “backward” from a hypothetical solution to a new set of given conditions.
How to create more time for study:
• Kill your television and video games. Seriously – these are incredible wastes of time.
distractions (e.g. cell phone, internet, socializing) in your place and time of study.
Eliminate
• Use your “in between” time productively. Don’t leave campus for lunch. Arrive to school early. If you
finish your assigned work early, begin studying the next day’s material.
Above all, cultivate persistence. Persistent effort is necessary to master anything non-trivial. The keys
to persistence are (1) having the desire to achieve that mastery, and (2) realizing challenges are normal and
not an indication of something gone wrong. A common error is to equate easy with effective: students often
believe learning should be easy if everything is done right. The truth is that mastery never comes easy!
file question0
20
Creative Commons License
This worksheet is licensed under the Creative Commons Attribution License, version 1.0. To view
a copy of this license, visit http://creativecommons.org/licenses/by/1.0/ or send a letter to Creative
Commons, 559 Nathan Abbott Way, Stanford, California 94305, USA. The terms and conditions of this
license allow for free copying, distribution, and/or modification of all licensed works by the general public.
Simple explanation of Attribution License:
The licensor (Tony Kuphaldt) permits others to copy, distribute, display, and otherwise use this
work. In return, licensees must give the original author(s) credit. For the full license text, please visit
http://creativecommons.org/licenses/by/1.0/ on the internet.
More detailed explanation of Attribution License:
Under the terms and conditions of the Creative Commons Attribution License, you may make freely
use, make copies, and even modify these worksheets (and the individual “source” files comprising them)
without having to ask me (the author and licensor) for permission. The one thing you must do is properly
credit my original authorship. Basically, this protects my efforts against plagiarism without hindering the
end-user as would normally be the case under full copyright protection. This gives educators a great deal
of freedom in how they might adapt my learning materials to their unique needs, removing all financial and
legal barriers which would normally hinder if not prevent creative use.
Nothing in the License prohibits the sale of original or adapted materials by others. You are free to
copy what I have created, modify them if you please (or not), and then sell them at any price. Once again,
the only catch is that you must give proper credit to myself as the original author and licensor. Given that
these worksheets will be continually made available on the internet for free download, though, few people
will pay for what you are selling unless you have somehow added value.
Nothing in the License prohibits the application of a more restrictive license (or no license at all) to
derivative works. This means you can add your own content to that which I have made, and then exercise
full copyright restriction over the new (derivative) work, choosing not to release your additions under the
same free and open terms. An example of where you might wish to do this is if you are a teacher who desires
to add a detailed “answer key” for your own benefit but not to make this answer key available to anyone
else (e.g. students).
Note: the text on this page is not a license. It is simply a handy reference for understanding the Legal
Code (the full license) - it is a human-readable expression of some of its key terms. Think of it as the
user-friendly interface to the Legal Code beneath. This simple explanation itself has no legal value, and its
contents do not appear in the actual license.
file license
21
Questions
Question 1
We will begin our introduction to the second year of the Instrumentation program by brainstorming
responses to a few questions:
(1) What are your goals in this program? Why did you enroll in it and what do you expect
to get out of it?
(2) What career options exist within the field of instrumentation and control?
(3) What knowledge and skills are most important for your success in this career? Or, to state
it differently, what benefit do employers get in return for the wages they pay you?
file i00001
22
Question 2
Use a computer to navigate to the “Socratic Instrumentation” website:
http://www.ibiblio.org/kuphaldt/socratic/sinst
When you get there, click on the link for the quarter (Summer, Fall, Winter, or Spring) you are enrolled
in, and download the INST200 “Introduction to Instrumentation” course worksheet. Today’s classroom
session will cover Day 1 of this worksheet.
Near the very beginning of this document, as is the case for all the 200-level Instrumentation course
worksheets, you will find a page titled “How To . . .”. Locate this page and read it thoroughly, as you will
be quizzed on its contents throughout the INST200 course. The “How to . . .” tips make reference to a
“Question 0” which is another page found in every course worksheet. Read the points listed in Question 0
as well.
Your instructor will also hand out copies of a release form (“FERPA form”) which you may sign to grant
permission to share your academic performance records with employers. This is voluntary, not mandatory.
Without signed consent from student, federal law prohibits any instructor from sharing academic records
with anyone but the student and appropriate college employees.
Your instructor will also have electronic copies (e.g.
flash drive and/or CD-ROM) of the
“Instrumentation Reference” on hand for you to copy to your personal computer. This is a collection of files,
mostly obtained from various manufacturers’ websites with their permission, of tutorials and reports and
technical manuals which you will be assigned to read throughout the second-year courses. The purpose of this
Reference is to provide you with fast, off-line access so that you need not search the internet for these assigned
documents. There is a file in the root directory of this Reference named “00 index OPEN THIS FILE.html”
you should open using a web browser. The hyperlinks within this HTML index file make it much easier to
find the document(s) you’re looking for than it would be scanning the various directories within the Reference
to peruse filenames.
Suggestions for Socratic discussion
• One of the purposes of this exercise is to practice active reading strategies, where you interact with the
text to identify and explore important principles. An effective strategy is to write any thoughts that
come to mind as you are reading the text. Describe how this active reading strategy might be useful in
daily homework assignments.
• For each and every one of the points listed in the “How To . . .” and “Question 0” pages, identify why
these points are important to your ultimate goal of becoming an instrument technician.
• Identify how the INST200-level course design and expectations differ from what you have experienced
in the past as students, and explain why these differences exist.
file i00002
23
Question 3
Near the beginning of every course worksheet there are some pages titled “General Values and
Expectations”. Your instructor will read through all these expectations with you and answer any questions
you have about them. Feel free to read this document in advance and bring questions with you to class for
answering. These expectations reference “Question 0” which is also found in every course worksheet, and
which you will want to read through as well.
Suggestions for Socratic discussion
• For each and every one of the points listed in the “General Expectations” pages, identify why these
points are important to your ultimate goal of becoming an instrument technician.
• Identify how the INST200-level course design and expectations differ from what you have experienced
in the past as students, and explain why these differences exist.
• One of the purposes of this exercise is to practice active reading strategies, where you interact with the
text to identify and explore important principles. An effective strategy is to write any thoughts that
come to mind as you are reading the text. Describe how this active reading strategy might be useful in
daily homework assignments.
file i00003
Question 4
One of the unique features of this program is the inclusion of mastery exams, where students must
answer questions with 100% accuracy in order to pass. Conventional “proportional” exams allow students
to pass if a certain minimum score is achieved. The problem with this testing strategy is that students may
not actually learn all the concepts they’re supposed to, but may still pass the exam if they are strong enough
in the other concepts covered in that assessment. The purpose of mastery exams is to guarantee proficiency
in all critical concepts and not just some.
Your instructor will hand out copies of the mastery exam for the INST200 “Introduction to
Instrumentation” course, covering several critical concepts of circuit analysis taught in the first year of
the Instrumentation program. Do your best to answer all the questions correctly. If you get any incorrect
on the first attempt, the instructor will mark which sections (not which questions) you missed and return it
to you for one more attempt. If a mastery exam is not passed by the second attempt, it counts as a failed
exam.
Mastery exams may be re-taken any number of times with no grade penalty. The purpose is to give
students the constructive feedback and practice that they need in order to master all the concepts represented
on the exam. Every mastery exam must be passed before the next scheduled exam is given in order to receive
a passing grade for that course, a period of approximately 2 weeks. If any student is not able to pass a mastery
exam with 100% accuracy by the deadline date, they will receive an “F” grade for that course, and must
re-take the course again during some future quarter.
The INST200 mastery exam is given for the purpose of exposing students to this unique type of
assessment. Failing to pass the INST200 mastery exam will not result in a failing grade for the INST200
course, but students should be warned that poor performance on this exam often marks trouble in future
Instrumentation courses, since so much of the second year’s material builds on what was taught during the
first year.
file i01230
24
Question 5
Locate the question in your worksheet outlining the lab project for this course section. What
information is given to you here to help you construct the lab project? Which objectives must be completed
individually, versus as a team? How does a “mastery” objective differ from a “proportional” objective?
file i03856
25
Question 6
Read the “Teaching Technical Theory” section of Appendix D (“How to Use This Book – Some Advice
for Teachers”) in your Lessons In Industrial Instrumentation textbook. This will serve as the basis for a
discussion on why the second-year Instrumentation courses are not lecture-based.
Imagine a child wishing to learn how to ride a bicycle. Seeking knowledge on the subject, the child
approaches an adult asking for that adult to explain how to ride a bike. The adult responds with a detailed
and thorough explanation of bicycle riding, including all the relevant safety rules. After this explanation
concludes, will the child be able to ride a bicycle? Now imagine that same child reading a book on bicycle
riding. The book is well-written and filled with clear illustrations to aid understanding. After finishing this
book, will the child be able to ride a bicycle? Now imagine that same child watching a demonstration video
on bicycle riding. The video is professionally shot, with very clear views on technique. The actor in the
video does a great job explaining all the important aspects of bicycle riding. After watching the video in its
entirety, will the child be able to ride a bicycle?
It should be obvious at this point that there is more to learning how to ride a bicycle than merely being
shown how to do so. Bike riding is a skill born of practice. Instruction may be necessary to learn how to
ride a bicycle safely, but instruction in itself is not sufficient to learn how to ride a bicycle safely – you must
actively attempt riding a bicycle before all the pieces of information come together such that you will be
proficient. What is it about bicycle riding that necessitates practice in order to learn?
Now imagine someone wishing to learn how to write poetry. Seeking knowledge on the subject, this
person consults poets for advice, reads books of poetry and books about writing poetry, and even listens to
audio recordings of poets presenting their work in public. After all this instruction and research, will the
person be a proficient poet?
Here we have the same problem we had with learning to ride a bicycle: instruction may be a necessary
part of learning to write poems, but instruction in itself is not sufficient to become a poet. One must actively
write their own poems to become good at it. What is it about poetry that necessitates practice in order to
learn how to write it?
The fundamental principle here is that we master that which we practice, because the brain strengthens
neural pathways through repeated use. There is nothing unique about bicycle riding or poetry in this regard:
if you wish to master any skill you must repeatedly do that skill. The problem with learning about bicycleriding or poetry from other people is that you aren’t doing any bicycle riding or poetry yourself. The most
valuable assistance any learner can receive is prompt and constructive feedback during the learner’s practice.
Think of a child attempting to ride a bicycle with an adult present to observe and give practical advice;
or of a person learning poetry, submitting their poems to an audience for review and then considering that
feedback before writing their next poem.
When we research which skills are most valuable to instrument technicians, we find self-directed learning
and general problem-solving top the list. These skills, like any other, require intensive practice to master.
Furthermore, that practice will be optimized with prompt and expert feedback. In order to optimally prepare
students to become instrument technicians, then, those students must be challenged to learn on their own
and to individually solve problems, with the instructor coaching them on both activities.
Here is where schools tend to cheat students: the majority of class time is spent presenting information
to students, rather than giving students opportunity to practice their problem-solving skills. This is primarily
the consequence of lecture being the dominant mode of teaching, where a live instructor must spend hour
upon hour verbally presenting information to students, leaving little or no time for those students to solve
problems and sharpen their critical thinking skills. Assigned homework does a poor job of providing practice
because the student doesn’t receive detailed feedback on their problem-solving strategies, and also because
many students cheat themselves by receiving inappropriate help from their classmates. Furthermore, lecture
is the antithesis of self-directed learning, being entirely directed by a subject matter expert. The skills
practiced by students during a lecture (e.g. taking dictation on lengthy presentations) have little value in
the career of an instrument technician. More time in school could be spent practicing more relevant skills,
but only if some other mode of instruction replaces lecture.
26
Not only does lecture displace more valuable activities in the classroom, but lecture isn’t even that good of
an instructional technique. Among the serious shortcomings of lecture are the following:
• Students’ attentions tend to drift over the span of any lecture of significant length.
• Lecture works well to communicate facts and procedures but fails at getting students to think for
themselves, because the focus and pace of any lecture is set by the lecturer and not the students.
• Lecture instills a false sense of confidence in students, because complex tasks always look easier than
they are when you watch an expert do it without trying it yourself. (An oft-heard quote from students
in lecture-based classes: “I understand things perfectly during lecture, but for some reason I just can’t
seem to do the homework on my own!”)
• A lecturer cannot customize (“differentiate”) instruction for individual students. Rather, everyone gets
the exact same presentation (e.g. the same examples, the same pace) regardless of their diverse needs.
The pace of lecture is perhaps the most obvious example of this problem: since the lecturer can only
present at one pace, he or she is guaranteed to bore some students by going to slow for them and/or
lose others by going too fast for them.
• Students cannot “rewind” a portion of lecture they would like to have repeated without asking the entire
class to repeat as well.
• Students’ must simultaneously dictate notes while trying to watch and listen and think along with the
instructor, a difficult task at best. Multitasking is possible only for simple tasks, none of them requiring
intense focus.
• If the instructor commits some form of verbal error and doesn’t realize it (which is very common because
it’s difficult to simultaneously present and self-evaluate), it is incumbent upon the students to identify
the error and ask for clarification.
• The instructor cannot accurately perceive how each and every student is understanding the presentation,
because the instructor is too busy presenting. Body language during the lecture isn’t a reliable enough
indicator of student understanding, and the time taken by lecture precludes the instructor visiting every
student to inspect their work.
• Lecture instills an attitude of dependence on students by reinforcing the notion they need to personally
consult an expert in order to learn anything new. This discourages students from even trying to learn
complex things on their own.
For these reasons – the fact that lecture displaces class time better spent coaching students to solve
problems, as well as the many problems of lecture as an instructional mode – there is almost no lecture in
any of the 200-level Instrumentation courses at BTC. Instead, students learn the basic facts and procedures
of the subject matter through reading assignments prior to class, then spend class time solving problems and
demonstrating their understanding of each day’s major topic(s) before leaving. This is called an inverted
classroom because the classroom and homework roles are swapped: what is traditionally lectured on in
class is instead done on the students’ time outside of class, while the problem-solving traditionally done as
homework is instead completed during class time while the instructor is available to coach. This format is
highly effective not only for learning the basic concepts of instrumentation, but also for improving technical
reading and critical thinking skills, simply because it requires students to practice the precise skills they must
master.
The primary reason reading was chosen as the preferred mode of instruction is feedback from employers
as well as observations of student behavior, both sources revealing an aversion to technical reading. Some
employers (most notably the BP oil refinery in Carson, California) noted reading comprehension as being
the weakest area when testing BTC students during recruiting trips. Also, a failure to reference equipment
manuals when working on real systems is a chronic problem both for novice technicians in a wide range
of industries as well as students learning in a lab environment. Given the fact that far more high-quality
technical information is available for continued learning in this career than high-quality videos, reading
comprehension is a vital skill for technicians to keep their knowledge up to date as technology advances.
27
Prior to 2006 all 200-level Instrumentation courses were strictly taught by lecture. Making matters
worse, many of the courses had no textbook, and homework was seldom assigned. All 200-level exams
prioritized rote memorization and execution of procedural problem-solving over creative problem-solving
and synthesis of multiple concepts. It was common for second-year students to flounder when presented with
a new piece of equipment or a new type of problem, because no instructor can teach procedures to cover any
and all possible challenges.
Since 2006 the 200-level Instrumentation courses have gradually morphed from lecture to “inverted”
format, with measurable gains in learning. Proportional exam scores from the Fall quarter courses (INST240,
INST241, and INST242 – those courses where the content has remained most stable over this time span)
demonstrate this, each histogram showing the number of students (vertical axis) achieving a certain exam
score (horizontal axis):
Fall 2006: limited text resources for students (no standard textbook for the curriculum), classroom format a mixture of lecture and group discussion
2
2
1
1
1
1
1
0
0
0
0
0
INST242 exam
Fall 2006
0-9
10-19
40-49
30-39
20-29
50-59
80-89
60-69
90-100
70-79
0-9
10-19
40-49
20-29
50-59
30-39
80-89
60-69
90-100
4
70-79
0-9
0-9
0-9
10-19
40-49
30-39
20-29
50-59
80-89
60-69
90-100
70-79
10-19
2
40-49
2
30-39
3
2
20-29
3
50-59
3
90-100
3
80-89
3
60-69
5
4
70-79
6
5
4
10-19
6
5
4
40-49
6
5
4
30-39
6
5
20-29
6
50-59
7
80-89
7
60-69
INST241 flow exam
Fall 2006
7
90-100
INST241 temp. exam
Fall 2006
7
70-79
INST240 level exam
Fall 2006
7
INST240 pressure exam
Fall 2006
Average score = 83.56%
Average score = 72.05%
Average score = 70.63%
Average score = 55.53%
Average score = 68.60%
Standard deviation = 8.19%
Standard deviation = 17.03%
Standard deviation = 19.54%
Standard deviation = 18.25%
Standard deviation = 21.48%
Cumulative exam score average for Fall quarter 2006 = 70.07%
Cumulative exam score standard deviation for Fall 2006 = 19.27%
Fall 2009: Lessons In Industrial Instrumentation textbook available to students, classroom format still a mixture of lecture and group discussion
Exam complexity increased significantly since the introduction of the new textbook in 2008
INST241 flow exam
Fall 2009
INST242 exam
Fall 2009
14
14
14
12
12
12
12
12
10
10
10
10
10
8
8
8
8
8
6
6
6
6
6
4
4
4
4
0-9
10-19
20-29
40-49
30-39
90-100
0-9
10-19
20-29
40-49
50-59
30-39
60-69
80-89
90-100
70-79
0-9
10-19
20-29
40-49
30-39
50-59
90-100
80-89
60-69
70-79
0-9
10-19
20-29
40-49
30-39
50-59
60-69
80-89
90-100
70-79
0-9
10-19
40-49
30-39
20-29
50-59
60-69
2
0
80-89
2
0
90-100
2
0
70-79
2
0
50-59
4
2
0
60-69
INST241 temp. exam
Fall 2009
14
80-89
INST240 level exam
Fall 2009
14
70-79
INST240 pressure exam
Fall 2009
Average score = 74.15%
Average score = 71.79%
Average score = 76.61%
Average score = 69.39%
Average score = 78.97%
Standard deviation = 23.90%
Standard deviation = 24.71%
Standard deviation = 23.25%
Standard deviation = 20.65%
Standard deviation = 15.64%
Cumulative exam score average for Fall quarter 2009 = 74.18%
Cumulative exam score standard deviation for Fall 2009 = 21.88%
Fall 2013: Lessons in Industrial Instrumentation textbook greatly expanded, classroom format fully inverted (i.e. no lecture)
Mastery exam complexity increased significantly since 2009, requiring broader competence and leaving less time to complete proportional exams
INST241 flow exam
Fall 2013
INST242 exam
Fall 2013
(18)
14
14
14
14
14
12
12
12
12
12
10
10
10
10
10
8
8
8
8
8
6
6
6
6
6
4
4
4
4
0-9
10-19
20-29
40-49
30-39
90-100
0-9
10-19
20-29
40-49
50-59
30-39
60-69
80-89
90-100
70-79
0-9
10-19
20-29
40-49
30-39
50-59
90-100
80-89
60-69
70-79
0-9
10-19
20-29
40-49
30-39
50-59
60-69
80-89
90-100
70-79
0-9
10-19
40-49
30-39
20-29
50-59
60-69
2
0
80-89
2
0
90-100
2
0
70-79
2
0
50-59
4
2
0
60-69
INST241 temp. exam
Fall 2013
80-89
INST240 level exam
Fall 2013
70-79
INST240 pressure exam
Fall 2013
Average score = 82.35%
Average score = 73.16%
Average score = 71.03%
Average score = 80.24%
Average score = 82.44%
Standard deviation = 12.17%
Standard deviation = 16.78%
Standard deviation = 13.88%
Standard deviation = 12.71%
Standard deviation = 8.98%
Cumulative exam score average for Fall quarter 2013 = 77.85%
Cumulative exam score standard deviation for Fall 2013 = 13.89%
Note the general improvement in average exam scores (2009) toward the end of the quarter, despite
the exams being more complex than they were in 2006. Students were held accountable for the assigned
28
textbook reading with graded “prep quizzes” at the beginning of each class session. Note also how the
standard deviations increased, representing a greater degree of “spread” between student performance on
these exams. The increased standard deviation shows some students falling behind their peers, since lecture
was not providing for their needs with a more challenging curriculum.
In the third set of histograms (2013) we see general increases in average scores as well as marked
improvements in standard deviation across the board (showing fewer students “left behind” their peers).
The inverted classroom format allows the instructor to spend one-on-one time with each and every student
to probe for misconceptions and offer assistance when needed. This kind of differentiated instruction is
impossible in a lecture format. Even more remarkable is the fact that the exam complexity increased
since 2009, with longer mastery exams (reviewing concepts from previous courses including first-year circuit
principles) and more complex proportional exams. In 2013 the exams so fully exhausted the 3-hour testing
period that graded results could no longer be given before the end of the day, and instead had to wait until
the following day. Yet, despite this increased rigor exam scores increased and standard deviation narrowed.
One of the most striking improvements realized since abandoning lecture is the ease of which students
grasp some of the more complex concepts throughout the year. These concepts used to be difficult to convey
in a lecture format (mostly due to pacing problems, since different students would get “stuck” at different
points in the presentation), and so long as some lecture existed in the classroom students would tend to
give up when they encountered difficult concepts in the assigned reading (knowing they could rely on the
instructor to lecture on these tough concepts in class):
•
•
•
•
•
•
•
•
•
•
•
•
•
•
•
INST230 course: Three-phase electric power system calculations
INST230 course: Normally-open versus normally-closed contact status
INST240 course: Interface liquid level measurement (hydrostatic and displacer)
INST240/250 courses: Force-balance versus motion-balance pneumatic mechanisms
INST241 course: Coriolis mass flowmeters
INST242 course: Gas chromatograph operation
→ Not only are students able to fully grasp basic GC operation in only one day, but they are also able
to tackle multi-column GCs as well!
INST242 course: Non-dispersive optical analyzers (NDIR, Luft detectors, etc.)
→ Comprehension of this topic used to be a real struggle, with a good percentage of students failing
to grasp filter cells and Luft detectors by the end of the first day. Now this concept comes easily
to all in one day.
INST250 course: Fluid power system analysis (hydraulic and pneumatic diagrams)
INST250 course: Split-ranged control valve sequencing
INST250 course: Control valve characterization
→ Comprehension of this topic is so much better now that I’ve had to modify that day’s learning
activities to provide more challenge than in past years.
INST252/263 courses: Feedforward control strategies
→ Dynamic compensation in particular used to be such a struggle to teach that most students really
didn’t seem to “get” the concept after repeated explanations. Now it’s no more challenging than
any other control concept we tackle in the program.
INST252 course: Loop stability analysis (based on trend recordings)
INST260 course: Data acquisition hardware connections (e.g. differential vs. single-ended connections)
INST262 course: FOUNDATION Fieldbus and wireless (radio) digital communications
→ The first year I taught FOUNDATION Fieldbus using an inverted classroom, my students knew
the topic better than our guest lecturer who I invited to present on the subject! The students’
only exposure to FOUNDATION Fieldbus at that point was one night’s study prior to the guest’s
appearance.
INST263 course: Selector and override controls
This improvement in student learning has been verified by industry representatives, when they are
invited to come to BTC to review certain complex topics such as Fieldbus, WirelessHART, and control
valves. The general feedback they give is that BTC students are unusually well-prepared on these subjects.
The “secret” of course is that students learning in an inverted classroom format spend more time immersed
29
in the subject matter, and the feedback they receive from their instructors in class is better tailored to their
individual learning needs.
Another significant gain realized since abandoning lecture is the immediate placement of inexperienced
BTC Instrumentation graduates in jobs typically reserved for engineers with 4-year degrees. This simply did
not happen when BTC’s Instrumentation program was lecture-based, and it is due to the fact that students
explicitly learn higher-order thinking skills when they must gather information on their own outside of class
and then demonstrate critical thinking before an instructor every day. This has happened once in December
2011, again in December 2012, again in March 2013, and again in August 2013.
Yet, despite the gains realized by abandoning lecture in favor of an “inverted” teaching format, some
students are highly resistant to the concept. Some of the critical comments routinely heard from students
against the inverted format are as follows:
(1) “I learn better in a lecture format.”
(2) “My learning style is visual, which means I need to see someone solve the problems for me.”
(3) “When I arrive to class after doing the assigned reading and trying to solve the homework problems, I’m
completely lost.”
Discuss each of these comments in detail. Here are some starting points for conversation:
(1) What does it mean to learn something better? How may a student measure how well they’ve learned
something new? What, exactly, is it that is learned better in lecture? Is there anything significant that
students don’t learn in a lecture?
(2) Would someone with an auditory or kinesthetic learning style fare any better in an inverted classroom?
Does a visual learning style preclude effective reading, or independent learning? Are learning styles real
or merely perceived? Are learning styles immutable (i.e. permanent), or is it possible for people to
cultivate new learning styles?
(3) What does it mean if a student is lost after completing the homework for an inverted class, assuming a
significant number of their classmates are not lost? What would be an appropriate course of action to
take in response to this condition?
file i00004
30
Question 7
You may find the course structure and format of the INST courses to be quite different from what you
have experienced elsewhere in your education. For each of the following examples, discuss and explain the
rationale. What do you think is the greater purpose for each of these course attributes and policies?
• Homework consists of studying new subjects prior to arriving to class for the theory sessions. Students’
primary source of new information is in the form of written materials: textbooks, reports, and
manufacturer’s literature. Daily quizzes at the start of each class session hold students accountable for
this preparatory learning. Why study new subjects outside of class, instead of doing normal homework
that reviews subjects previously covered in class? Why the strong emphasis on reading as a mode of
learning?
• Classroom sessions are not lecture-oriented. Rather, classroom sessions place students in an active role
discussing, questioning, and investigating what they’re learned from their independent studies. Learning
new facts (knowledge) and how to interpret them (comprehension) is the students’ responsibility, and it
happens before class rather than during class. Class time is devoted to higher-level thinking (application,
analysis, synthesis, and evaluation). What’s wrong with lecture, especially when the overwhelming
majority of classes in the world are taught this way?
• Students are expected to track their own academic progress using a computer spreadsheet to calculate
their own course grades as they progress through each school quarter. Why not simply present the grades
to students?
• Students must explicitly apply “sick hours” to their absences (this is not automatically done by the
instructor!), and seek donations from classmates if they exceed their allotment for a quarter. Why not
simply allow a fixed number of permitted absence for each student, or let the instructor judge the merits
of each student’s absence on a case-by-case basis?
• Mastery exams, where students must answer all questions with 100% accuracy. What’s wrong with
regular exams, where a certain minimum percentage of correct answers is all that’s necessary to pass?
• Students may submit optional, ungraded assignments called “feedback questions” to the instructor at the
end of most course sections in order to check their preparedness for the higher-level thinking challenges
of the upcoming exam. Why in the world would anyone do work that doesn’t contribute to their grade?
• Troubleshooting exercises in lab and diagnostic questions in homework, where students must
demonstrate sound reasoning in addition to properly identifying the problem(s). Isn’t it enough that the
student simply finds the fault?
• Extra credit is offered for students wishing to improve their grades, but this extra credit is always in the
form of practical and realistic work relevant to the specific course in which the extra credit is desired.
Why doesn’t unrelated work count?
file i03484
31
Question 8
Explain the difference between a mastery assessment and a proportional-graded assessment. Given
examples of each in the course(s) you are taking.
file i00113
Question 9
Participation is always an important factor in student success, both in being able to learn enough to
pass the assessments given in a course, and also to fulfill certain policy expectations. It is vital that students
learn to manage their time and life outside of school so that their time in school is well-spent. This carries
over to work ethic and the ability to contribute fully on the job. Your instructor’s duty is to prepare you
for the rigors of the workplace as instrument technicians, and the policies of the courses are set up to reflect
this reality.
Explain the attendance policy in these courses, according to the syllabi.
file i00115
Question 10
If and when you are unable to attend school for any reason, you need to contact both your instructor
and your team-mates. Explain why.
file i00116
Question 11
You are required to prepare for the classroom (theory) session by completing any reading assignments
and/or attempting to answer worksheet questions assigned for each day, before arriving to class. This
necessarily involves substantial independent research and problem-solving on your part.
What should you do if you encounter a question that completely mystifies you, and you have no idea
how to answer it? By the same token, what should you do if you encounter a section of the required reading
that you just can’t seem to understand?
file i00122
Question 12
Watch the US Chemical Safety Board video on the 2005 Texas City oil refinery explosion (available
on such Internet video sites as YouTube, and at the USCSB website directly), and answer the following
questions:
• What factors caused the explosion to occur?
• How was instrumentation involved in this accident?
• What precautions could have prevented the accident?
Now, shift your focus to this program of study you are engaged in here. Given the context of what you
have just seen (dangerous environments, complex systems), identify some of the skills and traits you will
need at the workplace as an instrument technician, and identify how you may gain these skills and traits
while in school.
file i03852
32
Question 13
Read and discuss the bullet-point suggestions given in “Question 0” of this worksheet on how to maximize
your reading effectiveness. Then, apply these tips to an actual document: pages 81 through 89 of the Report
of the President’s Commission on The Accident at Three Mile Island, where the prologue to the “Account
of the Accident” chapter explains the basic workings of a nuclear power plant.
After taking about half an hour in class to actively read these nine pages – either individually or in
groups – discuss what you were able to learn about nuclear power plant operation from the text, and also
how active reading helps you maximize the learning experience.
file i03861
33
Question 14
Suppose an ammeter inserted between test point C and the nearest lead of resistor R2 registers 10 mA
in this series-parallel circuit:
R3
C
A
E
1 kΩ
R2
1 kΩ
R1
B
1 kΩ
F
D
10 mA
(24 volts
voltage-limited)
Identify the likelihood of each specified fault for this circuit. Consider each fault one at a time (i.e. no
coincidental faults), determining whether or not each fault could independently account for all measurements
and symptoms in this circuit.
Fault
R1 failed open
R2 failed open
R3 failed open
R1 failed shorted
R2 failed shorted
R3 failed shorted
Current source dead
Possible
Impossible
Suggestions for Socratic discussion
• Identify which fundamental principles of electric circuits apply to each step of your analysis of this
circuit. In other words, be prepared to explain the reason(s) “why” for every step of your analysis,
rather than merely describing those steps.
• This type of problem-solving question is common throughout the Instrumentation course worksheets.
What specific skills will you build answering questions such as this? How might these skills be practical
in your chosen career?
• An assumption implicit in this activity is that it is more likely a single fault occurred than multiple,
coincidental faults. Identify realistic circumstances where you think this would be a valid assumption.
Hint: research the philosophical proverb called Occam’s Razor for more information! Are there any
realistic circumstances where the assumption of only one fault would not be wise?
This question is typical of those in the “Fault Analysis of Simple Circuits” worksheet found in the
Socratic Instrumentation practice worksheet collection (online), except that all answers are provided for
those questions. Feel free to use this practice worksheet to supplement your studies on this very important
topic.
file i04489
34
Question 15
An important concept in education is something called schema: the body of knowledge, expectations,
and assumptions that someone uses to interpret any form of communication they are receiving, whether
that communication be in the form of speech, text, or even something as abstract as art. One does not
approach an action-adventure novel in the same way or with the same expectations that one would approach
instructions for filing tax returns with the IRS. One does not interpret and appreciate a live jazz band in the
same way they would interpret and appreciate choral music. We have different schema for understanding and
appreciating these different forms of communication, even if they occur in the same medium (e.g. printed
text, or audible tones).
Industrial system diagrams also have schema associated with them. One does not interpret a P&ID
in the same manner that one interprets an electronic schematic or a block diagram, despite their many
similarities. This exercise will ask you to identify the meanings of similar symbols used in several types of
diagrams, in order to expose some of the schema you have (or that you are in the process of building).
Reference the following diagrams, and then answer the comparison/contrast questions that follow:
Schematic diagram of a relay circuit
A
G
N
120 VAC 1 A
H
B
H
P/S
E
D
24 VDC
1A
S
C
E
F
DE
35
Schematic diagram of a fuel tank level sensor circuit
Ignition
switch
Current mirror circuit
TP1
Fuel gauge
(voltmeter)
TP4
Q1
Q2
12 V
TP2
TP3
R1
Fuel level
sensor
5 Ω = Empty
260 Ω = Full
440 Ω
Ladder diagram of a solenoid valve control circuit
(-)
(+)
5A
O H A
1
5
S
4
CR1-1
6
1
3
8
Remote stop
Reset
7
9
11
CR1-2
5
7
CR1
3
IL-71
R
10
36
2
P&ID of a solvent storage tank
LAH
234
Set @
10 oz.
press.
PG
364
PSV
14
PG
363
Set @
8 oz.
vac.
LT
305
LSH
234
WirelessHART
2"
4"
Solvent unloading
1-1/2"
thick
S-403
Solvent storage tank
TT
109
1"
TCV
105
PG
365
H
2"
3"
Dwg. 45231
LI
305
TI
109
12"
30 PSI steam
TI
304
Dwg. 11032
PG
361
H
L
24"
MW
WirelessHART
TG
205
LSL
233
T
2"
TT
304
4"
PIR
271
2"
ET
PG
367
TG
209
PT
271
PG
368
Solvent wash
Dwg. 32451
ET
PG
366
Condensate header
PSH
231
Dwg. 11032
I
ET
PSL
232
HC
P-25
Schematic diagram of a hydraulic valve control system
HP gauge
Hand pump
Accumulator
Regulator
Line valve
LP gauge
FC
(test)
Relief, LP
Solenoid trip
Reset
Auto/Man
Relief, HP
37
Pressure pilot
H
Schematic/pictorial diagram of a pressure transmitter
Current
signal
output
−
Amplifier
"Force motor"
(applies force
proportional
to DC current)
S
+
N
Light
source
Flexure
Diaphragm
Closely-spaced
photoresistors
Applied
pressure
Pictorial diagram of an I/P transducer
OFF
% 4 to 20 mA
Coil
Bellows
mA
mA
READ VDC
N
Spring
N
Beam
Pivot
LOOP CALIBRATOR
READ
2-WIRE
TRANSMITTER
SIMULATOR
S
100%
20 mA
Coil
POWER 2-WIRE
TRANSMITTERS
SOURCE
ADJUST
S
4 mA
0%
Relay
Precision
test gauge
Vent
Fisher model 546 I/P
(schematic diagram)
Compressed
air
supply
38
Nozzle
Loop diagram of a compressor surge control system
Loop Diagram: Compressor surge control
Revised by: I. Hate Surge
Field
panel
Field process area
JB
30
0-200 PSID
+
PDT
42
4-20 mA
I
Panel rear
CBL21
JB
1
CBL24
8
-
PR1
P
FY
42b
+
2
10
3
S
FV 42
CBL22
PR2
5
6
4
L1
L2
G
6
G
L2
L1
14
15
CBL23
4-20 mA
-
0-1500 SCFM
4
AS 20 PSI
+
3
CBL26
5
13
FIC
42
2
60 Hz
ES 120VAC
11
12
-
1
CBL25
1
9
PR3
16
7
+
8
-
FY
42a
+
-
CBL27
ES 120VAC
60 Hz
9
0-1500 SCFM
Functional diagram of control loops
FT
FT
FT
D
A
P
A
I D
T
FCV
P
A
A
April 1, 2003
Panel front
4-20 mA
Compressor
FT
42
Date:
T
P
I
T
A
I
T
FCV
FCV
39
A
FOUNDATION Fieldbus function block diagram
TT-101a
OUT_D
AI
OUT
(TV-101)
BKCAL_IN
TT-101b
(TT-101a)
OUT_D
AI
FF_VAL
IN_2
OUT_D
OUT
OUT
IN
IN_3
TRK_IN_D
IN_4
TRK_VAL
DISABLE_1
TT-101c
AI
IN_1
OUT
BKCAL_OUT
CAS_IN
OUT
PID
ISEL
DISABLE_2
SELECTED
TV-101
CAS_IN
DISABLE_3
DISABLE_4
BKCAL_OUT
AO
OUT
OP_SELECT
Questions:
•
•
•
•
•
•
•
Identify
Identify
Identify
Identify
Identify
Identify
Identify
the meaning(s) of all dashed lines in these diagrams
the meaning(s) of all arrows in these diagrams
the meaning(s) of all triangles in these diagrams
the meaning(s) of all boxes in these diagrams
the meaning(s) of all circles in these diagrams
how directions of motion are indicated in each diagram (if at all)
how sources of energy are indicated in each diagram (if at all)
file i02683
Question 16
The nameplate on an electric compressor provides the following data:
•
•
•
•
•
•
4160 V / 60 Hz
Three-phase
850 HP
1800 RPM
Max. Discharge Pressure = 84 PSIG
Max. Flow = 1280 SCFM
Answer the following questions based on this nameplate data:
Identify whether this is an induction motor or a synchronous motor. If it were the other type of motor,
how would the nameplate data differ?
Determine the number of poles in the stator of this motor. Does it have 2 poles, 4 poles, 6 poles, or
more poles?
Calculate the slip speed of this motor.
file i01233
40
Question 17
Question 18
Question 19
Question 20
41
Question 21
Electrical transformers are extensively used in AC power grid systems, the point being to transmit
electrical power over long distances at high voltage levels and low current levels so as to limit the size of
the metal conductor wires (i.e. cheaper and lighter wiring) and then step voltage down to safer levels (while
boosting current) at the points of use. Transformers installed at large electrical generating stations (“power
plants”) step up voltage from the generator level (tens of kilovolts) to the transmission level (hundreds of
kilovolts). Substation transformers step the voltage back down to the tens-of-kilovolts level for distribution
through neighborhoods, and finally distribution transformers step the voltage down once more to household
and business levels (120, 240, and/or 480 volts).
Determine the following about this power distribution transformer, such as the kind seen on power poles
near homes and businesses in the United States:
po
we
r li
ne
insulator
crossarm
Fuse
Schematic diagram
7.2 kV
240/120 V
7.2 kV
240/120 V
Transformer
Power pole
Low-voltage lines
to customer
• How can we tell from the schematic diagram that this transformer is a voltage step-down unit?
• The meaning of the “240/120” designation.
• The amount of current through the fuse at a customer load of 11 kW.
Suggestions for Socratic discussion
• Why do you suppose the secondary winding of this power transformer is center-tapped?
• What purpose does it serve to build AC power distribution systems with transformers in them to step
voltages up and down at different locations? Why not just build a power system with a consistent
voltage level everywhere?
42
• Only one fuse is shown on the high-voltage side of this transformer circuit. What does the lack of a
second fuse tell us about the two high-voltage powerline conductors?
file i04754
Question 22
Calculate the source current and load current in this transformer circuit:
1400 turns
110 VAC
Isource =
3610 turns
Load
3.9 kΩ
Iload =
Suggestions for Socratic discussion
• Identify which fundamental principles of electric circuits apply to each step of your analysis of this
circuit. In other words, be prepared to explain the reason(s) “why” for every step of your analysis,
rather than merely describing those steps.
• Would this transformer be referred to as a step-up or a step-down, and why?
• Can a step-down transformer be used as a step-up, and vice-versa? Why or why not?
file i04757
43
Question 23
A very common form of transformer used in industrial control circuits is the control power transformer,
shown in both pictorial and schematic forms. Most commonly, the primary winding actually consists of two
coils which may be connected in different ways depending on the amount of voltage available from the AC
power source:
Pictorial illustration
Schematic diagram
240 × 480 primary
H1
H3
X1
H2
H1
H4
H3
H2
H4
X2
X1
X2
120 secondary
Determine first how 240 VAC power would be connected to the primary winding terminals. After this,
determine how a higher line voltage of 480 VAC power would be connected to the primary winding terminals.
Next, identify how a multimeter could be used to test the windings of this transformer, both for open
as well as shorted faults.
Finally, determine how you would use a piece of test equipment called an insulation tester (often referred
to by the brand name “Megger”) to check the transformer windings for a short to ground (to the iron core
of the transformer), and how this particular type of test equipment differs from a regular ohmmeter.
Suggestions for Socratic discussion
• Explain why the H2/H3 terminals are “crossed over” as they are shown in the schematic diagram.
• Determine how this transformer could be re-designed to provide two different secondary voltage options
(240 VAC vs. 120 VAC) as well as two different primary voltage options.
file i00267
44
Question 24
Read and outline the “Polyphase AC Power” section of the “AC” chapter in your Lessons In Industrial
Instrumentation textbook, skipping the subsection on “Symmetrical Components”. Note the page numbers
where important illustrations, photographs, equations, tables, and other relevant details are found. Prepare
to thoughtfully discuss with your instructor and classmates the concepts and examples explored in this
reading.
A note-taking technique you will find far more productive in your academic reading than mere
highlighting or underlining is to write your own outline of the text you read. A section of your Lessons
In Industrial Instrumentation textbook called “Marking Versus Outlining a Text” describes the technique
and the learning benefits that come from practicing it. This approach is especially useful when the text
in question is dense with facts and/or challenging to grasp. Ask your instructor for help if you would like
assistance in applying this proven technique to your own reading.
file i04759
45
Question 25
Calculate all voltages, currents, and total power in this balanced Y-Y system:
Source
Load
5
1.
kΩ
13.8 kV
• Vline =
• Iline =
• Vphase(source) =
• Iphase(source) =
• Vphase(load) =
• Iphase(load) =
• Ptotal =
Suggestions for Socratic discussion
• Identify which fundamental principles of electric circuits apply to each step of your analysis of this
circuit. In other words, be prepared to explain the reason(s) “why” for every step of your analysis,
rather than merely describing those steps.
• Suppose the center of the wye-connected load were connected to earth ground. Determine the amount
of voltage between each terminal of the wye-connected source and earth ground.
file i01994
46
Question 26
Calculate all voltages, currents, and total power in this balanced Delta-Y system:
Source
Load
30
2400 V
0
Ω
• Eline =
• Iline =
• Ephase(source) =
• Iphase(source) =
• Ephase(load) =
• Iphase(load) =
• Ptotal =
Suggestions for Socratic discussion
• Identify which fundamental principles of electric circuits apply to each step of your analysis of this
circuit. In other words, be prepared to explain the reason(s) “why” for every step of your analysis,
rather than merely describing those steps.
• Suppose the center of the wye-connected load were connected to earth ground. Determine the amount
of voltage between each vertex of the delta-connected source and earth ground.
• Suppose one of the vertices of the delta-connected source were connected to earth ground. Determine
the amount of voltage between each terminal of the wye-connected load and earth ground.
• Suppose one of the vertices of the delta-connected source were connected to earth ground. Determine
the amount of voltage between the center point of the wye-connected load and earth ground.
file i02270
47
Question 27
Calculate all voltages, currents, and total power in this balanced three-phase system where a Wyeconnected source provides electrical power to a 30 horsepower Delta-connected motor. Assume the motor
operates at full load (100% power) with perfect power factor and perfect efficiency:
Source
Motor
277 V
(30 HP)
• Eline =
• Iline =
• Ephase(source) =
• Iphase(source) =
• Ephase(load) =
• Iphase(load) =
• Ptotal =
Suggestions for Socratic discussion
• Identify which fundamental principles of electric circuits apply to each step of your analysis of this
circuit. In other words, be prepared to explain the reason(s) “why” for every step of your analysis,
rather than merely describing those steps.
• How might the results differ if the motor were not 100% efficient?
• How might the results differ if the power factor were less than 1?
file i02440
48
Question 28
Calculate all voltages, currents, and total power in this balanced three-phase system where a Deltaconnected source provides electrical power to a 250 horsepower Y-connected motor. Assume the motor
operates at full load (100% power) with perfect power factor and perfect efficiency:
Source
Motor
(250 HP)
4160 V
• Eline =
• Iline =
• Ephase(source) =
• Iphase(source) =
• Ephase(load) =
• Iphase(load) =
• Ptotal =
Suggestions for Socratic discussion
• Identify which fundamental principles of electric circuits apply to each step of your analysis of this
circuit. In other words, be prepared to explain the reason(s) “why” for every step of your analysis,
rather than merely describing those steps.
• How might the results differ if the motor output the same amount of mechanical power, but at a lesser
efficiency level (i.e. < 100%)?
• How might the results differ if the power factor were less than 1?
file i02448
Question 29
Read and outline the “Cable Routing” subsection of the “Electrical Signal and Control Wiring” section
of the “Instrument Connections” chapter in your Lessons In Industrial Instrumentation textbook. Note
the page numbers where important illustrations, photographs, equations, tables, and other relevant details
are found. Prepare to thoughtfully discuss with your instructor and classmates the concepts and examples
explored in this reading.
file i01702
49
Question 30
Calculate all resistor voltages and currents in these two circuits, also labeling all voltage polarities (+
and − symbols) next to each component in both circuits:
R1 = 1.2 kΩ
12 volts
R2 = 3.3 kΩ
12 volts
R1
1.2 kΩ
R3
R2
790 Ω
3.3 kΩ
R3 = 790 Ω
Quantity
VR1
VR2
VR3
IR1
IR2
IR3
Series circuit
Parallel circuit
Suggestions for Socratic discussion
• Predict the effects resulting from various wiring and component faults in this system (e.g. opens or
shorts).
• A useful analytical technique for any DC electric circuit is to identify all electrical sources and loads in
the circuit, annotate the diagram with arrowheads showing the directions of all currents, and also with
“+” and “−” symbols (and/or curved arrows) showing the polarities of all component voltages. Show
how this helps you analyze the circuit shown in this question.
file i02769
50
Question 31
Calculate all resistor voltages and currents in these two circuits, also labeling all voltage polarities (+
and − symbols) next to each component in both circuits:
R1 = 1 kΩ
24 volts
R2 = 3.9 kΩ
24 volts
R1
1 kΩ
R3
R2
790 Ω
3.9 kΩ
R3 = 790 Ω
Quantity
VR1
VR2
VR3
IR1
IR2
IR3
Series circuit
Parallel circuit
Suggestions for Socratic discussion
• Predict the effects resulting from various wiring and component faults in this system (e.g. opens or
shorts).
• Describe some of the problem-solving techniques you could (or did) apply to this question.
file i02828
Question 32
Calculate all listed values for this transformer circuit:
48 VAC
•
•
•
•
13000 turns
4000 turns
Rload
150 Ω
Vprimary =
Vsecondary =
Iprimary =
Isecondary =
Explain whether this is a step-up, step-down, or isolation transformer, and also explain what distinguishes
the ”primary” winding from the ”secondary” winding in any transformer.
file i04758
51
Question 33
Calculate the load current and load voltage in this transformer circuit:
2390 turns
28 VAC
Iload =
710 turns
Load
350 Ω
Vload =
Suggestions for Socratic discussion
• How do the input and output power levels in a transformer circuit compare? Voltages and currents may
be stepped up and down, but what about watts? Explain why.
file i04756
52
Question 34
Calculate all voltages, currents, and total power in this balanced Delta-Delta system:
Source
Load
790 Ω
220 V
• Eline =
• Iline =
• Ephase(source) =
• Iphase(source) =
• Ephase(load) =
• Iphase(load) =
• Ptotal =
Suggestions for Socratic discussion
• Explain how you may double-check your quantitative answer(s) with a high degree of confidence (i.e.
something more rigorous than simply re-working the problem again in the same way).
file i02362
53
Question 35
This doorbell refuses to make any sound when the pushbutton is pressed. An electrician begins to
diagnose the problem, measuring 120 volts AC between the “hot” and “neutral” terminals on receptacle
“A”, and 0 volts AC between terminals L and M when the pushbutton is not being pressed.
Circuit
breaker
120/18 VAC
A
C
E
G
J
"Hot"
Receptacle
A
Pushbutton
L
M
Doorbell
N
Receptacle
B
R
120 VAC
P
K
"Neutral"
B
D
F
H
Identify the likelihood of each specified fault for this circuit. Consider each fault one at a time (i.e. no
coincidental faults), determining whether or not each fault could independently account for all measurements
and symptoms in this circuit.
Fault
Circuit breaker tripped
Transformer primary winding failed open
Transformer secondary winding failed open
Resistor failed open
Resistor failed shorted
Open wire between K and P
Doorbell unit failed open
Doorbell unit failed shorted
file i01112
54
Possible
Impossible
Question 36
Suppose a 2.5 horsepower electric motor powered by 240 VAC (single-phase) power is used to turn a
pump:
2.5 HP motor
Pump
240 VAC
Using the conversion factor of 746 watts to one horsepower, calculate the amount of AC current drawn
by the motor at full power (assuming perfect efficiency).
If the motor were only 90% efficient (90% of the applied power performing mechanical work, and 10%
of the applied power wasted in the form of heat), how much AC current would it draw at full power then?
Program a computer spreadsheet (e.g. Microsoft Excel) to calculate the same ideal and real current
values requested above. Build the spreadsheet page so that all the given values in this problem (2.5 HP, 240
VAC, and 90% motor efficiency) may be edited by the user, allowing the spreadsheet to be used to calculate
ideal and real motor currents for a variety of different motor scenarios.
Suggestions for Socratic discussion
• Identify which fundamental principles of science, technology, and/or math apply to each step of your
solution to this problem. In other words, be prepared to explain the reason(s) “why” for every step of
your solution, rather than merely describing those steps.
• In any electrical device less than 100% efficient, where does the “lost” energy go?
• What design alterations might be made to an electric motor to increase its efficiency?
• Describe the benefit of using computer spreadsheet programs such as Excel to perform calculations such
as this, based on your experience using a spreadsheet to model this simple motor circuit. How helpful
do you think this might be on the job?
file i04755
55
Question 37
A balanced, three-phase power system has a line voltage of 13.8 kV volts and a line current of 150 amps.
How much power is being delivered to the load (assuming a power factor of 1)?
Eline = 13.8 kV
Iline = 150 A
3-phase
source
3-phase
load
Lines
A 13.8 kV single-phase system could be designed to provide the same amount of power to a load, but
it would require heavier-gauge (more expensive!) conductors. Determine the extra percentage of expense in
wire cost (based on the weight of the wires) resulting from the use of single-phase instead of three-phase.
Eline = 13.8 kV
Single-phase
load
Single-phase
source
Lines
file i02297
56
Question 38
Thomas Edison’s original power generating station and distribution system used direct current (DC) at
110 volts in distributing electrical power to loads within a city:
Fuse
Power station
...
Fuse
Generator
(turned by
steam engine)
Gen
Fuse
Fuse
110 volts DC
House
House
House
...
Supposing the total power load on the generating station was 18 kilowatts, calculate the amount of
current in the main power lines at the power station.
Modern electrical power systems use alternating current (AC) instead of DC, with much greater line
voltages than Edison’s DC system. The following schematic shows a (very) simplified diagram of an AC
power system complete with transformers:
Fuse
...
Power station
Fuse
Alternator
(turned by
steam engine)
Alt
Fuse
House
13.8 kV AC
House
...
Supposing the exact same load (18 kW) on the power station, calculate the amount of current in the
main (13.8 kV) power lines at the power station, then explain the advantage of using AC, transformers, and
high voltage for power distribution. In which of these two hypothetical power systems are the power line
conductors allowed to be smaller (skinnier) wire, and why?
Suggestions for Socratic discussion
• Identify which fundamental principles of electric circuits apply to each step of your analysis of this
circuit. In other words, be prepared to explain the reason(s) “why” for every step of your analysis,
rather than merely describing those steps.
• Can a transformers boost power (watts) up and down like it can voltage or current? Why or why not?
• Why are transformers only used in AC power systems, not DC?
• Is there any way to “fool” a transformer into functioning on DC?
• Explain what will happen in the AC circuit if the transformer’s primary winding fails open.
• Explain what will happen in the AC circuit if the transformer’s secondary winding fails open.
file i04753
57
Question 39
Increasing
DC current
Conduit
Two wires lay parallel to each other inside an electrical conduit. Through one of these wires runs a
steadily increasing direct current:
Resistor
Determine the following about the induced effect in the other wire:
• The direction of induced current in the second wire (please trace conventional flow!)
• The polarity of voltage drop across the resistor
Then, explain why the induced effects would be as you described, and not the other way (opposite
direction, opposite polarity).
file i02403
Question 40
Question 41
Read and outline the “AC Induction Motors” subsection of the “On/Off Electric Motor Control Circuits”
section of the “Discrete Control Elements” chapter in your Lessons In Industrial Instrumentation textbook.
Note the page numbers where important illustrations, photographs, equations, tables, and other relevant
details are found. Prepare to thoughtfully discuss with your instructor and classmates the concepts and
examples explored in this reading.
file i04492
58
Question 42
You task is to work in a team to disassemble a small AC induction “squirrel cage” electric motor.
Identify the following components of the motor once disassembled:
• Rotor
• Stator
• Stator windings
• “Squirrel-cage” rotor bars
• Shorting rings (on either end of “squirrel-cage” rotor)
• Bearings
• Keyway (on motor shaft)
• Power terminals
Either with the motor assembled or disassembled, use your multimeter to measure terminal-to-terminal
winding resistance. How many ohms do you read from T1 to T2, or from T2 to T3, or from T1 to T3?
Should these resistance measurements be the same or different from one another?
Either with the motor assembled or disassembled, use your multimeter to measure terminal-to-frame
winding resistance. How many ohms do you read from T1 to frame, or from T2 to frame, or from T1 to
frame? Should these resistance measurements be the same or different from one another?
Feel free to photograph the disassembled motor with a digital camera for your own future reference.
Reassemble the motor (ensuring the shaft still spins freely) when done.
Suggestions for Socratic discussion
• Explain the purpose of the shorting rings on the rotor. Why must the rotor bars be electrically shorted
to each other?
• What might happen to the motor if one of the rotor bar connections to a shorting ring happened to
open?
• Does your AC induction motor use a starting capacitor? If so, why? If not, why not?
file i04493
59
Question 43
The nameplate on an electric water pump provides the following data:
•
•
•
•
•
•
•
•
110 V / 60 Hz
Single-phase
1/2 HP
3400 RPM
Max. Lift = 22 ft
Max. Head = 115 ft
Max. Flow = 12 Gal/min
1” outlet
Answer the following questions based on this nameplate data:
Calculate the amount of line current expected in the motor’s power wiring.
Identify whether this is an induction motor or a synchronous motor. If it were the other type of motor,
how would the nameplate data differ?
Determine the number of poles in the stator of this motor. Does it have 2 poles, 4 poles, 6 poles, or
more poles?
Calculate the slip speed of this motor.
file i01232
60
Question 44
Suppose a 75 horsepower electric motor powered by three-phase 480 VAC power is used to turn a pump:
75 HP motor
Pump
480 VAC
Using the conversion factor of 746 watts to one horsepower, calculate the amount of AC line current
drawn by the motor at full power (assuming perfect efficiency).
If the motor were only 92% efficient (92% of the applied power performing mechanical work, and 8% of
the applied power wasted in the form of heat), how much AC current would it draw at full power then?
Program a computer spreadsheet (e.g. Microsoft Excel) to calculate the same ideal and real current
values requested above. Build the spreadsheet page so that all the given values in this problem (75 HP, 480
VAC, and 92% motor efficiency) may be edited by the user, allowing the spreadsheet to be used to calculate
ideal and real motor currents for a variety of different motor scenarios.
file i04249
61
Question 45
Read selected portions of the NFPA 70E document “Standard for Electrical Safety in the Workplace”
and answer the following questions:
Annex K (“General Categories of Electrical Hazards”) is a short appendix section of this document,
giving some background information on electric shock, arc flash, and arc blast. Read the definitions given
for these hazards, and then define them using your own words.
Article 100 (“Definitions”) of this document defines some key terms used throughout the standard.
Read the definitions given for the following terms and then define them using your own words:
•
•
•
•
•
Arc flash hazard analysis
Arc flash suit
Incident energy
Ground fault
Qualified person
file i03013
Question 46
Read selected portions of the NFPA 70E document “Standard for Electrical Safety in the Workplace”
and answer the following questions:
Annex C (“Limits of Approach”) and Article 100 (“Definitions”) both define some key terms used to
describe how close one can be to an electrical hazard. Read the definitions given for the following terms and
then define them using your own words:
•
•
•
•
Arc flash boundary
Limited approach boundary
Restricted approach boundary
Prohibited approach boundary
Article 130 provides tables specifying limited approach boundary, restricted approach boundary, and
prohibited boundary distances for a variety of circuit voltages and types. Identify the boundary distances
for each of these circuits, assuming all conductors within are non-moving:
•
•
•
•
480 VAC motor control circuit (“bucket”)
110 VAC control power wiring for a PLC
125 VDC uninterruptible “station power” for a substation facility
4160 VAC motor control circuit
Suggestions for Socratic discussion
• One of the informational notes in the 2012 edition of NFPA 70E, Article 130.4(B), reads “In certain
circumstances the arc flash boundary might be a greater distance from the energized electrical conductors
or circuit parts than the limited approach boundary. The shock protection boundaries and the arc flash
boundary are independent of each other.” Explain why this is, linking your answer to fundamental
principles of electric circuits.
file i03014
62
Question 47
Read selected portions of the NFPA 70E document “Standard for Electrical Safety in the Workplace”
and answer the following questions:
Article 120 of this document (“Establishing an Electrically Safe Work Condition”) outlines the
requirements for two different types of lockout/tagout procedures: a simple and a complex procedure.
Annex G provides a sample procedure for an industrial workplace meeting the requirements of the “simple”
procedure type. Read these sections and then write your own outline of a simple lockout/tagout procedure.
What criteria make a lockout/tagout procedure “complex” rather than “simple”?
Suggestions for Socratic discussion
• As with NFPA 70 (the National Electrical Code), NFPA 70E does not intrinsically possess the force of
law. That is to say, NFPA has no legal power of its own to declare or to enforce professional standards.
However, the Authority Having Jurisdiction (AHJ) in the area where the work is being done has the
ability to adopt any version of the NFPA’s standards as enforceable law. Generally, local government
agencies specify which version of the NFPA document(s) they adopt as law, and enjoy a certain freedom
of interpretation of those standards. Why is this important for you as a technical worker to know?
• An important safety policy at many industrial facilities is something called stop-work authority, which
means any employee has the right to stop work they question as unsafe. Describe a scenario involving
electrical power where one might invoke stop-work authority.
file i03015
Question 48
Read selected portions of the NFPA 70E document “Standard for Electrical Safety in the Workplace”
and answer the following questions:
Article 130 specifies Hazard/Risk categories as well as rubber glove and insulated tool requirements for
work done on different classifications of electrical circuits. Identify these ratings for a 480 volt motor control
system, where a technician wishes to remove the front panel and take some voltage measurements on the live
system. Then, identify what the particular “Hazard/Risk” number means in terms of Personal Protective
Equipment (PPE).
For those looking for a challenge, perform an arc flash boundary analysis for an open 208 VAC motor
starter circuit, such as the type we build in the lab during this course. Assume the following:
• 3 kVA transformer bank feeding the motor starter
• Transformers have 5% impedance rating
• Fault-clearing time is 21 cycle at 60 Hz with fuses on the 208 VAC lines
file i03016
63
Question 49
Three-phase motors and generators alike are manufactured in two basic forms: Wye (Y) and Delta (∆):
Mark in the above diagrams where the following electrical quantities would be measured (hint: each
coil shown in the diagram is called a phase winding, and each conductor connecting the motor or generator
to something else in the three-phase system is called a line):
• Phase voltage
• Line voltage
• Phase current
• Line current
In which circuit (Wye or Delta) are the phase and line currents equal? In which circuit (Wye or Delta)
are the phase and line voltages equal? Explain both answers, in terms that anyone with a basic knowledge
of electricity could understand (i.e. using the properties of series and parallel connections). Where phase
and line quantities are unequal, determine which is larger.
file i03258
64
Question 50
If a set of six electromagnet coils were spaced around the periphery of a circle and energized by 3-phase
AC power, and a magnetic compass were placed in the center of that circle, the compass needle would rotate
because it would experience a rotating magnetic field produced by these coils:
Physical arrangement of coils
Coil
1a
Coil connection pattern
Coil
3b
Coil
2b
Compass
Coil
2a
Coil
1b
Coil
Coil 2a
2b
Coil
3a
Coil
1a
Coil
3a Coil
3b
Coil
1b
Explain why the magnetic field produced by the stator coils appears to rotate, and also calculate the
rotational speed of this field if the 3-phase AC power frequency is 60 Hz. Based on the rotation shown (by
the arrows), what is the phase sequence of the AC power applied to the motor?
Also, determine what would have to be changed in this scenario for the compass needle to spin at only
half the speed it does now.
Also, determine what would have to be changed in this scenario for the compass needle to spin in the
reverse direction as it does now.
Suggestions for Socratic discussion
• Why does a real three-phase motor have its three phase coils built in pairs, as is shown here? Why not
just have three coils instead of six?
• Suppose that one of the lines in the three-phase power source feeding this motor were to fail open,
preventing current through one of the sets of coils in the stator of this motor. Would the compass
needle still spin? Why or why not?
• What would the stator coil arrangement look like for a four phase electric motor?
file i01443
65
Question 51
Suppose a set of three neon light bulbs were connected to a 3-phase alternator with the three stator
winding sets labeled A, B, and C:
A
A
B
C
N
B
S
C
C
A
B
B
C
A
Neutral
The schematic diagram for this alternator/lamp system is as follows:
A
Alternator
B
C
C
B
A
Neutral
If the alternator spins fast enough (clockwise, as shown), the AC voltage induced in its windings will be
enough to cause the neon lamps to “blink” on and off. Most likely this blinking will be too fast to discern
with the naked eye.
However, if we were to video-record the blinking and play back the recording at a slow speed, we should
be able to see the sequence of light flashes. Determine the apparent “direction” of the lamps’ blinking (from
right-to-left or from left-to-right), and relate that sequence to the voltage peaks of each alternator coil pair.
Furthermore, determine how to reverse the blinking sequence just by reconnecting wires between the
alternator and the neon lamps.
file i03257
66
Question 52
A stroboscope is a bright strobe light designed to be used for measuring the shaft speed of a rotating
machine. When flashed at the same frequency as the shaft’s rotation, the effect is to make the shaft look as
though it is stationary even while it is spinning.
Suppose a stroboscope is used to “freeze” the rotation of an AC motor’s shaft, and the flash frequency
is noted to be 29.3 Hz. Calculate the speed of the motor shaft, and then determine both the number of poles
inside this motor and whether or not it is an induction motor or a synchronous motor.
file i04786
Question 53
This is a schematic diagram of a Y-connected three-phase generator (with the rotor winding shown):
Three-phase "Y" alternator
A
B
. . . to a threephase load
C
DC
+
excitation −
Rotor winding
How much AC voltage will appear between any two of the lines (VAB , VBC , or VAC ) if each stator coil
inside the alternator outputs 277 volts? Draw a phasor diagram showing how the phase (winding) and line
voltages relate.
How much AC current will each of the lines (IA , IB , or IC ) conduct to a load (not shown) if each stator
coil inside the alternator outputs 17 amps of current to a load?
How much power will be delivered to a load given the stator coil voltages and currents described above?
Suggestions for Socratic discussion
• Explain how you may double-check your quantitative answer(s) with a high degree of confidence (i.e.
something more rigorous than simply re-working the problem again in the same way).
• Explain the purpose of the rotor winding shown in the diagram. Does this winding generate power or
receive power from an external source?
• Explain the purpose of the DC excitation shown in the diagram. What would the generator do without
this DC circuit in place and functioning?
file i02294
67
Question 54
This is a schematic diagram of a Delta-connected three-phase generator (with the rotor winding shown):
Three-phase "Delta" alternator
A
B
. . . to a threephase load
C
DC
+
excitation −
Rotor winding
How much AC current will each of the lines (IA , IB , or IC ) conduct to a load (not shown) if each stator
coil inside the alternator outputs 17 amps of current?
How much AC voltage will appear between any two of the lines (VAB , VBC , or VAC ) if each stator coil
inside the alternator outputs 240 volts?
How much power will be delivered to a load given the stator coil voltages and currents described above?
Suggestions for Socratic discussion
• Explain how you may double-check your quantitative answer(s) with a high degree of confidence (i.e.
something more rigorous than simply re-working the problem again in the same way).
• Explain the purpose of the rotor winding shown in the diagram. Does this winding generate power or
receive power from an external source?
• Explain the purpose of the DC excitation shown in the diagram. What would the generator do without
this DC circuit in place and functioning?
file i02295
68
Question 55
Three-phase electric motors are often equipped with a set of electrical terminals for configuring different
voltage ranges and/or base speeds. Different configurations consist of different patterns of “jumper” wires
connecting these terminals together. For example, here is an illustration of a three-phase electric motor with
nine stud-and-nut terminals for connecting a set of six wire windings (coils) in two different configurations:
one for low voltage (240 volts AC) and one for high voltage (480 volts AC):
Motor
9
4
2
7
5
8
6
3
2
1
5 8
3
Shaft
7
4
6
9
1
When connecting the terminals for high-voltage operation, the goal is to have a “delta” configuration
with two series-connected windings in each side of the triangle. When connecting the terminals for lowvoltage operation, the goal is to have two parallel “delta” winding sets.
Sketch the proper power conductor and jumper connections for low-voltage operation and for highvoltage operation:
Low-voltage (240 VAC)
C
High-voltage (480 VAC)
9
4
7
9
4
7
5
8
6
5
8
6
3
2
1
3
2
1
B
A
C
B
A
Suggestions for Socratic discussion
• Why do you think an electric motor manufacturer would equip one of their motors with the capability
of dual-voltage operation?
file i02298
69
Question 56
An electrician goes to troubleshoot a three-phase motor starter (“bucket”) that is not functioning. When
the operator presses the “Start” switch, the motor refuses to start up. Thinking that perhaps one of the
main fuses is blown, the electrician measures AC voltage across each fuse, measuring 0 volts drop for each
one. Upon seeing this, he declares all three fuses to be good, and that the trouble must lie elsewhere in the
circuit (e.g. bad motor, failed contactor, etc.).
480 VAC power
L1
L2
L3
Fuses
All control wiring omitted for
the sake of simplicity
Contactor
(three-pole relay
used to switch
power to the motor)
Overload heater
(detects overcurrent)
Reset
(to motor)
Explain what is wrong with the electrician’s reasoning, and how it is possible to measure 0 volts across
a fuse that is actually blown.
Suggestions for Socratic discussion
• Identify which fundamental principles of electric circuits apply to each step of your analysis of this
circuit. In other words, be prepared to explain the reason(s) “why” for every step of your analysis,
rather than merely describing those steps.
• This is an example of a logical fallacy known as illicit conversion. A general example of this fallacy goes
like this: “All rabbits are mammals, therefore all mammals are rabbits.” Explain how the electrician’s
association of 0 volts with a good fuse is an example of this fallacy.
file i03737
70
Question 57
The following diagrams show windings for different two-speed induction AC motors, along with
connection instructions for each of the operating speeds:
4
4
3
1
3
2
5
1
2
6
5
Low speed:
High speed:
Lines to 1, 2, 3
Lines to 4, 5, 6
Leave 4, 5, 6 unconnected Short 1, 2, 3 together
6
Low speed:
High speed:
Lines to 1, 2, 3
Lines to 4, 5, 6
Leave 4, 5, 6 unconnected Short 1, 2, 3 together
Identify the “wye” or “delta” configurations for each of these motors, in each of their speeds.
Also, explain the principle behind the two speeds of each motor. Hint: the “low speed” configuration
runs at half the speed as the “high speed” configuration.
Suggestions for Socratic discussion
• A helpful problem-solving technique to apply in this case is to mark the coils with polarity (+,−)
symbols as if they were being energized by DC, in order to better picture how the coils in each pair
relate to each other.
file i02137
71
Question 58
Suppose one of the windings in a three-phase AC motor were suspected to be partially shorted, as though
the electrical varnish insulation on several adjacent turns of the winding burned through allowing those turns
to directly contact each other. This would result in that one winding having less electrical resistance than
the other two windings.
Explain how you would use basic electrical test equipment to confirm a partially-shorted motor winding.
Provide two different answers: one for a Y-wound motor, and one for a Delta-wound motor:
T1
Y-wound motor
Delta-wound motor
T2
T1
T3
T2
T3
Also, determine how you would use a piece of test equipment called a megger to check the windings for
a short to ground (the metal frame of the motor), and how this particular type of test equipment differs
from a regular ohmmeter.
Suggestions for Socratic discussion
• A good problem-solving technique to apply in cases where we need to determine the effect of a change is
to consider limiting cases. Instead of asking ourselves what would happen if the resistance of one stator
winding changed slightly (e.g. a partial short), we ask ourselves what would happen if the resistance
changed dramatically (e.g. a direct short). Explain how this problem-solving technique helps simplify
this particular scenario, making it easier to solve.
• Identify how a megger might be improperly used, in such a way that it damages the equipment it is
supposed to test. Hint: think equipment containing semiconductor components!
file i04494
72
Question 59
Calculate the mechanical power output by an electric motor (in units of horsepower) as is delivers 1250
lb-ft of torque at 850 RPM. Then, calculate the line current for this motor if it is a 3-phase unit operating
at a line voltage of 480 volts. Assume 92% efficiency for the motor.
Suggestions for Socratic discussion
• How might the results differ if the motor were 100% efficient instead of 92% efficient?
• Explain how you may double-check your quantitative answer(s) with a high degree of confidence (i.e.
something more rigorous than simply re-working the problem again in the same way).
• Suppose we were to alter this problem to describe a diesel engine turning a three-phase generator with
an efficiency of 92%, at 1250 lb-ft of torque and a shaft speed of 850 RPM. At a line voltage of 480
volts, how much line current could we expect the generator to output? Is the answer the same as in the
case of the motor? Explain why or why not.
file i01434
Question 60
Question 61
Read and outline the “Relay Control Systems” chapter in your Lessons In Industrial Instrumentation
textbook in its entirety. Note the page numbers where important illustrations, photographs, equations,
tables, and other relevant details are found. Prepare to thoughtfully discuss with your instructor and
classmates the concepts and examples explored in this reading.
file i04500
73
Question 62
You task is to work in a team to remove the protective cover from an “ice-cube” control relay used for
industrial control circuitry. Identify the following components of the device once the cover is removed:
• Moving contacts
• Stationary contacts
• Armature (moving iron piece)
• Coil terminals
• Coil voltage rating
• Contact voltage, current, and/or horsepower ratings
Feel free to connect the coil of the uncovered relay to a DC voltage source to watch its operation.
Feel free also to photograph the disassembled contactor with a digital camera for your own future reference.
Reassemble the contactor (ensuring the armature still moves freely) when done. Be sure to bring appropriate
tools to class for this exercise (e.g. phillips and slotted screwdrivers, multimeter).
Suggestions for Socratic discussion
• Identify potential points of failure inside the relay you are examining. For each proposed fault, identify
the effect(s) of that fault on the relay’s operation.
• Describe a procedure you might use to clean the contact surfaces inside a relay if they were to become
dirty with use and exposure.
• Demonstrate how you could use a multimeter to identify pin assignments on an electromechanical relay
if it did not have a transparent case, and if the pinout diagram were obscured from view.
file i04733
74
Question 63
Predict how the operation of this relay logic circuit will be affected as a result of the following faults.
Consider each fault independently (i.e. one at a time, no coincidental faults):
L1
L2
A
CR1
B
CR2
CR1-1
CR3
CR2-1
CR3-1
CR1-2
Lamp 1
CR2-2
Lamp 2
• Pushbutton switch A fails open:
• Relay coil CR2 fails open:
• Relay contact CR1-1 fails open:
• Relay contact CR2-1 fails shorted:
• Relay contact CR2-2 fails shorted:
For each of these conditions, explain why the resulting effects will occur.
Suggestions for Socratic discussion
• Identify how ladder-logic type diagrams differ from standard electronic schematics, particularly with
regard to how electromechanical relay coils and contacts are shown in each.
• For each of the specified faults, identify how it could be diagnosed using a multimeter.
• Identify how a technician could force Lamp 1 to energize regardless of switch status.
file i02319
75
Question 64
There is a problem somewhere in this relay logic circuit. Lamp 2 operates exactly as it should, but lamp
1 never turns on. Identify all possible failures in the circuit that could cause this problem, and then explain
how you would troubleshoot the problem as efficiently as possible (taking the least amount of electrical
measurements to identify the specific problem).
L1
L2
A
CR1
B
CR2
CR1-1
CR3
CR2-1
CR3-1
CR1-2
Lamp 1
CR2-2
Lamp 2
Next, suppose an electrician tried to force lamp 1 to energize by connecting a temporary jumper wire
in parallel with that lamp. Explain why this strategy will not work, and in fact will likely cause damage to
the circuit.
Suggestions for Socratic discussion
• Identify how ladder-logic type diagrams differ from standard electronic schematics, particularly with
regard to how electromechanical relay coils and contacts are shown in each.
• Suppose you were asked to diagnose the problem in this circuit without using any test equipment, but
simply by observing and listening to the circuit function. Knowing that an electromechanical relay
typically makes a soft “click” sound when its coil changes state, explain how you could isolate certain
faults in this circuit without a multimeter.
• Explain why a relay coil failing shorted will not necessarily yield the same results as a relay contact
failing shorted.
file i02320
Question 65
Read and outline the “Motor Contactors” subsection of the “On/Off Electric Motor Control Circuits”
section of the “Discrete Control Elements” chapter in your Lessons In Industrial Instrumentation textbook.
Note the page numbers where important illustrations, photographs, equations, tables, and other relevant
details are found. Prepare to thoughtfully discuss with your instructor and classmates the concepts and
examples explored in this reading.
file i04495
76
Question 66
Read and outline the “Motor Protection” subsection of the “On/Off Electric Motor Control Circuits”
section of the “Discrete Control Elements” chapter in your Lessons In Industrial Instrumentation textbook.
Note the page numbers where important illustrations, photographs, equations, tables, and other relevant
details are found. Prepare to thoughtfully discuss with your instructor and classmates the concepts and
examples explored in this reading.
file i04496
Question 67
Read and outline the “Motor Control Circuit Wiring” subsection of the “On/Off Electric Motor Control
Circuits” section of the “Discrete Control Elements” chapter in your Lessons In Industrial Instrumentation
textbook. Note the page numbers where important illustrations, photographs, equations, tables, and other
relevant details are found. Prepare to thoughtfully discuss with your instructor and classmates the concepts
and examples explored in this reading.
file i04497
Question 68
You task is to work in a team to disassemble a contactor (and overload heater block) used for starting
an AC induction motor. Identify the following components of the device once disassembled:
• Moving contacts
• Stationary contacts
• Arc shields
• Armature (moving iron piece)
• Overload heaters
• Coil terminals
• Contact voltage, current, and/or horsepower ratings
Feel free to photograph the disassembled contactor with a digital camera for your own future reference.
Reassemble the contactor (ensuring the armature still moves freely) when done. Be sure to bring appropriate
tools to class for this exercise (e.g. phillips and slotted screwdrivers, multimeter).
Suggestions for Socratic discussion
• Identify potential points of failure inside the contactor you are examining. For each proposed fault,
identify the effect(s) of that fault on the contactor’s operation.
• Explain how the arc shields function, not just to serve as a barrier between the arcing contacts and any
nearby people, but also how the shields prevent a phase-to-phase arc from developing between adjacent
contacts.
• Describe a procedure you might use to clean the contact surfaces inside a motor contactor if they were
to become dirty or pitted with use.
• Demonstrate how you could use a multimeter to verify proper contact operation inside a contactor.
file i04499
77
Question 69
The direction of rotation for a three-phase AC electric motor may be reversed by swapping any two of
the three power conductor connections. With this in mind, explain how this reversing motor control circuit
works:
L1
L2
Forward
M2
M1
Reverse
M1
M2
M1
To 3-phase
power source
motor
M2
In particular, what if the function of the two normally-closed “M” contacts (called interlock contacts)
in the control circuit? What do you think might happen if those contacts were not there?
Suggestions for Socratic discussion
• Explain why reversing any two phase conductors supplying AC power to an induction motor will cause
it to reverse direction.
• Explain what arc flash is, and how to protect yourself from it while working on high-voltage motor
control circuits such as this one.
• Suppose an electrician tries to force the motor to spin in its forward direction by connecting a temporary
jumper wire across relay coil M1. Will this accomplish the desired result? Explain why or why not, and
also identify any potential safety hazards in doing this.
• Suppose an electrician tries to force the motor to spin in its forward direction by connecting a temporary
jumper wire across the “Forward” pushbutton. Will this accomplish the desired result? Explain why
or why not, and also identify any potential safety hazards in doing this.
• Suppose an electrician tries to force the motor to spin in its forward direction by connecting three
temporary jumper wires across the M1 contacts. Will this accomplish the desired result? Explain why
or why not, and also identify any potential safety hazards in doing this.
file i01391
78
Question 70
Suppose we wish to have three separate pushbutton start/stop stations for operators to use in controlling
a single three-phase electric motor. The control circuit wiring schematic shows how this will work:
L2
Fuse
Stop
Stop
L3
Start
Stop
M1
Start
Start
M1
Sketch the necessary connecting wires to build this control circuit:
L1
L2
L3
Start
Start
Start
Stop
Stop
Stop
X2
X1
H1
H3
H2
H4
Transformer
Contactor
Fuse
Motor
T1 T2 T3
Suggestions for Socratic discussion
• An overload contact has been omitted from this motor control system for simplicity’s sake. Identify
where one would be properly inserted into the schematic diagram, and also in the pictorial diagram.
• After you have sketched wires to make a complete diagram, try to predict the effects of various faults
in the circuit (e.g. switch contacts failing open or shorted ; wires breaking).
79
file i02449
Question 71
A lift station is an underground reservoir with an automatically-controlled electric pump that collects
and transports sewage from neighborhoods to a centralized wastewater treatment plant (usually located
miles away):
From homes
From homes
LSH
From homes
LSH
LSH
Empty
Full
LSL
LSL
To WWTP
LSL
To WWTP
Pump
To WWTP
Pump
ON
Pump
The wiring diagram for a simple lift station pump control circuit is shown here:
Disconnect
Contactor
L1
To 3-phase
AC power
(480 V)
K
L2
OL
L
T1
T2
motor
T3
L3
M
F1
F2
H2
H1
H3
M1
H4
F3
C
120 VAC
A
LSH
B
LSL
OL
D
M1
M1
F
G
Start
H
J
80
E
An electrician needs to perform some routine “megger” measurements on the electric pump motor.
“Megger” is the brand name of a high-voltage ohmmeter used to check the integrity of electrical insulation
in electric motors, transformers, and other devices with wire coils subject to faults due to corrosion, vibration,
or overheating. Here, the electrician will check resistance between each of the motor’s terminals (T1, T2, T3)
and the metal frame of the motor, ensuring there are many millions of ohms (open) as the wire insulation
should provide.
Like all ohmmeter tests, a “megger” check must be performed on a device that is unpowered. For this
reason, and also for personal safety, the electrician must ensure no power will get to the motor during his
test.
Before commencing the test, the electrician follows this procedure to ensure the motor is in a zero energy
state:
(1)
(2)
(3)
(4)
Turn off the disconnect switch
Place a padlock and a danger tag on the switch’s handle to ensure it cannot turn on
Push the “Start” pushbutton switch to check that the pump does not start up
Use an AC voltmeter to verify 0 volts between the following test points:
(a) Voltage between terminals K and L
(b) Voltage between terminals K and M
(c) Voltage between terminals L and M
(d) Voltage between terminals K and earth ground
(e) Voltage between terminals L and earth ground
(f ) Voltage between terminals M and earth ground
(5) Use the same AC voltmeter to verify 480 volts between any two of the L1, L2, and L3 test points
Explain the rationale behind each step in this sequence. Although this many steps may appear to be a
bit paranoid, there is actually logical justification for each one.
Suppose another electrician looked at this diagram and declared, “We don’t actually have to turn the
disconnect switch off – we can prevent power from getting to the motor’s terminals just by just pulling any
one of the fuses in this circuit! If the M1 coil can’t energize with 120 volts, then the M1 contactor relay
cannot close, which effectively locks out 480 volt power from getting to the motor.”
What would be your response to this electrician’s suggestion, and why?
Suggestions for Socratic discussion
• A good logical technique for justifying each step in the lock-out/tag-out sequence is to think of a
dangerous condition (such as a test equipment fault) that would go undetected if that step were skipped.
If you can think of just one possible failure uniquely detected by a step, then that step is justified beyond
any doubt!
• What sort of information do you think the electrician should write on the danger tag?
• Why do you suppose it is necessary to use high voltage to test the insulation integrity of an electric
motor? Why not just use a regular ohmmeter that only uses a few volts between the test probes?
file i03403
81
Question 72
This motor-control “bucket” has a problem: the motor refuses to start when the “Start” pushbutton is
pressed. A voltmeter connected to test points C and E indicates 118 volts AC with no pushbuttons pressed:
To 3-phase
power source
F1
B
A
480/120 V
Start
Stop
C
D
M1
F
F2
OL
E
M1
M1
OL
motor
Identify the likelihood of each specified fault for this circuit. Consider each fault one at a time (i.e. no
coincidental faults), determining whether or not each fault could independently account for all measurements
and symptoms in this circuit.
Fault
Fuse F1 blown
Fuse F2 blown
Start switch failed open
Stop switch failed open
M1 coil failed open
M1 auxiliary contact failed open
M1 power contact(s) failed open
OL contact failed open
Start switch failed shorted
Stop switch failed shorted
Transformer secondary failed shorted
Possible
Impossible
Finally, identify the next diagnostic test or measurement you would make on this system. Explain how
the result(s) of this next test or measurement help further identify the location and/or nature of the fault.
file i02398
82
Question 73
Complete the truth table for the following relay logic circuit, and then complete a second truth table
for the same circuit with relay coil CR2 failed open:
L1
L2
A
CR1
B
CR2
CR1
CR2
Truth table (good circuit)
A
0
0
1
1
Indicator
Truth table (with fault)
A
0
0
1
1
B Output
0
1
0
1
B Output
0
1
0
1
Assume a “1” state for a switch means it is being pressed, and a “0” state means it is unpressed. Explain
why the truth table will be modified as a result of the fault.
Suggestions for Socratic discussion
• Identify how ladder-logic type diagrams differ from standard electronic schematics, particularly with
regard to how electromechanical relay coils and contacts are shown in each.
• Suppose the indicator lamp in this circuit never energized, regardless of the switch states. Identify soe
possible faults that could account for this circuit behavior, and how you could confirm those faults using
a multimeter.
file i02318
83
Question 74
The following ladder logic diagram (for a steam heater control) contains a serious mistake:
L1
L2
Off
On
Red
CR1
Thermostat
Green
CR1
Steam
solenoid
This is a mistake I’ve seen many students make. Explain what the mistake is, and draw a corrected
version of this relay circuit.
Suggestions for Socratic discussion
• Why do you suppose this is a common mistake for students to make when sketching a ladder logic
diagram? Despite it being in error, there is a certain logic to it.
• If a real circuit were wired in this manner, what would it do? How would it behave?
• If a real circuit were wired in this manner, how could you diagnose the nature of the problem using a
multimeter?
file i02322
84
Question 75
Explain the operation of this circuit:
24 VDC
+
−
1 amp
Red
Trip = 1 foot 3 inches
Relay
Trip = 45 PSI
Grn
Blu
file i02304
85
Question 76
Shown here is a typical set of “curves” for an overload heater, such as is commonly used to provide
overcurrent protection for AC electric motors:
Time to trip
40
30
Seconds
Time to reset
20
10
0
0
100
200
300
400
500
600
Percent of full-load current rating
Why is there any time required to re-set an overload heater contact after a “trip?” Circuit breakers
can be re-closed mere moments after a trip with no problem, and fuses (of course) can be replaced moments
after blowing. Is this an intentional design feature of overload heaters, or just an idiosyncrasy?
Also, explain why the reset curve starts to decrease for currents above 300% of the motor’s full-load
rating. Why doesn’t the reset time curve continue to increase with increasing fault current magnitudes?
file i02308
86
Question 77
Identify at least three independent faults that could cause this motor not to start:
To 3-φ , 480 volt power source
L1
L2
L3
L1
L2
L3
Schematic diagram
Fuses
Transformer
X2
Contactor
H3
H2
H4
X1
H1
H1
H3
H2
H4
Transformer
Contactor
A1
X1
A2
Fuse
A2
Switch
Overload
motor
Reset
T1 T2
T3
A1
X2
Switch
OL
Motor
T1 T2 T3
For each of the proposed faults, explain why they would prevent the motor from starting.
file i02306
Question 78
Protective relays are special power-sensing devices whose job it is to automatically open or close circuit
breakers in large electric power systems. Some protective relays are designed to be used directly with large
electric motors to provide sophisticated monitoring, shut-down, and start-up control.
One of the features of these motor-oriented protective relays is start-up lockout. What this means is
the relay will prevent someone from attempting too many successive re-starts of a large electric motor. If
the motor is started and stopped several times over a short period of time, the relay will prevent the person
from starting it again until a sufficient “rest” time has passed.
Explain why a large electric motor would need to “rest” after several successive start-up events. If
electric motors are perfectly capable of running continuously at full load for years on end, why would a few
start-ups be worthy of automatic lock-out?
file i02311
87
Question 79
The starter and overload heater assembly for an industrial electric motor is often located quite a distance
from the motor itself, inside a room referred to as a motor control center, or MCC:
Motor control center (MCC)
From 3-φ
power source
Breaker
Starter
Overloads
Power conductors
motor
Since it is impossible for a technician to be in two places at once, it is often necessary to perform
diagnostic checks on a malfunctioning electric motor from the MCC where the technician has access to all
the control circuitry.
One such diagnostic check is line current, to detect the presence of an open motor winding. If a threephase motor winding fails open, or if one of the three-phase power conductors fails open along the way to
the motor, the motor will not run as it should. This is called single-phasing. A good way to check for this
condition is to use a clamp-on (inductive) ammeter to check line current on all three lines while the starter is
energized. This may be done at any location where there is physical access to the motor power conductors.
Suppose, though, you are working on a job site where single-phasing is suspected and you do not have
a clamp-on ammeter with you. All you have is a DMM (digital multimeter), which does not have the ability
to safely measure the motor’s current. You are about to head back to the shop to get a clamp-on ammeter
when a more experienced technician suggests an alternate test. He takes your DMM, sets it to the AC
millivolt range, then connects the test probes to either side of each overload heater element, one heater at a
time like this:
88
Overloads
To motor
mV
VΩ
A
COM
Across each overload heater element he measures about 20 mV AC with the starter engaged. From this
he determines that the motor is not single-phasing, but is drawing approximately equal current on all three
phases.
Explain how this diagnostic check works, and why this determination can be made. Also describe what
limitations this diagnostic procedure has, and how a clamp-on ammeter really is the best way to measure
motor line current.
file i02312
89
Question 80
This motor control circuit commands three motors to start and stop together:
Power circuit
M1
Control circuit
L1
L2
Stop
Start
M1
OL1
To 3-phase
power source
motor
OL1
M2
OL2
M3
motor
M1
M2
OL2
M3
M3
M2
OL3
OL3
motor
Examine the control circuit and then explain how starting one motor starts up the others. Also,
determine what will happen if motor #3 suffers an overload (i.e. OL3 warms up enough to trip).
Suggestions for Socratic discussion
• Explain why inrush current could be a problem in this three-motor control system, and identify at least
one practical solution for it.
• If motor #2 were to become overloaded, would the system react any differently from an overloaded
motor #3?
file i02399
Question 81
A delta-connected AC generator has a phase voltage of 13.8 kV, and is connected to a balanced wyeconnected load consuming power at a rate of 0.75 MW. Assuming a power factor of 1 (unity), calculate the
following parameters in this polyphase circuit, and draw a sketch of it:
• Line voltage =
• Line current =
volts
amps
• Equivalent phase resistance (of load) =
• Phase voltage (of load) =
• Phase current (of load) =
ohms
volts
amps
Be sure to show all your calculations!
file i02360
90
Question 82
A wye-connected AC generator has a phase voltage of 7.2 kV, and is connected to a balanced deltaconnected load consuming power at a rate of 3.4 MW. Assuming a power factor of 1 (unity), calculate the
following parameters in this polyphase circuit, and draw a sketch of it:
• Line voltage =
• Line current =
volts
amps
• Equivalent phase resistance (of load) =
• Phase voltage (of load) =
• Phase current (of load) =
ohms
volts
amps
Be sure to show all your calculations!
file i02517
91
Question 83
A current transformer is a donut-shaped device used to measure the amount of AC current through a
conductor, providing isolation between the power conductor and the instrument circuit. Their purpose is to
serve as a permanent “clamp-on” ammeter for a high-current AC power conductor. The power conductor
passes through the center of the “donut” while a stepped-down current is generated in the secondary winding
to pass through an AC ammeter:
600:5 ratio
350 A
power conductor
A
Calculate the amount of current through the ammeter in this example circuit, given the line current
and ratio shown.
Next, calculate the amount of current registered by the same ratio CT for all three line conductors of a
three-phase power system as shown here (still assuming 350 amps AC in each line), explaining your answer:
600:5 ratio
3-θ source
3-θ load
A
file i04760
92
Question 84
Calculate all phase voltages and currents in the load given an open fault in one of the source’s
(alternator’s) coils:
Wye-connected
generator (480/277 V)
Delta-connected
load
R1 = R2 = R3 = 115 Ω
R1
R3
Open fault
R2
Phase quantity
VR1
VR2
VR3
IR1
IR2
IR3
Value (volts/amps)
file i02363
93
Question 85
Complete the table of values for this circuit:
180 Ω
250 Ω
R1
R3
R2
100 Ω
7V
R1
R2
R3
Total
V
I
R
180 Ω
100 Ω
250 Ω
P
As you solve this problem, be sure to store all intermediate calculations (i.e. answers given to you by
your calculator which you will use later in the problem) in your calculator’s memory locations, so as to avoid
re-entering those values by hand. Re-entering calculated values unnecessarily introduces rounding errors
into your work, as well as invites keystroke errors. Avoiding the unnecessary introduction of error is a very
important concept in Instrumentation!
If your final answers are rounded as a result of not doing this, you will only receive half-credit for your
work. This is a general policy for all your mathematical work in this program, not just this particular
problem!
Note: the task of analyzing any series-parallel resistor network is greatly simplified by an approach
outlined in the online textbook Lessons In Electric Circuits, in the “Series-Parallel Combination Circuits”
chapter. There, a technique is demonstrated by which one may reduce a complex series-parallel network
step-by-step into a single equivalent resistance. After this reduction, Ohm’s Law and Kirchhoff’s Laws of
voltage and current are applied while “expanding” the circuit back into its original form. Even though the
current notation in this textbook is electron flow rather than conventional flow, the series-parallel analysis
technique works all the same.
file i01168
94
Question 86
Suppose the solenoid energizes when the pushbutton switch is pressed and de-energizes when the
pushbutton is released just as it is supposed to, but the lamp never energizes regardless of the pushbutton
switch’s state:
480 VAC
source
1 amp
1 amp
5 amps
D
C
F
G
1 amp
A
Solenoid
+ 24 VDC
−
Lamp
B
E
Identify the likelihood of each specified fault for this circuit. Consider each fault one at a time (i.e. no
coincidental faults), determining whether or not each fault could independently account for all measurements
and symptoms in this circuit.
Fault
Pushbutton switch failed open
NC relay contact failed open
NO relay contact failed open
Relay coil failed open
480 volt fuse(s) blown
Pushbutton switch failed shorted
NC relay contact failed shorted
NO relay contact failed shorted
Relay coil failed shorted
24 VDC source dead
file i03136
95
Possible
Impossible
Question 87
Three-phase electric motors are often equipped with a set of electrical terminals for configuring different
voltage ranges and/or base speeds. Different configurations consist of different patterns of “jumper” wires
connecting these terminals together. For example, here is an illustration of a three-phase electric motor with
nine stud-and-nut terminals for connecting a set of six wire windings (coils) in two different configurations:
one for low voltage (240 volts AC) and one for high voltage (480 volts AC):
2
3
Motor
6
5
4
9
8
7
3
2
1
5
9
6
8
Shaft
7
4
1
The following schematics show how the six windings interconnect for each voltage configuration, and
how the three AC power conductors (A, B, and C) connect to supply AC power to these windings:
Low-voltage
connections
B
B
C
2
3
8
High-voltage
connections
2
9
5
9
3
C
6
8
4,5,6
1
7
7
4
A
A
1
Sketch the proper power conductor and jumper connections for low-voltage operation and for highvoltage operation:
Low-voltage (240 VAC)
C
High-voltage (480 VAC)
6
5
4
6
5
4
9
8
7
9
8
7
3
2
1
3
2
1
B
A
C
file i03248
96
B
A
Question 88
Each of these statements is incorrect in some way. Correct the misconceptions in each:
“Thermal overloads protect against overcurrent conditions in case there is a short-circuit in
the power conductors feeding a motor bucket.”
“Thermal overloads protect against motor overheating by sensing the temperature of the motor.
They operate on temperature, rather than on motor current like a circuit breaker.”
“When an overload heater senses an over-loaded condition, it opens up like a fuse to directly
interrupt power to the motor.”
file i01283
97
Question 89
Small relays often come packaged in clear, rectangular, plastic cases. These so-called “ice cube” relays
have either eight or eleven pins protruding from the bottom, allowing them to be plugged into a special
socket for connection with wires in a circuit. Note the labels near terminals on the relay socket, showing the
locations of the coil terminals and contact terminals:
coil
Com #1
Com #2
coil
N.O. #1
N.C. #1
N.C. #2
N.O. #2
(top views)
Relay
socket
Relay
Draw the necessary connecting wires between terminals in this circuit, so that actuating the normallyopen pushbutton switch sends power from the battery to the coil to energize the relay, with one of the relay’s
normally-open contacts turning the lamp on. The pushbutton switch should not carry any lamp current,
just enough current to energize the relay coil:
+
-
N.O.
switch
Battery
Lamp
Relay
(plugged into socket)
file i03210
98
Question 90
In this 480 volt AC induction motor control circuit (sometimes referred to as a “bucket”), a three-pole
relay (typically called a contactor) is used to switch power on and off to the motor. The contactor itself is
controlled by a smaller switch, which receives 120 volts AC from a step-down transformer to energize the
contactor’s magnetic coil. Although this motor control circuit used to work just fine, today the motor refuses
to start.
To 3-φ , 480 volt power source
L1
L2
L3
L1
L2
L3
Schematic diagram
Fuses
Transformer
X2
H1
H3
H2
H4
X1
Contactor
H1
H3
H2
H4
Transformer
Contactor
A1
X1
A2
A2
motor
Switch
T1 T2
Motor
X2
A1
T3
Switch
T1 T2 T3
Using your AC voltmeter, you measure 478 volts AC between L1 and L2, 479 volts AC between L2 and
L3, and 478 volts AC between L1 and L3. With the switch in the “on” position, you measure 117 volts AC
between terminals X1 and X2 on the transformer. From this information, identify the following:
• Two components or wires in the circuit that you know cannot be failed either open or shorted, besides
the 480 volt AC source which is obviously operational.
• Two different component or wire failures in the circuit, either one of which could account for the problem
and all measured values, and the types of failures they would be (either open or shorted).
file i03175
99
Question 91
Lab Exercise – introduction
Your team’s task is to construct a three-phase reversing motor starter circuit, complete with a
transformer bank to convert 480 VAC power to 240 VAC or 208/120 VAC power. You will also demonstrate
proper safety precautions appropriate for working with three-phase power circuitry, including lock-out-tagout and verification of safe conditions using a multimeter.
The following table of objectives show what you and your team must complete within the scheduled
time for this lab exercise. Note how some of these objectives are individual, while others are for the team as
a whole:
Objective completion table:
Performance objective
Team meeting and prototype sketch (do first!)
Circuit design challenge
Final schematic diagram and system inspection
Proper use of insulation tester
Safety demonstrations
Hazard/risk assessment as per NFPA 70E
Transformer bank wiring inspection
Proper motor control function
Troubleshooting
Lab question: Wiring connections
Lab question: Commissioning
Lab question: Mental math
Lab question: Diagnostics
Decommission and lab clean-up
Personal tool kit complete (show on last day)
Reply to email message on BTC account
Grading
mastery
mastery
mastery
mastery
mastery
mastery
mastery
mastery
mastery
proportional
proportional
proportional
proportional
mastery
mastery
mastery
1
–
2
–
–
–
–
3
–
–
–
–
–
4
–
–
–
–
–
Team
–
–
–
–
–
–
–
–
–
–
–
–
–
–
–
–
–
–
–
–
–
–
–
–
–
–
–
–
–
–
–
–
–
–
–
–
–
–
–
–
–
––––
––––
The only “proportional” scoring in this activity are the lab questions, which are answered by each student
individually. A listing of potential lab questions are shown at the end of this worksheet question. The lab
questions are intended to guide your labwork as much as they are intended to measure your comprehension,
and as such the instructor may ask these questions of your team day by day, rather than all at once (on a
single day).
In addition to this motor control system, you must individually construct a PLC trainer for learning
PLC programming. An example is documented in the next question of this worksheet.
PLC objective completion table:
Performance objective
All components unwired before construction
All inputs (switches) function properly
All outputs (lights) function properly
Grading
mastery
mastery
mastery
1
2
3
4
Team
––––
––––
––––
It is essential that your team plans ahead what to accomplish each day. A short (10
minute) team meeting at the beginning of each lab session is a good way to do this, reviewing
what’s already been done, what’s left to do, and what assessments you should be ready for.
There is a lot of work involved with building, documenting, and troubleshooting these working
instrument systems!
100
As you and your team work on this system, you will invariably encounter problems. You should always
attempt to solve these problems as a team before requesting instructor assistance. If you still require
instructor assistance, write your team’s color on the lab whiteboard with a brief description of what you
need help on. The instructor will meet with each team in order they appear on the whiteboard to address
these problems.
101
Lab Exercise – team meeting, prototype sketch, and instrument selection
An important first step in completing this lab exercise is to meet with your instructor as a team
to discuss safety concerns, team performance, and specific roles for team members. If you would like to
emphasize exposure to certain equipment (e.g. use a particular type of control system, certain power tools),
techniques (e.g. fabrication), or tasks to improve your skill set, this is the time to make requests of your
team so that your learning during this project will be maximized.
An absolutely essential step in completing this lab exercise is to work together as a team to sketch a
prototype diagram showing what you intend to build. This usually takes the form of a simple electrical
schematic and/or loop diagram showing all electrical connections between components, as well as any tubing
or piping for fluids. This prototype sketch need not be exhaustive in detail, but it does need to show enough
detail for the instructor to determine if all components will be correctly connected for their safe function.
For example, if you intend to connect field devices to a PLC (Programmable Logic Controller), your
prototype sketch must show how those devices will connect to typical input/output terminals on the PLC,
where electrical power will be supplied, etc. Prototype sketches need not show all intermediary connections
between components, such as terminal blocks in junction boxes between the field device and the controller.
You should practice good problem-solving techniques when creating your prototype sketch, such as
consulting equipment manuals for information on component functions and marking directions of electric
current, voltage polarities, and identifying electrical sources/loads. Use this task as an opportunity to
strengthen your analytical skills! Remember that you will be challenged in this program to do all of this
on your own (during “capstone” assessments), so do not make the mistake of relying on your teammates to
figure this out for you – instead, treat this as a problem you must solve and compare your results with those
of your teammates.
Your team’s prototype sketch is so important that the instructor will demand you provide this plan
before any construction on your team’s working system begins. Any team found constructing their system
without a verified plan will be ordered to cease construction and not resume until a prototype plan has
been drafted and approved! Similarly, you should not deviate from the prototype design without instructor
approval, to ensure nothing will be done to harm equipment by way of incorrect connections. Each member
on the team should have ready access to this plan (ideally possessing their own copy of the plan) throughout
the construction process. Prototype design sketching is a skill and a habit you should cultivate in school
and take with you in your new career.
When selecting components for this lab exercise, you will need to choose a step-down “control power”
transformer, a pair of three-phase contactors (one for forward and one for reverse), and an overload “heater”
assembly. A three-pushbutton Forward/Reverse/Stop control station has already been constructed for you,
having four wires ready to connect to your motor starter assembly:
Pushbutton switch station wiring diagram
Stop
Fwd
Rvs
Com
After locating suitable components, you should qualitatively test them prior to construction of your
system. For an electric motor, this means checking continuity through all the windings. For switches,
ohmmeter (“continuity”) measurements will tell you if the switch contacts are actuating as they should. For
the contactor, you may manually actuate the contacts and also check the contacts and coil for continuity
102
using your ohmmeter. If any component fails to respond properly, notify the instructor and then tag it with
a label explaining what it does (or what it fails to do).
Another detail important to the planning of your system is identifying the necessary gauge (size) of
the wires used. Consult article 310 of the National Electrical Code (the “NEC,” also known as NFPA 70)
book regarding “ampacity” ratings for different gauges of stranded copper wire. Your motor’s nameplate
will provide the information you will need on line current.
Planning a functioning system should take no more than an hour if the team is working
efficiently, and will save you hours of frustration (and possible component destruction!).
103
Lab Exercise – circuit design challenge
Connect an “ice-cube” relay to a low-voltage DC source as well as 120 volts AC so that a hand-operated
switch will control the energization of a 120 VAC load. All electrical connections must be made using a
terminal strip (no twisted wires, crimp splices, wire nuts, spring clips, or “alligator” clips permitted), and
the 120 VAC portion of the circuit must be fused for overcurrent protection.
This exercise tests your ability to properly interpret the “pinout” of an electromechanical relay, properly
wire a switch to control a relay’s coil, properly wire a load to the contacts of a relay, properly select NO/NC
contacts on both the switch and the relay, and use a terminal strip to organize all electrical connections.
Relay socket
Switch
Relay
Batteries
Terminal strip
AC power
cord
+
-
+
-
+
-
Fuse holder
AC
load
The following components and materials will be available to you: assorted “ice cube” relays with DCrated coils and matching sockets ; assorted pushbutton switches ; terminal strips ; lengths of hook-up
wire ; battery clips (holders) ; 120 VAC power cord with fuse assembly ; 120 VAC lamp or other
suitable load.
You will be expected to supply your own screwdrivers and multimeter for assembling and testing the
circuit at your desk. The instructor will supply the battery(ies) to power your circuit when you are ready
to see if it works. Until that time, your circuit will remain unpowered.
Load/switch status (instructor chooses):
On when pressed
or
Off when pressed
Study reference: the “Control Relays” section of Lessons In Industrial Instrumentation.
104
Lab Exercise – documenting the system
Given the hazards associated with three-phase AC power circutry, it is essential that you carefully plan
your circuit in its entirety prior to assembling it. For this reason, the instructor will require a complete,
detailed schematic diagram of your motor starter circuit. These diagrams must be thoroughly checked for
accuracy and electrical safety, to ensure no unnecessary hazards are present when power is applied.
A sample schematic diagram for a one-direction motor starter circuit is shown on the next page. Your
schematic diagram must be comprehensive and detailed, showing every wire connection, every cable, every
terminal block, etc. The principle to keep in mind here is to make the schematic diagram so complete and
unambiguous that anyone can follow it to see what connects to what, even someone unfamiliar with motor
control circuits. In industry, systems are often constructed by contract personnel with limited understanding
of how the system is supposed to function. The schematic diagrams they follow must be so complete that
they will be able to connect everything properly without necessarily understanding how it is supposed to
work.
Note that each and every wire in your system needs to be labeled with a number. Wires electrically
common to each other at all times (i.e. connected at terminal blocks, not passing through any component)
must bear the same label number. An easy way to label wires is to wrap a short piece of masking tape around
each wire then writing on that masking tape with a permanent marker. Furthermore, each number or other
label appearing on a device terminal (e.g. the screw terminals on an octal-base relay socket) must be shown
on your schematic diagram in parentheses, to distinguish those labels from wire numbers used to identify
wires. With each wire and each device terminal clearly labeled, one cannot go wrong in re-connecting wires
that were undone. This is important when technicians remove components for repair and replacement, as
the schematic diagram is their only guide to proper re-connection of the new or repaired components.
When your entire team is finished drafting your individual schematic diagrams, call the instructor to
do an inspection of the system. Here, the instructor will have students take turns going through the entire
system, with the other students checking their diagrams for errors and omissions along the way. During this
time the instructor will also inspect the quality of the installation, identifying problems such as frayed wires,
improperly crimped terminals, poor cable routing, missing labels, lack of wire duct covers, etc. The team
must correct all identified errors in order to receive credit for their system.
After successfully passing the inspection, each team member needs to place their schematic diagram in
the diagram holder located in the middle of the lab behind the main control panel. When it comes time to
troubleshoot another team’s system, this is where you will go to find a schematic diagram for that system!
105
Note that this sample diagram is shown only to illustrate the conventions you should use in documenting
wire labels, terminal labels, etc. Your team’s diagram will differ substantially from this one, most notably
because it is a reversing motor control circuit whereas this example diagram shows a one-directional motor
control circuit:
L1
L2
L1
L2
L1
F1
Blk
H1
H4
Blk
Blk
H1
H2
H3
F2
L2
Blk
H4
480x120 VAC
control power transformer
F3
3
1
2
X1
Blu
X2
Blu
Blu
Stop
Start
3
OL
4
A
B
5
C
D
Blu
Blu
M
4
M
6
Blu
Terminal labels shown as red letters
Wire labels shown as blue numbers
5
Reversing motor control circuits always contain normally-closed interlocking relay contacts to prevent
simultaneous energization of both “Forward” and “Reverse” contactors. The one-direction motor control
circuit shown above lacks interlock contacts, because there is only one direction it can turn.
Feel free to consult the “Typical Wiring Diagrams” booklet produced by Allen-Bradley for manual and
magnetic full-voltage starter units, contained on your Instrumentation Reference. This booklet shows a wide
variety of starter circuit configurations, including diagrams for reversing starter circuits.
Note that wiring diagrams for motor control circuits often take two forms: schematic and pictorial.
Schematic diagrams are laid out in such a way as to minimize the number of wire crossings, in order to aid
visual analysis of the circuit. Pictorial diagrams, on the other hand, are laid out in a manner resembling
the physical orientation of circuit components, and therefore typically are more difficult to analyze because
there are many more wires crossing over each other in order to reach their intended terminal points. It
is highly recommended that you make your diagrams schematic rather than pictorial, especially for ease of
interpretation when you do troubleshooting on motor control circuits and must use the diagram to determine
your diagnostic tests.
Common mistakes:
• Copying (verbatim) a sample diagram from a book, rather than customizing the diagram for the
components at hand.
• Basing your diagram off of a team-mate’s diagram, rather than closely inspecting the system for yourself.
• Forgetting to label all wires (see example diagram).
• Forgetting to label all terminals (see example diagram).
• Forgetting to note all wire colors.
• Forgetting to put your name on the schematic diagram!
Creating and inspecting accurate schematic diagrams should take no more than one full
lab session (3 hours) if the team is working efficiently!
106
Lab Exercise – building the system
After getting your wiring diagram approved by the instructor, you are cleared to begin building your
system. Mount all control components (control power transformer, contactors, overload unit, fuse holders)
on a metal subpanel (plate) designed to insert into an electrical enclosure. Locate the pushbutton switched
at some other location such as the main control panel for the lab. This ensures a long enough cable run
for the switches to make the system realistic for testing and troubleshooting. Note: you must marshall all
switch wiring through terminal blocks on the subpanel, so that the switches may be disconnected from the
rest of the control circuit without disturbing any other wiring.
Power to your control circuit will come through four terminals located at one edge of the metal subpanel:
three fused terminals for the three-phase power lines (L1, L2, and L3), and one unfused terminal for earth
(safety) ground which will be bonded to the metal subpanel. Plastic “wire duct” will be used to route all
wires between components. Here is a model layout (note that yours may look different):
Stp
L1 L2 L3 Gnd
Stop
Com
Fwd
Rvs
Fwd
Rev
Subpanel
DIN rail
Wire duct
Fwd
Rvs
Wire duct
Wire duct
Wire duct
H1
H3
H2
H4
Control power
transformer
Reset
X1
Motor
X2
Wire duct
T1
T2
T3
All wires need to enter and exit the wire duct perpendicularly for a neat and professional appearance.
All conductors must be stranded copper, of sufficient gauge for the full-load motor current according to the
National Electrical Code (NEC). Each wire should bear its number label at each end where it terminates.
Before applying power to your motor control starter circuit, it must be inspected under instructor
supervision. Testing will be performed using a high-voltage insulation tester (sometimes called a “Megger”
in honor of a proper brand name for this type of instrument) to check for proper connections, proper fuse
operation (i.e. when a fuse is pulled out of its socket, continuity to the protected device is interrupted), etc.
Common mistakes:
• Failing to tug on each and every wire where it terminates to ensure a mechanically sound connection.
• Students working on portions of the system in isolation, not sharing with their teammates what they
did and how. It is important that the whole team learns all aspects of their system!
Building a functioning system should take no more than one full lab session (3 hours) if
all components are readily available and the team is working efficiently!
107
Lab Exercise – insulation tester usage
An insulation tester is a special kind of ohmmeter designed to detect high-resistance paths for electric
current (in the hundreds of megaohms). The purpose of using an insulation tester when checking the integrity
of electric motors and motor control circuits is to reveal any breakdowns of electrical insulation that might
not otherwise be detected using a regular low-range ohmmeter.
What makes an insulation tester different from a regular ohmmeter is its use of relatively high voltage
to perform the test. Unlike a regular ohmmeter which only applies a few volts (or even just a few tenths of
a volt for many modern DMM ohmmeter functions) to the circuit under test, an insulation tester contains
within it a high-voltage generator capable of supplying hundreds or even thousands of volts to the test leads
in order to “stress” the circuit under test and reveal any breakdown of insulation. This makes an insulation
tester capable of delivering an electrical shock to the user if incorrectly operated!
Legacy insulation testers, especially the “Megger” brand whose name has become synonymous with
insulation test instruments, used hand-crank electromechanical generators to create this high voltage. Early
“Megger” testers actually had a small crank handle protruding from the side which the user would turn
after having connected the test leads to the circuit. If something went wrong and the user became shocked
by the tester’s output voltage, they would naturally stop cranking the handle. Modern insulation testers
have battery-powered high voltage generator circuits, and use a pushbutton to trigger the application of
high voltage to the circuit under test. Again, the notion being that anyone shocked by the output of the
instrument will naturally stop pressing the button.
All insulation testers have rather high output impedance, so that when connected across a short-circuit
the high-voltage power source inside the tester will not be damaged by excessive current. This makes
insulation testers perfectly valid for testing continuity in addition to testing for the presence of non-continuity
(i.e. that conductors are insulated from each other).
Most insulation testers provide a way to vary the amount of voltage output by the tester, for different
testing applications. When using an insulation tester, you want to use a test voltage greater than that
normally experienced by the device or circuit under test, in order to adequately “stress” that device or
circuit to ensure its proper operation when energized by its normal supply voltage. However, you do not
want to use so much voltage that you actually cause damage to the device or circuit under test! This means
the tester’s output voltage should be configured to be just one step above the circuit’s normal operating
voltage.
Devices most susceptible to damage from mis-use of an insulation tester are semiconducting in nature.
Diodes, transistors, SRCs, TRIACs, and associated devices may all be damaged rather easily by the misapplication of an insulation tester. This means one should not use an insulation tester on a circuit containing
complex and expensive semiconductor components such as variable-speed motor drives (VSDs or VFDs).
108
Lab Exercise – safety demonstrations
This lab exercise, more than any other, harbors a significant level of personal danger due to the use
of 480 VAC power. Exercising safe work habits is not just an objective of this lab, but it is essential for
avoiding injury! This lab requires you to demonstrate the following procedures:
• The one-hand rule (working only with your right hand – keeping the left hand in a pocket or behind
your back – when working on any energized circuit)
• Lock-out, Tag-out (properly documenting work to be done on a tag, then attaching both tag and lock
to the disconnect device securing power)
• Attempt to start the motor (as a crude check to see that power has been disconnected)
• Proper use of meter to check for dangerous voltage (check for voltage between all possible pairs of points
– including earth ground – and then verifying the meter’s operation against a known voltage source)
109
Lab Exercise – hazard/risk assessment
Here, you will work with your team to perform an assessment of hazards and risks posed by a particular
job assignment selected by your instructor. Your assessment needs to be based on the NFPA 70E “Standard
for Electrical Safety in the Workplace” document. Your assessment shall account for arc flash as well as for
electric shock, and will detail necessary PPE (Personal Protective Equipment) and procedures necessary for
safe work.
Your instructor will randomly select a job task. Examples include:
• Attaching 4-20 mA wires to the back of a panel-mounted loop controller while the controller is powered
by 120 VAC.
• Using a multimeter to take voltage measurements on a 208 VAC motor starter circuit while it is powered
through the step-down transformer bank.
• Using a multimeter to take voltage measurements on the 480 VAC lines feeding the step-down
transformer bank.
• Using a multimeter to take voltage measurements on a live 480 VAC motor starter circuit fed directly
from a three-phase transformer with a specified MVA rating.
• Using a multimeter to take voltage measurements on a VFD while it is powered through an isolation
transformer of specified KVA rating (just like some of the VFDs in our lab).
• “Racking in” a 4160 VAC circuit breaker into a live panel.
• Using a clamp-on ammeter to measure current through a line feeding a 480 VAC motor.
Here are some details which must be included in your final assessment of hazards and risks:
• Arc flash boundary distance =
inches
• Necessary arc flash protective clothing to wear =
• Approach distance for a qualified worker =
inches
• Necessary gloves to wear =
• Whether or not electrically insulated tools are required
• Citations showing where in NFPA 70E you obtained the information
110
Lab Exercise – wiring the step-down transformer bank
In order to power your 240 VAC or 208 VAC motor from the 480 VAC receptacle in the lab, you will need
to wire three transformers together to create a three-phase transformer bank. Here are your configuration
options, based on the different possible primary/secondary voltage ratings available for the transformers:
Delta-Delta configuration
480 VAC
240 VAC
from receptacle
to motor
480 volt primaries
240 volt secondaries
Delta-Wye configuration
480 VAC
208 VAC
from receptacle
to motor
480 volt primaries
120 volt secondaries
Wye-Delta configuration
480 VAC
240 VAC
from receptacle
to motor
277 volt primaries
240 volt secondaries
Wye-Wye configuration
480 VAC
208 VAC
from receptacle
to motor
480 volt primaries
120 volt secondaries
You may have multiple options available to you, depending on the rating of your motor and the particular
transformers used to for the three-phase bank. If this is the case, your instructor will choose one of the
configurations for you.
After this, you must work as a team to determine the proper phasing (“polarity”) for the transformers
and then connect the necessary wires in order to build the desired circuit. You may find the section titled
“Transformer Polarity” in your Lessons In Industrial Instrumentation textbook helpful in explaining this
concept. The instructor must inspect your plan as well as the constructed circuit before you are allowed to
apply power to the transformer bank.
111
The following pictorial diagram might be useful for you and your team to use for sketching the necessary
Delta/Wye connections and transformer winding jumpers to achieve the necessary step-down ratios:
From three-phase
power source
Schematic diagram for each transformer
H1
H1
H3
H2
H4
H1
H3
H2
H4
H1
H3
H2
H4
X4
X2
X3
X1
X4
X2
X3
X1
X4
X2
X3
X1
H3
H2
H4
240 × 480 primary
120 × 240 secondary
X4
X2
X3
X1
To three-phase load
112
Lab Exercise – troubleshooting
The most challenging aspect of this lab exercise is troubleshooting, where you demonstrate your ability
to logically isolate a problem in the system. All troubleshooting is done on an individual basis (no team
credit!), and must be done on a system you did not help build, so that you must rely on schematic diagrams
to find your way around the system instead of from your own memory of building it.
Each student is given a limited amount of time to identify both the general location and nature of the
fault, logically justifying all diagnostic steps taken. All troubleshooting activities will take place under direct
instructor supervision to ensure students are working independently and efficiently.
Failure to correctly identify both the general location and nature of the fault within the allotted time,
and/or failing to demonstrate rational diagnostic procedure to the supervising instructor will disqualify the
effort, in which case the student must re-try with a different fault. Multiple re-tries are permitted with no
reduction in grade.
A standard multimeter is the only test equipment allowed during the time limit. No diagnostic circuit
breaks are allowed except by instructor permission, and then only after correctly explaining what trouble
this could cause in a real system.
The instructor will review each troubleshooting effort after completion, highlighting good and bad points
for the purpose of learning. Troubleshooting is a skill born of practice and failure, so do not be disappointed
in yourself if you must make multiple attempts to pass! One of the important life-lessons embedded in this
activity is how to deal with failure, because it will eventually happen to you on the job! There is no dishonor
in failing to properly diagnose a fault after doing your level best. The only dishonor is in taking shortcuts
or in giving up.
Common mistakes:
• Neglecting to take measurements with your multimeter.
• Neglecting to check other measurements in the system (e.g. pressure gauge readings).
• Incorrectly interpreting the wiring diagram (e.g. thinking you’re at the wrong place in the system when
taking measurements).
• Incorrect multimeter usage (e.g. AC rather than DC, wrong range, wrong test lead placement). This is
especially true when a student comes to lab unprepared and must borrow someone else’s meter that is
different from theirs!
Remember that the purpose of the troubleshooting exercise is to foster and assess your
ability to intelligently diagnose a complex system. Finding the fault by luck, or by trialand-error inspection, is not a successful demonstration of skill. The only thing that counts as
competence is your demonstrated ability to logically analyze and isolate the problem, correctly
explaining all your steps!
Troubleshooting takes a lot of lab time, usually at least two 3-hour lab sessions for everyone
in a full class to successfully pass. Be sure your team budgets for this amount of time as you
plan your work, and also be sure to take advantage of your freedom to observe others as they
troubleshoot, to better learn this art.
113
Lab questions
• Wiring connections
• Determine correct wire connections between components to create a working 3-phase motor control
circuit, based on diagrams of components with terminals labeled
Commissioning and Documentation
Explain the meanings of the various ratings specified on a motor nameplate
Explain the meanings of the coil and contact ratings specified on a contactor nameplate
Explain how an insulation tester may be used to test the integrity of an electric motor’s windings
Explain how an insulation tester might cause damage to circuit components if improperly used
Explain how to configure a multi-voltage induction motor for different operating voltages, given the
information shown on a motor nameplate
• Explain what arc flash and arc blast are, and what causes these effects
• Explain how overload heaters in a motor control circuit perform a function fundamentally different from
a fuse or a circuit breaker
•
•
•
•
•
•
• Mental math (no calculator allowed!)
• Convert horsepower rating of a three-phase AC electric motor into a current rating (at a specified line
voltage)
• Convert current rating of a three-phase AC electric motor into a horsepower rating (at a specified line
voltage)
• Diagnostics
• Determine whether or not a given diagnostic test will provide useful information, given a set of symptoms
exhibited by a failed system
• Identify at least two plausible faults given the results of a diagnostic test and a set of symptoms exhibited
by a failed system
• Propose a diagnostic test for troubleshooting a failed system and then explain the meanings of two
different test results
114
Lab Exercise – decommissioning and clean-up
The final step of this lab exercise is to decommission your team’s entire system and re-stock certain
components back to their proper storage locations, the purpose of which being to prepare the lab for the
next lab exercise. Remove your system documentation (e.g. wiring diagram) from the common holding area,
either discarding it or keeping it for your own records. Also, remove all wire labels from wiring and cables.
Leave the following components in place, mounted on the racks:
•
•
•
•
•
Large electric motors
Large variable-frequency drive (VFD) units
Cables inside conduit interconnecting junction boxes together
Pipe and tube fittings (do not unscrew pipe threads)
Supply air pressure regulators
Return the following components to their proper storage locations:
• Manual (e.g. pushbutton) switches
• “Jumper” cables used to connect terminal blocks within a single junction box
• Power cables and extension cords
115
Lab Exercise – tool kit and email usage
Two additional objectives that are not technically a part of making this lab project function, but are
nevertheless very important to your continued success in the Instrumentation program, include assembling
a personal tool kit and using your BTC email account (which is automatically created for every student at
the college).
You will be using your tool kit throughout the remainder of this program, and so it is very important
to have it complete and ready to use by the end of this lab exercise. Note that there are several optional
items listed in addition to mandatory items. These optional tools are useful, but not 100% necessary for the
work you will be doing in the lab. Also note that there are some consumable items in your tool list such as
electrical compression terminals which you will need to keep stocked as you use them in your labwork.
Likewise, you will be relying on email to receive important messages from your instructor(s) throughout
the remainder of the program. These messages include, but are not limited to, job announcements, guest
speaker appearances, schedule changes, emergency notifications, scholarship announcements, and feedback
on your personal performance in the program. The reason we use email as opposed to using learning
management software is because it is imperative you learn how to appropriately use email for your chosen
career. Email is simply the most common and most practical medium businesses use for day-to-day electronic
communication.
Every BTC student is automatically given an email account upon registration, and this account remains
active for some time after graduation. If you would rather not add one more email account to your electronic
life, there is the option of having all messages received in your BTC email inbox automatically forwarded
to the email platform of your choice (Yahoo, Hotmail, Gmail, Live, etc.) which may be selected as an
option within your BTC email management webpage. It is your responsibility to log in to your BTC email
account, set up any forwarding features you would like, and to check your email account daily to receive these
important messages.
The library staff at BTC provide technical support for all school-related IT (Information Technology)
needs. If you are experiencing trouble with your email account, with password management, or any other
network-based technology necessary for your learning at BTC, the library staff are well-trained and helpful
in this regard.
Your readiness for email use will be assessed by your reply to an email message sent to
you by your instructor. Replying to this email message with an email message of your own is
a mastery-level objective for every new student in this lab exercise.
When you graduate from this program and enter the workforce, your BTC email account will remain
active for some time, but not in perpetuity. Therefore, you must inform your instructors of your preferred
email account for post-graduation correspondence before you leave BTC. We use email to regularly
communicate job announcements of interest to graduates, so it is in your best interest to remain connected.
file i02132
116
Question 92
In order to learn PLC programming and perform the exercises necessary for exams in this course, you
must have your own PLC trainer consisting of a working PLC and input switches all wired and ready to use.
PLC
Power
I/O
Input switches
Indicator lamps
All components should be securely mounted to a wood board or some other structure making it easy
to transport and use. You must have a terminal block in between the switches, indicators, and PLC I/O
terminals to allow for easy connection and disconnection of external devices to your PLC without wearing out
the screws on the PLC’s terminal block prematurely. Separate terminal blocks are easily replaced, whereas
the terminal block on your PLC is likely much more expensive and inconvenient to replace!
Consult the user’s manual for your PLC in order to determine how all devices should be wired to the
input and output (I/O) terminals. Note that often there are different types of I/O (AC, DC, sourcing,
sinking) available for the same (or similar) model of PLC. Most PLC user’s manuals give detailed diagrams
showing how to connect devices to discrete I/O points, so be sure to follow the proper diagram for your
specific PLC model!
Once you have your PLC wired, the next step is to install and run the software used to program your
programmable logic controller (PLC), and try to get the two devices communicating with each other. This,
of course, requires you have a special cable connecting your PC to your PLC, with any necessary “drivers”
installed on your PC to allow it to communicate. Like all serial-based communications, the PC needs to be
properly configured with regard to bit rate, number of data bits, number of stop bits, and parity in order to
communicate with the PLC. The software you will be using should have an “auto detect” feature which will
sequentially try various combinations of these parameters until it finds one combination that works. Note: on
Allen-Bradley PLCs, you must first install and run software called RSLinx which manages communications
between your PC and PLC, before you start up the programming software (RSLogix).
After that, your next step is to use programming software (installed in a personal computer) to program
your PLC with some simple function consisting of “contact” and “coil” instructions. The purpose of a virtual
contact in a PLC program is to read data bits from memory, while the purpose of a virtual coil in a PLC
program is to write data bits to memory. Thus, you will create programs for the PLC using virtual contacts
to read the states of real-world switches connected to inputs on the PLC, and using virtual coils to control
real-world outputs on the PLC to energize loads such as lamps and solenoids. The interconnections and
arrangements of these virtual contacts and coils determine the logic implemented by the PLC: specifying the
conditions necessary to energize real-world devices based on input conditions.
You will find step-by-step instructional tutorials for both Allen-Bradley MicroLogix and Koyo CLICK
PLCs in your Instrumentation Reference (provided by the instructor). Follow these tutorials to establish
communication between your PC and your PLC, and to write a simple contact-and-coil ladder diagram
program, before attempting the exercises that follow. You will also find much pertinent information for
programming Allen-Bradley MicroLogix PLCs in the RSLogix 500 Getting Results Guide, since the SLC 500
117
line of Allen-Bradley PLCs program so similarly to the MicroLogix line.
This example shows an Allen-Bradley MicroLogix 1000 series PLC (model 1761-L10BWA) wired to two
toggle switches and one LED indicator lamp, complete with a demonstration program. Note that line power
(120 VAC) wire connections to power the PLC have been omitted, so the focus is solely on the I/O wiring:
Toggle switch
24V
DC
COM
I/0
I/1
I/2
I/3
DC
COM
I/4
I/5
DC OUT
Allen-Bradley
Power
Run
MicroLogix
Fault
1000
Force
85-264 VAC
L1
VAC
VDC
L2/N
O/0
VAC
VDC
O/1
VAC
VDC
O/2
VAC
VDC
O/3
LED (with dropping resistor)
Ladder-Diagram program written to PLC:
I:0
I:0
O:0
0
1
0
END
Note how Allen-Bradley I/O is labeled in the program: input bits designated by the letter I and output
bits designated by the letter O.
Based on the wiring and program you see for this PLC, identify the switch state combinations resulting
in an energized lamp. Try duplicating this program in your own PLC (even if it is a different brand or model)
and see how it functions. Be sure to activate the color highlighting feature of your programming editor so
you may see the “live” status of the program’s virtual contacts and coil!
118
This example shows a Siemens S7-200 series PLC (model 224XP) wired to two toggle switches and one
LED indicator lamp, complete with a demonstration program:
24 VDC
LED (with dropping resistor)
SIEMENS
Toggle switch
1M
SIMATIC
S7-200
1L+
0.0
0.1
0.2
Q0
SF/DIAG
0.3
0.4
2M
2L+
0.5
0.6
0.7
1.0
1.1
M
DC
CPU 224XP
Q1
.0 .1 .2 .3 .4 .5 .6 .7
L+
DC/DC/DC
.0 .1
RUN
STOP
.0 .1 .2 .3 .4 .5 .6 .7
I0
1M
Port 1
.0 .1 .2 .3 .4 .5
I1
0.0
0.1
0.2
0.3
0.4
0.5
0.6
0.7
2M
1.0
1.1
1.2
1.3
1.4
1.5
M
L+
Port 0
Ladder-Diagram program written to PLC:
I0.0
Q0.0
I0.1
END
Note how Siemens I/O is labeled in the program: input bits designated by the letter I and output bits
designated by the letter Q.
Based on the wiring and program you see for this PLC, identify the switch state combinations resulting
in an energized lamp. Try duplicating this program in your own PLC (even if it is a different brand or model)
and see how it functions. Be sure to activate the color highlighting feature of your programming editor so
you may see the “live” status of the program’s virtual contacts and coil!
119
This example shows a Koyo “CLICK” PLC (model C0-02DD1-D) wired to two toggle switches and one
LED indicator lamp, complete with a demonstration program:
C0-02DD1-D
CLICK
Koyo
C1
X1
X2
X3
X4
PWR
RUN
ERR
RUN
C2
STOP
Y1
LED (with dropping resistor)
Y2
Y3
PORT 1
TX1
Y4
RX1
+V
AD1V
TX2
AD1I
RX2
AD2V
PORT 2
AD2I
Toggle switch
ACOM
PORT 3 RS-485
DA1V
DA1I
TX3
RX3
DA2V
LG
0
DA2I
24V
24 VDC
Ladder-Diagram program written to PLC:
X1
X2
X2
X1
Y1
END
Note how Koyo I/O is labeled in the program: input bits designated by the letter X and output bits
designated by the letter Y.
Based on the wiring and program you see for this PLC, identify the switch state combinations resulting
in an energized lamp. Try duplicating this program in your own PLC (even if it is a different brand or model)
and see how it functions. Be sure to activate the color highlighting feature of your programming editor so
you may see the “live” status of the program’s virtual contacts and coil!
file i04513
120
Answers
Answer 1
Here is a collection of typical answers from previous students addressing question #1 (goals of enrolling in
Instrumentation):
•
•
•
•
•
•
To
To
To
To
To
To
achieve job security
gain a sense of doing something important in life
have respect on the job
be financially stable
provide for family
use your mind instead of doing menial work
Here is a collection of employer data addressing question #3 (important knowledge/skills):
In 2009, the Industrial Instrumentation and Control Technology Alliance (IICTA) conducted a survey
of 23 industrial instrumentation experts from across the United States to rank the relative importance of
knowledge and skill areas listed on the Texas Skill Standards Board (TSSB) skill standard for “Industrial
Instrumentation and Controls Technician.” The following is a list of knowledge/skill areas from this skill
standard where “critically important” (the absolute highest importance) was the most popular vote of the
experts surveyed, along with the percentage of experts voting the knowledge/skill area as “critical”, and also
my own qualitative judgment of how difficult it is for someone to first acquire that knowledge or skill:
Knowledge / Skill area
Ability to learn new technology
Interpret and use instrument loop diagrams
Configure and calibrate instruments
Knowledge of test equipment
Interpret and use process and instrument diagrams
Interpret and use instrument specification sheets
Knowledge of basic AC/DC electrical theory
Knowledge of basic mathematics
Interpret and use electrical diagrams
Interpret and use motor control logic diagrams
Knowledge of system interactions (e.g. interlocks & trips)
Knowledge of permits and area classifications
Understanding consequences of changes
Proper use of hand tools
Knowledge of control schemes (e.g. ratio, cascade)
Proper tubing and wiring installation
Motor control circuit knowledge
Electrical wiring knowledge
% vote
65%
65%
65%
61%
57%
52%
52%
48%
48%
43%
43%
43%
43%
43%
39%
35%
30%
30%
Difficulty
Hard
Moderate
Moderate
Hard
Moderate
Easy
Hard
Moderate
Moderate
Moderate
Hard
Easy
Hard
Moderate
Hard
Moderate
Moderate
Moderate
Which of these knowledge/skill areas would you consider yourself proficient in right now?
On January 24, 2013 the Washington State Workforce Training and Education Coordinating Board
presented results of a survey gathering input from over 2800 employers state-wide. One of the questions on
this survey asked employers if they had experienced difficulty with entry-level employees demonstrating the
following skills. A partial listing of results is shown here:
121
Knowledge / Skill area
Solve problems and make decisions
Take responsibility for learning
Listen actively
Observe critically
Read with understanding
Use math to solve problems and communicate
Percentage experiencing difficulty
50%
43%
40%
38%
32%
31%
In July and August of 2011, the Manufacturing Institute and Deloitte Development LLC worked together
to adminster a “Skills Gap study” across a range of manufacturing industries in the United States. Survey
results were collected from 1123 respondents, with one of the survey questions asking “What are the most
serious skill deficiencies in your current employees?”. The responses to this question are tabulated here:
Knowledge / Skill area
Inadequate problem-solving skills
Lack of basic technical training
Inadequate “soft skills” (attendance, work ethic)
Inadequate computer skills
Inadequate math skills
Inadequate reading/writing/communication skills
Percentage experiencing difficulty
52%
43%
40%
36%
30%
29%
In December of 2001, the question “What qualities should an Instrumentation graduate possess
in order to excel in their profession?” was posed to representatives on the Advisory Committee for
BTC’s Instrumentation program. In addition to a firm knowledge of fundamentals (electronics, physics,
mathematics, process control), one advisor in particular noted that “self-direction and the ability to learn
on your own” was even more important than these.
Do you see a pattern emerging from a comparison of these feedback results? As any economist can
tell you, the highest-valued commodity is one with the greatest demand and the least supply. Which
knowledge/skill area do you see in these survey results meeting both criteria? Are there other (lesser-valued)
knowledge/skill areas of high value as defined by the same criteria of low supply and high demand?
122
Here is a collection of images addressing question #2 (career options):
Electric power generation:
Photos taken at the Satsop nuclear generating station in Washington.
Combined-cycle (gas turbine plus steam turbine) power plant, fueled by natural gas, in Ferndale, Washington.
123
Antelope Valley coal-fired power plant in Beulah, North Dakota.
Hydroelectric turbine generators at Grand Coulee Dam in Washington.
124
Oil and natural gas exploration/production:
BP Exploration’s “Atlantis” offshore rig while under construction.
BTC Instrumentation grad Paige repairing flare ignitors on an offshore rig in the Gulf of Mexico.
125
Oil well drilling rig in the Bakken oil play (Stanley, North Dakota). These rigs drill approximately 2 miles
down, then drill horizontally and fracture the shale rock to allow oil to seep out and be collected.
Oil wellhead and pump in Stanley, North Dakota.
126
Oil refining:
The Phillips66 refinery in Ferndale, Washington.
Coal gasification:
Dakota Gasification plant in Beulah, North Dakota. Produces synthetic natural gas, ammonia, and a variety
of other high-value chemical products from coal. A majority of the carbon dioxide produced in this process
is captured and piped to oil fields in Canada for enhanced recovery operations, where the CO2 gas ends up
sequestered in underground wells.
127
Chemical processing:
Chemtrade Solutions sulfuric acid reprocessing plant in Anacortes, Washington. This plant receives “spent”
sulfuric acid from two oil refineries (alkylation units, where sulfuric acid is used as a liquid catalyst) and
reprocesses this contaminated acid into nearly pure acid for re-sale and re-use in the refineries.
128
Wood pulping and paper production:
This is the “blend chest” at a small pulping operation, where different grades of wood pulp are mixed together
to achieve the correct blend for paper production.
129
Pharmaceutical manufacturing:
Photos taken at Zymogenetics in Seattle. Sorry – they wouldn’t let me snap any pictures of the really cool
stuff !
130
Natural gas compression and distribution:
Williams Northwest Pipeline’s gas compression facility in Sumas, Washington.
Large reciprocating (piston) engine used to compress natural gas.
131
Food processing and packaging:
Plant floor at Nature’s Path Foods in Blaine, Washington.
Automated boxing machine for cereal.
132
Alcohol production and bottling:
Mash tuns and bottling line at RedHook Brewery in Woodinville, Washington.
133
Municipal water and wastewater treatment:
Potable water filtering at the city of Arlington, Washington.
Wastewater clarification at West Point treatment facility in King County (Seattle), Washington.
134
Electrical power distribution:
Bonneville Power Administration’s Custer, Washington substation switchyard (500,000 volts).
135
Lumber milling and treatment:
A computer-controlled drilling machine places holes into a wooden power line crossarm.
A retort used to pressure-treat lumber.
136
Aerospace:
Photos taken at NASA’s rocket engine test facility in Stennis, Mississippi.
137
Instrument control circuit layout and design:
A typical screenshot of AutoCAD being used to draft a P&ID for an oil refinery unit.
“Potline” buildings at the Alcoa/Intalco aluminum smelter in Ferndale, Washington.
138
PLC programming (control system design engineering):
in_start_switch
in_stop_switch
run_enable
run_enable
in_psl
in_psh
run_enable
out_comp_motor
out_comp_motor
out_comp_motor
RTO
Retentive Timer On
Timer
run_time
Time Base
Preset
3600000
0
CTU
Count Up
Counter
hours.dn
DN
0.001
Accum
run_time.dn
EN
CU
hours
Preset
250
Accum
0
DN
out_warning_light
in_reset_switch
hours
RES
run_time.dn
run_time
RES
in_reset_switch
A typical PLC “ladder logic” program for an air compressor controlled by a Rockwell ControlLogix 5000 PLC
is shown here.
139
Environmental monitoring:
A Sutro weir used to measure the flow of water out of lake Padden in Bellingham, Washington.
140
Energy research and development:
Sandia National Laboratory’s pulsed power device used to conduct experiments in nuclear fusion, and also to
test the effects of electromagnetic pulse energy on military hardware. Photo courtesy Department of Energy.
The control room of Pacific Northwest National Laboratory’s Fast Flux Test facility, used to conduct
research on nuclear fission “breeder” reactor technology. Photo courtesy Department of Energy.
141
Renewable energy:
Pacific Northwest National Laboratory’s experimental algae ponds for solar-to-biomass conversion. Photo
courtesy Department of Energy.
Wind turbines at the Wild Horse wind farm near Ellensburg, Washington, operated by Puget Sound Energy.
142
Photovoltaic array at the Wild Horse wind farm near Ellensburg, Washington, operated by Puget Sound
Energy.
143
Mining:
BTC Instrumentation grads Micah and Mark working on a control valve near an ore crushing mill in Alaska.
144
Control valve service:
Typical “As-Found” and “As-Left” page of a control valve rebuild report.
145
Contract instrumentation work:
BTC Instrumentation grad Corey services a control valve at a Wyoming oil refinery during a winter shutdown.
Other career sectors not shown in this photo collection include (but are not limited to):
•
•
•
•
•
•
•
•
•
•
Manufacturing assembly lines
Automotive research and development
Weight scale and weighfeeder service
Calibration standard laboratories
University campus utility work
Geological monitoring (volcano monitoring)
Robotics
CNC machine tool maintenance
Remotely piloted vehicles
Instrumentation sales
Answer 2
Answer 3
Answer 4
Answer 5
Answer 6
146
Answer 7
The general philosophy of education in these courses may be summed up in a proverb:
“Give a man a fish and you feed him for a day. Give a man a fishing pole and you feed
him for life.”
Instrumentation is a highly complex, fast-changing career field. You will not survive, much less thrive,
in this field if all you can ever learn is what someone directly teaches you. In order to stay up-to-date with
new technology, figure out solutions to novel problems, and adapt to a changing profession, you absolutely
must possess independent learning ability. You must be able to “fish” for new knowledge and understanding
on your own. These courses are designed to foster this higher-level skill.
Answer 8
A mastery assessment is one that must be passed with a 100% score (no errors). Mastery assessments
are usually given with multiple opportunities to pass. The basic idea is, you try and try until you get it
perfect. This ensures mastery of the concept, hence the name.
By contrast, a proportional-graded assessment is one where you do not have to achieve perfection to pass.
Most of the tests and assignments you have completed in your life are of this type. A grade (percentage,
ranking, and/or letter) is given based on how well you answer the question(s).
In all the Instrumentation courses, all exams have both mastery and proportional sections. Lab exercises
likewise have both mastery and proportional sections as well. Preparation and feedback grades are strictly
proportional, with no mastery component.
Follow-up question: what happens if you fail to fulfill a mastery assessment within the allotted time?
Answer 9
Each student is allowed a certain number of hours absence time per quarter (refer to the syllabus for
the exact number!), to be used for absences of any reason. Absences exceeding this number of hours will
result in grade deductions (refer to the syllabus to see how severe!). Unused absence hours may be donated
by students to their classmates at the end of each quarter to help out fellow students in need.
Answer 10
Contacting your instructor and team-mates allows you to keep abreast of any new developments, and
find out how you can participate (if possible) during your absence. For instance, there may be something
your lab team could have you research while you’re out, to bring back to school the next day.
Answer 11
If you find yourself completely lost on a question or on a portion of the assigned reading despite having
exhausted all available study time before class, you should highlight these specific points in your notes and
seek help immediately at the beginning of class time. Chances are, you won’t be the only person with that
same question, and your query at the beginning of class will help others too!
Answer 12
147
Answer 13
An anecdote to relate regarding active reading on challenging subjects is when I had to study policy
statements at BTC in preparation for an accreditation audit. The texts were long, boring, and I had little
interest in their particulars. I found myself nodding off as I tried to read the policy statements, and unable
to explain the meaning of what I had just read. Finally, I forced myself to outline each section of these policy
papers in my own words, paragraph by paragraph, until I could articulate their meaning. To be sure, this
technique took longer than simply reading the text, but it was far more effective than plain reading (even
with underlining and highlighting!).
I’ve successfully applied similar strategies studying labor contracts for my work with the union at BTC.
Several times I’ve been called upon to research policies in other college contracts, and I have done so (again)
by summarizing their statements in my own words to ensure I am comprehending them as I read.
Answer 14
The ammeter shows R2 carrying all the current, therefore either R2 must be shorted or R1 must be
open.
Fault
R1 failed open
R2 failed open
R3 failed open
R1 failed shorted
R2 failed shorted
R3 failed shorted
Current source dead
Possible
√
√
Impossible
√
√
√
√
√
Answer 15
Answer 16
This is most definitely a synchronous motor and not an inducation motor. It it were an induction motor,
the speed would be less than synchronous.
The number of poles in this motor is 4.
Slip speed = 0 RPM (because it is synchronous).
Answer 17
Answer 18
Answer 19
Answer 20
Answer 21
Partial answer:
• The fact that this is a step-down transformer, is clearly evident from its primary/secondary turns
ratio: the winding having more turns will exhibit greater voltage (and less current) than the winding
having fewer turns
• Fuse current = 1.528 amps
148
Answer 22
Isource = 187.5 mA
Iload = 72.73 mA
Answer 23
240 VAC
connections
H1
H3
X1
H2
480 VAC
connections
H4
H1
X2
H3
X1
120 VAC output
H2
H4
X2
120 VAC output
I’ll let you determine ways to use a multimeter for winding tests in a control power transformer.
A megger is a special high-resistance ohmmeter using a test voltage of several hundred or thousand
volts. It is able to detect faults in the insulation of transformer windings in the multiple-megaohm range!
Answer 24
Answer 25
Partial answer:
Vphase(source) = 7.967 kV
Iphase(source) = 5.312 A
Vphase(load) = 7.967 kV
Ptotal = 126.96 kW
Answer 26
Partial answer:
Eline = 2400 V
Iphase(source) = 2.667 A
Iphase(load) = 4.619 A
Answer 27
Partial answer:
Iline = 26.93 A
Ephase(source) = 277 V
Ephase(load) = 479.8 V
149
Answer 28
Partial answer:
Iline = 25.88 A
Iphase(source) = 14.94 A
Ephase(load) = 2402 V
Answer 29
Answer 30
R1 = 1.2 kΩ
12 volts
R2 = 3.3 kΩ
12 volts
R1
1.2 kΩ
R3
R2
R3 = 790 Ω
Quantity
VR1
VR2
VR3
IR1
IR2
IR3
Series circuit
2.722 V
7.486 V
1.792 V
2.268 mA
2.268 mA
2.268 mA
150
Parallel circuit
12 V
12 V
12 V
10 mA
3.636 mA
15.190 mA
3.3 kΩ
790 Ω
Answer 31
R1 = 1 kΩ
24 volts
R2 = 3.9 kΩ
24 volts
R1
1 kΩ
R2
R3 = 790 Ω
Quantity
VR1
VR2
VR3
IR1
IR2
IR3
Series circuit
4.218 V
16.450 V
3.332 V
4.218 mA
4.218 mA
4.218 mA
Answer 32
•
•
•
•
R3
Vprimary = 48 volts
Vsecondary = 14.77 volts
Iprimary = 30.3 mA
Isecondary = 98.5 mA
This is a step-down transformer.
Answer 33
Iload = 23.77 mA
Vload = 8.318 V
Answer 34
Eline = 220 V
Iline = 0.482 A
Ephase(source) = 220 V
Iphase(source) = 0.278 A
Ephase(load) = 220 V
Iphase(load) = 0.278 A
Ptotal = 183.8 W
151
Parallel circuit
24 V
24 V
24 V
24 mA
6.154 mA
30.380 mA
3.9 kΩ
790 Ω
Answer 35
Fault
Circuit breaker tripped
Transformer primary winding failed open
Transformer secondary winding failed open
Resistor failed open
Resistor failed shorted
Open wire between K and P
Doorbell unit failed open
Doorbell unit failed shorted
152
Possible
√
√
√
√
Impossible
√
√
√
√
Answer 36
A good way to convert horsepower into watts using the 746 conversion factor is to set up the equality
in the form of a “unity fraction” to cancel units:
"Unity fraction"
2.5 HP
1
746 watts
1 HP
1865 watts
This cancellation technique ensures the multiplication and/or division is done properly, with the units
showing you exactly how the fraction must be set up to properly cancel the undesired unit (horsepower) and
replace it with the desired unit (watts).
I = 7.77 amps of current (assuming 100% efficiency).
I = 8.63 amps of current (assuming 90% efficiency).
Here is a sample spreadsheet page, showing one possible layout for the values:
1
2
3
4
1
HP =
2.5
Current (ideal) =
2
Voltage =
240
Current (actual) =
3
Efficiency =
5
90%
4
5
• Cell R1C5 formula: = R1C2 * 746 / R2C2
• Cell R2C5 formula: = R1C5 / R3C2
Note that the use of “R1C1” spreadsheet row/column labeling is arbitrary; one may use the more
customary “A1” letter/number labeling if desired. There are some advantages to numbered row/column
labels in more advanced spreadsheet programming, however, and so I recommend this style over the
letter/number style.
153
Answer 37
Pload = 3.59 MW
Line current in the three-phase system is given as 150 amps. According to the 2008 edition of the
National Electrical Code, this would require a #4 AWG copper wire (from table 310.21 in NFPA 70).
Line current in the single-phase system is calculated to be 260 amps. This would require 1/0 copper
wire according to the same table in the NEC.
The ratio of three-phase current to single-phase current is √13 , which tells us how much smaller the
cross-sectional area of the three-phase conductors may be compared to the cross-sectional area of the singlephase conductors. However, we know the three-phase system requires 3 conductors whereas the single-phase
system requires only 2 conductors: an increase in conductor count of 23 . The overall savings in copper realized
by three-phase distribution may therefore be calculated by multiplying these two ratios:
¶µ ¶
µ
3
1
√
= 0.866
2
3
Therefore, a three-phase power system requires just 86.6% of the copper required by a single-phase
power system to convey the same amount of electrical power!
Answer 38
DC line current at 110 volts (@ 18 kW load) = 163.6 amps
AC line current at 13.8 kilovolts (@ 18 kW load) = 1.304 amps
The advantage of AC should be clear from this example: the freedom to use transformers to step voltage
up and down at will allows us to use high voltage for low-current transmission of power (using conductors
only large enough to handle these low currents) while still being able to use low voltages at the points of use
for safety.
Thomas Edison’s DC power distribution was horribly inefficient by modern standards, requiring buried
copper bus bars to conduct the very large currents necessary to power many loads. Even then, the maximum
distances were short (only a few miles before voltage drops became excessive) owing to the resistive losses
of the copper bars.
154
Increasing
DC current
Conduit
Answer 39
Resistor
The induced current runs opposite the incident current in accordance with Lenz’s Law, in an attempt
to oppose the change in magnetic flux near the wires.
Answer 40
Answer 41
Answer 42
Terminal-to-terminal resistance should be very low, since you are merely measuring the DC resistance
of the stator windings. Terminal-to-frame resistance, however, should be infinite because the insulation of
the stator windings should prevent any electrical contact with the motor frame.
Answer 43
Current = 3.39 amps AC
This is most definitely an induction motor and not a synchronous motor!
Answer 44
Iline = 67.30 amps of current (assuming 100% efficiency).
Iline = 73.15 amps of current (assuming 92% efficiency).
Answer 45
Answer 46
Answer 47
155
Answer 48
The bolted-fault MVA rating of the 3 kVA transformer bank feeding a 208 volt motor starter will be its
base MVA rating (0.003 MVA) divided by its impedance (5%, or 0.05 per-unit):
MVAbf =
MVAbf =
MVAbase
Z
0.003
= 0.060
0.05
Arc flash boundary distance may be calculated one of two different ways:
Dc =
Dc =
p
p
2.65 × MVAbf × t
53 × 1.25 × MVAbase × t
The time to clear a fault was specified as half of one cycle, which is 8.333 milliseconds at 60 Hz.
Calculating both ways:
Dc =
Dc =
√
2.65 × 0.060 × 0.008333 = 0.036 ft = 0.44 in
√
53 × 1.25 × 0.003 × 0.008333 = 0.041 ft = 0.49 in
Answer 49
Vline
Vline
Vphase
Ili
I line
I line
ne
e
as
Ili
V
ph
I ph
as
e
ne
e
has
Ip
se
I phas
ha
Vphase
Vphase
Vline
Vline
Vline
Iline
Iline
Vphase
Iphase
Vline
e
Ip
ha
Vp
se
Iphase
Wye configuration
• Iphase = Iline
• Vphase < Vline
156
Delta configuration
• Vphase = Vline
• Iphase < Iline
Answer 50
It is helpful to recall how three-phase power is generated when trying to answer this question: we
generate three-phase power by rotating a magnet at the center of three sets of coils, spaced 120o apart from
each other around the circle.
The magnetic field appears to rotate because the stator windings are energized out-of-step in a 1-2-3
sequence. This is not unlike a string of blinking “Christmas lights” which appear to move because the lights
blink in a sequence that has a definite direction.
The compass needle’s rotational speed would be 3600 RPM (60 revolutions per second) as a power
supply frequency of 60 Hz. To halve this speed, we would either need to add twice as many poles to the
motor, or else halve the frequency (30 Hz).
To reverse the needle’s direction, reverse the phase sequence of the power. This may be accomplished
by swapping any two of the three power conductors to the stator.
Answer 51
As the rotor spins clockwise, the lamps will blink from left to right (C-B-A-C-B-A). To reverse the
sequence, simply swap any two wires (A ↔ B, B ↔ C, or A ↔ C). Swapping any two phases will change a
C-B-A sequence into an A-B-C sequence.
Answer 52
29.3 Hz is 29.3 flashes per second, which when matching the shaft’s speed equates to 29.3 revolutions
per second. This is equivalent to 1758 RPM.
This must be a 4-pole, induction AC motor operating on a 60 Hz power supply, since 1800 RPM is the
synchronous speed of a 4-pole machine at 60 Hz. The slip speed of this induction motor is 1800 − 1758 =
42 RPM.
157
Answer 53
Phase voltage = 277 volts AC (given)
√
Line voltage = VAB = VBC = VAC = Vphase 3 = 480 volts AC
V
=4
80
V
12
0
o
V
77
=2
120o
VA = 277 V
=2
77
V
o
0
12
0V
V
B
VBC = 480 V
VC
AC
V AB
8
=4
Phase current = 17 amps AC (given)
Line current = IA = IB = IA = Iphase = 17 amps AC
√
Total load power = total source power = 3Iphase Vphase = Iline Vline 3 = 14.13 kW
Answer 54
Phase current = 17 amps AC (given) √
Line current = IA = IB = IC = Iphase 3 = 29.4 amps AC
Phase voltage = 240 volts AC (given)
Line voltage = VAB = VBC = VAC = Vphase = 240 volts AC
√
Total load power = total source power = 3Iphase Vphase = Iline Vline 3 =12.24 kW
158
Answer 55
This is just an exercise in connecting the dots! A helpful problem-solving technique to apply to such
problems is tracing all connections made in the schematic diagram after making those connections in the
pictorial diagram. This helps you keep track of which connections have been made, and which connections
still need to be made.
Low-voltage
connections
C
8
3
High-voltage
connections
B
C
2
5 8
B
2
3
5
4
9
7
4
6
9
7
1
6
A
1
A
Low-voltage (240 VAC)
C
High-voltage (480 VAC)
9
4
7
9
4
7
5
8
6
5
8
6
3
2
1
3
2
1
B
A
C
B
A
Answer 56
A measurement of 0 volts may imply electrical continuity, but it may not. There are other reasons why
one might obtain a 0 volt measurement, such as an open fault isolating the measurement points from power.
If some other part of the AC line is open (e.g. the contactor being de-energized), even an open fuse will drop
0 volts because it is not the only open in the circuit.
159
Answer 57
The left-hand motor always operates in a “wye” configuration. The right-hand motor operates as a
“delta” in the low-speed mode and as a “wye” in the high-speed mode.
These motors achieve half-speed operation by doubling the number of active poles in their stators. Note
that in each of the high-speed configurations, pairs of stator coils are connected in parallel so that they
act as one coil. In each of the low-speed configurations, stator coils are connected in series with opposing
polarities, so that they will have opposite magnetic poles and therefore function differently.
The doubling of poles is not unlike a doubling of light bulbs in a “chaser” light display, where the
sequential blinking of light bulbs gives them an appearance of motion. Adding more light bulbs in between
the existing bulbs of a chaser array (i.e. doubling the number of lights without changing the length of the
array) makes it appear as though the lights’ “motion” moves along at a slower pace for the same blinking
frequency.
Answer 58
A megger is a special high-resistance ohmmeter using a test voltage of several hundred or thousand
volts. It is able to detect faults in the insulation of motor windings in the multiple-megaohm range!
If one stator winding partially shorts in a wye-connected motor, the two line-to-line resistance
measurements that are lower than the third indicate the shorted winding by commonality (e.g. if RAB
and RBC are both less than RBC , it must be winding B that is shorted.
If one stator winding partially shorts in a delta-connected motor, the one line-to-line resistance
measurement that is lower than the other two indicates the shorted winding (e.g. if RAB and RBC are
both greater than RBC , it must be winding BC that is shorted.
160
Answer 59
P = 202.3 hp
If you calculated 181.5 amps for line current, you’re close – you have assumed 100% efficiency for the
motor! The actual line current is 197.2 amps if you take the motor’s 92% efficiency into account.
Here is a formula you can use to convert torque (lb-ft) and speed (RPM) values into horsepower:
Sτ
5252.113
I don’t expect anyone to memorize a formula like this, but one may derive it from a “thought
experiment.” It should be intuitively obvious that power (P ) must be directly proportional to both torque
(τ ) and speed (S), with some constant of proportionality (k) included to account for units:
P =
P ∝ Sτ
P = kSτ
If we were to imagine a 1-foot radius drum hoisting a 550 pound rate vertically at 1 foot per second
as an example of a machine exerting exactly 1 horsepower, we may solve for τ and S, then calculate the
necessary constant to make P equal to 1. The drum’s torque would be 550 lb-ft, of course (550 lb of force
exerted over a moment arm of 1 foot). With a circumferential speed of 1 foot per second, it would rotate at
30
30
1
2π revolutions per second, or π RPM. If τ = 550 and S = π and P = 1 horsepower, then:
P =
πSτ
30 × 550
In answer to the Socratic discussion question, the 92% efficiency works to diminish output current,
rather than increase input current as in the case of the motor. Thus, the diesel-powered generator will
output a line current of 167 amps.
Answer 60
Answer 61
Answer 62
Answer 63
• Pushbutton switch A fails open: Lamp 1 always energized, lamp 2 simply becomes inverse status of
pushbutton switch B.
• Relay coil CR2 fails open: Both lamp 1 and lamp 2 simply become inverse status of pushbutton switch
A.
• Relay contact CR1-1 fails open: Lamp 1 simply becomes same status as pushbutton switch B.
• Relay contact CR2-1 fails shorted: Lamp 1 always energized.
• Relay contact CR2-2 fails shorted: Lamp 2 simply becomes inverse status of pushbutton switch A.
161
Answer 64
This is a problem worthy of a good in-class discussion with your peers! Of course, several things could
be wrong in this circuit to cause lamp 1 to never energize. When you explain what measurements you would
take in isolating the problem, be sure to describe whether or not you are actuating either of the pushbutton
switches when you take those measurements.
Jumpering across lamp 1 creates a short-circuit condition by removing the only load in that “rung” of
the circuit!
Answer 65
Answer 66
Answer 67
Answer 68
Answer 69
The normally-closed contacts are referred to as interlock contacts, and they prevent simultaneous forward
and reverse actuation of the motor.
Answer 70
L2
L3
Start
Start
Start
Stop
Stop
Stop
X2
X1
H3
H2
H4
Transformer
H1
L1
Fuse
Motor
T1 T2 T3
162
Answer 71
Step 1 should ensure zero energy at the motor. Step 2 alerts others not to re-energize the motor. Step 3
is a check to see that the correct motor has been locked out. Step 4 checks for voltage at all possible 2-point
combinations on the power conductors. Step 5 verifies that the voltmeter is properly functioning.
Pulling a fuse on a control circuit forces the motor contactor to be a safety device, which it was never
intended to be. Furthermore, it makes re-energizing the motor as simple as replacing a low-voltage fuse,
which is far too easy (and therefore likely) for someone to do.
Answer 72
Fault
Fuse F1 blown
Fuse F2 blown
Start switch failed open
Stop switch failed open
M1 coil failed open
M1 auxiliary contact failed open
M1 power contact(s) failed open
OL contact failed open
Start switch failed shorted
Stop switch failed shorted
Transformer secondary failed shorted
Possible
√
√
Impossible
√
√
√
√
√
√
√
√
√
Answer 73
Truth table (good circuit)
A
0
0
1
1
Truth table (with fault)
B Output
0
0
1
0
0
1
1
0
A
0
0
1
1
B Output
0
0
1
0
0
1
1
1
If you thought that the “faulted” truth table would be all 0’s, you probably thought I said relay contact
CR2 failed open. The fault I proposed was relay CR2 coil failed open.
Answer 74
Never, ever connect load devices in series in a control circuit such as this!
Answer 75
The blue lamp will be energized whenever the pressure switch senses a pressure that is less than 45 PSI.
The red and green lamps will both be de-energized whenever the level senses a level less than 1 foot
3 inches. If that switch senses a level greater than 1 foot 3 inches, either the red lamp or the green lamp
will energize (not both simultaneously!) based on the pressure switch’s state: a pressure less than 45 PSI
energizes the relay coil and energizes the green lamp, while a pressure greater than 45 PSI de-energizes the
relay coil and energizes the red lamp.
163
Answer 76
The reset time for an overcurrent heater is an intentional design feature. If the heater is too hot to
re-set, then the motor is too hot to re-start.
Remember that the purpose of an overload heater is to provide a thermal analogue of the electric motor
itself. Ideally, the heater heats up and cools down at the exact same rate as the motor. This explains why
there is a necessary reset time after an overload heater causes the motor control circuit to “trip.”
The reason for the reset time curve decreasing after about 300% full-load current is a bit more complex
to answer. This, as well, is not an idiosyncrasy, but rather a design feature of the overload heater. Since
greater levels of current will trip the heater in a shorter time, they actually heat up the motor less during
that brief “on” time than a sustained overcurrent of lesser magnitude. Therefore the motor does not need
to cool down as long prior to the next re-start.
Answer 77
Here are some possible faults (not an exhaustive list by any means!):
•
•
•
•
•
•
•
Any fuse blown
Contactor coil failed open
Overload heater tripped (needs to be reset)
Any transformer winding failed open
Broken jumper between H3 and H2 on the transformer
Corroded wire connection at terminal A1 or A2
Motor winding failed shorted
Follow-up question: there will be a difference in operation between the L1 fuse blowing and either the
L2 or L3 fuse blowing. Explain what this difference is, and why it might serve as a clue to what was wrong.
Answer 78
Inrush current is a factor with every motor type, AC or DC. It is easy to forget just how substantially
larger a typical motor’s inrush current is compared to its normal full-load current. When students consider
the magnitude of the currents involved, and also the fact that most electric motors are fan-cooled and
therefore lacking in cooling during the initial moments of a start-up, the reason for automatic lock-out after
several successive start-up events becomes obvious.
Answer 79
Each overload heater element possesses a small amount of electrical resistance, which is the key to this
diagnostic procedure. Of course, the measurement obtained is strictly qualitative, not quantitative as a
clamp-on ammeter would give.
Follow-up question #1: what sort of result might occur with this diagnostic check if the motor were
indeed single-phasing due to one of the overload heaters failing open?
Follow-up question #2: what other causes could there be for a three-phase motor “single-phasing” other
than a motor winding failed open?
Answer 80
These three motors are all interlocked so that each one depends on the other. If any of them them trips,
all three shut off!
In the specific case of motor #3, its tripping causes all three motors to shut off automatically. However,
motors #1 and #2 may still be “jogged” by pressing and holding the “Start” pushbutton.
164
Answer 81
This is a graded question – no answers or hints given!
Answer 82
This is a graded question – no answers or hints given!
Answer 83
This is a graded question – no answers or hints given!
Answer 84
This is a graded question – no answers or hints given!
Answer 85
This is a graded question – no answers or hints given!
Answer 86
This is a graded question – no answers or hints given!
Answer 87
This is a graded question – no answers or hints given!
Answer 88
This is a graded question – no answers or hints given!
Answer 89
This is a graded question – no answers or hints given!
Answer 90
This is a graded question – no answers or hints given!
Answer 91
Answer 92
For the Allen-Bradley MicroLogix example, the lamp will energize only when switch 0 is turned off and
switch 1 is turned on.
For the Siemens S7-200 example, the lamp will energize when switch 0 is turned on or if switch 1 is
turned off, or both conditions occur simultaneously.
For the Koyo example, the lamp will energize according to the Exclusive-OR function with switch 1 and
switch 2. The lamp energizes when switch 1 is on and switch 2 is off, or when switch 1 is off and switch 2 is
on.
165