1
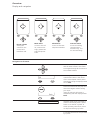
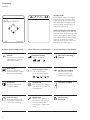
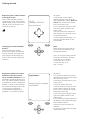
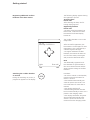
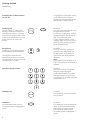
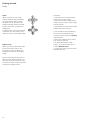
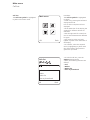
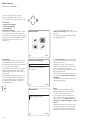
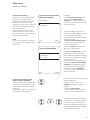
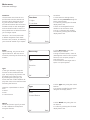
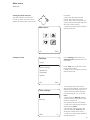
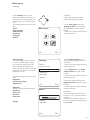
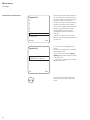
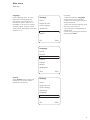
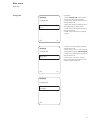
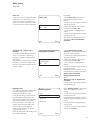
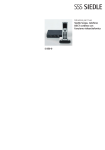
EN Operating Instructions
Siedle Scope
S 850-0
Overview
Display and navigation
Phone volume
Setting the
volume for the
receiver and
handsfree calls.
Main menu
Access to the call
list, intercom settings, general settings and phonebook.
Phonebook
Access to favourite
telephone numbers.
Intercom menu
Access to building
communication
functions (e.g. control and switching).
Navigation in all menus
Use the cross-shaped control pad
and the Enter button in the centre
to navigate through all the menus in
the cordless handset.
Activate your selection using the
round Enter button in the centre
of the cross-shaped control pad or
alternatively using the display button
OK or Save.
OK
Back
Leave the menu level and jump one
menu level higher without saving
your input
using the red End call button or
alternatively with the display button
Back.
Selected menu points, functions or
names in the display have a yellow
frame or are shown in yellow. In
these operating instructions, these
are depicted with a grey frame.
•Handling instructions are preceded
by a point.
Overview
Model: Siedle Scope
Loudspeaker for audio privacy
The loudspeaker for handsfree calls is located at the
back.
Status indications in the display
9+
14:34
Monday 21/03/2011
Display
Light
Door call
Frequently used functions
Display buttons
Control buttons for menu navigation
Enter button
Green Pick up button
Door release button
Red End call button
ON/OFF button (hold down for 3 seconds)
Button to move back through the menu
Input of numbers and letters
Hash button to lock the keypad (hold down for 3 secs.)
Microphone
Star button for call silencing (hold down for 3 secs.)
Overview
Display
9+
14:34
Monday 21/03/2011
Light
Status indications in the display
The current Siedle Scope status displays are shown along the top of the
screen. The reception quality to the
base station and the battery charge
status are continuously shown.
Other functions appear in the form
of symbols only when active.
Door call
Symbols in the standby mode
Status indications in the display
Volume
The receiver and handsfree
volume are set using the
Call volume menu.
Main menu
Access to the call list,
intercom settings, general
settings and phonebook.
Phonebook
Access to favourite telephone numbers.
Intercom menu
Access to building communication functions (e.g.
control and switching).
2
Standby mode
In the standby status, the cordless
handset shows the time and date
in the display, the 4 symbols of the
main menu and 2 frequently used
functions using display buttons, if
these have been set up.
9+
Status indications in the display
Reception quality
Very good to none
Door call forwarding
enabled
Battery charge status
100 %, 80 %, 60 %,
40 % and almost empty
Service not available
Required service cannot
currently be used (e.g.
external line engaged).
Keypad lock
The keypad lock prevents
unintentional operation of
the telephone.
Doormatic: enabled
Missed calls
All calls are counted up to
the number nine. If there
are more than 9 calls, a
plus symbol is shown after
the 9.
Call silencing:
Activated
Contents
Overview
Phone volume
15
Main menu
16
Display and navigation
Model: Siedle Scope
Display
Call lists
16
Intercom settings
18
Siedle Scope
4
Doormatic
18
One for all
4
Door call forwarding
19
5
Door call forwarding to the
public network telephone
19
Safety remarks
Disposal
5
Functions
20
Door
21
Control Device
21
Function
21
6
Settings
22
Charging the cordless handset
battery
6
Status
22
Setting the time
23
Registering additional cordless
handsets at the base station
6
Date settings
24
Switching the cordless handset
on and off
7
Audio settings
25
Ringtones
25
Incoming calls
8
Phone volume
26
8
Notifications
27
8
Key tones
27
Holding a call
8
Battery tone
27
Handsfree
8
Signal tone
27
Call silencing
9
Speed dial
28
Volume
9
Making a speed dialling call
29
Microphone silencing
9
Frequently used functions
29
9
Language
31
31
32
Getting started
Registering the cordless handset
at the base station
Keypad lock
Dial the required number
Call parking
6
Call forwarding
10
System
Ending a call
10
ECO mode
Brokering
11
Change PIN
32
Cordless handset
11
Resetting the base station
34
Charging cradle
11
Door call
35
Door release
11
35
Setting the date and time
12
Deregistering / registering a
handset
Setting the time
12
Dialling pause
35
Date settings
13
External line digit
36
Video
14
New entry
37
Phonebook options
38
Making a call to a phonebook
entry
38
Change entry
39
Deleting an entry
39
Intercom menu
40
The individual symbols in the
Intercom menu
40
Frequently asked questions
42
Index
43
Technical additions or printing
errors do not constitute grounds for
compensation claims.
Customer service in the
Furtwangen factory
+49 7723 63-375
These instructions are intended to
supplement:
•The Scope product information
•The In-Home bus: Video system
manual
The relevant current edition is
located in the download area on
www.siedle.de
3
Siedle Scope
One for all
A new freedom
Siedle Scope is a video indoor station and a landline telephone in
one device. And it’s cordless. That
means that wherever you are,
whether in the kitchen, the bathroom, the garden or the cellar …
Scope gives you a live update of
who is standing at the door. Scope
thus offers all the functions of a
video indoor station, including a
hands-free function and a door
release button. At the same time,
Scope is a fully-fledged landline telephone with excellent voice quality
and countless Comfort functions.
One for all. New freedom.
Scope, the mobile video indoor
station
•Large colour display
•Video monitoring with zoom and
swivel function
•Hands-free function
•In-house function control, such as
lighting, garage door or blinds
•Can be extended: up to 8 handsets
can be used in parallel
Scope, the cordless landline
telephone
•High range and excellent voice
quality thanks to the DECT standard
•Hands-free function
•Ergonomically optimized design
and user guidance
•ECO mode with reduced transmission power
•Telephone book, call log and
numerous other telephone functions
•Compatible with telephones from
other manufacturers using the GAP
profile, manufacturer-specific features only partially possible.
4
Scope of delivery
Siedle Scope cordless DECT telephone with door video function
for the In-Home bus. Comprising a
base station, cordless handset
and charging tray. Scope unites
the worlds of door communication
and public network telephony,
it is a comfort video in-house telephone and DECT telephone in one.
You will also find the necessary connecting cables:
•2 power supply units
•1 public network cable
•1 patch cable
Performance features
• Exclusive design with high-grade
materials and fine workmanship
• High range and excellent speech
quality thanks to DECT standard
• ECO mode with reduced
transmission output
• Energy-saving line rectifiers
(max. 0.5 W no load)
• Range outdoors up to 300 m,
indoors up to 50 m
• Video surveillance with digital
zoom
• Door call forwarding, e.g. to a
mobile phone, also for door calls
including door release
(PIN-protected)
• Control of house functions such as
light, garage door or roller shutters
• Communication between Scope
and all other In-Home devices in the
same line
• Doormatic
• Upgradable: Up to 8 cordless
handsets in parallel
• Compatible with DECT telephones
of other makes in compliance with
GAP profile
• Operation possible with and
without telephone system
Cordless handset performance
features
• Individual design concept with six
design variants
• Large 5.5 cm colour display,
240 x 320 pixel, illuminated
• Illuminated keypad
• Hands-free function
• Charging cradle with illuminated
control buttons (call acceptance and
door release)
• 8 ringtones
• Phonebook for 50 entries
• Caller list including date and time
• Last number redial
• Optional menu language setting
• Date and time display
• Signal strength display
• Caller display (clip)
• Li polymer battery
• Battery life on standby up to 100 h
Note
The Scope cordless handset must be
kept with the same care and security
awareness as a house key, as it can
also open your front door from the
outside. Ensure that it does not fall
into unauthorized hands!
Safety remarks
Danger
Warning
Mounting, installation and servicing
work on electrical devices may only
be performed by a suitably qualified
electrician. Failure to observe this
regulation could result in the risk of
serious damage to health or fatal
injury due to electric shocks.
•Operating the device not in
accordance with its intended purpose can cause injury.
•Do not drop or throw the devices!
•Do not use the devices if they are
damaged, for example if the device
housing has been damaged (sharp
edges or exposed parts)!
Warning
•Install the base station in a dry and
dust-free location away from direct
sunlight.
•Siedle Scope is not suitable for
use in wet rooms or in areas with an
explosion risk.
•The cordless handset and the base
station must be set up at least one
metre away from other electrical
devices.
•When used close to medical
devices, functional disturbances can
occur. In such cases, contact your
specialist dealer or electrical installer!
•Only ever use original Siedle power
supply units which form a part of
the scope of supply.
•Only use the original Siedle
rechargeable battery in the cordless
handset.
•Do not hold the back of the cordless handset against your ear when
it rings or when using the handsfree
function! This can result in serious
damage to your hearing.
•When using in conjunction with a
hearing aid, it is possible for humming or feedback noises to occur.
•If the device requires servicing,
contact your specialist dealer or electrical installer!
•Modern furniture is coated with an
enormous variety of different lacquer
and plastic finishes. Constituents
of these materials can result in softening of the plastic feet in table-top
devices and so impair the surface of
the furniture. Please appreciate that
the manufacturer is unable to accept
any liability.
Danger
•Keep the charger away from
sources of heat and naked flames!
•Never immerse the battery in
water or salt water!
•Never dismantle or modify the battery or expose it to heat!
•Avoid dropping the battery if at all
possible!
•Protect the battery from knocks or
impacts, as these can damage the
housing!
•Otherwise there is a risk of explosion or battery leakage, which could
result in fire, injury or damage to the
surroundings.
•If a battery leaks and the emerging
substances come into contact with
the eyes, mouth, skin or clothing,
rinse the affected area immediately
using water and consult a doctor.
•Only charge the battery in the
cordless handset using the provided
charging cradle and the original
power supply unit.
•The charging cradle and the power
supply unit were developed exclusively for use with the Siedle Scope
cordless handset.
•Never use in conjunction with
other products or batteries!
•A risk of overheating and deformation exists which could cause fires
or initiate electric shocks.
•Do not expose the device to overheating or excessive pressure!
Disposal
•All electrical and electronic devices
must be disposed of separately from
the general house waste at the specially provided municipal waste
facility.
•If a product bears the symbol of
a waste bin with a line through it,
then it falls under the regulations of
European Directive 2002/96/EC.
•Responsible disposal and separate
collection of end-of-life devices help
to prevent potential environmental
and health hazards, and form the
basis for the recycling of used electrical and electronic devices.
•Rechargeable batteries should also
not be disposed of with the general
household waste.
•When disposing of your end-of-life
devices and batteries, please observe
the local waste disposal regulations.
Details can be obtained from your
local authority, waste disposal service
or the specialist dealer from which
you purchased the product.
•Before disposing of rechargeable
batteries, cover over the contacts
with sticky tape or other insulating
material to ensure they do not
come into direct contact with other
objects. Direct contact with other
metal objects in waste containers
can result in fire and explosions.
5
Getting started
Registering the cordless handset
at the base station
Your cordless handset is already
registered in the set: The left-hand
signal strength symbol indicates the
strength of the connection in the
status bar at the top.
Procedure:
•If the display of the cordless
handset shows the following message highlighted in yellow: Base not
14:34
found, then connect the base staMonday 21/03/2011
tion to the mains power.
Base not found
•Also connect the charging cradle
with the cordless handset to the
mains power.
•As soon as the base station has
been located, you can begin to use
the cordless handset.
•If the registration has failed, contact your specialist dealer or electrical installer.
Note
Please observe the safety and disposal instructions relating to the
rechargeable battery.
Charging the cordless handset
battery
After unpacking the cordless
handset, the battery charge status
must be checked. This is delivered
fully charged, but discharge may
have occurred during storage and
transport.
Registering additional cordless
handsets at the base station
Up to 8 cordless handsets can be
operated in parallel at the base station. The cordless handset supplied
as standard in the set is designated
handset 1. Other cordless handsets
are numbered through in the order
in which they are registered.
The prescribed designations for
handsets 1 to 8 cannot be edited.
6
This is a li-polymer battery with the
following performance capability:
•Standby: appr. 100 hours
•Video link: appr. 3 hours
•Audio link only: up to
appr. 10 hours
Procedure:
•To register an additional cordless
handset, disconnect the base station
from the mains power.
•Reconnect the base station to the
mains power.
Would you like to register
•The base station now has a
the handset?
3-minute window in which an additional cordless handset can be registered. This is indicated by a green
flashing LED at the top.
•Also connect the charging cradle
with the cordless handset to the
mains power.
•The following message appears on
OK
the display on the additionally registered cordless handset:
•Would you like to register the
handset?
•Confirm by pressing the left-hand
display button OK.
Registration
Getting started
The following display appears during
the registration process:
Searching base
Please wait
After selecting the base, the following display appears:
Registering handset
Please wait
•As soon as the base station has
been found, confirm the located
base with the left-hand display
button OK.
Registering additional cordless
handsets at the base station
The cordless handset is now in the
ready status.
14:34
Monday 21/03/2011
Light
Switching the cordless handset
on and off
During the switching on process, a
progress bar appears on the display.
Door call
After successful registration, the
base station is locked again for new
registrations. This is indicated by a
continuous green LED light.
•To register additional cordless
handsets, disconnect the base station from the mains power again
and proceed as described above.
Note
The additionally registered cordless handsets are synchronized to
the correct date and time and the
same intercom settings as cordless
handset 1.
Procedure:
•In order to switch on the handset,
press the red End call button for
around 1 second.
•The handset automatically activates the power save mode if it is
in the idle status for more than 2
minutes.
•The display switches off.
•A hibernating handset switches
back on automatically as soon as it is
placed in the charging cradle.
•The display terminates the power
saving mode automatically after
around 1 second as soon as it is
removed from the charging cradle.
7
Getting started
Telephony
•If a display is in the power saving
mode, the first time a button is
pressed this only reactivates the display and has no other function.
Switching the cordless handset
on and off
Incoming calls
The call number is visible in the
display, provided the caller has not
withheld their number. If you have
stored the call number with a name
in the Scope phonebook, the name
of the caller can be read in the
display.
or
Procedure:
•Incoming calls are picked up using
the green Pick up button.
•If you pick up the call by pressing
the Mouth button, the call will be
held in the handsfree mode.
•If the cordless handset is in the
charging cradle, the call can also be
picked up using the Mouth button
on the charging cradle.
Procedure:
•To lock and unlock the keypad,
hold down the Hash button until
the Key symbol in the status bar
at the top of the display appears /
disappears.
Note
If the keypad lock is switched on, it
is also not possible to call emergency
numbers.
Keypad lock
The keypad lock prevents unintentional operation of the telephone.
The keypad lock switches off
automatically when you receive an
incoming call. At the end of the call,
it switches back on again.
Dial the required number
+
Procedure:
•Enter the required call number
using the numerical keypad.
•After entering the first numbers,
these are indicated by the display.
•Corrections can be made using the
display button <C.
Holding a call
Procedure:
•To establish a call, press the green
Pick up button.
Handsfree
If the handsfree mode is active,
the mouth symbol is highlighted in
yellow.
Procedure:
•To establish a call in the handsfree
mode, press the left-hand display
button with the mouth symbol.
If the handsfree mode is active,
the mouth symbol is highlighted in
yellow.
8
Getting started
Telephony
Procedure:
•To switch the muting function on
and off, hold down the Star button
until the bell symbol in the status bar
at the top of the display appears /
disappears.
Call silencing
If required, all ringtones can be
muted.
Incoming calls are then only signalled optically at the display.
-
Volume
Using the symbols + and - it is
possible to increase and decrease
the volume of the current call;
Depending on the call mode, this
affects either the receiver or the
handsfree speaker volume.
+
-
+
Procedure:
•Using the left-hand control button,
select the minus symbol, or with
the right-hand control button select
the plus symbol.
The volume can be set in 8 stages.
Microphone silencing
Using the microphone silencing
function, you can mute the cordless handset in the middle of a call
should you wish to speak privately to
a person in the room. The person at
the other end is unable to listen in.
The microphone symbol is highlighted in yellow when the microphone silencing function is active,
and the cordless handset gives off a
warning signal tone.
Procedure:
When using the telephone, select
the microphone symbol with the
line through it on the display using
the upper control button.
Call parking
The dot button is the so-called
“Flash” button. The function initiated by the “Flash” button depends
on the telephone system to which
the Scope is connected.
Depending on the configuration, for
example, it can be used to park the
call to confer with a third party user,
to whom the call is then forwarded.
Any telephone connected to a PBX
extension of the telephone system
can be a third party user.
Forwarding to a different Scope
cordless handset registered at the
same base station is carried out
using the Transfer display button.
Procedure:
•Select the dot symbol using the
lower control button.
•Select the telephone number of
the user to which you wish to forward the call.
•To establish a call, press the green
Pick up button.
•For successful call forwarding,
terminate the conference by pressing
the red End call button.
•If, alternatively, you wish to return
to the waiting call, press the Dot
button again.
9
Getting started
Telephony
Call forwarding
Any incoming calls, whether from
public network telephones or door
calls, as well as calls from other bus
telephones, can be forwarded to
other Scope cordless handsets.
Call transfer
Handset 1
Handset 2
Handset 3
Handset 4
Handset 5
OKTransfer
Door call forwarding
Door call
Earpiece volume
+
–
Microphone
On
Off
Transfer
OKClose
Call transfer
•If you have picked up a call, to forward the call activate the Forward
call display button.
•The submenu „Call forwarding“
appears showing a list of available
handsets.
•Use the control buttons to select
the handset to which you wish to
forward the call.
•Confirm by pressing the left-hand
display button OK.
•The call to the selected handset is
established.
•As soon as the call to the selected
handset is established, confirm the
completed call forwarding process
by pressing the red End call button.
•If you have picked up a door call,
to forward the call activate the
Options display button.
•The submenu Options opens up.
•Select the menu item Forwarding
using the lower control button.
•Now use the control buttons to
select the handset to which you wish
to forward the call.
•Confirm by pressing the left-hand
display button OK.
•The call to the selected handset is
established.
•As soon as the call to the selected
handset is established, confirm the
completed call forwarding process
by pressing the red End call button.
Note
Forwarding is not possible if there is
no active call (blind transfer).
Ending a call
Calls are ended using the red End
call button.
10
Procedure:
•To end the call, press the red End
call button.
•If you are speaking in the handsfree mode with the handset in the
charging cradle, end the call by
pressing the Mouth button on the
charging cradle.
Getting started
Telephony
Brokering
Brokering is used to describe the
process of switching backwards and
forwards between a door call and a
public network call.
•Accept the door or public network
call with the green Pick up button.
•By pressing the green Pick up
button again, you can accept the
second incoming call.
•The green Pick up button can be
used to switch backwards and forwards between the 2 active calls.
•By actuating the red End call
button, you can refuse the incoming
second call.
Cordless handset
Idle status
In order to save power and to extend
the life of the battery, the display is
switched off in the idle status. The
display switches off automatically
around two minutes after the last
action.
As soon as a call is received or information is transferred, the display is
automatically activated to the ready
status.
Note
If a display is in the power saving
mode, the first time a button is
pressed this only reactivates the display and has no other function.
Charging cradle
The charging cradle of your Scope
cordless handset is used to charge
the battery and offers two additional
control buttons.
The control buttons are only operational and alight when the cordless
handset is placed in the charging
cradle and the charging cradle is
supplied with power through the
power supply unit.
Procedure:
•Without picking up the cordless
handset, accept the incoming call
using the Handsfree button on the
charging cradle.
•End the call by pressing the
Handsfree button again.
•Open the door using the Door
release button.
Door release
The front door or storey door is
opened, depending on where the
door call comes from, using the
Door release button with the key
symbol.
The front door can be opened using
the white Door release button even
if there is no incoming door call.
There is an additional Door release
button on the charging cradle.
However, this only works if the
cordless handset is located in the
charging cradle.
11
Getting started
Setting the date and time
Setting the date and time
The date and time are required
in order to show the correct time
against incoming calls in the call list.
Main menu
Procedure:
•Using the right-hand control
button, select the Main menu.
•In the Main menu, select the settings by pressing the right and then
the lower control button.
•Confirm by pressing the left-hand
display button OK.
OKBack
Setting the time
Settings
Status
Date and time
Audio settings
Procedure:
•In the Settings menu, select the
date and time using the lower control button.
•Confirm by pressing the left-hand
display button OK.
Speed dial
Language
System
OKBack
Date and time
Time
Date
OKBack
12
•The Time entry is selected in the
Date and time menu.
•Confirm by pressing the left-hand
display button OK.
Getting started
Setting the date and time
Setting the time
Time settings
Hour
Minute
Save<C
Date settings
Date and time
Time
Date
•The display shows the current
date and time settings. These can be
deleted using the display button <C.
•Enter the current time using the
numerical keypad, e.g. 17 for the
hour.
•Then select the Minute settings
using the lower control button and
enter for instance 25.
•Confirm by pressing the left-hand
display button Save.
•The display confirms your entry
with the message: Time set, and
shows the entered time setting.
•Confirm by pressing the left-hand
display button OK.
In the main menu, select the
Settings symbol by pressing the
right and then the lower control
button.
•Confirm by pressing the left-hand
display button OK.
•In the Settings menu, select the
date and time using the lower control button.
•Confirm by pressing the left-hand
display button OK.
•Select the date using the control
button.
•Confirm by pressing the left-hand
display button OK.
•The display shows the current
date and time settings. These can be
deleted using the display button <C.
OKBack
Date settings
Year
Month
Day
Save<C
•Year: Enter the current year using
the numerical keypad.
•Month: Select Month using the
lower control button and enter the
current month using the numerical
keypad.
•Day: Select Day using the lower
control button and enter the current
day using the numerical keypad.
•Confirm by pressing the left-hand
display button Save.
•The display confirms your entry
with the message: Date set, and
shows the entered date setting.
•Confirm by pressing the left-hand
display button OK.
13
Getting started
Video
Video
When a call arrives, the Scope
cordless handset rings and shows
the video image. After pressing
the green Pick up button or the
Handsfree button with the mouth
symbol, the speech connection is
established.
If another door call is received from
a different door, the existing call is
ended and the process begins again.
Digital zoom
When you have accepted the video
link from the door station, the
Digital zoom function allows you
to enlarge excerpts of the display
image.
The zoomed image excerpt can be
defined as the standard setting. In
this case, when the next door call is
received, the video image starts with
precisely this image excerpt.
14
Procedure:
•Using the central control button,
zoom into the video image.
•Select the required image excerpt
using the upper, lower, left and right
control buttons.
•Actuating the control button again
disables the zoom function.
•You can define the activated digital zoom as the default setting.
•Open the menu using the Options
display button.
•Select Set as default and confirm
your selection with OK.
•To delete the default image
excerpt, open the Options menu.
•Select Disable zoom.
•Confirm by pressing the left-hand
display button OK.
Phone volume
Using the upper control button,
select the submenu Phone volume.
Earpiece volume
Phone volume
Earpiece volume
–
Handsfree
–
+
Procedure:
•Using the right and left control
buttons (+ and -), set the volume in
8 stages.
•If you wish to adopt a value, confirm this using the left-hand display
button Save.
+
SaveBack
Handsfree
Phone volume
Earpiece volume
–
Handsfree
–
+
+
•Using the lower control button,
select Handsfree volume.
•Using the right and left control
buttons (+ and -), set the handsfree
volume in multiple stages.
•If you wish to adopt a value, confirm this using the left-hand display
button Save.
SaveBack
15
Main menu
Call lists
Procedure:
•Using the right-hand control
button, select the main menu.
•The main menu offers quick access
to:
•Call lists
•Intercom settings
•General settings
•Phonebook
or
•Access the call lists by pressing
the green Pick up button from the
ready status.
Call lists
The call list logs incoming and outgoing calls with call number, date
and time.
The call list is subdivided into a
number of different lists: Incoming
calls, outgoing calls, missed calls and
all calls.
All calls
Missed calls
All calls are counted up to the
number nine. If there are more than
9 calls, a plus symbol is shown after
the 9.
Outgoing calls
Incoming calls
16
Main menu
Call lists
Call lists
The Call lists symbol is highlighted
in yellow in the main menu.
Main menu
OKBack
Calls list
Company X
Call
Procedure:
The call list symbol is highlighted
in yellow.
•Confirm by pressing the left-hand
display button OK.
First of all the complete call list is
displayed.
•In the status bar of the display, the
symbols for different call lists are
indicated.
•Use the right and left control buttons to switch between the different
list types.
•The active list is the one highlighted in yellow in the status bar of
the display.
•To call back, select the required
user by highlighting in yellow with
the control button and press the
green Pick up button.
•To edit the call lists, press the
Options display button.
•Here, the following functions are
offered:
•Call
•Delete
•Delete list
•Save to phonebook
Delete
Delete list
Save to phonebook
OKBack
17
Main menu
Intercom settings
•Using the right-hand control
button, select the main menu.
•The main menu offers quick access
to:
•Call lists
•Intercom settings
•General settings
•Phonebook
Intercom settings
The Intercom settings menu is used
to carry out user-specific inputs for
switching and control operation with
your Scope cordless handset. These
functions have to be set by your
electrician.
Main menu
•In the main menu, select the
Intercom settings using the control
buttons.
•Confirm by pressing the left-hand
display button OK.
OKBack
Doormatic
The Doormatic menu is used to activate and deactivate the Doormatic
once this function has been enabled
by your electrical installer.
If the Doormatic function is enabled,
in the ready status the Doormatic
symbol appears in the status bar of
the display.
The Doormatic setting applies to all
the cordless handsets registered to
the base station and is displayed in
the display status bars of the different handsets.
Intercom settings
Doormatic
Door call forwarding
Functions
•The Doormatic entry is selected.
•Confirm by pressing the left-hand
display button OK.
•Using the right or left control
button, select Yes or No. Your selection is highlighted in yellow.
•Confirm by pressing the left-hand
display button OK.
•The following message appears in
the display: Doormatic enabled/
disabled.
•Confirm by pressing the left-hand
display button OK.
OKBack
Doormatic
Enable Doormatic?
Yes
No
OKBack
18
Note
Despite the Doormatic function
being enabled, the door call continues for around 40 secs.
If you wish to switch off the call,
then set the front door volume to 0.
This is done in the Main menu >
Settings > Audio settings > Front
door, or
alternatively mute your Scope cordless handset using the Star button.
However, please note that this will
also mute all other incoming calls.
Main menu
Intercom settings
Door call forwarding
In the Door call forwarding menu,
the door call is automatically
forwarded to the public network
telephone. This function exists
exclusively for door calls; a door call
can only be forwarded to a public
network telephone.
If you also wish to use the Door
release function from your public
network telephone, you will have to
enter your individual PIN.
Note
If door call forwarding is activated,
your Scope cordless handset will no
longer ring.
Intercom settings
Doormatic
Door call forwarding
Functions
OKBack
Door call forwarding
Enable door call
forwarding?
Yes No
OKBack
Door call forwarding to the
public network telephone
If the Door call forwarding function
is activated, your front door can be
opened from your public network
telephone.
For security reasons, this is only possible using an individual PIN.
Procedure:
•In the Intercom settings menu,
select the entry Door call forwarding using the control button.
•Confirm by pressing the left-hand
display button OK.
•Using the right or left control
button, select Yes or No. Your selection is highlighted in yellow.
•Confirm by pressing the left-hand
display button OK.
The Door call forwarding menu
shows the forwarding addresses
from your phonebook.
•Select an entry using the lower
and upper control button.
or
•By selecting New entry, you can
create a new forwarding address
with a name and telephone number.
•Confirm by pressing the left-hand
display button OK.
The following message appears in
the display: Door call forwarding
enabled, accompanied by the relevant name to which you wish to
forward the calls, or disabled.
•Confirm by pressing the left-hand
display button OK.
•Pick up the door call at your public
network telephone.
•For door release, enter your
4-digit pin using the numerical
keypad.
•Press the Hash button.
•Your front door will be opened
from your public network phone.
•End the door call with the button
combination * 0 # before replacing
the receiver with the red hang up
button, as otherwise the public network engaged tone will be audible
at the door until timeout.
19
Main menu
Intercom settings
Functions
The Functions menu lists the control functions and the internal call
functions which have been set up
by your electrical installer. It also
provides information about function
numbers which are still unassigned
and can therefore still be used. It is
also possible here to delete functions
you no longer require.
Functions
1 Light
2 Last door
3
4
5
6
Functions 1 and 2 are preset with
a default assignment. Both these
functions can, however, be edited by
your electrical installer if you require.
Name
When selecting, only choose unassigned functions. Take care not to
overwrite previously set functions by
mistake.
7
OKBack
New entry
Name
Type
Type
In the Type submenu, assign the
function to the relevant function
type. On principle, any function can
be linked to any function type.
By selecting the right type, you
ensure that the cordless handset displays the correct user interface when
executing the function.
There are 3 possibilities to choose
from.
•Wired
•Door
•Control Device
Wired
Select this function type if you wish
to call a different bus telephone
using the function.
20
Procedure:
•In the Intercom settings menu,
select the entry Functions using the
lower control button.
•Confirm by pressing the left-hand
display button OK.
•Select an unassigned function
number in the Functions menu.
•Up to 15 functions are possible.
•Confirm by pressing the left-hand
display button OK.
•In the New entry menu, the
Name entry is selected.
•Using the letter buttons, enter an
unambiguous name for the required
function, such as Open garage or
Front door light.
•The name must not begin with a
space or a special symbol.
Function
3
OK<C
Type
Wired
•Select Type entry using the control
buttons.
•Access the possible function types
using the OK display button.
Door
Control Device
•Select Wired entry using the control buttons.
•Confirm by pressing the left-hand
display button OK.
OKBack
Main menu
Intercom settings
Door
Select this function type if the function is to be used to dial a door.
New entry
Name
•Select Door entry using the control buttons.
•Confirm by pressing the left-hand
display button OK.
Type
Door
Function
3
OKBack
Control Device
Select this function type if the function is to be used to switch a control
device.
Function
Assignment to the required function number is carried out in the
Function submenu. The function
number must be identical with
the programmed value in the bus
programming software BPS 650-...;
in total up to 15 functions can be
programmed.
New entry
Name
•Select Control device entry using
the control buttons.
•Confirm by pressing the left-hand
display button OK.
Type
Function
3
OKBack
New entry
Name
Type
The function number is pre-assigned
by your selection.
Select this using the lower control
button.
Now save your complete entry by
pressing the left hand display button
Save.
Function
3
SaveBack
21
Main menu
Settings
In the Settings menu, you can obtain
information about your cordless
handset and carry out general settings required for running operation.
The following menu points are available:
•Status
•Date and time
•Audio settings
•Speed dial
•Language
•System
•Using the right-hand control
button, select the Main menu.
Main menu
•In the main menu, select the
Settings symbol by pressing the
right and then the lower control
button.
•Confirm by pressing the left-hand
display button OK.
OKBack
Status
The Status menu provides information about the model, the used
software and firmware, the charge
status of the battery, and enabled /
disabled functions (Doormatic and
call forwarding).
Settings
Status
Date and time
Audio settings
Speed dial
Language
System
OKBack
Status
Model: Siedle Scope
PP:
FP:
Battery:
Doormatic: enabled
Door call forwarding: Off
Back
22
The Status menu is highlighted in
yellow.
•Confirm by pressing the left-hand
display button OK.
Main menu
Settings
Setting the date and time
The date and time are required
in order to show the correct time
against incoming calls in the call list.
Main menu
Procedure:
•Using the right-hand control
button, select the Main menu.
•In the Main menu, select the settings by pressing the right and then
the lower control button.
•Confirm by pressing the left-hand
display button OK.
OKBack
Setting the time
Settings
Status
Date and time
Audio settings
Speed dial
Language
In the Settings menu, select the
date and time using the lower control button.
•The Time entry is selected in the
Date and time menu.
•Confirm by pressing the left-hand
display button OK.
System
OKBack
Time settings
Hour
Minute
Save<C
•The display shows the current
date and time settings. These can be
deleted using the display button <C.
•Enter the current time using the
numerical keypad, e.g. 17 for the
hour.
•Then select the Minute settings
using the lower control button and
enter for instance 25.
Only plausible entries are possible.
•Confirm by pressing the left-hand
display button Save.
•The display confirms your entry
with the message: Time set, and
shows the entered time setting.
•Confirm by pressing the left-hand
display button OK.
23
Main menu
Settings
Date settings
Date and time
Time
Procedure:
•In the main menu, select the
Settings symbol by pressing the
right and then the lower control
button.
•Confirm by pressing the left-hand
display button OK.
•In the Settings menu, select the
date and time using the lower control button.
•Confirm by pressing the left-hand
display button OK.
•Select the date using the control
button.
•Confirm by pressing the left-hand
display button OK.
Date
OKBack
Date settings
Year
Month
Day
Save<C
•The display shows the current
date and time settings. These can be
deleted using the display button <C.
•Year: Enter the current year using
the numerical keypad.
•Month: Select Month using the
lower control button and enter the
current month using the numerical
keypad.
•Day: Select Day using the lower
control button and enter the current
day using the numerical keypad.
•Only plausible entries are possible.
•Confirm by pressing the left-hand
display button Save.
•The display confirms your entry
with the message: Date set, and
shows the entered date setting.
•Confirm by pressing the left-hand
display button OK.
•Pressing the red End call button
takes you back to the higher-level
menu without saving.
24
Main menu
Settings
In the Settings menu, you can
obtain information about your cordless handset and carry out general
settings required for running operation.
The following menu points are available:
Status
Date and time
Audio settings
Speed dial
Language
System
Procedure:
•Using the right-hand control
button, select the Main menu.
•In the main menu, select the
Settings symbol by pressing the
right and then the lower control
button.
•Confirm by pressing the left-hand
display button OK.
Main menu
OKBack
Audio settings
The Audio settings menu is used to
carry out acoustic settings, adjust
the call volume and to assign different melodies to different call
types. There are 8 different melodies
available to choose from for the different types of call.
The following menu points are available:
Ringtones
Call volume setting
Signal tones
Ringtones
Acoustic settings are performed for:
Telephone
Storey call
Intercom
Front door
Volume
•Select Audio settings in the
Settings menu using the lower control button.
•Confirm by pressing the left-hand
display button OK.
Settings
Status
Date and time
Audio settings
•Select Ringtones in the Audio
settings menu using the control
button.
•Confirm by pressing the left-hand
display button OK.
Speed dial
Language
System
OKBack
•Select the required entry in the
Ringtones menu using the control
buttons.
•Confirm by pressing the left-hand
display button OK.
Phone
Volume
–
+
Melody
Marimba
Procedure:
•Using the right and left control
buttons (+ and -), set the volume in
8 stages.
•If you wish to adopt a value, confirm this using the left-hand display
button Save.
SaveBack
25
Main menu
Settings
Melody
•Select the menu item Melody
using the lower control button.
Phone
Volume
–
+
Melody
Marimba
•The Melody selection menu is
opened by pressing the central Enter
button.
•Select the required melody using
the control buttons.
•Confirm by pressing the left-hand
display button Save.
SaveBack
Phone volume
The receiver and handsfree volume
are set using the Call volume menu.
•In the Audio settings menu, select
the submenu Call volume setting
using the lower control button.
•Confirm by pressing the left-hand
display button OK.
Audio settings
Ringtones
Phone volume
Notifications
OKBack
Earpiece volume
Phone volume
Earpiece volume
–
Handsfree
Handsfree
–
+
+
SaveBack
26
•Using the right and left control
buttons (+ and -), set the volume in
8 stages.
•If you wish to adopt a value, confirm this using the left-hand display
button Save.
•Using the lower control button,
select Handsfree volume.
•Using the right and left control
buttons (+ and -), set the handsfree
volume in multiple stages.
•If you wish to adopt a value, confirm this using the left-hand display
button Save.
Main menu
Settings
Notifications
In the Signal tones menu, acoustic
signal tones can be switched on and
off for different statuses.
Audio settings
Ringtones
Phone volume
Notifications
Procedure:
•In the Audio settings menu, select
the submenu Signal tones using
the lower control button.
•Confirm by pressing the left-hand
display button OK.
OKBack
Key tones
Each time a button is pressed, an
acoustic signal sounds. These key
tones can be switched on or off
here.
Notifications
Key tones
On Off
Battery tone
On Off
Signal tone
On Off
Battery tone
The Scope cordless handset signals
a critically low battery status with
an acoustic warning. The battery in
the cordless handset then requires
charging in the charging cradle. This
battery tone can be switched on
or off here.
Signal tone
Executed functions such as
Doormatic activation are signalled
by an acoustic tone. A signal tone
indicates that an action cannot be
performed, e.g. implausible inputs
for date or time. This signal tone
can be switched on or off here.
SaveBack
•Select the menu item Key tones
using the lower control button.
•Using the right and left control
buttons, select ON or OFF.
Your selection is highlighted in
yellow.
•Confirm by pressing the left-hand
display button OK.
•Select Battery tone using the
control button.
•Using the right and left control
buttons, select ON or OFF.
•Your selection is highlighted in
yellow.
•Confirm by pressing the left-hand
display button OK.
•Select Signal tone using the control button.
•Using the right and left control
buttons, select ON or OFF.
•Your selection is highlighted by a
yellow frame.
•Confirm by pressing the left-hand
display button OK.
27
Main menu
Settings
Speed dial
For fast access to favourite users
from the phonebook or intercom
users or functions, it is possible to
assign a speed dialling number from
0 - 9.
Settings
Status
Date and time
Audio settings
Speed dial
Language
System
OKBack
Speed dial
Procedure:
•In the Settings menu, select the
Speed dialling submenu using the
lower control button.
•Confirm by pressing the left-hand
display button OK.
•Select the required Speed dialling
number using the control button.
•Access the Assign speed dial menu
using the display button Assign.
•Speed dialling entries can be
assigned from the Phonebook or
Intercom.
•Using the right and left control
button, choose between Phonebook
or Intercom.
.
5
6
7
8
9
I Light
II Last door
AssignBack
Speed dial
Assign speed dial from
Phonebook Intercom
•Your selection is highlighted in
yellow.
•Confirm by pressing the left-hand
display button OK.
•Now select the required Speed
dialling assignment using the
lower control button.
•Confirm by pressing the left-hand
display button OK.
•Pressing the red End call button
takes you back to the higher-level
menu.
OKBack
28
Main menu
Settings
•When the Scope mobile handset
is in the ready status, press the
assigned number for around 3 seconds. The user is dialled directly.
Making a speed dialling call
Frequently used functions
Two frequently used functions or
user numbers (so-called softkeys)
can be indicated in the display for
super-fast access using the two
display buttons. For this, buttons I
and II are reserved in the speed dialling menu. These two buttons are
assigned a name from the phonebook or an intercom function in the
speed dialling menu.
In the ready mode, you can use the
two buttons at the bottom of the
display to access frequently used
functions such as light switching or
opening the garage, or alternatively
favourite telephone numbers.
14:34
Monday 21/03/2011
Light
Door call
Settings
Status
Date and time
Frequently used functions:
Light
Door call
•In the Settings menu, select the
Speed dialling submenu using the
lower control button.
•Confirm by pressing the left-hand
display button OK.
Audio settings
Speed dial
Language
System
OKBack
29
Main menu
Settings
Frequently used functions
Speed dial
5
6
7
8
9
I Light
II Last door
•Select the speed dialling number I
(for the left-hand display button) or
II (for the right-hand display button)
using the lower control button.
•Select the required Speed dialling
number using the control button.
•Access the Assign speed dial menu
using the display button Assign.
•Speed dialling entries can be
assigned from the Phonebook or
Intercom.
•Using the right and left control
button, choose between Phonebook
or Intercom.
AssignBack
Speed dial
Assign speed dial from
Phonebook Intercom
•Your selection is highlighted in
yellow.
•Confirm by pressing the left-hand
display button OK.
•Now select the required Speed
dialling assignment using the lower
control button.
•Confirm by pressing the left-hand
display button OK.
OKBack
•Pressing the red End call button
takes you back to the higher-level
menu.
30
Main menu
Settings
Language
In the Language menu, you can
select the menu language and
the possible special symbols for
phonebook entries. There are 10
languages to choose from: Danish,
German, English, Spanish, French,
Italian, Dutch, Norwegian, Polish and
Swedish.<br />
Settings
Status
Date and time
Audio settings
Speed dial
Language
System
Procedure:
•Select the submenu Language
using the lower control button.
•Confirm by pressing the left-hand
display button OK.
•Select the required language using
the lower control button.
•Your selection is highlighted by a
yellow frame.
•Confirm by pressing the left-hand
display button Save.
OKBack
Language
Dansk
Deutsch
English
Español
Français
Italiano
Nederlands
SaveBack
System
In the System menu, the general
settings of your Scope cordless
handset are carried out.
Settings
Status
Date and time
Audio settings
Speed dial
Language
System
OKBack
31
Main menu
Settings
ECO mode
In the ECO mode, the transmission
output is reduced to a fixed value.
This reduction of the radio output
is intended to reduce electro smog.
The value depends on the distance
from the base station.
This reduces the range of your Scope
cordless handset.
In the ECO mode menu, the ECO
mode is switched on and off.
ECO mode
ECO mode
On Off
Procedure:
•Select Eco mode in the System
menu using the lower control
button.
•Confirm by pressing the left-hand
display button OK.
•Using the right and left control
buttons, select ON or OFF.
•Your selection is highlighted in
yellow.
•Confirm by pressing the left-hand
display button OK.
OKBack
Settings
ECO mode: Off
Change PIN
Door call: On
Deregister handset
Dialling pause
External line digit
OKBack
Change PIN
Important system settings are protected against unauthorized access
by a 4-digit Personal Identification
Number (PIN), as protection against
registration and deregistration of the
cordless handset or protection of the
door release button on the public
network telephone. In the Change
PIN menu, it is possible to individualize the default PIN number (0000)
to any optional 4-digit PIN.
Settings
ECO mode: Off
Change PIN
Door call: On
Deregister handset
Dialling pause
External line digit
OKBack
32
Note
If you forget the PIN, you will need
to reset the base station to the
default settings (details in the next
chapter).
Main menu
Settings
Change PIN
Settings
Change PIN
Enter PIN
****
Procedure:
•Select Change PIN in the System
menu using the control button.
•Confirm by pressing the left-hand
display button OK.
•Using the numerical keypad, enter
the 4-digit PIN you wish to use.
•Confirm by pressing the left-hand
display button OK.
•Confirm the new PIN by entering
it again.
OK<C
Settings
Change PIN
Verify PIN
****
•Confirm by pressing the left-hand
display button OK.
•If the entry is correct, the following
confirmation appears: PIN changed.
•Confirm by pressing the left-hand
display button OK.
•If the entry is incorrect, rewrite
the second PIN entry with the same
4-digit number sequence.
OK<C
Settings
Change PIN
PIN
changed
OK
33
Main menu
Settings
Resetting the base station
When the base station is RESET, it
returns to the as-delivered status, in
other words:
•The PIN is rest to 0000
•All registered cordless handsets
are deleted
•The door forwarding function is
deleted
•The Doormatic function is deleted
•All the In-Home functions are
deleted
(Print out the settings from the BPS
or make a note of the functions activated prior to the RESET and enter
the same settings when repeating
the registration process.)
In-Home
Line
Power
Prog.
Procedure:
•Unplug the patch cable for the
In-Home bus at the base station.
•The base station can continue to
be supplied with power during this
process.
•Then press the PROG button (using
a paper clip or similar) and hold it
in place.
•While you continue to hold down
the PROG button, plug the patch
cable back into the In-Home bus.
•When the Prog LED flashes twice,
you can release the PROG button.
The status LED on the front of the
base station flashes to indicate that
the RESET is in progress.
•As soon as the status LED flashes
green, the RESET process is completed.
•You can now reregister the cordless handsets which you had previously deregistered.
If you did not deregister your cordless handsets before, the following
display appears:
Base not found
•Then select the entry Deregister
handset in the main menu under
system settings.
•In answer to the question Do you
want to deregister the handset?
confirm with Yes.
•Confirm by pressing the left-hand
display button OK.
The following question appears in
the display:
Deregistration failed. Register to
different base?
•Confirm by pressing the display
button OK.
The registration process is started.
As soon as the base station has been
located, you can begin to use the
cordless handset.
34
Main menu
Settings
Door call
If there are several cordless handsets
registered to one base station, it is
possible to activate call silencing at
any of the cordless handsets in order
to ensure that you are not disturbed.
Door call
Allow door call?
Yes No
OKBack
Deregistering / registering a
handset
In the Deactivate / Activate handset
menu, it is possible to register or
deregister cordless handsets at the
base station.
Registration is secured by the default
PIN 0000. If you have changed this
PIN, your own personal PIN must be
used to register.
Deregister handset
Do you want to deregister
the handset?
Yes No
OKBack
Dialling pause
If you are operating the Siedle Scope
at a telephone system, you may
require an external line digit.
It may be necessary to leave a short
pause between dialling the prefix
and continuing with the call number.
The required pause is determined
by the customer‘s own telephone
system. There are three dial pause
times to choose from: 800 ms,
1600 ms and 3200 ms, or alternatively no pause 0 ms.
Enter the dial pause individually at all
the cordless handsets.
Dialling pause
0 ms
800 ms
1600 ms
3200 ms
Procedure:
•Select Door call in the System
menu using the lower control
button.
•Confirm by pressing the left-hand
display button OK.
•Using the right and left control
buttons, select Yes or No.
•Your selection is highlighted in
yellow.
•Confirm by pressing the left-hand
display button OK.
The following message appears in
the display: Door call enabled/
disabled.
•Select Deregister/register
handset in the System menu using
the lower control button.
•Confirm by pressing the left-hand
display button OK.
•Using the right and left control
buttons, select Yes or No.
•Your selection is highlighted in
yellow.
•Confirm by pressing the left-hand
display button OK.
Depending on the selection, the display shows the following message:
Registration succeeded
Deregistration aborted
and:
Would you like to register the
handset?
•Confirm by pressing the left-hand
display button OK.
Select Dialling pause in the System
menu using the lower control
button.
•Confirm by pressing the left-hand
display button OK.
•Now select the required length of
the dialling pause using the control
button.
•Your selection is highlighted by a
yellow frame.
•Confirm by pressing the left-hand
display button Save.
SaveBack
35
Main menu
Settings
External line digit
Depending on the telephone system,
Scope may have to automatically dial
the external line digit before the call
number.
Enter the external line digit individually at all the cordless handsets.
External line digit
External line digit
0
Automatically add
Yes No
SaveBack
36
•Select External line digit in the
System menu using the lower control button.
•Confirm by pressing the left-hand
display button OK.
•The External line digit entry
is selected. Using the numerical
keypad, enter the external line digit
you wish to use. Generally this is the
external line digit: 0.
•Select the Automatically add
entry using the lower control button.
•Using the right and left control
buttons, select Yes or No.
•Your selection is highlighted in
yellow.
•Confirm by pressing the left-hand
display button Save.
Main menu
Phonebook
Procedure:
•When your cordless handset
is in the ready status, select the
Phonebook menu directly using the
lower control button.
Alternatively:
•In the main menu Settings, select
the Phonebook symbol by pressing
the lower control button.
•Confirm by pressing the left-hand
display button OK.
Phonebook
In the Phonebook menu, you enter
your preferred users and have direct
access to these users. Up to 50
entries are possible in the phonebook of each of the cordless handsets registered to the base station.
New entry
The customary special symbols for
the set language can also be found
by multiple pressing of a numerical
button.
Sequence of phonebook entries
The phonebook entries are generally
alphabetically listed.
Special symbols and numbers have
top priority.
If you wish to circumvent the alphabetical sequence of entries, precede
the name with a symbol or number.
These entries are listed at the top of
the phonebook.
Phonebook
New entry
OKBack
•In the Phonebook menu, the new
entry is selected.
•Confirm by pressing the left-hand
display button OK.
•The entry Name is highlighted in a
yellow frame.
•Using the input buttons, enter the
name entry you wish to use. There
are several letters stored behind each
button in the numerical keypad. By
pressing the button several times,
you move from one letter to the
next.
•A short pause between presses will
cause the selected letter to appear in
your entry.
•Confirm by pressing the left-hand
display button Save.
New entry
Name:
Number:
•Select the Number entry using the
lower control button.
•Enter the required number using
the numerical keypad.
•Confirm by pressing the left-hand
display button Save.
Save<C
37
Main menu
Phonebook
Phonebook options
The following options are available
for making entries in the phonebook:
•Call
•Edit
•Delete
Phonebook
New entry
Company X
...
...
Call
Edit
Delete
OptionsBack
Making a call to a phonebook
entry
If your phonebook is very extensive,
press on the various letters to jump
directly to the names starting with
the relevant letter.
•Press the green call button to dial
the selected user direct.
Company X
-
or
++
Transfer
38
•Select the required phonebook
entry using the control buttons.
•Select Options using the display
button located on the left below.
The following Options menu opens:
•Call
•Edit
•Delete
•Select Call in the Phonebook
options menu using the lower control button.
•Confirm by pressing the left-hand
display button OK.
Call:
The call to the user listed in the
phonebook is established. The
display changes to the telephony
mode.
Main menu
Phonebook
Change entry
Change entry
Name:
Number:
Procedure:
•Select Change in the Phonebook
options menu using the lower control button.
Edit:
The name entry can be edited,
extended or deleted here.
•Corrections can be made using the
display button <C.
Save<C
•Select Number in the Phonebook
options menu using the control
buttons.
•The number can be edited,
extended or deleted here.
•Confirm by pressing the left-hand
display button Save.
•Corrections can be made using the
display button <C.
Deleting an entry
Deleting an entry
Confirm delete
Yes
No
•Select Delete in the Phonebook
options menu using the lower control button.
Deleting an entry
•Using the right and left control
buttons, select Yes or No.
•Your selection is highlighted in
yellow.
•Confirm by pressing the left-hand
display button OK.
OKBack
39
Intercom menu
Using the Intercom menu, it is possible to execute functions in the
building communication mode.
Examples include:
Switching on the light
Dialling last door
Calling an in-house telephone
Calling another Siedle Scope
cordless handset
Viewing the video image at the
door station
A maximum of 15 different functions plus a maximum of five additional Scope cordless handsets are
possible. The latter are automatically
entered by the system.
Your electrical installer programs
these functions. Please refer to the
separate In-Home Video system
manual for the intercom functions.
Procedure:
When your cordless handset is in the
ready status, select the Intercom
menu directly using the left-hand
control button.
The display in the status bar shows
the Intercom settings for the different areas.
•Use the right or left control buttons to switch between the different
areas.
•The relevant Intercom symbol precedes each entry in the list.
•If your list contains a large number
of entries, use the lower control
button to scroll to the next page.
The individual symbols in the
Intercom menu
All intercom functions
Selectable doors
Bus telephones: Calls to wired
In-Home users
Scope cordless handsets
Switching and control functions
in the In-Home bus
40
41
Frequently asked
questions
There is nothing showing in the
display.
1The cordless handset is
hibernating.
•Briefly press any optional button.
2The cordless handset is not
switched on.
•Press the red End call button and
hold down for a while.
3The battery is empty.
•Charge the battery or exchange it.
The cordless handset does not
ring.
1The ring tone has been switched
off
•Hold down the Star key for 3
seconds.
2The call volume is set to minimum
•Increase the call volume.
3Door calls are switched off
•Switch the door calls on.
4Door call forwarding is enabled
•Disable door call forwarding.
The cordless handset does not
respond when buttons are
pressed.
1The keypad lock is activated
•Hold down the Hash key for 3
seconds.
The person at the other end
cannot hear you.
1You have set the cordless handset
to mute using the microphone
symbol
•Press the microphone symbol
again.
The number of the caller is not
displayed.
1The caller has withheld their call
number.
or
2The number display function has
not been enabled.
•The caller should arrange for
number display function to be
enabled by their provider.
42
The display says Base not found
1The cordless handset is out of
range of the base station
•Reduce the distance between
the cordless handset and the base
station.
2The cordless handset has been
deregistered
•Register the cordless handset.
3The base station has not been
switched on
•Check the power supply unit to
the base station.
Error tone after PIN enquiry /
forgotten PIN
1You have entered the wrong PIN.
•Reset the system PIN to the default
setting (0000).
You cannot hear a ring tone /
dialling tone from the landline.
1You are not using the supplied
telephone cable.
•Please use the supplied telephone
cable.
2The telephone cable is not
correctly connected to the base
station / the telephone network.
•Check for correct connection.
3Your telephone system requires
a (different) external line digit / a
(different) dialling pause than the
one which is set.
•When you call your cordless
handset from a public network
telephone, the display of your cordless handset tells you whether the
TC system automatically adds the
external line digit for incoming calls
or not.
•Try the various dialling pauses in
the Settings > System menu.
•Take into account the default
settings of your telephone system
in your Scope cordless handset settings.
It is not possible to call back the
numbers entered in the call list
1Your telephone system
automatically adds a 0 as a prefix
for incoming calls. For this, you
have preselected the external line
digit 0 in the system settings. Your
telephone system saves incoming
calls in the call lists with the zero
automatically added. This means
that you phone the entries in the call
list back with a double 0.
•You can find out the presettings
of your phone system using the following process:
•Call your cordless handset from a
public network telephone.
•The display on your cordless
handset will tell you about the presettings of your telephone system,
for instance the prefixed 0.
•If there is a 0 already entered,
select the option No in the system
settings under External line digit.
•Take into account the general
default settings of your telephone
system in your Scope cordless
handset settings.
You receive a call from a public
network telephone during a
door call.
If you wish to accept the public network call:
•Reject the door call with the red
End call button.
•Then accept the public network
call with the green Pick up button.
If a door call is forwarded, after
hanging up only the public
network engaged tone is audible
at the door.
•Before hanging up, press the
button combination * 0 #
•and then end the call by pressing
the red hang up button.
Index
A
Audio settings
25
B
2
Battery charge status
Battery tone
27
Brokering11
C
Call
38
Call forwarding
10
Call parking
9
Call silencing
2
Change PIN
32, 33
Charging
6
11
Charging cradle
Control Device
20
Cordless handset
deregister35
register35
D
Danish31
Date12
Default PIN number
32
35
Dialling pause
Directive 2002/96/EC
5
Disposal5
Disposal of battery
5
Door call
35
Enable35
Disable35
Door call forwarding
19
Door functions
40
Door release
11
Door release from
public network telephone
19
Doormatic
18
Dutch31
E
ECO mode
32
10
Ending a call
English31
External line digit
36
F
French31
Frequently asked questions
42
Frequently used functions
29
function number
21
Function type
20
Functions20
Functions for
Scope cordless handsets
40
G
German31
H
Handsfree
Handsfree volume
8, 15
26
I
11
Idle status
Incoming calls
16
Intercom menu
2, 37, 38, 39
18
Intercom settings
Italian31
K
Key tones
Keypad lock
27
8
L
Language31
M
Main menu
Making a speed dialling call
Melody
Microphone silencing
Missed calls
2
29
26
9
16
N
Name21
Navigation2
Norwegian31
Notifications
27
O
Outgoing calls
R
Reception quality
2
Register additional
6
cordless handsets
Ringtones25
S
Security awareness
4
Settings22
27
Signal tone
Spanish31
Speed dial
28
Standby mode
2
Status22
2
Status display
Swedish31
Switching and control functions 40
System31
T
Time
Type
V
Video
Volume
12, 13, 23
20, 21
14, 15
2, 9, 25
W
Wired20
16
P
Performance features
4
Personal Identification Number
PIN32
Phone volume
2, 15, 16
Phonebook
2, 34, 35, 36
Making a call to a
38
phonebook entry
Change entry
38
Deleting an entry
38
New entry
37
Phonebook options
38
Polish31
43
S. Siedle & Söhne
Postfach 1155
78113 Furtwangen
Bregstraße 1
78120 Furtwangen
Telefon +49 7723 63-0
Telefax +49 7723 63-300
www.siedle.de
[email protected]
Germany
© 2011/07.11
Printed in Germany
Best. Nr. 0-1106/141359 EN