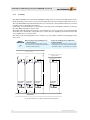
1
Installation and Operating Instructions ECOVARIO® 616 ECOVARIO® 616 D Installation and Operating Instructions ECOVARIO® 616, 616 D Published editions: Edition Comment April 2013 Preliminary version for prototypes July 2013 Preliminary version for UL certification Nov 2013 French translation of safety instructions added because of UL requirements June 2015 Series; added: Profinet interface, RFI suppression filter All rights reserved: Jenaer Antriebstechnik GmbH Buchaer Straße 1 07745 Jena No parts of this original instructions may be translated, reprinted or reproducted on microfilm or in other ways without written permission by Jenaer Antriebstechnik GmbH. The content of this document has been worked out and checked carefully. Nevertheless differences from the real state of the hard and software can never be fully excluded. Necessary corrections will be carried out in the next edition. ECOSTEP®, ECOVARIO® und ECOLIN® are registered trademarks of Jenaer Antriebstechnik GmbH, Jena. BISS® is a registered trademark of iC-Haus GmbH, Bodenheim. CANopen® is a registered community trademark of CAN in Automation e.V., Nuremberg. EnDat® is a registered trademark of Dr. Johannes Heidenhain GmbH, Traunreut EtherCAT® is a registered trademark and patented technology, licensed by Beckhoff Automation GmbH, Germany. HIPERFACE® is a registered trademark of SICK STEGMANN GmbH, Donaueschingen. Windows® is a registered trademark of Microsoft Corporation in the United States and other countries. Subject to change without notice! 3 Installation and Operating Instructions ECOVARIO® 616, 616 D 4 Subject to change without notice! Installation and Operating Instructions ECOVARIO® 616, 616 D Inhalt 1 About this manual ......................................................................................................................... 7 2 2.1 2.2 2.3 2.4 2.5 2.6 Safety instructions ......................................................................................................................... 7 Signal words and Symbols used ................................................................................................................. 7 General notes ................................................................................................................................................ 8 Dangerous voltages ...................................................................................................................................... 8 Danger by hot surfaces ................................................................................................................................ 8 Danger by unintentional mechanical movements ................................................................................... 9 Prescribed use ............................................................................................................................................... 9 3 3.1 3.2 3.3 3.3.1 3.3.2 Legal notes .................................................................................................................................... 10 Terms of delivery .......................................................................................................................................... 10 Liability .......................................................................................................................................................... 10 Standards and directives.............................................................................................................................. 10 UL/CSA conformity according to UL 508C (under preparation) ......................................................... 10 CE conformity .............................................................................................................................................. 11 4 4.1 4.2 4.3 4.4 4.5 4.5.1 4.5.2 4.5.3 Technical Data .............................................................................................................................. 13 Equipment ..................................................................................................................................................... 1 3 Rated data of the power stage ..................................................................................................................... 14 General technical data ................................................................................................................................. 15 Order key....................................................................................................................................................... 16 Suitable types of motors .............................................................................................................................. 17 ECOSPEED motors ..................................................................................................................................... 17 Direct linear motors ECOLIN® .................................................................................................................. 17 DC servo motors .......................................................................................................................................... 17 5 5.1 5.1.1 5.1.2 5.1.3 5.2 5.2.1 5.2.2 5.2.3 5.2.4 5.2.5 Installation ................................................................................................................................... 18 Mounting ....................................................................................................................................................... 18 Inportant notes ............................................................................................................................................. 18 Dimensions ................................................................................................................................................... 18 Assembly ....................................................................................................................................................... 19 Electrical Installation ................................................................................................................................... 20 Important notes ............................................................................................................................................ 20 EMC compliant installation ........................................................................................................................ 20 Connection diagram .................................................................................................................................... 21 Types of lines ................................................................................................................................................ 23 Operation with residual current devices ................................................................................................... 23 6 6.1 6.2 6.2.1 6.2.2 6.3 6.3.1 6.3.2 6.3.3 6.3.4 6.4 Interfaces ...................................................................................................................................... 24 Overview ....................................................................................................................................................... 24 Control signals.............................................................................................................................................. 26 X1A, X1B: Digital inputs and outputs, 24 V............................................................................................. 26 X2A, X2B: Digital Inputs ............................................................................................................................ 27 Power interfaces ........................................................................................................................................... 28 X4: Ballast resistor ........................................................................................................................................ 28 X5A/X5B: Motor connection ..................................................................................................................... 30 X6 Power Connection.................................................................................................................................. 31 X7A, X7B: Brake........................................................................................................................................... 32 Safety functions ............................................................................................................................................ 33 Subject to change without notice! 5 Installation and Operating Instructions ECOVARIO® 616, 616 D 6 6.4.1 6.5 6.5.1 6.5.2 6.6 6.6.1 6.6.2 6.7 6.8 6.8.1 6.8.2 6.8.3 6.8.4 6.8.5 Restart lock / Safe torque off (STO) ........................................................................................................... 33 Encoders ........................................................................................................................................................ 36 2-Axis Servo Amplifiers ECOVARIO 616 D: X11, X12: Encoder ......................................................... 37 1-Axis Servo Amplifier ECOVARIO 616: X11, X12: Encoder ............................................................... 39 Serial interfaces ............................................................................................................................................ 41 X13: RS485/RS232 interface with 2 Capture Inputs ................................................................................ 41 X14: Parameterizing USB interface ........................................................................................................... 44 X21: CAN interface ...................................................................................................................................... 45 Optional interfaces ....................................................................................................................................... 46 X22: Designs with encoder emulation ...................................................................................................... 46 X22: Designs with PROFIBUS DP-V0 interface ...................................................................................... 47 X22: Designs with Ethernet interface ........................................................................................................ 49 X22: Designs with EtherCAT® interface .................................................................................................... 5 2 X22: Designs with Profinet interface ......................................................................................................... 55 7 7.1 7.2 7.3 7.3.1 7.3.2 7.3.3 7.3.4 Commissioning ............................................................................................................................ 58 Important notes before commissioning .................................................................................................... 58 Control and display elements ..................................................................................................................... 58 Work schedule commissioning .................................................................................................................. 59 State display................................................................................................................................................... 60 Error messages .............................................................................................................................................. 61 Setting and querying displaying parameters via the keys ....................................................................... 64 Bootloader mode.......................................................................................................................................... 64 8 8.1 8.2 Parameter setting ......................................................................................................................... 65 User interface ECO Studio .......................................................................................................................... 65 Setting the current allocation to the both axes of the ECOVARIO 616 D ........................................... 65 9 9.1 9.1.1 9.2 9.2.1 9.3 9.4 Accessories ................................................................................................................................... 66 Supplementary parts .................................................................................................................................... 67 Shield set........................................................................................................................................................ 67 Ballast resistors ............................................................................................................................................. 68 Ballast resistors 200 W (500 W cooled) .................................................................................................... 69 Mating connector sets ................................................................................................................................. 70 Cables............................................................................................................................................................. 71 10 10.1 10.2 10.3 Appendix ...................................................................................................................................... 72 Glossary ......................................................................................................................................................... 72 Index of formulae ......................................................................................................................................... 74 Index of standards and directives .............................................................................................................. 74 Subject to change without notice! Installation and Operating Instructions ECOVARIO® 616, 616 D 1 About this manual This original instructions describe the servo amplifier range ECOVARIO® 6xx. It concerns to all persons who project, install and commission ECOVARIO® 616 or ECOVARIO® 616 D drives. Further information: Software commissioning: „ECO Studio Operation Manual ECOVARIO®, ECOSTEP®, ECOMPACT®“ Programming: manual „Object Dictionary ECOVARIO® and ECOSTEP®“, software tool ECO Studio Application Notes ECOVARIO® and ECOSTEP® Motor data: Product catalogue „ECOSTEP®/ECOVARIO®/ECOLIN® Drives“. This manual makes the following demands on qualified personnel: Transport: Personnel trained in handling electrostatic sensitive devices Installation: Electrotechnically qualified personnel who know the security directives of electrical engineering and automation Setup/Commissioning: Qualified personnel with a broad knowlege of the fields of electrical engineering, automation and drives. Knowledge of machine safety legislation is compulsory. 2 Safety instructions / Consignes de sécurité 2.1 Signal words and symbols / Mots d‘avertissement et symboles Table 2.1: Signal words and possible symbols / Mots d‘avertissement et symboles Description Description DANGER Warning about a dangerous situation. Disregarding this warning will lead to death or serious, irreversible injuries. Left symbol: General danger Right symbol: Dangerous electrical voltages Indique une situation dangereuse. Le non-respect de l’indication de danger mènera à la mort ou à des blessures graves ou irréversibles. Pictogramme de gauche : indication générale de danger Pictogramme de droite : Danger du au courant électrique WARNING / AVERTISSEMENT Warning about a dangerous situation. Disregarding this warning may lead to death or serious, irreversible injuries Left symbol: General danger Right symbol: Dangerous electrical voltages Indique une situation dangereuse. Le nonrespect de l’indication de danger peut mener à la mort ou à des blessures graves ou irréversibles. Pictogramme de gauche : indication générale de danger Pictogramme de droite : Danger du au courant électrique CAUTION / ATTENTION Warning about a dangerous situation. Disregarding this warning may lead to minor injuries Left symbol: General Right symbol: Hot surfaces Indique une situation dangereuse. Le nonrespect de l’indication de danger peut mener à des blessures légères. Pictogramme de gauche : indication générale Pictogramme de droite : Attention aux surfaces chaudes NOTICE / PRUDENCE Disregarding this note may lead to damages of things. Indique une situation qui, si elle n’est pas évitée, peut mener à la détérioration de matériel. INFO / INDICATION Not a safety instruction. However: Important information on the use of the servo amplifier. N’indique pas de situation de danger, mais une information importante par rapport à l’utilisation de l’amplificateur de servomoteur. Subject to change without notice! 7 Installation and Operating Instructions ECOVARIO® 616, 616 D 2.2 CAUTION / ATTENTION Improper handling of the servo amplifier may lead lead to injuries and material damage. Read this documentation carefully before you install and commission the device. The technical data and the information on connection requirements (nameplate and documentation) have to be adhered to. Only properly qualified personnel are permitted to perform activities such as transport, installation, setup and maintenance of the servo amplifier ECOVARIO®. L’utilisation non conforme des amplificateurs de servomoteurs peut entrainer des blessures et des dégâts matériels. Veuillez lire la documentation avant d’installer et de mettre en route l’appareil. Les données techniques ainsi que les informations concernant le raccordement (Plaque constructeur et documentation) doivent absolument être respectées. Le transport, l’installation, la mise en service de l’amplificateur de servomoteurs ECOVARIO® ne doivent être réalisés que par du personnel autorisé et qualifié. CAUTION / ATTENTION The manufacturer of the machine must generate a hazard analysis for the machine and take appropriate measures to ensure that unforeseen movements cannot cause injury or damage to any person or property. In case of modifications or retrofits with components of manufacturers other than Jenaer Antriebstechnik, please contact us to clarify that those components are suitable to be assembled with our devices.. Le fabricant d’une machine ou d’une installation doit réaliser une analyse des risques et en tirer les conséquences qui assurent une utilisation en toute sécurité de l’ensemble de l’installation. Lors de modification ou intégration de matériels d’autres fabricants, merci de nous contacter pour que nous puissions vérifier la compatibilité de ces éléments avec nos composants d’entrainement. 2.3 8 General notes / Indications générales Dangerous voltages / Danger dus à des tensions dangereuses DANGER Never open the units during operation. There is danger of life or a risk of serious health and material damage. Covers and cabinet doors have to be kept closed during operation. With the opening of the device all warranty and liability claims against Jenaer Antriebstechnik GmbH are void. Ne pas ouvrir l’appareil pendant l’utilisation. Il y a danger de mort ou danger de graves dommages à la santé et au matériel. Les capots et portes d’armoires électriques doivent restés fermés pendant l’utilisation. L’ouverture de l’appareil entraine la perte de toute garantie et responsabilité de Jenaer Antriebstechnik GmbH. WARNING / AVERTISSEMENT The protective earth conductor has to be properly applied before applying a voltage. If the protective earth conductor is not connected, in case of a failure e.g. the housing of the servo amplifier can be at hazardous voltage level. Un raccordement à la terre réglementaire doit obligatoirement être raccordé avant la mise sous tension de l’appareil. Si cette mise à la terre n’est pas raccordée, le boitier de l’amplificateur de servomoteur peut, en cas de problèmes, mener de dangereuses tensions. WARNING / AVERTISSEMENT Never undo electrical connections while they are live! There is a risk of arcing. Arcs can cause injury and damage contacts. During operation logic and power connectors are live. Ne pas effectuer de débranchements sous tension. Il y a danger d’arc électrique qui peut blesser des personnes et endommager des contacts. Pendant l’utilisation les conducteurs de pilotage et de puissance conduisent des tensions dangereuses. WARNING / AVERTISSEMENT Directly after disconnecting the servo amplifier from the power supply never touch parts of the device which potentially could be live (e.g. contacts). Wait at least six minutes. Capacitors can still have dangerous voltages present. To be sure measure the DC link circuit and wait till it has fallen below 40 V. Ne touchez pas de pièces de l’amplificateur de servomoteurs directement après l’avoir débranché de l’alimentation électrique qui peuvent être potentiellement conducteur de tension (par exemple des contacts). Attendez au moins 6 minutes. Les condensateurs peuvent rester chargés aussi longtemps de tension dangereuse. Mesurez par sécurité les tensions entre circuits jusqu’à qu’elles soient inférieurs à 40V. Subject to change without notice! Installation and Operating Instructions ECOVARIO® 616, 616 D 2.4 Danger by hot surfaces / Dangers dus à des surfaces chaudes CAUTION / ATTENTION 2.5 Des surfaces chaudes peuvent entrainer des brulures. Le boiter de l’ECOVARIO sert également de radiateur, ceci entraine qu’il peut atteindre des températures de plus de 70°C pendant l’utilisation. Danger by unintentional mechanical movements / Dangers dus à des mouvements involontaires DANGER 2.6 Hot surfaces may cause burns to the skin. As the housing of the ECOVARIO 6xx serves also as heat sink during operation the surface temperature may rise to more than 70°C. Unintentional movements of motors, tools or axes may lead to death or serious injuries. ECOVARIO® drives can produce strong mecanical powers and high accelerations. Avoid staying in the danger zone of the machine. Never switch off safety equipment! Emergency-off equipment must be workable in all operation modes, especially during setup and maintenance. Malfunctions should be repaired by qualified personnel immediately. Des mouvements involontaires de moteurs, d’axes ou d’outillages entrainent un danger de mort ou de blessures. Les entrainements ECOVARIO® peuvent engendrer de très fortes accélérations mécaniques ainsi que des forces très élevées. Il faut éviter de se trouver dans la zone de danger de la machine. Des équipements de sécurité ne doivent jamais être mis hors service. Des équipements d’arrêt d’urgence doivent rester opérationnels dans tous les modes de fonctionnement, aussi pendant la mise en service ainsi qu’en mode maintenance. Des dérangements doivent être résorbés sans délai par du personnel qualifié. Prescribed use / Utilisation conforme The servo amplifiers ECOVARIO® are components which are built into electrical equipment or machines and can only be used as integral components of such equipment. The leakage current of ECOVARIO® is higher than 3.5 mA. All notes about technical data and ambient conditions have to be observed. Note the requirements concerning mounting position and reserved space for ventilation given in chapter 5.1.3. Using the unit in hazardous locations and in ambients containing oil, gas, vapours, dusts, radiations etc. is prohibited if it is not explicitly allowed. The manufacturer of the machine must generate a hazard analysis for the machine and take appropriate measures to ensure that unforeseen movements cannot cause injury or damage to any person or property. L’amplificateur de servomoteurs ECOVARIO® est un composant de systèmes d’entrainement, il doit être installé en en monte fixe dans une armoire électrique prévue à cet effet. Le courant de terre de l’ECOVARIO® est supérieur à 3,5 mA. Toutes les indications de donnée techniques et conditions d’implantation doivent absolument être respectées. Veuillez respecter les positions de montage et les espaces nécessaires à l’aération indiqués dans le chapitre 5.1.3. L’utilisation de l’appareil est interdite dans des environnements aux risques explosifs, environnements huileux, acide, gazeux, vaporeux, poussiéreux, radiants, etc… s’il n’est pas expressément autorisé pour ces milieux. Le fabricant de la machine ou de l’installation doit établir une analyse des risques et en tirer les conséquences qui garantissent une utilisation en toute sécurité. Subject to change without notice! 9 Installation and Operating Instructions ECOVARIO® 616, 616 D If one or more servo amplifiers ECOVARIO® are built into machines or plants the intended operation of the servo amplifier is forbidden until it has been established that the machine or plant fulfills the requirements of the EC Machinery Directive 2006/42/EC and the EMC Directive 2004/108/EC. Further EN 60204 and EN ISO 12100 parts 1 and 2 have to be observed. La mise en service d’une installation ou une machine où sont intégrés un ou plusieurs ECOVARIO® est interdite jusqu‘à ce qu‘il ait été établi que toutes les dispositions des directives européennes et des règles de sécurité de protection contre les accidents spécifiques au pays d’implantation soient remplies. En particuliers, il s’agit en premier ordre de la Directive Machines 2006/42/CE et de la Directive CEM 2004/108/CE. Puis DIN EN 60204 et DIN EN ISO 12100, parties 1 et 2. Safety function „Safe Torque Off “, STO (cf. chapter 6.4.1) / Fonction de sécurité „Safe Torque Off “, STO, chapitre 6.4.1 The safety function STO must be integrated into a safety circuit that meets the demands of the safety standards of EN 60204, EN ISO 12100-1 and -2 and EN ISO 13849-1. It must only be activated when the motor is not longer rotating. Drives with a suspended load must have an additional safe mechanical blocking. La fonction de sécurité STO doit être intégrée dans un circuit de sécurité, les exigences des directives DIN EN 60204, DIN EN ISO 12100-1 et -2 et EN ISO 13849-1 sont suffisantes. Elle ne doit être activée que si le moteur est arrêté et isolé de toute force s’exerçant sur lui (par exemple des charges suspendues) qui doivent être bloquées avec un dispositif mécanique complémentaire. 2.7 Foreseeable misuse of the safety function STO / Mauvaises utilisation prévisibles de la fonction de sécurité STO The safety function STO must not be used if the drive is to be made inactive for the following reasons: cleaning, maintenance and repair operations long inoperative periods In such cases the entire system should be disconnected from the supply by the personnel, and secured (main switch). in emergency-stop situations In emergency-stop situations the main contactor is switched off (by the emergency-stop button or the BTB-contact in the safety circuit). La fonction de sécurité STO ne doit pas être utilisée pendant la mise à l’arrêt pour travaux de nettoyage, de maintenance, de réparation ainsi que pour de longues interruptions d’utilisation : Dans ces cas, l’installation doit être mise hors tension par le sectionneur principal dans une situation d’arrêt d’urgence : dans ce cas, un relais d’arrêt d’urgence doit mettre l’installation hors tension. 10 Subject to change without notice! Installation and Operating Instructions ECOVARIO® 616, 616 D 3 Legal notes 3.1 Terms of delivery Our terms of delivery are based on the „The General Terms of Delivery for Products and Services of the Electrical Industry“ (German: ALB ZVEI) of the Central Association of the Electrical and Electronics Industry (ZVEI e.V.) in their current version. 3.2 Liability The circuits and procedures in this manual are proposals. Every user has to check the suitability for every special case. Jenaer Antriebstechnik GmbH is not responsible for suitability. Especially Jenaer Antriebstechnik is not responsible for the following damage causes: disregarding the instructions of this manual or other documents concerning ECOVARIO® unauthorized modifications of drive, motor or accessories operating or dimensioning faults Improper use of the ECOVARIO® components 3.3 Standards and directives ECOVARIO® are components intended to be built into machines or plants for industrial purpose. The units meet the following standards: DIN EN 61800-5-1: Adjustable speed electrical power drive systems – Part 5-1: Safety requirements; Electrical, thermal and energy DIN EN 61800-3: Adjustable speed electrical power drive systems – Part 3: EMC requirements and specific test methods DIN EN 60 204: Safety of machinery - electrical equipment of machines - Part 1: General requirements. 3.3.1 UL/CSA conformity according to UL 508C (under preparation) / Conformité UL/CSA d’après UL 508C (en préparation) If ECOVARIO® servo amplifiers are to be used in countries where UL (Underwriters Laboratories Inc.) or cUL conformity resp. is required the appropriate type has to be selected (cf. chapter 4.3 „Order key“). For further information see UL file number E244038 at www.ul.com. Si les amplificateurs de servomoteur ECOVARIO® sont installés dans des pays où l’ UL ou une conformité cUL est requise, le type exact qui est requis doit être précisé lors de la commande on choisissant le type exacte (voir chapitre 4.3 clé du type). Vous trouverez des informations complémentaires sous le numéro de fichier UL E244038 sur la page web www.ul.com. The UL(cUL) certification (UL 840 and UL 508C in this case) is related exclusively to the mechanical and electrical design of the device. UL(cUL) certified servo amplifiers are in accordance with the respective american and canadian fire regulations. La certification UL(cUL) (Dans ce cas UL 840 et UL 508C) se rapporte exclusivement aux caractéristiques de constructions mécaniques et électriques de l’appareil. Les directives UL(cUL) fixent entre autres les exigences techniques minimales pour appareils électriques pour prévenir les risques d’incendie qui émanent d’appareils électriques. The installation and safety precautions in this documentation have to be observed. Les indications d’installation et de sécurité de ce document doivent être respectées. Subject to change without notice! 11 Installation and Operating Instructions ECOVARIO® 616, 616 D 3.3.2 CE conformity ECOVARIO® servo amplifiers are components that are intended to be built into electrical plant and machines for industrial use. The manufacturer of the machine is responsible that the machine or plant fulfills the requirements of the EMC directive. The servo amplifiers have been tested by an authorized testing laboratory in a defined configuration with the system components which are described in this documentation. Any divergence from the configuration and installation described in this manual means that you will be responsible for carrying out new measurements to ensure that the regulatory requirements are fulfilled. For servo amplifiers with integrated safety function the conformity assessment is carried out according to the EC machine directive 2006/42/EC. 12 Subject to change without notice! Installation and Operating Instructions ECOVARIO® 616, 616 D Jenaer Antriebstechnik GmbH • Buchaer Straße 1 • 07745 Jena Tel.: +49 (0) 3641/63376-0 • Fax: +49 (0) 3641/63376-99 Internet: www.jat-gmbh.de • E-mail: [email protected] EG – Konformitätserklärung EC – Declaration of Conformity Hiermit erklären wir / Herewith we Jenaer Antriebstechnik GmbH, Buchaer Str. 1, 07745 Jena, Deutschland in alleiniger Verantwortung, dass das gelieferte Modell / declare under our own responsibility that the supplied model of Servoverstärker mit Sicherheitsfunktion ECOVARIO® 616 xR-xx-xxx-xxx Servo amplifier with safety function den Anforderungen der complies with EG-Maschinenrichtlinie 2006/42/EC EC Machinery Directive 2006/42/EC entspricht. Hierfür wurden die folgenden harmonisierten Normen angewendet / For this, the following harmonized standards were applied: EN 60204-1:2006, EN ISO 13849-1:2008 EN 61800-5-2:2007, EN 61800-5-1 / VDE160 EN 61800-3:2004 Das Produkt ist nach Artikel 2, Buchstabe c der Richtlinie 2006/42/EG als Sicherheitsbauteil definiert. Es ist ausschließlich für den Einbau in eine Maschine bestimmt. Die Inbetriebnahme ist so lange untersagt, bis die Gesamtmaschine, in die das Produkt eingebaut werden soll, den Bestimmungen der Richtlinie 2006/42/EG entspricht. The products are defined as safety components according to directive 2006/42/EC. They are exclusively intended for installation in machines. Operation is prohibited until it has been determined that the machines in which these products are to be installed, conform to the directive 2006/42/EC. Die Sicherheitshinweise der Betriebsanleitung sind zu beachten. The safety instructions of the manual are to be considered. Ort, Datum der Ausstellung (Place and date of issue) Geschäftsführer (General Manager) Dokumentationsverantwortlicher (Responsible for documentation) Jena, 07.01.2013 Dipl.-Ing. (FH) Stephan Preuß Subject to change without notice! Dipl.-Ing. Gerald Bobe 13 Installation and Operating Instructions ECOVARIO® 616, 616 D 4 Technical Data 4.1 Equipment Features: Supply voltage range from 200 to 528 VAC 3-phase Integrated support for 1Vp-p SinCos encoder, incremental encoder Integrated support for BISS B, BISS C or HIPERFACE protocol Integrated encoder emulation Support for second feedback input Internal brake resistor; external brake resistor connector. Safety: Integrated Safe Torque Off (STO) function according to EN 61800-5-2 SIL 2 Sufficient isolation distances / creepage distances for safe galvanic isolation according to EN 61800-5-1 between the supply connectors / motor connectors and the signal electronics. Overvoltage detection, short-circuit protection, phase failure supervision Temperature monitoring of the servo amplifier and of the motor Motor overload protection: I2t monitoring. Parameterization: Commissioning software ECO Studio with wizard functions. Controller data: Digital current, velocity, and position control with position, speed and torque limiting, minimum cycle time for current control: 62,5 µs Digital filter functions effective on resonant loads Parameterisable velocity profiles with jerk limiting 256 motion profiles storable. In-/outputs: 8 digital inputs per axis, includes 1 Enable input 3 digital outputs per axis, includes 1 Ready output 1 STO input per axis 1 STO output contact per axis. Field bus interfaces (dependent on the selected option): CANopen EtherCAT Profibus DP Profinet. 14 Subject to change without notice! Installation and Operating Instructions ECOVARIO® 616, 616 D 4.2 Rated data of the power stage Table 4.1: Rated data of the power stage, AC supply at X6 Symb. Rated data Unit 616 AR 616 DR 3-phase AC supply UNetz Rated supply voltage at AC input connector X6 VAC 3~ 400 (200 ... 528 V) 3~ 400 (200 ... 528 V) fN Line frequency Hz 49 – 61 49 – 61 SN Rated installed load kVA 8,2 8,2 PVN Rated losses W 280 280 UON Rated output voltage1) VAC 390 390 ION Rated output current4) total ARMS 3~ 8 3~ 8 3) PON Rated output power1) total W 5400 5400 3) Losses if diverging from nominal load: PV = PV0 + PVI + PVD PV0 Basic losses W t.b.d. t.b.d. PVI/IO Current-dependent losses per A W/A t.b.d. t.b.d. PVD/PO Output power-dependent losses per 100 W W/100 W t.b.d. t.b.d. Power stage IOP Peak output current2) ARMS 3~ 16 3~ 16 3) UBUSN Rated DC link voltage VDC 560 560 UBUSP Max. DC link voltage VDC 850 850 UP Overvoltage trip VDC 850 850 CL DC link capacity µF 470 470 EN-P Regenerated capacity Ws 96 96 RB EXT External ballast resistor Ω 40 40 PBP EXT Impulse power ext. ballast resistor kW 17 17 1) The data refers only to the internal data of the servo amplifier. Modifications of the input voltage due to line supply fluctuations are not taken into consideration. That means that with 15 % less input voltage the output data (UON, PON), on X5 have to be reduced by 15 %. For motors with a low inductivity the motor dimensioning for the maximum velocity should be 25% to 50% below the specified voltages (otherwise very high ripple current). For motors with a high inductivity even a higher reduction might be required in order to achieve an acceptable dynamic performance. At a heat sink temperature of more than 75 °C or at an ambient temperature of more than 40 °C the power stage is switched off. 2) The DC link connection (X4) has no inrush-current limiting. Therefore appropriate circuits have to be integrated in the central power supply. The power supply also has to be resistant against regenerated energy. It must regulate the DC link voltage during dynamic operation under the limit UP. If the regenerating energy (deceleration of the drive) is higher than the energy consumed by all units connected to the DC bus, the power supply must have a load circuit. 3) For the 2-axis servo amplifier ECOVARIO 616 DR the sum of the currents of both axes is listed here. The sharing to the axes can be parameterized. 4) Ambient conditions for cabinet dimensioning. The losses PVN refer to nominal operation with IONenn and the maximum output power PDC. In case of deviations the losses can be estimated as shown here. Subject to change without notice! 15 Installation and Operating Instructions ECOVARIO® 616, 616 D 4.3 General technical data Table 4.3: General technical data, control signals No. 616 A 616 D Control signal Unit 1 1 24 V supply (current draw without outputs) 8 16 Digital control signal inputs V 24 ±10 % A 0.8 V 0 ... 36 (Switching level: L->H: 11 V; H->L: 7 V acc. to IEC 61131-2 type 3) mA 3 6 Digital control signal outputs 10 (at 24 V) V 24 A 0.5 Table 4.4: General technical data, external fuses AC supply 616 AR 616 DR 16 A (characteristic C) 16 A (characteristic C) Note: When the device is used in an UL environment the overcurrent protection equipment has to comply to UL489 (current ≤ 13 A) or UL Class CC (current ≤ 15 A, time delay current limiting)! Alternatively a motor protection switch (self protecting motor controller, certified acc. to UL508, type E) can be used. 24 V supply max. 12 A (fast) external ballast resistance (not accessory resistors DPRxx-xxx)1) t.b.d. t.b.d. 1) The accessory ECOVARIO® resistors DPRxx-xxx are intrinsically safe and therefore do not have to be fused. Table 4.5: General technical data, ambient conditions Ambient conditions ECOVARIO® is designed for ambient conditions of class 3K3 following EN 50178. Symb. Condition Unit TA Ambient temperature during operation with nominal load °C p Degree of humidity (not con- % R. H. densing) 5 – 85 Air pressure 860 – 1 060 mbar Cooling h 5 – 40 Installation altitude the closed cubicle has to be sufficiently ventilated. m up to 1 000 without restriction of power Installation position The technical data refer to a vertical position. Protection class IP20 Table 4.6: General technical data, dimensions and weight 16 Dimensions and weight Unit ECOVARIO® 616 Dimensions w x h x d mm 82 x 330 x 225 Weight of unit kg 4.0 Subject to change without notice! Installation and Operating Instructions ECOVARIO® 616, 616 D 4.4 Order key Table 4.7: Order key ECOVARIO® 6xx ECOVARIO® x xx x x - x x - xxx xxx No. of parameter set (three digits) No. of firmware (three digits) Approvals A: CE, standard design B - I: CE, special design J: CE, UL, standard design (UL approval under preparation) K - Z: CE, UL, special design (UL approval under preparation)) Type of field bus A: CAN + RS485 + encoder emulation B: CAN + RS232 + encoder emulation F: CAN + RS485 + PROFIBUS DP-V0 G: CAN + RS232 + PROFIBUS DP-V0 H: CAN* + Profinet + RS485 I: CAN* + Profinet + RS232* K: CAN + Ethernet + RS485 L: CAN + Ethernet + RS232 P: CAN + EtherCAT® + RS485 Q: CAN + EtherCAT® + RS232 Options R: Safety function „Safe torque off“ (STO) N: no option Supply A: 3-phase AC; 1-axis power stage D: 3-phase AC; 2-axis power stage Current rating (rms for 5 s) 16: max. 16 A Voltage rating (DC bus) 6: max. 600 V Name of the unit *) CAN/RS232 as service interface for ECO Studio only; no object dictionary acc. to CANopen DS402 Example ECOVARIO® 616 DR-AA-000-000: ECOVARIO® servo amplifier with: max. 600 VDC DC link voltage max. 16 A output current (total) AC supply 3-phase, 2-axis power stage Safety function „STO“ CAN interface + RS485 interface + encoder emulation CE appproval, standard design Fig. 4.1: Name plate ECOVARIO®, dimensions 70 x 20 mm Subject to change without notice! 17 Installation and Operating Instructions ECOVARIO® 616, 616 D 4.5 Suitable types of motors With ECOVARIO® 6xx servo amplifiers various types of motors can be operated. Rotative and linear 3-phase motors of the motor series ECOSPEED and ECOLIN® as DC motors can be driven. The motors must be equipped with encoders for commutation and for position and speed control. Incremental encoders, SINCOS encoders and absolute encoders can be evaluated. It is not possible to drive motors with resolvers as measuring system. The techical data in this manual refer exclusively to the servo motors mentioned in chap. 4.4.1 and 4.4.2. If you want to drive DC motors with ECOVARIO® please contact our technical support (see http://www. jat-gmbh.de/engl/service/service.html) 4.5.1 ECOSPEED motors The motor series 60C, 80C, 110C and 150C contain rotative, 3-phase low-pole servo motors with holding torques between 0.5 and 11 Nm. For technical data and accessories for the motors see our product catalogue „ECOVARIO®-/ECOMPACT®-/ECOSTEP® Drives“ or our web site www.jat-gmbh.de Fig. 4.1: Motor series 60C, 80C and 110C 4.5.2 Direct linear motors ECOLIN® Series SLM contains iron core, 3-phase, encoder commutated synchronous linear motors from 220 to 1450 N peak force. Series SLME provides provides ironless direct linear motors from 150 N to 400 N peak force. For technical data and accessories of the motors see our product catalogue „ECOVARIO®-/ECOMPACT®-/ECOSTEP® Drives“ or our web site www.jat-gmbh.de. Fig. 4.2: Direct linear motors SLM, SLME 4.5.3 DC servo motors DC motors are not part of the delivery range of the Jenaer Antriebstechnik GmbH but can be operated with ECOVARIO® amplifiers. In this case we recommend strongly to contact our technical service. The ECOVARIO® supports DC motors with brushes as well as brushless DC servo motors in conjunction with RS422 compatible standard encoders. 18 Subject to change without notice! Installation and Operating Instructions ECOVARIO® 616, 616 D 5 Installation 5.1 Mounting 5.1.1 Inportant notes / Informations importantes 15,6 mm 300 mm 330 mm 263 mm 375,5 mm Make sure that transport and storage did no damage to the units. / Veillez à ce que le matériel n’a pas subi de dommages lors du transport ou du stockage. The ambient air must not be polluted by dust, greases, aggressive gas etc. Eventually appropriate countermeasures have to be taken (installation of filters, frequent cleaning). / L’air de ventilation ne doit pas être souillé (Poussière, graisses, gaz agressifs, etc.). Le cas échéant prendre les mesures nécessaires intégration de filtres, nettoyage régulier) The ECOVARIO with STO function has to be mounted in a cabinet which conforms to protection class IP54 (or in a comparable environment) / L’ECOVARIO avec fonction STO doit être monté dans une armoire électrique ou un environnement équivalent qui présente un degré de protection minimum IP54. Depending on the power losses an appropriate ventilation should be provided / Il faut prévoir une ventilation suffisante pour compenser les pertes par échauffement. Observe the mounting spaces. / Les espaces libres doivent être respectés. Use 60/75°C copper wire only. The accessory cables provided by Jenaer Antriebstechnik fulfill these requirements. / N’utiliser que des câbles à âme cuivre qui résistent à une température de 60/75°C. Les câbles proposés par Jenaer Antriebstechnik dans son programme d’accessoires, respectent ces exigences. At installation locations with permanent vibrations or shocks damping measures should be taken into consideration. / Dans des implantions exposées à des vibrations continues ou des chocs, il faut vérifier si des mesure de réduction des phénomènes vibratoires doivent être prises. 82 mm 15,6 mm 300 mm 330 mm 263 mm 375,5 mm 5.1.2 Dimensions 82 mm 225 mm Fig. 5.1: Dimensions of ECOVARIO® 616 [mm], upper shield optional Subject to change without notice! 19 Installation and Operating Instructions ECOVARIO® 616, 616 D 5.1.3 Assembly Basically, ECOVARIO® 6xx is intended for vertical mounting (motor connectors X5A, X5B on the bottom). In this mounting position devices can be operated with built-in fan unit at ambient temperatures of up to 40°C. The ECOVARIO 6xx with STO function has to be mounted in a cabinet which conforms to protection class IP54 (or in a comparable environment). Cable clamps and side metal sheets assure that the connecting cables are laid EMC conform by connecting the cable shield extensively to chassis earth. The shields with cable clamps shown in fig. 5.3 are available as accessories (see table 9.1). It is important that the air flow is not disturbed by components above or below the servo amplifiers. The distance between the servo amplifers has to be at least 3 mm. The surface of the mounting plate has to be conductive (e.g. zinc plated). Varnished mounting plates must not be used. INFO / INDICATION Make sure that no heat accumulation can occur in the cabinet. The servo amplifier switches off at too high temperatures in the cabinet (Error D02 or D03, => p. 57, Motor without torque). Assurez une ventilation forcée suffisante de l’armoire électrique. L’amplificateur de servomoteur se coupe en cas de température trop élevée dans l’armoire électrique (Erreur D02 ou D03, => p. 57, Moteur sans couple). Kabelkanal Cable conduct ECOVARIO® 616/616D ECOVARIO® 616/616D 85 60 ECOVARIO® 616/616D 60 ECOVARIO® 616/616D 300 300 20 60 Kabelkanal Cable conduct 85 Cable conduct Kabelkanal Fig. 5.3: Mounting dimensions cabinet, width, minimum spacing [mm] 20 Subject to change without notice! Installation and Operating Instructions ECOVARIO® 616, 616 D To calculate the minimal mounting depth ( g. 5.4, dim A) the form of the connectors (cable outlet direction) and the minimum bending radii of the connecting cables at the sub-D connectors have to be regarded. Fig. 5.4: Mounting dimensions cabinet, depth [mm] 5.2 Electrical Installation 5.2.1 Important notes All installation work may only be carried out if the machine or plant is not live and protected against restart. Never exceed the maximum rated voltage at the X6 connector! UNetz max. 3~ 480 VAC (+10 %) The guarding of the AC supply and the 24 V logic voltage should be carried out by the user. Servo amplifier and motor have to be properly grounded. The protective earth conductor must have at least the same diameter as the supply cables. The servo amplifier should be mounted onto a conductive (not varnished) metal mounting plate. When the device is used in an UL environment: ECOVARIO 616 xx-xJ-xxx xxx is suitable for use on a circuit capable of delivering not more than 5 kARMS symmetrical amperes, 480Y/277 V maximum when protected by (DIQV) listed circuit breaker rated 16 A maximum. The feeding system must be grounded at the center. 5.2.2 EMC compliant installation The supply connection of the servo amplifier has to be equipped with an appropriate RFI suppression filter (mains filter, e.g. Block HLD 110-500/12 has been used for EMC testing / for 12 A, also available for 8 A and 16 A depending on the current of the fuse used). Recommended position cf. chapter 5.2.3. Always use shielded cables. To connect the shield as effective as possible to earth use the original ECOVARIO® shield set (s. table 9.1 „Original accessories ECOVARIO®“). Subject to change without notice! 21 Installation and Operating Instructions ECOVARIO® 616, 616 D Metal parts in the cabinet have to be interconnected extensively and and be conductive regarding HF. Used relays, contactors, solenoids etc. have to be protected against overvoltage. Supply cables and motor cables must be laid in a proper distance of control cables. 5.2.3 Connection diagram Note: The protective earth connection (PE) of the ECOVARIO® can be implemented in two different ways and thus complies to EN 60204-1, Chap. 8.2.8: via the stud at the bottom of the housing with a wire gauge of min. 10mm² via two PE wires independent of each other with the power connection wire gauge of the device (1 at the supply, connector X6, the other at the stud at the bottom of the housing) Motor protection switch or Circuit breaker class C or Fuse (slow) < 16 A L1 400 V ~ L2 L3 Cable length max. 500 mm ® ECOVARIO 616 X6 X13 CAP1+ CAP1CAP2+ CAP2- L1 L2 Mains filter (cf. chapter 5.2.2) L3 PE RS485 altern.RS232 X14 PE X4 FB2 *) +L/+R -RI -R -L CAN Ethernet/EtherCAT or PROFIBUS DP or Profinet (under preparation) RBrake or Bridge -RI -> -R if internal brake resistor RI is used X11 Encoder A X5A Ethernet/EtherCAT or PROFIBUS DP or Profinet +24V IO CWI +24 V voltage for IO Positive limit switch CCWI Home DIN16 DIN17 DIN18 Negative limit switch GND GND Homing switch Digital output Digital output Digital output W X7A X8A ASI+ ASIASO1 ASO2 +BRAKE1 -BRAKE1 GND 24V = GND 2 CAN X2A U V M 8 PC Parameterizing Interfaces Controller / Peripherics X12 Encoder B or 15 4 X22 GND 15 RS422 4 X21 RI Machine signals Fast event Capture 5 USB F B1*) RB RS422 +24V Logik GND X1A STO function input + STO function input - STO function output STO function output OUT1 OUT2 Digital input READY RESET Ready Digital input Reset ENABLE Enable GND GND Fig. 5.5: Connection diagram 1-axis servo amplifier ECOVARIO® 616 22 Subject to change without notice! Installation and Operating Instructions ECOVARIO® 616, 616 D Motor protection switch or Circuit breaker class C or Fuse (slow) < 16 A L1 400 V ~ L2 L3 Cable length max. 500 mm ECOVARIO ® 616 D X6 X13 CAP1+ CAP1CAP2+ CAP2- L1 L2 Mains filter (cf. chapter 5.2.2) L3 PE RS485 altern.RS232 X14 PE X4 FB2 *) +L/+R -RI -R -L RS422 4 X21 CAN RI 4 X22 Ethernet/EtherCAT or PROFIBUS DP or Profinet (under preparation) R Brake or Bridge -RI -> -R if internal brake resistor RI is used Machine signals Fast event Capture 5 USB F B1*) RB RS422 8 2 PC Parameterizing interfaces CAN Ethernet/EtherCAT or PROFIBUS DP or Profinet Controller / Peripherics Axis 1 15 X11 X2A Encoder 1 X5A U V M W X7A DIN7 Digital output axis 1 DIN8 GND GND ASI+ ASIASO1 ASO2 -BRAKE GND +24V Logic GND Negative limit switch Homing switch Digital output axis 1 Digital ouput axis 1 X8A +BRAKE 24V = GND +24 V voltage for IO Positive limit switch +24V IO CWI CCWI HOME DIN6 X1A OUT1 OUT2 READY STO function axis 1 input + STO function axis 1 input STO function axis 1 output STO function axis 1 output Digital input axis 1 Digital input axis 1 Ready axis 1 RESET Reset axis 1 ENABLE Enable axis 1 GND GND Axis 2 optional; internal connection +24V logic voltage 15 +24V Logic GND X12 Encoder 2 X1B OUT1 OUT2 READY RESET Digital input axis 2 ENABLE GND Enable axis 2 GND +24V IO +24 V voltage for IO Positive limit switch M X5B CCWI Negative limit switch HOME Homing switch Digital output axis 2 DIN6 W DIN7 DIN8 GND X7B Ready axis 2 Reset axis 2 X2B CWI U V Digital input axis 2 Digital output axis 2 Digital output axis 2 GND X8B +BRAKE -BRAKE GND ASI+ ASIASO1 ASO2 STO function axis 2 input + STO function axis 2 input STO function axis 2 output STO function axis 2 output Fig. 5.6: Connection diagram 2-axis servo amplifier ECOVARIO® 616 D Subject to change without notice! 23 Installation and Operating Instructions ECOVARIO® 616, 616 D 5.2.4 Types of lines The servo amplifiers series ECOVARIO® 6xx must only be connected 3-phase directly to 400 VAC TN systems or TT systems with earthed neutral. NOTICE / PRUDENCE 5.2.5 Only 3-phase feed is possible! In case of 1-phase feed the power stage is switched off and the error D16 is displayed. The mains supply voltage has to be in the range 3~ 230VAC-10% to 3~ 480VAC+10% 50-60Hz, the feeding system must be grounded at the center. The voltage to ground must not exceed 300VRMS because of the built-in noise suppression. Seule une alimentation triphasée est possible, en alimentation monophasée, le défaut D16 coupe l’alimentation. La tension d’alimentation doit être de 3~ 230VAC-10% jusqu’à 3~ 480VAC+10% 50-60Hz, Le réseau d’alimentation doit avoir un centre à la terre. La tension à la terre ne pas dépasser 300VRMS à cause de la protection contre les arcs intégrée. Operation with residual current devices In case of a fault to frame over the internal rectifier of a multi-phase driven servo amplifier the residual current may block the protective function of an AC sensitive or pulse current sensitive earth-leakage circuit breaker. Residual currents cause a pre-magnetization of the transformer core and thus increase the the tolerance for residual currents. To meet the requirements of EN 61800-5-1 we recommend therefore the use of the following earth-leakage circuit breakers depending on the application: universal RCDs (type B) in plant with 3-phase power system connection of the servo amplifiers (L1/L2/L3). If the leakage current is too high it may lead to unintentional activation of the RCD even in faultless operation. High leakage currents may be caused by: capacitative compensating currents over the cable shields if the motor cables are very long simultaneous switch in of several servo amplifiers use of interference filters with high leakage current Note: The leakage current of ECOVARIO®6xx is higher than 3.5 mA. Measures to reduce the leakage current: use of EMC filters with low leakage current use of a 4 conductor filter in systems where there is a neutral avoidance of asymmetrical load of the phases; several 1 phase operated units should be shared equally between the three phases shielded motor cables should be as short as possible In plant with several servo amplifiers a sinusoidal filter should be used instead of single EMC filters. In plant with several servo amplifiers not all units should be switched on at the same time. 24 Subject to change without notice! Installation and Operating Instructions ECOVARIO® 616, 616 D 6 Interfaces 6.1 Overview X4 DC link voltage ballast resistor X6 Power connector X22 Options: EtherCAT, Profibus DP, Ethernet X21 CAN X8B N.c. X8A STO function X2B N.c. X2A Digital inputs X1A 24V/Digital inputs/outputs X14 USB X13 RS485/RS232/Capture X12 Encoder B X11 Encoder A X1B N.c. X4 DC link voltage ballast resistor X6 Power connector X22 Options: EtherCAT, Profibus DP, Ethernet X21 CAN X7 Motor brake X5 Motor connector X8B STO function axis 2 X8A STO function axis 1 X2B Digital inputs axis 2 X2A Digital inputs axis 1 X1A 24V/Digital inputs/outputs axis 1 X14 USB X13 RS485/RS232/Capture X12 Encoder axis 2 X11 Encoder axis 1 X1B 24V/Digital inputs/outputs axis 2 X7B Motor brake axis 2 X5A Motor connector axis 1 X7A Motor brake axis 1 X5B Motor connector axis 2 Fig. 6.1: Order of the interfaces of ECOVARIO® 616 (top) and ECOVARIO® 616 D (bottom) On the next page, the available interfaces for all ECOVARIO®-6xx types are shown in an overview table. Subsequently, detailed descriptions of each interface with pin assignment and block diagram are provided. For the interfaces X1 to X8 a mating connector set is available (see table 9.1 „Original accessories ECOVARIO®“). To simplify the handling all mating connectors are labelled. Subject to change without notice! 25 Installation and Operating Instructions ECOVARIO® 616, 616 D X22 ECOVARIO®616AN-GJ-000-000 X21 X22 ECOVARIO 616AR-FJ-000-000 X21 X22 ECOVARIO 616AR-GJ-000-000 X21 ECOVARIO®616AN-KJ-000-000 X21 X22 ECOVARIO®616AN-LJ-000-000 X21 X22 ECOVARIO®616AR-KJ-000-000 X21 X22 ECOVARIO®616AR-LJ-000-000 X21 X22 ECOVARIO 616AN-PJ-000-000 X21 X22 ECOVARIO 616AN-QJ-000-000 X21 X22 ECOVARIO®616AR-PJ-000-000 X21 X22 ECOVARIO®616AR-QJ-000-000 X21 X22 ECOVARIO®616DN-AJ-000-000 X21 ECOVARIO®616DN-BJ-000-000 X21 ECOVARIO®616DR-AJ-000-000 X21 ECOVARIO®616DR-BJ-000-000 X21 ECOVARIO 616DN-FJ-000-000 X21 X22 ECOVARIO®616DN-GJ-000-000 X21 X22 ECOVARIO®616DR-FJ-000-000 X21 X22 ECOVARIO®616DR-GJ-000-000 X21 X22 ECOVARIO®616DN-KJ-000-000 X21 X22 ECOVARIO®616DN-LJ-000-000 X21 X22 ECOVARIO 616DR-KJ-000-000 X21 X22 ECOVARIO 616DR-LJ-000-000 X21 ECOVARIO®616DN-PJ-000-000 X21 X22 ECOVARIO®616DN-QJ-000-000 X21 X22 ECOVARIO®616DR-PJ-000-000 X21 X22 ECOVARIO®616DR-QJ-000-000 X21 X22 ® ® ® ® ® X13 X13 X13 X13 X13 X13 X13 X13 X13 X13 X13 X13 X13 X13 X13 X13 X13 X13 X13 X13 X13 X13 X13 X13 X13 Ballast resistor - X7A - X6 X5A - X7A - X6 X4 X11 X12 X22 X5A - X7A - X6 X4 X22 X8 X14 X8 X14 X14 X8 X14 X8 axis 1 X5A X22 X14 Motor connect. Digital inputs/ outputs X22 X12 STO function X12 X11 X4 X11 X12 X5A - X7A - X6 X4 X11 X12 X5A - X7A - X6 X4 X11 X12 X5A - X7A - X6 X4 X11 X12 X5A - X7A - X6 X4 X11 X12 X5A - X7A - X6 X4 X14 X11 X12 X5A - X7A - X6 X4 X14 X11 X12 X5A - X7A - X6 X4 X14 X8 X11 X12 X5A - X7A - X6 X4 X14 X8 X11 X12 X5A - X7A - X6 X4 X11 X12 X5A - X7A - X6 X4 X14 X13 X22 X11 X14 X14 X13 X22 X14 USB RS232 RS485 X13 X13 AC power supply X21 Holding brake axis 2 X21 ECOVARIO®616AN-FJ-000-000 Holding brake axis 1 ECOVARIO®616AR-BJ-000-000 X13 Motor connect. axis 2 X21 X13 Encoder output ECOVARIO®616AR-AJ-000-000 ® X13 Encoder input B X21 Encoder input A X21 ECOVARIO®616AN-BJ-000-000 Profinet Profibus DP Ethernet ECOVARIO®616AN-AJ-000-000 ® 26 EtherCAT Order designation CAN Table 6.1: Overview of interfaces ECOVARIO 616, ECOVARIO 616 D X14 X11 X12 X5A - X7A - X6 X4 X14 X8 X11 X12 X5A - X7A - X6 X4 X14 X8 X11 X12 X5A - X7A - X6 X4 X14 X11 X12 X22 X5A X5B X7A X7B X6 X4 X14 X11 X12 X22 X5A X5B X7A X7B X6 X4 X14 X8 X11 X12 X22 X5A X5B X7A X7B X6 X4 X14 X8 X11 X12 X22 X5A X5B X7A X7B X6 X4 X14 X11 X12 X5A X5B X7A X7B X6 X4 X14 X11 X12 X5A X5B X7A X7B X6 X4 X5A X5B X7A X7B X6 X4 X5A X5B X7A X7B X6 X4 X5A X5B X7A X7B X6 X4 X5A X5B X7A X7B X6 X4 X14 X8 X11 X12 X14 X8 X11 X12 X14 X11 X12 X14 X11 X12 X1A, X2A (axis 1) X1B, X2B (axis 2) X14 X8 X11 X12 X5A X5B X7A X7B X6 X4 X14 X8 X11 X12 X5A X5B X7A X7B X6 X4 X14 X11 X12 X5A X5B X7A X7B X6 X4 X14 X11 X12 X5A X5B X7A X7B X6 X4 X14 X8 X11 X12 X5A X5B X7A X7B X6 X4 X14 X8 X11 X12 X5A X5B X7A X7B X6 X4 Subject to change without notice! Installation and Operating Instructions ECOVARIO® 616, 616 D 6.2 Control signals 6.2.1 X1A, X1B: Digital inputs and outputs, 24 V INFO / INDICATION The 2-axis device ECOVARIO 616 D has assigned the interface X1A to axis 1 and X1B to axis 2. In the 1-axis device ECOVARIO 616 X1B is not used. Sur des appareils 2 axes ECOVARIO 616 D l’interface X1A est affecté à l’axe 1 et X1B à l’axe 2. Sur des appareils à 1 axe ECOVARIO 616 l’interface X1B n’est pas affectée. Table 6.2: Pin assignment connector X1A/X1B Signal Pin Description OUT1 1 Digital output 1 IO max = 0,5 A OUT2 2 Digital output 2 IOmax = 0,5 A READY 3 Ready IOmax = 0,5 A RESET 4 Reset ENABLE 5 Enable GND 6 24-V ground +24V 7 24-V supply GND 8 24-V ground Coding IOgesamt = max. 1 A 1 2 Switching threshold: L->H: 11 V H->L: 7 V 3 4 Coding 5 6 7 8 Fig. 6.2: Mating connector X1A/ X1B: Combicon MC 1,5/8-ST-3,81 CN2,7 BDNZX1 Phoenix No.: 17 55 40 2 connected internally between X1A and X1B +24 V Control X1A (axis 1) X1B (axis 2/nc) 1 OUT1 +24 V Load 2 OUT2 +24 V Load 3 READY Load +24 V 4 RESET RESET 5 ENABLE GND ENABLE +24 V GND GND Galvanic isolation +24 V 7 +24 V 6 GND 8 GND R ECOVARIO 616 + - External Power Supply 24 V DC Fig. 6.3: Connector X1A/X1B: Circuit of the digital inputs and outputs axis 1 / axis 2 Subject to change without notice! 27 Installation and Operating Instructions ECOVARIO® 616, 616 D 6.2.2 X2A, X2B: Digital Inputs INFO The 2-axis device ECOVARIO 616 D has assigned the interface X2A to axis 1 and X2B to axis 2. In the 1-axis device ECOVARIO 616 X2B is not used. Sur des appareils 2 axes ECOVARIO 616 D l’interface X12A est affecté à l’axe 1 et X2B à l’axe 2. Sur des appareils à 1 axe ECOVARIO 616 l’interface X2B n’est pas affectée. Table 6.3: Pin assignment connector X2A/X2B Signal Pin Description +24V IO 1 24-V control voltage for I/O (internally connected between X2A and x2B) CWI 2 CCWI 3 HOME 4 DIN6 5 DIN7 6 Positive limit switch Switching threshold: Negative limit switch L->H: 11 V Homing switch H->L: 7 V acc. to IEC Digital input 6 61131-2 type 3 Digital input 7 DIN8 7 Digital input 8 GND 8 24 V ground X2A (axis 1) X2B (axis 2 / n.c.) + 24 V 1 + 24V IO 2 CWI Coding 1 2 Coding 3 4 5 6 7 8 Fig. 6.4: Mating connector X2A/X2B Combicon MC 1,5/8-ST-3,81 CN1,8 BDNZX2, Phoenix No.: 17 55 41 5 Peripherics Positive limit switch DGND 3 CCWI Negative limit switch DGND 4 HOME Homing DGND 5 DIN6 Control signal DGND 6 DIN7 Control signal DGND 7 DIN8 Control signal DGND DGND Galvanic isolation 8 GND R ECOVARIO 616 Fig. 6.5: Connector X2A/X2B: Circuit of the digital inputs axis 1/ axis 2 28 Subject to change without notice! Installation and Operating Instructions ECOVARIO® 616, 616 D 6.3 Power interfaces 6.3.1 X4: Ballast resistor WARNING Acute danger of life or risk of injury due to high voltages! Up to 850 V DC voltage at the DC link clamps +L and -L. Never undo and redo electrical connections while they are live. After disconnection from the supply wait at least six minutes. Capacitors can still have dangerous voltages present. Danger de mort ou danger de blessures par des tensions élevées! Des tensions qui peuvent aller jusqu’à 400 V DC sont aux bornes +L et -L du circuit intermédiaire. Avant de connecter ou déconnecter, il faut absolument mettre hors tension. La tension résiduelle reste présente dans la charge des condensateurs jusqu’à 6 minutes. Attendez ce temps avant de retirer la prise. The connector X4 at the top of the housing can be used for connecting a ballast resistor. Ballast resistor During braking energy is fed back and the DC link voltage increased. If a drive is decelerated from speed ω1 to speed ω2 the energy difference EBR is fed back. EBR = ½ J (ω12 - ω22) (1) 1 EN-P = ½ CL (UBUSP – U ) Signal (see chap. 4.1 „Rated data of the power stage“). A ballast resistor will prevent the DC link voltage from rising up to the limit of the overvoltage trip. The ECOVARIO® accessory ballast resistors DPRxx-xxx are intrinsically safe, therefore the supply conductors do not have to be fused. Using other ballast resistors both supply conductors have to be equipped with fuses! 2 +L/+R 5 -RI 4 -R 3 -L RI Pin Description 5 1 GND +L/+R 2 + DC link/ + Ballast resistor -L 3 - DC link -R 4 - Ballast resistor - RI 5 - Internal ballast resistor External Ballast resistor Internal Ballast resistor X4 ECOVARIO®616 and 616 D are equipped with a builtin ballast resistor. For using the internal ballast resistor a bridge between -R and -RI is required. Alternatively an external ballast resistor can be connected. 4 Table 6.5: Pin assignment connector X4 (2) 2 BUSN 3 Fig. 6.6: Mating connector X4: GIC 2,5 HCV/ 5-ST-7,62, Nr. 17 45 65 8 Phoenix The maximum regenerable energy EN-P is calculated according to the following formula (2): 2 2 Dc link voltage DC+ F B1 RB DC Power Supply FB2 + Ballast control ECOVARIO R 616 1 DCPE PE PE Fig. 6.7 : X4: Circuit load resistor and DC link Table 6.6: Maximum values of ballast circuit External ballast resistor Ω 40 Overvoltage trip VDC 850 Switch-off threshold ballast VDC 820 Switch-off threshold ballast VDC 800 Continuous power internal load circuit W 30 Continuous power external load circuit kW max. 5 Impulse power external load circuit kW 17 *) For power specifications for the available ECOVARIO® accessory ballast resistors DPRxx-xxx cf. chapter 9.3 Subject to change without notice! 29 Installation and Operating Instructions ECOVARIO® 616, 616 D Ballast circuit threshold The switch-on and switch-off thresholds for the ballast resistor shown in Table 6.6 can be reduced by programming. The objects 0x2701:09 (switch-on threshold) and 0x2701:10 (switch-off threshold) are used for this. The continuous power of the ballast resistor can be set in the objects 0x2701:11 (power) and 0x2701:12 (Ohm value). For more details please refer to the manual „Object Dictionary ECOVARIO®, ECOSTEP®, ECOMPACT®“. 30 Subject to change without notice! Installation and Operating Instructions ECOVARIO® 616, 616 D 6.3.2 X5A/X5B: Motor connection Tabelle 6.7: Pin assignment connector X5A, X5B 1 2 3 4 Signal Keying Pin 3-phase motor 1 GND Phase U U 2 Connection U Phase V V 3 Connection V Phase W W 4 Connection W Fig. 6.8: Mating connector X5A/X5B: GIC 2,5 HCV/ 4-ST-7,62, Nr. 17 45 64 5 Phoenix Using long cables (>25 m) the losses rise strongly due to the cable capacity. Therefore with long cables the technical data of the drive are reduced, further too high leakage currents can lead to indeliberare activation of the circuit breakers (see chap. 5.2.5 „Operation with residual current devices“). For all available types of cable see chap. 9.5. Motor 3-phase Fig. 6.9 X5: Example for connection with standard cable, e.g. MOT-61-133-523-xxx Connection of motor and brake with one cable The insulated meshes of the overall shield and of the shield of the brake cable must in any case be connected to the chasis earth or protective earth. Due to improper grounding or free mesh dangerous voltages may occur at the shield. Motor 3-phase Brake Fig. 6.10: Example for connection with standard cable MOT63-134-523-xxx Subject to change without notice! 31 Installation and Operating Instructions ECOVARIO® 616, 616 D 6.3.3 X6 Power Connection WARNING / AVERTISSEMENT Acute danger of life or risk of injury due to high voltages! Up to 528 V AC voltage at X6. Never undo and redo electrical connections while they are live. After disconnection from the supply wait at least six minutes. Capacitors can still have dangerous voltages present. Danger de mort ou danger de blessures par des tensions élevées! Des tensions qui peuvent aller jusqu’à 528 V AC sont au connecteur X6. Avant de connecter ou déconnecter, il faut absolument mettre hors tension. La tension résiduelle reste présente dans la charge des condensateurs jusqu’à 6 minutes. Attendez ce temps avant de retirer la prise. Tabelle 6.8: Pin assignment connector X6 Signal Pin Description L3 1 Phase L3 L2 2 Phase L2 L1 3 Phase L1 PE 4 PE conductor INFO / INDICATION 1 2 3 4 Fig. 6.11: Mating connector X6 (female): GMSTB 2,5 HCV/ 4-ST-7,62, Nr. 17 14 29 4 Phoenix Only 3-phase feed is possible. In case of 1-phase feed the power stage is switched off and the error D16 is displayed. The mains supply voltage has to be in the range 3~ 230VAC-10% to 3~ 480VAC+10% 50-60Hz, the feeding system must be grounded at the center. The voltage to ground must not exceed 300Veff because of the built-in noise suppression. Seule une alimentation triphasée est possible, en alimentation monophasée, le défaut D16 coupe l’alimentation. La tension d’alimentation doit être de 3~ 230VAC-10% jusqu’à 3~ 480VAC+10% 50-60Hz, Le réseau d’alimentation doit avoir un centre à la terre. La tension à la terre ne pas dépasser 300VRMS à cause de la protection contre les arcs intégrée. L1 608/616 Fig. 6.12: Connector X6, circuit AC1 AC1 U < 48VAC AC2 Inrush-current limiting The peak inrush-current is limited to maximum 50 A by a temperature-depending resistor. After rechar114 ging the DC link the limiting resistor is bridged by a relay contact and thus can cool down during normal operation. Inbetween two switch-on and switch-off sequences must be a delay of at least 10 s. A cyclic switching on and off the servo amplifier by the line contactor is not allowed. During switching on and off the supply voltage the servo amplifier should be in the „ready to switch-on“ state. 3 AC2 Mains filter The user has to make sure to conform to the regulations of the EMC Directive (2004/108/EC) by appropriate measures. The supply connection of the servo amplifier has to be equipped with an appropriate RFI suppression filter (mains filter, e.g. Block HLD 110-500/12 has been used for EMC testing / for 12 A, also available for 8 A and 16 A depending on the current of the fuse used), recommended position cf. Fig. 6.12. Fusing For external fusing please consider the general technical data (cf. chapter 4.2). When the device is used in an UL environment: ECOVARIO 616 xx-xJ-xxx xxx is suitable for use on a circuit capable of delivering not more than 5 kARMS symmetrical amperes, 480Y/277 V maximum when protected by (DIQV) listed circuit breaker rated 16 A maximum. The feeding system must be grounded at the center. 32 Subject to change without notice! Installation and Operating Instructions ECOVARIO® 616, 616 D 6.3.4 X7A, X7B: Brake INFO / INDICATION The 2-axis device ECOVARIO 616 D has assigned the interface X7A to axis 1 and X7B to axis 2. In the 1-axis device ECOVARIO 616 X7B is not used. Sur des appareils 2 axes ECOVARIO 616 D l’interface X7A est affecté à l’axe 1 et X7B à l’axe 2. Sur des appareils à 1 axe ECOVARIO 616 l’interface X7B n’est pas affectée. Table 6.9: Pin assignment connector X7A, X7B Signal Sign GND Pin 1 Brake + +B 2 Brake - -B 3 Imax peak = 1 A Imax Dauer = 0.5 A If the control mode is choppered the holding current is reduced after pulling the brake. Fig. 6.13: Mating connector X7A, X7B: ZEC 1,0/3-ST-3,5 C1,3 R1,3 19 98 20 5 Phoenix If the current consumption of the brake is higher, the static version is suitable for connecting a relay (cf. fig. 6.15). Fig. 6.14: Brake connection, brake current Imax < 0,5 A Fig. 6.15: Brake connection, brake current Imax > 0,5 A Subject to change without notice! 33 Installation and Operating Instructions ECOVARIO® 616, 616 D 6.4 Safety functions 6.4.1 Restart lock / Safe torque off (STO) The versions ECOVARIO® 616 xR-xx-xxx xxx contain the safety function Safe Torque Off (STO) according to EN 61800-5-2 and EN ISO 13849-1: 2006. The function also conforms to an uncontrolled stop according to category 0 of IEC 60204-1.The safety function is used to prevent the drive from starting indeliberately. WARNING / AVERTISSEMENT The „Safe Torque Off “ function does not switch off the power supply of the DC link voltage of the servo amplifier. Thus, maintenance of electrical parts of the motor or the servo amplifer may only be carried out after the drive system has been disconnected from the power supply. La fonction „Safe Torque Off“ ne coupe pas la tension du circuit intermédiaire de l’amplificateur de servomoteur. Pour ces raisons, des travaux d’entretien sur les parties électriques de l’amplificateur ou sur le moteur ne doivent être réalisés qu’après avoir coupé l’alimentation électrique du système d‘entrainement. The safety function „Safe Torque Off, STO“ is implemented together with the standard functionality of the ECOVARIO® with only a few components related exclusively to the safety function. The STO function meets the requirements to SIL2 or PLd respectively according to EN 61800-5-2 or EN ISO 13849-1. The function is established by means of the circuitry shown in Fig. 6.17. The signals are lead to the connector X8. Further, the signals Enable and Ready of connector X1 are used. INFO The 2-axis device ECOVARIO 616 D has assigned the interface X8A to axis 1 and X8B to axis 2. In the 1-axis device ECOVARIO 616 X8B is not used. Sur des appareils 2 axes ECOVARIO 616 D l’interface X7A est affecté à l’axe 1 et X7B à l’axe 2. Sur des appareils à 1 axe ECOVARIO 616 l’interface X7B n’est pas affectée. X8A (axis 1) X8B (axis 2 / nc) 1 ASI+ max. 200 mA Setpoint=0 24V Activate STO Ctrl voltage=0 2 ASI- Power stages off Fig. 6.16: Mating connector X8A/X8B: MC 1,5/4-ST-3,81 BD: 1-4, Phoenix No.: 18 40 722 1 3 ASO1 4 ASO2 GND Output contact STO 5 Enable 24V Enable +24V 3 Ready Load R Table 6.10: Pin assignment connector X8A, X8B Signal Pin Description ECOVARIO 616 X1A (axis 1) X1B (axis 2 / nc) ASI+ 1 Trip contact STO + ASI- 2 Trip contact STO - Table 6.11: Signals used for STO on connector X1A; X1B Signal Pin Description ASO1 3 Message contact STO Ready 3 Ready for operation ASO2 4 Message contact STO Enable 5 Enable operation Control Using the STO function The internal logic circuit safely switches off the power stages of the servo amplifier and zeroes the demand values. The inputs and outputs can be connected to an external safety PLC. Advantage: The DC link rests charged. Only low voltages are switched, the extend of wiring and components is reduced. 34 Subject to change without notice! Installation and Operating Instructions ECOVARIO® 616, 616 D Implementation of the STO function A block diagram of the components which contribute to the STO function is shown in Fig. 6.18. For 2-axis servo amplifiers the function is implemented for both axes in the same way. Channel A: If a voltage of +24V is applied between the inputs ASI+ and ASI- and to the Enable input (channel B) and software enable is set an electronic switch is switched on via an optocoupler and the servo amplifier operates normally. If the voltage at the input ASI+ and ASI- decreases the STO function becomes effective by switching off the 15V voltage of the power stage. A restart is only possible if a 24 V voltage is applied again between the inputs ASI+ and ASI- (channel A) and to the Enable input (channel B), software enable is set and the error status of the servo amplifier has been reset. The safe status of the restart lock (channel A) is signalled by the contact between ASO1 and ASO2 (if the drive is blocked the contact is closed). The signal can be fed to a higher-level safety PLC and can e.g. be used for enabling a door lock. Channel B: If the 24 V voltage is not applied to the Enable input, the power stage is switched off via a FPGA. The STO function protects against a restart. A restart is only possible if a +24 V voltage is applied again between the inputs ASI+ und ASI- (channel A) and to the Enable input (channel B), software enable is set and the error status of the servo amplifier has been reset. The safe status of the restart lockout (channel B) is signalled via the Ready output (if the restart lockout is active, the level at the Ready output is 0 V). Channel A +15V ASI+ ASI15VH ASO1 1 max. 200 mA Software Enable Further blocks of the servo amplifier ASO2 Status signal Channel B 5VD +5V Ready Power stage 15VH Enable (24V) FPGA GND Control logic Control signals VBUS- Fig. 6.18: Block diagram: Implementation of the safety function STO (for one axis) Subject to change without notice! 35 Installation and Operating Instructions ECOVARIO® 616, 616 D WARNING The STO function may only be activated (i.e. no voltage between ASI+ and ASI-) by an automatic control or by manual activation if the motor is no longer rotating and the servo amplifier has been switched to „inactive“ (24 V are not applied to „Enable“ input). Drives with a suspended load must have an additional safe mechanical blocking. In the safety circuit the monitoring contact ASO1/ASO2 bridges the safety equipment of the machine (e.g. safety position switches at safety doors). The safety area is protected from indeliberate restart of the device. La fonction STO ne doit être activée manuellement ou de façon pilotée en retirant la tension entre les entrées ASI+ et ASI- qu’après l’arrêt du freinage et que le frein d’arrêt a pris, que l’amplificateur de servomoteur soit devenu inactif (signal „Enable“ retiré). Le contact de surveillance ASO1/ASO2 ponté dans le circuit de sécurité de l’installation des équipements de sécurité (par exemple des contacteurs de sécurité sur des portes). La zone de sécurité est maintenant protégée contre le redémarrage de l’entrainement Relevant aspects of safety See also the prescribed use of the servo amplifier ECOVARIO® described in chap. 2.6 and the operating conditions mentioned there. As Fig. 6.18 shows the STO function is implemented by two channels. If a single error occurs, the function still remains operative via the other channel. If the restart lock is active, all driver transistors are in high resistance state. If a current in the motor is produced by damaged driver transistors the high-pole servo motors as well as the 2-phase servo motors cannot start because the necessary rotating field is not created. In the worst case, however, a short hitch can occur at the motor shaft (movement of max. 1/2 pole pair of the motor). If the internal semiconductor switch is damaged or a cable is broken the safety equipment switches off the drive because in this case the bridging of the safety equipment is not effective. If the restart lock is activated by an automatic control, the control signal must be monitored to make sure that the restart lock cannot be activated if the motor is rotating. Commissioning and checking the STO function During commissioning of the machine, after changing components or restructuring the wiring, after a download of a new Firmware, after modifications of the parameters, however at least once a year the function of the safety equipment including the STO function must always be checked as described below: Table 6.12: Checking the functions of the safety equipment including the STO-Funktion 36 Step Measure 1 Make sure that during the check the drive can run and stop unrestrictedly Check 2 Stop drive controlled (target velocity=0) 3 Disable drive (remove Enable signal) 4 Activate the holding brake, if any 5 Remove the +24V voltage between ASI+ and ASI- at X8A or X8B (axis 2), i.e. activate the STO function 6 Open safety equipment (e.g. safety door) without interfering with the safety area. 7 Pull off mating connector X8A or X8B Line contactor must drop. (axis 2) from the respective servo amplifier. 8 Pull in mating connector X8A or X8B. Switch on line contactor. Measure the signal level at the Ready signal: has to be inactive (0 V). Line contactor must stay „on“. Subject to change without notice! Installation and Operating Instructions ECOVARIO® 616, 616 D Maintenance, trouble shooting and diagnosis The STO function and the STO interface do not require any maintencance. However, periodical functional checks are necessary. A check concerning the proper operation of the STO function according to table 6.12 has to be carried out: During commissioning of the machine after changing components after restructuring of the wiring after a download of a new Firmware after modifications of the parameters periodically at least once a year; the required intervals depend on the application. The following error messages are related to the STO function (list of all errors in Chap. 7.3.2): D00 Restart lock blocks switch on Measure: Check STO function D01 No external Enable Measure: Check Enable signal Technical Data Table 6.13: Technical data with respect to the safety standards EN 61800-5-2 SIL 6.5 EN ISO 13849-1 2 PL d MTTFd 890 years (high) DCavg > 60% (low), cyclic plausibility check by evaluation of the status signal is recommended Category 3 (dual-channel system, single fault tolerance is given) λd 1.01 * 10-7 Encoders The 1-axis servo amplifier ECOVARIO 616 provides two encoder connectors. The 2-axis servo amplifier ECOVARIO®616 D provides one encoder connector per axis (X11 for axis 1 and X12 for axis 2). NOTICE / PRUDENCE Never plug and pull encoder cables while they are live! Always switch off the logic supply of the ECOVARIO®. Otherwise damages to the encoder can occur. Ne connectez ou ne déconnectez jamais le câble d’un codeur sous tension ! Toujours éteindre l’alimentation logique de l’ECOVARIO avant. Dans le cas contraire, le codeur pourrait être endommagé Encoder inputs X11, X12 Apart from incremental standard encoders also absolute value encoders system HIPERFACE® and BISS® can be connected to the 15-pole High-Density Sub-D socket. As an option, a version for use with sine encoder systems with 1 Vpp signal amplitude for high resolution encoder evaluation is available. Connection of two encoders per axis at ECOVARIO 616 D Via a so-called Y encoder cable it is possible to use an additional incremental encoder per axis. If you want to use this option please double-check with our applications department. Parametrization of the encoder interfaces For all encoders of the Jenaer Antriebstechnik GmbH complete data sets are available. With the PC software ECO Studio the data set for the selected encoder can be chosen and transmitted to the ECOVARIO®. Subject to change without notice! 37 Installation and Operating Instructions ECOVARIO® 616, 616 D 6.5.1 2-Axis Servo Amplifiers ECOVARIO 616 D: X11, X12: Encoder Fig. 6.19: Mating connector X11/ X12: 15-pole Sub-D high density connector, view of the solder or crimp side Standard encoder: max. signal frequency 2 MHz, that is a count rate of 8 MHz. SinCos encoder: max. signal frequency 150 kHz Table 6.14: Pin assignments connector X11, X12 at ECOVARIO 616 D Standard encoder (incremental) optional 2nd incremental enc. JAT SinCos encoder (Optolab) optional 2nd incremental enc. HIPERFACE® (Stegmann SCS) optional 2nd incremental enc. BISS® (Hengstler / IC-Haus) + 2nd encoder (incremental) or JAT SinCos encoder Pin Signal Signal Signal 1st encoder Signal 1 UP UP 5/11 (15) V can be set, 500 mA* UP 2 A Track A - sin+ Sine + - Sine 0,8 ... 1,2 VPP - A - Track A / sin+ 3 B Track B - cos+ Cosine + - Cosine 0,8 ... 1,2 VPP - B - Track B / cos+ 4 Z Track N - Z Index track - Data Data channel - Data Daten - 5 +TSENSE Temp.sensor - +TSENSE Temp.sensor - +TSENSE Temp.sensor +TSENSE Temp.sensor - 6 DGND DGND Ground - DGND Ground - DGND Ground - 7 /A Track /A - sin- Sine - - RefSin Reference sine - /A - Track /A / sin- 8 /B Track /B - cos- Cosine - - RefCos Reference cosine - /B - Track /B / cos- 9 /Z Track /N - /Z Index track - /Data /Data channel - /Data /Daten - -TSENSE Temp.sensor - -TSENSE Temp.sensor - -TSENSE Temp.sensor - - Track /B - - Track /B /Z - Track /N 1st encoder 2nd enc. 5/11 (15) V can be set, 500 mA* Ground 1st encoder UP 10 -TSENSE Temp.sensor - 11 /B - Track /B /B 2nd enc. 5/11 (15) V can be set, 500 mA* 2nd enc. - BISS encoder 2nd encoder 5/11 (15) V, can be set, 500 mA* 12 +VENCSENSE Sensor UP - +VENCSENSE Sensor UP - +VENCSENSE Sensor UP - +VENCSENSE Sensor UP - 13 B - Track B B - Track B - - Track B Z - Track N 14 A - Track A A - Track A - - Track A CLK CLK - 15 /A - Track /A /A - Track /A - - Track /A /CLK /CLK - *) the same supply voltage for both encoders Setting the supply voltage Up The voltage UP at the respective encoder interface can be parameterized and is set via the voltage applied to Pin 12 (+VENCSENSE): Table 6.15: Setting the encoder supply voltage VENCSENSE UP + 5 V / open 5V 0V 11 V The standard cable ABS 65-300-525-xx for BISS® encoders already contains the settings for the voltage UP. The maximum length of the cable is 50 m. INFO The connection of voltage dividing resistors for setting the encoder supply voltage is not possible at ECOVARIO 616 D. All cables which are no JAT standard cables have to be assessed for their suitability before they are used together with ECOVARIO 616 D. Connection of a second incremental or JAT SinCos encoder via Y cable If required, a further incremental or SinCos encoder can be connected to the encoder interface via a Y cable. If you want to use this option please double-check with our applications department. The assignment depends on the encoder type used as first encoder (cf. table above). 38 Subject to change without notice! Installation and Operating Instructions ECOVARIO® 616, 616 D Fig. 6.20: Example for connection for a 5 V incremental encoder / SinCos encoder [deviations in brackets] Fig. 6.21: Example for connection for a BISS® encoder via standard cable ABS65-300-525-xx Subject to change without notice! 39 Installation and Operating Instructions ECOVARIO® 616, 616 D 6.5.2 1-Axis Servo Amplifier ECOVARIO 616: X11, X12: Encoder Fig. 6.22: Mating connector X11/ X12: 15-pole Sub-D high density connector, view of the solder or crimp side The maximum signal frequency is 2 MHz, that is a count rate of 8 MHz. Table 6.16: Pin assignments connector X11, X12 at 1-axis servo amplifier ECOVARIO 616 Standard encoder (incremental) JAT-SinCos-Encoder (Optolab) HIPERFACE® (Stegmann SCS) BISS® (Hengstler / IC-Haus) Pin Signal Description Signal Description Signal Description Signal Description 1 UP 5/11 (15) V can be set, 500 mA UP 5/11 (15) V can be set, 500 mA UP 5/11 (15) V can be set, 500 mA UP 5/11 (15) V, can be set, 500 mA 2 A Track A sin+ Sine + Sine 0,8 ... 1,2 VPP A - 3 B Track B cos+ Cosine + Cosine 0,8 ... 1,2 VPP B - 4 Z Track N Z Index track Data Data channel Data Data 5 +TSENSE Temperature sensor +TSENSE Temperature sensor +TSENSE Temperature sensor +TSENSE Temperature sensor 6 DGND Ground DGND Ground DGND Ground DGND Ground 7 /A Track /A sin- Sine - RefSin Reference sine /A - 8 /B Track /B cos- Cosine - RefCos Reference cosine /B - 9 /Z Track /N /Z Index track /Data /Data channel /Data /Data 10 -TSENSE Temperature sensor -TSENSE Temperature sensor -TSENSE Temperature sensor -TSENSE Temperature sensor 11 - - - - - - - - 12 +VENCSENSE Sensor UP +VENCSENSE Sensor UP +VENCSENSE Sensor UP +VENCSENSE Sensor UP 13 - - - - - - - - 14 - - - - - - CLK CLK 15 - - - - - - /CLK /CLK Setting the supply voltage Up The voltage UP at the respective encoder interface can be parameterized and is set via the voltage applied to Pin 12 (+VENCSENSE): Table 6.17: Setting the encoder supply voltage VENCSENSE UP + 5 V / open 5V 0V 11 V The standard cable ABS 65-300-525-xx for BISS® encoders already contains the settings for the voltage UP. the maximum length of the cable is 50 m. INFO 40 The connection of voltage dividing resistors for setting the encoder supply voltage is not possible at ECOVARIO 616 (D). All cables which are no JAT standard cables have to be assessed for their suitability before they are used together with ECOVARIO 616 (D). Subject to change without notice! Installation and Operating Instructions ECOVARIO® 616, 616 D Fig. 6.23: Example for connection for a 5 V incremental encoder / SinCos encoder [deviations in brackets] Fig. 6.24: Example for a BISS® encoder via standard cable ABS65-300-525-xx Subject to change without notice! 41 Installation and Operating Instructions ECOVARIO® 616, 616 D 6.6 Serial interfaces 6.6.1 X13: RS485/RS232 interface with 2 Capture Inputs The ECOVARIO® is available with RS485 or RS232 interface with 2 capture inputs for fast position capturing. ECOVARIO® 6 xx x x-A x-xxx xxx: design with RS485 interface ECOVARIO® 6 xx x x-F x-xxx xxx: design with RS485 interface ECOVARIO® 6 xx x x-B x-xxx xxx: design with RS232 interface ECOVARIO® 6 xx x x-G x-xxx xxx: design with RS232 interface Design with RS485 interface Table 6.18: Pin assignment connector X13 Fig. 6.25: Mating connector X13: 9-poliger D-Sub-Stecker; Ansicht auf die Löt- bzw. Crimpseite Pin Signal Description 1 CAP1+ Capture input1 (RS422 level) 2 Rx+ Receive RS485 3 Tx+ Transmit RS485 4 CAP2+ Capture input2 (RS422 level) 5 DGND Digital ground 6 CAP1- Capture input1 (RS422 level) 7 Rx- Receive RS485 8 Tx- Transmit RS485 9 CAP2- Capture input2 (RS422 level) Apart from the serial interface the connector X13 provides at ECOVARIO® 6xx additionally two capture inputs with RS422 signal transmission for rapid capture of process events. The capture inputs are not galvanically separated and can also be configured as digital inputs. The RS485 interface of the ECOVARIO® may as well serve for a 4-conductor (full duplex) as also a 2-conductor (half duplex) connector. Transmitter and receiver of the ECOVARIO® meet the specifications of EIARS485 (up to 250 kBaud) and are EMC-protected according to IEC 61 000-4-4. The communication protocol allows network operation with a master (host) and up to 126 ECOVARIO® units as slaves in an RS485 network. At most 32 participants may take part in one network. The network must have a bus structure. The adress (ID) of an ECOVARIO® is set by the front keys. Each ID may only be allocated once. ID = 0 is reserved and may not be allocated. 42 Subject to change without notice! Installation and Operating Instructions ECOVARIO® 616, 616 D Fig. 6.26: Example for connection RS485: point-to-point connection in half duplex mode Bild 6.27: Example for connection RS485: point-to-point connection in full duplex mode Subject to change without notice! 43 Installation and Operating Instructions ECOVARIO® 616, 616 D Design with RS232 interface Apart from the serial interface the connector X13 of the ECOVARIO® 6xx provides two capture inputs with RS422 signal transmission for rapid event capture. Alternatively to the USB interface, via the RS232 interface a PC can be connected for setting the parameter of the ECOVARIO® 114 D. How to set the parameters of the RS232 interface is described in the manual „Object Dictionary ECOVARIO®, ECOSTEP®, ECOMPACT®, ECOMiniDual“. For RS232 communication with ECOVARIO® 6xx a 3-core connection to the host is needed. The connector X13 of the ECOVARIO® 6xx is designed in a way that a 1:1 standard cable for communication with a COM port (9-pole Sub-D connector) can be used. Transmitter and receiver of the ECOVARIO® 114 D meet the specifications of EIA-232E and CCITT V.28 and are EMCprotected according to IEC 61000-4-2. The communication protocol allows network operation of up to 126 ECOVARIO® units as slaves in a mono master network. For this option a ring structure of the RS232 network according to the scheme in fig. 6.30 is necessary. Fig. 6.28: Mating connector X13: 9-pole Sub-D connector, view of the solder or crimp side Table 6.19: Pin assignment connctor X13 in RS232 design Pin Signal Description 1 CAP1+ Capture input 1 (RS422 level) 2 TxD RS232 TxD 3 RxD RS232 RxD 4 CAP2+ Capture input 2 (RS422 level) 5 DGND Digitalground 6 CAP1- Capture input 1 (RS422 level) 7 - free 8 - free 9 CAP2- Capture input 2 (RS422 level) Fig. 6.29: Example for connection of an RS232 interface 44 Subject to change without notice! Installation and Operating Instructions ECOVARIO® 616, 616 D Fig. 6.30: RS232 network in ring structure Fig. 6.31: RS232 cable ECOVARIO® – PC; view of the solder or crimp side of the plug connectors at the cable 6.6.2 X14: Parameterizing USB interface The USB interface serves for setting the parameters of the ECOVARIO® with a PC. a USB cable A – B connects the USB interface of the ECOVARIO® (USB connector type B) to a PC (USB connector type A). The USB interface is EMC protected according to IEC 61 000-4-2 and is internally supplied. To communicate via the USB interface firstly the unit ID of the ECOVARIO® must be set. The ID is set with the front keys of the ECOVARIO®. Each ID can only be allocated once. ID = 0 is reserved and may not be allocated. Subject to change without notice! Fig. 6.32: Connector X14: USB connector type B: front view onto the socket at the ECOVARIO® 45 Installation and Operating Instructions ECOVARIO® 616, 616 D Table 6.20: Pin assignment connector X14 Pin Signal Description 1 USB_VBUS USB +5V 2 USB_D- USB data - 3 USB_D+ USB data + 4 DGND USB ground Fig. 6.33: Circuit of the USB interface 6.7 X21: CAN interface The CAN interface of the ECOVARIO® is based on the communication profile CiA DS 301 and the device profile CiA DSP 402 (drives and motion control). It must be supplied with external voltage. (Exception: ECOVARIO 6xx xx Ax xxx and ECOVARIO 6xx xx Bx xxx xxx). Terminating resistors for busses are not built in the ECOVARIO®. A CAN bus has to be terminated with a 120 Ω resistor at the beginning and at the end. If the ECOVARIO® is operated as first or last participant at a CAN bus, it is useful to solder the terminating resistor in the mating connector of X21 between the pins 2 and 7. Fig. 6.34: Mating connector X21: 9-pole Sub-D socket; view of the solder or crimp side Table 6.21: Pin assignment connector X21 The manual „Object Dictionary ECOVARIO® and ECOSTEP®“ contains a detailed description of all available functions. Pin Signal Description 1 - n.c. 2 CAN_L CAN data L The Baud rate und the device ID can be set with the front keys of the device (see chap. 7.3.3 „Key operation“) or directly via the appropriate CAN objects. 3 CAN_GND reference potential to CAN data 4 - n.c. 5 - n.c. The following Baud rates are supported: 1 000 kBit/s, 500 kBit/s, 250 kBit/s, 125 kBit/s, 100 kBit/s, 50 kBit/s. These values accord to the register values of the common older 8 or 16 bit CAN controller (ECOSTEP® compatible) and are transformed via table into ECOVARIO® CAN controller values. If point of sampling and scan rate (86.7 %, 3-times sampling at all Baud rates) do not meet the demands please get in touch with the technical service of Jenaer Antriebstechnik. 6 CAN_GND reference potential to CAN_V+ 7 CAN_H CAN data H 8 - n.c. 9 CAN_V+ +8 ... +18 VDC, max. 50 mA * *) for ECOVARIO 6xx xx Ax xxx xxx and ECOVARIO 6xx xx Bx xxx xxx no external supply voltage for the CAN interface is required. Fig. 6.35: Circuit X21: design with CAN interface 46 Subject to change without notice! Installation and Operating Instructions ECOVARIO® 616, 616 D Fig. 6.36: Size terminating resistors R acc. to line impedance; normal: R = 120 Ω 6.8 Optional interfaces ECOVARIO® 6xx is available with the following options: ECOVARIO® 6 xx xx-A x-xxx xxx: CAN + RS485 + Encoder emulation ECOVARIO® 6 xx xx-B x-xxx xxx: CAN + RS232 + Encoder emulation ECOVARIO® 6 xx xx-F x-xxx xxx: CAN + RS485 + PROFIBUS DP-V0 ECOVARIO® 6 xx xx-G x-xxx xxx: CAN + RS232 + PROFIBUS DP-V0 ECOVARIO® 6 xx xx-L x-xxx xxx: CAN + RS232 + Ethernet interface ECOVARIO® 6 xx xx-P x-xxx xxx: CAN + RS485 + EtherCAT® interface ECOVARIO® 6 xx xx-Q x-xxx xxx: CAN + RS232 + EtherCAT® interface ECOVARIO® 6 xx xx-H x-xxx xxx: CAN* + RS485 + Profinet® interface ECOVARIO® 6 xx xx-I x-xxx xxx: CAN* + RS232*+ Profinet® interface *) CAN/RS232 as service interface for ECO Studio only; no object dictionary acc. to CANopen DS402. 6.8.1 X22: Designs with encoder emulation Table 6.22: Pin assignment connector X22; design with encoder emulation Pin Signal Description Fig. 6.37: Mating connector X22: 9-pole Sub-D connector; view of the solder or crimp side The interface „encoder emulation“ is supplied by an external voltage of 5 VDC. The maximum cable length is 10 m. Subject to change without notice! 1 ENC_5V Stromversorgung (external) 2 A Track A 3 B Track B 4 Z Track N 5 ENC_GND Encoder ground 6 ENC_GND Encoder ground 7 /A Track /A 8 /B Track /B 9 /Z Track /N 47 Installation and Operating Instructions ECOVARIO® 616, 616 D Fig. 6.38: Connector assignment X22 on designs with encoder emulation 6.8.2 X22: Designs with PROFIBUS DP-V0 interface Table 6.23: Pin assignment connector X22 on design with PROFIBUS DP-V0 interface Bild 6.39: Mating connector X22: 9-pole Sub-D socket; view of the solder or crimp side Pin Signal Description 1 - n.c. 2 - n.c. 3 RxD/TxD+ PB data 4 CNTR PB control The pin assignment of the design with PROFIBUS DP-V0 meets the requirements of EN 50 170. 5 PB_GND PB ground Additionally to the signals RxD/TxD+, RxD/TxD-, PB_GND and 6 PB_5V PB 5 V PB_5V the optional signal CNTR (RTS, control of the forward direc7 n.c. tion of the data) is supported. This signal can be used for controlling 8 RxD/TxDPB /Data a repeater or an fibre optic link converter (OLP, Optical Link Plug). 9 n.c. The bus interface of the ECOVARIO® is electrically seperated from the rest of the device. But the reference potentials are interconnected via 1 MΩ and 100 nF. The interface is supplied by the unit, an external supply in not necessary. The shroud of the Sub-D connector is connected to chassis earth (GND). Fig. 6.40: Circuit X22 on design with PROFIBUS DP 48 Subject to change without notice! Installation and Operating Instructions ECOVARIO® 616, 616 D All units are connected in a bus structure (line). In one segment up to 32 participants (master or slaves) can be connected. Each segment has an active bus terminating module at the beginning and at the end (cf. Fig. 6.41). Fig. 6.41: PROFIBUS connection of several ECOVARIO® axes To obtain faultless operation it has to be made sure that both bus terminating modules are continuously supplied. The bus terminating module is commonly realized in the bus connectors to be switched in. If there are more than 32 participants or for enlarging the network repeaters have to be used to connect the bus segments to each other. Use only cable with a mesh shield. If the unit is mounted it is an advantage if the cable is stripped without interruption and laid on the shield or PE conductor. This measure increases the reliability in ambients with strong interferences. For newly installed PROFIBUS DP-V0 cablings we recommend standardized cable type A with the following characteristics: Wave resistance: 135 – 165 Ω Capacitance per unit length: < 30 pF/m Loop resistance: 110 Ω/km Core diametre: 0,64 mm Core cross section: > 0,34 mm² The maximum cable length depends on the transmission rate. E. g. with a transmission rate of 187.5 kBit/s the maximum cable length is 1 200 m, at 12 MBit/s the cable should not be longer than 100 m. At transmission rates ≥1.5 MBit/s spur lines must be avoided. Common connectors provide the possibility to connect incoming and outgoing cables directly in the connector. Thus spur lines are avoided and the bus connector can be plugged in and off the bus without interrupting the data transmission. Use only bus connectors suitable for PROFIBUS DP-V0 and the respective baud rate. The connectors at both ends should provide a termination to be switched in. Additionally in each connector should be a longitudinal inductance with 100 nH for each outgoing data conductor. These connectors are available from Siemens for example. The shield of the PROFIBUS DP-V0 cable may not be used for potential compensation. Machines that are grounded at various spots must have a separate PE conductor the impedance of which is at least 10 times smaller than the one of the cable shields. Subject to change without notice! 49 Installation and Operating Instructions ECOVARIO® 616, 616 D 6.8.3 X22: Designs with Ethernet interface As an option, ECOVARIO® can be equipped with an Ethernet interface which can be used for parameterization. The interface supports Fast Ethernet according to IEEE-802.3u (100Base-TX), halfduplex, 100Mbps. Physically, the interface is designed as two standardized RJ45-sockets at the front side of the ECOVARIO®. Table 6.24: Pin assignment connector X22A,B on design with Ethernet interface Pin Signal Description 1 RX+ Receive signal + 2 RX- Receive signal - 3 TX+ Transmit signal + 4 - n.c. 5 - n.c. 6 TX- Transmit signal - 7 - n.c. 8 - n.c. The interfaces X22A and X22B can each be used for the connection to the PC or a server (end of a starshaped connection) as well as for the connection to further servo amplifiers via a line-shaped connection (uplink, cf. examples below). Cabling is done via twisted-pair-cables UTP, Cat.5e. Star and line topologies are supported. Not more than 6 ECOVARIO® servo amplifiers should be cabled in line. The cable length between two devices is limited to 100 m. For using the Ethernet interface the IP address, the subnet mask, the port and, if necessary, a gateway IP address have to be parameterized. The gateway IP address is only necessary if a communication to external network is intended to be set up. The interfaces X22A and X22B are each equipped with the following display elements: green LED displays „Link Activity“ orange LED displays „Collision Detection“. An ECOVARIO® which is operated with the Ethernet interface automatically selects the interface used for message transfer. If a CAN bus connection is available, all messages which the ECOVARIO® intends to transmit, e.g. PDOs, emergencies or the boot-up message are sent on the CAN bus. If no CAN bus voltage can be detected it is assumed that a pure Ethernet application is set up and all messages are sent via Ethernet (if no Ethernet cable is plugged, the messages are lost!). CAN bus has the highest priority, i.e. the messages are transmitted via CAN bus as soon as the CAN connector has been plugged. Ethernet messages are not sent until 5s after power-up, because the hardware requires this time for configuration. During this time up to 8 (via DPM) or up to 32 (via CAN-Bus) received messages are stored temporarily. 50 Subject to change without notice! Installation and Operating Instructions ECOVARIO® 616, 616 D There are three ways to implement the operation with Ethernet interface: as a CAN/Ethernet bridge, where one ECOVARIO® with Ethernet interface serves as a gateway as a pure Ethernet application, where all ECOVARIOs® are connected to each other by Ethernet interfaces as a version with parallel bus operation. The three ways are described in the following. Gateway operation In the most common application an ECOVARIO® with Ethernet interface serves as a bus coupler between Ethernet and an existent CAN bus system. Fig. 6.42 shows the resulting topology. In any case the CANopen protocol is used which is „tunneled“ in UDP packages for the transport via Ethernet. The original CAN data is extracted from these packages and is lead to the CAN bus. All bus nodes (also the ECOVARIO® with Ethernet interface) can receive them. In the other direction all CAN messages received via the bus are packed into UDP packages and sent via the Ethernet. Fig. 6.42: Gateway operation of the ECOVARIO® The Ethernet function supports full SDO transfer with one or more client applications on PC/IPC side. Therefore, the SDO answers received on the CAN bus are switched through to the respective service (automatic assignment of IP address and port). All other received messages as PDOs and emergencies etc. are sent to an address which has to be defined in the configuration object. For example, this could be the IP address of the PC/IPC or the IP broadcast address (255.255.255.255). The port is freely selectable, however should be adjusted to a respective application on the PC (e.g. for logging). Subject to change without notice! 51 Installation and Operating Instructions ECOVARIO® 616, 616 D Ethernet operation For this version CAN bus wiring is not required at all (cf. Fig. 6.43). The communication is handled exclusively via Ethernet. All CANopen messages and services (PDO, Emergency, NMT etc.) are managed. Fig. 6.43: Ethernet operation of the ECOVARIO® without using the CAN bus Redundant operation The special feature of this version (Fig. 6.44) is that e.g. service data (via SDO) can be exchanged via Ethernet while process communication is done via the CAN bus. The SDO transfer with the PC/IPC does not reach the CAN bus which is not disturbed (e.g. synchronous motion). In order to change the operation mode the gateway mode has to be deactivated in each device (object 0x2FB2, sub index 12), because otherwise the devices would send the messages to each other continuously. Process data communication is decoupled completely from the Ethernet in this case. All other CANopen messages and services (PDO, Emergency, NMT etc.) are not switched through from the CAN bus to the Ethernet side (and vice versa). Fig. 6.44: Redundant operation Ethernet/CAN with ECOVARIO® 52 Subject to change without notice! Installation and Operating Instructions ECOVARIO® 616, 616 D 6.8.4 X22: Designs with EtherCAT® interface As an option, ECOVARIO® can be equipped with an EtherCAT® interface which can be used for setpoint setting and parameterization. The interface supports the protocol of the EtherCAT® Technology Group and allows for Fast Ethernet according to IEEE-802.3u (100Base-TX), fullduplex, 100Mbps. Physically, the interface is designed as two standardized RJ45-sockets at the front side of the ECOVARIO®. Pin assignment is the same as for the standard Ethernet interface (c.f. Chap. 6.8.3). OUT Table 6.25: Pin assignment connector X22A,B on design with EtherCAT® interface IN Pin Signal Description 1 RX+ Receive signal + 2 RX- Receive signal - 3 TX+ Transmit signal + 4 - n.c. 5 - n.c. 6 TX- Transmit signal - 7 - n.c. 8 - n.c. The interface X22B is the EtherCAT® „IN“ port and is used for the connection to the PC or a server (end of a star-shaped connection). The interface X22A is the EtherCAT® „OUT“ port and is intended for the connection to further servo amplifiers via a line-shaped connection (uplink, cf. examples below). Cabling is done via twisted-pair-cables UTP, Cat.5e. Tree and line topologies are supported. Star topologies are possible as well. The cable length between two devices is limited to 100 m. For process control and visualization of EtherCAT® devices the operation with the PC software „TwinCAT“ (manufacturer: Beckhoff GmbH) is proposed. For configuration instructions and an application example please refer to Application Note 26. he objects which are required for the configuration of the EtherCAT® communication are described in the manual „Object Dictionary ECOVARIO, ECOSTEP, ECOMPACT, chapter 5.2.29. The interfaces X22A and X22B are each equipped with the following display elements: green LED displays „Link / Activity“ orange LED displays „Transmission in fullduplex mode“. The green „RUN“ LED is located in the housing of the ECOVARIO and can be seen through the air slots on the upper side of the housing. The LED has the following functions: LED off: LED flashes (5 Hz): LED flashes (200ms on/1s off ): LED on: Subject to change without notice! „RUN“ LED EtherCAT® State Init EtherCAT® State Pre-Operational EtherCAT® State Safe Operational EtherCAT® State Operational 53 Installation and Operating Instructions ECOVARIO® 616, 616 D There are two ways to implement the operation with EtherCAT® interface: as a pure EtherCAT® application, where all ECOVARIOs® are connected to each other by EtherCAT® interfaces as a version with parallel bus operation EtherCAT® / CAN. The two ways are described in the following. Pure EtherCAT® operation For this version no CAN bus wiring is required (cf. Fig. 6.45). The communication is handled exclusively via EtherCAT®. All CANopen messages and services (PDO, Emergency, NMT etc.) are managed. Bild 6.45: EtherCAT® operation of ECOVARIO® without using the CAN bus Parallel operation In principle, CAN and EtherCAT® can be operated in parallel (cf. Fig. 6.46), where the CAN bus is used for parameterization while EtherCAT® is used for the synchronous (interpolated) operation. As soon as the ECOVARIO® has been configurated successfully by the EtherCAT® master and has been set to preoperational state via EtherCAT®, the NMT telegrams via CAN are ignored. PDOs assigned to the EtherCAT® bus are no longer sent nor received via CAN. Interpolated operation via CAN is not possible in this case. Emergency telegrams are sent via both bus systems. SDO traffic is functional without limitations via all interfaces. Fig. 6.46: Parallel operation EtherCAT/CAN with ECOVARIO® 54 Subject to change without notice! Installation and Operating Instructions ECOVARIO® 616, 616 D 6.8.5 X22: Designs with Profinet® interface As an option, the ECOVARIO® 616/616D can be equipped with a Profinet® interface which can be used for setpoint setting and parameterization via a respective PLC. The device supports the following ProfiDrive application classes: 1 (standard drive with velocity control) 3 (drive with one-axis positioning control) 4 (servo drive with clock synchronous velocity and position control with central motion control). ECOVARIO supports IRT (Realtime Class C) and can work in interpolation cycles of 1 ms, 2 ms or 4 ms. The interface allows for Fast Ethernet according to IEEE-802.3u (100Base-TX), fullduplex, 100Mbps. Physically, the interface is designed as two standardized RJ45-sockets at the front side of the ECOVARIO®. Pin assignment is the same as for the standard Ethernet interface (c.f. Chap. 6.8.3). The netwotk controller used for the Profinet interface also provides an Ethernet stack. By means of the Ethernet stack it is possible to support the manufacturer specific UDP protocol for Ethernet communication. Thus, a communication e.g. with ECO Studio can be established in parallel to the ProfiNet traffic. Table 6.26: Pin assignment connector X22A,B on design with Profinet interface Pin Signal Description 1 RX+ Receive signal + 2 RX- Receive signal - 3 TX+ Transmit signal + 4 - n.c. 5 - n.c. 6 TX- Transmit signal - 7 - n.c. 8 - n.c. The interfaces X22A and X22B can each be used for the connection to the PC or a server (end of a starshaped connection) as well as for the connection to further servo amplifiers via a line-shaped connection (uplink, cf. examples below). Cabling is done via twisted-pair-cables UTP, Cat.5(e). Tree and line topologies are supported. Star topologies are possible as well. The cable length between two devices is limited to 100 m. The interfaces X22A and X22B are each equipped with the following display elements: green LED displays „Link / Activity“ orange LED displays „Collision Detection“. Three more diagnosis LEDs are located in the housing of the ECOVARIO 616/616D and can be seen through the air slots on the upper side of the housing. Subject to change without notice! 55 Installation and Operating Instructions ECOVARIO® 616, 616 D The LEDs have the following functions: System LED: yellow: green: off : NetX system runs without user application User application is running Option card has no NetX system or no supply voltage. Real Time Ethernet Status LED 1 red: off : Status LED 1 Status LED 2 Bus error (cable not connected / IP settings not configured) No error or no supply voltage. System LED Real Time Ethernet Status LED 2 red: System error flashes red: Under configuration or protocol stack expects configuration off : No error or no supply voltage. For process control and visualization of ECOVARIO® in the Profinet® network a ProfiDrive compatible controller can be used. For configuration instructions and an application example with the PLC S7-1500 (manufacturer: Siemens) please refer to Application Note 33. There are two ways to implement the operation with Profinet® interface: as a pure Profinet® application communication with ECO Studio in parallel to the Profinet® bus operation. The two ways are described in the following. Pure Profinet® operation The communication is handled exclusively via Profinet® (cf. Fig. 6.42). All CANopen messages and services (PDO, Emergency, NMT etc.) are managed. For the ECOVARIOs e.g. a line-shaped or a star-shaped connection via an IRT switch can be provisioned. ECOVARIO with Profinet interface ECOVARIO with Profinet interface ECOVARIO with Profinet interface Fig. 6.47: Example: Profinet® operation of ECOVARIO® 616/616D with line-shaped connection 56 Subject to change without notice! Installation and Operating Instructions ECOVARIO® 616, 616 D Note: IRT switch required for IRT operation only (AK4), in other cases a normal switch is sufficient ECOVARIO with Profinet interface ECOVARIO with Profinet interface ECOVARIO with Profinet interface Fig. 6.48: Example: Profinet® operation of the ECOVARIO® 616/616D with star-shaped connection via IRT switch Communication with ECO Studio connection in parallel to Profinet traffic The following settings have to be made in the IP configuration to communicate via the Ethernet interface and ECO Studio: IP of the ECOVARIO and IP of the ECO Studio PC have to be in the same subnet The gateway address of the ECOVARIO has to be the IP adress of the ECO Studio PC. The settings can be made via object 0x2FB2 or via Step 7. ECOVARIO with Profinet interface ECOVARIO with Profinet interface ECOVARIO with Profinet interface Fig. 6.49: Communication of ECO Studio in parallel to the Profinet traffic Subject to change without notice! 57 Installation and Operating Instructions ECOVARIO® 616, 616 D 7 Commissioning 7.1 Important notes before commissioning Only qualified personnel with a broad knowlege of the fields of electrical engineering, automation and drives are allowed to commission the servo amplifier ECOVARIO® 6xx. If required, Jenaer Antriebstechnik GmbH offers trainings. The manufacturer of the machine must generate a hazard analysis for the machine and take appropriate measures to ensure that unforeseen movements cannot cause injury or damage to any person or property. Check the wiring for completeness, short circuit and ground fault. WARNING / AVERTISSEMENT The protective earth conductor has to be properly applied before applying a voltage. If the protective earth conductor is not connected, in case of a failure e.g. the housing of the servo amplifier can be at hazardous voltage level. Un raccordement à la terre réglementaire doit obligatoirement être raccordé avant la mise sous tension de l’appareil. Si cette mise à la terre n’est pas raccordée, le boitier de l’amplificateur de servomoteur peut, en cas de problèmes, mener de dangereuses tensions. WARNING / AVERTISSEMENT Never plug or pull electrical connections while they are live! There is a risk of arcing. Arcs can cause injury and damage contacts. During operation logic and power connectors are live. Ne pas effectuer de débranchements sous tension. Il y a danger d’arc électrique qui peut blesser des personnes et endommager des contacts. Pendant l’utilisation les conducteurs de pilotage et de puissance conduisent des tensions dangereuses. WARNING / AVERTISSEMENT Acute danger of life or risk of injury due to high voltages up to 850 V! All live parts must be protected safely against touching. Even up to six minutes after disonnection from the supply capacitors can still have dangerous voltages present. To be sure measure the DC link circuit and wait till it has fallen below 40 V. Danger de mort ou danger de blessures par des tensions élevées (850 V)! Ne touchez pas de pièces de l’amplificateur de servomoteurs qui peuvent être potentiellement conducteur de tension (par exemple des contacts). Attendez au moins 6 minutes. Les condensateurs peuvent rester chargés aussi longtemps de tension dangereuse. Mesurez par sécurité les tensions entre circuits jusqu’à qu’elles soient inférieurs à 40V. If there are several axes in one machine commission one axis after the other. The axes already commisioned should be switched off. Concerning the allocation of the current to the both axes at ECOVARIO 616 D cf. chap. 8.2. For commissioning of the safety function STO observe chap. 6.4.1. CAUTION / ATTENTION 7.2 Hot surfaces may cause burns to the skin. As the housing of the ECOVARIO 6xx serves also as heat sink during operation the surface temperature may rise to more than 70°C. Before touching these parts after switching off the unit wait until the temperature has fallen down to 40 °C. Des surfaces chaudes peuvent entrainer des brulures. Le boiter de l’ECOVARIO 6xx sert également de radiateur, ceci entraine qu’il peut atteindre des températures de plus de 70°C pendant l’utilisation. Avant de toucher ces pièces, vous devez attendre après l‘arrêt jusqu‘à ce que la température de surface tombe à environ 40 ° C. Control and display elements At the front side of the ECOVARIO® one 7 segment LED display and two keys are located. The display shows state and error messages. If the state or error message has more than one digit the digits are shown one after another in intervals of 0.5 s. For further information cf. chapter 7.3.1. The following settings can be made with the keys: 58 Subject to change without notice! Installation and Operating Instructions ECOVARIO® 616, 616 D Unit ID (Node-ID) in a CAN, USB, RS232, RS485 or PROFIBUS network Baud rate for the CAN network Display of the Ethernet IP Address or of the EtherCAT® station address Restarting the bootloader and the loadware For detailed instructions on the use of the keys refer to chapter 7.3.3. 7.3 Work schedule commissioning 1. Check installation The servo amplifier is disconnected from the supply. Check the wiring for completeness, short circuits and ground faults (according to connection diagram in Fig. 6.2.1). 2. Zero enable Connect the ENABLE input of the respective axis to 0 V (connector X1A (axis 1) or X1B (axis 2)). 3. Switch on 24 V logic supply Apply the 24 V control voltage at the connector X1A between the pins GND and +24 V; after an initializing phase of about 3 s the LED display shows the operation mode of the servo amplifier. 4. Rectify eventual errors If the display shows an error, the error has to be rectified before commissioning (cf. chapter 7.3.2). 5. Start commissioning software Connect a PC to the PC interface (X13) of the ECOVARIO® (or via CAN dongle to the interface X21) and start the commissioning and operation program ECO Studio. Here, establish the logic connection between PC and ECOVARIO® 616. Note: At ECOVARIO 616 D for each axis a separate ECO Studio session has to be started. 6. Device configuration and mechanical configuration NOTICE / PRUDENCE Incorrect parameter settings can cause damage or destruction of machine parts. Device configuration and mechanical configuration must be adjusted to each specific case. De mauvais paramétrage peuvent endommager ou détruire des paries de la machine. Les appareils et la configuration mécanique doivent être individuellement adaptés à chaque cas. With the help of the ECO Studio device configuration wizard and of the mechanical configuration wizard carry out the basic settings for the operation of ECOVARIO®. A detailed description of software commissioning can be found in the „ECO Studio Operation Manual ECOVARIO®, ECOSTEP® and ECOMPACT®“ and in the ECO Studio help system. Before switching on the power supply the following items 7 to 10 have to be observed. 7. Check safety equipment DANGER High voltages up to 850 V and unintentional movements of motors, tools or axes may lead to death or serious injuries. Before switching on the voltage it is vital to check if all safety equipment that protects from touching live parts and from the consequences of indeliberate movements functions properly. Des tensions pouvant atteindre 850 V et des mouvements involontaires du moteur, des outils ou des déplacements d’axes entraines des dangers de mort ou de blessures. Avant la mise sous tension de la partie puissance, il s’assurer que les parties pouvant conduire du courant et les conséquences de de mouvements involontaires soient sécurisées et fonctionnent correctement. 8. Zero demand values Before switching on the power supply the analog and digital demand values for position and speed should be zeroed. Subject to change without notice! 59 Installation and Operating Instructions ECOVARIO® 616, 616 D 9. Switch on power supply The power supply should only be switched on with the on/off switches of a contactor circuit. 10. ENABLE 0,5 s after switching on the power supply, the enable signal of the respective axis can be changed to „high“ (24 V level at input X1A: Enable1 or X1B: Enable2). If the motor vibrates or hums the value of the p-gain should be reduced (ECO Studio: in the navigation area select the „Controller“ entry and then the „Velocity Controller“ tab). 11. Parameter optimization, further programming NOTICE / PRUDENCE 7.3.1 Incorrect parameter settings can cause damage or destruction of machine parts. The controller parameters are pre-set by the manufacturer. However, they must be checked and if necessary adjusted to the specific application. A detailed description of how to set the velocity controller and position controller parameters can be found in the ECO Studio help system. De mauvais paramétrage peuvent endommager ou détruire des paries de la machine. Les paramètres du régulateur sont préréglés en usine, cependant, doivent être vérifiées et adaptées à chaque cas spécifique. Une description détaillée de la configuration des paramètres du régulateur de vitesse et de position, est donnée le système d’aide ECO-Studio. State display After switching on the servo amplifier, the display shows the letters „Eco“, followed by the type (616) of the ECOVARIO® device (once). No parameters available Display shows Uc. If no communication or control parameters are available or if these are invalid, the unit is in the state „not configurated“. After setting or storing the unit must be restarted. Operation Display shows Display shows Display shows Display shows . Inactive state (power stage switched off at both axes) display „0“, dot flashes . Active state (power stage switched on at axis 1; axis 2 switched off ), dot flashes . Active state (power stage switched on at axis 2; axis 1 switched off ), dot flashes . Active state (power stage switched on at both axes) display „8“, dot flashes. Blocking Display shows . positive limit switch axis 1 reached Display shows . negative limit switch axis 1 reached Display shows . both limit switches axis 1 reached Display shows . positive limit switch axis 2 reached Display shows . negative limit switch axis 2 reached Display shows . both limit switches axis 2 reached Blockings of both axes are displayed as a combination of the displays shown above. Save parameters During saving parameters in the EEPROM the display shows a „P“. Afterwards the prior value is displayed. Error display If an error is detected, this is displayed. It is always the last error, that is displayed. If the error on the display is cleared (if possible) the next error on the list is displayed. In ECOVARIO 616 D, for the groups D and E the error code on the display is preceded by an axis code („1.“ or „2.“). Bootloader mode The „b.“ on the display indicates that the device is in the bootloader mode. The point indicates that the bootloader is ready for operation. 60 Subject to change without notice! Installation and Operating Instructions ECOVARIO® 616, 616 D 7.3.2 Error messages If the loadware recognizes an error, it is displayed. In bootloader mode the error display can be interrupted by pressing a key, afterwards errors can be shown with the display of the error memory (cf. chap. 7.3.3 „Key operation“). It is always the last error that is displayed. Note for ECOVARIO 616 D: For the groups D and E the error code on the display is preceded by an axis code („1.“ or „2.“). In ECO Studio the error messages of groups D and E are related to the axis which is connected to the individual ECO Studio session. Table 7.1: Error messages Code Error Group A A00 Countermeasure General errors Incorrect checksum of a bootloader section or overall checksum Repeat action, if the error reoccurs, send in device to manufacturer A01 Error during deleting a flash section Repeat action, if the error reoccurs, send in device to manufacturer A02 Error during activation of the Flash-Speichers Repeat action, if the error reoccurs, send in device to manufacturer A03 Error during programming of the flash memory Repeat action, if the error reoccurs, send in device to manufacturer A04 Error during adressing the flash memory Repeat action, if the error reoccurs, send in device to manufacturer A10 Error during reading/writing the EEPROM If the error reoccurs send in the device to manufacturer A11 Incorrect checksum of an EEPROM section Communication and/or application parameters have not (yet) been stored. This behaviour is normal with new devices and has been implemented for signalling this to the user. A12 Error during RAM check Repeat action, if the error reoccurs, send in device to manufacturer A20 Incorrect calibration data Send in device to manufacturer A21 Watchdog error of standard loadware If the error reoccurs send in the device to manufacturer A22 PLD firmware inappropriate for loadware Send in device to manufacturer A23 Loadware does not support this device Contact service hotline of Jenaer Antriebstechnik GmbH A24 Firmware/Loadware does not fit to device A25 FPGA could not be started Load appropriate firmware/loadware. First letter of the file name has to be „D“. If in doubt, contact service hotline of Jenaer Antriebstechnik GmbH. A26 Device could not be started Contact service hotline of Jenaer Antriebstechnik GmbH A27 Runtime error in FPGA Contact service hotline of Jenaer Antriebstechnik GmbH Group B Bus errors B00 CAN Nodeguarding error. No messages are Check bus connection and device function, check supply voltage of sent. Synchronisation window in interpolated the CAN bus mode exceeded. B01 CAN bus parameters not available, incorrect saving of parameters. No messages are sent Group D Enter parameters again, check node ID and Baud rate Device and axis errors: For ECOVARIO 616 D, the error code on the display is preceded by an axis code („1.“ or „2.“) D00 Restart lock blocks switch on Check function of the restart lock D01 No external enable Check ENABLE signal Switch off unit and let it cool down. Check whether the device is mounted in the correct mounting position. Make sure that no heat accumulation can occur in the cabinet. D02 Heat sink temperature >85 °C D03 Device temperature >60 °C D04 Temperature error motor (Encoder input A (X11)) Let motor cool down. Check temperature sensor connectors. D05 Temperature error motor (Encoder input B (X12)) Let motor cool down. Check temperature sensor connectors. D06 Negative limit position reached Reset if an error message is raised Subject to change without notice! 61 Installation and Operating Instructions ECOVARIO® 616, 616 D Code Error Countermeasure D07 Positive limit position reached Reset if an error message is raised D10 Short circuit of motor phases or ground fault of Check motor and supply cables. Check whether the shield wires are the power stage resp. connected correctly. D11 Overvoltage in the supply cables D12 Exceeding i2 x t limitation of device D13 Exceeding i x t limitation of motor D14 ADC reference measurement failure D15 Threshold value DC link voltage reached D16 At the mains connector not all three phases are connected; no 3-phase feed D20 External 24 V supply at X1 has fallen below 17 V Check 24 V power supply. Are there disturbances on the supply line? Check output power specification of power supply whether it is dimensioned sufficiently. D21 DC link voltage too high, short circuit of ballast Check DC link and ballast circuit. Is the ballast resistor connected circuit correctly? Check supply voltage (might be too high). D22 DC link voltage too low Check power supply and connections. Check output power specification of power supply whether it is dimensioned sufficiently. D23 Overload ballast circuit Check dimensioning of ballast resistor. Is the ballast resistor connected correctly? Error cause might be a defective ballast resistor (high-resistance). Check voltage 2 If error reoccurs send in device to manufacturer Connect all three phases D24 Exceeding charging time of DC link D25 Short circuit or overload of the digital outputs Check READY, OUT1, OUT2 and brake. Check whether the shield wire or the brake control resp. of the motor cable is connected correctly. D26 No +5 V OD voltage If error reoccurs send in device to manufacturer D27 15 V HOK If error reoccurs send in device to manufacturer D30 Following error too high Check axis parameters and operating conditions. Check whether the axis is freely movable. Check whether the (second) position measuring system still counts correctly. D31 Commutation not found Check if axis is freely movable. Check whether the motor phases are connected correctly, whether the encoder counts and whether the commutation settings are correctly. D32 Internal software reset If error reoccurs send in device to manufacturer D33 Fehler Reglerwatchdog If error reoccurs send in device to manufacturer D34 Error supervision of external position measuring system Check adjustment of the machine. If error reoccurs send in device to manufacturer. D35 Gantry system only: Error of an axis in the gantry interconnection t.b.d. Gruppe E 62 Check parameters and operating conditions. Check if axis is freely movable. Encoder errors: For ECOVARIO 616 D the error code on the display is preceded by an axis code („1.“ or „2.“) E00 1. Antivalence error of incremental encoder A 2. No encoder has been selected 3. Signal error absolute value encoder Check encoder and supply cables for wire breakage. If no encoder is configurated, select encoder. Check whether the correct encoder port has been selected. In case of externally powered encoders check supply voltage. E10 1. Antivalence error of incremental encoder B 2. Error at external encoder input 3. Signal error absolute value encoder Check encoder and supply cables for wire breakage. Check whether the correct encoder port has been selected. In case of externally powered encoders check supply voltage. E01 Capture error incremental encoder A E11 Capture error incremental encoder B Check whether the monitoring is set correctly. Error reasons might also be disturbances on the lines or a defective encoder. E02 Interpolation error SINCOS encoder A E12 Interpolation error SINCOS encoder B E03 Too high speed of encoder A or cannot be read E13 Too high speed of encoder B or cannot be read Check encoder and supply cables. Error reason might be strong electromagnetic interferences. Check parameters (limit speed of the motor). Error reason might be contamination or damage of the measuring system Subject to change without notice! Installation and Operating Instructions ECOVARIO® 616, 616 D Code Error Countermeasure E14 Selected encoder type is wrong or not supported Check configuration, enter appropriate encoder type E15 Invalid motor data (not supported) - E16 Error during reading user data Check encoder and supply cables and configuration, if the error reoccurs send in encoder E17 Invalid user data or motor and servo amplifier do not fit Error occurs upon initial commissioning of a new encoder because no user data has been stored yet in the encoder EEPROM. Writing to the object 0x607C „home_offset“removes the error cause. User data is only stored in multiturn absolute value encoders. E20 Mismatch between stored position value and Carry out homing procedure. actual encoder value (more than 1/2 revolution) E21 Incorrect multiturn value Error cause is a contamination or a defect of the revolution counter of the multiturn absolute value encoder. E23 Quadrant correction error of SINCOS encoder A E24 Quadrant correction error of SINCOS encoder B Check encoder and supply cables for wire breakage. If no encoder is configured, select encoder. Check whether the correct encoder port has been selected. In case of externally powered encoders check supply voltage. E25 Encoder error absolute value encoder (group error) Subject to change without notice! t.b.d. 63 Installation and Operating Instructions ECOVARIO® 616, 616 D 7.3.3 Setting and querying displaying parameters via the keys In ECOVARIO communication settings of the device ID and the CAN baud rate can be made with the keys on the front of the device. Furthermore, Ethernet IP or EtherCAT® addresses can be retrieved. Functions of the keys Key S1 : select, menu navigation, count up display values Key S2 : enter, select menu option, accept values 616 D only! Fig. 7.1: Work schedule key operation 7.3.4 Bootloader mode The bootloader mode can be selected in three different ways: press both keys during switching on the 24 V control voltage if after switching on the 24 V control voltage an error is recognized by starting the bootloader mode with the commissioning tool from the PC 64 Subject to change without notice! Installation and Operating Instructions ECOVARIO® 616, 616 D 8 Parameter setting By setting the parameter the ECOVARIO® is adjusted to the application. The parameters are set in the PC. The user interface ECO Studio is menu-driven and easy to handle. There are several interfaces to connect the PC to the ECOVARIO®: USB interface CAN interface (with the respective dongle) RS232 interface (optional) Ethernet (optional) 8.1 User interface ECO Studio How to work with the user interface ECO Studio is described in the ECO Studio online documentation. Further information on programming the ECOVARIO® can be found in the manual „Object Dictionary ECOVARIO® and ECOSTEP®“. 8.2 Setting the current allocation to the both axes of the ECOVARIO 616 D At ECOVARIO 616 D the current allocation to the both axes can be set. For each axis this is done via the object 0x6073 (max_current) or by means of ECO Studio (connected to the respective axis) in the selection tree via Limits in the Maximum Current field. The total maximum current for both axes must not exceed 16 A. By default a maximum current of 8 A per axis is set. The i2t monitoring power stage value (Objekt 0x2701, Sub index 4) has to be set according to the load of the individual axes. The total maximum value must not exceed 8,8 ARMS. Subject to change without notice! 65 Installation and Operating Instructions ECOVARIO® 616, 616 D 9 Accessories Table 9.1: Overview of ECOVARIO® original accessories Order key Description For ECOVARIO® type Shield set with 2 shield plates, 5 cable ties and mounting material ECOVARIO® 616, 616 D Ergänzungsteile DHZ10 DHK10 Mating connector set ECOVARIO® 616 D DHK11 Mating connector set ECOVARIO® 616 (1-axis) Ballast resistor 40 Ω/200 W (500 W cooled) ECOVARIO® 616, 616 D CD with ECO software tools and documentation all 1-phase power supply 24 VDC all Encoder cable for motors with incremental encoders or SinCos encoders all Ballast resistors DPR40-200 Software tools Power supplies logic voltage SV24 Cables INK65-491-525-xxx 66 ABS65-300-525-xxx Encoder cable for motors with BiSS® encoders all MOT67-133-523-xxx Motor cable for motors without brake ECOVARIO® 616, 616 D MOT68-134-523-xxx Motor cable for motors with brake ECOVARIO® 616, 616 D Subject to change without notice! Installation and Operating Instructions ECOVARIO® 616, 616 D 9.1 Supplementary parts 9.1.1 Shield set The shield set DHZ10 consists of: 3 shield clips, 14 mm 2 shield clips, 8 mm 1 bottom shield plate 1 top shield plate Mounting of the shield plate at the bottom of the servo amplifier is generally required because of EMC reasons. The top shield plate and the bottom shield plate are designed differently and cannot be interchanged. Observe Fig. 9.1. For mounting the shield plate proceed as follows: 1. On the respective side of the servo amplifier loosen the screws (Pos. 1) and screw them approx. 2 mm out. 2. Shift the shield plate with the cutout (Pos. 2) under the screw heads (Pos. 1) and into the studs on the side of the servo amplifer (Pos.3). 3. Tighten the screws (Pos. 1) again. The fixing of the cables can be achieved by cable ties and shield clamps. 1 2 3 Fig. 9.1: Mounting of the shield plate (example: lower shield plate) Subject to change without notice! 67 Installation and Operating Instructions ECOVARIO® 616, 616 D 9.2 Ballast resistors Series DPR ballast resistors are short circuit proof, intrinsically safe resistors with an eloxated aluminium casing. Intrinsically safe on continuous overload and free convection: no short circuit no fault to frame no fire no melting of the casing Protection class: IP65 Approvals: cCSAus, cURus Note: Mounting in a built-up of heat casing temperatures up to 350 °C may occur. Braided wire of the connecting cables: length: 510 ±40 mm, Ø AWG16 or 1,5 mm² resp. The scope of delivery contains elbow joints with mounting elements. 68 Subject to change without notice! Installation and Operating Instructions ECOVARIO® 616, 616 D 9.2.1 Ballast resistors 200 W (500 W cooled) DPR40-200: 40 Ω/200 W (500 W cooled) Fig. 9.2: Dimensions of ballast resistor DPRxx-200 (above) and elbow joint (below) Fig. 9.3: Pulse strength ballast resistors DPRxx-200 (without restriction of durability), ED = duty cycle Subject to change without notice! 69 Installation and Operating Instructions ECOVARIO® 616, 616 D All cases on the left side below the characteristics in fig. 9.3 are covered by the ballast resistors DPRxx-200 abgedeckt werden. Frame conditions: Basis is the normal cycle time of 120 s. The casing temperature be determined with the temperature diagram in fig. 9.4 on the basis of the average power. The avarage power is calculated according to formula (4). The value taken from fig. 9.4 plus 5 K amounts to the casing temperature at the chosen poulse strength. Fig. 9.4: Housing temperature ballast resistor DPRxx-200 at CDF = 100 %, max. T = 250 °C 9.3 Mating connector sets Mating connetor sets for all interfaces of the ECOVARO® is available. All mating connectors are clearly labelled and designed in a way that there is no danger of mixing them up. Table 9.2: Composition of ECOVARIO® 616 D mating connector set DHK10 70 Connector Function Mating connector designation, Phoenix ID No. Number X1A, X1B 24 V/digital inputs and outputs Combicon MC 1,5/8-ST-3,81 CN 2,7 BDNZX1, No. 17 55 40 2 2 X2A, X2B Digital inputs Combicon MC 1,5/ 8-ST-3,81, CN 1,8 BDNZX2, No. 17 55 41 5 2 X8A, X8B STO function MC 1,5/ 4-ST-3,81, BD: 1-4, No. 18 40 72 2 2 X6 Power connection GMSTB 2,5 HCV/ 4-ST-7,62, No. 17 14 29 4 1 X7A, X7B Motor brake ZEC1,0/3-ST-3,5 C1,3R1,3 No. 19 98 20 5 2 X5A, X5B Motor connection GIC 2,5 HCV/ 4-ST-7,62, No. 17 45 64 5 2 X4 DC link / ballast resistor GIC 2,5 HCV/ 5-ST-7,62, No. 17 45 65 8 1 Subject to change without notice! Installation and Operating Instructions ECOVARIO® 616, 616 D Table 9.3: Composition of ECOVARIO® 616 mating connector set DHK11 Connector Function Mating connector designation, Phoenix ID No. Number X1A 24 V/digital inputs and outputs Combicon MC 1,5/8-ST-3,81 CN 2,7 BDNZX1, No. 17 55 40 2 1 X2A Digital inputs Combicon MC 1,5/ 8-ST-3,81, CN 1,8 BDNZX2, No. 17 55 41 5 1 X8A STO function MC 1,5/ 4-ST-3,81, BD: 1-4, No. 18 40 72 2 1 X6 Power connection GMSTB 2,5 HCV/ 4-ST-7,62, No 17 14 29 4 1 X7A Motor brake ZEC1,0/3-ST-3,5 C1,3R1,3 No. 19 98 20 5 1 X5A Motor connection GIC 2,5 HCV/ 4-ST-7,62, No. 17 45 64 5 1 X4 DC link / ballast resistor GIC 2,5 HCV/ 5-ST-7,62, No. 17 45 65 8 1 9.4 Cables The insulated shield mesh of the cables must be connected to the device potential or the PE conductor resp. If the grounding is improper or the mesh lies freely dangerous voltages may occur. The following table lists the cables available for connection of the motors of Jenaer Antriebstechnik GmbH. If other cables are used functional errors of the drive and EMC problems might occur. If you intend to use other cables please double-check with our application department whether your cables are appropriate. Table 9.4: ECOVARIO® accessories, cables Cable type Use Characteristic Encoder cables INK65-491-525-xxx ABS65-300-525-xxx Y-encoder cable Encoder cable for motors with incremental or SINCOS encoders shielded, twisted in pairs (4x(2x0.14)+(2x0.5)), Ø: 9.5mm, trailing capability from bending Encoder cable for motors with BiSS® enradius >120mm coders option Motor cables MOT67-133-523-xxx Motor cable for motors without brake shielded, 5xAWG16, up to 12 A, 600 V, Ø: 8.9 mm, trailing capability from bending radius >125 mm MOT68-134-523-xxx Motor cable for motors with brake shielded, (5xAWG16)+(2xAWG16), up to 12 A, 600 V, Ø: 10.8 mm, trailing capability from bending radius >105 mm All cables in table 9.4 are available up to 50 m. All cables are trailing cables. Subject to change without notice! 71 Installation and Operating Instructions ECOVARIO® 616, 616 D 10 Appendix 10.1 Glossary Ballast circuit A ballast circuit transforms energy that is fed back into the DC link during braking of a motor into heat. Thus it is made sure that the DC link voltage does not increase too much. Baud rate Unit of measure for the transmission rate of data in serial interfaces. The baud rate indicates the number of possible changes of state of the transmitted signal per second (1 baud = 1 state change/s). The baud rate can be lower than the bit rate (one bit is coded in several signal states). „Baud rate“ in this document refers to signals in which one bit is defined with the two signal states HIGH and LOW. In this case the bit rate equals the baud rate. BISS® Bidirectional sensor interface of iC-Haus GmbH, Bodenheim Bitrate Transmission rate of information in bit/second Bootloader mode State of the servo amplifier in which a new loadware can be transmitted into the servo amplifier‘s memory. Brake chopper The brake chopper circuit produces a high inrush current, that initiates a quick pulling of the brake. After pulling the brake the current is reduced to a lower holding current. Capture input Control input for quick event capture of a machine or plant Circuit breaker Switch that cuts the power if an error current limit is exceeded DC link voltage Smoothed DC voltage Disable Take back ENABLE signal for the servo amplifier: ENABLE input = 0 V Encoder Measuring system, that transforms the angular position of a shaft or the position of a linear system into coded data EMC Electromagnetic compatibility Enable enable signal for the servo amplifier (24 VDC signal) ESD protection Protection against electrostatic discharge Field bus interface Here: CANopen, EtherCAT, PROFIBUS DP or Profinet (under preparation) Firmware Part of the software that is stored to ROM (read-only memory), the firmware contains the start-up routines. Ground fault Here: electrically conductive connection between a power system or motor phase and the PE conductor 72 Subject to change without notice! Installation and Operating Instructions ECOVARIO® 616, 616 D HIPERFACE® Universal interface for electric actuators by SICK STEGMANN GmbH, Donaueschingen Host Computer in a multi computer system that controls the whole system ID number Identification number of a special device in a bus structure Loadware Part of the software that can be stored to the flash memory of the servo amplifier Node Device connection in a bus structure Positively-opening contacts Form of relays and contactors that prevents single contacts from switching in case of errors Repeater Equipment for reinforcing and regenerating of signals in a network Restart lock (AS) Technical measure that prevents actuators safely by mechanical elements (positively driven contacts) from restarting indeliberately. RMS Root mean square Sequencer programming Programming a work schedule in which a sequence of events is defined depending on external states (input data), internal states (actual values) or time states Short circuit Here: electrically conductive connection between two power systems or motor phases STO function Safe Torque Off; safety function defined in EN DIN 61800-5-2. The motor is not supplied with energy and cannot generate a rotation. The STO function is used for the implementation of the restart lock. Token passing Hybrid access method for multimaster systems; token passing uses a token, or series of bits, to grant a master permission to transmit over the network, while the transmission between master and slave is carried out after the master-slave principle Token system In networking, a token is a special series of bits that travels around a token-ring network. As the token circulates, computers attached to the network can capture it. The token acts like a ticket, enabling its owner to send a message across the network. There is only one token for each network, so there is no possibility that two computers will attempt to transmit messages at the same time. Watchdog Supervisory software Subject to change without notice! 73 Installation and Operating Instructions ECOVARIO® 616, 616 D 10.2 Index of formulae (1) Energy difference EBR: (2) Regenerable energy EN-P: (3) Supply voltage UP: (4) Average power mm: 10.3 EBR = ½ J (ω12 - ω22) EN-P = ½ CL (UBUSP2 – UBUSN2) UP = 5V ( (R1/R2) +1) mm = P[W] x ED [%]/100 Index of standards and directives DIN 912: replaced by DIN EN ISO 4762 DIN 6 798: drawn back without replacement DIN EN 50 170: General purpose field communication system DIN EN 50 178 Electronic equipment for use in power installations DIN EN 60 204: Safety of machinery - electrical equipment of machines - Part 1: General requirements DIN EN 61 800-3: Adjustable speed electrical power drive systems - Part 3: EMC product standard including specific test methods DIN EN 61800-5-1: Adjustable speed electrical power drive systems - Part 5-1: Safety requirements; Electrical, thermal and energy DIN EN 61800-5-2: Adjustable speed electrical power drive systems - Part 5-2: Safety requirements; Functional safety DIN EN ISO 4762: Hexagon socket head cap screws DIN EN ISO 12100-1: Safety of machinery - Basic concepts, general principles for design - Part 1: Basic terminology, methodology DIN EN ISO 12100-2: Safety of machinery - Basic concepts, general principles for design - Part 2: Technical principles DIN EN ISO 13 849-1:2006 Safety of machinery – Safety-related parts of control systems – Part 1: General principles for design IEC 61000-4-2: Electromagnetic compatibility (EMC) - Part 4-2: Testing and measurement techniques Electrostatic discharge immunity test IEC 61000-4-4: Electromagnetic compatibility (EMC) - Part 4-2: Testing and measurement techniques Electrical fast transient/burst immunity test 2006/42/EC: Directive of the European Parliament and the Council on the approximation of the laws of the Member States relating to machinery 2006/95/EC: Council Directive on the harmonization of laws of Member States relating to electrical equipment designed for use within certain voltage limits 2004/108/EC: Council Directive on the approximation of the laws of the Member States relating to Electromagnetic Compatibility 74 Subject to change without notice!