1
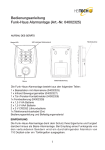
Operating Instructions, Type No. 10000012
Contents
1.
2.
3.
4.
5.
6.
7.
8.
9.
10.
11.
Introduction
Controls
Changing / inserting batteries
Programming the Universal Remote Control (Code Setup)
4.1 Programming with the integrated manufacturer list
4.2 Programming with the automatic search function (DEV Search)
4.3 Manual programming (DEV Search)
Learning function
5.1 Learn key (Learn key)
5.2 Delete key (Delete key)
5.3 Delete all keys on a device (Delete DEV)
5.4 Delete keys on all devices (Delete all)
Macro function (Macro)
6.1 Create macro (Macro 1-3)
6.2 Delete macro (Macro 1-3)
Configuration (Configure)
7.1 Setting the time (Time-Setup)
7.2 Locking the volume (VOL Lock)
7.3 Lock / release code-numbers (DEV lock)
7.4 Background illumination (LIGHT)
7.5 Contrast (Contrast)
7.6 ShowView function (ShowView)
7.7 Switch off all devices (ALL OFF)
7.8 Factory reset (Clear all)
Disposal information
Guarantee
Technical data
Code list
1. Introduction
Thank you for choosing to purchase Remote Control No. 10000012. It is a programmable
universal remote control unit with LCD display and background illumination. The unit replaces lost
or damaged remote controls and can simultaneously control up to 8 devices.
The following types of devices can be controlled:
TV
– television sets with teletext
VCR
– video recorders
TAPE
– cassette decks
CD
– CD players
Tuner
– Tuners/HiFi systems
DVD
– DVD players
DVB
– Satellite receivers, Freeview receivers, decoders
AUX
– for other devices
Special functions such as menu control, teletext and Fast Text, AV-device switching. Suitable for
the European market.
2. Controls
1. POWER
On / off switch
2. SET
Remote control setup menu
3. ALL OFF
Switch off all devices
4. LEARN
Learning function
5. TV VCR DVB CD DVD TUNER TAPE AUX
Device selection keys
6. DISPLAY
Information display
7. CH ±
Channel up / down
8. VOL ±
Volume increase/decrease
9. MUTE
Mute function switch
10. ▲▼◄► OK EXIT
Direction / function keys
11. MENU
OSD menu or memory function
12. SHOW VIEW
ShowView menu
13. MACRO
Command sequence
14. 0-9
Channel selection keys
15. ↩
Function as per original remote control
16. AV
TV/video for television
TV/SAT for satellite receiver
17. TV/Video, teletext, split picture, hold picture
18. Colour keys
Navigation keys for teletext function/OSD menu
19. Rewind, play, fast forward, record, stop, pause
3. Changing / inserting batteries
The Universal Remote Control unit requires 2 Micro/AAA batteries (not included). The battery
should be replaced as soon as the battery icon appears!
1. Open the battery compartment cover on the rear side of the remote control unit.
2. Insert the batteries according to their correct polarity (+/-).
3. Close the battery compartment cover again.
Important! It is not necessary to reprogram the remote control unit subsequent to exchanging the
batteries. It is only necessary to reset the current time (see point 7.1).
4. Programming the Universal Remote Control (CODE Setup)
You can program the Universal Remote Control unit with the help of the integrated manufacturer
list, use the automatic search function, or enter the code numbers manually. The integrated
manufacturer list details all well-known manufacturers and the corresponding device codes can be
easily selected. The Universal Remote Control automatic programming system automatically
searches for the required device codes. Please enter the device code as listed in the code list for
manual programming. The Universal Remote Control uses the pre-set codes.
Attention! Before programming, ensure that the code number that you want to change has been
released. Please refer to the additional information under point 7.3.
4.1 Programming with the integrated manufacturer list
This function enables you to select the code number from the manufacturer list.
1. Switch on the device that you want to control with the Universal Remote Control unit. If the
device happens to be a video recorder, insert a video cassette and switch to "PLAY" mode.
2. Press and hold the SET button and simultaneously press the device selection key (e.g. TV) of
the code number that you want to program. You will now automatically enter the manufacturer
list.
3. Navigate to the device manufacturer with the help of the ▲and ▼ keys.
Note: Pressing the ▲or ▼ buttons for an extended period (approx. 4 seconds) causes the navigation
speed to be increased!
4. Subsequently select the first or additional code number (insofar as factory-programmed) by
means of the ◄and ► keys.
5. Now point the Universal Remote Control unit at the device and test to see if it reacts to the
Universal Remote Control. If the programming fails to work with the first code number on the
code list, repeat steps 4 and 5 with the second code number.
Note: You can test all of the buttons with the exception of the direction and function keys (▲▼◄►
OK EXIT).
Important! It may be that several codes work for the same device. If only some of the functions are
available via the Universal Remote Control unit, try using one of the other codes.
6. Subsequently confirm your entry with the OK key. SUCCESS appears on the display for
approx. 1 second, subsequently the menu exits automatically.
7. If you want to abort the programming procedure, please press the EXIT key.
4.2 Programming with the automatic search function (DEV Search)
This function makes it possible for you to search for codes automatically.
1. Switch on the device that you want to control with the Universal Remote Control unit. If the
device happens to be a video recorder, insert a video cassette and switch to "PLAY" mode.
2. Press and hold the SET button for approx. 3 seconds until the system menu appears.
3. The menu item CODE SETUP is displayed on the screen. Now press the OK button once, so
that the DEV SEARCH menu item is shown on the display. Confirm the menu item by pressing
the OK button again.
4. Use the device selection button (e.g. TV) to select the device for which you intend to carry out
the automatic code search function.
5. Now point the Universal Remote Control unit at the device and press the OK button in order to
start the code search. From now on a new code is sent to the device approx. every 1 second.
This is indicated by means of the successive code numbers shown on the display and the red
flashing device selection key.
6. As soon as the device reacts to the Universal Remote Control (device switches off), press any
key on the Universal Remote Control unit in order to stop searching.
7. Subsequently confirm your entry with the OK key. SUCCESS appears on the display for
approx. 1 second, subsequently the menu exits automatically.
8. If you fail to confirm the code in time, then steps 1 to 7 have to be repeated.
9. In order to quit the programming menu, press the EXIT key 2 or 3 times.
4.3 Manual programming (DEV SETUP)
This function enables you to manually enter the code number from the code table.
1. Switch on the device that you intend to operate with the Universal Remote Control unit.
2. Press and hold the SET button for approx. 3 seconds until the system menu appears. The
menu item CODE SETUP is displayed on the screen. Now press the OK button.
3. Subsequently select DEV SETUP with the ▲and ▼ keys and confirm your entry by pressing
the OK button once more.
4. Use the device selection button (e.g. TV) to select the device for which you intend to manually
enter the code search and confirm your entry with the OK button.
5. Now enter the three-digit code from the list as detailed for your device. If the list has several
codes, start with the first number.
6. Subsequently confirm your entry with the OK key. SUCCESS appears on the display for
approx. 1 second, subsequently the menu exits automatically.
Note! If you enter a device code that is not detailed on the list, NOT FOUND appears for approx. 1
second on the display. Subsequently you can re-enter the device code!
7. Now point the Remote Control unit at the device and test to see if it reacts to the Universal
Remote Control.
8. If the programming fails to work with the first code number on the code list, repeat steps 1 and
7 with the second code number.
Important! It may be that several codes work for the same device. If only some of the functions are
available via the Universal Remote Control unit, try using one of the other codes.
9. In order to quit the programming menu, press the EXIT key twice.
5. Learning function
After you have programmed the Universal Remote Control unit, you may notice that one or more
buttons which were available on your original remote control are missing from the 10000012
keypad or that they are assigned to a different function. For this reason the 10000012 is equipped
with a special learning function which enables you to transfer all of the keys from your original
remote control to your new Universal Remote Control unit.
5.1 Learn Key (Learn Key)
This remote control unit is capable of learning a total of 100 keys for 8 different devices. In doing
so, any of the keys can be used with the exception of the device selection keys (TV, VCR etc.),
SHOWVIEW, MACRO, SET, LEARN and ALL OFF.
Attention! Ensure that the original remote control works correctly and that neither the 10000012
nor your original remote control unit is pointing at the end device (e.g. the TV).
1. Lay the original remote control and the 10000012 on a level surface, so that the infrared
diodes on the remote control units are positioned approx. 2 to 5 cm apart from each other (see
fig. 1).
2. Use the device selection button (e.g. TV) to select the device which you intend to operate with
learnable keys on the 10000012.
3. Press and hold the LEARN button for approx. 3 seconds.
or
Press and hold the SET button for approx. 3 seconds until the system menu appears.
Navigate with the ▲and ▼ buttons to the LEARNING menu item and subsequently press the
OK button, so that the LEARN KEY menu item is shown on the display.
4. Confirm the menu item by pressing the OK button again. The SELECT KEY message is now
shown on the display. Press the desired button on the 10000012 which is to be re-assigned
(e.g. MUTE). WAITING appears on the display for approx. 20 seconds. During this time, the
10000012 is in learning mode and will wait for the keyed command from your original remote
control.
Note! You cannot exit the system menu during the duration of the learning mode, in this case you
have to wait 20 seconds!
5. Press the desired button on the original remote control (e.g. MUTE) which is to be learned by
the 10000012.
6. If the learning process is successful, SUCCESS appears on the display for 1 second.
Subsequently you can continue learning for additional keys.
Note! Previously learned keys can be overwritten at any time by means of a keyed command on
the original remote control.
7. In the event that FAILED appears on the display or in the event that the waiting time in
learning mode exceeds 20 seconds, the learning process has failed. Please repeat the
learning process from point 4.
Attention! In rare cases it may happen that the keyed command from the original remote control
is not recognised and therefore cannot be learned.
8. In order to quit the learning function menu, press the device selection key (e.g. TV).
Fig. 1
Infrared diodes
Now press the respective button on
your original remote control
5.2 Delete key (Delete Key)
A previously learned key command can be deleted in order to restore the default function of the
key.
1. Use the device selection button (e.g. TV) to select the device for which you intend to delete
the learned key command.
2. Press and hold the LEARN button for approx. 3 seconds.
or
Press and hold the SET button for approx. 3 seconds until the system menu appears.
Navigate to the LEARNING menu item with the help of the ▲and ▼ keys and press the OK
button.
3. Subsequently select the DELETE KEY menu item with the help of the ▲and ▼ keys and
press the OK button. The SELECT KEY message is now shown on the display.
4. Press the desired key which has previously been learned and which you intend to delete again
(e.g. MUTE). SURE DELETE appears on the display.
5. If you are sure that you want to delete the selected key, press the OK button. SUCCESS
appears on the display for approx. 1 second. Subsequently you can delete another key.
6. When you are finished with the delete process or you wish you quit the learning function
menu, press the EXIT button.
5.3 Delete all keys on a device (Delete DEV)
All of the previously learned key commands on a device can be deleted in order to restore the
default functions of the individual keys.
1. Press and hold the LEARN button for approx. 3 seconds.
or
Press and hold the SET button for approx. 3 seconds until the system menu appears.
Navigate to the LEARNING menu item with the help of the ▲and ▼ keys and press the OK
button.
2. Subsequently select the DELETE DEV menu item with the help of the ▲and ▼ keys and
press the OK button. The SELECT DEV message is now shown on the display.
3. Press the desired device selection key (e.g. TV) of the device that you want to delete. SURE
DELETE appears on the display.
4. If you are sure that you want to delete all of the keys for the selected device, please press the
OK button. SUCCESS appears on the display for approx. 1 second. Subsequently you can
delete another device key.
5. When you are finished with the delete process or you wish you quit the learning function menu
after deleting, press the EXIT button.
5.4 Delete keys on all devices (Delete All)
All of the previously learned key commands for all of the devices can be deleted in order to restore
the default functions for the individual keys.
1. Press and hold the LEARN button for approx. 3 seconds.
or
Press and hold the SET button for approx. 3 seconds until the system menu appears.
Navigate to the LEARNING menu item with the help of the ▲and ▼ keys and press the OK
button.
2. Subsequently select the DELETE ALL menu item with the help of the ▲and ▼ keys and press
the OK button. The SURE DELETE message is now shown on the display.
3. If you are sure that you want to delete all of the keys for all of the devices, please press the
OK button again. SUCCESS appears on the display for approx. 1 second. Afterwards the
menu quits automatically.
4. If you want to abort the delete process, press the EXIT key.
6 Macro function (MACRO)
A macro is a sequence of key combinations which serves to reduce the number of buttons which
you have to press. For example, you can switch on your complete home entertainment system at
the press of a button.
6.1 Create macro (MACRO 1 - 3)
You can create up to 3 macros (Macro 1- 3). Each macro can contain a maximum sequence of 10
subsequent key combinations.
Note! Before creating a macro, ensure that each of the keys which you intend to combine are
actually assigned to a command. You can check this by pressing the corresponding buttons. In
doing so, the corresponding device selection key should flash in red and the transmission symbol
should appear on the display. If this is not the case, the key is not assigned.
1. Press and hold the SET button for approx. 3 seconds until the system menu appears.
2. Navigate to the MACRO menu item with the help of the ▲and ▼ keys and press the OK
button.
3. Subsequently select MACRO1 or navigate with the ▲and ▼ buttons to MACRO2 or MACRO3
and then press the OK button again, so that the SET UP menu item is shown on the display.
Confirm the menu item by pressing the OK button again, so that SELECT KEY is shown on
the display.
4. Now press the desired key combination sequence, e.g. to switch the TV to AV, press TV +
AV, to switch the DVD player to play mode, press DVD + ► and to switch on the tuner, press
TUNER + POWER.
5. In order to store the newly created key combination, please press the OK button. SUCCESS
appears on the display for approx. 1 second, subsequently the menu quits automatically to the
MACRO menu. In order to quit the macro menu, press the EXIT key twice.
6. To run a macro, press and hold the MACRO key and simultaneously press button 1 for
MACRO1 (or button 2 for MACRO2 etc.). The previously created key combination will now
run.
Note! When running a macro, ensure that all of the criteria required for performing the macro
function are fulfilled, e.g. device in standby mode, DVD inserted in the DVD player, etc.
6.2 Delete macro (MACRO 1 - 3)
You can also delete a previously created macro.
1. Press and hold the SET button for approx. 3 seconds until the system menu appears.
2. Navigate to the MACRO menu item with the help of the ▲and ▼ keys and press the OK
button.
3. Subsequently select the macro that you want to delete (MACRO1, MACRO2 or MACRO3)
with the help of the ▲and ▼ keys and press the OK button again.
4. Now press the ▲and ▼ keys until such time as DELETE appears on the screen. Now press
the OK button. The SURE DELETE message will be shown on the display.
5. If you are sure that you want to delete the macro, press the OK button again. SUCCESS
appears on the display for approx. 1 second, subsequently the menu quits automatically to the
MACRO menu. In order to quit the macro menu, press the EXIT key twice.
7 Configuration (Configure)
This menu enables you to change the preset configurations to your own requirements.
7.1 Setting the time (Time Setup)
This menu enables you to set the time. Once it has been entered, the current time will be shown
on the display of your Universal Remote Control.
1. Press and hold the SET button for approx. 3 seconds until the system menu appears.
2. Navigate with the ▲and ▼ buttons to the CONFIGURE menu item and subsequently press
the OK button, so that the TIME SETUP menu item is shown on the display. Confirm the menu
item by pressing the OK button again.
3. Now you can enter the current time with numbers 0-9 (12 hour clock). You can toggle the input
field with the ◄and ► keys. Please use the keys ▲and ▼ in order to toggle between AM
(before 12 midday) and PM (after 12 midday).
4. Subsequently confirm your entry with the OK key. SUCCESS appears on the display for
approx. 1 second, subsequently the menu quits automatically to the TIME SETUP menu. In
order to quit the menu, press the EXIT key twice.
7.2 Locking the volume (VOL LOCK)
It is a good idea to release the volume lock if you want to control all of the connected devices, for
example, via your television only. In this case, the television always controls the volume,
regardless of the state of the other devices (DVD, SAT, etc.).
1. Press and hold the SET button for approx. 3 seconds until the system menu appears.
2. Navigate to the CONFIGURE menu item with the help of the ▲and ▼ keys and press the OK
button.
3. Subsequently select the VOL LOCK menu item with the help of the ▲and ▼ keys and press
the OK button.
4. Now press the device selection key e.g. TV, with which you wish to release the volume lock.
5. The ◄and ► keys toggle between OFF and ON in order to deactivate the volume lock.
6. Subsequently confirm your entry with the OK key. SUCCESS appears on the display for
approx. 1 second, subsequently the menu quits automatically to the VOL LOCK menu. In
order to quit the menu, press the EXIT key twice.
Note! You can only ever select one device, all others will be deactivated automatically.
7.3 Lock/release code-numbers (DEV LOCK)
This function enables you to lock the currently used code number. The code-number can then
neither be changed by means of manual entry nor by means of automatic search.
1. Press and hold the SET button for approx. 3 seconds until the system menu appears.
2. Navigate to the CONFIGURE menu item with the help of the ▲and ▼ keys and press the OK
button.
3. Subsequently select the DEV LOCK menu item with the help of the ▲and ▼ keys and press
the OK button.
4. Now press the device selection key e.g. TV, the code of which you wish to release/lock.
5. The ◄and ► keys toggle between OFF and ON in order to lock the code number or between
ON and OFF, in order to release the code number.
6. Subsequently confirm your entry with the OK key. SUCCESS appears on the display for
approx. 1 second, subsequently the menu quits automatically to the DEV LOCK menu. In
order to quit the menu, press the EXIT key twice.
Note! If you attempt to change the code number whilst it is locked, you will be informed that the
function is currently locked (LOCKED). The code number has to be released first.
7.4 Background illumination (LIGHT)
You can switch the LCD display background illumination on or off.
1. Press and hold the SET button for approx. 3 seconds until the system menu appears.
2. Navigate to the CONFIGURE menu item with the help of the ▲and ▼ keys and press the OK
button.
3. Subsequently select the LIGHT menu item with the help of the ▲and ▼ keys and press the
OK button.
4. The ◄and ► keys toggle between OFF and ON in order to switch the background illumination
on or between ON and OFF, in order to switch the background illumination off.
5. Subsequently confirm your entry with the OK key. SUCCESS appears on the display for
approx. 1 second, subsequently the menu quits automatically to the LIGHT menu. In order to
quit the menu, press the EXIT key twice.
7.5 Contrast (Contrast)
You can adjust the brightness of the LCD display to suit your needs.
1. Press and hold the SET button for approx. 3 seconds until the system menu appears.
2. Navigate to the CONFIGURE menu item with the help of the ▲and ▼ keys and press the OK
button.
3. Subsequently select the CONTRAST menu item with the help of the ▲and ▼ keys and press
the OK button.
4. The contrast of the LCD display can be adjusted with the ◄ button for darker and ► for
brighter. In doing so, 00 represents the lowest setting and 15 the highest.
5. Subsequently confirm your entry with the OK key. SUCCESS appears on the display for
approx. 1 second, subsequently the menu quits automatically to the CONTRAST menu. In
order to quit the menu, press the EXIT key twice.
7.6 ShowView function (ShowView)
This function offers you a listing of all ShowView programmes which can be received.
Important! You need a ShowView-capable device which supports this function.
1. Switch over to the desired device with the device selection key (e.g. VCR).
2. Point the remote control unit at the device and press the SHOWVIEW button for approx. 1
second.
3. Your ShowView device will now open the ShowView menu and will automatically search for
ShowView programmes. Subsequently you will see a listing of all available ShowView
programmes.
Note! It is important to keep the Universal Remote Control pointed at the device until such time as
the search process is completed.
7.7 Switch off all devices (ALL OFF)
You can switch off all of the active devices at the press of a button.
Point the remote control unit at the device and press the ALL OFF button for approx. 3 seconds.
All of the active devices will now be successively switched off (Stand-by).
Note! It is important to keep the Universal Remote Control pointed at the device until such time as
all of the devices are switched off.
7.8 Factory reset (Clear All)
You can delete all of the previously undertaken settings by resetting the Universal Remote Control
unit to the factory setting.
Attention! Doing so will also reset all of the learned codes, settings and clock.
1. Press and hold the SET button for approx. 3 seconds until the system menu appears.
2. Navigate to the CONFIGURE menu item with the help of the ▲and ▼ keys and press the OK
button.
3. Subsequently select the CLEAR ALL menu item with the help of the ▲and ▼ keys and press
the OK button. SURE DELETE appears on the display.
4. If you are sure that you want to reset the Universal Remote Control unit to the factory settings,
press the OK button again. Afterwards the menu quits automatically.
5. If you want to abort the delete process, press the EXIT key, in order to return to the CLEAR
ALL menu. In order to quit the menu, press the EXIT key twice.
8 Disposal information
Old appliances, used batteries and accumulators may not be disposed of with the household
waste.
They must be brought to a recycling centre for old appliances, used batteries or special waste.
9 Guarantee
The statutory regulations pertaining to guarantee and service conditions apply.
10 Technical data
Operating voltage: 3 V, 2 x 1.5V Micro/AAA batteries (not included).
Type No. 10000012
HEITECH Promotion GmbH
Krefelder Str. 562
D-41066 Mönchengladbach
www.heitech-promotion.de