1
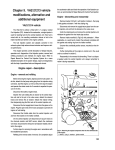
Operating Instructions
Badge Maker Type 900
Operating Lever
Lower Stamp 2
Badge Maker Typ 900
Upper Stamp
Place the Badge Maker on a table in front of you.
Keep the required material handy. This includes top part, bottom part with safety pin (Caution: For 25 mm badges with dshaped pin and 59 mm badges with clip, use back ring without
d-shaped pin or clip instead), polyester foil as well as paper
inlay with your design. Make sure the paper inlay has the same
diameter as the foil.
Lower Stamp 1
(with integrat
groove)
Swivelling Plate
Off we go!
Turn the Swivelling Plate so that the Lower Stamp 1 is in the front. Put an upper tin plate (edge downwards), the
paper inlay and the foil one after the other into the Lower Stamp.
Tip: Make sure the pattern on the paper is in a horizontal position.
Turn the Swivelling Plate by 180 degrees to the stop. The Lower Stamp 1 is now directly underneath the Upper Stamp.
Now the Lower Stamp 2 (round depression) is in front.
Put the lower tin plate (or - up to 25 mm - the back ring, edge upwards) into the Lower Stamp 2, with the pin opening facing the bottom.
Pull the Operating Lever forward until you feel resistance. The upper plate with paper and foil is now in the Upper
Stamp.
Turn the Swivelling Plate by 180 degrees to the stop. The Lower Stamp 2 is now directly underneath the Upper Stamp.
Pull the Operating Lever forward towards you, until there is no more space between the two parts of the Upper Stamp.
This time, you need to apply some more pressure than the first time.
Turn the Swivelling Plate back by 180 degrees and take out the finished badge.
(Caution: In case of 25 mm badges with d-shaped pins or 59 mm badges with clips, you still have to insert the
d-shaped pin or clip!)
Maintenance and Service
In order to ensure a long and trouble-free usage, the machine needs a few drops of oil once in a while. For lubrication,
sprinkle some drops of precision oil on the parts marked with a little oil can. Do not lubricate any other parts, as they
will stick. Dust and leftovers of paper should be removed from the dies regularly, so that they cannot accumulate.
Most suitable is to use a clean brush.
Should you still be facing any problems with your Badge Maker, please do not hesitate to contact us. We will
be pleased to assist you.
Badgematic Button GmbH
Industriestraße 59-61
D-44894 Bochum
Telefon: 02 34 / 29 36 99
Telefax: 02 34 / 29 02 66
[email protected] / www.badgematic.de
Badge 25 mm with d-shaped pin
back ring
Badge 25, 38, 50, 59 mm with magnet
foil
foil
paper
paper
upper tin plate
Magnet
upper tin plate
Put the d-shaped pin into the ready
made button only at the very end.
Our tips to manage a well done badge:
- please use 80 - 90 g/m² paper (e.g. normal copying paper) and take care that the paper is cut with the correct
size (same size as the polyesterfoils)
- please do not hold the swivelling plate or the front die while pushing the lever
- when you push the lever for the second time please push until the horizontal gap at the upper die is completely
closed. But please do not use more power than necessary, otherwise the machine could be damaged
Badge 59 mm with mirror
mirror
back ring
with clip
foil
foil
paper
paper
upper tin plate
back ring
upper tin plate
Put the clip into the ready made button
only at the very end