1
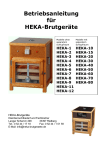
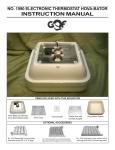
Grumbach Brutgeräte GmbH
Loherstraße 17 / D-35614 Aßlar / Germany
Phone.: +49(0)6441/87142 / Fax.: +49(0)6441/87269
e-mail: [email protected]
internet: www.grumbach-brutgeräte.de
Operating instructions for parrot home with LCD digital thermometer
Dear Customer,
Congratulations for purchasing a parrot home from Grumbach. We wish you every success
with this appliance.
Getting started:
After inserting the plug into an approved earthed 220V socket outlet, your appliance is ready
for use.
Turn the temperature control device clockwise until the pilot lamp lights up. The heating
element now starts to heat the room. Regulate the temperature according to the age of the
chicks. For the first few days the temperature should be approximately 35°C, after which time
the temperature can be reduced by 2° -3°C every week.
The temperature is displayed digitally; the sensor is not placed on the ground but has been
calibrated to this temperature. The best thermal radiation is in the middle two thirds of the
brooder; the heat precipitates in an almost elliptical surface with fluctuations of 0.5°C in this
surface. The deviations are somewhat greater in the corners or close to the walls, due to the
pure radiated heat and the absence of any circulating air system.
All breeders will of course monitor their young animals continually and will always be able to
deduce their current state of wellbeing from these observations. If the chicks are not well at
the temperature set, the individual optimum temperature must be determined.
• If the temperature is too high, the chicks will flee toward the outer perimeters.
• If it is too low the chicks will look for warmth in the middle.
Additionally, the parrot home is fitted with a safety thermostat so that the animals are not
overheated in an emergency and the appliance remains better protected. You can set the upper
cut-out point with a thin screwdriver once the appliance has undergone a trial run of 1 – 2
days.
Setting the safety thermostat (1/10 of a turn = 0.5°C):
• Turn in clockwise direction to increase the cut-out temperature.
• Turn anticlockwise to reduce the cut-out temperature.
Deactivation of the heating is confirmed by a soft click and the heating pilot lamp going off.
We have designated a 25 Watt bulb for the interior lighting. This provides sufficient light and
ensures better cleaning.
The dirt collecting tray can easily be removed for cleaning. It is divided into 3 sections and is
used
a) to increase humidity and
b) to remove dirt from underneath the floor grid of the cage.
The sliding doors are made of excellent scratchproof real glass and therefore show a low
breaking strength. Exercise care when removing the panes.
Please ensure that you only use fully charged batteries in the digital thermometer. The life of a
battery is approximately one year. If the battery voltage is too low, measurements will be
incorrect.
Troubleshooting:
Large temperature fluctuations
:
Safety thermostat cutting out too early.
Please set higher.
Unusual thriving temperature
:
Ambient conditions too extreme.
Determine and set individual optimum
temperature.
Digit shows incorrect values
:
Battery voltage too low.
Please replace battery.
Drawer jams
:
Base uneven. Place something underneath
at the sides if necessary.