1
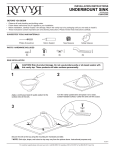
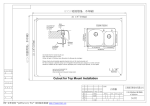
Item #1000 552 008
Model #FD2034
USE AND CARE GUIDE
STAINLESS STEEL KITCHEN SINK
Questions, problems, missing parts? Before returning to the store,
call Glacier Bay Customer Service
8 a.m. - 6 p.m., EST, Monday - Friday
1-855-HDGLACIER
HOMEDEPOT.COM
THANK YOU
We appreciate the trust and confidence you have placed in Glacier Bay through the purchase of this kitchen sink. We strive to continually create
quality products designed to enhance your home. Visit us online to see our full line of products available for your home improvement needs.
Thank you for choosing Glacier Bay!
Table of Contents
Table of Contents. . . . . . . . . . . . . . . . . . . . . . . . . . . . . . . . . . . . 2
Safety Information. . . . . . . . . . . . . . . . . . . . . . . . . . . . . . . . . . . 2
Warranty. . . . . . . . . . . . . . . . . . . . . . . . . . . . . . . . . . . . . . . . . . . 2
Pre-Installation. . . . . . . . . . . . . . . . . . . . . . . . . . . . . . . . . . . . . . 3
Planning Installation . . . . . . . . . . . . . . . . . . . . . . . . . . . . . . . . 3
Tools Required. . . . . . . . . . . . . . . . . . . . . . . . . . . . . . . . . . . . . 3
Hardware Required (not included). . . . . . . . . . . . . . . . . . . . . . 3
Hardware Included. . . . . . . . . . . . . . . . . . . . . . . . . . . . . . . . . . 4
Package Contents . . . . . . . . . . . . . . . . . . . . . . . . . . . . . . . . . . 4
Topmount Installation . . . . . . . . . . . . . . . . . . . . . . . . . . . . . . . . 5
Undermount Installation . . . . . . . . . . . . . . . . . . . . . . . . . . . . . . 7
Care and Cleaning . . . . . . . . . . . . . . . . . . . . . . . . . . . . . . . . . . . 9
Safety Information
Please carefully read this guide before installing or using this
product. Store this guide in a safe place for future reference.
WARNING: Risk of personal injury. Metal surfaces are
sharp and can cause severe cuts. Use gloves and handle
sink edges carefully.
NOTICE: Specialized tools may be required to install the sink to
countertop surfaces other than wood or wood composites.
NOTICE: The number of clips included with your sink may differ
from the number of clips illustrated. Use all clips included with this
sink.
NOTICE: Allow the sealant to cure following the sealant
manufacturer’s instructions.
Warranty
LIMITED LIFETIME WARRANTY
Glacier Bay products are manufactured with superior quality standards and workmanship and are backed by our limited lifetime warranty.
Glacier Bay products are warranted to the original consumer purchaser to be free of defects in materials or workmanship. We will replace
FREE OF CHARGE any product or parts that proves defective. Simply, return the product / part to any of The Home Depot retail locations
or call 1-855-HDGLACIER (1-855-434-5224) to receive the replacement item. Proof of purchase (original sales receipt) from the original
consumer purchaser must be made available for all Glacier Bay warranty claims.
This warranty excludes incidental/inconsequential damages and failures due to misuse, abuse or normal wear and tear. This warranty
excludes all industrial, commercial & business usage, whose purchasers are hereby, extended a five year limited warranty from the date of
purchase, with all other terms of this warranty applying except the duration of warranty.
Some states and provinces do not allow the exclusion or limitation of incidental or consequential damages, so the above limitations may
not apply to you. This warranty gives you specific legal rights and you may also have other rights that vary from state to state and province
to province. Please see a store or contact 1-855-HDGLACIER for more details.
2
Pre-Installation
PLANNING INSTALLATION
Before installation, verify the cabinet clearance:
Compare all parts with the Hardware Included and Package Contents lists in this manual. Check the surface of the sink for any flaws or
damage, including dents, bends, bumps, or scuff marks. If any damage is noticed or parts are missing, do not proceed with the installation.
Contact the Customer Service Team at 1-855-434-5224 or visit www.HomeDepot.com.
NOTE: You may choose to install this sink either undermount (from below the counter) or topmount (from above the counter).
TOOLS REQUIRED
Measuring
tape
Safety
goggles
Phillips
screwdriver
Pencil
Hacksaw
Saber saw
or Jig saw
Electric
drill
Wrenches
Silicone
sealant
Flathead
screwdriver
11 mm
drill bit
HARDWARE REQUIRED (NOT INCLUDED)
Description
Quantity
65 mm undermount clips
8
50 mm undermount clips
4
3HOMEDEPOT.COM
Please contact 1-855-HDGLACIER for further assistance.
Pre-Installation (continued)
HARDWARE INCLUDED
NOTE: Hardware not shown to actual size.
AA
Part
Description
AA
Topmount clip
Quantity
10
PACKAGE CONTENTS
C
D
B
E
A
F
G
H
I
L
J
K
Part
Quantity
Part
A
Sink
Description
1
G
Paper washer
1
B
Topmount and undermount template
1
H
Locknut
1
C
Screener
1
I
Plastic joint
1
D
Bowl
1
J
Connecting nut
1
Quantity
E
Strainer ring
1
K
Basket
1
F
Rubber washer
1
L
Sink grid
1
4
Description
Topmount Installation
1 Preparing the countertop
2 Cutting the installation hole
□□ Place the topmount side of the template (B) on the
countertop. Ensure the template (B) is centered on the
counter so that it is parallel to the counter edge and that
the installation hole will not interfere with the structure of
the cabinet.
□□ Drill a pilot hole and cut the countertop opening. Use the
appropriate cutting tool for the surface you are cutting.
□□ Tape the template (B) to the countertop to keep it in place
and trace the cutout line on the template (B) with a pencil.
B
3 Preparing the sink
4 Attaching the mounting clips
□□ Place the sink (A) into the installation hole to verify the fit.
Adjust the cutout if necessary.
□□ Attach the topmount clips (AA) at the corners of the sink
(A) and space the rest evenly around the underside of the
sink (A).
□□ Place the sink (A) upside down and align the bottom edge
with waterproofing strip.
A
AA
A
5HOMEDEPOT.COM
Please contact 1-855-HDGLACIER for further assistance.
Topmount Installation
5 Installing the sink
□□ Apply silicone sealant (not included) around the underside
and lip of the sink (A).
□□ Carefully lower the sink (A) into the counter.
□□ Tighten the screws on the topmount clips (AA) evenly until
the sink (A) is flush with the counter. Do not over-tighten.
□□ Wipe excess sealant with a rag.
6 Installing the strainer assembly
□□ Apply a small amount of plumber’s putty (not included) in
the notch around the drain hole of the sink (A).
□□ Place the strainer ring (E) on top of the drain hole in the
sink (A).
□□ Insert the screener (C) into the bowl (D) and place this
assembly into the drain hole in the sink (A).
□□ From underneath the sink (A), place the rubber washer
(F), paper washer (G), locknut (H), plastic joint (I), and
connecting nut (J) over the drain hole in the sink (A).
Tighten the locknut (H) and connecting nut (J) to hold the
strainer assembly securely in place.
A
C
A
D
E
A
AA
A
F
G
AA
H
J
7
Installing the faucet and soap
dispenser
□□ Install the faucet and soap dispenser according to the
installation instructions for these items.
□□ When finished, place the basket (K) and sink grid (L) into
the sink.
6
I
L
K
Undermount Installation (continued)
1 Preparing the countertop
2 Cutting the installation hole
□□ Place the undermount side of the template (B) on the
countertop. Ensure the template (B) is centered on the
counter so that it is parallel to the counter edge and that
the installation hole will not interfere with the structure of
the cabinet.
□□ Drill a pilot hole and cut the countertop opening. Use the
appropriate cutting tool for the surface you are cutting and
cut along the inside of the template line.
□□ Tape the template (B) to the countertop to keep it in place
and trace the cutout line on the template (B) with a pencil.
B
3 Drilling holes for the clamps
4 Installing the sink
□□ Insert the screws (1) attached to the 65 mm and 50 mm
clips (AA and BB) loosely in the holes that you drilled in
the underside of the counter. Ensure that you use the 50
mm clips (BB) in the locations that have the narrowest
clearance between the sink and counter.
□□ On the underside of the counter, mark the location of
the twelve holes for the clips (not included). These holes
should be equally spaced around the perimeter of the
cutout.
□□ Using an electric drill with a 11 mm drill bit, drill each hole
so that it is 11 mm in diameter and
13 mm deep.
□□ Place a small bead of silicone sealant (not included) around
the upper lip of the sink (A).
□□ Carefully place the sink (A) into its location under the
counter, with the lip of the sink being supported by the
clips (not included).
□□ Insert the plastic caps from each of the clips (not included)
into each of the installation holes.
□□ Tighten the screws (1) evenly, ensuring the sink (A) remains
in place.
□□ Wipe away any excess silicone and, for best results, allow
the bond to rest undisturbed for 8 hours or overnight.
A
1
7HOMEDEPOT.COM
Please contact 1-855-HDGLACIER for further assistance.
Undermount Installation (continued)
5 Installing the strainer assembly
□□ Apply a small amount of plumber’s putty (not included) in
the notch around the drain hole of the sink (A).
□□ Place the strainer ring (E) on top of the drain hole in the
sink (A).
□□ Insert the screener (C) into the bowl (D) and place this
assembly into the drain hole in the sink (A).
□□ From underneath the sink (A), place the rubber washer
(F), paper washer (G), locknut (H), plastic joint (I), and
connecting nut (J) over the drain hole in the sink (A).
Tighten the locknut (H) and connecting nut (J) to hold the
strainer assembly securely in place.
C
D
E
A
F
G
H
J
I
8
6
Installing the faucet and soap
dispenser
□□ Install the faucet and soap dispenser according to the
installation instructions for these items.
□□ When finished, place the basket (K) and sink grid (L) into
the sink.
L
K
Care and Cleaning
□□ Daily, regular cleaning to remove dirt and prevent staining is recommended. Use liquid dish detergent, water and a soft household
sponge.
□□ Mild, non-abrasive cleaners can be used with a nylon scrub pad. To ensure a uniform appearance in a stainless steel sink surface,
rinse with water and wipe down the sink with a soft, dry cloth. Drying the sink will prevent water spots caused by time in the water.
□□ Remove stubborn stains from lime or calcium deposits by pouring a little warm vinegar or vinegar-based cleaner into the sink and
allow it to sit for a few minutes. Rinse with clean water and dry.
□□ Scratches are inevitable during your usage over time. Use a nylon pad with an iron free abrasive polishing compound. Follow the
original polish lines to blend out the scratch in a small area. Be careful not to overdo as aggressive scrubbing will result in a bright
spot.
□□ DO NOT use strong abrasive cleaners, metal scrub pads, or steel wool. These will scratch the surface.
□□ DO NOT leave rubber mats or sponges inside the sink. Water trapped below could lead to stains.
□□ DO NOT let food with a high salt content sit inside the sink for prolonged periods of time.
□□ DO NOT allow chlorine bleach to sit inside a stainless steel sink for more than 1 hour.
□□ DO NOT allow drain cleaners to come into contact with the sink surface.
□□ DO NOT pour paint in your sink. The chemicals in acrylic paint will react with sinks if allowed to sit over 24 hours and will produce
permanent marks. For latex based paints, remove any residue immediately using a paint remover manufactured by the same brand.
Consult the paint remover recommendations before using on the sink. For all sinks, we also recommend nail polish remover, rubbing
alcohol or an acetone based paint remover to eliminate paint residue.
□□ Rust spots – Stainless steel does not rust. Rust stains are the result of iron particles introduced by water, cookware, and steel wool
pads that react with water to create rust. Metal cleaners will remove rust spots.
□□ Food stains – Depending on the severity of the stain, use a bleach and water solution or pour the bleach onto a cloth and cover the
stain. Allow the bleach to sit for at least 1/2 hour and then clean with dish detergent and water.
9HOMEDEPOT.COM
Please contact 1-855-HDGLACIER for further assistance.
Questions, problems, missing parts? Before returning to the store,
call Glacier Bay Customer Service
8 a.m.-6 p.m., EST, Monday-Friday
1-855-HDGLACIER
HOMEDEPOT.COM
Retain this manual for future use.
Núm. de artículo 1000 552 008
Núm. de modelo FD2034
Guía de uso y cuidado
LAVABO DE COCINA DE ACERO INOXIDABLE
¿Tiene preguntas, problemas, o faltan piezas? Antes de regresar a la tienda,
llame a Servicio al Cliente de Glacier Bay
de lunes a viernes de 8 a.m. a 6 p.m., hora local del Este
1-855-HDGLACIER
HomeDepot.Com
GRACIAS
Apreciamos la confianza que ha depositado en Glacier Bay por la compra de este lavabo de cocina. Nos esforzamos por crear continuamente
productos de calidad diseñados para mejorar su hogar. Visítenos en internet para ver nuestra línea completa de productos disponibles para sus
necesidades de mejorar su hogar. ¡Gracias por elegir a Glacier Bay!
Tabla de contenido
Tabla de contenido. . . . . . . . . . . . . . . . . . . . . . . . . . . . . . . . . . . 2
Información de seguridad . . . . . . . . . . . . . . . . . . . . . . . . . . . . . 2
Garantía. . . . . . . . . . . . . . . . . . . . . . . . . . . . . . . . . . . . . . . . . . . 2
Pre-instalación. . . . . . . . . . . . . . . . . . . . . . . . . . . . . . . . . . . . . . 3
Planificación de la instalación. . . . . . . . . . . . . . . . . . . . . . . . . 3
Herramientas requeridas. . . . . . . . . . . . . . . . . . . . . . . . . . . . . 3
Herraje requerido (no incluido) . . . . . . . . . . . . . . . . . . . . . . . . 3
Herraje incluido. . . . . . . . . . . . . . . . . . . . . . . . . . . . . . . . . . . . 4
Contenido del paquete. . . . . . . . . . . . . . . . . . . . . . . . . . . . . . . 4
Instalación de montaje superior . . . . . . . . . . . . . . . . . . . . . . . . 5
Instalación de montaje inferior . . . . . . . . . . . . . . . . . . . . . . . . . 7
Cuidado y limpieza. . . . . . . . . . . . . . . . . . . . . . . . . . . . . . . . . . . 9
Información de seguridad
Por favor, lea cuidadosamente esta guía antes de instalar o usar este
producto. Guarde esta guía en un lugar seguro para referencia futura.
ADVERTENCIA: Riesgo de lesiones personales. Las
superficies metálicas son filosas y puedan causar heridas
graves. Use guantes y manipule los bordes del lavabo con
cuidado.
AVISO: Se pueden necesitar herramientas especializadas para
instalar el lavabo en superficies de mostrador que no sean de madera
o compuestos de madera.
AVISO: El número de ganchos incluidos con su lavabo puede diferir
del número de ganchos ilustrados. Use todos los ganchos incluidos
con este lavabo.
AVISO: Deje que el sellador cure siguiendo las instrucciones del
fabricante del sellador.
Garantía
GARANTÍA DE POR VIDA LIMITADA
Los productos de Glacier Bay están fabricados con normas y mano de obra de calidad superior y están respaldados por nuestra garantía de por vida
limitada . Los productos de Glacier Bay están garantizados al comprador consumidor original de estar libres de defectos en materiales o mano de obra.
Reemplazaremos LIBRE DE CARGOS cualquier producto o pieza que se demuestre está defectuosa. Símplemente, devuelva el producto a cualquiera de
las ubicaciones de venta al detalle de The Home Depot o llame al 1-855-HDGLACIER (1-855-434-5224) para recibir el artículo de reemplazo. La prueba de
compra (recibo de venta original) del comprador consumidor original debe estar disponible para todos los reclamos de garantía de Glacier Bay.
Esta garantía excluye daños y fallos incidentales/consecuenciales debido al mal uso, abuso o desgaste normal por el uso. Esta garantía excluye todos los
usos industriales, comerciales y de negocios, a cuyos compradores por la presente, se les ha ampliado una garantía limitada de cinco años a partir de la
fecha de compra, con todos los otros artículos de esta garantía que aplican excepto la duración de la garantía.
Algunos estados y provincias no permiten la exclusión o la limitación de los daños incidentales o consecuenciales, por lo tanto, las limitaciones y
exclusiones anteriores podrían no aplicar a usted. Esta garantía le otorga derechos legales específicos y también puede tener otros derechos que varían de
un estado a otro. Por favor, vaya a una tienda o llame al 1-855-HDGLACIER para más detalles.
2
Pre-instalación
PLANIFICACIÓN DE LA INSTALACIÓN
Antes de la instalación, verifique el espacio libre del gabinete:
Compare todas las piezas con las listas de Herraje incluido y Contenido del paquete en este manual. Revise la superficie del lavabo en busca de defectos o
daños, incluyendo abolladuras, dobleces, protuberancias o marcas de arañazos. Si se advierten daños o hacen falta piezas, no proceda con la instalación.
Póngase en contacto con el Equipo de Servicio al Cliente llamando al 1-855-434-5224 o visite www.HomeDepot.com.
NOTA: Puede elegir instalar este lavabo de forma inferior (abajo del mostrador) o superior (arriba del mostrador).
Herramientas requeridas
Cinta
métrica
Gafas de
seguridad
Sierra de
sable o
caladora
Taladro
eléctrico
Destornillador
Phillips
Llaves
Lápiz
Sierra con
marco
Sellador
de
silicona
Destornillador
de punta plana
Broca de
11 mm
Herraje requerido (no incluido)
Descripción
Cantidad
Ganchos de montaje inferior de 65 mm
8
Ganchos de montaje inferior de 50 mm
4
3HomeDepot.com
Para obtener asistencia, por favor, póngase en contacto llamando al 1-855-HDGLACIER.
Pre-instalación (continuación)
Herraje incluido
NOTA: No se muestra el herraje en el tamaño
real.
AA
Pieza
AA
Descripción
Cantidad
Gancho de montaje superior
10
Contenido del paquete
C
D
B
E
A
F
G
H
I
L
J
K
Pieza
Descripción
Cantidad
Pieza
Cantidad
A
Lavabo
1
G
Arandela de papel
1
B
Plantilla de montaje superior y montaje inferior
1
H
Tuerca de seguridad
1
C
Tamizador
1
I
Junta de plástico
1
D
Tazón
1
J
Tuerca de conexión
1
E
Anillo del colador
1
K
Cesta
1
F
Arandela de goma
1
L
Rejilla del lavabo
1
4
Descripción
Instalación de montaje superior
1 Preparación del mostrador
□□ Coloque el lado del montaje superior (B) sobre el mostrador.
Asegúrese de que la plantilla (B) esté centrada sobre el mostrador
de modo que esté paralela al borde del mostrador y que el agujero
de la instalación no interfiera con la estructura del gabinete.
2 Perforación del agujero de instalación
□□ Perfore un agujero piloto y corte la abertura del mostrador. Use
la herramienta de corte apropiada para la superficie que está
cortando.
□□ Pegue con cinta la plantilla (B) en el mostrador para mantenerla
en su lugar y trace la línea de corte en la plantilla (B) con un lápiz.
B
3
Preparación del lavabo
□□ Coloque el lavabo (A) en el agujero de instalación para comprobar
que se ajusta. Ajuste el corte si es necesario.
□□ Coloque el lavabo (A) boca abajo y alinee el borde del fondo con la
tira de impermeabilización.
4
Instalación de los ganchos de
montaje
□□ Instale los ganchos de montaje superior (AA) en las esquinas del
lavabo (A) y espacie el resto uniformemente alrededor de la parte
de abajo del lavabo (A).
A
AA
A
5HomeDepot.com
Para obtener asistencia, por favor, póngase en contacto llamando al 1-855-HDGLACIER.
Instalación de montaje superior
5
Instalación del lavabo
□□ Aplique sellador de silicona (no incluido) alrededor de la parte de
abajo del lavabo (A).
□□ Baje con cuidado el lavabo (A) en el mostrador.
□□ Apriete los tornillos del montaje superior (AA) uniformemente
hasta que el lavabo (A) esté alineado con el mostrador. No apriete
demasiado.
□□ Limpie el exceso de sellador con un trapo.
6
Instalación del ensamblaje del
colador
□□ Aplique una pequeña cantidad de masilla de fontanero (no
incluida) en la ranura alrededor del agujero del desagüe del
lavabo (A).
□□ Coloque el anillo del colador (E) en la parte superior del agujero
del desagüe en el lavabo (A).
□□ Inserte el tamizador (C) en el tazón (D) y coloque este ensamblaje
en el agujero del desagüe en el lavabo (A).
□□ Desde abajo del lavabo (A), coloque la arandela de goma (F), la
arandela de papel (G), la tuerca de seguridad (H), la junta plástica
(I), y la tuerca de conexión (J) sobre el agujero del desagüe
en el lavabo (A). Apriete la tuerca de seguridad (H) y la tuerca
de conexión (J) para sostener el ensamblaje del colador con
seguridad en su lugar.
A
C
A
D
E
A
AA
A
F
G
AA
H
J
7
Instalación del grifo y dispensador
de jabón
□□ Instale el grifo y el dispensador de jabón de acuerdo a las
instrucciones de instalación para estos artículos.
□□ Cuando haya terminado, coloque la cesta (K) y la rejilla del lavabo
(L) en el lavabo.
6
I
L
K
Instalación de montaje inferior (continuación)
1 Preparación del mostrador
□□ Coloque el lado del montaje inferior de la plantilla (B) sobre el
mostrador. Asegúrese de que la plantilla (B) esté centrada sobre
el mostrador de modo que esté paralela al borde del mostrador y
que el agujero de la instalación no interfiera con la estructura del
gabinete.
2 Perforación del agujero de instalación
□□ Perfore un agujero piloto y corte la abertura del mostrador. Use
la herramienta de corte apropiada para la superficie que está
cortando y corte a lo largo del interior de la línea de la plantilla.
□□ Pegue con cinta la plantilla (B) en el mostrador para mantenerla
en su lugar y trace la línea de corte en la plantilla (B) con un lápiz.
B
3
Perforación de agujeros para las
abrazaderas
4 Instalación del lavabo
□□ En la parte de abajo del mostrador, marque la ubicación de los
doce agujeros para los ganchos (no incluidos). Estos ganchos
deben estar igualmente separados alrededor del perímetro del
corte.
□□ Inserte los tornillos (1) instalados en los ganchos de 65 mm y 50
mm (AA y BB) sin apretar en los agujeros que perforó en la parte
de abajo del mostrador. Asegúrese de usar los ganchos de 50 mm
(BB) en las ubicaciones que tengan el espacio libre más angosto
entre el lavabo y el mostrador.
□□ Usando un taladro eléctrico con una broca de 11 mm, perfore
cada agujero de modo que tenga 11 mm de diámetro y 13 mm de
profundidad.
□□ Coloque un pequeño cordón de sellador de silicona (no incluido)
alrededor del borde superior del lavabo (A).
□□ Inserte las tapas de plástico de cada uno de los ganchos (no
incluidos) en cada uno de los agujeros de instalación.
□□ Con cuidado coloque el lavabo (A) en su lugar abajo del
mostrador, con el borde del lavabo soportado por los ganchos (no
incluidos).
□□ Apriete los tornillos (1) uniformemente, asegurándose de que el
lavabo (A) permanezca en su lugar.
□□ Limpie el exceso de silicona y, para mejor resultado, deje que la
union permanezca sin ser tocada durante 8 horas o toda la noche.
A
1
7HomeDepot.com
Para obtener asistencia, por favor, póngase en contacto llamando al 1-855-HDGLACIER.
Instalación de montaje inferior (continuación)
5
Instalación del ensamblaje del
colador
□□ Aplique una pequeña cantidad de masilla de fontanero (no
incluida) en la ranura alrededor del agujero del desagüe del
lavabo (A).
□□ Coloque el anillo del colador (E) en la parte superior del agujero
del desagüe en el lavabo (A).
□□ Inserte el tamizador (C) en el tazón (D) y coloque este ensamblaje
en el agujero del desagüe en el lavabo (A).
□□ Desda abajo del lavabo (A), coloque la arandela de goma (F), la
arandela de papel (G), la tuerca de seguridad (H), la junta plástica
(I), y la tuerca de conexión (J) sobre el agujero del desagüe
en el lavabo (A). Apriete la tuerca de seguridad (H) y la tuerca
de conexión (J) para sostener el ensamblaje del colador con
seguridad en su lugar.
C
D
E
A
F
G
H
J
I
8
6
Instalación del grifo y dispensador
de jabón
□□ Instale el grifo y el dispensador de jabón de acuerdo a las
instrucciones de instalación para estos artículos.
□□ Cuando haya terminado, coloque la cesta (K) y la rejilla del lavabo
(L) en el lavabo.
L
K
Cuidado y limpieza
□□ Se recomienda limpieza diaria regular para eliminar la suciedad y evitar el manchado. Use detergente líquido para platos, agua y una esponja suave
doméstica.
□□ Se pueden usar limpiadores suaves, no abrasivos con un estropajo de fregar de nylon. Para garantizar una apariencia uniforme en una superficie de
lavabo de acero inoxidable, enjuague con agua y limpie el lavabo con un paño suave y seco. Secar el lavato evitará manchas de agua causadas por el
tiempo en el agua.
□□ Elimine las manchas persistentes de cal o depósitos de calcio colocando un poco de vinagre caliente o limpiador en base a vinagre en el lavabo y
deje que repose unos minutos. Enjuague con agua limpia y seque totalmente.
□□ Los rayones son inevitables durante su uso con el tiempo. Use un estropajo de nylon con un compuesto pulidor abrasivo libre de hierro. Siga las
líneas originales de pulido para mezclar el rasguño en un área pequeña. Tenga cuidado de no excederse ya que el fregado excesivo resultará en una
mancha brillante.
□□ NO use limpiadores abrasivos fuertes, estropajos de metal, ni lana de acero. Estos rayarán la superficie.
□□ NO deje alfombras de goma ni esponjas dentro del lavabo. El agua atrapada abajo puede causar manchas.
□□ NO deje alimentos con alto contenido de sal adentro del lavabo durante periodos prolongados de tiempo.
□□ NO deje que la lejía repose adentro de un lavabo de acero inoxidable durante más de 1 hora.
□□ NO permita que limpiadores de desagüe entren en contacto con la superficie del lavabo.
□□ NO vierta pintura en su lavabo. Los químicos en la pintura acrílica reaccionarán con los lavabos si se deja que reposen más de 24 horas y producirán
manchas permanentes. Para pinturas en base a látex, elimine cualquier residuo de inmediato usando un removedor de pintura fabricado por la misma
marca. Consulte las instrucciones del removedor de pintura antes de usarlo en el lavabo. Para todos los lavabos, recomendamos también removedor
de esmalte de uñas, alcohol desinfectante o un removedor de pintura en base a acetona para eliminar el residuo de pintura.
□□ Manchas de óxido – El acero inoxidable no se oxida. Las manchas de óxido son el resultado de partículas de hierro introducidas por el agua, utensilios de
cocina y estropajos de lana de acero que reaccionan con el agua para crear óxido. Los limpiadores de metal eliminarán las manchas de óxido.
□□ Manchas de alimentos – Dependiendo de la severidad de la mancha, use una solución de lejía y agua o vierta la lejía en un paño y cubre la mancha.
Deje que la lejía repose durante al menos 1/2 hora y luego limpie con detergente para platos y agua.
9HomeDepot.com
Para obtener asistencia, por favor, póngase en contacto llamando al 1-855-HDGLACIER.
¿Tiene preguntas, problemas, o faltan piezas? Antes de regresar a la tienda,
llame a Servicio al Cliente de Glacier Bay
de lunes a viernes de 8 a.m. a 6 p.m., hora local del Este
1-855-HDGLACIER
Homedepot.COM
Conserve este manual para uso futuro.