Transcript
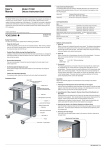
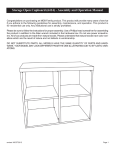
INSTALLATION INSTRUCTIONS
To install your new Rolling Shelf, just follow these few simple steps:
1) Lay out your parts : (A) the shelf itself (B) the pair of guides (C) screw bag
2) Place the guides onto the shelf, making sure the rollers are facing in and toward the
front of the shelf. (The metal “L” brackets should face down toward the mounting
surface).
3) Place the shelf (with the guides attached) into your cabinet space.
4) Close your cabinet door, making sure you have proper clearance for your new Rolling
Shelf.
5) Once you are sure the shelf will fit properly; roll out the drawer on the guides far
enough to see the rear welded “L” brackets. Make a mark on the mounting surface
through the back hole on the rear welded”L” brackets. This mark is where you will
place one of the included screws to hold the bracket. Make sure your Rolling Shelf, is
placed straight in your cabinet before making these marks.
6) Remove the loose guides from your Rolling Shelf and install them. Use one of the
included screws and loosely fasten the rear welded “L” bracket into the mark you just
made.
7) After making sure the guides are parallel to each other, use another screw to fasten
the front welded “L” brackets.
8) Reinstall the shelf onto the guides. Once you have a smooth fit; install the remaining
screws to secure.
These Rolling Shelves, are designed to fit on existing full cabinet shelves or fixed bases
only. Optional mounting hardware is available.
Please call the number below with ANY questions.
1-866-512-6951