Transcript
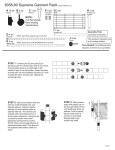
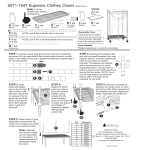
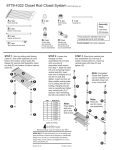
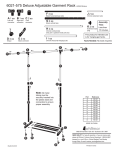
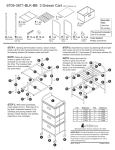
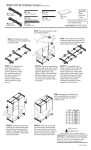
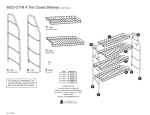
6486-1917 50 Pair Floor Shoe Tower
©2009 Whitmor
B 2 ea
Assembly Time:
Less than 15 minutes.
C 20 ea
This product's intended use
is for storing shoes.
Foot
A 10 ea
Side frame
(some parts may
be pre-assembled)
Horizontal pole
Tools Needed: No tools required.
NOTE: Side frame and foot
STEP 1. Place five side frames (A) on a flat hard surface. Snap
each side frame together. Insert 20 horizontal poles (C) into holes
in side frames at desired locations. Snap foot (B) on bottom end
of side frame.
C
C
C
C
C
C
C
C
C
parts snap together by sliding
the five tabs on the bottom of
side frame into the slots on
the top of another side frame
or foot as shown.
C
C
C
C
C
C
C
C
C
C
C
B
A
A
A
A
A
NOTE: Tube placement is optional. Decide how you want to set up your shoe stand before inserting the poles.
Some poles can be left out of the middle for high top shoes and boots. Most shoes work best with the back tube
higher than the front tube. Shown here is our recommended placement for most uses.
STEP 2. Place five remaining side frames (A) on a flat hard surface. Snap each side frame together. Place assembled
side frames onto top of poles aligning poles with the holes in side frames. Tap firmly until poles are seated into holes.
Snap foot (B) on bottom end of side frame.
A
B
A
A
A
STEP 3. Turn assembled shoe tower
upright. Assembly is now complete.
Part
A
B
C
Reference
F6965
F6966
F6077
8680 Swinnea Road • Suite 103 • Southaven, MS • 38671
NEED HELP? For help with assembly, or if you are missing a part,
please call Whitmor’s Customer Service Department, 1-888-944-8667
between 8 a.m. and 4:30 p.m. (Central Standard Time) Monday
through Friday. Or email: [email protected]
Rev#2 9.15.09
Printed in China
CAUTION! When using this
unit at full height, tipping can
occur. Place heavier items at
the bottom of the tower and
make sure weight is evenly
distributed.
A