Transcript
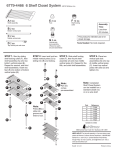
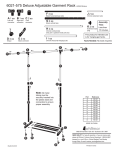
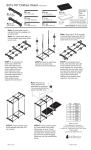
6779-4322 Closet Rod Closet System
A 2 ea
E 3 ea
Shelf assembly
©2012 Whitmor, Inc.
F 4 ea
Foot
Shelf locking
collar
I 1 ea
Hanging rod
Assembly
Time:
Less than
45 minutes.
B 3 ea
Bottom vertical pole
C 3 ea
Middle vertical pole
G 3 ea
Vertical pole
lock assembly
(These two parts
are pre-assembled)
D 3 ea
Top vertical pole with claw
STEP 1. Start by sliding shelf locking
collar (F), then shelf assembly (A) onto
bottom two bottom vertical poles (B).
Repeat for second shelf assembly. Insert
two feet (E) into bottom of bottom vertical
poles (B).
A
F
A
F
F
F
B
E
E
H 2 ea
Hanging rod
lock assembly
(These two parts
are pre-assembled)
STEP 2. Loosen two
hanging rod lock
assemblies (H) and slide
onto one side of
assembled shelf section
from step 1. Slide the other
(H) onto remaining bottom
vertical pole (B). Insert
each end of hanging rod (I)
into (H) on both and
tighten. Insert and lock all
three middle vertical poles
(C) by sliding into (B) and
locking. Hanging rod can
now be repositioned higher
onto vertical pole (C) if
desired. Insert remaining
foot (E) onto bottom of (B).
Part
A
B
C
D
E
F
G
H
I
B
This product's intended use is for
hanging garments and storage.
Reference
F7495
F7496
F7497
F7498
F7499
F7500
F7501
F7502
F7503
Tools Needed: No tools required.
STEP 3. Place three vertical pole
lock assemblies (G) onto top of
middle vertical poles (C). Insert top
vertical poles with claw (D) and
tighten (G).
Note: Completed
Closet Rod System
can be installed on a
standard closet rod,
or on a wire shelf.
D
D
G
G
C
Note:
C Parts (G)
Note:
Poles (B&C)
slide into
grove and
twist to lock.
D
G
and (H) come
pre-assembled.
B
H
B
C
I
H
MADE IN CHINA
8680 Swinnea Road • Suite 103 • Southaven, MS • 38671
NEED HELP? For help with assembly, or if you are missing a part,
please call Whitmor’s Customer Service Department, 1-888-944-8667
between 8 a.m. and 4:30 p.m. (Central Standard Time) Monday
through Friday. Or email: [email protected]. Visit us
online at www.whitmor.com
Rev#0 6.6.12
Printed in China
B
E