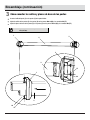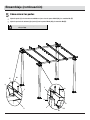
1
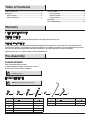
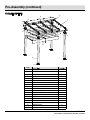
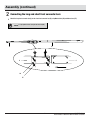
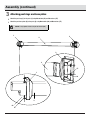
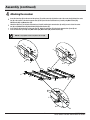
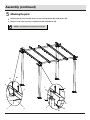
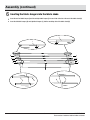
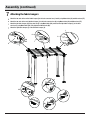
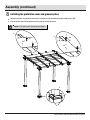
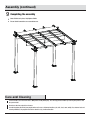
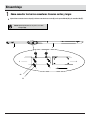
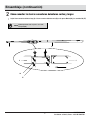
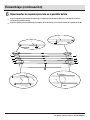
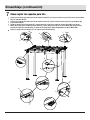
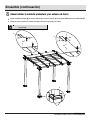
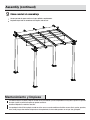
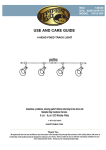
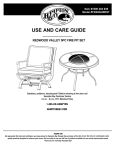
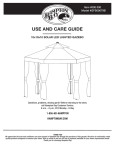
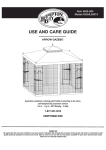
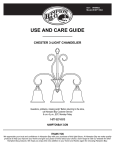
Item #000-000
Model #GFM00467F
USE AND CARE GUIDE
STEEL PERGOLA WITH CANOPY
Questions, problems, missing parts? Before returning to the store,
call Customer Service
1-888-628-1888
HOMEDEPOT.COM
Table of Contents
Table of Contents .......................................................... 2
Warranty ......................................................................... 2
What is Covered .......................................................................2
What is Not Covered ................................................................2
Pre-Assembly ................................................................ 2
Planning Assembly ..................................................................2
Hardware Included ...................................................................2
Package Contents ....................................................................3
Assembly ....................................................................... 4
Care and Cleaning .......................................................12
Warranty
1 YEAR FRAME WARRANTY
WHAT IS COVERED
We warrant the frame to be free of manufacturing defects to the original purchaser for one year.
WHAT IS NOT COVERED
It remains the customer’s responsibility for freight and packaging charges to and from our service center. This warranty does not cover
commercial use, hardware, acts of nature, fire, freezing and abusive use. In addition, purchased parts are not covered under this warranty.
We reserve the right to make substitutions with similar merchandise, if the model in question is no longer in production.
Contact Customer Care at 1-888-628-1888 or visit www.HomeDepot.com.
Pre-Assembly
PLANNING ASSEMBLY
Read all instructions before assembly.
To avoid damaging this product, assemble it on a soft, nonabrasive surface such as carpet or cardboard.
NOTE: More than one person may be required to
assemble this product.
HARDWARE INCLUDED
NOTE: Hardware not shown to actual size.
AA
Part
Description
AA
M6x16 Bolt
M6x15 Bolt
M6x32 Bolt
M6x75 Bolt
M6 Washer
BB
CC
DD
EE
BB
DD
CC
Quantity
50
8
3
22
75
2
EE
FF
Part
Description
FF
GG
Ground spike
Hex wrench
GG
Quantity
16
1
Pre-Assembly (continued)
PACKAGE CONTENTS
A
Q
O
M
E
B
J
G
I
L
F
S
K
C
D
P
N
H
R
Part
Description
Quantity
A
Long back connector bar
1
B
Short back connector bar
1
C
D
E
F
G
H
I
J
K
L
M
N
O
P
Q
R
S
Long front connector bar
Short front connector bar
Outer bar
Top bar
Center bar
Post
End left fabric hanger
End right fabric hanger
Left fabric hanger
Right fabric hanger
Protective cover
Fabric shade
End tip
Post ring
Center tip
Post base plate
Inner tip
1
1
2
2
1
4
1
1
4
4
1
1
4
4
2
4
4
3
HOMEDEPOT.COM
Please contact 1-888-628-1888 for further assistance.
l
Assembly
1 Connecting the long and short back connector bars
Attach the long back connector bar (A) to the short back connector bar (B) using M6x16 bolts (AA) and M6 washers (EE).
NOTE: Loosely tighten all bolts using the hex wrench (GG).
A
B
A
B
AA
EE
4
l (continued)
Assembly
2 Connecting the long and short front connector bars
Attach the long front connector bar (C) to the short front connector bar (D) using M6x16 bolts (AA) and M6 washers (EE).
NOTE: Loosely tighten all bolts using the hex wrench (GG).
C
D
D
C
AA
EE
5
HOMEDEPOT.COM
Please contact 1-888-628-1888 for further assistance.
l (continued)
Assembly
3 Attaching post rings and base plates
Attach the post rings (P) to the posts (H) using M6x16 bolts (AA) and M6 washers (EE).
Attach the post base plates (R) to the posts (H) using M6x16 bolts (AA) and M6 washers (EE).
NOTE: Loosely tighten all bolts using the hex wrench (GG).
P
R
H
R
H
EE
P
AA
H
AA
EE
6
l (continued)
Assembly
4 Attaching the crossbar
Insert the inner tips (S) into the ends of the top bars (F) and the center tips (Q) into the ends of the center bar (G). Attach the center
bar (G) to the centers of the back connector bars (A and B) and the front connector bars (C and D) using M6x75 bolts (DD),
M6x16 bolts (AA), and M6 washers (EE).
Attach the top bars (F) to the back connector bars (A and B) and the front connector bars (C and D) (on each side of the center
bar (G)) using M6x16 bolts (AA), M6x75 bolts (DD) and M6 washers (EE).
Insert end tips (O) into the ends of the outer bars (E). Attach the outer bars (E) to the back connector bars (A and B) and
front connector bars (C and D) using M6x16 bolts (AA), M6x75 bolts (DD), and M6 washers (EE).
NOTE: Loosely tighten all bolts using the hex wrench (GG).
Q
DD
S
AA
GG
A
DD
EE
AA
EE
G
A
F
B
A
E
F
G
F
E
D
C
AA
EE
DD
EE
E
D
7
O
HOMEDEPOT.COM
Please contact 1-888-628-1888 for further assistance.
l (continued)
Assembly
5 Attaching the posts
Attach the posts (H) to the assembled structure in step 4 using M6x75 bolts (DD) and M6 washers (EE).
Attach the end tips (O) to the post (H) using M6x16 bolts (AA) and M6 washers (EE).
NOTE: Loosely tighten all bolts using the hex wrench (GG).
EE
DD
O
E
E
DD
GG
D
O
A
H
H
EE
AA
8
l (continued)
Assembly
6 Inserting the fabric hangers into the fabric shade
Insert the end left fabric hanger (I) and the end right fabric hanger (J) into each side of the slot at the end of the fabric shade
.
(N).
Insert the left fabric hangers (K) and right fabric hangers (L) into the remaining slots of the fabric shade (N).
J
I
N
N
L
K
K
L
K
K
L
L
K
N
N
9
L
HOMEDEPOT.COM
Please contact 1-888-628-1888 for further assistance.
l (continued)
Assembly
7 Attaching the fabric hangers
Attach the two ends of the end left fabric hanger (I) to the back connector bars (A and B) using M6x32 bolts (CC) and M6 washers (EE).
Attach the two ends of the end right fabric hanger (J) to the back connector bar (A) using M6x32 bolts (CC) and M6 washers (EE).
Attach the left fabric hangers (K) to the outer bar (E) using M6x15 bolts (BB) and attach the right fabric hangers (L) to the other
outer bar (E) using M6x15 bolts (BB). Fully tighten the M6x15 bolts (BB).
Attach the right fabric hangers (L) to the left fabric hangers (K).
J
A
A
CC
EE
B
CC
I
EE
J
N
EE CC
I
G
L
E
L
K
BB
K
K
LL
KK
10
l (continued)
Assembly
8 Installing the protective cover and ground spikes
Attach the protective cover (M) to the outer bars (E) and center bars (G) using M6x16 bolts (AA) and M6 washers (EE).
Insert the ground spikes (FF) through the post base plates (R) and into the ground.
NOTE: Loosely tighten all bolts using the hex wrench (GG).
G
E
AA
EE
AA
EE
M
M
H
R
FF
11
HOMEDEPOT.COM
Please contact 1-888-628-1888 for further assistance.
l (continued)
Assembly
9 Completing the assembly
Once all bolts are in place, fully tighten all bolts.
Ensure that all connections are secure before use.
Ca
are and
d Cleaning
For best resullts, clean the frame with a daamp cloth and dry
d thoroughly. T his will help prevent mildew by removing diirt particles thatt
may accumulate.
Do not use abrasive materials or cleaners.
In order to prolong the life of your pergola when not in use or inclement weather (rain, hail, sleet, snow, wind), fire, extreme heat and
freezing conditions, the pergola needs to be stored in a dry, sheltered location.
12
Questions, problems, missing parts? Before returning to the store,
call Customer Service.
1-888-628-1888
HOMEDEPOT.COM
Retain this manual for future use.
Artículo núm. 000-000
Modelo núm. GFM00467F
GUÍA DE USO Y MANTENIMIENTO
PÉRGOLA DE ACERO CON TOLDO
¿Preguntas, problemas o piezas faltantes? Antes de regresar a la tienda,
llama al servicio al cliente de Hampton Bay, de
8 a.m. a 6 p.m., hora estándar del Este, de lunes a viernes
1-855-HD- HAMPTON
HAMPTONBAY.COM
GRACIAS POR TU COMPRA.
Apreciamos la confianza que has depositado en Hampton Bay al comprar esta pérgola de acero con toldo. Nos esforzamos para continuamente
crear productos de calidad diseñados para mejorar tu hogar. Visítanos por Internet para ver nuestra línea completa de productos disponibles
para las necesidades de mejoras de tu hogar. ¡Gracias por elegir Hampton Bay!
Tabla de contenido
Preensamblaje .............................................................. 2
Planificación del ensamblaje ...................................................2
Herrajes incluidos ...................................................................2
Contenido del paquete .............................................................3
Ensamblaje .................................................................... 4
Mantenimiento y limpieza...........................................12
Tabla de contenido ....................................................... 2
Garantía ......................................................................... 2
Qué cubre la garantía ..............................................................2
Qué no cubre la garantía .........................................................2
Garantía
1 AÑO DE GARANTÍA PARA EL ARMAZÓN.
QUÉ CUBRE LA GARANTÍA
Le garantizamos al comprador original que el armazón no presentará defectos de fábrica durante un año.
QUÉ NO CUBRE LA GARANTÍA
El cliente es responsable de los costos por flete y empaque desde y hacia nuestro centro de servicio. Esta garantía no cubre el uso comercial,
herrajes, daños por desastres naturales, incendios, congelamiento y uso abusivo del producto. Además, piezas compradas aparte no están
cubiertas bajo esta garantía. Nos reservamos el derecho de sustituir el producto por mercancía similar, si el modelo en cuestión ya no se fabrica.
Comuníquese con el equipo de servicio al cliente al 1-855-HAMPTON o visite www.HamptonBay.com
Preensamblaje
PLANIFICACIÓN DEL ENSAMBLAJE
Lee todas las instrucciones antes de ensamblar.
Para evitar dañar este producto, ensámblalo sobre una superficie suave,
no abrasiva, como por ejemplo una alfombra o cartón.
NOTA: Se puede necesitar a más de una persona
para ensamblar este producto.
HERRAJES INCLUIDOS
NOTA: No se muestra el tamaño real de los herrajes.
AA
Pieza
Descripción
AA
Perno M6x16
Perno M6x15
Perno M6x32
Perno M6x75
Arandela M6
BB
CC
DD
EE
BB
DD
CC
EE
FF
Cantidad
50
Pieza
Descripción
FF
8
3
22
75
GG
Estaca de tierra
Llave hexagonal
2
GG
Cantidad
16
6
Preensamblaje (continuación)
CONTENIDO DEL PAQUETE
A
Q
O
M
B
E
J
L
G
I
F
S
K
C
D
P
N
H
R
Part
Pieza
Descripción
Cantidad
A
Barra conectora trasera larga
1
B
Barra conectora trasera corta
1
C
D
E
F
G
H
I
J
K
L
M
N
O
P
Q
R
S
Barra conectora delantera larga
Barra conectora delantera corta
Barra externa
Barra superior
Barra central
Poste
Soporte para tela del extremo izquierdo
Soporte para tela del extremo derecho
Soporte para tela izquierdo
Soporte para tela derecho
Cubierta protectora
Pantalla de tela
Punta del extremo
Anillo del poste
Punta central
Placa de base del poste
Punta interna
1
1
2
2
1
4
1
1
4
4
1
1
4
4
2
4
4
3
HAMPTONBAY.COM
Para obtener asistencia, llama a 1-855-HD-HAMPTON.
Ensamblaje
1 Cómo conectar las barras conectoras traseras cortas y largas
Sujeta la barra conectora trasera larga (A) a la barra conectora trasera corta (B) con los pernos M6x16 (AA) y las arandelas M6 (EE).
NOTA: Aprieta ligeramente todos los pernos con la llave
hexagonal (GG).
A
B
A
B
AA
EE
4
Ensamblaje (continuación)
2 Cómo conectar las barras conectoras delanteras cortas y largas
Sujeta la barra conectora delantera larga (C) a la barra conectora delantera corta (D) con los pernos M6x16 (AA) y las arandelas M6 (EE).
NOTA: Aprieta ligeramente todos los pernos con la llave
hexagonal (GG).
C
D
D
C
AA
EE
5
HAMPTONBAY.COM
Para obtener asistencia, llama a 1-855-HD-HAMPTON.
Ensamblaje (continuación)
3 Cómo conectar los anillos y placas de base de los postes
Inserta el anillo del poste (P) en los postes (H) de la parte inferior.
Sujeta los anillos de los postes (P) a los postes (H) con los pernos M6x16 (AA) y las arandelas M6 (EE).
Sujeta las placas de base de los postes (R) a los postes (H) con los pernos M6x16 (AA) y las arandelas M6 (EE).
NOTA: Aprieta ligeramente todos los pernos con la llave
hexagonal (GG).
P
R
H
R
H
EE
P
AA
H
AA
EE
6
Ensamblaje ( continuación)
4 Cómo conectar la barra transversal
Inserta las puntas internas (S) en los extremos de las barras superiores (F) y las puntas centrales (Q) en los extremos de la barra
central (G). Sujeta la barra central (G) a los centros de las barras conectoras traseras (A y B) y las barras conectoras delanteras
(C y D) con los pernos M6x75 (DD), los pernos M6x16 (AA) y las arandelas M6 (EE).
Sujeta las barras superiores (F) a las barras conectoras traseras (A y B) y las barras conectoras delanteras (C y D) (a cada lado de
la barra central (G)) con los pernos M6x75 (DD), los pernos M6x16 (AA) y las arandelas M6 (EE).
Inserta las puntas de los extremos (O) en los extremos de las barras externas (E). Sujeta las barras externas (E) a las barras conectoras
traseras (A y B) y las barras conectoras delanteras (C y D) con los pernos M6x16 (AA), los pernos M6x75 (DD) y las arandelas M6 (EE).
NOTA: Aprieta ligeramente todos los pernos con la llave
hexagonal (GG).
DD
Q
AA
GG
DD
EE
S
AA
EE
G
F
A
B
F
F
G
E
E
D
C
AA
EE
DD
EE
E
O
7
HAMPTONBAY.COM
Para obtener asistencia, llama a 1-855-HD-HAMPTON.
Ensamblaje (continuación)
5 Cómo colocar los postes
Sujeta los postes (H) a la estructura ensamblada en el paso 4 con los pernos M6x75 (AA) y las arandelas M6 (EE).
Sujeta las puntas de los extremos (O) al poste (H) con los pernos M6x16 (AA) y las arandelas M6 (EE).
NOTA: Aprieta ligeramente todos los pernos con la llave
hexagonal (GG).
EE
DD
O
E
E
DD
EE
D
O
H
H
EE
AA
8
Ensamblaje (continuación)
6 Cómo insertar los soportes para tela en la pantalla de tela
Inserta el soporte para tela del extremo izquierdo (I) y el soporte para tela del extremo derecho (J) a cada lado de la ranura
. en
el extremo de la pantalla de tela (N).
Inserta los soportes para tela izquierdos (K) y los soportes de tela derechos (L) en las ranuras restantes de la pantalla de tela (N).
J
I
N
N
L
K
K
L
K
K
L
L
K
N
N
9
L
HAMPTONBAY.COM
Para obtener asistencia, llama a 1-855-HD-HAMPTON.
Ensamblaje (continuación)
7 Cómo sujetar los soportes para tela
Sujeta los dos extremos del soporte para tela del extremo izquierdo (I) a las barras conectoras traseras (A y B) con los pernos M6x32
(CC) y las arandelas M6 (EE).
Sujeta los dos extremos del soporte para tela del extremo derecho (J) a la barra conectora trasera (A) con los pernos M6x32 (CC)
y las arandelas M6 (EE).
Sujeta los soportes para tela izquierdos (K) a la barra externa (E) a través de las ruedas de la barra central (G) con los pernos
M6x15 (BB) y luego sujeta el soporte para tela derecho (L) a la otra barra externa (E) con los pernos M6x15 (BB). Conecta el lado
pequeño del soporte para tela derecho (L) al soporte de tela izquierdo (K). Aprieta completamente los pernos M6x15 (BB).
Sujeta los soportes para tela derechos (L) a los soportes para tela izquierdos (K).
EE
CC
A
EE
I
EE
CC
A
I
B
J
CC
G
J
N
K
L
K
E
K
L
BB
L
10
Ensamble (continuación)
8 Cómo instalar la cubierta protectora y las estacas de tierra
Sujeta la cubierta protectora (M) a las barras externas (E) y las barras centrales (G) con los pernos M6x16 (AA) y las arandelas M6 (EE).
Inserta las estacas de tierra (FF) a través de las placas base de los postes (R) y en la tierra.
NOTA: Aprieta ligeramente todos los pernos con la llave
hexagonal (GG).
G
E
AA
EE
AA
EE
M
M
H
R
FF
11
HAMPTONBAY.COM
Para obtener asistencia, llama a 1-855-HD-HAMPTON.
l (continued)
Assembly
9 Cómo concluir el ensamblaje
Una vez que todos los pernos estén en su lugar, apriétalos completamente.
Asegúrate de que todas las conexiones estén seguras antes de usar.
Mantenimiento y limpieza
Para obtener mejores resultados, limpia el armazón con un paño húmedo y sécalo completamente. Esto ayudará a prevenir la aparición
de moho al quitar las partículas de polvo que puedan acumularse.
No utilices limpiadores o materiales abrasivos.
Para prolongar la vida útil de tu pérgola, cuando no esté en uso o en caso de condiciones climáticas severas (lluvia, granizo, aguanieve,
nieve, viento), fuego, calor extremo o temperaturas de congelamiento, la misma debe guardarse en un lugar seco y protegido.
12
¿Preguntas, problemas o piezas faltantes? Antes de regresar a la tienda,
llama al Servicio al Cliente de Hampton
. Bay,
de lunes a viernes, entre 8 a.m. y 6 p.m., (Hora Estándar del Este)
1-855-HD-HAMPTON
HAMPTONBAY.COM
Conserva este manual para uso en el futuro.