1
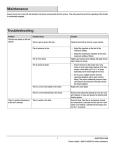
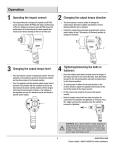
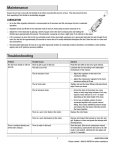
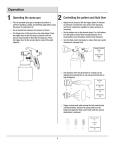
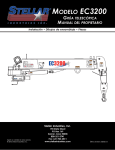
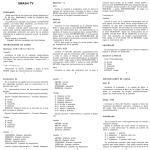
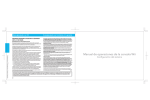
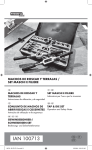
Item # 1000 009 070
Model # HD7024A
USE AND CARE GUIDE
2-1/2 TON QUICK LIFT LOW PROFILE JACK
Questions, problems, missing parts?
Before returning to the store, call
Husky Customer Service
8 a.m.-6 p.m., EST, Monday-Friday
1-888-HD-HUSKY
WWW.HUSKYTOOLS.COM
THANK YOU
We appreciate the trust and confidence you have placed in Husky through the purchase of this SUV Jack.
We strive to continually create quality products designed to enhance your home. Visit us online to see our
full line of products available for your home improvement needs. Thank you for choosing Husky!
Table of Contents
Care and Cleaning ........................... 6
Inspection ............................................. 6
Safety Information ......................... 2
Warranty ......................................... 3
Maintenance .................................... 6
To add hydraulic jack oil ...................... 6
To replace hydraulic jack oil ................. 7
Lubrication ........................................... 7
Storing.................................................. 8
Rust prevention .................................... 8
Specifications .................................. 3
Package Contents ........................... 4
Operation ........................................ 5
How it works ........................................ 5
To attach the handle............................. 5
To raise and lower the vehicle.............. 5
Troubleshooting .............................. 8
Safety Information
WARNING: This jack is a lifting device
only. It is not a support device. NEVER
place yourself under or near a raised
vehicle supported by a jack. Immediately
after lifting, support vehicle with jack
stands or other appropriate means.
SAVE THESE INSTRUCTIONS
READ ALL INSTRUCTIONS
1.
Study, understand and follow all
instructions before operating this
device prior to use.
2.
Do not overload this jack beyond the
rated capacity.
3.
This jack is designed for use only on
hard level surfaces capable of
sustaining the load. Use on other than
hard level surfaces can result in jack
instability and possible loss of load.
4.
This is a lifting device only. Immediately
after lifting, support the vehicle with
jack stands.
5.
Inspect jack prior to each use. Do not
attempt use if the unit is broken, bent,
cracked, or has missing and/or
damaged parts. Replace broken, bent,
cracked, missing and/or damaged parts,
and/or missing labels, warnings and/or
decals with factory authorized parts
prior to use.
WARNING: For your safety and to
prevent injury use service jack for lifting
purposes only.
CAUTION: Do not move or dolly the
vehicle while on the jack.
CAUTION: Any jack that appears to be
damaged or has worn parts should be
removed from service immediately.
IMPORTANT: Lift only on areas of the
vehicle as specified by the vehicle
manufacturer. Use vehicle manufacturers
instructions on proper lifting.
NOTE: Center load on saddle prior to
lifting.
NOTE: Use of SUV jack on sea vessels
is prohibited.
]
NOTE: Failure to heed these warnings
may result in personal injury and/or
property damage.
NOTE: Some vehicles require an adapter
to properly engage the frame for lifting.
DANGER: Because of the potential
hazards associated with the misuse of
equipment of this type, no alterations
shall be made to the product without
written authorization of the
manufacturer or supplier.
WARNING: Do not get under or allow
anyone under the vehicle until it has
been supported by jack stands.
2
Warranty
The manufacturer warrants the products to be free from defects in materials and workmanship for a
period of one (1) year from the date of purchase. This warranty applies only to the original consumer
purchaser and only to products used in normal use and service. If this product is found to be defective,
the manufacturers only obligation, and your exclusive remedy, is the repair or replacement of the product
at the manufacturers discretion, provided that the product has not been damaged through misuse, abuse,
accident, modifications, alteration, neglect or mishandling. This warranty shall not apply to any product
as a result of an accident, misuse, abuse, negligence, alteration, faulty installation, or any other failure not
relating to faulty material or workmanship. This warranty shall not apply to the finish on any portion of
the products such as surface and/or weathering, as this is considered normal wear and tear.
The manufacturer does not warrant and specially disclaims any warranty, whether express or implied, of
fitness for a particular purpose, other than the warranty contained herein. The manufacturer specifically
disclaims any liability and shall not be liable for any consequential or incidental loss or damage, including
but not limited to any labor/expense costs involved in the replacement or repair of said product.
Contact the Customer Service at 1-888-HD-HUSKY or visit www.huskytools.com.
Specifications
Jack
Dimensions
2-1/2 Ton
22.25 in. x 8.625 in.
Low Profile Jack x 4.875 in.
Model
Max Load
Capacity
5,000 lbs
Lifting Range
3.375 to 14.375 in.
3
Saddle
Dimensions
2.2 in.
diameter
Jack Weight
33 lbs
WWW.HUSKYTOOLS.COM
Please contact 1-888-HD-HUSKY for further assistance.
Package Contents
12
20
17
26
31
18
19
11
16
10
9
4 5
15
32
21
22
23
13
24
8
14
7
6
25
27
3
26
1
30
2
3 4 5
28
29
Part
1
2
3
4
5
6
7
8
9
10
11
12
13
14
15
16
Description
Front Wheel
Bush
Flat Washer
Spring Washer No. 12
Nut M12
Left Frame
Nut
Rear Wheel Set
Spring Washer No. 8
Nut M8
Carrying Handle
Cover
Bolt M5x15
Retaining Spring
Bush
Power Unit
Part
17
18
19
20
21
22
23
24
25
26
27
28
29
30
31
32
QTY
2
2
4
4
4
1
2
2
2
2
1
1
2
1
2
1
4
Description
Right Frame
Shaft
Lifting Arm Axis
Clip
“C” Ring No. 12
Handle
Link Rod
Shaft
Front Wheel Axle
Lifting Arm Assembly
Middle Shaft
Saddle
Saddle Base
“C” Ring No. 17
Base Axel
Oil Fill Plug
QTY
1
1
1
1
4
1
2
1
1
1
1
1
1
1
1
1
Operation
HOW IT WORKS
The jack power unit consists of plunger, plunger cavity, hydraulic oil reservoir, cylinder and ram.
An upward stroke of the jack handle draws oil from the reservoir into the plunger cavity. Hydraulic
pressure closes a valve that keeps oil in the cavity.
A downward stroke of the jack handle forces oil into the cylinder, pushing out the ram and raising the
saddle. NOTE: As a protective feature, when the ram reaches maximum extension, sufficient oil passes
back into the reservoir to prevent an overextended ram stroke and possible jack damage.
When the release valve is open, oil flows back into the reservoir, causing the ram to retract, lowering the
saddle.
TO ATTACH THE HANDLE
1
2
Inserting the Handle
Insert lower handle into
handle socket
Fitting Pin
Pin on lower end of handle fits into handle
socket slot.
TO RAISE AND LOWER THE VEHICLE
1
2
Placing the Vehicle in Park
Place vehicle in PARK (in gear
on standard transmissions)
and apply emergency brake.
3
Close the jack release
valve by turning the
handle clockwise.
4
Blocking the Wheels
Block the vehicle wheels not
being raised.
5
Closing the Jack
Centering the Jack
Center jack under load so
that saddle contacts load
firmly and will not slip.
(Refer to vehicle
manufacturer's owner’s
manual to locate the
approved lifting points on the vehicle).
6
Pumping the Jack Handle
Lifting the Vehicle
Continue to pump the jack
handle to lift the vehicle
to a height slightly above
the jack stands or other
supports. Then turn the
handle very slowly
counterclockwise to open
the release valve to lower
the vehicle onto the
supports.
Pump the jack handle until saddle nears
contact with vehicle. Check to see that the
saddle is centered and will contact the lifting
point firmly.
5
WWW.HUSKYTOOLS.COM
Please contact 1-888-HD-HUSKY for further assistance.
Operation (Continued)
WARNING: To avoid pinching or crushing hands or feet,
ALWAYS keep them clear of the jack hinge and ground
contact area when lowering the vehicle. The jack is a
lifting device only. DO NOT move or dolly the vehicle
while it is on the jack
Care and Cleaning
INSPECTION
The product shall be maintained according to these instructions.
You may not alter this product in any way.
1. Before using, a thorough inspection shall be made on the jack. Look for cracks in the welds, bent,
damaged, loose, worn or missing parts.
2.
Inspect according to this manual ONLY.
3.
If the jack has been subjected to abnormal load or shock (abuse), perform an immediate
inspection. Take the product to a local customer service representative for an authorized
inspection before use.
Maintenance
TO ADD HYDRAULIC JACK OIL
1
2
Positioning on Level Ground
Unscrew and remove oil
fill plug.
With saddle fully lowered
and the jack on level ground,
unscrew and remove oil fill
plug.
3
Removing Plug
4
Filling the Oil Reservoir
Using a good grade of SAE 5W hydraulic jack
oil, fill the oil reservoir to the bottom of the
threads in the oil filler hole.
Replacing the Plug
Replace and tighten the
oil fill plug. Do not allow
dirt or debris to enter the
system.
6
Maintenance (Continued)
TO REPLACE HYDRAULIC JACK OIL
1
2
Opening the Release Valve
Open the release valve by
turning handle
counterclockwise.
3
Removing the Plug
Remove oil fill plug.
4
Draining the Old Oil
Turn entire jack over so that
all of the old oil will drain
out of the oil fill hole.
Leveling the Jack
After all of the old oil has drained out of
the jack, turn the jack back over to a level
position fill with new oil.
Note: when draining oil, use a
proper container and always follow
all local and state waste disposal guidelines.
5
6
Releasing Pressurized Air
Filling with New Oil
Using a good grade of SAE
5W hydraulic jack oil, fill
the reservoir to the
bottom of the threads in
the oil fill hole. Replace
and tighten oil fill plug.
Do not allow dirt and
debris to enter the system.
Rapidly pump jack handle 6
to 8 strokes to release any
pressurized air.
IMPORTANT: When adding or replacing oil, ALWAYS use a
good grade of (SAE 5W) hydraulic jack oil. NEVER use brake
fluid, alcohol, glycerin, detergent motor oil or dirty oil of any
kind. Improper oil usage will cause serious internal damage to
jack.
LUBRICATION
1
2
Oil When Needed
Use a good grade of
lubricating oil on all moving
parts when needed (arm
linkages, front wheels and
rear casters).
Grease the Lifting Assembly
Grease the lifting arm
assembly through its
grease fitting, using a
good grade of multipurpose chassis grease.
7
WWW.HUSKYTOOLS.COM
Please contact 1-888-HD-HUSKY for further assistance.
Maintenance (Continued)
STORING
1
2
Place Saddle in the Lowest
Position
Store in a Level Position
It is
recommended
the jack be
stored in a dry
location with all
wheels touching the
ground on a relatively
level position.
When jack is not in use, or
when storing the jack,
ALWAYS have the saddle in
its lowest (down) position.
RUST PREVENTION
Check ram and pump piston every two months (or sooner, based on usage) for any signs of rust or
corrosion. Clean as needed and wipe down with an oil cloth.
Troubleshooting
Problem
Cause
Solution
Jack will not lower
completely
1. Air in hydraulic system
2. Release valve stuck
1. Purge air from hydraulic system
2. Transfer weight load and clean valve
Jack will not hold
weight
1. Release valve in open
position.
1. Close release valve tightly
Jack will not lift to
full height
1. Oil level is low
2. Air in hydraulic system
1. Fill to recommended level
2. Purge air from hydraulic system
Weak lifting
1. Air in hydraulic system
2. Dirty Oil
3. Release valve not
completely closed
1. Purge air from hydraulic system
2. Change oil. Use SAE 5W
3. Close release valve tightly
Jack will not lift load
1. Excessive weight
2. Release valve in open
position
3. Oil level low
1. Decrease weight or change to higher
capacity jack
2. Turn valve clockwise and tighten
3. Fill to recommended level
8
Questions, problems, missing parts?
Before returning to the store,
call Husky Customer Service
8 a.m.-6 p.m., EST, Monday-Friday
1-888-HD-HUSKY
WWW.HUSKYTOOLS.COM
Retain this manual for future use.
X0000000000-A
Artículo Núm. 1000 009 070
Modelo Núm. HD7024A
GUÍA DE USO Y MANTENIMIENTO
GATO DE BAJO PERFIL DE ELEVACIÓN RÁPIDA
Y 2.26 MT DE CAPACIDAD
¿Preguntas, problemas o piezas faltantes?
Antes de regresar a la tienda, llama al
Servicio al Cliente de Husky
de 8 a.m. a 6 p.m., Hora estándar del Este, de Lunes a Viernes
1-888-HD-HUSKY
WWW.HUSKYTOOLS.COM
GRACIAS POR TU COMPRA.
Apreciamos la confianza que has depositado en Husky al comprar este Gato para Vehículo Utilitario. Nos
esforzamos para continuamente crear productos de calidad diseñados para mejorar tu hogar. Visítanos por
Internet para ver nuestra línea completa de productos disponibles para las necesidades de mejoras de tu
hogar. ¡Gracias por elegir Husky!
Índice
Información de Seguridad ............. 2
Cuidado y limpieza ........................ 6
Inspección............................................. 6
Garantía .......................................... 3
Mantenimiento ............................... 6
Agregar aceite del gato hidráulico ............ 6
Reemplazo del aceite de gato hidráulico.7
Lubricación ........................................... 7
Almacenamiento................................... 8
Prevención de la oxidación .................. 8
Especificaciones .............................. 3
Contenido del Paquete .................. 4
Funcionamiento .............................. 5
Cómo funciona ..................................... 5
Para instalar el mango ......................... 5
Para subir y bajar el vehículo................ 5
Resolución de fallas..... ................... 8
Información de Seguridad
GUARDA ESTAS INSTRUCCIONES
ADVERTENCIA: No se coloque
debajo del equipo ni permita que nadie
lo haga hasta que esté apoyado en
puntales de expansión ajustables.
LEE TODAS LAS INSTRUCCIONES
1.
Estudie, comprenda y respete todas las
instrucciones antes de operar este dispositivo
previo a su uso.
2.
No sobrecarge este gato arriba de su
capacidad nominal.
3.
Este gato está diseñado para ser usado solamente
sobre superficias duras niveladas capaces de
soportar la carga. Su uso sobre superficies que no
sean duras y no estén niveladas puede resultar en
inestabilidad del gato y posible pérdida de la carga.
4.
5.
ADVERTENCIA: Este gato es un dispositivo de
levantamiento solamente. No es un dispositivo de
apoyo. NUNCA se coloque debajo o cerca de un
vehículo levantado y soportado por un gato.
Inmediatamente después del levantamiento,
apoye el vehículo en puntales de expansión
ajustables u otros medios apropiados.
ADVERTENCIA: Para su seguridad y evitar
lesiones use el gato de servicio para fines de
levantamiento solamente.
PRECAUCIÓN: No mueva ni desplace el
vehículo en una plataforma rodante mientras
está en el gato.
Este es un dispositivo de levantamiento
solamente. Inmediatamente después del
levantamiento, apoye el vehículo en puntales de
expansión ajustables.
Revise el gato antes de cada uso. No intente
usarlo si la unidad está rota, doblada, agrietada
o le hace falta o tiene piezas dañadas. Reemplace
las piezas rotas, dobladas, agrietadas, faltantes o
dañadas y/o etiquetas faltantes, advertencias o
calcomanías con piezas autorizadas de fábrica
antes de su uso.
PELIGRO: Debido a los peligros
potenciales asociados con el mal uso de
equipo de este tipo, no se hará ninguna
alteración al producto sin la autorización
por escrito del fabricante o proveedor.
PRECAUCIÓN: Cualquier gato que parezca
estar dañado o con piezas desgastadas debe
ser retirado del servicio de inmediato.
IMPORTANTE: Levante solo en áreas del
vehículo especificadas por el fabricante del
vehículo. Use las instrucciones del fabricante
del vehículo sobre levantamiento apropiado.
]
NOTA: Centre la carga en la montura antes
del levantamiento.
NOTA: El uso del gato de botella en
embarcaciones de mar está prohibido.
NOTA: No respetar esta precaución
puede resultar en lesiones físicas graves
y/o daños a la propiedad.
NOTA: Algunos vehículos requieren un
adaptador para enganchar apropiadamente
el marco para levantamiento.
2
Garantía
El fabricante garantiza que este producto está libre de defectos en materiales y mano de obra por un
periodo de un (1) año a partir de la fecha de compra. Esta garantía aplica únicamente al comprador
consumidor final y únicamente para los productos usados en condiciones de uso y servicio normal. Si este
producto está defectuoso, la única obligación del fabricante y la única reparación, es reparar o reemplazar
el producto a discreción del fabricante, siempre y cuando el producto no ha sido dañado por mal uso,
abuso, accidente, modificaciones, alteraciones, negligencia o mal manejo. Esta garantía no aplicará
ningún producto como resultado de un accidente, mal uso, abuso, negligencia, alteración o instalación
incorrecta o cualquier otra falla no relacionada a una falla por fabricación material o de mano de obra.
Esta garantía no aplicará al acabado de cualquier parte del producto, como la superficie y/o intemperización, ya que esto es considerado deterioro por uso.
El fabricante no garantiza ni deniega específicamente ninguna garantía, sea expresa o implícita, o idoneidad
para un propósito particular, que no sea la garantía contenida en el presente. El fabricante renuncia
específicamente a cualquier responsabilidad civil y no se hará responsable por daños y perjuicios, por pérdida
o daños accesorios, incluidos pero no limitados a los gastos de mano de obra u otros gastos relacionados al
reemplazo o reparación de dicho producto.
Póngase en contacto con el Equipo de Servicio al Cliente llamando al 1-888-HD-HUSKY o visite
www.huskytools.com.
Especificaciones
Modelo
Gato
Dimensiones
Gato de bajo
perfil de
2-1/2 Ton
56,5 cm x
21,9 cm x
12,3cm
Máxima
capacidad de
carga
2268 kg
Rango de
Levantamiento
Dimensiones de
la montura
de 8.5 a 36.5 cm
5,5 cm de
diámetro
Peso del Gato
14,9 kg
3
WWW.HUSKYTOOLS.COM
Póngase en contacto con el 1-888-HD-HUSKY para asistencia adicional.
Contenido del Paquete
12
17
20
26
31
18
19
11
16
10
9
4 5
15
32
21
22
23
13
24
8
14
7
6
25
27
3
26
1
30
2
3 4 5
28
29
Pieza
1
2
3
4
5
6
7
8
9
10
11
12
13
14
15
16
Pieza
17
18
19
Descripción
Pieza
Rueda frontal
2
Buje
2
Arandela plana
4
Arandela de resorte
No. 12
4
Tuerca M12
4
Marco izquierdo
1
Tuerca
2
Juego de rueda trasera
2
Arandela de resorte No. 8
2
Tuerca M8
2
Asa de transporte
1
Tapa
1
Perno M5x15
2
Resorte retenedor
1
Buje
2
Unidad de potencia
1
20
21
22
23
24
25
26
27
28
29
30
31
32
4
Descripción
Marco derecho
Eje
Eje del brazo de
levantamiento
Gancho
Anillo “C” No. 12
Asa
Barra de enlace
Eje
Eje de rueda frontal
Ensamblaje de brazo
de levantamiento
Eje central
Montura
Base de la montura
Anillo “C” No. 17
Eje de la base
Tapón de aceite
Pieza
1
1
1
1
4
1
2
1
1
1
1
1
1
1
1
1
Operación
CÓMO FUNCIONA
La unidad de potencia del gato consiste del émbolo, cavidad del émbolo, depósito de aceite hidráulico, cilindro y
pistón.
Una carrera hacia arriba del mango del gato extrae aceite del depósito a la cavidad del émbolo. La presión hidráulica
cierra una válvula que mantiene el aceite en la cavidad.
Una carrera hacia abajo del mango del gato obliga al aceite a entrar en el cilindro, empujando hacia afuera el pistón y
elevando la montura. NOTA: Como una característica de protección, cuando el pistón alcanza la máxima extensión,
suficiente aceite pasa al depósito para evitar una carrera extendida en exceso y posible daño al gato.
Cuando la válvula de alivio está abierta, el aceite fluye de nuevo al depósito, haciendo que el pistón se retraiga,
bajando la montura.
PARA INSTALAR EL MANGO
1
2
Inserción del Mango
Inserte el mango inferior en
el receptáculo del mango
Pasador de Ajuste
El pasador en el extremo inferior del
mango se ajusta en la ranura del
receptáculo del mango.
PARA SUBIR Y BAJAR EL VEHÍCULO
1
Colocación del Vehículo
en Park
2
Cierra la válvula de liberación
del gato rotando el mango
hacia la derecha.
Coloque el vehículo en PARK
(en engranaje en transmisiones
estándar) y aplique el freno
de emergencia.
3
4
Bloquear las Ruedas
Bloquea las ruedas del vehículo
que no serán levantadas.
5
Cómo Cerrar el Gato
Centrado del Gato
Centre el gato bajo carga de
modo que la montura contacte a
la carga con firmeza y no se
deslice. (Consulte el manual del
propietario del fabricante del
vehículo para ubicar los puntos de
evantamiento aprobados en el vehículo).
6
Cómo Bombear el Mango
del Gato
Bombee el mango del gato hasta que la montura
esté cerca de entrar en contacto con el vehículo.
Revise para ver que la montura esté centrada y que
contactará el punto de levantamiento con firmeza
Levantamiento del vehículo
Continúe bombeando el mango
del gato para levantar el vehículo
a una altura ligeramente arriba
de los puntales de expansión
ajustables u otros apoyos. Luego
gire muy lentamente el mango
hacia la izquierda para abrir la
válvula de alivio y bajar el
vehículo sobre los apoyos.
5
WWW.HUSKYTOOLS.COM
Póngase en contacto con el 1-888-HD-HUSKY para asistencia adicional.
Operación (Continuación)
ADVERTENCIA: Para evitar pellizcarte o aplastarte las manos
o pies, SIEMPRE mantenlos lejos de la bisagra del gato y el área
de contacto con el suelo al bajar el vehículo. El gato es sólo un
dispositivo para levantamiento. NO muevas o ruedes el vehículo
mientras esté apoyado sobre el gato
Cuidado y Limpieza
INSPECCIÓN
El producto debe ser mantenido de acuerdo a estas instrucciones.
No altere este producto en ninguna manera.
1. Antes de usarlo, se deberá hacer una inspección completa del gato. Busque grietas en las
soldaduras, piezas dobladas, dañadas, flojas, desgastadas o faltantes.
2.
Inspeccione de acuerdo a este manual SOLAMENTE.
3.
Si el gato ha estado sujeto a carga anormal o choque (abuso), realice una inspección inmediata.
Lleve el producto a un representante local de servicio al cliente para una inspección autorizada
antes de usarlo.
Mantenimiento
AGREGAR ACEITE DE GATO HIDRÁULICO
1
2
Colocación a Nivel del Suelo
Con la montura completamente
abajo y el gato a nivel del suelo,
desenrosque y retire el tapón
de aceite
3
Retiro del Tapón
Desenrosque y retire el
tapón de aceite.
4
Llenado del Depósito de Aceite
Usando un aceite de gato hidráulico de buen
grado SAE 5W, llene el depósito de aceite
hasta el fondo de las roscas en el agujero
de llenado de aceite.
Reemplazo del Tapón
Coloque de nuevo y apriete
el tapón de aceite. No permita
que entre al sistema suciedad
o desechos.
6
Mantenimiento (Continuación)
REEMPLAZO DEL ACEITE DE GATO HIDRÁULICO
1
Cómo Abrir la Válvula de Alivio
2
Abre la válvula de liberación
rotando el mango hacia la
izquierda.
3
Cómo Extraer el Tapón
Retire el tapón del aceite.
4
Drenado del Aceite Viejo
Voltee todo el gato de modo que
todo el aceite viejo drene del
agujero de llenado de aceite.
Nivelación del Gato
Después de que todo el aceite viejo ha
sido drenado del gato, voltee de nuevo
el gato a una posición nivelada y llénelo
con aceite nuevo.
Nota: cuando drene el aceite, use
un depósito apropiado y siga siempre todas
las directrices locales y estatales de eliminación
de desechos.
5
Liberación del Aire Presurizado
6
Llenado con Aceite Nuevo
Usando un aceite de gato
hidráulico de buen grado
SAE 5W, llene el depósito de
aceite hasta el fondo de las
oscas en el agujero de llenado
de aceite. Coloque de nuevo y apriete el tapón
de aceite. No permita que entre al sistema
suciedad o desechos.
Rápidamente, bombee el mango
del gato de 6 a 8 carreras para
liberar cualquier aire
presurizado.
IMPORTANTE: Cuando agregue o reemplace aceite, SIEMPRE use un
aceite de gato hidráulico de buen grado (SAE 5W). NUNCA use solución
de frenos, alcohol, glicerina, detergente, aceite de motor o aceite sucio
de ninguna clase. El uso de aceite inapropiado causará daños internos
serios al gato.
LUBRICACIÓN
1
Lubrica Cuando Sea Necesario
Use un aceite lubricante de
buen grado en todas las piezas
móviles cuando sea necesario
(uniones de brazos, ruedas
delanteras y rueditas traseras).
2
Engrase del Ensamblaje de
Levantamiento
Lubrique el ensamblaje del
brazo de levantamiento a
través de su accesorio de
engrase, usando una grasa
de buen grado o de chasis
de múltiples propósitos.
7
WWW.HUSKYTOOLS.COM
Póngase en contacto con el 1-888-HD-HUSKY para asistencia adicional.
Mantenimiento (Continuación)
ALMACENAMIENTO
1
Coloque la Montura en su
Posición Más Baja
2
Cuando el gato no está en uso,
o cuando guarde el gato,
SIEMPRE tenga la montura en
su posición más baja (abajo).
Guárdelo en una Posición
Nivelada
Se recomienda que
el gato se guarde
en un lugar seco con
todas las ruedas
tocando el suelo en
una posición relativamente nivelada.
PREVENCIÓN DE LA OXIDACIÓN
Revise el émbolo y el pistón de la bomba cada dos meses (o antes, basado en el uso) en busca
de cualquier señal de óxido o corrosión. Limpie según sea necesario con un trapo de aceite.
Resolución de Fallas
Problem
Cause
Solution
El gato no bajará
completamentey
1. Aire en el sistema
hidráulico
2. Libere el atascamiento
de la válvula
1. Purgue el aire del sistema hidráulico
2. Transfiera la carga del peso y limpie
la válvula
El gato no sostendrá
el peso
1. Válvula de alivio en
posición abierta
1. Cierre la válvula de alivio con firmeza
El gato no levantará
a la altura total
1. El nivel del aceite está bajo
2. Aire en el sistema hidráulico
1. Llene hasta el nivel recomendado
2. Purgue el aire del sistema hidráulico
Levantamiento débil
1. Aire en el sistema hidráulico
2. Aceite sucio
3. Válvula de alivio no está
completamente cerrada
1. Purgue el aire del sistema hidráulico
2. Cambie el aceite Use SAE 5W
3. Cierre la válvula de alivio con firmeza
El gato no levantará
la carga
1. Peso excesivo
2. Válvula de alivio en posición
abierta
3. Nivel de aceite bajo
1. Disminuya el peso o cambie a un gato
de mayor capacidad
2. Gire la válvula hacia la derecha y apriete
3. Llene hasta el nivel recomendado
8
¿Tiene preguntas, problemas, o faltan piezas?
Antes de regresar a la tienda,
llame a Servicio al Cliente de Husky
de lunes a viernes de 8 a.m. a 6 p.m., hora local del Este
1-888-HD-HUSKY
WWW.HUSKYTOOLS.COM
Conserva este manual para uso en el futuro.
X0000000000-A