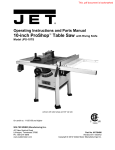
1
This .pdf document is bookmarked
Operating Instructions and Parts Manual
Planer/Molder
Model JPM-13CS
WALTER MEIER (Manufacturing) Inc.
427 New Sanford Road
LaVergne, Tennessee 37086
Ph.: 800-274-6848
www.waltermeier.com
Part No. M-708524
Revision G1 06/2013
Copyright © 2013 Walter Meier (Manufacturing) Inc.
1.0 Warranty and Service
Walter Meier (Manufacturing) Inc., warrants every product it sells. If one of our tools needs service or repair, one of
our Authorized Service Centers located throughout the United States can give you quick service. In most cases, any
of these Walter Meier Authorized Service Centers can authorize warranty repair, assist you in obtaining parts, or
perform routine maintenance and major repair on your JET® tools. For the name of an Authorized Service Center in
your area call 1-800-274-6848.
MORE INFORMATION
Walter Meier is consistently adding new products to the line. For complete, up-to-date product information, check with
your local Walter Meier distributor, or visit jettools.com.
WARRANTY
JET products carry a limited warranty which varies in duration based upon the product (MW = Metalworking, WW =
Woodworking).
WHAT IS COVERED?
This warranty covers any defects in workmanship or materials subject to the exceptions stated below. Cutting tools,
abrasives and other consumables are excluded from warranty coverage.
WHO IS COVERED?
This warranty covers only the initial purchaser of the product.
WHAT IS THE PERIOD OF COVERAGE?
The general JET warranty lasts for the time period specified in the product literature of each product.
WHAT IS NOT COVERED?
Five Year Warranties do not cover woodworking (WW) products used for commercial, industrial or educational
purposes. Woodworking products with Five Year Warranties that are used for commercial, industrial or education
purposes revert to a One Year Warranty. This warranty does not cover defects due directly or indirectly to misuse,
abuse, negligence or accidents, normal wear-and-tear, improper repair or alterations, or lack of maintenance.
HOW TO GET SERVICE
The product or part must be returned for examination, postage prepaid, to a location designated by us. For the name
of the location nearest you, please call 1-800-274-6848.
You must provide proof of initial purchase date and an explanation of the complaint must accompany the
merchandise. If our inspection discloses a defect, we will repair or replace the product, or refund the purchase price,
at our option. We will return the repaired product or replacement at our expense unless it is determined by us that
there is no defect, or that the defect resulted from causes not within the scope of our warranty in which case we will,
at your direction, dispose of or return the product. In the event you choose to have the product returned, you will be
responsible for the shipping and handling costs of the return.
HOW STATE LAW APPLIES
This warranty gives you specific legal rights; you may also have other rights which vary from state to state.
LIMITATIONS ON THIS WARRANTY
WALTER MEIER (MANUFACTURING) INC., LIMITS ALL IMPLIED WARRANTIES TO THE PERIOD OF THE
LIMITED WARRANTY FOR EACH PRODUCT. EXCEPT AS STATED HEREIN, ANY IMPLIED WARRANTIES OR
MERCHANTABILITY AND FITNESS ARE EXCLUDED. SOME STATES DO NOT ALLOW LIMITATIONS ON HOW
LONG THE IMPLIED WARRANTY LASTS, SO THE ABOVE LIMITATION MAY NOT APPLY TO YOU.
WALTER MEIER SHALL IN NO EVENT BE LIABLE FOR DEATH, INJURIES TO PERSONS OR PROPERTY, OR
FOR INCIDENTAL, CONTINGENT, SPECIAL, OR CONSEQUENTIAL DAMAGES ARISING FROM THE USE OF
OUR PRODUCTS. SOME STATES DO NOT ALLOW THE EXCLUSION OR LIMITATION OF INCIDENTAL OR
CONSEQUENTIAL DAMAGES, SO THE ABOVE LIMITATION OR EXCLUSION MAY NOT APPLY TO YOU.
Walter Meier sells through distributors only. The specifications in Walter Meier catalogs are given as general
information and are not binding. Members of Walter Meier reserve the right to effect at any time, without prior notice,
those alterations to parts, fittings, and accessory equipment which they may deem necessary for any reason
whatsoever. JET® branded products are not sold in Canada by Walter Meier.
2
2.0 Table of contents
Section
Page
1.0 Warranty and Service ..................................................................................................................................... 2 2.0 Table of contents............................................................................................................................................ 3 3.0 Safety warnings.............................................................................................................................................. 4 4.0 About this manual .......................................................................................................................................... 5 5.0 Electrical connections .................................................................................................................................... 6 5.1 Grounding instructions ............................................................................................................................... 6 5.2 115 Volt operation ...................................................................................................................................... 6 5.3 230 Volt operation ...................................................................................................................................... 6 6.0 On-Off Switch Padlock ................................................................................................................................... 7 7.0 Specifications ................................................................................................................................................. 8 8.0 Glossary ......................................................................................................................................................... 9 9.0 Setup and assembly..................................................................................................................................... 10 9.1 Shipping contents ..................................................................................................................................... 10 9.2 Unpacking and cleanup ............................................................................................................................ 10 9.3 Assembly .................................................................................................................................................. 10 10.0 Adjustments: Planing ................................................................................................................................. 10 10.1 Depth of cut ............................................................................................................................................ 10 10.2 Adjusting depth of cut scale ................................................................................................................... 10 10.3 Feed rate adjustment ............................................................................................................................. 11 10.4 Adjusting V-Belt Tension ........................................................................................................................ 11 10.5 Knife adjustment ..................................................................................................................................... 11 10.6 Knife replacement .................................................................................................................................. 12 10.7 Adjusting infeed roller and outfeed rollers for planing ............................................................................ 12 10.8 Adjusting chip deflectors for planing ....................................................................................................... 13 11.0 Planing procedure ...................................................................................................................................... 13 11.1 Dealing with warped wood ..................................................................................................................... 13 11.2 Wood Grain ............................................................................................................................................ 14 12.0 Molding setup and adjustments ................................................................................................................. 14 12.1 Installing molding cutters ........................................................................................................................ 14 12.2 Setting feed rollers for molding ............................................................................................................... 15 12.3 Making & installing a bedboard .............................................................................................................. 16 12.4 Making guide rails .................................................................................................................................. 16 12.5 Guide rail placement and attachment ..................................................................................................... 16 13.0 Molding procedure ..................................................................................................................................... 17 13.1 Setting table height for first pass ............................................................................................................ 17 13.2 Back Relief Molding ................................................................................................................................ 18 13.3 Tongue and Groove Molding .................................................................................................................. 18 14.0 Maintenance ............................................................................................................................................... 18 14.1 Lubrication .............................................................................................................................................. 18 15.0 Troubleshooting the JPM-13CS ................................................................................................................. 19 15.1 Mechanical and electrical problems ....................................................................................................... 19 15.2 Performance problems ........................................................................................................................... 20 16.0 Replacement Parts..................................................................................................................................... 21 16.1.1 Table and Base Assembly – Exploded View ....................................................................................... 22 16.1.2 Table and Base Assembly – Parts List ................................................................................................ 23 16.2.1 Cutterhead and Roller Assembly – Parts List ...................................................................................... 24 16.2.2 Cutterhead and Roller Assembly – Parts List ...................................................................................... 24 16.3.1 Gearbox Assembly – Parts List ........................................................................................................... 26 16.3.2 Gearbox Assembly – Parts List ........................................................................................................... 27 16.4.1 Stand and Motor Assembly – Parts List .............................................................................................. 28 16.4.2 Stand and Motor Assembly – Parts List .............................................................................................. 29 17.0 Electrical Connections................................................................................................................................ 30 3
3.0 Safety warnings
For your own safety, read this instruction manual before operating the tool.
Wear Eye Protection
1.
KEEP GUARDS IN PLACE and in working order.
2.
REMOVE ADJUSTING KEYS AND WRENCHES. Form the habit of checking to see that keys and
adjusting wrenches are removed from the tool before turning it on.
3.
KEEP THE WORK AREA CLEAN. Cluttered areas and benches invite accidents.
4.
DO NOT USE IN A DANGEROUS ENVIRONMENT. Don’t use power tools in damp or wet locations, or
expose them to rain. Keep work area well lighted.
5.
KEEP CHILDREN AWAY. All visitors should be kept at safe distance from the work area.
6.
MAKE THE WORKSHOP KID PROOF with padlocks, master switches, or by removing starter keys.
7.
DON’T FORCE THE TOOL. It will do the job better and safer at the rate for which it was designed.
8.
USE THE RIGHT TOOL. Don’t force a tool or attachment to do a job for which it was not designed.
9.
USE THE PROPER EXTENSION CORD. Make sure your extension cord is in good condition. When using
an extension cord, be sure to use one heavy enough to carry the current your product will draw. An
undersized cord will cause a drop in the line voltage resulting in loss of power and overheating. The table
below shows the correct size to use depending on the cord length and name plate ampere rating. If in
doubt, use the next heavier gauge. The smaller the gauge number, the heavier the cord.
Volts
Total Length of Cord in Feet
120V
25
50
100
150
240V
50
100
200
300
AWG
14
12
Not recommended
Table 1
10. WEAR PROPER APPAREL. Do not wear loose clothing, gloves, neckties, rings, bracelets, or other
jewelry which may get caught in moving parts. Nonslip footwear is recommended. Wear protective hair
covering to contain long hair.
11. ALWAYS USE SAFETY GLASSES. Also use face or dust masks if the cutting operation is dusty.
Everyday eyeglasses only have impact resistant lenses, they are NOT safety glasses.
12. SECURE WORK. Use clamps or a vise to hold the work when its practical. It’s safer than using your hand
and it frees both hands to operate the tool.
13. DON’T OVERREACH. Keep proper footing and balance at all times.
14. MAINTAIN TOOLS WITH CARE. Keep tools sharp and clean for best and safest performance. Follow
instructions for lubricating and changing accessories.
15. DISCONNECT TOOLS before servicing; when changing accessories, such as blades, bits cutters, and the
like.
16. REDUCE THE RISK OF UNINTENTIONAL STARTING. Make sure the switch is in the off position before
plugging in the machine.
17. USE RECOMMENDED ACCESSORIES. Consult the owner’s manual for recommended accessories. The
use of improper accessories may cause a risk of injury.
4
18. NEVER STAND ON A TOOL. Serious injury could occur if the tool is tipped or if the cutting tool is
unintentionally contacted.
19. CHECK DAMAGED PARTS. Before further use of the tool, a guard or other part that is damaged should
be carefully checked to determine that it will operate properly and perform its intended function. Check for
alignment of moving parts, binding of moving parts, breakage of parts, mounting, and any other conditions
that may affect its operation. A guard or other part that is damaged should be properly repaired or
replaced.
20. DIRECTION OF FEED. Feed work into a blade or cutter against the direction of rotation of the blade or
cutter only.
21. NEVER LEAVE THE TOOL RUNNING UNATTENDED. TURN THE POWER OFF. Don’t leave the tool
until it comes to a complete stop.
22. Some dust created by power sanding, sawing, grinding, drilling and other construction activities contain
chemicals known to cause cancer, birth defects or other reproductive harm. Some examples of these
chemicals are:
•
Lead from lead based paint.
•
Crystalline silica from bricks, cement and other masonry products.
•
Arsenic and chromium from chemically treated lumber.
Your risk of exposure varies, depending on how often you do this type of work. To reduce your exposure to
these chemicals, work in a well-ventilated area and work with approved safety equipment, such as face or
dust masks that are specifically designed to filter out microscopic particles.
Familiarize yourself with the following safety notices used in this manual:
This means that if precautions are not heeded, it may result in minor injury and/or possible
machine damage.
This means that if precautions are not heeded, it may result in serious injury or possibly even
death.
4.0 About this manual
This manual is provided by Walter Meier (Manufacturing) Inc. covering the safe operation and maintenance
procedures for a JET Model JPM-13CS Planer-Molder. This manual contains instructions on installation, safety
precautions, general operating procedures, maintenance instructions and parts breakdown. Your machine has
been designed and constructed to provide years of trouble-free operation if used in accordance with the
instructions as set forth in this document.
If there are questions or comments, please contact your local supplier or Walter Meier. Walter Meier can also
be reached at our web site: www.waltermeier.com.
Retain this manual for future reference. If the machine transfers ownership, the manual should accompany it.
Read and understand the entire contents of this manual before attempting assembly
or operation! Failure to comply may cause serious injury!
5
5.0 Electrical connections
5.1 Grounding instructions
In the event of a malfunction or breakdown, grounding provides a path of least resistance for electric current to
reduce the risk of electric shock. This tool is equipped with an electric cord having an equipment-grounding
conductor and a grounding plug. The plug must be plugged into a matching outlet that is properly installed and
grounded in accordance with all local codes and ordinances.
Do not modify the plug provided - if it will not fit the outlet, have the proper outlet installed by a qualified
electrician.
Improper connection of the equipment-grounding conductor can result in a risk of electric shock. The conductor
with insulation having an outer surface that is green with or without yellow stripes is the equipment-grounding
conductor. If repair or replacement of the electric cord or plug is necessary, do not connect the equipmentgrounding conductor to a live terminal.
Check with a qualified electrician or service personnel if the grounding instructions
are not completely understood, or if in doubt as to whether the tool is properly grounded. Failure to
comply may cause serious or fatal injury.
Use only 3-wire extension cords that have 3-prong grounding plugs and 3-pole receptacles that accept the
tool's plug.
5.2 115 Volt operation
As received from the factory, your planer/molder is ready to run at 115 volt operation. This planer/molder, when
wired for 115 volt, is intended for use on a circuit that has an outlet and a plug that looks like the one illustrated
in Figure 1a. A temporary adapter, which looks like the adapter as illustrated in Figure 1b, may be used to
connect this plug to a two-pole receptacle, as shown in Figure 1b if a properly grounded outlet is not available.
The temporary adapter should only be used until a properly grounded outlet can be installed by a qualified
electrician. This adapter is not applicable in Canada. The green colored rigid ear, lug, or tab, extending from
the adapter, must be connected to a permanent ground such as a properly grounded outlet box, as shown in
Figure 1b.
Figure 1a
Figure 1b
5.3 230 Volt operation
If 230V, single phase operation is desired, the following instructions must be followed:
1.
Disconnect the machine from the power source.
2.
This planer/molder is supplied with four motor leads that are connected for 115V operation, as shown in
Figure 2a. Reconnect these four motor leads for 230V operation, as shown in Figure 2b.
3.
The 115V attachment plug, supplied with the planer/molder, must be replaced with a UL/CSA listed plug
suitable for 230V operation, similar to the one shown in Figure 3. Contact your local Authorized JET
Service Center or qualified electrician for proper procedures to install the plug. The planer/molder must
comply with all local and national codes after the 230 volt plug is installed.
6
4.
The planer/molder with a 230 volt plug should only be connected to an outlet having the same
configuration as illustrated by the grounded outlet box in Figure 3. No adapter is available or should be
used with the 230 volt plug.
Important: In all cases (115 or 230 volts), make certain the receptacle in question is properly grounded.
If you are not sure, have a registered electrician check the receptacle.
Figure 2a
Figure 2b
Figure 3
6.0 On-Off Switch Padlock
To safeguard your machine from unauthorized operation and to avoid accidental starting by young children, the
use of a padlock (not provided) is highly recommended.
To lock out an on-off switch (see Figure 4):
1.
Open the padlock.
2.
Insert through holes in the start button.
3.
Close the padlock.
4.
Place the key in a safe location.
Figure 4
7
7.0 Specifications
Model number ........................................................................................................................................ JPM-13CS
Stock Number ............................................................................................................................................. 708524
Capacities:
Maximum Cutting Width................................................................................................................. 13” (330 mm)
Maximum Thickness .................................................................................................................. 6-1/8” (156 mm)
Full Width Depth of Cut................................................................................................................................ 1/16”
Minimum Planing Length ............................................................................................................... 14” (356 mm)
Cuts per Minute ........................................................................................................................................ 13,500
Feed Rate, Planing ................................................................................................................................... 20 fpm
Feed Rate, Molding .................................................................................................................................. 10 fpm
Cutterhead:
Number of Knives .............................................................................................................................................. 3
Knife Size.................................................................................................................. 13-1/16”L x 1/16”W x 5/8”H
Cutterhead Diameter ................................................................................................................................ 2-9/16”
Cutterhead Speed (RPM) ............................................................................................................................ 4500
Motor and controls:
Motor type ......................................................................... totally enclosed fan cooled, induction, capacitor start
Horsepower ........................................................................................................................................... 1-1/2 HP
Phase .......................................................................................................................................................... single
Voltage....................................................................................................................... 115/230V (prewired 115V)
Cycle ............................................................................................................................................................ 60Hz
Listed FLA (full load amps) ..................................................................................................................... 15/7.5 A
RPM ............................................................................................................................................................. 3450
Start capacitor......................................................................................................................... 400MFD, 125VAC
Power transfer ............................................................................................................................................ v-belt
On/off switch ..................................................................................................................................... push button
Motor speed ........................................................................................................................................ 3450 RPM
Power plug installed ..................................................................................................................................... 120V
Recommended circuit and fuse/breaker size1 .......................................................... 30A (115V), or 15A (230V)
1
subject to local/national electrical codes.
Dust collection:
Dust port outside diameter................................................................................................................ 4” (100mm)
Minimum extraction volume required .................................................................................... 350 CFM (18CMM)
Dimensions and weights:
Overall Dimensions........................................................................................ 23-31/32”W x 36-1/2”D x 43-1/2”H
Net Weight (approx.) .................................................................................................................... 225 lb (102 kg)
Shipping Weight (approx.) ........................................................................................................... 262 lb (119 kg)
The specifications in this manual were current at time of publication, but because of our policy of continuous
improvement, Walter Meier (Manufacturing) Inc., reserves the right to change specifications at any time and without
prior notice, without incurring obligations.
IMPORTANT:
∗
The use of a dust chute and adequate dust collection system is highly recommended but not
required for most planing operations.
∗
The use of a dust chute and adequate dust collection system is required for all molding operations.
For a complete line of woodworking dust collectors, contact your local JET distributor, or visit our website at
www.jettools.com.
8
8.0 Glossary
•
Cutterhead (A, Figure 5) – metal cylinder that
holds the planer knives or the molding cutters.
•
Table – part of machine over which the lumber
passes.
•
Feed Rollers – two rubber covered cylinders
that push lumber through the machine.
•
Planer Knife – one of three knives found in
the cutterhead used for planing. (B, Figure 5)
•
Molding Cutter – one of three cutters in a set
with a patterned edge used for cutting a
decorative design into wood.
•
Gib – metal bar with adjusting screws that
holds planer knives or molding cutters in the
cutterhead.
•
Depth of Cut – depth of cut from workpiece on
a single pass through the machine. (Figure 6)
•
Snipe – depression on either end of a planed
board caused by feeding the board into the
machine at an angle to the table or letting the
board end drop down when exiting the planer.
Figure 5
Figure 6
9
9.0 Setup and assembly
9.1 Shipping contents
1
1
2
1
Molder/Planer
Dust Chute
Extension Roller Assemblies
Accessory Package, containing:
1 Handle Assembly
1 10/12mm Wrench*
1 11/13mm Wrench*
1 Screwdriver*
1 3mm Hex Wrench*
1 4mm T-Handle Hex Wrench*
1 5mm Hex Wrench*
1 Knife Setting Gauge*
1 Molding Cutter Gauge*
1 Feed Roller Adjustment Wrench*
1 Brass Bar*
1 Video
1 Hardware Bag #2 (p/n MHD-17S-A)
1 Operator’s Manual
1 Warranty Card
* included in Hardware Bag #1 (p/n MHD-17S)
3.
Attach the top side of dust chute with three
M5x10 machine screws, and three M5
washers.
4.
Attach lower section of dust chute with three
M6x8 machine screws, and three M6 washers.
5.
Mount extension roller assembly to the middle
table with four M8x12 hex cap bolts, and four
M8 flat washers. The frame is adjustable using
these bolts.
6.
Use a straight edge to make sure rollers are
level with middle table.
7.
The first roller is adjustable by loosening the
hex cap bolts that hold the roller on the frame
supports.
8.
Repeat steps 5-7 for opposite side roller
assembly.
Never run machine with dust
hood loose or removed. Failure to comply may
cause serious injury.
10.0 Adjustments: Planing
10.1 Depth of cut
Read and understand all
assembly instructions before attempting
assembly. Failure to comply may cause serious
injury.
Maximum depth of cut is 1/8”
up to 5-1/2” wide, and 1/16” on stock over 51/2” wide. Trying to cut more in one pass will
cause stress on machine and could damage
cutterhead.
9.2 Unpacking and cleanup
1.
2.
Inspect contents for shipping damage. Report
damage, if any, to your distributor.
3.
Compare contents of shipping carton with the
contents list in this manual. Report shortages,
if any, to your distributor.
4.
5.
Thickness planing refers to the sizing of lumber to
a desired thickness while creating a level surface
parallel to the opposite side of the board.
Finish removing all contents from the shipping
container. Do not discard any shipping
material until the planer/molder is set up and
running properly.
The quality of thickness planing depends on the
operator’s judgment about the depth of cut. Depth
of cut depends upon the width, hardness,
dampness, grain direction, and grain structure of
the wood.
The maximum thickness of wood that can be
removed in one pass is 1/8” on wood up to 51/2” wide and 1/16” on wood wider than 5-1/2”.
Clean all rust protected surfaces with a mild
solvent or kerosene. Do not use lacquer
thinner, paint thinner, or gasoline; these will
damage painted surfaces.
When planing hard wood, take light cuts or plane
wood in thin widths.
Make a test cut when working with a new type of
board or different kind of operation. Check the
accuracy of the test cut before working on the
finished product.
To prevent rust, apply a light coating of paste
wax to the table surface.
9.3 Assembly
1.
2.
10.2 Adjusting depth of cut scale
Remove dust hood. Check gib screws on
cutterhead for tightness. Reinstall dust hood.
Note: Recheck after five minutes of operation.
Recheck again after every 2 hours of use.
Use caution when placing
hands near cutterhead. Knives are extremely
sharp. Failure to comply may cause serious
injury.
Attach the handle to the post with a hex socket
cap screw.
1.
10
Take a test cut.
10.5 Knife adjustment
2.
Measure the cut piece.
3.
Adjust pointer accordingly.
Any
adjustment
or
replacement of knives must be done to all three
knives at the same time. Failure to comply may
result in an out-of-balance cutterhead which
will lead to bearing failure.
10.3 Feed rate adjustment
The planer/molder has two speeds that feed the
work piece, at 10 feet per minute (FPM) for
improved surface finish when molding and 20 FPM
for faster planing.
Use caution when placing
hands near the cutterhead. Knives are
extremely sharp. Failure to comply may cause
serious injury.
To change the feed rate gears:
1.
Disconnect
(Unplug).
machine
from
power
source
2.
Remove acorn nut holding the gear cover.
3.
1.
Disconnect
(Unplug).
machine
from
power
source
Remove two hex socket cap screws and two
washers.
2.
Remove screws securing dust hood and dust
chute.
4.
Remove gears and position according to
operation. See gear chart (Figure 7).
3.
Remove dust hood and dust chute.
5.
Replace screws and washers to hold gears in
place.
4.
With a marking pen, label each knife on the
cutterhead one, two, and three for easy
identification.
6.
Replace cover and acorn nut.
5.
Loosen all lock bar screws on blade number
one.
6.
With the brass bar and a mallet, carefully tap
on each end on the outside of the set screws
for all three lock bars on knife number one.
This loosens the taper fit of the lock bar.
7.
Raise or lower knife by turning jack screw.
Knife is at correct height when knife tip just
touches center tip of knife gauge (Figure 8).
Figure 7
10.4 Adjusting V-Belt Tension
1.
Disconnect
(Unplug)
machine
from
power
source.
Figure 8
2.
Remove stand cover on left of stand.
8.
3.
Loosen four round cap hex socket slot screws
holding motor plate to stand.
Place knife gauge at other end of knife number
one.
9.
Raise or lower knife to correct height.
4.
Push down on motor to tension belt. Belt is
tensioned properly when moderate finger
pressure on belt midway between the two
pulleys causes approximately 1/4” deflection.
5.
Tighten four round cap hex socket slot screws.
6.
Replace stand cover.
10. Tighten knife bar locking screws. Note: Tighten
each large lock bar independently. Take half
turns alternating on each end until lock bar is
tight against the knife. Tighten small lock bar
after two large lock bars are tight. The small
lock bar requires two spacers to firmly hold the
knife. Tighten in the same manner as the large
lock bars.
11. Continue to check knife height with gauge until
set screws are firmly tightened.
11
12. Repeat steps five through eleven for blades
two and three.
10.7 Adjusting infeed roller and
outfeed rollers for planing
10.6 Knife replacement
As a general rule of thumb, the infeed and outfeed
rollers are set 1/8” below the cutterhead (not the
knives) at the factory. To check the feed rollers:
Use caution when placing
hands near the cutterhead. Knives are
extremely sharp. Failure to comply may cause
serious injury.
1.
Disconnect
(Unplug)
machine
from
power
2.
Remove screws securing the dust hood and
dust chute.
3.
Remove dust hood and dust chute.
4.
With a marking pen, label each knife on the
cutterhead one, two, and three for easy
identification.
5.
Loosen all lock bar set screws on knife number
one.
6.
With the brass bar and a mallet, carefully tap
on each end on the outside of the set screws
for all three lock bars on knife number one.
This loosens the taper fit of the lock bar.
7.
Carefully remove knife.
8.
Remove lock bars.
9.
Repeat steps 5-8 for knives two and three.
1.
Disconnect
(Unplug)
2.
Make two blocks out of scrap 2x4 lumber using
the dimensions noted.
3.
Mark each block as shown in Figures 10 and
11.
source.
machine
from
power
source.
Figure 10
10. Clean cutterhead of any wood chips, pitch,
saw dust, and any other debris.
11. Replace lock bars on knife number one as in
Figure 9, paying attention to which direction
they face.
Figure 9
Figure 11
12. Carefully install new or sharpened knife into
cutterhead between lock bar and cutterhead.
Note direction of knife as pictured in Figure 5.
4.
Lower the work table to allow cutterhead block
to slide freely between the table and the
cutterhead. Note: Cutterhead may have to be
turned by hand to rotate a blade out of the
way.
5.
Adjust the table height so the block can be
inserted between the table and the cutterhead
with minimum resistance.
6.
Remove the block. Do not raise or lower the
table at this point. It will affect the final result.
13. Adjust knife. Refer to section in this manual
titled “Knife Adjustment”, steps seven through
eleven.
14. Repeat steps 11-13 for blades number two
and three.
12
7.
Insert the block labeled “Feed Roller Planing”
into the planer opening.
adjustment allows without
cutterhead and knives.
8.
Raise or lower the feed roller until it rests on
top of the block end to end. To adjust the feed
roller (Fig 12):
11.0 Planing procedure
• Loosen the jam nut on both sides of infeed
roller with the wrench provided.
the
Never stand directly in front of
or behind machine while planing or molding.
Always stand to one side. Failure to comply
may cause serious injury from kickback.
• Turn the threaded bushing counterclockwise to raise roller and clockwise to
lower roller.
Never attempt to plane a
workpiece shorter than 14” or thinner than 1/2”.
Failure to comply may cause serious injury.
• Raise or lower roller until it contacts the top
of the block on both ends of the roller.
• Block should slide in and out with a
minimum of force.
Never plane more than 1/8” on
stock narrower than 5-1/2” and 1/16” on stock
5-1/2” and wider in one pass. This will cause
stress on machine, lead to premature wear, and
may damage knives and/or cutterhead.
• Tighten jam nuts and re-check.
9.
contacting
Repeat this process with outfeed roller. Retain
the wooden blocks for future use.
The use of a dust collection
system is highly recommended. If a dust
collection system is not used, remove hose
adaptor from dust hood to prevent wood chips
collecting in dust hood and backing up into
machine.
The JPM-13CS is supplied with planing blades
mounted in the cutterhead. Planing can be done at
10 FPM for an improved surface finish or 20 FPM
for faster planing. Work pieces longer than 24”
should be supported with infeed and outfeed
rollers.
Figure 12
10.8 Adjusting chip deflectors for
planing
Adjust the outfeed chip deflector (as shown in
Figure 13) to within 1/4” to 1/8” of planing knives to
prevent chips from being pressed into the planed
surface of the work piece by the outfeed roller.
Note: Adjusting the chip deflector too close to the
cutterhead while planing will cause a higher than
normal noise level especially when using a dust
collector. The use of a dust collection system with
the capacity to handle a large volume of material is
highly recommended.
1.
Adjust table height to produce desired depth of
cut.
2.
Start machine.
3.
Stand to one side and grasp work piece in the
center.
4.
Gently slide work piece into infeed side of
planer/molder until infeed roller begins to
advance the work piece.
5.
Let go of the work piece and allow the feed
rollers to advance the work piece.
6.
Catch the work piece as it comes out the
outfeed side of the planer/molder.
11.1 Dealing with warped wood
Warp is caused by different grain directions in a
piece of wood drying at different rates during the
drying process.
Wood warped across the width - Cupped wood
is planed flat on one side first, then planed flat on
the other. Ripping the board down the middle will
avoid huge amounts of waste in planing to
thickness.
Figure 13
The infeed chip deflector (curved piece attached to
the top cover with three screws and wing nuts)
must be adjusted as close to the cutterhead as the
13
Wood warped lengthwise - Feed rollers will
flatten a lengthwise warped board as if it were flat,
but the board will spring back to its original shape
once out of the planer. A lengthwise warped board
must be jointed flat on one side on a jointer before
being thickness planed.
3.
Remove dust hood (B, Figure 14) and dust
chute.
4.
Loosen three wing nuts (C, Figure 14) and
slide the curved infeed chip deflector (D,
Figure 14) out of the way.
Twisted wood - Twisted lumber or lumber twisted
lengthwise is difficult to thickness plane. The wood
may be so twisted that it cannot be thickness
planed. One possible solution may be to saw the
board into smaller sections and see if the sections
can be thickness planed.
5.
Tighten screws to hold chip deflector in place.
It is not used in the molding operation.
6.
Remove plastic
completely.
7.
With a marking pen, label each knife slot on
the cutterhead one, two, and three for easy
identification.
11.2 Wood Grain
outfeed
chip
deflector
For 2” and under cutters:
For an improved surface finish with minimal
tearout, always plane the work piece with the grain.
The work piece should be fed into the
planer/molder so that blades are traveling with the
grain as they finish the cut. The grain should be
angled up toward the rear of the work piece as it is
fed into the planer/molder.
12.0 Molding setup and
adjustments
•
Loosen set screws on 2” lock bar at cutter
number one.
•
With the brass bar and a mallet carefully tap
on lock bar outside of set screws to loosen
taper fit of the lock bar.
•
Remove spacers.
•
Remove lock bar. Note: With 2” wide and
under molding cutters, the planing knives
remain in place (Figure 15).
•
Install lock bar but do not tighten at this time.
Note: Depending on cutter width, 1” and under
cutters will require a spacer next to the cutter.
Set feed gear box to 10 FPM. (See illustration and
instruction in section 10.3).
12.1 Installing molding cutters
Cutterhead knives are sharp.
Use extreme caution when working in close
proximity. Never attempt to mold without a dust
chute and dust collection system. Failure to
comply may cause serious injury.
1.
Disconnect
(Unplug).
machine
from
power
source
2.
Remove screws (A, Figure 14) securing the
dust hood.
Figure 15
•
Install cutter in place of spacers. Cutters must
face proper direction and be seated fully in the
cutterhead.
For cutters over 2”:
Figure 14
14
•
Loosen set screws on all lock bars at cutter
number one.
•
With the brass bar and a mallet, carefully tap
on lock bar outside of set screws to loosen
lock bar taper fit.
•
Carefully remove spacers, planing knives and
lock bars.
•
Install special lock bar that is included with the
knife set. Make sure set screws are loose to
allow locking adjustment. Do not tighten at this
time.
•
Install cutter. Make sure it is facing proper
direction and is fully seated in the cutterhead.
8.
Install molding cutter gauge with hex socket
cap screw and tighten to hold in place. The
guide may be attached to either side. See
Figure 16.
When using cutters larger than 2” wide, the feed
rollers will have to be set 5/16” below the cutter
head. To set the feed rollers for molding:
1.
Figure 17
Figure 16
9.
Following the method for setting the feed
rollers when planing (previously explained in
this manual), make another wooden block
5/16” lower than the cutterhead block. See
Figure 17.
Adjust the guide end to meet the cutter edge.
10. Tighten the hex socket cap screw holding the
guide bar and be careful not to move it during
the alignment process.
11. Tighten lock bar set screws to hold cutter in
place. Tighten set screws half turn each side
to uniformly raise the lock bar until tight.
2.
Adjust the infeed and outfeed rollers in the
same manner as setting the rollers for planing
using this new block.
3.
Label this block “feed roller molding”.
4.
Save the block for future use.
Never lower infeed and
outfeed rollers beyond 5/16” lower than
cutterhead. This will cause severe stress on
gear box and roller system.
12. Rotate cutterhead to the second cutter insert.
13. Repeat steps for cutter inserts two and three
making sure the cutters are properly
positioned according to the alignment guide.
When using molding knives wider than 2”, the first
pass or cut will remove approximately two thirds of
the stock. Test cuts on scrap material will
determine the number of passes required to
complete the cut. Never attempt to complete a
cut with less than two passes on smaller knives
(under 2”) and three passes on larger knives
(over 2”). Generally, the more passes, the better
the finish.
14. Remove guide.
15. Check that all set screws in the cutterhead are
tight.
16. Replace dust hood and dust chute.
17. Run machine for five minutes. Re-tighten gib
screws in cutterhead. Recheck after every 2
hours of use.
Due to the variety of cutters available, it is
impossible to cover every possible set-up. It is very
important to use test cuts on scrap material before
attempting cuts on project material.
Never run the machine with
the dust hood loose or removed. All cutter lock
bar screws must be firmly seated before
turning on the machine. Failure to comply may
cause blade and/or cutter ejection resulting in
damage to machine, cutter, and may pose
hazard to operator.
This machine is designed and intended for use with
three matched knives in sets. Many companies
offer knife sets that included only one knife and two
counter-weights. These cause severe vibration and
can damage the machine.
12.2 Setting feed rollers for molding
The infeed and outfeed rollers will have to be
lowered for most molding operations. The amount
of adjustment required will vary depending on the
size and style of the cutter.
15
12.3 Making & installing a bedboard
You must use a board over the
planer/molder table when molding. This
prevents the knives from hitting the table and
allows the knives to cut into the guide boards
to clean up the sides of the molding.
1.
Disconnect
(unplug).
2.
Cut a piece of 3/4” particle board 12-7/8” wide
and 31-1/4” long. Note: Board is 12” longer
than the table to allow overhang (6” front and
rear). This increases the work surfaces for
longer pieces of wood stock.
3.
machine
from
power
source
Figure 19
12.5 Guide rail placement and
attachment
Mark and drill four 1/4” holes on the bedboard
that match the pre-drilled holes in the
planer/molder table.
4.
Countersink the four drilled holes on the top
side to allow installation of countersunk
screws.
5.
Secure the bedboard to the table with four
3/16” x 1-1/2” flat head machine screws, four
3/16” x 3/4” washers and four 3/16” hex nuts.
12.4 Making guide rails
Guide rails are used during the molding process to
align the workpiece with the molding cutters. Using
properly adjusted guide rails assures the workpiece
passes the molding cutters in the same position
using multiple passes.
Guide rails should be the same length as the table
(31-1/4”) and 2” wide and be made from smooth,
straight hardwood, such as oak, maple, alder, etc.
so they will not damage the cutters when they
contact them. Some molding profiles require the
knives to cut into the guide rails to clean up the
outer edge to complete the cut. (Fig. 18)
1.
Disconnect
(unplug).
machine
from
2.
To assist in proper placement of guide rails, it
is suggested to remove the dust hood and dust
chute to clearly see the cutter knife and rail
placement. It is also helpful to draw parallel
lines on the bedboard to assure proper
alignment of the guide rails from the infeed
side to the outfeed side.
3.
Molding cutter must be installed properly in the
cutterhead. See “Installing Molding Cutters”.
4.
Lower table.
5.
Carefully turn cutterhead so that one cutter is
at the lowest point of the cutting arc.
6.
Slide in first guide rail and position inside edge
of guide rail to outside edge of the finished
work piece. Note: On many patterns this will
be the outside edge of the knife.
7.
Clamp the guide rail to the bedboard using “C”
clamps on both ends. (This can also be done
by nailing with small gauge finish nails. Keep
in mind the guide rails must be positioned
properly before nailing. Be careful with nail
length; do not nail through the bedboard and
into the table). (Fig. 20)
Figure 18
Guides should be cut 1/4” lower than the maximum
thickness of the final workpiece profile. Regardless
of how thick your guide rails are, they must be
notched to clear the infeed/outfeed rollers and antikickback fingers. See Figure 19 for pattern.
Figure 20
16
power
source
8.
Position second guide rail on the table.
Placement of this rail depends on the width of
the board and if the board requires outer edge
clean-up. Review molding procedure section
for pre-sizing stock guidelines. When using
knives that require outer edge clean-up, the
workpiece will contact the guide rails only
while wood is feeding into the cutterhead. After
the workpiece passes the cutterhead, the
outfeed roller will hold the workpiece in
position.
9.
Clamp or nail second guide rail.
10. Replace dust hood, dust chute and fasten in
place.
Figure 22
Other considerations before molding to consider
are wood hardness, moisture content, degree of
warp, and direction of grain.
11. Connect to the dust collection system.
12. Make sure all adjusting tools and wood stock
are removed from the machine.
Never attempt to mold a
workpiece shorter than 14” or thinner than 1/2".
Failure to comply may cause damage to
machine and/or serious injury to operator.
TIP: Save money, time, and frustration by
experimenting first with scrap work pieces before
attempting to mold with expensive stock.
13.0 Molding procedure
13.1 Setting table height for first
pass
Never mold without using a
dust collector. Molding without a dust collector
may cause clogging of and damage to machine.
1.
Do not connect machine to power source until
instructed to do so.
2.
Lower table to allow insertion of workpiece.
3.
While looking into the front opening of the
machine, raise the table until the workpiece
just contacts the infeed roller.
4.
Record the height of the table as indicated on
the scale to either side of the table.
5.
Lower the table and remove the workpiece.
6.
Raise the table back up to the recorded
measurement.
7.
Raise the table one full turn above the
recorded measurement to allow adequate feed
roller pressure. This measurement is now the
starting point for this particular job.
8.
Connect the machine to the power source,
start the dust collector, and start the machine.
9.
Insert the work piece until the infeed roller
begins to advance the workpiece.
Molding with professional results takes planning
prior to starting. Always take a light cut for the
smoother finish. Pre-sizing wood before molding is
a necessity. Always pre-size the workpiece to 1/16”
of the final thickness before running the workpiece
through the molder.
With profiles that require outer edge clean-up, the
workpiece should be 1/8” larger than the final width
allowing 1/16” on either side of the cutter. (Fig. 21)
Figure 21
10. Let go of the work piece and move to one side
of the machine.
With profiles that only cut the edge of the
workpiece, the workpiece should be the same size
as the final width. (Fig. 22)
11. Retrieve the work piece from the outfeed side
of the machine. Note: It is our experience that
on the first pass using some cutters, the
material may feed in a jerky motion. If this
occurs, raise the table during the cut until the
workpiece begins to advance smoothly. This
point now becomes your first pass
measurement.
17
12. Run all stock to be molded through the
machine at this time. Note: If you are
molding several boards with the same
profile and have to make several passes to
complete the profile, you must run all
boards through at each setting. This
assures all stock will match the desired
shape. This is especially important when
splicing molded boards together such as
crown molding or baseboards.
13.2 Back Relief Molding
Back relief molding is used to create a better fit
over irregular surfaces. With less wood contact, the
molding matches irregular surfaces more easily.
The back relief cut is formed on the work piece
first; then the workpiece is molded to its finished
shape. (Fig. 23)
Figure 24
14.0 Maintenance
Disconnect
(unplug).
machine
from
power
source
•
Keep anti-kickback pawls clean and operating
smoothly to prevent injury due to kickback.
•
Lubricate table with furniture wax or
automotive paste wax for smoother feeding of
workpiece. Do not use a lubricant that will
affect the workpiece’s ability to accept stains
or protective finishes.
•
Replace feed rollers, blades, and cutter knives
if they become damaged. Sharpen blades and
cutters when they become dull.
14.1 Lubrication
Disconnect
(unplug).
Figure 23
13.3 Tongue and Groove Molding
Tongue and groove molding is accomplished in the
same manner as other types of molding. Keep in
mind the edge guide must be taller to adequately
support the work piece. The edge guides must be
set 3/4” below the lowest point the cutter will travel.
Cutting the groove first allows adequate support
when cutting the tongue (Figure 24).
18
machine
from
power
source
•
Coat the elevating screws with light automotive
bearing grease once a month.
•
Lightly coat the chain drive and gears with light
automotive grease once a month.
•
Lubricate four columns with 10W machine tool
oil once a month.
15.0 Troubleshooting the JPM-13CS
15.1 Mechanical and electrical problems
Trouble
Probable Cause
Remedy
Table difficult to
adjust.
Lack of lubrication on corner posts and
screws.
Lubricate corner posts and screws.
Chain is jumping.
Inadequate tension.
Adjust chain tension.
Sprockets misaligned.
Align sprockets.
Machine will not
start/restart or
repeatedly trips circuit
breaker or blows
fuses.
Sprockets are worn.
Replace sprockets.
No incoming power.
Verify power connections to planer.
Building circuit breaker trips or fuse
blows.
Verify that planer is on a circuit of
correct size. Check amp setting on
motor. If circuit size is correct, there is
probably a loose electrical lead.
Loose electrical connections.
Go through all the electrical
connections on the planer including
motor connections, verifying the
tightness of each. Look for any signs of
electrical arcing which is a sure
indicator of loose connections or circuit
overload.
Motor failure.
If electric motor is suspect, you have
two options: Have a qualified electrician
test the motor for function or remove
the motor and take it to a qualified
electric motor repair shop and have it
tested.
Miswiring of the unit.
Check to confirm all electrical
connections are correct and properly
tight. Make any needed corrections.
On/off switch failure.
If the on/off switch is suspect, you have
two options: Have a qualified electrician
test the switch for function, or purchase
a new on/off switch and establish if that
was the problem on changeout.
19
15.2 Performance problems
Trouble
Probable Cause
Remedy
Snipe.
Table rollers not set properly.
Adjust rollers to proper height.
Inadequate support of long boards.
Support long boards with extension
rollers.
Uneven feed roller pressure front to
back.
Adjust feed roller pressure.
Dull knives.
Sharpen or replace knives.
Lumber not butted properly.
Butt end-to-end each piece of stock as
they pass through.
Planing wood with high moisture
content.
Remove moisture by drying, or use
different stock.
Dull knives.
Sharpen or replace knives.
Too heavy a cut.
Adjust proper depth of cut.
Knives cutting against grain.
Cut along the grain where possible.
Dull knives.
Sharpen or replace knives.
Dull knives.
Sharpen or replace knives.
Too heavy a cut.
Adjust proper depth of cut.
Planing wood with high moisture
content.
Remove moisture by drying, or use
different stock.
Dull knives.
Sharpen or replace knives.
Feed rate too slow.
Increase feed rate.
Cutting depth too shallow.
Increase cutting depth.
Inadequate feed roller pressure.
Adjust feed roller tension. If proper
tension cannot be achieved, replace
feed rollers.
Planer table rough or dirty.
Clean pitch and residue from table, and
apply paste wax.
Belt slipping on pulleys.
Tighten belt.
Surface of feed rollers too smooth.
Lightly roughen feed roller surface with
sandpaper.
Improper guide setup.
Review proper guide setup for molding.
Tearing out at end of
molding.
Improper guide setup.
Review proper guide setup for molding.
Inadequate outfeed pressure.
Adjust feed roller tension.
Uneven depth of cut
side to side.
Knife projection not uniform
Adjust knife projection.
Table not parallel to cutterhead.
Adjust table/cutterhead parallelism.
Depth of cut scale is incorrect.
Adjust depth of cut scale.
Fuzzy grain.
Torn grain.
Rough/raised grain.
Rounded, glossy
surface.
Poor feeding of
lumber.
Wavering molding
pattern.
Board thickness does
not match depth of cut
scale.
20
16.0 Replacement Parts
Replacement parts are listed on the following pages. To order parts or reach our service department, call 1800-274-6848 Monday through Friday (see our website for business hours, www.waltermeier.com). Having the
Model Number and Serial Number of your machine available when you call will allow us to serve you quickly
and accurately.
21
16.1.1 Table and Base Assembly – Exploded View
22
16.1.2 Table and Base Assembly – Parts List
Index No Part No Description Size Qty 1 ................ MHA-B01W ............... Cover (left) ............................................................... ...................................... 1
2 ................ TS-0680021 .............. Flat Washer ............................................................. 1/4 ................................. 8
3 ................ TS-1503011 .............. Hex Socket Cap Screw............................................ M6x8 ............................. 8
4 ................ MGA-B05 .................. Scale (inch) .............................................................. ...................................... 1
5 ................ MHA-B02................... Middle Table (serial # 6082715 and lower).............. ...................................... 1
.................. MHA-B02AW ............. Middle Table (serial # 6082716 and higher) ............ ...................................... 1
6 ................ MGA-B29 .................. Guide (left) ............................................................... ...................................... 2
7 ................ TS-1534031 .............. Pan Head Machine Screw ....................................... M6x10 ........................... 4
8 ................ TS-1551041 .............. Lock Washer ............................................................ M6 ................................. 4
9 ................ MGA-B15 .................. Guide (right) ............................................................. ...................................... 1
10 .............. MHA-B03................... Column .................................................................... ...................................... 4
11 .............. MHA-B04................... Leadscrew (left – serial # 6082715 and lower) ........ ...................................... 1
.................. MHA-B04A ................ Leadscrew (left – serial # 6082716 and higher)....... ...................................... 1
12 .............. MHA-B05W ............... Base......................................................................... ...................................... 1
13 .............. MGA-B09 .................. Anchor Plate ............................................................ ...................................... 2
14 .............. TS-1503031 .............. Hex Socket Cap Screw............................................ M6x12 ........................... 4
15 .............. TS-1551041 .............. Lock Washer ............................................................ M6 ................................. 4
16 .............. MHA-B20................... Pointer ..................................................................... ...................................... 2
17 .............. TS-1532022 .............. Pan Head Machine Screw ....................................... M4x8 ............................. 2
18 .............. MHA-B06................... Leadscrew (right – serial # 6082715 and lower) ...... ...................................... 1
.................. MHA-B06A ................ Leadscrew (right – serial # 6082716 and higher) .... ...................................... 1
19 .............. MHA-B07................... Cover (right – serial #810xxxx and lower) ............... ...................................... 1
.................. MHA-B07UW............. Cover (right – serial #811xxxx and lower) ............... ...................................... 1
21 .............. MHA-B09................... Gear Box Cover (serial #810xxxx and lower) .......... ...................................... 1
.................. MHA-B09U ................ Gear Box Cover (serial #811xxxx and higher) ......... ...................................... 1
22 .............. 5BB-B07 .................... Hex Nut .................................................................... M8x25 ........................... 1
23 .............. TS-1504051 .............. Hex Socket Cap Screw............................................ M8x25 ........................... 4
24 .............. 5GF-B07.................... Chain ....................................................................... ...................................... 1
25 .............. PGE-B14 ................... Sprocket................................................................... ...................................... 2
26 .............. TS-1523011 .............. Set Screw ................................................................ M6x6 ............................. 4
27 .............. PGE-B12 ................... Sprocket................................................................... ...................................... 2
28 .............. PGE-B10 ................... Sprocket Idler/Bracket Bushing ............................... ...................................... 1
29 .............. PGE-B11 ................... Bracket Bushing RE:PGE-B10 ............................... ...................................... 2
30 .............. MHA-B10................... Pulley Cover ............................................................ ...................................... 1
31 .............. TS-1503021 .............. Hex Socket Cap Screw............................................ M6x10 ........................... 2
32 .............. TS-0680021 .............. Flat Washer ............................................................. 1/4 ................................. 2
33 .............. TS-1504051 .............. Hex Socket Cap Screw............................................ M8x20 ........................... 1
34 .............. MGA-B04 .................. Scale (metric)........................................................... ...................................... 1
35 .............. MHA-B11................... Speed Label (serial #810xxxx and lower) ................ ...................................... 1
.................. MHA-B11U ................ Speed Label (serial #810xxxx and higher) .............. ...................................... 1
36 .............. TS-1551061 .............. Lock Washer ............................................................ M8 ................................. 5
37 .............. MHA-C18 .................. Identification Label ................................................... ...................................... 1
.................. JPM13CS-RA ............ Roller Assembly ....................................................... ........................................
38 .............. MHD-Y01A ................ Roller Frame ............................................................ ...................................... 4
39 .............. MHA-Y02A ................ Roller Shaft .............................................................. ...................................... 4
40 .............. MHA-Y02C ................ Roller ....................................................................... ...................................... 4
41 .............. PJ020804 .................. Bushing .................................................................... ...................................... 8
42 .............. TS-1550041 .............. Flat Washer ............................................................. M6 ................................. 8
43 .............. TS-1482021 .............. Hex Cap Bolt............................................................ M6x12 ........................... 8
44 .............. TS-1490011 .............. Hex Cap Bolt2 .......................................................... M8x12 ........................... 8
45 .............. TS-1550061 .............. Flat Washer2 ............................................................ M8 ................................. 8
2
included in Hardware Bag #2, p/n MHD-S17-A
23
16.2.1 Cutterhead and Roller Assembly – Parts List
16.2.2 Cutterhead and Roller Assembly – Parts List
Index No Part No Description Size Qty .................. MHA-CW ................... Dust Hood Assembly CP ......................................... ...................................... 1
1 ................ MHA-C01AW............. Dust Hood ................................................................ ...................................... 1
2 ................ TS-1503011 .............. Hex Socket Cap Screw............................................ M6x8 ............................. 3
3 ................ TS-0680021 .............. Flat Washer ............................................................. 1/4 ................................. 3
4 ................ 5FA-A10 .................... C-Ring...................................................................... STW15 .......................... 2
5 ................ PGA-C17 ................... Sprocket................................................................... ...................................... 2
6 ................ 5GF-B08.................... Chain ....................................................................... ...................................... 2
7 ................ MHA-C02 .................. Feed Roller .............................................................. ...................................... 2
8 ................ PGA-C09 ................... Spring ...................................................................... ...................................... 4
9 ................ MGA-C09 .................. Bushing .................................................................... ...................................... 4
10 .............. MHA-C03W ............... Head Body ............................................................... ...................................... 1
11 .............. TS-1504041 .............. Hex Socket Cap Screw............................................ M8x20 ........................... 4
12 .............. PGE-B19A................. Handle Assembly ..................................................... ...................................... 1
13 .............. TS-2321041 .............. Wing Nut .................................................................. ...................................... 3
14 .............. PGE-B19B................. Bushing .................................................................... ...................................... 1
24
Index No Part No Description Size Qty 15 .............. PGE-B19C ................ Stud ......................................................................... ...................................... 1
20 .............. TS-1503021 .............. Hex Socket Cap Screw2 .......................................... M6x10 ........................... 1
21 .............. MHA-C05 .................. Spindle Pulley .......................................................... ...................................... 1
22 .............. TS-0680021 .............. Flat Washer ............................................................. 1/4 ................................. 1
23 .............. TS-1503051 .............. Hex Socket Cap Screw............................................ M6x20 ........................... 1
24 .............. MHA-C06 .................. Spacer ..................................................................... ...................................... 2
25 .............. TS-1503041 .............. Hex Socket Cap Screw............................................ M6x16 ........................... 3
26 .............. BB-6203ZZ ................ Ball Bearing ............................................................. ...................................... 1
27 .............. 5FK-C06 .................... Key........................................................................... 5x5x15 .......................... 1
28 .............. MHA-C07 .................. Cutterhead ............................................................... ...................................... 1
29 .............. TS-1513021 .............. Flat Head Screw ...................................................... M5x12 ........................... 6
30 .............. BB-6202ZZ ................ Ball Bearing ............................................................. ...................................... 1
31 .............. 5BA-A28 .................... C-Ring...................................................................... RTW35.......................... 1
32 .............. MHA-C08 .................. Bushing .................................................................... ...................................... 1
33 .............. MHA-C09 .................. Gear ......................................................................... ...................................... 1
34 .............. MHA-C10 .................. Chip Deflector .......................................................... ...................................... 1
35 .............. 5AK-E128 .................. Screw....................................................................... M6x12 ........................... 3
36 .............. MHA-C11 .................. Anti-Kickback Shaft.................................................. ...................................... 1
37 .............. MGA-C30 .................. Anti-Kickback Finger ................................................ .................................... 36
38 .............. MGA-C34 .................. Anti-Kickback Collar................................................. .................................... 37
39 .............. MGA-C31 .................. Bracket..................................................................... ...................................... 2
40 .............. TS-1551031 .............. Lock Washer ............................................................ M5 ................................. 4
41 .............. TS-1502011 .............. Hex Socket Cap Screw............................................ M5x8 ............................. 4
42 .............. MHA-C12 .................. Lock Bar (long) ........................................................ ...................................... 6
43 .............. MGA-C22 .................. Lock Bar (short) ....................................................... ...................................... 3
44 .............. TS-1524031 .............. Set Screw ................................................................ M8x12 ......................... 18
45 .............. MGA-C23 .................. Lock Bar Spacer ...................................................... ...................................... 6
46 .............. 708366 ...................... Knife (set of 3) ......................................................... ...................................... 1
48 .............. TS-1540071 .............. Hex Nut .................................................................... M10x1.5 ........................ 4
49 .............. MGA-C07 .................. Adjustment Screw .................................................... ...................................... 4
50 .............. MGA-C05 .................. Adjustment Screw .................................................... ...................................... 4
51 .............. MGA-C06 .................. Nut ........................................................................... ...................................... 4
52 .............. MHA-C19 .................. Warning Label (long) ............................................... ...................................... 1
53 .............. PGE-B13 ................... Bushing .................................................................... ...................................... 1
54 .............. MHA-C20 .................. Washer .................................................................... ...................................... 1
55 .............. PJE-C03 .................... Warning Label (small) .............................................. ...................................... 1
56 .............. MHA-C22W ............... Plate......................................................................... ...................................... 1
57 .............. TS-1533031 .............. Screw2 ..................................................................... M5x10 ........................... 3
58 .............. TS-1550031 .............. Flat Washer2 ............................................................ M5 ................................. 3
59 .............. 708361 ...................... Dust Chute Assembly .............................................. ...................................... 1
60 .............. HS040703 ................. Screw2 ..................................................................... M6x8 ............................. 3
61 .............. TS-1550041 .............. Flat Washer2 ............................................................ M6 ................................. 3
.................. MHA-X06................... Brass Bar (not shown)1 ............................................ ...................................... 1
.................. MGA-B14A ................ Feed Roller Adjustment wrench 17/32mm (not shown)1 ................................ 1
.................. MGA-B14D ................ Knife Setting Gauge (not shown)1 ........................... ...................................... 1
.................. MGA-B14F ................ Molding Cutter Gauge (not shown)1 ........................ ...................................... 1
.................. MHA-X07................... T-Handle Hex Wrench (not shown)1 ........................ 4mm .............................. 1
1
2
included in Hardware Bag #1, p/n MHD-S17
included in Hardware Bag #2, p/n MHD-S17-A
25
16.3.1 Gearbox Assembly – Parts List
26
16.3.2 Gearbox Assembly – Parts List
Index No Part No Description Size Qty .................. MHA-G ...................... Gearbox Assy (#’s 1-33,35) (serial #810xxxx and lower) ............................... 1
.................. MHA-GUW ................ Gearbox #’s (#’s 1-12,14,16-32,35-36) (serial #811xxxx and higher)............. 1
1 ................ MHA-G01 .................. Gearbox Body (serial #810xxxx and lower) ............. ...................................... 1
.................. MHA-G01UW ............ Gearbox Body (serial #811xxxx and higher)............ ...................................... 1
2 ................ MHA-G02 .................. Gear Shaft (serial #810xxxx and lower)................... 10T ................................ 2
.................. MHA-G02 .................. Gear Shaft (serial #811xxxx and higher) ................. 10T ................................ 1
3 ................ FK-A03 ...................... Key........................................................................... 3x3x8 ............................ 2
4 ................ MHA-G03 .................. Gear (serial #810xxxx and lower) ............................ 46T ................................ 1
.................. MHA-G03U................ Gear (serial #811xxxx and higher)........................... 44T ................................ 1
5 ................ PGA-M15 .................. Bushing .................................................................... ...................................... 5
6 ................ MHA-G04 .................. Gear (serial #810xxxx and lower) ............................ 38T ................................ 1
.................. MHA-G04U................ Gear (serial #811xxxx and higher)........................... 43T ................................ 1
7 ................ MGA-C28 .................. Pin............................................................................ 4x16 .............................. 2
8 ................ MHA-G05 .................. Gear (serial #810xxxx and lower) ............................ 51T ................................ 1
.................. MHA-G05U................ Gear (serial #811xxxx and higher)........................... 47T ................................ 1
9 ................ 5FA-A07 .................... C-Ring...................................................................... STW12 .......................... 1
10 .............. 5FA-A07 .................... C-Ring...................................................................... STW12 .......................... 2
11 .............. MHA-G06 .................. Gear Box Cover (serial #607xxxx and lower) .......... ...................................... 1
.................. MHA-G06N................ Gear Box Cover (serial #608xxxx to 810xxxx)......... ...................................... 1
.................. MHA-G06UW ............ Gear Box Cover (serial # 811xxxx and higher) ........ ...................................... 1
12 .............. TS-1503051 .............. Hex Socket Cap Screw............................................ M6x20 ........................... 4
13 .............. MHA-G07 .................. Bracket (serial #607xxxx and lower) ........................ R.H................................ 1
.................. MHA-G07N................ Bracket (serial #608xxxx to 810xxxx) ...................... L.H. ............................... 1
14 .............. TS-0680021 .............. Flat Washer (serial #810xxxx and lower)................. 1/4 ................................. 2
.................. TS-0680021 .............. Flat Washer (serial #811xxxx and higher) ............... 1/4 ................................. 1
15 .............. TS-1540041 .............. Hex Nut (serial #810xxxx and lower) ....................... M6x1.0 .......................... 1
16 .............. MHA-G08 .................. Gear (serial #607xxxx and lower) ............................ 24T ................................ 1
.................. MHA-G08N................ Gear (serial #608xxxx to 810xxxx) .......................... 28T ................................ 1
.................. MHA-G08U................ Gear (serial #811xxxx and higher)........................... 22T ................................ 1
17 .............. PGA-M12 .................. Bushing .................................................................... ...................................... 1
18 .............. MHA-G09 .................. Stud Bolt (serial #607xxxx and lower) ..................... ...................................... 1
.................. MHA-G09N................ Stud Bolt (serial #608xxxx and higher) .................... ...................................... 1
19 .............. MHA-G18 .................. Key........................................................................... 5x5x9 ............................ 1
20 .............. MHA-G10 .................. Shaft (serial #607xxxx and lower)............................ ...................................... 1
.................. MHA-G10N................ Shaft (serial #608xxxx and higher) .......................... ...................................... 1
21 .............. PGA-C17 ................... Sprocket................................................................... ...................................... 1
22 .............. MGA-C32 .................. Sprocket................................................................... ...................................... 1
23 .............. 5FA-A10 .................... C-Ring...................................................................... STW15 .......................... 1
24 .............. MHA-G11 .................. Gear (serial #810xxxx and lower) ............................ 43T ................................ 1
.................. MHA-G11U................ Gear (serial #811xxxx and higher)........................... 40T ................................ 1
25 .............. 5EB-A08 .................... Washer .................................................................... ...................................... 2
26 .............. TS-1503031 .............. Hex Socket Cap Screw............................................ M6x12 ........................... 2
27 .............. 5FK-B02 .................... Key........................................................................... 4x4x7 ............................ 1
28 .............. MHA-G12 .................. Shaft (serial #607xxxx and lower)............................ ...................................... 1
.................. MHA-G12N................ Shaft (serial #608xxxx to 810xxxx) .......................... ...................................... 1
.................. MHA-G12U................ Shaft (serial #811xxxx and higher) .......................... ...................................... 1
29 .............. MHA-G13 .................. Gear (serial #810xxxx and lower) ............................ 31T ................................ 1
.................. MHA-G13U................ Gear (serial #811xxxx and higher)........................... 29T ................................ 1
30 .............. MHA-G14 .................. Bushing (serial #810xxxx and lower) ....................... I.D. 6 ............................. 1
.................. MHA-G14U................ Bushing (serial #811xxxx and higher)...................... I.D. 10 ........................... 1
31 .............. MHA-G15 .................. Bushing (serial #607xxxx and lower) ....................... ...................................... 2
.................. MHA-G15N................ Bushing (serial #608xxxx and higher)...................... ...................................... 2
32 .............. MHA-G16 .................. Washer .................................................................... ...................................... 2
33 .............. MHA-G17 .................. Washer (serial #810xxxx and lower)........................ ...................................... 2
34 .............. MHA-B08................... Stud ......................................................................... ...................................... 1
35 .............. 5FK-B05 .................... Key........................................................................... 4x4x12 .......................... 1
36 .............. MHA-G19 .................. Gear Shaft (serial #811xxxx and higher) ................. 10T ................................ 1
27
16.4.1 Stand and Motor Assembly – Parts List
28
16.4.2 Stand and Motor Assembly – Parts List
Index No Part No Description Size Qty 1 ................ VB-M45 ..................... V-Belt ....................................................................... ...................................... 2
2 ................ TS-0051011 .............. Hex Cap Bolt............................................................ 5/16-18NCx1/2 .............. 1
3 ................ PJA-C03 .................... Washer .................................................................... ...................................... 1
4 ................ MHA-S01................... Motor Pulley ............................................................. ...................................... 1
5 ................ TS-1550061 .............. Flat Washer ............................................................. M8 ............................... 12
6 ................ TS-2288202 .............. Pan Head Machine Screw ....................................... M8x1.25x20 .................. 4
7 ................ TS-1551061 .............. Lock Washer ............................................................ M8 ................................. 8
8 ................ MHD-S02 .................. Motor Bracket .......................................................... ...................................... 1
9 ................ TS-1490031 .............. Hex Cap Bolt............................................................ M8x1.25x20 .................. 4
10 .............. 5FK-C13A ................. Key........................................................................... 5x5x30 .......................... 1
11 .............. MHA-S02AW ............. Motor........................................................................ 1½ HP 115/230V........... 1
.................. MHA-S02W ............... Motor Assembly (includes # 10,11,14) .................... ...................................... 1
12 .............. MHD-S01 .................. Stand ....................................................................... ...................................... 1
13 .............. TS-1540061 .............. Hex Nut .................................................................... M8x1.25 ........................ 4
14 .............. MHA-S02B ................ Motor Cord ............................................................... 14AWG ......................... 1
15 .............. MHA-S14................... Switch Cord ............................................................. 14AWG ......................... 1
16 .............. 5MA-I04..................... Strain Relief Bushing ............................................... ...................................... 3
17 .............. MHA-S16................... Power Cord.............................................................. 14AWG ......................... 1
18 .............. JEA-S14 .................... Switch Box ............................................................... ...................................... 1
19 .............. TS-1540021 .............. Hex Nut .................................................................... M4 ................................. 2
20 .............. 5EB-E05 .................... Star Washer ............................................................. M5 ................................. 2
21 .............. JE090702 .................. Plate......................................................................... ...................................... 1
22 .............. 5EB-A04 .................... Washer .................................................................... M5 ................................. 2
23 .............. 5CD-C06B ................. Screw....................................................................... 3/16-24NCx1/2 .............. 2
24 .............. JE011302 .................. Switch ...................................................................... ...................................... 1
25 .............. JI-X01 ........................ Switch Cover............................................................ ...................................... 1
26 .............. 5AL-C10A.................. Pan Head Machine Screw ....................................... M4x25 ........................... 2
27 .............. TS-1550021 .............. Washer .................................................................... ...................................... 2
28 .............. TS-2284301 .............. Flat Head Machine Screw........................................ M4x.7x30 ...................... 2
29 .............. PJN-S04 .................... Eccentric Cam ......................................................... ...................................... 2
30 .............. TS-1523011 .............. Set Screw ................................................................ M6x1.0x6 ...................... 2
31 .............. HG010911 ................. Spring Pin ................................................................ 4x20 .............................. 1
32 .............. PG010033 ................. Spring ...................................................................... ...................................... 1
33 .............. MHD-S03 .................. Shaft ........................................................................ ...................................... 1
34 .............. 5EA-E06A ................. Flat Head Screw ...................................................... M6x1.0x12 .................... 4
35 .............. PJ100001 .................. Door ......................................................................... ...................................... 1
36 .............. TS-0561031 .............. Lock Nut................................................................... 3/8-16NC....................... 4
37 .............. PJE-S05 .................... Wheel....................................................................... ...................................... 4
38 .............. 5CA-H16B ................. Hex Cap Bolt............................................................ 3/8-16NCx2 ½ ............... 4
39 .............. PG-M02 ..................... JET Label................................................................. ...................................... 1
40 .............. TS-1503031 .............. Hex Socket Cap Screw............................................ M6x1.0x12 .................... 1
41 .............. PJN-S02 .................... Foot Brake ............................................................... ...................................... 1
42 .............. TS-1550071 .............. Washer .................................................................... M10 ............................... 1
43 .............. TS-2342101 .............. Lock Nut................................................................... M10x1.5 ........................ 1
44 .............. TS-1550041 .............. Flat Washer ............................................................. M6 ................................. 4
45 .............. HS020440 ................. Hex Socket Cap Screw............................................ M6x70 ........................... 4
.................. STRIPE-1-3/4 ............ JET Stripe (not shown) ............................................ 1-3/4”W .................. per ft.
29
17.0 Electrical Connections
30
31
WALTER MEIER (Manufacturing) Inc.
427 New Sanford Road
LaVergne, Tennessee 37086
Phone: 800-274-6848
www.jettools.com
www.waltermeier.com
32