1
GRAVITY FEED
HVLP SPRAY GUN
with Digital
Micrometer
Operating Manual
Revision: AB Issue Date: January 2012 Manual No.: 0-SG-800G0112
We Appreciate Your Business.
Thank you and congratulations on choosing Smarter Tools. Now you can stop
working harder and start working smarter.
This Operating Manual has been designed to instruct you on the correct use and
operation of your Smarter Tools’ product. Your satisfaction with this product and
its safe operation is our ultimate concern. Therefore please take the time to read
the entire manual, especially the Safety Precautions. They will help you to avoid
potential hazards that may exist when working with this product.
WARNING!
READ AND UNDERSTAND ALL SAFETY PRECAUTIONS
IN THIS MANUAL BEFORE OPERATING. FAILURE TO
COMPLY WITH INSTRUCTIONS IN THIS MANUAL
COULD RESULT IN PERSONAL INJURY, PROPERTY
DAMAGE, AND/ OR VOIDING OF YOUR WARRANTY.
SMARTER TOOLS WILL NOT BE LIABLE FOR ANY
DAMAGE BECAUSE OF FAILURE TO FOLLOW THESE
INSTRUCTIONS.
Operating Manual Number 0-SG-800G0112
SG-800G | Gravity-feed HVLP Spray Gun with Digital Micrometer
Published by:
Smarter Tools, Inc.
12195 Harley Club Drive
Ashland, VA 23005
888.241.8498
www.usesmartertools.com
MADE IN CHINA
Copyright © 2012 by
Smarter Tools, Inc.
Reproductions of this work, in whole or in part, without written permission of
the publisher are strictly prohibited.
The publisher does not assume and herby disclaims any liability to any party
for any loss or damage caused by any error or omission in this Manual,
whether such error results from negligence, accident, or any other cause.
Publication Date: 01.30.12
REMINDER: Keep your dated proof of purchase for warranty purposes! Attach
it to this manual or file it for safe keeping.
Operating Instructions
Please read and save these instructions. Read carefully before attempting to
assemble, install, operate or maintain the product described. Protect yourself and
others by observing all safety information. Failure to comply with instructions
could result in personal injury and/or property damage! Retain instructions for
future reference.
Description
The 800G Digital HVLP Spray Gun offers superior material flow, atomization and
transfer efficiency. It incorporates a Digital Air Micrometer so there is no need for
an external gauge. The LED display is located at the top of the gun and not on
the handle to maximize its visibility while in use. The 800G is for coating larger
surfaces, thick layers and spotted effects. Widely used for primer. Will apply thick
primer quickly. Best suited for thicker materials such as flakes, heavy solid
materials, primer, primer sealers, polyester primers, varnish, polyurethane, oil
base paints, enamels, epoxy, plastic adhesives, floor paving paints, latex (on
walls), splatter paints, multi-fleck, etc. HVLP (High Volume Low Pressure)
technology provides a higher transfer of materials while reducing bounce-back
and overspray. Ideal for spraying heavier materials superior performance for
deck, fence, furniture and automotive work. External mix for fine atomization with
adjustable air, fluid, and spray pattern controls. Digital Air Micrometer no need for
an external gauge. Easy-pull trigger with feathering capability. Stainless Steel
fluid passages and needle. Fully adjustable spray pattern for spraying large
surfaces and tight areas. Working Pressure at nozzle: 7-8PSI. 600cc/20oz Plastic
Cup. Stainless steel fluid passages and needle.
SAFETY INSTRUCTIONS AND WARNINGS
Symbol Usage
This manual contains important information that you need to know and
understand in order to assure YOUR SAFETY and PROPER OPERATION OF
EQUIPMENT. The following symbols help you recognize this information. Please
read the manual and pay attention to these sections.
Save These Important Safety Instructions!
Read and understand all of these safety instructions. Be sure to retain
them for future use.
WARNING!
WARNINGS INDICATE A CERTAINTY OR STRONG
POSSIBILITY OF PERSONAL INJURY OR DEATH IF
INSTRUCTIONS ARE NOT FOLLOWED.
CAUTION:
CAUTIONS INDICATE A POSSIBILITY OF EQUIPMENT
DAMAGE IF INSTRUCTIONS ARE NOT FOLLOWED
PROPERLY.
Note:
Notes give helpful information
Unpacking
After unpacking the product, inspect carefully for any damage that may have
occurred during transit. Make sure to tighten fittings, bolts, etc., before putting unit
into service.
WARNING!
DO NOT OPERATE TOOL IF DAMAGED DURING SHIPPING,
HANDLING OR USE. DAMAGE COULD RESULT IN
BURSTING AND CAUSE INJURY OR PROPERTY DAMAGE.
!
General safety Information
1. Read all manuals included with this product carefully. Be thoroughly
familiar with the controls and the proper use of the equipment.
2. Follow all local electrical and safety codes as well as the United
States National Electrical Codes (NEC) and Occupational Safety and
Health Act (OSHA).
WARNING!
USE A FACE MASK/RESPIRATOR AND PROTECTIVE
CLOTHING WHEN SPRAYING. ALWAYS SPRAY IN A WELL
VENTILATED AREA TO PREVENT HEALTH AND FIRE
HAZARDS. REFER TO MATERIAL SAFETY DATA SHEETS
(MSDS) OF SPRAY MATERIAL FOR DETAILS.
WARNING!
NEVER SPRAY CLOSER THAN 25 FEET TO THE
COMPRESSOR! IF POSSIBLE, LOCATE COMPRESSOR IN
SEPARATE ROOM. NEVER SPRAY INTO THE COMPRESSOR,
COMPRESSOR CONTROLS OR THE MOTOR.
3. Do not smoke or eat when spraying paint, insecticides, or other
flammable substances.
WARNING!
DO NOT SPRAY FLAMMABLE MATERIALS IN VICINITY OF
OPEN FLAME OR NEAR IGNITION SOURCES. MOTORS,
ELECTRICAL EQUIPMENT AND CONTROLS CAN CAUSE
ELECTRICAL ARCS THAT WILL IGNITE A FLAMMABLE GAS
OR VAPOR. NEVER STORE FLAMMABLE LIQUIDS OR GASES
IN THE VICINITY OF THE COMPRESSOR.
!
WARNING!
DO NOT MISUSE THIS PRODUCT. EXCESSIVE EXPOSURE TO
VIBRATION, WORK IN AWKWARD POSITIONS, AND
REPETITIVE WORK MOTIONS CAN CAUSE INJURY TO HANDS
AND ARMS. STOP USING ANY TOOL IF DISCOMFORT,
NUMBNESS, TINGLING OR PAIN OCCUR, AND CONSULT A
PHYSICIAN.
4. When spraying and cleaning, always follow the instructions and safety
precautions provided by the material manufacturer (Refer to MSDS).
WARNING!
DO NOT SPRAY ACIDS, CORROSIVE MATERIALS, TOXIC
CHEMICALS, FERTILIZERS OR PESTICIDES. USING THESE
MATERIALS COULD RESULT IN DEATH OR SERIOUS INJURY.
5. Keep visitors away and NEVER allow children or pets in the work area.
WARNING!
NEVER AIM OR SPRAY AT YOURSELF OR ANYONE ELSE OR
SERIOUS INJURY COULD OCCUR.
6. Always work in a clean environment. To avoid injury and damage to the
work-piece, do not aim the spray gun at any dust or debris.
CAUTION:
DO NOT USE PRESSURE THAT EXCEEDS THE OPERATING
PRESSURE OF ANY OF THE PARTS (HOSES, FITTINGS,
ETC.) IN THE PAINTING SYSTEM.
CAUTION:
KEEP HOSE AWAY FROM SHARP OBJECTS. BURSTING AIR
HOSES MAY CAUSE INJURY. EXAMINE AIR HOSES
REGULARLY AND REPLACE IF DAMAGED.
7. Always use a pressure regulator the air supply to the spray gun.
CAUTION:
FAILURE TO INSTALL APPROPRIATE WATER/OIL REMOVAL
EQUIPMENT MAY RESULT IN DAMAGE TO MACHINERY OR
WORK-PIECE.
Introduction
The spray gun is a vital link in any finishing application. In addition to operating
the spray gun properly, techniques of surface preparation and paint preparation
must be understood. These instructions will explain the differences among
various spray technologies and serve as a guide in the proper operation and
techniques of spray painting. Refer to the Replacement Parts Manual for model
specific information.
SPRAY GUN TERMS
Atomization - Conversion of bulk liquid to spray droplets (mist).
Bleeder – In this mode, air passes continuously through the gun whether
spraying or not. This mode is generally used when the air is supplied by a
continuously running compressor that does not have a tank.
Bleeder/Non-Bleeder – Indicates whether air flows through the gun continuously
or as the trigger is pulled.
External Mix – Process where the air and paint are mixed just after leaving the
nozzle. This type of mix should be used for fast drying paints and when a high
quality finish is needed.
Feed – Method used to bring paint into the gun for spraying.
Fluid Control Knob – Used to control the amount of paint being mixed with air.
Gravity Feed – Method of paint feed similar to the siphon feed method.
However, the cup is inverted to create a positive fluid pressure at the nozzle.
Internal Mix – Process where the air and paint are mixed inside the air cap just
before being sprayed. This method is best for heavy bodied, slow drying paints
and can only be used with the pressure feed method. Do not use fast drying
paints with internal mix. The paint will dry inside and quickly clog the air cap.
Mix – The mixing of paint and air when spraying.
Non-Bleeder – In this mode, air flows only when the trigger is pulled. This type of
operation is used with a compressor equipped with a tank or with a large factory
air system.
Paint Tank – An auxiliary pressurized paint reservoir that allows continuous
spraying of large amounts of paint with- out stopping for refills as with a canister.
It also allows using the spray gun at any angle without causing paint to drip.
Pattern Control Knob – Used to form the proper pattern (size and shape) of
paint as it is sprayed from the gun to the work-piece.
Pressure Feed – Method of paint feed where a canister or paint tank is
pressurized to force paint to the gun. Either internal or external mix air caps are
used with this method. Pressure feed is generally used for spraying heavy bodied
paints or for large size projects.
Siphon Feed – Method of paint feed where atmospheric pressure creates a
partial vacuum to siphon paint to the gun. Only external mix air caps are used
with this method. Siphon feed is used with light bodied paints.
Viscosity – A measurement of the resistance to the flow of liquids.
CONVENTIONAL VS HVLP
Conventional spray guns use a much higher air cap pressure to atomize paint
than HVLP spray guns. This results in more overspray and lower transfer
efficiency.
HVLP, electrostatic and airless processes are currently the only compliant spray
methods that meet the strict 65% transfer efficiency criteria required by some air
quality management districts. This enhanced transfer efficiency results in a
significant material savings com- pared to conventional spraying. Check local,
state and national regulations that may be in effect before performing any
spraying operations.
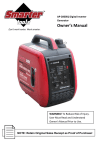
HVLP spraying is a growing trend in the finishing
industry due to its environmental friendliness. By
definition, dynamic air pressures in the air cap must be
10 psi or less to qualify as HVLP. A soft, low velocity
pattern is produced which increases control and
reduces bounce-back and overspray (See Figure 1). For
these reasons, HVLP is also well suited for spraying
parts with recessed areas.
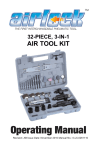
Spray Gun Set-up
The pressure for atomization is controlled at the air
source. The amount of fluid is adjusted by the fluid
control knob, the paint viscosity and the air
pressure.
The gravity feed cup screws onto the top of the gun
body creating a positive fluid pressure in the nozzle
(See Figure 2).
PREPARATION
1. Thoroughly mix and thin paint in accordance with the paint
manufacturer’s instructions. Most materials will spray readily if thinned
properly.
2. Strain material through cheese cloth or a paint strainer.
3. Fill the canister about 3/4 full and start the air compressor.
4. Setup a piece of cardboard or other scrap material to use as a target
and adjust for best spray pattern.
5. Test the consistency of the material by making a few strokes on a
cardboard target. If material still appears too thick, add a small
amount of thinner. THIN WITH CARE!! Do not exceed paint
manufacturer’s thinning recommendations.
FAN DIRECTION
The direction of the fan (horizontal or vertical) can
be changed by loosening the lock ring and turning
the air cap 90 degrees (See Figure 3). Hand
tighten lock ring after adjustment.
PATTERN ADJUSTMENT
1. Adjust air pressure to the spray gun according to the
recommendations supplied with the spray material. This air pressure
usually falls between 40 - 60 psi.
WARNING!
DO NOT EXCEED SPRAY GUN MAXIMUM PRESSURE.
Adjust air pressure with the trigger pulled and air
control knob (if applicable) fully open. If reduced air
pressure is desired for some areas of the spray job,
use the air compressor regulator or air control knob
to reduce pressure as necessary (See Figure 4).
2. Set pattern size to desired shape. For
full pattern, open pattern control knob
by turning counterclockwise. For a
round pattern, turn pattern control knob
clockwise (See Figure 6).
3. Turn fluid control knob fully clockwise until closed (See Figure 6).
4. Trigger a short burst while turning fluid
control knob counterclockwise. Observe
the spray pattern on the target and
adjust the fluid control knob until the
desired pattern (atomization) is obtained
(See Figure 7).
If the spray is too fine (excessive over-spray), caused by too much
air for the amount of paint being sprayed, reduce the air pressure or
open the fluid control to spray more material.
If the spray is too coarse (spitting globs), reduce the amount of
material with the fluid control knob or thin the paint.
5. The fluid control knob can be used to finely adjust pattern
consistency.
Before spraying the work-piece, practice a few minutes on a cardboard target to
ensure the pattern size and consistency are set correctly.
Operation
1. Begin spraying. Always keep the gun at right angles
to the work (See Figure 8).
2. Keep the nozzle about 6 to 9 inches from the work
surface throughout the stroke and always keep the
gun in motion while spraying. Stopping gun
movement in mid-stroke will cause a build-up of paint
and result in runs. Do not fan the gun from side to
side while painting. This will cause a build-up of paint
in the center of the stroke and an
insufficient coating at each end (See
Figure 9).
3. Trigger the gun properly. Start the gun
moving at the beginning of the stroke
BEFORE SQUEEZING THE TRIGGER
and release the trigger BEFORE
STOPPING GUN MOVEMENT at the
end of the stroke. This procedure will
feather (blend) each stroke with the
next without showing overlap or
unevenness (See Figure 10).
4. The amount of paint being applied can be varied by the speed of the
stroke, distance from the surface and adjustment of the fluid control
knob.
5. Overlap strokes just enough to obtain an
even coat (See Figure 11).
NOTE:
Two thin coats of paint will yield better results and have less
chance of runs than one heavy layer.
6. Use a piece of cardboard as a shield to catch overspray at the edges of
the work to protect other surfaces. Use masking tape to cover other
areas if needed.
Maintenance
DAILY CLEAN-UP
Local codes may require specific cleaning methods and equipment. Follow local
codes and paint manufacturer’s recommendations for the use and disposal of
spray materials and solvent.
CAUTION:
CLEAN SPRAY GUN IMMEDIATELY AFTER USE. PAINT AND
OTHER MATERIALS DRY QUICKLY IN THE SMALL PASSAGES
RENDERING GUN USELESS DUE TO THE DIFFICULTY OF
REMOVING HARDENED PAINT FROM THE PASSAGES INSIDE
THE GUN.
NOTE:
In the instructions below, the use of the word “solvent” refers to
the specific solvent for the material used (example: lacquer
thinner for lacquer, etc.).
1. Remove and empty the canister; then rinse with a solvent
recommended for the paint or other material used.
2. Refill canister with clean solvent and attach to the gun. Spray solvent
through the gun while shaking the gun vigorously. Wipe the gun
exterior with a solvent soaked rag. Repeat until the gun is clean.
3. Remove the air cap and soak in solvent until clean. Use a small brush
for stubborn stains if necessary. Toothpicks or small brushes may be
used to clean air passages; however, NEVER USE METAL
OBJECTS TO CLEAN PRECISELY DRILLED PASSAGES.
DAMAGED PAS- SAGES WILL CAUSE IMPROPER SPRAYING.
4. Clean gaskets with a solvent soaked rag. To prevent equipment
damage, DO NOT IMMERSE GASKETS OR SPRAY GUN BODY IN
SOLVENTS.
5. After using water to clean out water based paints or materials, spray
mineral spirits through the gun to prevent corrosion.
6. Use a non-silicone oil on all moving parts when reassembling. Use
Vaseline® or light grease on all threaded connections prior to
storage.
7. Clean and flush gun thoroughly to neutralize any contaminants
corrosive to the spray gun.
PERIODIC CLEAN-UP
Due to improper cleaning and paint it may be necessary to inspect and clean the
internal parts and the gun body.
1. Examine openings in air cap and fluid tip. If clogged, remove any orings and soak the air cap or fluid tip in solvent.
2. A brush or toothpick or something similar may be used to dislodge
the dried paint from holes and pas- sages. NEVER USE METAL
OBJECTS TO CLEAN PRECISELY DRILLED PASSAGES.
DAMAGED PASSAGES WILL CAUSE IMPROPER SPRAYING.
3. Remove and check the fluid needle for excessive wear at the tip and
straightness.
IMPORTANT: If the needle tip is worn more on one side than the other, either
the needle is bent or the gun body has been dropped or knocked out-of-line.
There are no adjustments that can be made to a bent gun
Test the needle by rolling on a flat surface. Replace if necessary.
4. Check and replace any damaged o- rings and seals. O-rings and
seals can be wiped clean but not soaked in solvent.
5. Unscrew packing nuts and replace the packing ONLY if a leak will
not stop when the nut is tightened (See Figure 5). Do not over-
tighten a packing nut because this will restrict movement of the
needle.
6. Re-assemble in reverse order of above and use a non-silicone oil on
moving parts. Apply Vaseline® or light grease on threaded joints
and hose connections.
STORING
1. When not using spray gun, turn the fluid adjustment knob
counterclockwise to open which will reduce spring tension on needle
fluid tip.
2. Spray gun MUST BE well cleaned and lightly lubricated.
LIMITED WARRANTY
This information applies to Smarter Tools products purchased in the USA and Canada.
January 2012
LIMITED WARRANTY: Smarter Tools™, Inc. warrants to customers of
authorized distributors (“Purchaser”) that its products will be free of defects in
workmanship or material. Should any failure to conform to this warranty appear
within the warranty period stated below, Smarter Tools shall, upon notification
thereof and substantiation that the product has been stored, installed, operated,
and maintained in accordance with Smarter Tools’ specifications, instructions,
recommendations and recognized standard industry practice, and not subject to
misuse, repair, neglect, alteration, or damage, correct such defects by suitable
repair or replacement, at Smarter Tools’ sole option, of any components or parts
of the product determined by Smarter Tools to be defective.
This warranty is exclusive and in lieu of any warranty of merchantability, fitness
for any particular purpose, or other warranty of quality, whether express, implied,
or statutory.
Limitation of liability: Smarter Tools shall not under any circumstances be liable
for special, indirect, incidental, or consequential damages, including but not
limited to lost profits and business interruption. The remedies of the purchaser
set forth herein are exclusive, and the liability of Smarter Tools with respect to
any contract, or anything done in connection therewith such as the performance
or breach thereof, or from the manufacture, sale, delivery, resale, or use of any
goods covered by or furnished by Smarter Tools, whether arising out of contract,
tort, including negligence or strict liability, or under any warranty, or otherwise,
shall not exceed the price of the goods upon which such liability is based.
No employee, agent, or representative of Smarter Tools is authorized to change
this warranty in any way or grant any other warranty, and Smarter Tools shall not
be bound by any such attempt. Correction of non-conformities, in the manner and
time provided herein, constitutes fulfillment of Smart Tools’ obligations to
purchaser with respect to the product.
This warranty is void, and seller bears no liability hereunder, if purchaser used
replacement parts or accessories which, in Smarter Tools’ sole judgment,
impaired the safety or performance of any Smarter Tools product. Purchaser’s
rights under this warranty are void if the product is sold to purchaser by
unauthorized persons.
The warranty is effective for the period of 1-year beginning on the date that the
authorized distributor delivers the products to the Purchaser. Notwithstanding the
foregoing, in no event shall the warranty period extend more than the time stated
plus one year from the date Smarter Tools delivered the product to the
authorized distributor.
Warranty repairs or replacement claims under this limited warranty must be
submitted to Smarter Tools Customer Service (888-241-8498 or
http://www.usesmartertools.com/customerservice) or an authorized Smarter
Tools repair facility within thirty (30) days of purchaser’s discovery of any defect.
Smarter Tools shall pay no transportation costs of any kind under this warranty.
Transportation charges to send products to an authorized warranty repair facility
shall be the responsibility of the Purchaser. All returned goods shall be at the
Purchaser’s risk and expense.
Smarter Tools™ is a Trademark of Smarter Tools, Inc.
GARANTÍA LIMITADA
Esta información se aplica a los productos más inteligentes herramientas adquiridos en los
EE.UU. y Canadá.
De enero 2012
GARANTÍA LIMITADA: Smarter Tools ™, Inc. garantiza a los clientes de los distribuidores
autorizados ("Comprador") que sus productos estarán libres de defectos de fabricación o
materiales. En caso de que el incumplimiento de esta garantía dentro del período de garantía se
indican a continuación, Smarter Tools, previa notificación y comprobante de que el producto ha
sido almacenado, instalado, operado y mantenido de acuerdo con las especificaciones de
Smarter Tools, instrucciones, recomendaciones y reconoció la práctica estándar de la industria, y
no está sujeto a mal uso, reparación, negligencia, alteración o daño, corregir tales defectos
mediante reparación o reemplazo apropiado, a elección de Smarter Tools, de cualquier
componente o parte del producto determinado por Smarter Tools para ser defectuoso.
Esta garantía es exclusiva y en lugar de cualquier garantía de comerciabilidad, adecuación para
un propósito particular, o de otra garantía de calidad, ya sea expresa, implícita o legal.
Limitación de responsabilidad: Herramientas inteligentes no será en ningún caso será
responsable por daños especiales, indirectos, incidentales o consecuentes, incluyendo pero no
limitado a la pérdida de beneficios e interrupción del negocio. Los remedios del comprador
establecidos en este documento son exclusivas, y la responsabilidad de Smarter Tools con
respecto a cualquier contrato, ni nada hecho en relación con la misma, tales como el desempeño
o incumplimiento del mismo, o de la fabricación, venta, entrega, la reventa, o el uso de cualquier
producto cubierto por o provistas por Smarter Tools, tanto si se producen fuera de contrato, acto
ilícito, incluida la negligencia o responsabilidad estricta, o bajo cualquier garantía, o de lo
contrario, no podrá superar el precio de los bienes sobre los cuales se basa tal responsabilidad.
Ningún empleado, agente o representante de Smarter Tools está autorizado a cambiar esta
garantía en cualquier forma o conceder ninguna otra garantía, y Smarter Tools no estará
obligado por cualquier intento de este tipo. Corrección de no conformidades, en la forma y plazos
previstos en este documento, que constituye el cumplimiento de las obligaciones de Smart Tools
"al comprador con respecto al producto.
Esta garantía es nula, y el vendedor no tiene ninguna responsabilidad a continuación, en caso de
adquisición utilizado repuestos o accesorios que, a su juicio Smarter Tools, deterioro de la
seguridad o el rendimiento de cualquier producto Smarter Tools. Comprador derechos bajo esta
garantía se anula si el producto se vende al comprador por personas no autorizadas.
La garantía es válida para el período de inicio de 1 año en la fecha en que el distribuidor
autorizado entrega los productos al comprador. No obstante lo anterior, en ningún caso el
período de garantía se extienden más de la hora señalada más de un año desde la fecha de
Smarter Tools entrega del producto al distribuidor autorizado.
Garantía de reparación o reemplazo de los reclamos bajo esta garantía limitada debe ser
presentado a más inteligentes Herramientas de Servicio al Cliente (888-241-8498 o
http://www.usesmartertools.com/customerservice) o un centro de reparación autorizado más
inteligentes herramientas dentro de los treinta (30) días de comprador descubrimiento de
cualquier defecto. Smarter Tools no pagarán los costos de transporte de cualquier especie en
virtud de esta garantía. Los gastos de transporte para enviar productos a un centro de garantía
de reparación autorizados será responsabilidad del comprador. Todas las mercancías de retorno
será a riesgo del comprador y los gastos.
Más inteligente ™ Tools es una marca registrada de Smarter Tools, Inc.