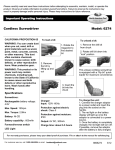
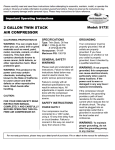
1
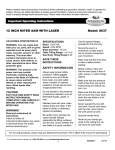
20 TON HYDRAULIC JACK
CALIFORNIA PROPOSITION 65
WARNING: You can create dust
when you cut, sand, drill or grind
materials such as wood, paint,
metal, concrete, cement, or other
masonry. This dust often
contains chemicals known to
cause cancer, birth defects, or
other reproductive harm. Wear
protective gear.
WARNING: This product or its
power cord may contain
chemicals, including lead,
known to the State of California
to cause cancer and birth
defects or other reproductive
harm. Wash hands after
handling.
accidents which arise due to
non-observance of these
instructions and the safety
information herein.
SAFETY WARNINGS
1) Read, understand and
follow the warnings listed in
this manual.
2) Wear eye protection while
operating this jack.
SPECIFICATIONS:
Lift Capacity: 20 Tons
Min. Lift Height: 9-1/2 in
Max. Lift Height: 17-7/8 in
Ram Travel: 6 in
Screw Top Adjustment:
2-3/8 in
Important!
When using equipment, a few
safety precautions must be
observed to avoid injuries and
damage. Please read the complete
operating manual with due care.
Keep this manual in a safe place,
so that the information is available
at all times. If you give the
equipment to any other person,
give them these operating
instructions as well. We accept no
liability for damage or
Model: 7525
CAUTION:
FOR YOUR OWN SAFETY
READ INSTRUCTION
MANUAL COMPLETELY AND
CAREFULLY BEFORE
OPERATING. Failure to follow
all instructions as listed
below may result in electrical
shock, fire, and/or serious
personal injury.
[email protected]
3) Inspect the jack before
each use. Do not use this
jack if it is damaged or altered
in any way or if it is in poor
condition.
4) Set up and use the jack on
a hard, level surface to
prevent tipping.
5) The load must not exceed
the rated lifting capacity of the
jack. Lift only dead weight.
6) Center the load on the jack
saddle. Off center loads can
cause damage to the seals
and can cause hydraulic
failure.
7) Use the jack for lifting
purposes only. This jack is
designed to lift loads and not
support them. Support a lifted
load with jack stands.
8) Use only approved
hydraulic fluids.
8807525
06/13
9) Always place the Bottle
Jack on a dry, oil/grease
free, solid, level floor surface
capable of supporting the
weight of the Jack and all
other additional tools and
accessories.
10) Apply the vehicle’s
parking brake and chock
the tires before lifting the
vehicle.
11) Lift the vehicle only by
the manufacturer’s
recommended lifting points.
12) Stay out from under the
load while it is being lifted or
supported.
13) Avoid rapid load
descent. Turn the Release
Screw slowly.
14) Do not use for aircraft
purposes.
15) Do not leave the tool
unattended.
16) Release the tool’s load &
lower the object before
leaving the area
17) This product is not a toy.
Keep it out of reach of
children.
18) When lifting only one
wheel, make sure to support
the load immediately with
one jack stand (not included)
placed under the side of the
vehicle being lifted.
19) Align the saddle of the
jack stand directly under the
vehicle’s seam or
recommended lifting point.
[email protected]
20) When lifting the entire front
end or rear end of a vehicle,
make sure to support the load
immediately with two jack
stands. Align the saddles of the
jack stands directly under the
vehicle’s frame or
recommended lifting points.
Also, make sure the jack stands
are adjusted at the same height.
21) Use the Bottle Jack only on
vehicles whose frames have
lifting points (on its seam or
frame) capable of aligning with
the Bottle Jack.
22) Do not use the Bottle Jack
with the vehicle’s engine
running. When running, the
vehicle’s engine produces
carbon monoxide, a colorless,
odorless, toxic fume that, when
inhaled, can cause serious
personal injury or death.
26) Before lowering the Bottle
Jack, make sure tool trays, jack
stands, and all other tools and
equipment are removed from
under the vehicle.
27) Before operating, insert the
notched end of the handle into
the release valve. Turn the
handle clockwise until the
release valve is closed. Do not
over tighten the valve
28) Insert the operating handle
into the socket. Raise and lower
the handle to raise the jack.
29) Lower the ram by slowly
turning the release valve
counterclockwise.
OPERATING INSTRUCTIONS
To Raise:
1) Assemble jack handle
securely.
23) Always keep hands, fingers,
and feet away from all moving
parts of the Bottle Jack when
applying or releasing a load.
Remain clear of the vehicle
being raised or lowered. People
and animals should be kept at a
safe distance when using the
Bottle Jack.
24) Do not allow anyone in the
vehicle when using the Bottle
Jack. Keep all bystanders a
safe distance away from the
vehicle.
25) Never use Bottle Jacks to
lift both ends of a vehicle at the
same time.
2
2) With the narrow end of the
jack handle, close the release
valve tightly by turning it
clockwise.
3) Place jack under the
vehicle at the proper lifting
point. (Refer to Owner’s
Manual.) If needed, turn the
extension screw counterclockwise until it comes into
contact with vehicle.
extended, turn it clockwise until
it retracts enough to move the
jack away from the vehicle.
MAINTENANCE
Adding Oil/Lubrication (Fig 5)
1) Place the jack in an upright
position.
2) Lower pump and piston to full
down position.
3) Remove the rubber oil plug
on jack.
1) Open release valve and
remove the oil plug.
2) Operate pump rapidly
several times to force air out.
3) Close release valve and
replace the oil plug.
The Jack should now operate
normally. If it does not, repeat
the purging procedure as
needed.
RUST PREVENTION
Keep piston, pump, and
extension screw in full down
position when not in use. Avoid
contact with moisture. If
contact with moisture occurs,
wipe dry and grease/lubricate
all jack parts.
4) Insert jack handle into
handle socket. Pump the
handle to lift the vehicle to
the desired height.
CAUTION:
• Read all the instructions
carefully before use.
To Lower:
Caution: Lower vehicle
slowly! Turn release valve
slowly.
1) Remove handle, use
small end to open the
release valve. (To open
release valve, turn it
SLOWLY in a counterclockwise direction.)
Note: Do not open release
valve more than one (1)
full turn.
2) When vehicle is fully
lowered, remove jack. If the
extension screw has been
[email protected]
4) Fill with a good grade
hydraulic oil only. (Fill to the
lower rim of oil fill hole.) Purge
system of air as described in
this manual.
5) Replace rubber oil plug.
6) Lubricate pivoting joints and
screw extension periodically for
proper maintenance.
PURGING AIR FROM
HYDRAULIC SYSTEM
Occasionally, air bubble
become trapped inside the jack,
reducing its efficiency. Release
air from the jack’s hydraulic
system following the directions
below.
3
• Never exceed the jack’s
rated capacity.
• Jack should only be used on
a solid level surface.
• Never work underneath the
vehicle without the use of
additional safety support
devices (Ex: Rated jack
stands).
• Do not disassemble.
Disassembly may result in
malfunction or injury.
North American Tool (NATI) Industries makes every effort to ensure that this product meets high
quality and durability standards. NATI warrants to the original retail consumer a 1-year limited
warranty from the date the product was purchased at retail and each product is free from defects in
materials. Warranty does not apply to defects due directly or indirectly to misuse, abuse, negligence or
accidents, repairs or alterations, or a lack of maintenance. NATI shall in no event be liable for death,
injuries to persons or property, or for incidental, special or consequential damages arising from the
use of our products. To receive service under warranty, the original manufacturer part must be
returned for examination by an authorized service center. Shipping and handling charges may apply. If
a defect is found, NATI will either repair or replace the product at its discretion.
DO NOT RETURN TO STORE
For Customer Service:
Email: [email protected] or Call 1-800-348-5004
[email protected]
4
20 TON HYDRAULIC JACK
Model: 7525
#
Description
1
Release Valve Lever
2
Base
3
O-Ring
4
Hydraulic Cylinder
5
Ram
6
Hydraulic Oil
7
Oil-Tight Tank
8
Extension Screw
9
Top Cap
10
Pump Plunger
11
Pump Body
12
O-Ring
[email protected]
5
8807525 06/13