1
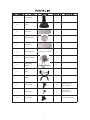
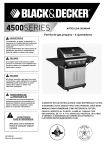
READ BEFORE USE! Model No.: HYPH4601-4
Item No.: 67775
General Safety Information
This manual contains important information about
the assembly, operation and maintenance of this
heater.
General safety information is presented in these
first few pages and is also located throughout the
manual.
Keep this manual for future reference and to educate
new users of this product. This manual should be read in
conjunction with the labeling on the product.
Safety precautions are essential when any mechanical or propane fueled equipment is involved. These
precautions are necessary when using, storing, and
servicing. Using this equipment with the respect and
caution demanded will reduce the possibilities of
personal injury or property damage.
The following symbols shown below are used extensively throughout this manual. Always pay
attention to these precautions, as they are essential
when using any mechanical or propane fueled
equipment.
Failure to comply with the precations and instructions
provided with this heater can result in death, serious
bodily injury and property loss or damage from
hazards of fire, explosion, burn, asphyxiation, and/or
carbon monoxide poisoning.
Only persons who can understand and follow the
instructions should use or service this heater.
This product is fueled by propane gas. Propane gas is
invisible, odorless, and flammable. An odorrant is normally added to help detect leaks and can be described
as a “rotten egg” smell. The odorant can fade over time
so leaking gas is not always detectable by smell alone.
Propane gas is heavier than air and leaking propane
will sink to the lowest level possible. It can ignite by
ignition sources including matches, lighters, sparks or
open flames of any kind many feet away from the original leak. Use only propane gas set up for vapor with draw.
Propane gas should be stored or used in compliance
with local ordinances and codes or with ANSI/NFPA 58.
Turn off propane when not in use.
DANGER indicates an imminently hazardous
situation which, if not avoided, will result in death or
serious injury.
EXPLOSION-FIRE HAZARD
Keep solid combustibles, such as building
materials, paper or cardboard, a safe
distance away from the heater as recommended by the instructions.
Provide adequate clearances around air
openings into the combustion chamber.
Never use the heater in spaces which do or
may contain volatile or airborne combustibles,
or products such as gasoline, solvents, paint
thinner, dust particles or unknown chemicals.
During operation, this product can be a
source of ignition. Keep heater area clear
and free from combustible materials,
gasoline, paint thinner, cleaning solvents
and other flammable vapors and liquids. Do
not use heater in area with high dust
content. Minimum heater clearances from
combustible material: two(2) feet from the
sides & two(2) feet from the top.
WARNING indicates an imminently hazardous
situation which, if not avoided, could result in death
or serious injury.
CAUTION indicates an imminently hazardous
situation which, if not avoided, may result in minor or
moderate personal injury, or property damage.
We cannot foresee every use which may be made
of our heaters.
Check with your local fire safety authority if you have
questions about heaters use.
Other standards govern the use of fuel gasses and
heat producing products for specific uses. Your local
authorities can advise you about these.
2
Never store propane near high heat, open
flames, pilot lights, direct sunlight, other ignition sources or where temperatures exceed 120 (49 ).
Propane is heavier than air and can accumulate in low places. If you smell gas, leave the
area immediately.
Never install or remove propane cylinder
while heater is lighted, near flame, pilot light,
ignition sources or while heater is hot touch.
This heater is red hot during use and can ignite flammables too close to the heater. Keep
flammables at least 2 feet from sides & 2 feet
from top. Keep gasoline and other flammable
liquids and vapors well away from heater.
The propane cylinder must always be stored
outdoors in a well ventilated space. Never
store propane cylinder in an enclosed
area(house, garage, etc.). If heater is to be
stored indoors, disconnect the propane cylinder for outdoor storage.
BURN HAZARD
Never leave heater unattended when hot or
in use.
Keep out of reach of children.
SERVICE SAFETY
Keep all connections and fittings clean. Make
sure propane cylinder valve outlet is clean.
Inspect hose before use. Replace if there is
evidence of abrasion or wear.
During set up, check all connections and
fittings for leaks using soapy water. Never use
a flame.
Use as a heating appliance only. Never alter
in any way or use with any device.
Check entire hose at least annually.
The maximum gas supply pressure is 250psi.
Don’t store certain materials such as cloth,
plastic products ect. under the heater, or it
will be subjected to radiant heat and could
be seri-ously damaged.
Do an inspection of the visible portion of the
hose before each use of the appliance. If the
hose is damaged, the replacement hose
assembly shall be that specified by the
manufacturer.
Do the lighting of the heater accroding to
the lighting instructions, otherwise may
cause injury or property damage.
Do not use 30 lb propane cylinder for this
appliance.
CARBON MONOXIDE HAZARD
This heater is a combustion appliance. All
combustion appliances produce carbon
monoxide(CO) during the combustion process.
This product is designed to produce extremely
minute, non-hazardous amounts of CO if used
and maintained in accordance with all
warnings and instructions. Do not block air
flow into or out of the heater.
Carbon monoxide(CO) poisoning produces
flu-like symptoms, watery eyes, headaches,
dizziness, fatigue and possibly death. You
can’t see it and you can’t smell it. It’s an invisible killer. If these symptoms are present
during operation of this product get fresh air
immediately.
For outdoor use only.
Never use inside a house, or other unventilated or enclosed areas.
This heater consumes air(oxygen). Do not
use in unventilated or enclosed areas to avoid
endangering your life.
3
sides 24 in /60.9 cm.
24 in/60.9cm
4
24 in /60.9 cm and
24 in /60.9cm
A
Tank Housing
1
B
Burner
1
C
Glass Tube
1
D
Glass Tube Ring
1
E
Mesh Guard
3
F
Upper Supporter
3
G
Upper Combination
1
H
Tank Housing
Supporter
1
I
Wheel
1
J
Handle
1
K
M5x12 screw
6
Attached into the
upper supporter
L
M4x10 screw
3
Attached into
the burner cover
M
M5x12 screw
6
in hardware packing
5
N
M5 lock nut
4
in hardware packing
O
M8x16 screw
3
1 in hardware packing, 2
screwed into wheel
P
M8 lock nut
2
screwed into wheel
Q
M6 nuts
1
assembled into handle
R
M6 washer
1
assembled into handle
S
M6x12 screw
6
in hardware packing
T
M6 lock nut
6
in hardware packing
U
Anchoring Arm
3
in hardware packing
V
Anchoring Nut
3
in hardware packing
W
Wrench
1
in hardware packing
6
Step 1:Unscrew the handle nuts (Q)and washer(R) and
assemble the handle into tank housing(A).
1-1
1-2
1-3
Step 2: Unscrew the wheel screws (O) and nuts (P) and
assemble the wheel (I) into tank housing base.
2-1
2-2
2-3
Step 3:Use the M8x16 screw (O) and M5x12 screw(M)
from the hardware packing to attach the tank housing
supporter(H) into the base hole and the tank housing
and don’t fasten them.
3-1
3-2
3-4
3-5
3-3
Step 4:Attach the burner(B) into the tank housing top and
make the control knob faced to the door and hole to hole,
use 4pcs M5x12 screws(M) and 4pcs M5 nuts(N),fasten
them well.
4-1
7
4-2
4-3
4-4
Step 9:Put the upper combination(G) into the supporter
and glass tube to make sure the three holes match up
and use screws (from Step 7) to fasten them.
4-5
9-1
9-2
9-3
Step 5:Use 1pc M5x12 screw (M) to fasten the tank
housing supporter.
5-1
9-4
5-2
Step 10:Assemble three mesh guards(E) into the upper
supporter hook.
Caution: Ensure t he mesh guard is in the correct
position. (10-3)
Step 6:Screw off 3pcs M4x10 screws(L) from the burner
cover and attach the glass tube ring(D) into it.
6-1
6-2
6-3
10-1
Step 7:Screw off all M5x12 screws(K)
from the upper supporter(F) first and then put through the
burner cover to the bottom and use screws to fasten them.
7-2
7-3
7-4
11-1
Step 8:Put the glass tube(C) into the glass tube ring.
8-1
10-3
Step 11:Assemble the anchoring arm(U) with M6x12
screws(S) and M6 nuts(T) into the base and use the
anchoring nut(V) to fasten the product into the ground.
Installation process is completed.
Caution: Keep the hook upwards.
7-1
10-2
8-2
8
11-2
11-3
Connect Hose & Regulator to Cylinder
Step 1 - Gas Cylinder Required
■ You must provide propane gas and propane cylinder.
Use a standard 20lb propane cylinder only.
■ Use this heater only with a propane vapor withdrawal
supply system. See chapter 5 of the Standard for Storage
Figure 1
20LB Propane Cylinder
and Handling of Liquefied Petroleum Gas, ANSI/ NFPA 58.
Your local library or fire department will have this book.
■ Maximum supply pressure of 250 psi. A minimum supply
pressure of 25 psi is required for the purpose of input
adjustment for propane gas.
■ The pressure regulator and hose assembly supplied with
the appliance must be used. Replacement pressure regu-
lators and hose assemblies must be those specified by the
appliance manufacturer.
■ A dented, rusted or damaged propane cylinder may be
hazardous and should be checked by your cylinder supplier. Never use a propane cylinder with a damaged valve
connection.
■ The propane cylinder must be constructed and marked in
accordance with the specifications for LP gas cylinders of
the U.S. Department of Transportation(DOT) or the
Standard for Cylinder, Spheres & Tubes for transportation
of Dangerous Goods & Commission, CAN/CSA-B339, as
applicable.
■ Never connect an unregulated propane cylinder to the
heater.
■ The cylinder must include a collar to protect the
cylinder valve.
■ Provided with a listed overfilling prevention device.
■ Provided with a cylinder connection device compatible with
the connection for the appliance.
■ Do not store a spare LP-Gas cylinder under or near this
appliance.
■ A cylinder must be stored outdoors in a well-ventilated
area out of reach of children. A disconnected cylinder
must have dust caps tightly installed and must not be
stored in a building, garage or any other enclosed area.
■ Never fill the cylinder beyond 80 percent full.
■ Place the dust cap on the cylinder valve outlet whenever
the cylinder is not in use. Only install the type of dust cap
on the cylinder valve that is provided with the cylinder
valve. Other types of caps or plugs may result in leakage
of propane.
9
307.9 mm
This appliance shall be used only in a wellventilated space and shall not be used in a
building, garage or any other enclosed area.
This appliance may be installed with shelter no
more inclusive than:
1. With walls on all sides, but with no overhead
cover.
2. Within a partial enclosure which includes an
overhead cover and no more than two side walls.
These side walls may be parallel, as in a breezeway, or at right angles to each other.
3. Within a partial enclosure which includes an
overhead cover and three side walls, as long as
30 percent or more of horizontal periphery of the
enclosure is permanently open.
DO NOT store in a location that will exceed 120
/49
.
If you need a replacement part, please call BOND
toll free# 1-866-771-BOND(2663) or better to expedite your request feel free to email us
[email protected] .
12
IF YOU HAVE QUESTIONS OR CONCERNS
PLEASE CALL BOND TOLL FREE #
1-866-771-BOND(2663) OR TO BETTER
EXPEDITE YOUR REQUEST FEEL FREE TO EMAIL US
[email protected]
OR VISIT OUR WEBSITE UNDER CUSTOMER SERVICE SUPPORT
www.bondmfg.com
BOND MANUFACTURING CO.
1700 West 4th Street, Antioch, CA 94509 USA
MADE IN CHINA
13