Transcript
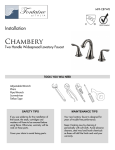
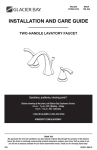
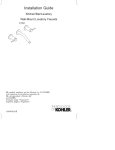
Design
Place gasket on bottom of new faucet. If sink is
uneven, use silicone under the gasket.
MIDDLETON SINGLE
HANDLE LAVATORY FAUCET
WITH POP-UP DRAIN
Connect the water supply lines.Stainless steel braided
faucet supply tubes with ½” female IPS connection or
flexible supply lines with 3/8” OD and coupling nuts will
work. Match the opposite end to your water supply fittings
or shut off valve under your sink. Carefully follow the
manufacturer’s installation instructions for each tube. Note:
when looking at the faucet the left pipe is the Hot water
side, the right pipe is the Cold water side.
Models 545830, 545814, 545822
House
but do not overtighten
Warning! Avoid contact of plastic parts with plumber’s putty, pipe dope, or
any other oil based compound. Use a silicon, acrylic, or latex based
sealant where needed.
plastic
washer
When installing your new faucet, first hand tighten the connector nuts, then
use one wrench to anchor the fitting and a second wrench to tighten the nut
one additional turn. Connections that are too tight will reduce the integrity of
the system.
Re-assemble aerator,
Remove flange (1) and rubber washer (2). Screw
rubber washer (3) plastic washer (4) and mounting nut (5)
down onto pipe body. Put the rubber washer (2) and
flange (1) into the sink hole. From underneath sink screw
the pipe body into the flange. Make sure the nut is facing
the faucet (pointing towards back of sink). Push the
rubber washer (3) and plastic washer (4) tight against the
flange. Tighten mounting nut (5) against rubber washers
using a wrench to create a water tight seal.
Wrap threaded connections (except aerator thread in spout or where o-ring
or rubber sealant are present) with Teflon tape available from your local
hardware or plumbing supply store. Always wrap in a clockwise direction.
7. Install the spring clip on the ball rod, and simultaneously
insert the linkage (2).
8. Insert lift rod (1) into back of faucet, through the linkage
hole. Tighten the lock nut (2). Pull the lift rod knob up and
down and move the linkage along the ball rod to the optimal
location.
Handle
Screw
Color button
Adjusting nut
Pop-up
Cover
Block
Ball valve seal
Ball valve
Lock nut
Panel
Sealing gasket
Sealing spring
Body
O-ring
Spout
Washer
Aerator
Aerator shell
Pin
Stator
Screw
Copper tube
Plate
Screw
Stator
Bolt
Mounting nut
Washer
Coupling nut