1
MSLED 825-0504.qxd:Layout 1
1/19/10
9:30 AM
Page 4
INSTALLATION INSTRUCTIONS
Note: Your fixture is supplied with a pre-installed long life (non replaceable) LED bulb.
1.
Locate area in which you would like to install your light fixture.
Note: For fixture to operate properly, the solar panel must be
located in an area that will receive the maximum amount of sunlight
and is free from obstructions.
2.
3.
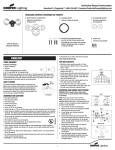
Using two of the mounting screws provided, mount fixture to a
solid surface 8-12 feet above the ground, by placing the screws
through the holes on both sides of the fixture (Fig. 3). Adjust
sensor head so that control switches are facing the ground.
Remove label from the front of the sensor head.
Using three of the mounting screws provided, mount solar
panel to a solid surface (Fig. 4). Adjust the angle of the
solar panel so that it will receive the maximum amount of
direct sunlight possible during the daylight hours. The solar
panel can be mounted up to 8 feet away from the light fixture.
4.
Carefully route the wire from the solar panel to the fixture and
plug it into the connector wire attached to the fixture housing.
(For now, keep fixture in the OFF position) (Fig. 5).
5.
If fixture is new or batteries have never been charged, allow fixture
to receive 3 full days of sunlight before turning the fixture to the
ON position.
Fig. 3
Fig. 4
Fig. 5
HOW TO OPERATE YOUR FIXTURE
1.
After fixture has received three (3) full days of sunlight, turn the AUTO/OFF
switch to the AUTO position.
Note: Fixture has a warm up period of about one minute. Light may
turn on during this period. Once light turns off, you are ready to test.
2.
Turn LUX knob counterclockwise to indicate sun symbol. This
means that unit should operate during the day. Set SENS knob
to medium (halfway) (Fig. 6).
3.
Aim sensor head in desired direction. Make sure sensor head is
positioned with control switches facing towards ground.
4.
Walk across detection zone at furthest distance you wish your
detector to detect motion.
5.
Adjust sensitivity until you get desired results. Light will turn off anywhere from
10 seconds to 4 minutes after motion has stopped.
Fig. 6
Note: Allow five seconds after light turns off before next test. TIME setting may be
adjusted up to 4 minutes with TIME knob. Turn knob towards + to increase time the
fixture stays on with motion in Auto mode and toward – for less ON time.
6.
Once you are satisfied with your adjustments turn LUX knob to moon symbol to
indicate operation at night. Light will turn on with motion only at night when in
this mode.
Note: To adjust when the AUTO Mode turns on at night, turn LUX control closer to
sun to prevent light from coming on later in the evening.
For assistance, call 1-800-334-6871 or e-mail us at [email protected]
4