1
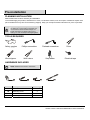
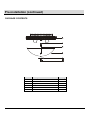
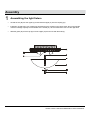
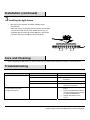
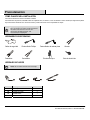
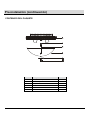
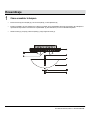
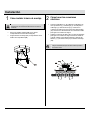
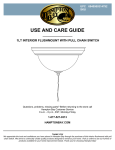
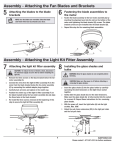
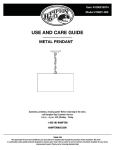
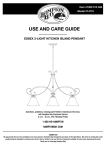
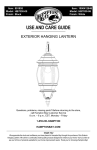
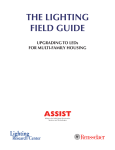
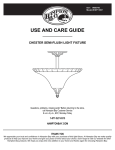
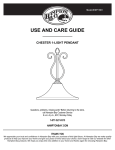
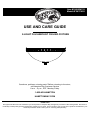
Item #1000054 132
Model #F567CH02
USE AND CARE GUIDE
2-LIGHT FLUSHMOUNT CEILING FIXTURE
Questions, problems, missing parts? Before returning to the store,
call Hampton Bay Customer Service
8 a.m. - 6 p.m., EST, Monday-Friday
1-855-HD-HAMPTON
HAMPTONBAY.COM
THANK YOU
We appreciate the trust and confidence you have placed in Hampton Bay through the purchase of this ceiling fixture. We strive to
continually create quality products designed to enhance your home. Visit us online to see our full line of products available for your
home improvement needs. Thank you for choosing Hampton Bay!
Table of Contents
Table of Contents..........................................................2 Safety Information.........................................................2 Warranty.........................................................................2 Pre-installation ..............................................................3 Planning Installation ...................................................3 Tools Required ...........................................................3 Hardware Included .....................................................3 Package Contents ......................................................4 Assembly ....................................................................... 5 Installation ..................................................................... 6 Care and Cleaning ........................................................ 7 Troubleshooting............................................................ 7 Safety Information
□
Consult a qualified electrician with any electrical
questions you may have.
IMPORTANT: Inspect the wire insulation for any
cuts, abrasions, or exposed copper that may have
occurred during shipping. If there is a defect in the
wire, do not continue the assembly process. Please
call our Customer Service Team at 1-855-HDHAMPTON.
Warranty
ONE-YEAR LIMITED WARRANTY
WHAT IS COVERED
The manufacturer warrants this lighting fixture to be free from defects in the materials and workmanship for a period of
one (1) year from date of purchase. This warranty applies only to the original consumer purchaser and only to products
used in normal use. If this product is found to be defective, the manufacturer's only obligation, and your exclusive remedy,
is the repair or replacement of the product at the manufacturer's discretion, provided that the product has not been
damaged through misuse, abuse, accident, modifications, alterations, neglect, or mishandling.
WHAT IS NOT COVERED
This warranty shall not apply to any product that is found to have been improperly installed, assembled, or used in any
way not in accordance with the instructions supplied with the product. This warranty shall not apply to a failure of the
product as a result of an accident, misuse, abuse, negligence, alteration, faulty installation, or any other failure not relating
to faulty material or workmanship. This warranty shall not apply to the finish on any portion of the product due to
weathering, as this is considered normal wear. The manufacturer does not warrant and specifically disclaims any warranty,
whether expressed or implied, other than the warranty contained herein. The manufacturer specifically disclaims any
liability and shall not be liable for any consequential or incidental loss or damage, including but not limited to, any labor or
expense costs involved in the replacement or repair of the product.
Contact the Customer Service Team at 1-855-HD-HAMPTON or visit www.Hamptonbay.com.
2
Pre-installation
PLANNING INSTALLATION
Read all instructions before assembly and installation.
To avoid damaging this product, assemble it on a soft, non-abrasive surface, such as carpet or cardboard. Inspect each
part for defects that may have occurred during shipping. Keep your receipt and these instructions for proof of purchase.
NOTE: This light fixture requires the use of two
75- Watt max., type A bulb (not included). Do
not exceed the recommended wattage. For
further information on selecting the correct
bulbs, go to www.homedepot.com/lightingfacts.
TOOLS REQUIRED
Safety goggles
Wire strippers
Phillips screwdriver
Flathead screwdriver
Wire cutters
Step ladder
Pliers
Electrical tape
HARDWARE INCLUDED
NOTE: Hardware not shown to actual size.
Part
AA
BB
CC
DD
Description
Wire nut
Mounting screw
Ground screw
Mounting bar
Quantity
2
4
1
1
3
HAMPTONBAY.COM
Please contact 1-855-HD-HAMPTON for further assistance.
Pre-installation (continued)
PACKAGE CONTENTS
Part
A
B
C
D
E
F
Description
Fixture body
Hex nut
Nipple
Glass shade
Cap
Finial
Quantity
1
1
1
1
1
1
4
Assembly
1
Assembling the light fixture
□
Thread the nut (B) onto the nipple (C) and thread the nipple (C) into the coupling (G).
□
Install two 75-Watt max, type A bulbs (not provided) into the sockets on the fixture body. Do not exceed the
maximum wattage capacity recommended on the socket (H). We recommend the use of a clear light bulb.
□
Slide the glass (D) and the cap (E) onto the nipple (C) then secure with the finial (F).
5
HAMPTONBAY.COM
Please contact 1-855-HD-HAMPTON for further assistance.
Installation
1
2
Installing the mounting bar
□
CAUTION: Ensure the power is shut off at the main
fuse box prior to beginning installation.
□
□
Thread the mounting screws (BB) into the matching
holes in the mounting bar (DD).
Secure the mounting bar (DD) to the outlet box with
outlet box screws (BB).
□
Making the electrical
connections
Connect the white wire (3) from the fixture to the
white wire (4) from the outlet box (7) and the black
wire (5) from the fixture to the black wire (6) from
the outlet box (7). Cover the two wire connections
using the two provided wire nuts (AA). Wrap the two
wire connections with electrical tape for a more
secure connection.
Attach the grounding wire connections with
electrical tape for a more secure connection.
Connect the copper ground wires from the fixture
and from the outlet box (1 and 2) to the ground
screw (CC) on the mounting bar (DD).
NOTE: If you have electrical questions, consult your
local electrical code for approved grounding methods.
6
Installation (continued)
3
Installing the light fixture
□
□
After wires are connected, tuck them carefully inside
the outlet box.
Raise the canopy (A) allowing for the mounting screws (BB)
to protrude through the key slots. Rotate the canopy (A)
clockwise until the mounting screws (BB) are in the narrow
part of the key slots, and tighten with a screwdriver.
Care and Cleaning
□
Clean the light fixture with a soft, dry cloth. Do not use any cleaners with chemicals, solvents, or harsh abrasives.
Troubleshooting
Problem
The bulb will not light.
Possible Cause
□ The bulb is burned out.
□ The power is off.
□
There is a faulty wire connection.
□
The circuit breaker is off.
The fuse blows or a
circuit breaker trips when
the light is turned on.
Solution
□ Replace the light bulb.
□ Ensure that the power supply is
turned on.
□ Check the wiring.
□
□
□
□
7
Ensure that the circuit breaker is
set in the On position.
Discontinue use of the light
fixture.
Contact a qualified electrician or
call the Customer Service Team
at 1-855-HD-HAMPTON.
Unplug other items on the
circuit.
HAMPTONBAY.COM
Please contact 1-855-HD-HAMPTON for further assistance.
Questions, problems, missing parts? Before returning to the store,
call Hampton Bay Customer Service
8 a.m. - 6 p.m., EST, Monday-Friday
1-855-HD-HAMPTON
HAMPTONBAY.COM
Retain this manual for future use.
Artículo núm. 1000054132
Modelo núm.F567CH02
GUÍA DE USO Y MANTENIMIENTO
LÁMPARA DE TECHO AL RAS, DE 2 LUCES
¿Preguntas, problemas o piezas faltantes? Antes de regresar a la tienda,
llama al servicio al cliente de Hampton Bay
de lunes a viernes, de 8:00 a.m. a 6:00 p.m. (hora estándar del Este)
1-855-HD-HAMPTON
HAMPTONBAY.COM
GRACIAS POR TU COMPRA
Apreciamos la confianza que has depositado en Hampton Bay al comprar esta lámpara de techo. Nos esforzamos continuamente para crear productos de
calidad diseñados para mejorar tu hogar. Visítanos por Internet para ver nuestra línea completa de productos disponibles para las necesidades de mejoras de
tu hogar. ¡Gracias por elegir Hampton Bay!
Tabla de contenido
Tabla de contenido .....................................................10 Información de seguridad ..........................................10 Garantía........................................................................10 Preinstalación..............................................................11 Cómo planificar la instalación .....................................................11 Herramientas necesarias............................................................11 Herrajes incluidos .......................................................................11 Contenido del paquete................................................................12 Ensamblaje .................................................................. 13 Instalación ................................................................... 14 Mantenimiento y limpieza .......................................... 15 Solución de problemas .............................................. 15 Información de seguridad
□
Si tienes alguna pregunta al respecto,
consulta a un electricista calificado.
IMPORTANTE: Revisa que el aislamiento de los cables no
haya sufrido ningún corte, abrasión ni tenga filamentos de
cobre expuestos debido al envío. Si hay un defecto en el cable,
suspende el ensamblaje. Llama a nuestro equipo de servicio al
cliente al 1-855-HD-HAMPTON.
Garantía
GARANTÍA LIMITADA DE UN AÑO
QUÉ CUBRE LA GARANTÍA
El fabricante garantiza que esta lámpara no presentará defectos materiales o de fabricación por un período de (1) año a partir de la fecha de
compra. Esta garantía es válida sólo para el comprador original y sólo cubre productos en uso normal. Si se descubre algún defecto en este
producto, la única obligación y solución exclusiva del fabricante, a criterio del mismo, será reparar o reemplazar el producto siempre y cuando el
defecto no sea resultado de un mal uso, abuso, accidente, modificaciones, alteraciones, negligencia o manejo indebido.
QUÉ NO CUBRE LA GARANTÍA
Esta garantía no cubre ningún producto instalado, ensamblado o usado incorrectamente sin seguir las instrucciones adjuntas al producto. Esta
garantía no cubre fallas del producto a consecuencia de un accidente, mal uso, abuso, negligencia, modificaciones o instalaciones defectuosas, o
cualquier otra falla no relacionada con defectos de fabricación. Esta garantía no se aplica al acabado de ninguna parte de los productos a causa del
deterioro por condiciones ambientales, ya que eso se considera un desgaste normal. El fabricante no garantiza y se exime especialmente de
cualquier garantía, explícita o implícita, distinta de la indicada en la garantía incluida en la presente. El fabricante se exime específicamente de
cualquier obligación y no es responsable por daños o pérdidas directas o indirectas, lo que incluye cualquier costo de mano de obra o gastos
relacionados con el reemplazo o reparación del producto.
Comuníquese con el equipo de servicio al cliente al 1-855-HD-HAMPTON o visite www.Hamptonbay.com.
10
Preinstalación
CÓMO PLANIFICAR LA INSTALACIÓN
Lee todas las instrucciones antes de ensamblar e instalar.
Para evitar daños al producto, ensámblalo sobre una superficie suave, no abrasiva, como una alfombra o cartón. Verifica que ninguna de las piezas
haya sufrido daños durante el envío. Conserva el recibo y estas instrucciones como comprobante de compra.
NOTA: Esta lámpara requiere dos bombillas de 75 Watts
tipo A (no incluidas). No excedas el vataje recomendado.
Para obtener más información acerca de cómo
seleccionar las bombillas adecuadas, visita
www.homedepot.com/lightingfacts.
HERRAMIENTAS NECESARIAS
Gafas de seguridad
Destornillador Phillips
Pelacables
Cortacables
Destornillador de cabeza plana
Escalera de tijera
Alicates
Cinta de electricista
HERRAJES INCLUIDOS
NOTA: No se muestra el tamaño real de los herrajes.
Pieza
AA
BB
CC
DD
Descripción
Tuerca para cable
Tornillo de montaje
Tornillo a tierra
Barra de montaje
Cantidad
2
4
1
1
11
HAMPTONBAY.COM
Para obtener asistencia, llama a 1-855-HD-HAMPTON.
Pre-instalación (continuación)
CONTENIDO DEL PAQUETE
Pieza
A
B
C
D
E
F
Descripción
Cuerpo de la lámpara
Tuerca hexagonal
Boquilla
Pantalla de vidrio
Tapa
Remate
Cantidad
1
1
1
1
1
1
12
Ensamblaje
1
Cómo ensamblar la lámpara
□
Enrosca la tuerca (B) en la boquilla (C) y enrosca la boquilla (C) en el acoplamiento (G).
□
Instala dos bombilla s, tipo A de 75Watts como máximo (no incluidas) en los portabombillas del cuerpo de la lámpara. (No sobrepases la
capacidad del vataje máximo recomendado en el portabombilla (H). Recomendamos que uses una bombilla transparente.
□
Desliza el vidrio (D) y la tapa (E) sobre la boquilla (C) y luego asegura el remate (F).
13
HAMPTONBAY.COM
Para obtener asistencia, llama a 1-855-HD-HAMPTON.
Instalación
1
2
Cómo instalar la barra de montaje
□
PRECAUCIÓN: Asegúrate de que la electricidad esté
apagada en la caja principal de fusibles antes de comenzar la
instalación.
□
□
Enrosca los tornillos de fijación (BB) en los orificios
correspondientes en la barra de montaje (DD).
Asegura la barra de montaje (DD) a la caja eléctrica con los
tornillos de la caja eléctrica (BB).
□
Cómo hacer las conexiones
eléctricas
Conecta el cable blanco (3) de la lámpara al cable blanco (4)
de la caja eléctrica (7) y el cable negro (5) de la lámpara al
cable negro (6) desde la misma caja (7). Cubre las dos
conexiones de cable con las dos tuercas para cable provistas
(AA). Envuelve con cinta aislante las dos conexiones de cable
para lograr una conexión más segura.
Sujeta las conexiones de cable a tierra con cinta de electricista
para lograr una conexión más segura. Conecta los cables de
cobre de conexión a tierra desde la lámpara y desde la caja
eléctrica (1 y 2) al tornillo a tierra (CC) en la barra de montaje
(DD).
NOTA: Si tienes preguntas sobre la materia, consulta en tu
código de electricidad local para encontrar métodos aprobados
de conexión a tierra.
14
Instalación (continuación)
3
Cómo instalar la lámpara
□
□
Después de terminar con las conexiones, empújalas con cuidado dentro de
la caja eléctrica.
Levanta la cubierta (A) permitiendo que los tornillos de montaje (BB)
sobresalgan a través de las ranuras en forma de ojo de llave. Rota la cubierta (A)
en sentido de las manecillas del relojhasta que los tornillos de montaje (BB) estén en la parte
estrecha de las ranuras en forma de ojo de llave, y aprieta con un destornillador.
Mantenimiento y limpieza
□
Limpia la lámpara con un paño suave y seco. No uses limpiadores con químicos, solventes o productos abrasivos.
Solución de problemas
Problema
La bombilla no enciende.
Causa posible
□ La bombilla está fundida.
□ La electricidad está apagada.
□
Hay una conexión defectuosa del cable.
□
El cortacircuitos está apagado.
El fusible se funde o el
cortacircuitos se activa cuando
se enciende la luz.
Solución
□ Reemplaza la bombilla.
□ Asegúrate de que el suministro de
electricidad esté encendido.
□ Revisa el cableado.
□
□
□
□
15
Verifica que el cortacircuitos está en la
posición de “ON” (encendido).
Deja de usar la lámpara.
Contacta a un electricista calificado o
llama al equipo de servicio al cliente al
1-855-HD-HAMPTON.
Desconecta otros artículos del circuito.
HAMPTONBAY.COM
Para obtener asistencia, llama a 1-855-HD-HAMPTON.
¿Preguntas, problemas o piezas faltantes? Antes de regresar a la tienda,
llama al servicio al cliente de Hampton Bay
de lunes a viernes, de 8:00 a.m. a 6:00 p.m. (hora estándar del Este)
1-855-HD-HAMPTON
HAMPTONBAY.COM
Conserva este manual para uso en el futuro.