1
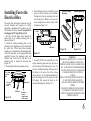
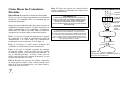
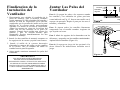
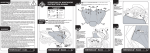
Step 1 Connect the fan supply (black) wire and
light supply (blue) wire to the black household
supply wire as shown in Figure 14.
Step 4 After connecting the wires, spread them
apart so that the green and white wires are on one
side of the outlet box and the black wire is on the
other side.
7.
Ground
Conductor
Outlet Box
WARNING
ELECTRICAL DIAGRAMS ARE FOR
REFERENCE ONLY. OPTIONAL USE OF ANY
LIGHT KIT SHALL BE CUL LISTED AND
MARKED SUITABLE FOR USE WITH THIS
FAN.
Step 2. Connect the neutral fan (white) wire to the
white neutral household wire.
Step 3 Connect the two green fan ground wires,
located on the hanging ball and mounting plate, to
the household ground wire. When using Close-toCeiling mounting, there is only one green ground
lead from the ceiling mounting plate since the
ball/downrod assembly is not used.
WHITE
BLACK
WARNING
TO REDUCE THE RISK OF FIRE OR ELECTRIC
SHOCK, DO NOT USE A WALL MOUNTED
SOLID STATE SPEED CONTROL WITH THIS
FAN. IT WILL PERMANENTLY DAMAGE THE
ELECTRONIC CIRCUITRY.
GREEN
Follow the steps below to connect the fan to your
household wiring. Use the wire connecting nuts
supplied with your fan. Secure the connectors with
electrical tape. Make sure there are no loose
strands or connections.
SUPPLY CIRCUIT
WHITE
REMEMBER to disconnect the power. If you feel
that you do not have enough electrical wiring
knowledge or experience, have your fan installed
by a licensed electrician.
Step 5 Turn the connecting nuts upward and
push the wiring into the outlet box.
BLUE
BLACK
Making the Electrical
Connections
BLUE
BLACK
Green
Ground
Lead
Ground to
Downrod
WHITE
WHITE
Figure 14
Diagram indicates optional light kit wiring.