Transcript
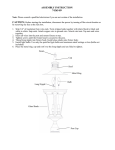
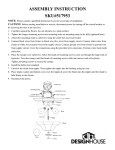
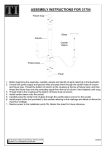
ASSEMBLY INSTRUCTION
SKU#74261-89
Note: Please consult a qualified electrician if you are not certain of the installation
CAUTION: Before starting the installation, disconnect the power by turning off the circuit breaker or
by removing the fuse at the fuse box.
1. Thread the shorter 3/4” mounting screws completely into the Mounting strap, in the opposite
direction of the green ground screw. These mounting screws should protrude away from the outlet
box when the mounting strap is attached. Attach the mounting strap by tightening the longer
mounting screws securely into the outlet box.
2. Strip 3/4” of insulation from wire ends. Twist stripped ends together with pliers black to black and
white to white. Snip ends. Attach copper wire to ground wire. Attach wire nuts. Tap nuts and wires
together.
3. Place the wall plate of fixture over the mounting strap by cap nut over the screws until fixture was
held firmly to the wall.
4. Place glass shade over nipple and use cap and finial to tighten.
5. Install light bulbs. Use only the specified type bulbs and maximum rated wattage or less.(Bulbs not
included)
Lock Nut
Fixture Body
Outlet Box Screw
Bulb
Mounting Strip
Wall Plate
Glass Shade
Nipple
Cap
Finial