1
6
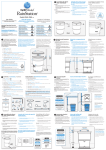
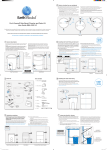
9 Connecting a garden hose or a rain barrel to the RainRouter Selector Valve
Special instructions for a remote rain barrel installation
• If locating a new 45 gallon RainStation or DIY rain barrel away from a downspout, DO NOT drill the hole for the fill hose at
eithe rim of the barrel as you will be filling the barrel from the bottom drain instead.
A. To connect to a garden hose: Thread the female end of the hose directly to the threaded end of the selector valve.
• For the 65 gallon RainStation rain barrel, the predrilled hole can be plugged using a 1’’ schedule 40 PVC end cap inserted
eiinto the hose seal. This plug is necessary to prevent flooding and infestation.
B. To connect to an EarthMinded rain barrel fill hose or bilge hose: Attach the multi-hose adaptor to the threaded end of
eeethe selector valve first. Next, press the hose over the barbed end of the adaptor. Two multi-hose adaptors are included for
eeeconnecting two rain barrels to the selector valve.
eiWhen remote locating a sealed barrel (no removable lid), you will need to add an air vents to allow the barrel to fill. Drill a
eifew small holes in the top of the barrel using a 3/64’’ (1.5mm) or smaller drill bit to allow air to escape while discouraging
eiinfestation.
C. To connect a remote rain barrel: Connect the male end of the garden hose to the outlet on the selector valve using the
eeemulti-hose adaptor. The female end of the hose should connect to the rain barrel for a water tight connection.
Remember to set the selector valve to the desired operating setting.
A
C
B
TIP: CAP UNUSED OUTLET
TO PREVENT ACCIDENTAL
FLOODING
2.5”-3”
RS45
7
RS65
Add air vents
10 Removal, maintenance, and winterization of the RainRouter Selector Valve
Planning the diverter installation
The RainRouter selector valve can be damaged if left installed in freezing temperatures. To winterize:
DO NOT CUT THE DOWNSPOUT UNTIL READING THE ENTIRE GUIDE!
1. Remove the RainRouter selector valve from the FlexiFit diverter by gently twisting the valve from side to side while pulling outward.
There are two methods for installing a remote location rain barrel diverter.
1. iEasy installation: Install the diverter at least 1’ (300mm) above the level of the barrel rim. This method will fill the barrel, and
then overflow. If flooding at the barrel is an issue, attach an overflow hose near the rim of the barrel or use the precision installation
method. After marking the height on the downspout, drill the hole and install the diverter according to the instructions included
with the EarthMinded rain barrel.
2. Precision installation method: The diverter is installed 3” (76mm) below the level of the barrel rim. Excess water will
automatically pass through the downspout when the barrel is full.
eeesame time.
3. Remove any debris that may have collected in the downspout above the diverter.
4. Cover the hole in the downspout with the winter hole cover and replace the screws.
The valve, diverter, and winter hole cover can be cleaned with soap and water.
For remote rain barrel installations, the fill hose should occasionally be connected to a household spigot and turned on to flush
out any algae or debris.
Note: Installing the diverter below 3” (76mm) will lower the water level of the barrel and reduce capacity.
1
2. Remove the FlexiFit diverter from the downspout by removing the two (2) screws, and then pull out and upward at the
2
Wear Safety Gloves
Easy installation method - barrel will overflow
Precision installation method - water passes
through downspout when the container is full
8 Marking the diverter height for remote installations
11 Troubleshooting
Water is not reaching the collection spot:
Special instructions for marking the diverter height at the downspout for new remote installations
1. iPlace the rain barrel in its intended location, which should be on a solid and level base. Remove the cap from the bottom drain and
eeattach the female end of the hose to the barrel.
2. Screw the cap on the male end of the hose and run it to the downspout. This is how the hose will connect to the RainRouter diverter
eesystem.
3. Fill the barrel with water to the the rim.
4. Raise the end of the hose near the downspout and remove the cap. Slowly lower the hose until the water is just level with the end of
eethe hose. This indicates the level of the barrel rim at the downspout. Slowly raise and lower the hose a second time just to verify.
5. Make a mark on the downspout at this level.
6. Next, measure down 3” (76mm) and make a second mark. The second mark will now be your reference mark for the diverter height.
The diverter must be installed according to the instructions in the EarthMinded Rain Barrel User Guide.
Then follow STEP 4 in this user guide “Installing the RainRouter Selector Valve”
• Check the top of the gutter for blockage at the downspout connection.
• Remove the diverter and check that the downspout, diverter, valve, and fill hose are not blocked by debris.
• Make sure the diverter is installed with the collection cup (arrow) facing up.
• Make sure no point of the fill hose is above the level of the diverter.
• Check that the water inlet on the rain barrel is level or lower than the diverter.
• Check the fill hose to make sure that water is not leaking.
• Check to see that the active setting indicator (protruding ridge on the valve housing) is aligned with the intended ON setting.
• Make sure that no point along the hose has any kinks.
• This is a low-pressure gravity fed system; it not suitable for use with sprinklers or other devices requiring pressure. We recommend
eusing a non-kinking hose. Water pressure is low and will not work out kinks in a hose.
• For remote rain barrel installations, the fill hose should occasionally be connected to a household spigot and turned on to flush
out eany algae or debris.
Multiple rain barrel connections:
• If one of the barrels will not fill, check that the water inlet is level to or lower than the diverter.
• Check for an obstruction in the fill hose.
2
The rain barrel floods:
• The barrel is too low. To Correct: drain the barrel and construct a solid surface base to raise the barrel so both ends of the fill hose
eare level.
3
5
3”
4
• An overflow hose can be added to the rim of the barrel to drain off excess water. (overflow hose not included)
6
1