1
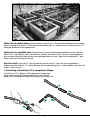
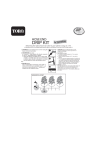
Option one, for planter boxes: Near the planter, connect the ½” tee and add an additional section of drip
tubing to the top of the planter. To the end of the drip tubing add a ½” elbow as well as another piece of 1/2”
tubing perpendicular to the vegetable row.
Option two, for vegetable rows: At ground level, lay out the drip tubing perpendicular to the vegetable
rows. The ½” drip tubing is used as the main line to deliver the water to the ¼” drip line, assuming you will
have a number of parallel rows with the same spacing between the rows. Make sure to extend the ½” drip
tubing a few extra feet past the last row.
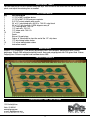
Drip line layout: Lay out the ¼” drip line with drip emitters every 9” near each row of vegetables or
between two close rows (6”-10” apart) and secure to the ground using the ¼” stake included. Leave the end
of the ¼” drip line open.
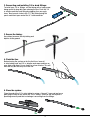
1. Connecting and installing 1/2 in. compression fittings:
To install your 1/2 in. fittings, cut the tubing with a hand pruner,
being careful to keep dirt from entering the line. Push the drip
tubing into the compression fitting while moving it from side to side.
2