Transcript
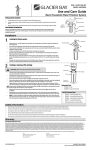
Screws (4)
Mounting
Bracket (1)
ITEM #1000
1000 991 176
US MODEL#HDG4HS4
HDG4HS4
Water
Filter (1)
Use and Care Guide
High--Flow
Flow Basic Household Water Filtration System
INSTALLATION LOC
LOCAT
ATION
ATION
Clamp (2)
□
To filter all house water, install the filtration system on the main COLD supply water pipe near where it
enters the house.
□
□
A mounting bracket and screws are included to support the filtration system
system.
IN
Ground Wire
OUT
Allow a minimum of 2 in. under the filter for removing the sump in order to change the filter cartridge
cartridge.
GROUNDING INFORMATIO
INFORMATION
N
1 in. male NPT
Adaptor (2)
Shutoff
ff Valve
The house cold water pipe is often used to ground electrical outlets. Grounding protects you from electrical shock.
Installing the water filter may break this ground. To restore, install a #4 copper wire across the filter, tightly
clamped
mped at both ends
ends.
Cold Water Pipe
Installation
1
□
□
□
□
□
□
□
2
Installing the filtration system
Screws (4)
Obtain two 1 in. male NPT adaptors (not included) oof the appropriate size and type to adapt to the existing cold water supply pipe.
Shut off the water supply to the main pipe and open a high and low faucet in the system to drain the pipe.
Cut out a section of the COLD water supply pipe several inches long, as needed to install the filtration system
system.. See the Installation
Location drawing.
Apply four wraps of sealant tape to the threads of the 1 in. male NPT adaptors (not included) and carefully turn them into the filtration
system's inlet and outlet ports.
With the IN side of the filtration system toward the incoming water, make connections as the Installation Location fig
figure
ure shows
shows.. When
tightening
ng compression nuts, use a second wrench to hold the 1 in.. male NPT adaptor while turning the nut.
Fully open the cold water faucet downstream of the filtration system
system. Slowly
lowly turn the water supply back on and check for leaks.
Turn off the cold water faucet when the water flow becomes smooth.
Mounting
Bracket
Head
Installing or replacing a filter cartridge
Vent Valve
CAUTION
CAUTION: Never remove the sump with water pressure in the filter.
Close the water supply shutoff valve to the filtration system
system.. To relieve pressure in the filtration system
system,, open the cold water faucet
downstream of the filtration system
system.
□
Carefully tturn
urn the sump to the left to remove from the hhead,
ead, as the sump is full of water. Do not lose the O-ring seal. A special wrench
is included for removing the sump.
□
Bee sure the inside of the sump is clean. Thoroug
Thoroughly
hly wash with warm, soapy water and rinse.
□
Remove the wrapper from the new filter cartridge and iinsert
nsert the filter cartridge into the sump. Some filter cartridges fit either way,
while others
thers fit only one way. Observe markings on the filter cartridge
cartridge,, or on the wrapper.
□
Lightly lubricate the O-ring
ring seal, in the sump, with sil
silicone
icone grease
grease.. Be sure it is fully seated in the groove. Hold the sump up to the
filter head, aligning the center hole in the filter cartridge
ge with the protrusion on the bottom of the head.
NOTE: If the sump will not tighten to the head, you may have the filter cartridge in upside down or not centered in the sump. Take the filter
cartridge out and check for correct orientation.
□
Being careful not to cross
cross-thread,
thread, turn the sump to the right onto the filter head and tighten securely. Do not overtighten.
□
Partially open the faucet downstream of the filtration system
system.. Then, slowly open the water supply shutoff valve and allow the filtration
system to fill with water. Close the faucet. Then, check for leaks between the sump and the head.
NOTE: If a leak is occurring, turn off the water supply and depressurize the filtration system
system.. Then, remove the sump and check the O-ring
for cuts, flat spots, etc., and sealing surfaces for foreign material. Clean the O--ring
ring and lubricate with silicone grease. Carefully press into
the groove in the sump.
NOTE: Taste and Odor Cartridges contain activated carbon which is a black powder. After the new filter cartridge is installed, open the
faucet downstream of the filtration system and allow carbon particles to purge from the filter cartridge
cartridge.. Close the faucet when you no longer
see “fines” (discoloration) in the filtered water, or appr
approximately
oximately 2 - 3 minutes.
□
O-Ring Seal
Filter
Cartridge
Sump
Turn to the left
to remove
ve
Replacement Parts:
□
□
HDGAOO4 – O-ring
HDXAWO4
HDXAWO4– Sump removal wrench
Uses HDX™ Household Filters:
□ HDX4CF4 - High-Flow
Flow
Household Carbon Filter
□
HDX4PF4 - High-Flow
Flow
Household Pleated Filter
□
Other standard high flow
household filters
Safety Information
□
□
□
□
□
□
Check with your local public works department for plumbing codes. You must follow their guidelines as you install the water ffiltration
iltration system.
Do not use this system on water that is microbiologically unsafe or of unknown quality without adequate disinfection before or after the system.
This system is only for use on COLD water (100°F / 38°C max.). Do not install on a hot water supply.
Do not install this system where it will be exposed to outdoor weather or direct sun.
Do not install or store this system where it will be exposed to temperatures below freezing. Water freezing in the system wil
will damage it.
The maximum operating water pressure of this system is 100 PSI.. If your home water pressure exceeds 80 PSI,, install a pressure reducing valve before install
installing the filter
filter.
Warranty
Glacier Bay Water Filtration Systems
Systems- Warranty
Glacier Bay Water Filtration Systems are manufactured under the highest standards of quality and workmanship. Glacier Bay Wat
Water
er Filtration Systems warrants to the original purchaser that
this system will be leak and drip free during normal domestic use for a period of one (1) year from date of purchase. If this system should ever develop a leak or drip Glacier Bay Water
Filtration Systems will free of charge provide the parts necessary to put the system back in good working condition. A replac
replacement
ement for any defective part will be supplied free of charge for
installation by the purchaser. Defects or damage caused by use of other than authorized parts are not covered by this warrant
warranty.
y. This warranty shall be effective from date of purchase as
shown on purchaser’
purchaser’ss receipt. Glacier Bay Water Filtration Systems shall be installed per the manufacturer’s installation instructions and speci
specifications.
fications. Some states do not allow limitations
on how long a warranty lasts, so the above limitation may not apply to you. This wa
warranty
rranty is valid for the original purchaser only and excludes industrial, commercial, or business use of the
product, product misuse, and product damage due to installation error, whether performed by a contractor, service company, or yourself. Glacier Bay Water Filtration Systems will not be
responsible for labor charges or for damage incurred during installation, repair or replacement, nor for incidental or conseq
consequential
uential damages. Some states, provinces and nations do not allow
the exclusion or limitation o
off incidental or consequential damages, so the above exclusions or limitations may not apply to you. Glacier Bay Water Filtrat
Filtration
ion Systems will advise you of the
procedure to follow in making warranty claims.
Simply write to Glacier Bay Water Filtration Sys
Systems
tems at the address below. Explain the defect and include proof of purchase and you name, address and telephone number or yo
you can also
call us at 11-800-247
247-1087.
U.S.A
Glacier Bay Water Filtration Systems
2455 Paces Ferry Road, N.W
Atlanta, GA 30339
30339-
201
01-8401480 (Rev 0
00)
Can
Canada
Glacier Bay Water Filtration Systems
900
900-11 Concorde Gate
Toronto, ON M3C 4H9
H
HOMEDEPOT.COM
M/GLACIERBAY
Please
ase contact 1-800-2
247-1087 for furth
rther assistance.