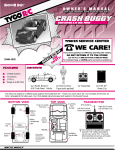
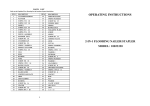
1
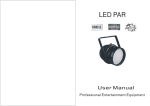
Stratos X-LEDPAR86
User Manual
Feat ures
Multi -Color s
Color Strob e
Electroni c Dim ming 0-100%
Bui lt i n Microp hone
DMX-512 Control
Auto/Ma ster&Sl ave s ynchroni zati on
Multi -channel mod e
Dip s witch to choos e menu
Gen eral Instru ctio ns
To op timize the per formance of this pr oduct, p leas e rea d thes e op erati ng
instructions ca reful ly to fa milia rize you with the b asi c op erations o f this
unit. These instructions contain imp ortant safety informati on rega r di ng
the use and maintenance of thi s unit. Pleas e k eep this manua l with the
unit, for future reference.
Unpackin g:
T hank you for p urchasi ng this utem 86X5MM LED PAR . Ever y has
been thoroug hl y tested and ha s been ship ped i n per fect opera ti ng
cond ition. Car efully check the shipp ing carton for d ama ge tha t m ay
ha ve occurr ed during shipp ing . If the car ton a ppea rs to be da ma g ed,
carefully inspect your fix ture for any d ama ge and be sur e all a cc essor ies
neces sar y to op erate the unit has ar rived intact. In the case d am ag e has
been found or p ar ts are mis sing, p leas e contact the ma nufactur e r or
your dea ler for fur ther instructions . Do not return this unit to your d ea ler
without firs t contacting.
Intro duct ion:
This item i s a DMX Control PAR lig ht. This LED PAR i s lig ht
weig ht and comp act whi ch makes it a grea t p iece for mobile DJ's and
clubs. This unit ca n be used as a stand alone, or a s ound-active m ode.
The uni t ca n al so be contr ol led via DMX controller.
Cau tion!
T here are no user s erviceab le p ar ts inside this unit. Do not
a ttempt any r epai rs yours elf; doing s o wi ll voi d your ma nufactur es
w arra nty. In the unlikel y event your uni t ma y r equi re service plea s e
contact the ma nufactur er or your deal er.
Please recycle t he shippi ng carto n when ev er possib le.
Safe ty Pr ecau tions
Be sur e that the loca l power outl et m atch that of the required voltag e f or
your unit.
Do not attem pt to op erate thi s unit if the pow er cor d ha s been fr ayed or
b roken. Do not attemp t to rem ove or brea k off the ground prong from the
el ectr ical cord . T his prong is used to reduce the risk of el ectr ical s hock
a nd fi re in cas e of a n internal short.
Dis connect fr om m ain p ower before ma king a ny typ e of connecti on.
Do not remove the cover und er any conditions. T here are no user
ser vicea ble p arts insid e.
Never op erate this unit when it's cover is removed.
Never p lug this unit in to a dimmer p ack .
Alwa ys be sure to mount thi s unit in a n ar ea tha t w ill al low prop er
ventila tion.
Allow a bout 6 inch (15cm) betw een thi s device and a wa ll.
Do not attemp t to oper ate this unit, if it becomes da mag ed.
Duri ng l ong p eriods of non-use, dis connect the unit's main power.
Alwa ys mount this uni t i n sa fe a nd stab le matter.
Pow er-supp ly cor ds shoul d be routed so that they a re not likel y to be
w alked on or pinched b y i tems pla ced up on or ag ainst them, paying
p ar ti cula r attention to the poi nt they exit from the unit.
Clea ni ng -T he fixture should b e clea ned only as r ecom mend ed by the
ma nufacturer. See Cl eaning for d etai ls.
H eat -The a ppl iance should b e s itua ted aw ay from heat sources such a s
ra di ators, heat regi sters, s toves , or other app lia nces (i ncluding a mp
l ifiers) that prod uce hea t.
The f ixture s houl d be ser vi ced by qualifi ed service per sonnel when:
A. The p ower-s upp ly cord or the pl ug has b een da mag ed.
B. Obj ects ha ve fal len, or liq uid has been s pill ing to the a pp lia nce.
C. The ap pl iance has b een exp osed to rai n or water.
D. The a ppl iance does not a ppea r to op erate normal ly or exhibi ts a
ma rked change in p erform ance.
Set Up
Pow er Su pply: Before p lug gi ng your uni t i n, be sure the source volta ge
in your a rea ma tches the req ui red vol tage for your 86x 5mm l ed p ar
The RGBPAR64-03-183 is a vaila ble in a 110v to 250v vers ion. Because
line volta ge may var y from venue to venue, you should b e s ure your uni t
vol tage ma tches the w all outlet volta ge before attem pting to opera te
you fixture.
A . Manual Mode (fixed col or, w /o co lor ch angi ng w /o chasing )
1. Link up more than 2 unit s or more and set Mast er and Sla ve
M aster: DI P switch 9 and 5 at O N
S lave: DI P switc h 1 0 at ON
2. To set color by se tting dip switche s of Mas t er unit :
DIP 1 ON:
DIP 2 ON:
DIP 3 ON:
DIP 4 ON:
DIP 5 ON:
DIP 6 ON:
Red LED at med ium brig htness;
Red LED at hig h brightne ss;
Green LED at m ediu m b rightnes s;
Green LED at hi gh brigh t ness;
Blue LE D at med ium brig h tness;
Blue LE D at hig h brightn ess;
Dip 7 Auto f unction .when DIP 7 turn o n the sut o speed will slow .
Bu t you sh ould turn on DIP 9 at the sa me time
DIP 8 Soun d funct io n
DIP 9 Auto fu nct ion
DIP 10 DMX Mode Fu nct ion
※ The abov e setti ng s canno t work w ith D MX - 512 controll er.
※ When tw o or mor e LE Ds are in seri al, sett in gs appl ie s to Mas ter
only. DO NOT ma ke any se ttings on Sl aves. Ot herwi se, there wi ll
be unexp ected co lor chan ging.
※ DO NOT set DI P s witch 7 a t ON.
B . Sou nd- active Mo de
M aster: DI P swi tch 8 and 5 a t ON
S l ave: DIP switch 10 at ON
D . DMX-51 2 Mode
1. To set D IP switch 1 0 of all un its at ON.
2. To set ad dress cod e by setti ng DIP s w it ch 1-9 o f each un it .
3. The t otal v alue of t he DI P sw itches is t he addre ss c ode.
DM X C HA N N EL
2
32
8
12 8
SP
NO
1
1
2
3
4
4
5
16
6
7
64
8
9
10
25 6
C. When t h e light ing f ixture con nect D MX Controller:
Ch annel 1:T he light in g will turn on .001- 0 79 is St robe
Ch annel 2:Dimmer fu n ction
Ch annel 3:I t can t urn on RED L ED
Ch annel4 :I t can turn on Gree n LED
Ch annel 5:I t cans turn on BLUE LED on
C lean ing
D ue to fo g residue , smoke, and du st cleani ng t he in tern al a n d extern al
o ptical len ses mu st be car ried out periodically to optimize l ight out p ut.
1.Use n orm al glass clea ner and a so ft clot h to wipe d own the outside
casing .
2.Clean th e ext ern al opt ics with gla ss clean er and a soft clot h ev ery 2 0
day s.
3.Always b e sure to dry a ll p art s com pletely before p lug ging t he u nit
back in.
Cleaning freq uen cy d epe nds on the envir onmen t in which the fixt u re
operates (i.e. sm oke, fog residue, dust , de w).
Tr oub le Sh ootin g
List ed below a re a few com mon pro blems th e user m ay en co unter, with
solution s.
U nit n ot re s po nding to D MX:
1.Check th at the DMX cables are connected proper ly a nd a re wired
correct ly (pin 3 is hot; on some ot h er DMX devices pin 2 ma y be
'hot'). Also, check tha t all cables a re conn ected to the righ t
conn ec tors; it do es m atte r which way th e inputs an d out pu ts are
conn ec ted.
U nit d oe s n ot re spo nd to sou nd:
1.Quiet or h igh pitc hed sou nds will n ot activ ate the u nit . If problems
are n ot resolved , cont act your de aler for s erv ice.
Specific ati ons
Mod el:
Voltage:
Powe r co ns um ptio n:
Colo rs:
LED:
Gros s We ight:
Dime nsio ns:
Fuse :
DMX :
Work ing p o siti on:
Str atos X-PA R86LED
110-250VV 50-/ 60Hz
15W
RG B Co lor M ixing
86*5MM
1.1 Kgs
140*14 0*1 90MM
1A
5D MX Chan nel
An y safe Se c ure Po siti on
Pl ease no te:Speci tation an d impro vemen ts in t he de sig n of this
un bit and this ma nual a re subject to chan ge witho ut any p rior
wr itten no tice