1
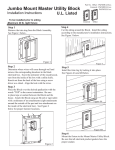
06/15/2006
#16584
GAMBREL DORMER
LDR PL
An attractive alternative to skylights, with modern function and country appeal
Part I.D.
1. Assemble framing brackets, using pieces
LY and LZ as shown. Fasten using two 3”
screws per bracket.
LY
3“ Screws
A
B
C
D
E
F
G
FA
FB
LX
LY
LZ
Qty.
2
2
2
1
1R/1L
12
1
2
2
1
2
2
1
1
Description
Size
Wall Sub Panel
Vertical Filler Strips
Horizontal Filler Strips
Roof Panel
Wall Panel
Flashing Cards
Flashing Card
Horizontal Window Trim
Vertical Window Trim
Window Header
Roof Cleat
Window Side Framing
Window
Hardware Kit
3/8”
3/8”
3/8”
3/8”
3/8”
5” x
4” x
1” x
1” x
2” x
2” x
2” x
x 9” x 27-7/8”
x 2-7/8” x 16-3/4”
x 2” x 28-3/16”
x 14” x 30”
x 8-3/4” x 27-1/16”
8”
32”
4” x 16-1/4”
3” x 29”
3” x 27-1/2”
3” x 24-1/8”
3” x 20-1/8”
x2
LZ
2“ Nails
2. Using wall sub panel A, attach brackets as
shown. Make sure sub panels are flush to the
front and bottom of the brackets. Attach using
one 1-1/4” screws and two 2” nails per
bracket.
1-1/4” Screws
A x2
2“ Nails
Flush to front and bottom of frame
3“ Screws
3. Attach the window header, LX, to the top of the
brackets as shown. Fasten using four 3” screws.
LX
4. Attach waferboard spacers to the framing. Begin with the top horizontal piece, C,
flush to the top of the roof cleat. Next attach
the two vertical pieces, B, flush to the
outside. Finally attach the bottom
horizontal piece, C. Fasten all pieces using
eight 1-1/4” screws.
C
B
1-1/4” screws
D
Flush to back of frame
2“ Nail
About 7/8” overhang
5. Attach the roof panel, D, using four 2”
nails. The roof panel should be flush to
the back and centered.
22-1/2”
(57cm)
6. To cut opening for dormer, locate the
rafters on the roof. Cut a hole 22-1/2” wide
by 28-1/2” high.
28-1/2”
(72cm)
Screw in as high as possible
3“ Screws
7. Center dormer over hole and attach using six
3” screws in the locations shown. Screws should
be driven at a slight angle to be driven into the
rafters.
8. To attach window, center in the hole and
fasten using four 1-1/4” screws in the predrilled corner holes.
9. Using the square edge of a table or bench,
bend the twelve step flashing cards, F, to a 90
degree angle down the center. Beginning at the
bottom edge of the dormer fasten the first card
using roofing nails(not supplied) in the bottom
corners only. The next piece should over lay the
first piece and should leave a 5” reveal, attach
both pieces using nails in the bottom corners
only. Continue process all the way up each side
of the dormer. Top pieces will need to be cut
flush to the top of dormer using regular tin snips
and fastened in all four corners.
F x12
5“ Reveal
10. Shingle the building one complete row up
past the bottom edge of the dormer.
G
11. Using the square edge of a table or bench
bend the front flashing, G, to slight angle (about
30 degrees) down the center. Place against
dormer and adjust angle if needed. Fasten to the
dormer and roof using roofing nails as shown.
2“ Nails
E x2
Flush
13. Attach front trim using twelve 1-1/4”
screws, beginning with the top horizontal
piece, FA. Make sure the trim is flush to the
underside of the roof panel and centered on
the dormer. Attach the vertical trim pieces,
FB, flush to the outside of the dormer. Finally, attach the bottom trim piece, FA.
FB
12. Attach the siding, E, as shown.
Make sure the siding is flush to the front
of the dormer and flush to the underside
of the roof panel. Attach siding using six
2” nails per piece. Siding should leave
about 3/8” gap above roof to allow for
shingles.
FA
FB
14. To shingle dormer, begin at the front of
the roof panel and work backwards toward
the roof pitch. Exposure should be 5”, the
same as the roof. Run the shingles all the
way up until the dormer is covered. Shingle
the remainder of the building.
15. Using an exterior grade caulk, be sure to
caulk all joints around the dormer including
above and below trim and along the underside of the roof panel. Paint must also be
applied to trim and siding.