1
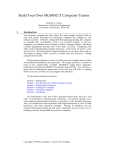
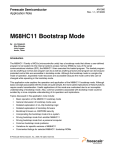
Session 3532
MC68HC11 Portable Lab Unit -- A Flexible Tool for Teaching Microprocessor Concepts
Pamela J. Neal, George W. P. York
U.S. Air Force Academy
ABSTRACT
One challenge when teaching assembly language and microprocessor basics is to provide enough
hands-on experience to both teach the concepts and keep the course interesting. At the Air Force Academy,
we have designed a self-contained lab unit that is portable, durable, flexible enough to support three
courses, and relatively inexpensive. Centered around the Motorola 68HC11 Evaluation Board, the unit also
includes a power supply, protoboard area, and enough storage to house the power cord, serial cable, wire kit
and logic probe. Each student signs a unit out for the semester, and can take it to their dorm room. This
allows students to program and run examples from the text as they are learning the concepts, rather than
waiting for certain hours when labs are available. Students can also work on laboratory exercises and build
associated circuits at their convenience. We are able to use this unit for courses ranging from basic
microprocessor programming through our senior level microprocessor interfacing course. Our lab exercises
range from simple tutorials, to stoplight controllers, to LCD and video controllers, to building a simple
network. This unit is also useful for students using the 68HC11 as part of the senior design project. They
find the portable lab unit is a convenient development platform so they can test the software and interfaces
before programming a 68HC11 in the stand-alone mode. We will discuss the variety of topics we illustrate
with hands-on exercises using the portable lab unit as well as the rationale behind choosing this
microprocessor.
INTRODUCTION
At the Air Force Academy, the heart of our Computer Engineering Track is a 3-semester course
sequence which uses the Motorola 68HC11 as the processor of choice to teach assembly language
programming, microprocessor system design, and microprocessor interfacing skills. The development board,
the 68HC11 EVB, is used extensively in all three courses. In this paper, we discuss why we chose the 68HC11
as our processor, some logistical problems we encountered when using the EVB, and our solution to those
problems: the Portable Lab Unit. Finally, we’ll discuss the types of labs we use the lab unit for, and our results
in using the Portable Lab Unit.
WHY THE 68HC11?
In the 1980’s and early 90’s we were using the Zilog Z-80 and the Intel 8088 to teach microprocessor
concepts. While these were fine processors, we felt our students could gain more practical knowledge in a
shorter amount of time if we switched to a microcontroller. At the undergraduate level, we wanted to stay
Page 1.316.1
1996 ASEE Annual Conference Proceedings
with a common 8-bit machine. We felt this narrowed our choices to two: the INTEL 8051 and the Motorola
68HC11. At that time, Motorola was aggressively marketing to universities by selling the development boards
(EVB and EVBU) for less than $100 each. The least expensive 8051 development board we could find at that
time was about $1100. Motorola also had (and still has) an extensive and well-advertised University Support
Program. Since we were planing to buy many (at least 50) development boards, we decided to take the most
cost-effective route and go with Motorola.
THE PROBLEM
Before we developed the Portable Lab Unit, we used the 68HC11 EVB by itself to do the labs. We
found that adding external hardware to it is a cumbersome process since, even with a breakout cable, each pin
must to be jumpered to a protoboard with some nonstandard type of connection. The lab setup was also
awkward because, in addition to a computer, a power supply that provided +5 V and +/- 12 V had to be
hooked to the EVB. Between the bare EVB and all the loose cables attached to it, the students (especially the
first-semester Juniors) found the labs to be somewhat frustrating. They spent a lot of their time
troubleshooting loose and broken wires, when they should have been concentrating on the task at hand. Also,
since the setup was too fragile to move, they had to remove their protoboard with external hardware on it each
time they went away from the lab. More time was wasted reconnecting the protoboard to the EVB each time
they wanted to work on it. They had to work on the assignments in the particular lab where the EVBs were
located, which was also inconvenient for the student.
THE SOLUTION
Our solution to these problems was the 68HC11 EVB Portable Lab Unit. It consists of a 68HC11 EVB,
power supply, breakout board, protoboard, and storage space for a wire kit, power cable, serial cable, logic
probe, and a few small tools. It is completely self-contained in a rugged case, and is quite portable. It
measures 14” x 10” x 6” when closed, and weighs about 12 lbs. A picture of the Portable Lab Unit is shown
in Fig. 1. Cost of parts was less than $300 per unit. All assembly work and fabrication, with the exception of
the breakout board, was performed in-house. A brief description of the major parts and assembly is given
below.
Page 1.316.2
1996 ASEE Annual Conference Proceedings
Figure 1. Photograph of Portable Lab Unit
The Processor - As discussed above, we used a 68HC11 EVB. This development board contains a nice
monitor program as well as 8 K (expandable to 16K) of user RAM, so fairly extensive programs can be written
and tested.
The Power Supply - We used a 5 amp switching power supply which has +5 V, +12 V, and -12 V available
and is compact enough to fit into our case in the designated area.
The Breakout Board - This printed circuit board simply consists of straight runs that takes the double-row
male connector from the EVB and converts it to a single row of protoboard connections each five pins wide.
The signal name for each pin is printed right next to the connection, thus lessening the possibility of
miscounting pins. Standard jumper wires are used to connect these signals to the protoboard.
The Case - We used a Pelican case to contain the equipment, but any durable case of the same size would
work. We made several different prototypes before deciding on our current configuration -- the processor,
protoboard, and power supply mounted in the lid and the storage located in the main compartment. This
configuration gave us a lot of storage space and added stability to the unit when open. We had first mounted
the equipment in the main compartment. This caused the lid to fall closed when trying to use the unit. This
problem was solved when the “lid” became the “bottom”, and vice versa.
Assembly - Assembly of the units was not difficult, though did take some time. The case was slightly modified
by drilling a hole in the side of the lid to accommodate the power supply plug. A small piece of angle-iron was
attached to either side of the main compartment. These are used to hold a piece of thin board that serves to
hold contents of the storage area in place when the case is closed. Opaque Plexiglas was used to build a large
stand-off area slightly smaller than the lid. The power supply is mounted underneath this Plexiglas, and the
EVB, breakout board, and protoboards are mounted on top of this Plexiglas. A small hole is drilled in the
Plexiglas to accommodate wires that connect the power supply to the EVB. A short connector to connect the
EVB to the breakout board was fabricated using ribbon cable. Finally, a piece of thin waferboard to separate
the storage area from the EVB was cut and finger holes drilled. The board is attached to the angle-irons using
Velcro, so the finger holes are necessary to easily remove the board.
LIMITATIONS OF THE PORTABLE LAB UNIT
The main limitation to using the Portable Lab Unit for all labs in all three courses is a limitation of the
EVB itself. The EVB does not allow access to the address and control buses, which is needed to teach some
system concepts such as memory expansion and I/O port expansion. This problem was easily solved by using
another development board, the 68HC11 EVBU. The EVBU is a much smaller and less expensive
development board with no additional user RAM. It has a wire-wrap area for external components. The
transition to the EVBU is very easy, since it uses the same monitor program as the EVB and the students are
already familiar with the 68HC11 and the monitor program. There is an additional benefit in that the students
learn to wire-wrap when they do the labs using the EVBU.
The other limitation we’ve noticed when using the Portable Lab Unit is insufficient protoboard space
for a few of the larger labs. The protoboard space is driven by the physical size of the case and the EVB.
Page 1.316.3
1996 ASEE Annual Conference Proceedings
There’s plenty of space for most labs, and all labs can actually be done in the space provided if a student is
very conscientious (and occasionally creative) in how he/she uses the board space.
THE LABS
We use the Portable Lab unit for many lab exercises, to teach a variety of concepts. The labs and
concepts they teach are listed below, for each course, in order of increasing complexity. All use the Portable
Lab Unit except where noted. In all labs, we emphasize proper software design techniques and structured
programming. The laboratory exercises include the following:
Course: Assembly Language Programming
LAB
CONCEPTS
Print Message to Terminal
Rolling Die
Traffic Light Controller
Square-Wave Divider
Display A/D Result
Basic Programming, Calling Subroutines
Interrupts, Parallel I/O
Basic Timing System, Parallel I/O
Advanced Timing System Features
Using A/D Converter, Programming, LCD Display
Course: Microcomputer System Design
LAB
CONCEPTS
SIMON™ Game
Logic Analyzer
Memory Expansion
I/O Port Expansion
UART
Ethernet
(Team Project)
Software Development, Interface Switch, LEDs, Buzzer
Examine timing of control signals on the bus
Learn to use Logic Analyzer
Use EVBU
Wire-wrapping skills
PALS for address decoding
Interface Memory
EVBU and wire-wrapping
Interface I/O Ports
Use add-on board developed in-house
Serial I/O
Program State Machine for UART Controller
Implement Ethernet Protocol and Hardware Interface
Develop Chat and email applications
Page 1.316.4
1996 ASEE Annual Conference Proceedings
Course: Microcomputer Interface Design
LAB
CONCEPTS
Frequency Counter
Pong Game
Video
Calculator
Digital Filter
Sonar Room Mapper
(Team Project)
Interface 7-segment LEDs
Interface Graphics LCD
Interface serial input device (mouse)
Learn timing for video signals
Interface B/W CRT to 68HC11
Keypad Interface
Text LCD Interface
Interface A/D and D/A converters
Implement digital LPF
Interface Ultrasonic Transducer to 68HC11
Interface stepper motors to 68HC11
Use Graphics display to show room plot
Software to change polar to rectangular coords.
RESULTS
We have used the portable lab unit for the past 4 semesters. It has held up well, and the students like
the portability and the fact that they can keep their hardware setup as they want it for the whole semester.
Since they have access to the 68HC11 EVB all the time, they also use it when doing homework or trying to
understand basic programming concepts. The biggest complaint we’ve had is that it has no on/off switch! We
plan to correct this oversight in later versions.
CONCLUSIONS
We have described in detail the Portable Lab Unit we use for our microprocessor course sequence. We
discussed why we needed to develop it, and how we are using it in our lab. We have been very pleased with
the cost, flexibility, and robustness of this tool.
REFERENCES
1. M68HC11EVB Evaluation Board User’s Manual, 1986, Motorola, Inc.
2. M68HC11 Reference Manual, Rev. 3, 1991, Motorola, Inc.
AUTHORS
PAMELA J. NEAL - Pam graduated from Utah State University with a BSEE in ‘86 and was a test engineer
for early GPS satellites from ‘86 to ‘90. She graduated from the University of Washington with a MSEE in
‘92, and currently teaches Microcomputer Programming and Computer Architecture courses at the US Air
Force Academy.
Page 1.316.5
1996 ASEE Annual Conference Proceedings
GEORGE W.P. YORK - George graduated from the US Air Force Academy with a BSEE in ‘86 and from the
University of Washington with a MSEE in ‘88. He developed guidance computers for missiles at USAF Wright
Laboratories from ‘88-’92. Then he served two years as an exchange engineer at the Korean Agency for
Defense Development. Currently he is teaching Microcomputer System Design courses at the US Air Force
Academy.
Page 1.316.6
1996 ASEE Annual Conference Proceedings