1
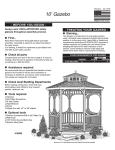
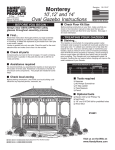
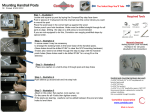
#16686
2-26-03
Oval Gazebo
Second Tier
-BEFORE YOU BEGIN-
■ First...
Read these instructions thoroughly before you begin assembly.
Assembly is easiest if you follow the steps in the order shown.
In a drawing, a dotted line represents a part hidden from view
(like a part under a panel).
Lumber is graded from only one side. Check the part for the
most attractive face and make sure to face it to the outside.
■ Check all parts
Compare the parts you have to the list, If a part is missing, circle
the part in question and call our toll-free # at (800) 437-0784.
Always wear OSHA-APPROVED safety
glasses throughout the assembly process
■ Tools Required
■ Optional Tools
❒
❒
❒
❒
❒
❒
Hammer
❒ Electric Drill with #2 phillips Tip
Phillips Screwdriver
❒ Square
Level
❒ Nail Pouch
Pencil
❒ 1/8” Drill Bit for Pre-drilling
Tape Measure
Staple Gun with 1/4” or 3/8” staples
Parts List
Qty.
Description
Size
10’ Two Tier Parts
❑ 8 pcs. Pre-assembled Wall Panels
❑ 2 pcs. Pre-assembled Long Wall Panels
❑ 2 pcs. Ridge Block 8-Sided
❑ 1 pc. Metal Roof Cap from Gazebo
❑ 8 pcs. Triangular Roof Panels
❑ 2 pcs. Square Roof Panels
❑ 6 pcs. Plywood Gusset Brackets
❑ 4 pcs. 2 left/2 right Plywood Gusset Brackets
❑12 pcs. Rafters
2 x 4 x 27”
❑ 2 pcs. Center Rafter Support
2 x 4 x 43-1/4” angled
❑ 3 pcs. Rafter Support Spacers
1/2” x 3-1/2” x 6”
❑ 8 pcs. Fascia
2-1/2x21-1/16”
❑ 2 pcs. Fascia
2-1/2x44-3/4”
❑ 10 pcs. Fascia Trim
3/4” x 1-1/2” x 2-3/4”
❑ 2 pcs. Roof Finial Block
1-1/2” x 1-1/2” x 3-1/2”
❑ 2 pcs. Roof Finials from Gazebo
❑ 1 pc. 13” Roll of screen
❑ Hardware #8 - 3” Screw, #8 - 1-5/8” Screw, 6d-2” Nail,
4d-1-1/2” Finish Nail, 3/4” Roofing Nail, 1” Roofing Nail
12’ Two Tier Parts
❑ 10 pcs. Pre-assembled Wall Panels
❑ 2 pcs. Pre-assembled Long Wall Panels
❑ 2 pcs. Hollow Ridge Block 10-Sided
❑ 2 pcs. Ridge Cap 10-Sided
❑ 1 pc. Metal Roof Cap from Gazebo
❑ 10 pcs. Triangular Roof Panels
❑ 2 pcs. Square Roof Panels
❑ 2 pcs. Plywood Gusset Brackets
❑ 4 pcs. 2 left/2 right Plywood Gusset Brackets
❑14 pcs. Rafters
2 x 4 x 33-1/8”
❑ 2 pcs. Center Rafter Support
2 x 4 x 43-1/16” angled
❑ 3 pcs. Rafter Support Spacers
2 x 4 x 2-1/4”
❑10 pcs. Fascia
2-1/2 x 20-9/16”
❑ 2 pcs. Fascia
2-1/2 x 44-3/4”
❑12 pcs. Fascia Trim
3/4” x 1-1/2” x 2-3/4”
❑ 2 pcs. Roof Finial Block
1-1/2” x 2-1/2” x 3-1/2”
❑ 2 pcs. Roof Finials from Gazebo
❑ 1 pc. 13” Roll of screen
❑ Hardware #8 - 3” Screw, #8 - 1-5/8” Screw, 6d-2” Nail,
4d-1-1/2” Finish Nail, 3/4” Roofing Nail, 1” Roofing Nail
14’ Two Tier Parts
❑ 12 pcs. Pre-assembled Wall Panels
❑ 2 pcs. Pre-assembled Long Wall Panels
❑ 2 pc. Ridge Cap 12-Sided
❑ 2 pc. Hollow Ridge Block 12-Sided
❑ 1 pc. Metal Roof Cap from Gazebo
❑ 12 pcs. Triangular Roof Panels
❑ 2 pcs. Square Roof Panels
❑ 2 pcs. Plywood Gusset Brackets
❑ 4 pcs. 2 left/2 right Plywood Gusset Brackets
❑ 16 pcs. Rafters
2 x 4 x 38-5/8”
❑ 2 pcs. Center Rafter Support
2 x 4 x 42-13/16” angled
❑ 3 pcs. Rafter Support Spacers
2 x 4 x 4-1/4”
❑ 12 pcs. Fascia
2-1/2 x 20-3/16”
❑ 2 pcs. Fascia
2-1/2 x 44-3/4”
❑ 14 pcs. Fascia Trim
3/4” x 1-1/2” x 2-3/4”
❑ 2 pcs. Roof Finial Block
1-1/2” x 2-1/2” x 3-1/2”
❑ 2 pcs. Roof Finials from Gazebo
❑ 1 pc. 13” Roll of screen
❑ Hardware #8 - 3” Screw, #8 - 1-5/8” Screw, 6d-2” Nail,
4d-1-1/2” Finish Nail, 3/4” Roofing Nail, 1” Roofing Nail
10’ Oval Second Tier - 10 sided Gazebo shown with Second Tier
12’ Oval Second Tier - 12 sided (not shown)
14’ Oval Second Tier- 14 sided (not shown)
1
SECOND TIER
SCREEN AND
WALL ASSEMBLY
PARTS LIST 10’ GAZEBO
PARTS LIST 12’ GAZEBO
PARTS LIST 14’ GAZEBO
❑ 8 pcs.
❑ 2 pcs.
❑ 1 pc.
❑ 6 pcs.
❑ 4 pcs.
❑ 10 pcs.
❑ 2 pcs.
❑ 1 pc.
❑ 2 pcs.
❑ 4 pcs.
❑ 12 pcs.
❑ 2 pcs.
❑ 1 pc.
❑ 2 pcs.
❑ 4 pcs.
Short Wall Sections
Long Wall Sections
Roll of Screen
Gussets
2 left and 2 right Gussets
Short Wall Sections
Long Wall Sections
Roll of Screen
Gussets
2 left and 2 right Gussets
Short Wall Sections
Long Wall Sections
Roll of Screen
Gussets
2 left and 2 right Gussets
Note: Apply shingles on Gazebo all the way to the top covering ridge block. Metal roof cap and Roof Finial will be used to
finish the second tier.
1-A: For a 10’ Second tier Cut 8 sections of screen 17”x13” and
2 sections 43”x13” and apply to the inside of the Second Tier
Cut 17"x 13" piece of screen.
panel with staples (not included) every 2”.
Apply Screen to inside of Second Tier.
17"
Rollover
Screen 1/2"
at Top and
Sides
1-A
Screen
Outside
of Two
Tier
Gazebo Size
Total Pieces
17"x13" Size
43"x13" Size
10'
12'
14'
10
12
14
8
10
12
2
2
2
Staple every 2"
3" Screws
1-B
Side View
Flush at top
Leave 2" of Screen at bottom to Staple to Roof in step 3 G
Angle
Down
2-1/2" Overhang
1-C
1-B: Stand up two Side Wall Panels and attach them
together using two 3” screws as shown in illustration. Make
sure that the two Wall Panels are flush at the top with Angle
end down as shown. Connect all Wall Panels in this same
manner with the long wall panel opposite each other to make
the oval.
Flush to inside edge
Smooth
Side
Up
1-5/8" Screws
All Gussets
Fig.1
Cedar Side
Down
Left
Fig.2
1-C: Install Gussets with Rough sawn Cedar side facing down using
1-5/8” screws for each Gusset inside pre-drilled holes. Make sure that
the Gusset is flush to the inside of the Wall Panel and that the inside
corner is directly over inside corner of Wall Panel as shown in Fig. 1.
The Gusset should overhang the outside edge of the Wall Panel by 21/2”. This step may require some shifting of the Wall Panel to bring it
into proper position. The gap between Gussets may vary. For 10’
Gazebo Second Tier see Fig. 2, For 12’ Gazebo Second Tier see Fig.
3, For 14’ Gazebo Second Tier see Fig. 4.
Left
Right
End
10' Second Tier
10 Gussets
2 Left, 2 Right and 6 End
Right
Left
Right
Left
Fig.4
End
End
Fig.3
14' Second Tier
6 Gussets
End
End
12' Second Tier
6 Gussets
End
2 Left, 2 Right and 2 End
2 Left, 2 Right and 2 End
Right
Right
Right
Left
Left
2
Second Tier
2
PARTS LIST 10’ GAZEBO
SECOND TIER
RIDGE ASSEMBLY
❑ 2 pcs.
❑ 3 pcs.
❑ 2 pcs.
Center Rafter Support
Center Spacer
Solid Center Block 8 sided
PARTS LIST 12’ GAZEBO
❑ 2 pcs.
❑ 3 pcs.
❑ 2 pcs.
10' Assembly
Center Rafter Support
(2) 3" Screw
Center Block
2 x 4 x 43-1/16”
2 x 4 x 2-1/4”
PARTS LIST 14’ GAZEBO
❑ 2 pcs.
❑ 3 pcs.
❑ 2 pcs.
(2) 3" Screw
Center Rafter Support
Center Spacer
Hollow Center Block 12 sided
2 x 4 x 42-1/4”
2 x 4 x 4-1/4”
2-A: 10’ Gazebo - Layout Center Rafter Support
(angled) and Center Support Spacers equally as
shown. Use (2) 3” screws staggered as shown
into each spacer. Install 2 solid center blocks
with pre-dirlled holes facing down, secure with 3”
screws as shown.
Center Rafter Spacer
Equally Spaced
10' Gazebo
Center Block Pre-Drilled
Inside Holes Facing Down
12' Assembly
Center Rafter Support
Center Rafter Support
Center Spacer
Hollow Center Block 10 sided
2 x 4 x 43-1/4”
1
/2” x 3-1/2” x 6”
(2) 3" Screw
2-1/4"
Center Block
(2) 3" Screw
2-A: 12’ Gazebo - Layout Center Rafter Support
(angled) and Center Support Spacers equally as
shown. Use (2) 3” screws into each spacer as
shown. Install 2 hollow center blocks with 3”
screws as shown.
Center Rafter Spacer
Equally Spaced
14' Assembly
Center Rafter Support
(2) 3" Screw
4-1/4"
Center Block
2-A: 14’ Gazebo - Layout Center Rafter Support
(angled) and Center Support Spacers equally as
shown. Use (2) 3” screws into each spacer as
shown. Install 2 hollow center blocks with 3”
screws as shown.
Center Rafter Spacer
Equally Spaced
(2) 3" Screw
3
Second Tier
3
PARTS LIST 10’ GAZEBO
❑ 12 pcs. Rafters 2 x 4 x 27”
❑ 1 pc. Assembled Ridge from 2-A
PARTS LIST 12’ GAZEBO
❑ 14 pcs. Rafters 2 x 4 x 33-1/8”
❑ 1 pc. Assembled Ridge from 2-A
SECOND TIER
ERECTING RAFTERS
PARTS LIST 14’ GAZEBO
❑ 16 pcs. Rafters 2 x 4 x 38-5/8”
❑ 1 pc. Assembled Ridge from 2-A
If you are assembling a 12’ or 14’ Second Tier, please begin with step 3-B, if you are assembling a 10’ Second
Tier, please go to step 3-A. Note: Step 3-A and 3-B only show the method for securing rafters to ridge assembly. Follow step 3-C for layout and attachment to Gussets.
3-A
Flush
at top
10' GAZEBO
TOP VIEW
Keep Center Rafter
Flush to Top
Flush to Top
3" Screw
10' Gazebo
Ridge Block Eight
Pre-Drilled Holes
Facing Down
Rafter
Rafter
44-3/4"
3" Screw
3-A: For a 10’ Second Tier, assemble Rafters (with
predrilled holes facing up) by joining two Rafters
on opposite sides to Ridge Block (with predrilled
holes in Ridge Block Assembly facing down) using
3” screws through predrilled hole in top of Rafter.
Once two Rafters are connected to Ridge Block,
carefully turn over and attach 3” screws through
predrilled holes in Ridge Block into Rafter. The 10’
Monterey has twelve Rafters.
BOTTOM VIEW
BOTTOM VIEW
3" Screws
12' & 14' GAZEBO
TOP VIEW
3-B
1/2"
Mark
3" Screws
Keep Center Rafter
1/2" above Top
3" Screws
Maintain
1/2"
Space
Rafter
Rafter
44-3/4"
3-B: For 12’ and 14’ Gazebo, assemble Rafters by joining two Rafters on opposite sides to Ridge Block Assembly using 3” screws through predrilled hole in top of Hollow Center Block. Leave a 1/2” gap between the
top of the rafter and the Ridge block.
Once two Rafters are connected to Ridge Block Assembly, carefully turn over and attach 3” screws through
predrilled holes in Ridge Block into Rafter. The 12’ has fourteen Rafters and the 14’ has sixteen Rafters.
4
Second Tier
3
SECOND TIER
RAFTER ASSEMBLY
CONTINUED
3-C
10
1
11
2
3-C: Attach rafters 1, 2, 3, 4 to Ridge assembly first. Set on Gussets and attach with 1-5/8”
screws, see 3-D for details. In windy conditions, have a second person hold this assembly in place until rafters 5 and 6 are installed.
Layout and attach remaining rafters according
to 3-C for easier assembly. Install rafters in
same order for 12’ and 14’ model gazebos.
7
6
5
9
3
12
4
8
NOTE: Adjust Wall corners in (or out) to fit.
44-3/4"
on center
3-D: Carefully lift the Rafter and Ridge
Block assembly on top of the Gussets at
opposite corners of the Gazebo Second
Tier. Place Rafter Ends at center of outside
corner of Gusset as shown. Once Rafter is
in place, attach to Gusset with two 1-5/8”
screws through predrilled holes from underside of Gusset into bottom of Rafter as
shown.
3-D
Rafter
Rafter
VIEW FROM TOP
Install remaining Rafters by inserting screws
through Gusset, as shown in Fig. 2, while
holding Rafter in position. Install 3” screw
through top of Rafter or Ridge Block as
shown in 3-A or 3-B top view. Once all
Rafters are in place, install 3” screws in
underside of Ridge Block into Rafters as
shown in 3-A or 3-B bottom view.
Screen
Centered
over corner
1-5/8"
Screws
at angle
Fig.2
Fig.1
5
Second Tier
3
PARTS LIST 10’ GAZEBO
❑ 2 pcs. Roof Finial Block
SECOND TIER
RAFTER ASSEMBLY
CONTINUED
PARTS LIST 12’ GAZEBO
❑ 2 pcs. Ridge Cap Tops
❑ 2 pcs. Roof Finial Block
PARTS LIST 14’ GAZEBO
❑ 2 pcs. Ridge Cap Tops
❑ 2 pcs. Roof Finial Block
3-E: For 12’ and 14’ Gazebo Only
For 12’ and 14’ Gazebos, attach Ridge Cap to top of Ridge Block with four 1-5/8” screws as in Fig.1.
(4) 1-5/8"
Screws into
each Ridge Cap
Fig.1
12' & 14' GAZEBO
TOP VIEW
3-F: Add Roof Finial Block to top as shown with 3” screws . Use pre-drilled holes to keep from
splitting.
3" Screws
3-F
3-G: Carefully place the Second
Tier on top of your Gazebo aligning
seam to Gazebo Seam. Fasten
into roof with 3” screws through
Wall Panel into Rafter below as
shown in Fig. 1. Staple screen to
roof every 2” as shown in Fig. 2.
Pre-drill mounting hole to keep
from splitting.
Fig.2
3-G
Fig.1
3" #8 Wood
Screw to Main
Rafter
Staple to
Roof
6
Second Tier
4
ASSEMBLING
SECOND TIER
ROOF CONTINUED
PARTS LIST 10’ GAZEBO
PARTS LIST 12’ GAZEBO
PARTS LIST 14’ GAZEBO
❑
❑
❑
❑
❑
❑ 10 pcs.
❑ 2 pcs.
❑ 10 pcs.
❑ 2 pcs.
❑ 12 pcs.
❑
❑
❑
❑
❑
8 pcs.
2 pcs.
8 pcs.
2 pcs.
10 pcs.
Triangular Roof Panels
Square Roof Panels
Fascia
Fascia long
Fascia Trim
5
6
7
4
4-A
Fig.1
Square
Roof Panels Should
Overhang Rafter End
Triangular Roof Panels
Square Roof Panels
Fascia
Fascia long
Fascia Trim
12 pcs.
2 pcs.
12 pcs.
2 pcs.
14 pcs.
Triangular Roof Panels
Square Roof Panels
Fascia
Fascia long
Fascia Trim
8 Square
9
3
10
2
Fig.2
2" Nail
Center Panels on or in
between 3/4" Marks
1
3/4"
2
2" Nails every 8"
once all Roof Panels are in place
3/4"
Marks
3/4"
3/4"
4-A: Along each Rafter, place a mark 3/4” in on each Rafter to help center Roof Panels as shown in Fig. 1 and Fig. 2.
Set first Roof Panel in place on top as shown in Fig. 2 and temporarily nail with one 2” nail at the top of Roof Panel.
Continue with remaining roof panels. Shift slightly left to right to line up bottom edge of roof panels. Install all remaining
Roof Panels, only temporarily nailing in place, with two 2” nails at bottom corners. Once all Roof Panels are in place
and fit properly on your Second Tier, then nail through Roof Panel into Rafters every 8” with 2” nails.
Fig.2
4-B
3/4"
a
sci
Fa
Rough sawn
Cedar side
Fascia
Fascia
butts up
to Roof
Panel
Two-1-1/2"
Finish Nails to hold
all Fascia in place
then, once all
Fascia in place,
add five more
1-1/2" Finish Nails.
Rafter End
Fig.1
Attach Fascia Trim with
two 1-1/2" Finish Nail
Roof Panel
3/4"
Mark
Fascia
Roof Panel
Fascia
Note: Pre-drill to eliminate
splitting the wood
when nailing Fascia
and Fascia Trim.
4-B: Place a mark 3/4” in on end of Rafter as shown in Fig. 1. Center Fascia on Wall Panels in between corners and 3/
4” marks and butt Fascia to bottom of Roof Panels. Tack on the Fascia to the Gussets at each corner with one 1-1/2”
Finish Nails. Continue attaching remaining pieces of Fascia for Second Tier. Once all Fascia are in place, finish along
bottom edge nailing with three more 1-1/2” Finish Nails and two nails through Roof Panel into Fascia.
Attach Fascia Trim over seam where two Fascia panel pieces meet and attach with two 1-1/2” Finish nails through Fascia
Trim into Fascia Panel as shown in Fig. 2. Pre-drilling is recommended.
7
Second Tier
5
INSTALLING DRIP EDGE,
SHINGLES, METAL CAP
AND SPINDLE
❑ 1 Bundle
❑ 2 Bundle
❑ 20 feet
❑ 1 Pc.
❑ 1 Pc.
Shingles (not included) for 10’ & 12’ Gazebo
Shingles (not included) for 14’ Gazebo
Drip Edge (not included) for 10’, 12’ & 14’
Metal Roof Cap from Gazebo
Roof Finial from Gazebo
Caulking the Roof Seams before
shingling will improve the water
resistance of your Gazebo.
5-A
Upside down
starter course
First course
Utility Knife
3/4" Roofing
Nail
Drip
Edge
3/4"
Roof nails
Snip at
corner
5-A: Install the recommended Drip Edge
around the perimeter of the Roof Panels
before shingling the Roof. Snip the top of
the Drip Edge at corners and bend to
meet next Roof Panel.
Fig.1
Making Ridge
Cap
Fig.2
Cutting angle
on Ridge Cap
Fig.3
Ridge Cap
1" Roofing Nail on
Ridge Cap
Fig.4
Installing Ridge Cap
Install a starter course of Shingles consisting of a row of Shingles with tabs
facing up as shown in 5-A. Attach with
3/4” Roofing Nails supplied with kit. After
starter course is completed, cut excess
shingles off along seam of Roof Panels
with Utility Knife as shown in 5-A. Next,
place first course of shingles directly over
starter course in normal position and nail.
Cut excess material off in the same
manner as starter course. Continue up
Roof Panel, overlapping Shingles as you
go and cutting off excess.
To create Ridge Caps, take a shingle and
cut it into six equal pieces as shown in
Fig. 1. Cut about 1/3 of Shingle at top on
an angle as shown in Fig. 2. Install Ridge
Caps (Fig. 3) over seams where the
excess Shingle material was cut off,
making sure to cover each of the angled
cut ends of the Ridge Cap. Attach each
Ridge Cap with two 1” roof nails supplied
with kit (Fig. 4).
Fig.5
Place Metal Roof Cap from original
Gazebo on top of shingled Second Tier
and install Roof Finials for original Gazebo
through hole in cap and screw down
snugly (Fig. 5).
8
Second Tier