1
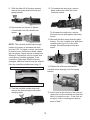
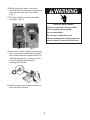
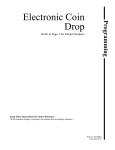
COINSLIDE PRICE VEND CHANGE INSTRUCTIONS
5. Unscrew the coinslide retaining bolt with
a 5/16” socket by turning counter clock
wise and remove the bolt.
The following procedure will guide the user
through changing the coinslide vend amount
for a factory equipped or ESD vertical 8
coinslide. The procedure will be similar for
other coinslide manufacturers, consult the
manufacturers installation instructions. If the
coinslide(s) are installed, they must be
removed prior to changing the vend price. If
the coinslide(s) have not yet been installed,
skip to step 6.
6. Push the coinslide up, and then pull it
forward to remove from the metercase.
Electrical Shock Hazard
Disconnect power before servicing.
Replace all panels before operating.
Failure to do so can result in death or
electrical shock.
7. Set the coinslide and extension assembly
on a level surface and remove the return
spring(s) from the spring bracket.
1. Unplug unit or disconnect power.
2. Unlock the metercase access panel or
collar control panel lock and remove the
control panel from the collar assembly.
3. On single washer and dryer models, lift
the metercase access panel up at the
back and remove.
4. On mechanical stack dryer models open
the console by lifting it up off the bottom
mounting flange. On electronic stack
dryers slide the control panel to the left,
then carefully open the control panel by
swinging the right side away from the
collar.
8. Place coins in the coinslide of the proper
vend amount (factory preset on coin
equipped models is $1.00) and push the
slide all the way in until the coins drop
through the coinslide.
1
9. With the slide still all the way inserted,
remove the spring bracket screw and
spring bracket.
12. To increase the vend price, remove
blank inserts and install the metal
functional inserts.
10.Remove the coin inserts (2 blanks,
2 functional) from the coinslide are
shown.
To decrease the vend price, remove
functional inserts and replace with blank
inserts.
13. Reinstall the three insert retaining plate
screws. Turn the coinslide over and place
unused inserts (up to 4) in the slide
storage. Reinstall spring bracket and
screw.
NOTE: The coinslide comes with enough
inserts to increase or decrease the vend
price by $.50, if a higher or lower vend price
is desired, more functional or blank inserts
are necessary. Inserts may be ordered from
Whirlpool Corporation only for models that
come factory coinslide equipped. If the
coinslide is other than Whirlpool factory
equipped, additional inserts must be ordered
from the coinslide manufacturer, page 13.
14. Release the slide and reinstall the
coinslide return spring(s) onto the spring
bracket.
$.25 US insert (Whirlpool Corp., Part No. 8316265)
Insert blank (Whirlpool Corp., Part No. 8316264)
11. Turn the coinslide upside down and
remove the three screws in the insert
retaining plate.
15.Insert coins in the amount of the new set
vend price into the coinslide and push the
slide in to eject the coins. If the coins do
not eject, look for missing parts and go
back to Step 7.
2
16. While holding the slide in, insert the
coinslide into the metercase, making sure
the extension clears the coin funnel.
(Fig. 1)
17. Pull down slightly to lock the coinslide
into place. (Fig. 2)
Electrical Shock Hazard
Plug into a grounded 3 prong outlet.
Do not remove ground prong.
Do not use adaptor.
Do not use an extension cord.
Failure to follow these instructions can
result in death, fire or electrical shock.
Fig. 1
Fig. 2
18. Insert the coinslide retaining bolt through
the console access panel into the back of
the coinslide and hand tighten the bolt to
start the threads prior to using any tools
to avoid stripping the coinslide or
retaining bolt threads.
19.Affix the proper new vend price sticker to
the front of the coinslide.
3