1
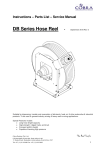
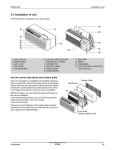
PTAC
Standard Louvered and
Architectural Outdoor Grilles
Installation Instructions
Standard Louvered Grille
NOTE: A baffle kit must not be used with a standard
louvered grille on any PTAC installation.
Before installing the grille, remove the cardboard stiffener
and rear enclosure panel from the wall sleeve. These
items can be removed from inside of the building. The
sleeve stiffener must be taken out before the rear sleeve
enclosure panel can be removed from the sleeve.
Sleeve Stiffiner Removal
Fold the two outside flaps “A” in and downward to remove
(Figure 1).
Figure 2
Standard Louvered Grille Installation Instructions
A
A
Figure 3
Figure 1
Rear Enclosure Removal
Remove the rear enclosure by folding the front ends of the
top and bottom towards the center. Grasp the top and
bottom flanges as shown in Figure 2 and pull out diagonally
from one side of the sleeve.
1. Position the grille so that all four flanges are in the up
position.
2. Insert the six grommets provided so the square end
protrudes through the grille in the opposite direction
from the flanges.
3. Manipulate the grille out through the rear sleeve opening using the plastic handle (not shown) provided.
4. Align the guide pins located in the lower right- and lefthand corners of the grille (Figure 3) with the corresponding holes in the rear of the wall sleeve.
5. Secure the grille by threading each of the six screws
into the plastic grommets.
6. Remove the plastic handle (not shown) from the center
of the grille prior to installing the chassis into the
sleeve.
CAUTION
Be sure to keep a firm grip on the plastic
handle and grille to prevent it from dropping
and /or causing possible injury or property
damage.
Made in USA
The installation and servicing of this equipment should be
performed by qualified, experienced technicians.
October 2000
Rev. 1
A3495703
Architectural Louvered Grille
NOTE: Some PTACs may include factory-installed baffles
on the outdoor coil. Remove these baffles before installing
the architectural grille.
B
1. Remove the cardboard sleeve stiffener and the rear
enclosure of the sleeve as described on page 1.
2. Install the four threaded studs (B, Figure 4) into the
threaded openings on the inside face of the grille.
3. Manipulate the grille out through the rear sleeve opening using the plastic handle provided.
CAUTION
Be sure to keep a firm grip on the plastic
handle and grille to prevent it from dropping
and /or causing possible injury or property
damage.
C
D
Figure 4
4. Attach the grille to the sleeve by aligning and inserting
the threaded studs in the corresponding holes.
5. Secure the grille to the sleeve with washers C and hex
nuts D provided with the kit.
6. Remove the plastic handle after installation is completed.
B
B
PLASTIC
HANDLE
B
B
Figure 5
Figure 6
Due to policy of continual product improvements, the right is reserved to change specifications and design without notice.
2