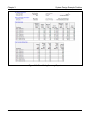
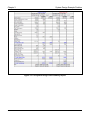
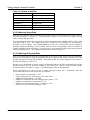
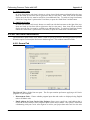
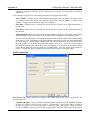
1
HAP QUICK REFERENCE GUIDE COPYRIGHT 1998-2013 CARRIER CORPORATION PRINTED IN USA [This page has been left blank intentionally] HAP Quick Reference Guide Carrier Corporation Software Systems Network 7th Edition……..(HAP v4.8)……..July, 2013 Copyright 1998-2013 Carrier Corporation [This page has been left blank intentionally] Preface ABOUT THIS REFERENCE GUIDE The HAP Quick Reference Guide provides instructional information for users of Carrier’s Hourly Analysis Program (HAP). It describes how to use key features of the user interface, and how to use the program to design HVAC systems and estimate annual energy costs. This Guide also contains program tutorials, example problems and discussions of common applications. The Guide serves as a supplement to the program's help system which provides additional information including descriptions of all input items, program reports and program calculation procedures. ABOUT HAP Carrier’s Hourly Analysis Program (HAP) is a computer tool which assists engineers in designing HVAC systems for commercial buildings. HAP is two tools in one. First it is a tool for estimating loads and designing systems. Second, it is a tool for simulating building energy use and calculating energy costs. In this capacity it is useful for LEED®, schematic design and detailed design energy cost evaluations. HAP uses the ASHRAE transfer function method for load calculations and detailed 8,760 hour-by-hour simulation techniques for the energy analysis. This program is released as two separate, but similar products. The “HAP System Design Load” program provides system design and load estimating features. The full “HAP” program provides the same system design capabilities plus energy analysis features. This Quick Reference Guide deals with both programs. WHAT THIS REFERENCE GUIDE CONTAINS The HAP Quick Reference Guide is divided into six chapters and four appendices: Chapter 1 (Getting Started) discusses basic program concepts - how to use HAP to design systems and run energy analyses, how to operate the program, how to work with projects and perform common tasks. Chapter 2 (HAP Tutorials) provides step-by-step instructions for using the program to design systems and run energy analyses. These tutorials are designed for readers who are already familiar with HAP terminology and concepts. Chapters 3 & 4 (Example Problems) contain two simple example problems illustrating how the software is used to design an HVAC system and how it is used to run an energy analysis. Chapters 5 & 6 (“Applications”) provide a series of short discussions on how to use HAP to design common types of HVAC systems and how to run energy analyses for common equipment types. Appendix A (“Performing Common Tasks with HAP”) contains step-by-step procedures for performing common tasks in HAP such as entering data, editing data and generating reports. Appendix B (“Performing Common Project Management Tasks”) provides short descriptions of procedures used to work with project data. Appendix C (“Index”) contains an index for this manual. All information in this Guide is also available in the HAP on-line help system. The on-line help system also includes extensive information about program inputs, reports and calculation procedures. HAP Quick Reference Guide 1 Table of Contents Chapter 1 Getting Started 1.1 Welcome to the Hourly Analysis Program ...........................................................................................................1-1 1.2 Using HAP to Design Systems and Plants............................................................................................................1-2 1.3 Using HAP to Estimate Energy Use and Cost ......................................................................................................1-3 1.4 Working with the HAP Main Program Window...................................................................................................1-7 1.5 Working with HAP Input Forms.........................................................................................................................1-10 1.6 Performing Common Tasks with HAP ...............................................................................................................1-12 1.7 Working with Projects ........................................................................................................................................1-12 1.8 Using the Help Resources in HAP......................................................................................................................1-14 Chapter 2 HAP Tutorials 2.1 HAP System Design Tutorial ...............................................................................................................................2-1 2.2 HAP Energy Analysis Tutorial - Preliminary Design ...........................................................................................2-3 2.3 HAP Energy Analysis Tutorial - Detailed Design ................................................................................................2-4 Chapter 3 System Design Example Problem 3.1 Overview for the Example Problem .....................................................................................................................3-1 3.2 Defining the Problem............................................................................................................................................3-1 3.3 Gathering Data......................................................................................................................................................3-2 3.4 Entering Data........................................................................................................................................................3-6 3.5 Generating System Design Reports ......................................................................................................................3-8 3.6 Selecting Equipment.............................................................................................................................................3-8 Chapter 4 Energy Analysis Example Problem 4.1 Overview for the Example Problem .....................................................................................................................4-1 4.2 Defining the Problem............................................................................................................................................4-1 4.3 Gathering Data......................................................................................................................................................4-2 4.4 Entering Data........................................................................................................................................................4-4 4.5 Generating Simulation Reports.............................................................................................................................4-8 Chapter 5 Design Applications 5.1 Application Information Overview.......................................................................................................................5-1 5.2 Applications Involving Single-Zone HVAC Units ...............................................................................................5-1 5.3 Applications Involving Terminal Units ................................................................................................................5-2 5.4 Applications Involving Multiple-Zone HVAC Systems .......................................................................................5-3 5.5 Applications Involving Chillers and Boilers.........................................................................................................5-4 5.6 Troubleshooting Strategies ...................................................................................................................................5-6 Chapter 6 Energy Analysis Applications 6.1 Application Information Overview.......................................................................................................................6-1 6.2 Energy Analysis Strategies ...................................................................................................................................6-1 6.3 Troubleshooting Strategies ...................................................................................................................................6-3 6.4 Simulating Packaged Rooftop Units.....................................................................................................................6-5 6.5 Simulating Vertical Packaged Units .....................................................................................................................6-5 6.6 Simulating Split DX Air Handling Units ..............................................................................................................6-6 6.7 Simulating Chilled Water Air Handling Units......................................................................................................6-6 6.8 Simulating Packaged or Split DX Fan Coil Units.................................................................................................6-7 6.9 Simulating Hydronic Fan Coil Units ....................................................................................................................6-8 2 HAP Quick Reference Guide Table of Contents Chapter 6 (continued) 6.10 Simulating Induction Beam and Chilled Beam Systems.....................................................................................6-9 6.11 Simulating Water Source Heat Pump Systems .................................................................................................6-10 6.12 Simulating Ground Water and Ground Source Heat Pump Systems ................................................................6-10 6.13 Simulating Chilled Water Plants.......................................................................................................................6-11 6.14 Simulating Hot Water and Steam Plants...........................................................................................................6-11 6.15 Modeling Utility Rate Structures ......................................................................................................................6-12 Appendix A Performing Common Tasks with HAP A.1 Basic Procedures for Common Tasks .................................................................................................................A-1 A.2 Creating a New Item ...........................................................................................................................................A-2 A.3 Editing an Existing Item .....................................................................................................................................A-3 A.4 Using the On-Line Calculator to Enter Data.......................................................................................................A-4 A.5 Duplicating an Existing Item ..............................................................................................................................A-5 A.6 Duplicating a Building (with Spaces and HVAC Equipment) ............................................................................A-6 A.7 Copying Items.....................................................................................................................................................A-6 A.8 Replacing Space Data .........................................................................................................................................A-6 A.9 Rotating Spaces ..................................................................................................................................................A-7 A.10 Performing LEED (90.1 PRM) Rotations.........................................................................................................A-8 A.11 Deleting Items...................................................................................................................................................A-8 A.12 Generating Input Data Reports .........................................................................................................................A-9 A.13 Generating System Design Reports...................................................................................................................A-9 A.14 Generating Plant Design Reports....................................................................................................................A-10 A.15 Generating System Simulation Reports ..........................................................................................................A-11 A.16 Generating Plant Simulation Reports..............................................................................................................A-11 A.17 Generating Building Simulation Reports ........................................................................................................A-12 A.18 Using the Report Viewer ................................................................................................................................A-12 A.19 Changing the List View Format ......................................................................................................................A-14 A.20 Setting User Preferences.................................................................................................................................A-15 Appendix B Performing Common Project Management Tasks B.1 Creating a New Project ....................................................................................................................................... B-1 B.2 Opening an Existing Project ............................................................................................................................... B-1 B.3 Saving a Project .................................................................................................................................................. B-1 B.4 Saving a Project as a New Project ...................................................................................................................... B-2 B.5 Deleting a Project ............................................................................................................................................... B-2 B.6 Editing Project Properties ................................................................................................................................... B-2 B.7 Archiving a Project ............................................................................................................................................. B-3 B.8 Retrieving a Project ............................................................................................................................................ B-3 B.9 Converting Data From Previous Versions........................................................................................................... B-4 B.10 Publishing Equipment Sizing Requirements for Use in ECAT ......................................................................... B-6 B.11 E-Mailing Project Data to Your Carrier Sales Engineer ................................................................................... B-8 B.12 Exporting Results to Engineering Economic Analysis...................................................................................... B-9 B.13 Importing Data From Another Project .............................................................................................................. B-9 B.14 Importing Data From CAD and BIM Software............................................................................................... B-12 Appendix C HAP Quick Reference Guide Index 3 [This page has been left blank intentionally] Chapter 1 Getting Started This chapter explains what Carrier’s Hourly Analysis Program does, how to use the software to design HVAC systems and estimate annual energy costs, and how to operate the software. We encourage you to read this chapter before using HAP. 1.1 WELCOME TO THE HOURLY ANALYSIS PROGRAM Welcome to HAP. Welcome to Carrier’s Hourly Analysis Program (HAP). HAP is a computer tool which assists engineers in designing HVAC systems for commercial buildings. HAP is two tools in one. First it is a tool for estimating loads and designing systems. Second, it is a tool for simulating energy use and calculating energy costs. In this capacity it is useful for LEED®, schematic design and detailed design energy cost evaluations. HAP uses the ASHRAE-endorsed transfer function method for load calculations and detailed 8,760 hour-by-hour energy simulation techniques for the energy analysis. This program is released as two similar, but separate products. The “HAP System Design Load” program provides the system design and load estimating features. The full “HAP” program provides the same system design capabilities plus energy analysis features. This Quick Reference Guide deals with both programs. HAP System Design Features. HAP estimates design cooling and heating loads for commercial buildings in order to determine required sizes for HVAC system components. Ultimately, the program provides information needed for selecting and specifying equipment. Specifically, the program performs the following tasks: Calculates design cooling and heating loads for spaces, zones, and coils in the HVAC system. Determines required airflow rates for spaces, zones and the system. Sizes cooling and heating coils. Sizes air circulation fans. Sizes chillers and boilers. HAP Energy Analysis Features. HAP estimates annual energy use and energy costs for HVAC and non-HVAC energy consuming systems in a building by simulating building operation for each of the 8,760 hours in a year. Results of the energy analysis are used to compare the energy use and energy costs of alternate HVAC system designs so the best design can be chosen. Specifically, HAP performs the following tasks during an energy analysis: Simulates hour-by-hour operation of all heating and air conditioning systems in the building. Simulates hour-by-hour operation of all plant equipment in the building. Simulates hour-by-hour operation of non-HVAC systems including lighting and appliances. Uses results of the hour-by-hour simulations to calculate total annual energy use and energy costs. Costs are calculated using actual utility rate features such as stepped, time-of-day and demand charges, if specified. Generates tabular and graphical reports of hourly, daily, monthly and annual data. If you have questions about the program: In the United States or Canada, please e-mail [email protected] or call 1-800-253-1794. In other countries, please contact your local Carrier sales office or local Carrier distributor. HAP Quick Reference Guide 1-1 Chapter 1 Getting Started 1.2 USING HAP TO DESIGN SYSTEMS AND PLANTS This section briefly describes, in conceptual terms, how to use HAP to design systems and plants. Application of these concepts will be demonstrated both in the HAP tutorial in Chapter 2 and in the example problem in Chapter 3. All design work requires the same general five step procedure: 1. Define the Problem. First define the scope and objectives of the design analysis. For example, what type of building is involved? What type of systems and equipment are required? What special requirements will influence system features? 2. Gather Data. Before design calculations can be performed, information about the building, its environment and its HVAC equipment must be gathered. This step involves extracting data from building plans, evaluating building usage and studying HVAC system needs. Specific types of information needed include: Climate data for the building site. Construction material data for walls, roofs, windows, doors, exterior shading devices and floors, and for interior partitions between conditioned and non-conditioned regions. Building size and layout data including wall, roof, window, door and floor areas, exposure orientations and external shading features. Internal load characteristics determined by levels and schedules for occupancy, lighting systems, office equipment, appliances and machinery within the building. Data concerning HVAC equipment, controls and components to be used. 3. Enter Data Into HAP. Next, use HAP to enter climate, building and HVAC equipment data. When using HAP, your base of operation is the main program window (described in greater detail in Section 1.4). From the main program window, first create a new project or open an existing project. Then define the following types of data which are needed for system design work: a. Enter Weather Data. Weather data defines the temperature, humidity and solar radiation conditions the building encounters during the course of a year. These conditions play an important role in influencing loads and system operation. To define weather data, a city can be chosen from the program's weather database, or weather parameters can be directly entered. Weather data is entered using the weather input form. b. Enter Space Data. A space is a region of the building comprised of one or more heat flow elements and served by one or more air distribution terminals. Usually a space represents a single room. However, the definition of a space is flexible. For some applications, it is more efficient for a space to represent a group of rooms or even an entire building. To define a space, all elements which affect heat flow in the space must be described. Elements include walls, windows, doors, roofs, skylights, floors, occupants, lighting, electrical equipment, miscellaneous heat sources, infiltration, and partitions. While defining a space, information about the construction of walls, roofs, windows, doors and external shading devices is needed, as well as information about the hourly schedules for internal heat gains. This construction and schedule data can be specified directly from the space input form (via links to the construction and schedule forms), or alternately can be defined prior to entering space data. Space information is stored in the project database and is later linked to zones in an air system. c. Enter Air System Data. An Air System is the equipment and controls used to provide cooling and heating to a region of a building. An air system serves one or more zones. Zones are groups of spaces having a single thermostatic control. Examples of systems include central station air handlers, packaged rooftop units, packaged vertical units, split systems, packaged DX fan coils, hydronic fan coils and water source heat pumps. In all cases, the air system also includes associated ductwork, supply terminals and controls. To define an air system, the components, controls and zones associated with the system must be defined as well as the system sizing criteria. This data is entered on the air system input form. 1-2 HAP Quick Reference Guide Getting Started Chapter 1 d. Enter Plant Data. A Plant is the equipment and controls used to provide cooling or heating to coils in one or more air systems. Examples include chiller, changeover, hot water, service hot water and steam boiler plants. This step is optional; it is only required if you are sizing the plants. To define a plant for design purposes, the type of plant and the air systems it serves must be defined. This data is entered on the plant input form. 4. Use HAP to Generate Design Reports. Once weather, space, air system and plant data has been entered, HAP can be used to generate system and plant design reports. To generate design reports, go to the main program window and select the desired air systems or plants. Next choose the “Print/View Design Results” menu bar option, toolbar button, or pop-up menu option. For systems this displays the System Design Reports form; for plants this displays the Plant Design Reports form. Select the desired report options on this form. If calculations are needed to supply data for these reports, the program will automatically run the calculations before generating the reports. If all the data needed for the reports already exists, reports are generated immediately. 5. Select Equipment. Finally, use data from the reports you generated to select the appropriate cooling and heating equipment from product catalogs or electronic catalog software. System and plant design reports provide information necessary to select all the components of your HVAC system including air handlers, packaged equipment, supply terminals, duct systems, piping systems and plant equipment. Carrier can provide a wide variety of electronic catalog computer programs to make selecting equipment quick and easy. Please contact your local Carrier sales office or Carrier distributor for details. 1.3 USING HAP TO ESTIMATE ENERGY USE AND COST This section briefly describes, in conceptual terms, how to use HAP to estimate annual energy use and energy costs for a building. HAP is designed with features to help you efficiently compare energy costs of HVAC design alternatives both in the preliminary design phase of a project and in the detailed design phase of a project: 1. In the Preliminary or Schematic Design Phase of a project a variety of HVAC designs and equipment types may be under consideration. The goal of energy analysis in this phase of a project is to quickly compare the energy cost performance of many design alternatives to identify a small group of designs with the best performance for further, more detailed study. Simplification and approximation may be appropriate here both because of limited information about the building and because speed is important in evaluating the alternatives. The HAP Wizard interface is designed to help you quickly perform these types of energy analysis. See 1.3.1 for details. 2. In the Detailed Design Phase of a project one or a small set of HVAC designs is under consideration. The goal of energy analysis in this phase of a project is to carefully analyze and optimize the design. The goals here may also include generating documentation for LEED Energy and Atmosphere Credit 1. Given these goals, more detailed definition of the building and its HVAC equipment is typically needed. The HAP detailed design interface is designed to help you perform these types of energy analysis. See 1.3.2 for details. 1.3.1 HAP Energy Analysis for Preliminary Design This sub-section describes in conceptual terms how to use HAP to perform an energy analysis in the preliminary or schematic design phase of a project where simplification and approximation are appropriate. Application of these concepts will be demonstrated in the HAP tutorial in Chapter 2. Analysis work requires a general five step procedure: 1. Define the Problem. First define the scope and objectives of the energy analysis. For example, what type of building is involved? What type of systems and equipment are required? What alternate designs or energy conservation measures are being compared in the analysis? HAP Quick Reference Guide 1-3 Chapter 1 Getting Started 2. Gather Data. Before energy simulations can be run, general information about the building, its environment, the types of HVAC and non-HVAC equipment, and its energy prices must be gathered. This step involves extracting data from building plans, evaluating building usage, studying HVAC system needs and acquiring utility rate schedules. Specific types of information needed include: Climate data for the building site. General information about building size, shape, layout and number of floors. General information about the type of wall, window and roof envelope construction to be used. General information about the space usage in the building which will affect occupant density and lighting and equipment usage levels. General information about the type of air-side systems, equipment and components to be considered. General information about prices for electric service and any fuel sources used in the building. 3. Enter Data Into HAP. Next, use HAP to enter data for the analysis. When using HAP, your base of operation is the main program window. From the main program window, first create a new project or open an existing project. Then use the "Full Wizard Session" feature to rapidly enter all your data for the analysis. From the main program window choose the "Full Wizard Session" option on the Wizards menu, or click the "Full Wizard Session" button on the toolbar. The Full Wizard Session window provides access to all of the HAP Wizards: The Weather Wizard - Used to quickly configure weather data for the building site. The Building Wizard - Used to rapidly define the size, shape, layout, envelope and internal loads for the building spaces. The Equipment Wizard - Used to easily create HVAC design alternatives. The Utility Rate Wizard - Used to quickly assemble electric and fuel pricing data. After entering data on the Wizard input screens, press the Finish button in the lower left of the Full Wizard Session window. HAP converts your Wizard data into a full set of detailed HAP inputs and displays them in the HAP main window. 4. Use HAP to Generate Simulation Reports. Once all input data has been entered, HAP can be used to generate reports showing energy cost results. To generate building simulation reports, go to the main program window and select the buildings representing your set of HVAC design alternatives. Next choose the “Print/View Simulation Results” option on the Reports Menu. This displays the Building Simulation Reports Selection window. Choose the desired reports. Then press Preview to display the reports or press Print to directly print the reports. HAP will automatically run any necessary calculations first before generating the reports. When comparing annual energy cost for a preliminary design type of analysis, the Annual Cost Summary and Annual Energy & Emission Summary reports are most frequently used. These reports compare energy cost or energy use for the design alternatives side by side on a single page. Simulation reports for individual air systems and plants included in your analysis can also be generated. Use the same procedure but select air system or plant items instead. System and plant simulation reports provide more detailed performance information for individual pieces of equipment. These reports are often useful for learning about equipment performance and for troubleshooting unexpected results. 5. Evaluate Results. Finally, use data from the simulation reports you generated to draw conclusions about the most favorable design alternatives. 1-4 HAP Quick Reference Guide Getting Started Chapter 1 1.3.2 HAP Energy Analysis for Detailed Design This sub-section describes in conceptual terms how to use HAP to perform an energy analysis in the detailed design phase of a project. Application of these concepts will be demonstrated in the HAP tutorial in Chapter 2 and in the example problem in Chapter 4. Analysis work requires a general five step procedure. Note that certain steps below are identical or similar to those used for system design. If a system design has already been performed for a building, all of the data entered for design can be reused for the energy analysis, and this significantly reduces the effort needed to complete the energy analysis. 1. Define the Problem. First define the scope and objectives of the energy analysis. For example, what type of building is involved? What type of systems and equipment are required? What alternate designs or energy conservation measures are being compared in the analysis? 2. Gather Data. Before energy simulations can be run, information about the building, its environment, HVAC and non-HVAC equipment, and its energy prices must be gathered. This step involves extracting data from building plans, evaluating building usage, studying HVAC system needs and acquiring utility rate schedules. Specific types of information needed include: Climate data for the building site. Construction material data for walls, roofs, windows, doors, exterior shading devices and floors, and for interior partitions between conditioned and non-conditioned regions. Building size and layout data including wall, roof, window, door and floor areas, exposure orientations and external shading features. Internal load characteristics determined by levels and schedules for occupancy, lighting systems, office equipment, appliances and machinery within the building. Data for HVAC equipment, controls and components to be used. Data for chilled water, hot water and/or steam plants, if applicable. Data for non-HVAC energy-consuming equipment. Utility rate information for electric service and any fuel sources used in the building. 3. Enter Data Into HAP. Next, use HAP to enter data for the analysis. When using HAP, your base of operation is the main program window (described in greater detail in Section 1.4). From the main program window, first create a new project or open an existing project. Then define the following types of data which are needed for energy analysis work: a. Enter Weather Data. Weather data defines the temperature, humidity and solar radiation conditions the building encounters during the course of a year. These conditions play an important role in influencing loads and system operation throughout the year. Both design and simulation weather data are needed. To define design weather data, a city can be chosen from the program's weather database, or weather parameters can be directly entered. Simulation weather is selected by loading a simulation weather file from the library provided with the program or importing data from an external source. This step is also used to define the calendar for your simulation year. All three types of data are entered using the weather input form. b. Enter Space Data. A space is a region of the building comprised of one or more heat flow elements and served by one or more air distribution terminals. Usually a space represents a single room. However, the definition of a space is flexible. For some applications, it is more efficient for a space to represent a group of rooms or even an entire building. To define a space, all elements which affect heat flow in the space must be described. Elements include walls, windows, doors, roofs, skylights, floors, occupants, lighting, electrical equipment, miscellaneous heat sources, infiltration, and partitions. While defining a space, information about the construction of walls, roofs, windows, doors and external shading devices is needed, as well as information about the hourly schedules for internal heat gains. This construction and schedule data can be specified directly from the space input form (via links to the construction and schedule forms), or alternately can be defined prior to entering space data. HAP Quick Reference Guide 1-5 Chapter 1 Getting Started Space information is stored in the project database and is later linked to zones in an air system. c. Enter Air System Data. An Air System is the equipment and controls used to provide cooling and heating to a region of a building. An air system serves one or more zones. Zones are groups of spaces having a single thermostatic control. Examples of systems include central station air handlers, packaged rooftop units, packaged vertical units, split systems, packaged DX fan coils, hydronic fan coils and water source heat pumps. In all cases, the air system also includes associated ductwork, supply terminals and controls. In the case of packaged DX, split DX, electric resistance heating and combustion heating equipment, the system also encompasses this DX or heating equipment. For example, when dealing with a gas/electric packaged rooftop unit, the "air system" includes the DX cooling equipment and the gas heating equipment. To define an air system, the components, controls and zones associated with the system must be defined as well as the system sizing criteria. For energy analyses, performance information about DX cooling equipment and electric and combustion heating equipment must also be defined. All of this data is entered on the air system input form. d. Enter Plant Data. A Plant is the equipment and controls used to provide cooling via chilled water or heating via hot water or steam to coils in one or more air systems. Examples include chiller, changeover, hot water, service hot water, steam boiler, and remote source cooling and heating plants. This step is optional; it is only required if chilled water, hot water or steam plants are used in your building. To define a plant for energy analysis purposes, the type of plant and the air systems it serves must be defined along with its configuration, controls and distribution system information. This data is entered on the plant input form. e. Enter Utility Rate Data. Utility rate data defines the pricing rules for electrical energy use and fuel use. An electric rate structure must be defined for all energy studies. One fuel rate for each non-electric fuel source must also be defined. Electric rate data is entered using the electric rate form. Fuel rate data is entered using the fuel rate form. f. Enter Building Data. A Building is simply the container for all energy-consuming equipment included in a single energy analysis case. One Building is created for each design alternative being considered in the study. Building data consists of lists of plants and systems included in the building, utility rates used to determine energy costs and data for non-HVAC energy or fuel use. Data is entered using the building form. 4. Use HAP to Generate Simulation Reports. Once all input data has been entered, HAP can be used to generate simulation reports. To generate building simulation reports, go to the main program window and select the desired buildings. If data for a single building is being evaluated, select only one building. If energy use and costs for a number of alternatives is being compared, select a group of buildings. Next choose the “Print/View Simulation Results” option on the Reports Menu. This displays the Building Simulation Reports Selection window. Choose the desired reports. Then press Preview to display the reports or press Print to directly print the reports. If system, plant or building calculations are needed to supply data for your reports, HAP will automatically run these calculations first. Otherwise, if no calculations are needed the reports will be generated immediately. Simulation reports for individual air systems and plants included in your analysis can also be generated. Use the same procedure but select air system or plant items instead. System and plant simulation reports provide more detailed performance information for individual pieces of equipment. They are often useful for learning about equipment performance and for troubleshooting unexpected results. 5. Evaluate Results. Finally, use data from the simulation reports you generated to draw conclusions about the most favorable design alternative. In many cases energy use and energy cost data will be used for further study of lifecycle economics. 1-6 HAP Quick Reference Guide Getting Started Chapter 1 1.4 WORKING WITH THE HAP MAIN PROGRAM WINDOW This section discusses HAP’s main program window which appears when you start the program. Much of the work you will perform entering data and generating reports is done using features of the main program window. Key elements and features of the main program window are discussed below. Appendix A explains how to use these features in greater detail. The HAP tutorials in Chapter 2 and the example problems in Chapters 3 and 4 also illustrate how features are used when designing systems and simulating energy use. The HAP main program window consists of six components used to operate the program. Working from top to bottom in Figure 1.1: Title Bar Tree View Pane Menu Bar List View Pane Toolbar Status Bar Figure 1.1 The HAP Main Program Window 1. The Title Bar lists the program name and the name of the current project. If you are running HAP System Design Load or are running the full HAP but in System Design mode, the program name will be "HAP System Design Load". If you are running the full HAP program with energy analysis features turned on, the program name will simply be "HAP". At the right-hand end of the title bar are command buttons for minimizing and maximizing the program window and for exiting from the program. HAP Quick Reference Guide 1-7 Chapter 1 Getting Started 2. The Menu Bar lies immediately below the title bar. The menu bar contains six pull-down menus used to perform common program tasks. To use menu options, first click on the menu name to “pulldown” its list of options. Then click on the name of the desired option. The six pull down menus are as follows: The Project Menu provides options for manipulating project data. This includes tasks such as creating, opening, saving, deleting, archiving and retrieving projects. Section 1.7 and Appendix B discuss projects in greater detail. The Edit Menu contains options used to work with individual data items such as spaces, systems, walls, roofs, etc… Appendix A provides more information about how options on the Edit Menu are used to perform specific tasks. The View Menu offers options used to change the appearance of the main program window. This includes changing the format of data shown in the list view, turning on or off the toolbar and status bar, and setting user preferences such as units of measure. For HAP users, an option is also provided for switching between full HAP and HAP System Design Load modes of program operation. This feature is used for projects which only require system design. In these cases, it is sometimes useful to simplify program operation by temporarily turning off the energy analysis features. The Reports Menu provides options for generating reports containing input data, design results and energy simulation results (HAP users only). Appendix A describes how these menu options are used in greater detail. The Wizards Menu contains options for running the Weather, Building, Equipment or Utility Rate Wizards separately, and for running a "Full Wizard Session" which integrates all four Wizards so you can rapidly generate data for a cost comparison study all at one time. The Help Menu contains options for technical assistance with the program. This includes options for displaying the on-line help system and the user's manual, contact information for Carrier software support, and links to web-based support materials and software training class information. Section 1.8 discusses these help resources in more detail. 3. The Toolbar lies immediately below the menu bar and contains a series of buttons used to perform common program tasks. Each button contains an icon which represents the task it performs. These tasks duplicate many of the options found on the pull-down menus. To determine the function of a toolbar button, simply place the mouse cursor over a button. A “tooltip” will appear listing the function of that button. The toolbar buttons shown above appear by default when you first run the program. However, you can customize the toolbar by removing buttons that are not often used or arranging the buttons in a different order that is more efficient for you to use. To customize the toolbar, double click on the toolbar. This will cause the “Customize Toolbar” window to appear. Options in this window are used to add and delete buttons, and to arrange the order of appearance of the buttons. 4. The Tree View is the left-hand panel in the center of the main program window. It contains a tree image of the major categories of data used by HAP. The tree view acts as the “control panel” when working with program data: 1-8 To display a list of items in one of the categories of data, click once on the category name. For example if you click on the Space category name, a list of spaces you have entered will appear in the list view panel on the right side of the main program window. Once a list of items appears, you can click on items in the list view to perform such tasks as creating new data, editing data and generating reports. To display a pop-up menu of options for the category, right-click on the category name. The “category pop-up menu” will appear. Options on this menu will perform tasks on all items in a HAP Quick Reference Guide Getting Started Chapter 1 given category. For example, if you right-click on the System category name, the System category pop-up menu will appear. If you select the Print Input Data option, input data for all systems in your project will be printed. Because options on the category pop-up menu operate on all items in a category, you should be careful using these options. To display a summary of project contents, click once on the Project category name. A list of the major data categories (weather, spaces, systems, plants) will appear. If the “details” format is used for the list view, the quantity of items you have defined for each category will also be shown. For example, the summary shows the number of spaces and systems which have been defined. To display a summary of project library contents, click once on the Project Libraries category name. A list of the library categories (schedules, walls, roofs, windows, doors, shades) will appear. If the “details” format is used for the list view, the quantity of items you have defined in each category will be shown. For example, the summary shows the number of wall and roof assemblies you have defined. 5. The List View is the right-hand panel in the center of the main program window. It contains a list of data items in alphabetical order for one of the categories of data in your project. For example, when the space category is selected, the list view shows a list of spaces you have entered. The list view acts as the second part of the “control panel” when working with program data. By selecting items in the list view you can: Create new items. Example: Creating a new schedule. Edit existing items. Example: Editing a wall assembly you previously defined. Duplicate an existing item. Example: Creating a new space using defaults from an existing space. Duplicate a building with all its spaces and HVAC equipment. This is often useful in LEED® EA Prerequisite 1 and EA Credit 1 analyses when making a copy of a Proposed Design building and all its spaces, systems, plants, chillers, towers and boilers to serve as the basis for assembling the Baseline Building. Delete existing items. Example: Deleting three systems you previously entered. Searching and replacing existing space data. Example: Change lighting W/sqft from 2.0 to 1.8 for 40 spaces all at one time. Rotating the orientation of existing spaces. Example: Rotate the orientation of 35 spaces by 45 degrees clockwise all at one time. Performing LEED (90.1 PRM) Rotations. This is used in a LEED® EA Prerequisite 1 and EA Credit 1 analyses to take a Baseline Building and make three copies of it, with spaces rotated 90 deg, 180 deg and 270 deg respectively. View or print input data. Example: Printing input data for four window assemblies you previously entered. View or print design reports. Example: Viewing design reports for two air systems you defined. View or print energy simulation reports (HAP users only). Example: Printing a building simulation report listing annual energy use and energy costs. There are usually at least two or three ways of performing each task. For example, after selecting items in the list view, an option on the Edit or Report Menu can be selected, or a button on the Toolbar can be pressed, or an item pop-up menu can be displayed by right-clicking on the selected items. Appendix A provides specific procedures for performing all these common operating tasks. 6. The Status Bar is the final component of the main program window and appears at the bottom of the window. The current date and time appear at the right-hand end of the status bar. Pertinent messages appear at the left-hand end of the status bar. Further information on program operation can be found in separate sections of this guide dealing with input forms and project management. Appendix A also provides detailed information on using main program window features to enter data and generate reports. HAP Quick Reference Guide 1-9 Chapter 1 Getting Started 1.5 WORKING WITH HAP INPUT FORMS This section discusses the basic operating principles of HAP’s input forms. While much of your work with the program is done on the main program window, the actual entry of data is done using input forms. An input form appears when you choose to create a new item or edit an existing item. A separate input form is provided for each category of HAP data. Figure 1.2. A Simple Input Form Simple Input Forms. Many input forms have a simple appearance as shown in Figure 1.2. These simple kinds of input forms consist of three components: 1. The Title Bar is found at the top of the input form. It lists the type of data contained in the input form and the name of the current item being edited. In the example above, data for a window assembly named “4x6 Double Glazed with Blinds” is being edited. The title bar also contains a close button. If you press this button, the program will return to the main program window without saving any changes you made on the form. Thus, the close button performs the same function as Cancel. 2. The Data Area is the middle portion of the form. It contains all the data describing the current item. In the example above, the data area contains information describing a window assembly: its dimensions, framing properties, internal shades, glazings and thermal performance. While entering information in the data area, you can display explanations of each input item by pressing the F1 key. For example, if you press F1 while the cursor is on the “Frame Type” item in the figure above, the help topic for “Window Frame Type” will appear automatically. This feature is useful for learning about the program while you work. 3. The Command Buttons are found in the lower right-hand portion of the form. All forms contain three buttons: 1-10 Press the OK button to return to the main program window after saving any changes you made on the input form. HAP Quick Reference Guide Getting Started Chapter 1 Press the Cancel button to return to the main program window without saving any changes you made on the input form. The Cancel button performs the same function as the close button in the title bar. Press the Help button to display an overview of the current input form. This overview describes how the input form is organized and how to use it. It also contains links to help topics for the individual input items on the form. Figure 1.3. A Tabbed Input Form Tabbed Input Forms. For certain categories of HAP data, the input form has a more complex appearance as shown in Figure 1.3. This input form contains the same basic elements (title bar, data area, command buttons) as discussed earlier, but the data area contains multiple categories of information rather than a single set of information. Categories of data are represented as tabs in a notebook. In Figure 1.3 data for a space is shown. Space data is divided into five categories: General data Internal load data Wall, Window, Door data Roof, Skylight data Infiltration data Floor data Partition data To switch between the different categories of data, simply click on the tab title. For example, to switch to the “Walls, Windows, Doors” category of data, click on the “Walls, Windows, Doors” tab. HAP Quick Reference Guide 1-11 Chapter 1 Getting Started 1.6. PERFORMING COMMON TASKS WITH HAP In order to use HAP, you will need to enter data, edit data and generate reports. A common set of procedures is used in HAP to perform these tasks, and this makes the program easier to learn and use. Whether you are working with walls, spaces or systems, for example, the same basic procedures are used. Further, there are typically two or more ways of performing each task. So you can choose the approach that you find most convenient. Table 1.1 lists common program tasks along with alternate ways of performing each. More extensive information on each task is provided in Appendix A and in HAP’s online help system. Table 1.1 Common Operating Tasks in HAP Task Menu Bar Tool Bar Button Creating a New Item Tree View Pop-Up Menu List View X X Editing an Existing Item X List Special View Feature Pop-Up Menu X X Using the On-Line Calculator to Enter Data X Duplicating an Existing Item X X Deleting Items X X X Generating Input Data Reports X X X X Generating Design Reports X X X X X X X X Generating Simulation Reports (HAP only) Key: X X X X 1. Menu Bar = One of the menus on the menu bar contains an option for performing this task. 2. Tool Bar Button = One of the toolbar buttons can be used to perform this task. 3. Tree View Pop-Up Menu = The pop-up menu displayed from the tree view contains an option for this task. 4. List View = Task can be performed by directly manipulating items in the list view. 5. List View Pop-Up Menu = The pop-up menu displayed from the list view contains an option for this task. 6. Special Feature = A special feature is provided for this task. Please see Appendix A for details. 1.7 WORKING WITH PROJECTS While using HAP you will need to create and manage project data. This section discusses projects and features provided for managing project data. What is a Project? All the data you enter and calculate in HAP is stored together within a “project”. A Project is simply a container for your data. However, a project can hold data for other programs as well as HAP. For example, if you create a project for a building design job, it might contain load estimating and system design data from HAP, rooftop selection data from the Carrier Packaged RTU Builder program, and air terminal selection data from the Carrier Air Terminal Builder program. Keeping this data together in a single container is often more efficient than keeping the data in several separate locations. Using Projects. HAP provides a variety of features for working with project data. Common projectrelated tasks are listed below. Further information on each feature can be found in Appendix B. 1-12 HAP Quick Reference Guide Getting Started Chapter 1 Create a new project. Edit data in an existing project. Save changes in a project. Save changes to a new project. Delete an existing project. Edit descriptive data for the project. Archive project data for safe keeping. Retrieve data that you earlier archived. Convert data from a previous version of HAP. Publish equipment sizing requirements so the data can be used in Carrier Electronic Catalog to make equipment selections. E-mail project data to your Carrier sales engineer for assistance with equipment selections. Export results to the Engineering Economic Analysis program for use in lifecycle cost studies. Import data from another project into the current project. Import data from Computer Aided Design (CAD) or Building Information Modeling (BIM) software. How Project Data is Stored. When a new project is saved for the first time, you designate the folder which will hold the project files (either by accepting the default folder \E20-II\Projects\ProjectName or by specifying a folder yourself). This folder is the permanent storage location of project data. When you open the project to work with its data, temporary copies of the project’s data files are made. As you enter data, make changes and perform calculations, all this data is stored in the temporary copy of the data files. Only when you use the Save option on the Project Menu are the changes you’ve made copied to permanent storage. Therefore, if you ever need to undo changes you’ve made to a project, simply re-open the project without saving the changes you’ve made. When you re-open the project, the changes stored in the temporary copy of the data files are discarded, and data from your last project/save is restored. Recommended Project Management Practices. Project data represents an important investment of your time and effort. And, as the saying goes, ‘time is money’. Therefore it is important to safeguard your investment in project data. We recommend adopting the following practices when working with projects: Create a separate project for each job you work on. It is usually more efficient to keep data for separate jobs in separate projects. It is also safer to store data in smaller, focused units. If you keep data for all jobs in a single project, and this project becomes damaged, your data loss will be greater than if you keep data for separate jobs in separate projects. Use a descriptive name for the project so you can quickly recognize what it contains, both now and when you need to refer to the project in the future. Because the selection list for projects is arranged alphabetically it is useful to use a consistent naming convention. Many firms begin the project name with their internal project number followed by descriptive text (e.g., P2003-47 Lincoln School). Save early and often. While entering data, changing data and generating reports, save the project periodically. This practice is useful in the event that you make a mistake and need to undo changes. If the last time you saved the project was 15 minutes ago, undoing your mistake will only cause you to lose 15 minutes of work. On the other hand, if the last time you saved the data was 4 hours ago, undoing a mistake may cause you to lose 4 hours worth of work. Archive your data periodically for safekeeping. These days data on hard disks is relatively safe. However, it is still possible for hard disk drives to become damaged, or for files on the hard disk to be damaged or erased. Therefore it is a good practice to periodically archive your project data. Data can be archived to a separate location on your hard disk, to a different hard disk drive or to removable media such as a zip drive or floppy disks. For example, if you archive data for a large project at the end of each day and your hard disk drive fails, at most you will have lost one day’s worth of work. On the other hand, if data for the same large project was never archived and your hard disk drive fails, all the project data would be lost. Further Information. Further information on procedures used to manage project data is found in Appendix B and the program’s on-line help system. HAP Quick Reference Guide 1-13 Chapter 1 Getting Started 1.8 USING THE HELP RESOURCES IN HAP HAP provides extensive resources to help users learn about, understand and use the software. These resources are primarily available via the Help Menu on the menu bar of the main program window. The resources include: 1. The On-Line Help System. The "Contents and Index" menu option launches the on-line help system. The help system contains introductory information, tutorials, examples, application information, and complete explanations of all program input screens and reports and calculation documentation. In addition to you can launch the on-line help system by pressing [F1] at any point during program operation or by pressing any of the Help buttons that appear on program input screens. 2. The User's Manual. The "User's Manual" menu option launches your Adobe Acrobat Reader and displays the electronic copy of the program user's manual. This manual contains a subset of the information in the on-line help system which includes the introductory information, tutorials, example problems and application information. 3. Telephone and E-mail Support. The "Contact Software Support" menu option displays telephone and e-mail contact information you can use to contact Carrier software support for assistance with the program. 4. Self-Directed Help on the Web. The "eDesign Support Web Site" menu option links you to the eDesign Application Support web page. This page provides self-service support materials such as frequently asked questions and "eHelps", which are short articles on common program topics of interest. 5. Software Newsletter. The "eDesign Newsletter" menu option links you to the EXchange software newsletter web page from which you can subscribe to this quarterly electronic newsletter containing information about HAP and other Carrier eDesign tools. 6. Program Updates. The "Check for Program Updates" menu option links you to the eDesign Downloads web page where you can check to see if patch updates or major updates for the program have been released. 7. Software Training Information. The " eDesign Software Training" menu option links you to the eDesign Software Training web page which contains class descriptions, a schedule of class dates and locations, and on-line class registration. 8. Current Program Version Information. The "About HAP" menu option displays the current program version. This option is useful if you are unsure if you have the latest version. The version displayed via this option can be compared with the versions shown in the eDesign Downloads web page (item 5 above). The Help Menu also provides links to the Carrier eDesign software main web page and the Carrier commercial building products and services web site. 1-14 HAP Quick Reference Guide Chapter 2 HAP Tutorials This chapter provides three brief tutorials. The first describes how to use the Hourly Analysis Program to design systems and plants. The second and third explain how to use the program to estimate annual energy costs for HVAC systems. The tutorials are designed for readers who want a quick description of how to use the program and are already familiar with the design process, HAP terminology and basic principles of program operation. 2.1 HAP SYSTEM DESIGN TUTORIAL This tutorial explains how to use HAP to perform detailed system design work for systems and plants. When HAP is started, the main program window appears. At this point the system design process involves the following five steps to design systems and two additional steps to design plants. Note that this tutorial assumes the reader is prepared to enter his or her own building and system data. For a complete example problem, please refer to Chapter 3. 1. Create a New Project Choose New on the Project menu. This creates a new project. A project is the container which holds your data. Choose Save on the Project menu. You’ll be asked to name the project. From here on, save the project periodically. 2. Enter Weather Data Click on the “Weather” item in the tree view in the main program window. A “Weather Properties” item appears in the list view. Double click on the “Weather Properties” item in the list view. The Weather input form will appear. Enter weather data. Press the OK button on the Weather input form to save the data and return to the main program window. 3. Enter Space Data Click on the “Space” item in the tree view in the main program window. Space information will appear in the list view. Double-click on the “<new default space>” item in the list view. The Space input form will appear. Enter data for your first space. While entering spaces, you may need to create schedules, walls, roofs, windows, doors or external shades. You can do this by choosing the “create new …” item in drop-down selection lists. For example, when entering overhead lighting data, you must choose a schedule. In the schedule drop-down list, choose the “create new schedule” item to create a schedule and automatically assign it to overhead lighting. Similar procedures are used for walls, roofs, windows, doors and external shades. An alternate approach is to create schedules, walls, roofs, windows, doors and external shading prior to entering space data. Press the OK button on the Space input form to save your data and return to the main program window. To enter another space, in the list view right-click on the name of the space you just created. The space pop-up menu appears. HAP Quick Reference Guide 2-1 Chapter 2 HAP Tutorial Choose the “Duplicate” option on the pop-up menu. A copy of the original space will be created and its input form will appear. This is a quick way of generating new spaces based on defaults from the previous space. For many projects this will be more efficient than creating each new space from standard defaults. Enter data for this new space. Press the OK button on the Space input form to save your data and return to the main program window. Repeat the previous four steps to enter data for as many spaces as you need. 4. Enter Air System Data Click on the “System” item in the tree view in the main program window. System information will appear in the list view. Double-click on the “<new default system>” item in the list view. The System input form will appear. Enter data for your first system. While entering the system, you will need to create a fan/thermostat schedule. You can do this by choosing the “create new schedule” item in the fan/thermostat schedule drop-down list. This will create a schedule and automatically assign it to your system. An alternate approach is to create this schedule before entering air system data. Press the OK button on the System input form to save your data and return to the main program window. To enter another system, in the list view right-click on the name of the system you just created. The system pop-up menu appears. Choose the “Duplicate” option on the pop-up menu. A copy of the original system will be created and its input form will appear. This is a quick way of generating new systems based on defaults from the previous system, if successive systems are similar. If they are not, use the "new default system" option to create each new system. Enter data for this new system. Press the OK button on the System input form to save your data and return to the main program window. Repeat the previous four steps to enter data for as many systems as you need. 5. Generate System Design Reports Click on the “System” item in the tree view in the main program window. System information will appear in the list view. Select the systems for which you want reports. Choose the “Print/View Design Results” option on the Reports menu. On the System Design Reports form, choose the desired reports. To view the reports before printing, press the Preview button. To print the reports directly, press the Print button. Before generating reports, HAP will check to see if system design calculations have been performed. If not, HAP automatically runs these calculations before generating the reports. 6. Enter Plant Data (if necessary) 2-2 Click on the “Plant” item in the tree view in the main program window. Plant information will appear in the list view. Double-click on the “<new default plant>” item in the list view. The Plant input form will appear. Enter data for your first plant. For plant design purposes users will typically only select from the first five plant types (Generic Chilled Water, Generic Changeover, Generic Hot Water, Generic Service Hot Water, Generic Steam). HAP users have additional options for specific types of chilled water, hot water and steam plants, but these require extra data not relevant to the design calculation. Therefore it is more efficient to use the Generic plant types for design. Later Generic plants can be converted into specific plant types without loss of data. Press the OK button on the Plant input form to save your data and return to the main program window. To enter another plant, in the list view right-click on the name of the plant you just created. The plant pop-up menu appears. HAP Quick Reference Guide HAP Tutorial Chapter 2 Choose the “Duplicate” option on the pop-up menu. A copy of the original plant will be created and its input form will appear. This is a quick way of generating new plants based on defaults from the previous plant, if successive plants are similar. If they are not similar, use the "new default plant" option to create each new plant. Enter data for this new plant. Press the OK button on the Plant input form to save your data and return to the main program window. Repeat the previous four steps to enter data for as many plants as you need. 7. Generate Plant Design Reports (if necessary) Click on the “Plant” item in the tree view in the main program window. Plant information will appear in the list view. Select the plants for which you want reports. Choose the “Print/View Design Results” option on the Reports menu in the menu bar. On the Plant Design Reports form, choose the desired reports. To view the reports before printing, press the Preview button. To print the reports directly, press the Print button. Before generating reports, HAP will check to see if plant design calculations have been performed. If not, HAP automatically runs these calculations before generating the reports. 2.2 HAP ENERGY ANALYSIS TUTORIAL - PRELIMINARY DESIGN This tutorial and the following tutorial in section 2.3 explain how to use HAP to estimate annual energy use and energy costs. HAP provides features suited to energy analysis in the preliminary or schematic design phase of a project and for analysis in the detailed design phase of a project. In preliminary design the goal is often to quickly "screen" prospective HVAC design alternatives to identify the most promising designs for further study. In this type of analysis extensive details about the building and its HVAC equipment may not yet be known or may not be relevant for obtaining useful screening results. As a result a simplified modeling approach can be used and data entry can be made faster. HAP provides a set of "wizard" features to help users rapidly generate building and HVAC equipment input data for these applications. This tutorial explains how to use those features. In detailed design the goal is to investigate energy consumption and energy cost performance of HVAC designs in greater detail. In this type of analysis complete details about the building envelope, layout and use are known and HVAC equipment is defined in greater detail. As a result, data entry is more involved, but results are also more detailed and accurate. The tutorial in section 2.3 explains how to use HAP for energy analysis in detailed design applications. Energy Analysis Tutorial for Preliminary Design When HAP is started, the main program window appears. At this point the energy analysis involves the following 3 easy steps. 1. Create a New Project Choose New on the Project menu. This creates a new project. A project is the container which holds your data. Choose Save on the Project menu. You’ll be asked to name the project. From here on, save the project periodically. 2.. Run a Full Wizard Session to Rapidly Define All Input Data Choose the Full Wizard Session option on the Wizards menu. In the Full Wizard Session window, first click the Weather button. Select the weather data for your analysis by either clicking on the map images or using the drop-down lists at the bottom of the Weather Wizard window. Then click OK to exit the Wizard. From the Full Wizard Session window, then click the Building button. Enter data describing your building on the two Building Wizard input screens. Then press Finish to exit the Wizard. HAP Quick Reference Guide 2-3 Chapter 2 HAP Tutorial From the Full Wizard Session window, click the Equipment button next. The Equipment Alternatives window will appear. In the Equipment Alternatives click the Add button to add a new HVAC equipment alternative. Enter data on the Equipment Wizard screens to describe your air-side equipment and, as applicable, your DX or plant equipment. Press Finish to exit. Repeat the previous step for each equipment alternative you wish to include in your study. When finished, click the Close button on the Equipment Alternatives window to return to the Full Wizard Session window. From the Full Wizard Session window, click the Utility Rate button. Enter data describing your electric and fuel prices on the Utility Rate Wizard screens. Press Finish to exit. Finally, on the Full Wizard Session window, click the Finish button. At this point HAP automatically takes your weather, building, equipment and utility rate wizard input data and generates a complete set of detailed input data for your analysis. When this work is finished you are returned to HAP main window. 3. Obtain Results On the HAP main window, click the Building node in the tree view on the left. In the Building list that appears in the right-hand list view panel select one or more buildings you want to include in your energy cost comparison. Each "building" in the list corresponds to one equipment alternative you defined in the Equipment Wizard. Choose the “Print/View Simulation Results” option on the Reports menu. In the Building Simulation Reports window, choose the desired reports. To view the reports, press the Preview button. To print the reports directly, press the Print button. Note that simulation reports can also be generated for systems and plants separately. These reports provide more detailed information about the energy use of air system and plant equipment. To generate these reports, use the same procedure described above, but select systems or plants in the HAP main window tree view panel instead of selecting buildings. 2.3 HAP ENERGY ANALYSIS TUTORIAL - DETAILED DESIGN This tutorial explains how to use HAP to estimate annual energy use and energy cost for alternate system designs. This tutorial is appropriate for energy analysis in the detailed design phase of a project where extensive information about the building and its HVAC systems is known, and highly accurate results are needed. Energy Analysis Tutorial for Detailed Design When HAP is started, the main program window appears. At this point the energy analysis involves the following 7 steps. If system design work has already been completed, many of these steps will not be necessary or will only require minimal work. 1. Create a New Project Choose New on the Project menu. This creates a new project. A project is the container which holds your data. Choose Save on the Project menu. You’ll be asked to name the project. From here on, save the project periodically. =OR= If system design work was done previously, then the project will already exist. In this case use the Open option on the Project menu to open the project. 2-4 HAP Quick Reference Guide HAP Tutorial Chapter 2 2. Enter Weather Data Click on the “Weather” item in the tree view in the main program window. A “Weather Properties” item appears in the list view. Double click on the “Weather Properties” item in the list view. The Weather input form will appear. Enter weather data. Be sure to enter data on the Simulation tab of the Weather form. Inputs on this tab link simulation weather data to the project and define the holiday calendar for the year. Press the OK button on the Weather input form to save the data and return to the main program window. 3. Enter Space Data This step is the same as in the System Design Tutorial in section 2.1, but with the following exceptions: Make sure that schedules for internal loads include profiles assigned for all 7 days of the week and for holidays. Data originally used for system design work may only have defined profiles for the design day. Make sure infiltration rates for energy analysis days are specified. For design work infiltration rates may only have been specified for design cooling and design heating conditions. 4. Enter Air System Data This step is the same as in the System Design Tutorial in section 2.1, but with the following exceptions: Systems used in an energy analysis may not use the "Undefined" equipment class. Any “Undefined” system must be converted to one of the specific equipment classes before it can be used in energy simulations. To convert a system, edit its data and change the “Equipment Class” input from “Undefined” to one of the other choices. This will change the cooling and heating sources for coils in the system, but will retain the other input data. Review your input data, particularly the cooling coil and heating coil source items before saving the system. When defining data for packaged rooftop, packaged vertical units, split DX air handlers, packaged or split DX fan coils or water source heat pumps, you must enter data on the Equipment tab of the Air System form. This tab provides inputs describing the full load capacity, full load efficiency and operating controls for these types of DX equipment. When entering data for water-cooled vertical packaged units, you will need to create a cooling tower. When entering data for a water source heat pump system you will need to create a cooling tower and an auxiliary boiler. You can create both from within the air system form by choose the “create new cooling tower” and “create new boiler” options on the drop-down lists used to select towers and boilers. An alternate approach is to create towers and boilers prior to entering the air system. 5. Enter Plant Data (if necessary) If your study includes chilled water, hot water or steam plants, define each as follows: Click on the “Plant” item in the tree view in the main program window. Plant information will appear in the list view. Double-click on the “<new default plant>” item in the list view. The Plant input form will appear. Enter data for your plant. While entering plant data it may be necessary to create chillers, reversible chillers, boilers, air-towater heat pumps, water-to-water heat pumps, cooling towers and/or dry coolers to link to the plant. This can be done without leaving the plant form by using the "create new ..." options which appear in the drop-down lists used to select these plant components. An alternate approach is to define the chillers, heat pumps, towers, and boilers prior to entering plant data. Press the OK button on the Plant input form to save your data and return to the main program window. HAP Quick Reference Guide 2-5 Chapter 2 HAP Tutorial If more than one plant is required for your analysis, repeat the previous steps to define each plant. 6. Enter Building Data Click on the “Building” item in the tree view in the main program window. Building information will appear in the list view. Double-click on the “<new default building>” item in the list view. The Building input form will appear. Enter data for your building. While entering building data it may be necessary to create electric and fuel rates to link to the building. This can be done without leaving the building form by using the “create new electric rate” and “create new fuel rate” options which appear on the drop-down lists used to select utility rates. An alternate approach is to define the electric and fuel rates prior to entering the building. Press the OK button on the Building input form to save your data and return to the main program window. Repeat the previous steps to define each building in your analysis. Typically an energy analysis contains at least two buildings containing equipment for alternate HVAC designs. 7. Generate Simulation Reports Click on the “Building” item in the tree view in the main program window. Building information will appear in the list view. To study energy use and cost data for one building, select a single building. If you wish to compare energy use and costs for a group of buildings, select all buildings in the group. Choose the “Print/View Simulation Results” option on the Reports menu in the menu bar. On the Building Simulation Reports window, choose the desired reports. To view the reports, press the Preview button. To print the reports directly, press the Print button. Before generating reports, HAP will determine whether system, plant and building calculations are necessary to generate data for your reports. If so, HAP will automatically run the calculations before generating your reports. If no calculations are necessary, reports will be generated immediately. Note that simulation reports can also be generated for systems and plants. These reports provide more detailed information about the energy use of these equipment components. To generate these reports, use the same procedure described above, but use systems or plants instead of buildings. 2-6 HAP Quick Reference Guide Chapter 3 System Design Example Problem This chapter contains a simple example problem which demonstrates how to use HAP to design an HVAC system. The example builds on concepts and procedures discussed in Chapters 1 and 2. 3.1 OVERVIEW FOR THE EXAMPLE PROBLEM The procedure for designing HVAC systems in HAP involves five steps, as discussed in Chapter 1: 1. 2. 3. 4. 5. Define the Problem. Gather Data. Enter Data Into HAP. Use HAP to Generate Design Reports. Select Equipment. The example problem presented in this chapter will demonstrate each step in this process. In the remainder of this chapter a separate section will deal with each step. 3.2 DEFINING THE PROBLEM The objective of this example problem is to design an HVAC system which serves one wing of a high school building located in Chicago, Illinois. The floor plan for this portion of the school building is shown in Figure 3.1. It is comprised of six classrooms, a music room and its associated office, storage and practice rooms, plus two corridors for a total of 12 rooms. In Figure 3.1, classrooms D101 through D104 face due east. East, south and west walls are exposed to ambient. The north walls adjoin other airconditioned areas of the building; we will assume there is no heat transfer across this northern boundary. The rooms in this portion of the school building will be air conditioned by one rooftop unit serving parallel fan powered mixing box (PFPMBX) terminals. A gas-fired preheat coil in the rooftop unit and electric resistance heating coils in the mixing box terminals provide heating. HAP will be used to model the heat transfer processes in the building in order to determine the following nine equipment sizing values: Rooftop unit required cooling capacity. Rooftop unit required fan airflow Rooftop unit required preheat coil capacity. Rooftop unit required outdoor airflow rate. PFPMBX terminal design airflow rates. PFPMBX terminal minimum airflow rates. PFPMBX terminal fan design airflow rates. PFPMBX terminal reheat coil capacities. Space required supply airflow rates. Note: The VAV air system serves all of the spaces shown in Figure 3.1 except for D105 South Vestibule and D112 West Vestibule. The two vestibules contain fan coil heaters and would be modeled using a separate heating-only fan coil air system. For purposes of this example we will focus on the VAV air system and omit consideration of the vestibule fan coil units. HAP Quick Reference Guide 3-1 Chapter 3 System Design Example Problem Figure 3.1 Floor Plan for School Building 3.3 GATHERING DATA The second step in the design process is to gather information necessary to model heat transfer processes in the building and to analyze operation of the HVAC equipment which heats and cools the building. This involves gathering data for the building, its environment and its HVAC equipment. Below, gathering of weather data, data for spaces in the building and data for the HVAC system will be discussed. 3.3.1 Gathering Weather Data ASHRAE design weather conditions for Chicago O’Hare International Airport (Chicago IAP) will be used for this analysis. These design parameters are shown in Figure 3.2. In addition to the ASHRAE data, we will: 3-2 Specify daylight savings time from April 7 through October 26. Use the period May through November as the design cooling months. This means cooling sizing calculations will only be performed for this range of months. We could use January through December as the calculation period. However, design weather conditions in Chicago are such that peak loads are most likely to occur during the summer or fall months. So we can reduce the set of calculation months to May through November to save calculation time without sacrificing reliability. HAP Quick Reference Guide System Design Example Problem Chapter 3 3.3.2 Gathering Space Data In this example problem we will model the heat transfer of each room separately so peak loads and required airflow rates can be determined for each room. In this portion of the school building there are 12 rooms, but three (D101, D102 and D103) are identical. Therefore we will define one of these classrooms as a space and reuse it three times. This reduces the total number of spaces needed for the analysis from 12 to 10. Characteristics of these spaces were derived from architectural plans and from information about the use of the building and are described below. Walls. One common wall construction is used for all exterior walls. The construction, whose data is shown in Figure 3.3, consists of 4-inch face brick, R-7 board insulation, 8-inch lightweight concrete block, an air space and gypsum board finish. The exterior surface absorption is in the “dark” category. The overall U-value is 0.084 BTU/(hr-sqft-F). The overall weight is 69.8 lb/sqft. Roofs. One uniform horizontal roof construction is used for this portion of the school building. Its data is shown in Figure 3.7. The roof construction consists of built-up roofing, board insulation with R-21, 22 gauge steel deck, a plenum air space and acoustic ceiling tiles. The exterior surface absorption is in the “dark” category. The overall U-value is 0.040 BTU/(hr-sqft-F). The overall weight is 5.8 lb/sqft. Note that in HAP the roof assembly must include all material layers from the exterior surface to the interior surface adjacent to the conditioned space. Thus, the ceiling plenum is considered part of the overall roof assembly. Windows & External Shading. One type of fixed window unit is used for all windows in this portion of the school building. The window units measure 6 feet in height by 4 feet in width, are double glazed, and use an aluminum frame with thermal breaks. No internal shades are used. Manufacturer’s NFRC ratings indicate the window has a U-value of 0.550 BTU/(hr-sqft-F) and a shading coefficient of 0.40. All windows have a 4-inch reveal depth. Window data is shown in Figure 3.4 while external shading data is shown in Figure 3.8 Lighting. Recessed, unvented fluorescent lighting fixtures are used for all rooms in this portion of the school building. A lighting density of 1.00 W/sqft is used. For classrooms, offices, storage rooms and practice rooms we will use design day lighting levels of 100% from 0700 through 1700, the standard occupancy period for the school, and 5% from 1800 through 2100 when lighting is reduced or operated intermittently for custodial work. This lighting profile applies for the days the school is in session. For weekends and holidays lighting levels of 0% are used. The holiday period includes a summer shutdown period from late June to early August. Therefore the Weekend/Holiday lighting profile will be used for July for design calculations. Lighting schedule data is shown in Figure 3.5. For the corridors and vestibules we will use design day lighting levels of 100% for 0700 through 2100. Security lighting levels of 5% will be used for all other hours. This lighting profile applies for days the school is in session. For weekends and holidays lighting remains at 5% security levels for all hours. Lighting schedule data is shown in Figure 3.5 Occupants. The maximum number of occupants varies by space and will be discussed later in this section. For all rooms except the music room, a “seated at rest” activity level will be used (230 BTU/hr/person sensible, 120 BTU/hr/person latent). For the music room the “office work” activity level will be used due to the higher level of activity in this room (245 BTU/hr/person sensible, 205 BTU/hr/person latent). For all rooms we will use design day occupancy levels of 100% for 0700 through 1700, the normal hours of operation for the school. Occupancy during the period 1800 through 2100 is very infrequent and will be ignored. Thus, occupancy levels of 0% will be used for all other hours of the day. This occupancy profile applies for days the school is in session. For weekends and holidays 0% occupancy is used for all hours. For the summer shutdown period from late June to early August these 0% occupancy values will be used. The occupant schedule is shown in Figure 3.5. Spaces. A total of 10 spaces will be defined. Data for these spaces appears in Figures 3.8 through 3.17. Details: HAP Quick Reference Guide 3-3 Chapter 3 System Design Example Problem Floor areas are shown in Table 3.1. The average ceiling height is 8 feet for all spaces. The building weight is 70 lb/sqft (medium category). Ventilation airflow rates will be defaulted by choosing the appropriate ASHRAE Standard 62.1-2007 space usage type. One type of lighting fixture is used in all spaces. Lighting fixture characteristics and schedules were discussed earlier in this subsection. Occupants per space are listed in Table 3.1. Occupant heat gains and schedules were discussed earlier in this subsection. One set of common wall, door, window and external shading constructions are used for the building. Wall orientations, wall areas, and window and door quantities for each space are summarized in Table 3.1. One common roof construction is used for the building. Roof areas are shown in Table 3.1. This wing of the school building uses slab on grade floor construction. The floor slab is constructed of 6-inch of heavy weight concrete with an overall U-value of 1.2 BTU/(hr-sqft-F). R-7 edge insulation is used for the slab. Slab floor areas and exposed perimeters are shown in Table 3.1. Note that slab floors are not modeled for the corridor spaces since neither has an exposed slab perimeter. Table 3.1 Summary of Space Characteristics Floor Area (sqft) People D101 - Typical Classroom D104 - Classroom 907.5 907.5 25 25 D106 - Classroom 907.5 25 D107 - Classroom D108 - Music Room D109 - Practice Room 907.5 1781.0 65.0 25 50 1 D110 - Storage Room D111 - Office D113 - West Corridor D114 - South Corridor 120.0 174.0 1054.0 920.0 0 1 0 0 Wall, Window, Door Data E: 275 sqft, 3 windows E: 275 sqft, 3 windows S: 330 sqft, 0 windows W: 275 sqft, 3 windows S: 330 sqft, 0 windows E: 110 sqft, 0 windows W: 275 sqft, 3 windows S: 242 sqft, 2 windows W: 66 sqft, 0 windows S: 99 sqft, 0 windows W: 121 sqft, 0 windows W: 132 sqft, 1 window None None Roof Data H: 907.5 sqft H: 907.5 sqft Slab Slab Floor Exposed Area Perimeter (sqft) (ft) 907.5 27.5 907.5 60.5 H: 907.5 sqft 907.5 71.5 H: 907.5 sqft 907.5 H: 1781.0 sqft 1781.0 H: 65.0 sqft 65.0 27.5 24.2 16.5 H: 120.0 sqft H: 174.0 sqft H: 1054.0 sqft H: 920.0 sqft 12.1 13.2 0.0 0.0 120.0 174.0 0.0 0.0 3.3.3 Gathering Air System Data One air handling system will provide cooling and heating to the rooms in this wing of the school building. Therefore, we will define one HAP air system to represent this equipment. Data for this air system is shown in Figure 3.18. Details: 3-4 Equipment Type. A VAV rooftop unit will be used. Ventilation. Outdoor ventilation airflow will be calculated using the ASHRAE Standard 62.1-2007 method. “Constant” control for ventilation will be used so the system uses the design flow of HAP Quick Reference Guide System Design Example Problem Chapter 3 outdoor air at all times. Ventilation dampers are closed during the unoccupied period and the damper leak rate is 5%. Cooling Coil. The system provides a constant 55 F supply air temperature to zone terminals. The DX cooling coil is permitted to operate in all months. The bypass factor for the cooling coil is 0.038 which is representative of the type of equipment we expect to select. Preheat Coil. The rooftop unit contains a preheat coil to maintain minimum supply duct temperatures during the winter. The preheat coil is located downstream of the point where return air and outdoor ventilation air mix. The preheat setpoint is 52 F. The gas-fired heat exchanger in the rooftop unit is used for this purpose. The coil is permitted to operate in all months. Supply Fan. The supply fan in the rooftop unit will be forward curved with variable frequency drive. The total static pressure for the system is estimated to be 3 in wg. The overall fan efficiency is 48%. The coil configuration is draw-thru. Return Air Plenum. The system uses a return air plenum. It is estimated that 70% of the roof load, 20% of the wall load and 30% of the lighting load is removed by plenum air. Zoning. A zone is a region of the building with one thermostatic control. One zone will be created for each classroom. The music room and its adjacent office, storage room and practice room will all be part of a single zone. Each corridor will also be zone. Therefore, a total of 9 zones will be created: one each for the six classrooms, one for the music room and two for the corridors. Thermostats. Thermostat settings of 75 F occupied cooling, 80 F unoccupied cooling, 70 F occupied heating and 65 F unoccupied heating will be used in all zones. The throttling range will be 1.5 F. The schedule for fan and thermostat operation for the design day will designate 0700 through 2100 as “occupied” hours. This covers both the 0700-1700 operating hours for the school and the 1800-2100 period when custodial staff is present. All other hours will be “unoccupied”. This profile applies for the school year which runs from August through June. During the shutdown month of July all hours will be designated as “unoccupied”. Schedule data is shown in Figure 3.5. Supply Terminals. All zones use parallel fan powered mixing box terminals with 0.5 in wg total fan static, 50% overall fan efficiency and a 95 F heating supply temperature. Minimum supply airflow for the terminals is based on ASHRAE Standard 62.1-2007 requirements. We will specify minimum zone airflow as zero so the program will automatically use the Standard 62.1-2007 requirement to set the minimum damper position. The heat source for the reheat coils is electric resistance. Sizing Criteria. Required zone airflow rates will be based on the peak sensible load in each zone. Required space airflow rates will be based on peak space loads for the individual spaces. Safety factors will be specified as zero. A margin of safety will be applied later during equipment selection. HAP Quick Reference Guide 3-5 Chapter 3 System Design Example Problem 3.4 ENTERING DATA After weather, space and HVAC system data has been gathered, it is entered into HAP. This is the third step in the design process. The procedure for entering data into HAP is presented below in a tutorial format. 1. Create a New Project (Optional) If you only wish to view this example rather than entering all the data yourself, you can use archive data for the example problem which is provided on the HAP CD. To use this archive file: Run HAP. Use the New option on the Project Menu to create a new untitled project. Then choose the Retrieve option on the Project Menu. In the Retrieve window choose the archive file containing the HAP example problem and click the Open button. On the next window click the Retrieve button. Finally after data has been retrieved use the Save option on the Project Menu to save the project. Use the project name “Example Problem”. Skip to step 3 below. =OR= If you will be entering example problem data yourself, choose New on the Project menu. This creates a new project. A project is the container which holds your data. The new project you create will contain data for the example problem. Then choose Save on the Project menu. Because you are saving the project for the first time, you will be asked to specify a name for the project. Use “Example Problem” as the project name. From here on, save the project periodically. 2. Enter Weather Data Click the “Weather” item in the tree view in the main program window. A “Weather Properties” item appears in the list view. Double click on the “Weather Properties” item in the list view. The Weather input window will appear. From the drop-down lists on the Weather window, choose data for United States / Illinois / Chicago IAP. Also select design cooling months of May through November, and specify daylight savings time from April 7 through October 26. Design parameter input data for the example problem is shown in Figure 3.2. When finished entering this data, press the OK button on the Weather input window to save the data and return to the main program window. 3. Enter Space Data Entering space data is the most labor-intensive phase of data entry. By using the program’s “duplicate” feature input effort can be minimized. First enter data for the “D101- Typical Classroom” space: 3-6 Click the “Space” item in the tree view in the main program window. Space information will appear in the list view. Double-click on the “<new default space>” item in the list view. The Space input window will appear. Enter data on the General tab of the space input window using data shown in Figure 3.8. Switch to the Internals tab on the space input window and enter the data shown in Figure 3.8. As you enter internal load data it will be necessary to create a lighting schedule and an occupant HAP Quick Reference Guide System Design Example Problem Chapter 3 schedule. This can be done “on-the-fly” without leaving the space input window. Simply choose the “<create new schedule>” item in the schedule drop-down list. This will launch the schedule input window. Enter data for the appropriate schedule shown in Figure 3.5. If you are new to the Schedule window, make frequent use of the help features on this window to learn about the many ways in which schedule data can be entered. When finished, press the OK button to save the schedule and return to the space window. When you do this, the schedule you created will be assigned to the space automatically. For example, if you chose “<create a new schedule>” from the drop down list for overhead lighting schedule, the schedule you create will be assigned to overhead lighting automatically. Switch to the Walls, Windows, Doors tab on the space input window and enter the data shown in Figure 3.8. As you enter this data it will be necessary to create wall, window, door and external shade constructions. For example, while the desired exposure line in the table is highlighted, you can create the wall construction for that exposure by choosing the “<create a new wall>” item in the wall drop-down list. Similar procedures are used for creating window, door and external shade constructions. Wall, window and shade construction data is shown in Figures 3.3, 3.4, 3.6 and 3.7 respectively. Switch to the Roofs, Skylights tab on the space input window and enter the data shown in Figure 3.8. As you enter this data it will be necessary to create a roof construction. With the desired exposure row in the table highlighted, you can create a roof construction for that exposure by choosing the “<create a new roof>” item in the roof drop-down list. Roof construction data is shown in Figure 3.6. Switch to the Floors tab on the space input window and enter the data shown in Figure 3.8. At this point, press the OK button to save data for space D101 and return to the main program window. D102 and D103 are identical to D101, so the next space we enter will be “D104 - Classroom”. The “duplicate” feature can be used to minimize input effort: Right-click the “D101 - Typical Classroom” space item in the list view portion of the main program window. On the pop-up menu that appears, select the “duplicate” option. A duplicate of “D101 - Typical Classroom” will be created, the space input window will be launched and data for the new space will be displayed. Because this new space is a copy of D101, we will only need to modify items which differ from D101. On the General tab of the space input window change the space name to “D104 - Classroom” and specify its floor area as shown in Figure 3.9. Switch to each of the other tabs on the space input window in succession and enter the data shown in Figure 3.9. Note that many of the default values for this space will not need to be changed since much of the space data is common among spaces. By making duplicates of successive spaces, the number of items which need to be modified will be minimized. When finished modifying data for space D104, press the OK button to save data for space D104 and return to the main program window. Enter data for the remaining spaces using a procedure similar to that used for D104: Use the “duplicate” feature to create successive copies of spaces and modify the data for each new space you create in this manner. As you enter data for the remaining spaces, use a strategy of entering similar spaces consecutively. The recommended order for the remaining spaces in this example is D106, D107, D108, D109, D110, D111, D113 and D114. Input data for the remaining spaces is shown in Figures 3.10 through 3.17. HAP Quick Reference Guide 3-7 Chapter 3 System Design Example Problem 4. Enter Air System Data Click on the “System” item in the tree view in the main program window. System information will appear in the list view. Double-click on the “<new default system>” item in the list view. The System input window will appear. Enter data for the “VAV Rooftop” air system shown in Figure 3.18. If you are new to the air system window, make frequent use of the help button or the on-line help features (F1 key) to learn about operation of this window. As you enter data you will need to create a fan/thermostat schedule for the air system. This is done in a manner similar to creating schedules “on-the-fly” for spaces. In the Thermostats data view on the Zone Components tab, choose the “<create a new schedule>” item in the schedule drop-down list. This will launch the Schedule input window. Use this window to enter the fan/thermostat schedule data shown in Figure 3.5. Be sure to specify the schedule type as “fan/thermostat” instead of “fractional”. When finished, press the OK button to save the schedule and return to the air system window. The schedule will be assigned to the air system automatically. When finished entering air system data, press the OK button on the System window to save your data and return to the main program window. At this point all input data has been entered and we’re ready to design the system. Procedures for generating system design reports will be discussed in Section 3.5. 3.5 GENERATING SYSTEM DESIGN REPORTS The fourth step in the design process is to use the data entered in step 3 to perform system design calculations and generate system design reports. The procedure for doing this is as follows: Click the Systems item in the tree view portion of the main program window. Systems information will appear in the list view. Right click the “VAV Rooftop" item in the list view. On the menu which appears, select the “Print/View Design Results” item. The System Design Reports window will appear. On the System Design Reports window, select the “System Sizing Summary”, “Zone Sizing Summary” and “System Load Summary” report options. Then press the Preview button. When you press the Preview button, the program will determine whether system design data exists for the air system. Since design data has not yet been calculated, the program will run design calculations automatically. A status monitor will appear to help you track the progress of the calculation. Once the calculation is finished, the reports you requested will appear in the HAP Report Viewer. The Report Viewer can be used to browse and print the reports. Use the scroll bar to browse the report pages. The System Sizing Summary, Zone Sizing Summary and System Load Summary reports are shown in Figures 3.19 through 3.21. Information in these reports can be used to size the various components of the HVAC system as explained in section 3.6. 3.6 SELECTING EQUIPMENT The final step in the design process is to use system design reports to select HVAC equipment. At the beginning of this example, nine equipment sizing objectives were listed. Data provided on the System Sizing Summary report (see Figure 3.19) and the Zone Sizing Summary report (see Figure 3.20) can be used to meet all nine of these objectives. The Air System Design Load Summary (see Figure 3.21) provides supplemental information about component loads. The table below lists the nine sizing objectives and the report and table which contains data needed to meet each objective. 3-8 HAP Quick Reference Guide System Design Example Problem Chapter 3 The System Sizing Summary report contains data used to select the rooftop unit. The Central Cooling Coil Sizing Data table lists the peak coil capacities, coil entering and leaving conditions and a number of useful check figures. The Preheat Coil Sizing Data table lists the peak load for this coil as well as entering and leaving conditions. The Supply Fan Sizing Data table provides the required airflow rates and motor data for the supply fan. The Outdoor Ventilation Air Data section lists the total outdoor air requirement for the system. Together this data can be used in the applied rooftop unit selection software offered by Carrier and other manufacturers to select a rooftop unit which meets the sizing requirements. The Zone Sizing Summary report contains data used to select terminal equipment. The Zone Sizing Data table lists the required airflow rate for each zone terminal. It also lists the minimum airflow rate which can be used to set minimum damper positions for the mixing boxes. The Zone Terminal Sizing Data table lists the required sizes for the parallel mixing box fans, the reheat coils and the zone heating unit coils. The Space Loads and Airflows table lists the required airflows for each space served by the system. Because 8 of the 9 zones contain a single space, space and zone airflows for these zones will match. For the Music Room zone which contains four spaces, the airflow rates can be used to size ductwork and supply diffusers for the four rooms in this zone. Together this data can be used in air terminal selection software offered by Carrier and other manufacturers to select terminal components which meet the sizing requirements. This data can also be used in duct design calculations to size ductwork for the system. Table 3.2. Location of System Sizing Data on Design Reports Objective: Table Report: Air System Sizing Summary 1. Rooftop Cooling Capacities Central Cooling Coil Sizing Data 2. Rooftop Supply Fan Airflow Supply Fan Sizing Data 3. Rooftop Preheat Coil Capacity Preheat Coil Sizing Data 4. Rooftop Outdoor Airflow Rate Outdoor Ventilation Air Data Report: Zone Sizing Summary 5. Supply Terminal Airflow Rate Zone Sizing Data (see “Design Air Flow”) 6. Supply Terminal Minimum Airflow Rates Zone Sizing Data (see “Minimum Air Flow”) 7. Supply Airflow Rates for Mixing Box Fans Zone Terminal Sizing Data (see “Mixing Box Fan Airflow”) 8. Terminal Reheat Coil Capacities Zone Terminal Sizing Data (see “Reheat Coil Load”) 9. Space Airflow Rates Space Loads and Airflows (see “Air Flow”) HAP Quick Reference Guide 3-9 Chapter 3 System Design Example Problem Figure 3.2 Design Weather Parameters Figure 3.3 Wall Construction Data Figure 3.4 Window Construction Data 3-10 HAP Quick Reference Guide System Design Example Problem Chapter 3 Figure 3.5 Schedule Input Data HAP Quick Reference Guide 3-11 Chapter 3 System Design Example Problem Figure 3.5 Schedule Input Data (Continued) Figure 3.6 Roof Construction Data 3-12 HAP Quick Reference Guide System Design Example Problem Chapter 3 Figure 3.7 External Shading Geometry Figure 3.8 Space Inputs for D101 – Typical Classroom HAP Quick Reference Guide 3-13 Chapter 3 System Design Example Problem Figure 3.9 Space Inputs for D104 - Classroom 3-14 HAP Quick Reference Guide System Design Example Problem Chapter 3 Figure 3.10 Space Inputs for D106 - Classroom HAP Quick Reference Guide 3-15 Chapter 3 System Design Example Problem Figure 3.11 Space Inputs for D107 - Classroom 3-16 HAP Quick Reference Guide System Design Example Problem Chapter 3 Figure 3.12 Space Inputs for D108 – Music Room HAP Quick Reference Guide 3-17 Chapter 3 System Design Example Problem Figure 3.13 Space Inputs for D109 – Practice Room 3-18 HAP Quick Reference Guide System Design Example Problem Chapter 3 Figure 3.14 Space Inputs for D110 – Storage Room HAP Quick Reference Guide 3-19 Chapter 3 System Design Example Problem Figure 3.15 Space Inputs for D111 - Office 3-20 HAP Quick Reference Guide System Design Example Problem Chapter 3 Figure 3.16 Space Inputs for D113 – West Corridor HAP Quick Reference Guide 3-21 Chapter 3 System Design Example Problem Figure 3.17 Space Inputs for D114 – South Corridor 3-22 HAP Quick Reference Guide System Design Example Problem Chapter 3 Figure 3.18 Packaged Rooftop AHU Inputs HAP Quick Reference Guide 3-23 Chapter 3 System Design Example Problem Figure 3.18 Packaged Rooftop AHU Inputs (continued) 3-24 HAP Quick Reference Guide System Design Example Problem Chapter 3 Figure 3.19 Air System Sizing Summary Report HAP Quick Reference Guide 3-25 Chapter 3 System Design Example Problem Figure 3.20 Zone Sizing Summary Report 3-26 HAP Quick Reference Guide System Design Example Problem Chapter 3 Figure 3.20 Zone Sizing Summary Report (continued) HAP Quick Reference Guide 3-27 Chapter 3 System Design Example Problem Figure 3.21 Air System Design Load Summary Report 3-28 HAP Quick Reference Guide Chapter 4 Energy Analysis Example Problem This chapter contains a simple example problem which demonstrates how to use HAP to estimate annual energy use and cost for a building. The example is suitable for the detailed design phase of a project. The example builds on concepts and procedures discussed in Chapters 1 and 2. 4.1 OVERVIEW FOR THE EXAMPLE PROBLEM The procedure for conducting an energy analysis with HAP involves five steps previously discussed in Chapter 1: 1. 2. 3. 4. 5. Define the Problem. Gather Data. Enter Data Into HAP. Use HAP to Generate Simulation Reports. Evaluate the Results. The example problem presented in this chapter will demonstrate the first four steps in this process. In the remainder of this chapter a separate section will deal with each step. 4.2 DEFINING THE PROBLEM The objective of this example problem is to estimate annual energy use and energy cost for a building. Normally an energy analysis compares energy use and cost for two or more design scenarios. To make this example practical and efficient, the scope of the example will be limited to estimating energy use and cost for a single design scenario. This will demonstrate the key steps in the energy analysis process. In a real energy study, certain of the steps would be repeated to generate the additional design scenarios so the costs of multiple scenarios could be compared. The example will analyze the classroom wing of the high school building used in the system design example problem discussed in Chapter 3. The floor plan for this wing of the school building is shown in Figure 4.1. It is comprised of six classrooms, a music room and its associated office, storage and practice rooms, plus two corridors for a total of 12 rooms. The rooms in this portion of the school building will be air conditioned by one rooftop unit serving parallel fan powered mixing box (PFPMBX) terminals. A gas-fired preheat coil in the rooftop unit and electric resistance heating coils in the mixing box terminals provide heating. HAP will be used to simulate building loads and equipment operation hour-by-hour for one year in order to determine energy use and energy cost. Note: The VAV air system serves all of the spaces shown in Figure 4.1 except for D105 South Vestibule and D112 West Vestibule. The two vestibules contain fan coil heaters and would be modeled using a separate heating-only fan coil air system. For purposes of this example we will focus on the VAV air system and omit consideration of the vestibule fan coil units. HAP Quick Reference Guide 4-1 Chapter 4 Energy Analysis Example Problem Figure 4.1 Floor Plan for School Building 4.3 GATHERING DATA The second step in the analysis process is to gather information necessary to model heat transfer processes in the building, to analyze operation of the HVAC equipment and to calculate costs for energy and fuel use. This involves gathering data for the building, its environment, the HVAC equipment and the utility rate structures. Below, each type of data will be discussed. 4.3.1 Gathering Weather Data The same design weather conditions used in the system design example problem in Chapter 3 will be used here: ASHRAE design weather conditions for Chicago O’Hare International Airport, plus daylight savings time specifications and cooling design calculation months (see Figure 3.2). For the energy analysis, simulation weather data will also be needed. This is observed weather data for a typical year spanning all 8,760 hours in the year. We will use the Typical Meteorological Year v2 (TMY2) weather file for Chicago O’Hare International Airport as the source of this data. This data is provided in the library of HAP simulation weather data. In addition, the operating calendar for the year must be specified. We will use a calendar with January 1 st falling on a Saturday and having the following days designated as holidays: 4-2 HAP Quick Reference Guide Energy Analysis Example Problem Chapter 4 Table 4.1 Calendar of Holidays January 1 New Year’s Day April 18-22 Spring Holiday May 30 US Memorial Day June 25 – August 14 Summer Holiday September 5 US Labor Day November 24, 25 US Thanksgiving Holiday December 24 – 31 Christmas/New Year's Holiday 4.3.2 Gathering Space Data Data describing the heat transfer elements of each room in this wing of the building will be the same as described in Chapter 3, section 3.3.2. This discussion in Chapter 3 covers wall, roof, window, external shade, schedule and space data. The only adjustment needed for energy analysis will be the assignment of schedule profiles to days of the week and times of year. The “School_In_Session” profiles for each schedule will be assigned to weekdays in all 12 months. The “Weekend/Holiday” profiles for each schedule will be assigned to Saturday, Sunday and Holidays in all 12 months. Because we have designated the June 25 to August 14 summer shutdown period as “holidays” we do not need to create separate profiles representing operation during the shutdown days. This expanded schedule data is shown in Figure 4.3. 4.3.3 Gathering Air System Data One VAV rooftop unit will provide air-conditioning to the rooms in this wing of the school building. Heating will be provided by a gas-fired preheat coil in the rooftop unit and electric resistance coils in the parallel fan powered mixing box terminals. Data defining this air system equipment is the same as described in Chapter 3, section 3.3.3. Because we are performing an energy analysis, performance data for the DX cooling apparatus and the gas-fired preheat coil will need to be added to this system data. Results from the system design calculations shown in Chapter 3, Figure 3.19 established peak loads for the equipment. These requirements were used to select a sample packaged rooftop unit. associated product data for this rooftop unit is as follows: Performance data and Design outdoor air temperature = 91 F. Gross cooling capacity = Peak Load + 15% safety factor. AHRI Performance Rating = 11.0 EER Outdoor air temperature for start of head pressure control = 55 F Outdoor air temperature for unit shutoff = 15 F Preheat Coil Gross heating capacity = Peak Load + 25% Efficiency for gas-fired heat exchanger = 82% HAP Quick Reference Guide 4-3 Chapter 4 Energy Analysis Example Problem 4.3.5 Gathering Electric Rate Data The General Service electric rate structure for the local utility company is defined as follows: Monthly Customer Charge The Monthly Customer Charge shall be ..........................................$40.00 Demand Charge Charge per kilowatt for all kilowatts of Maximum Demand for the month: For Summer Months ..................................................................$14.50 For Winter Months ....................................................................$11.25 For purposes of the demand charge, the Summer Months shall be the customer’s first billing period with an ending meter reading on or after June 15 and the three succeeding monthly billing periods. Energy Charge Charge per kilowatt-hour for kilowatt-hours supplied in the month: For the first 30,000 kilowatt-hours........................................$0.04247 For the next 470,000 kilowatt-hours .....................................$0.03167 For all over 500,000 kilowatt-hours......................................$0.03118 Maximum Demand The Maximum Demand shall be the highest 30-minute demand established at any time during the month. Minimum Charge The minimum monthly charge shall be the Monthly Customer Charge. 4.3.6 Gathering Fuel Rate Data The packaged rooftop unit uses gas heating equipment so a fuel rate for natural gas must be defined. The General Service natural gas rate structure for the local utility company is defined as follows: Monthly Customer Charge The Monthly Customer Charge shall be ..........................................$22.00 Distribution Charge Charge per Therm for natural gas supplied in the month: For the first 100 Therms ........................................................$0.22360 For the next 4,900 Therms.....................................................$0.11500 For all over 5000 Therms ......................................................$0.05329 Gas Charge Charge per Therm for natural gas supplied in the month: For all Therms .......................................................................$0.39650 Minimum Charge The minimum monthly charge shall be the Monthly Customer Charge. 4.4 ENTERING DATA Once input data has been gathered, it is entered into HAP. This is the third step in the analysis process. The procedure for entering data into HAP is presented below in a tutorial format. 1. Project Setup (Optional) If you only wish to view this example rather than entering all the data yourself, you can use archive data for the example problem which is provided on the HAP CD. To use this archive file: Run HAP. Use the New option on the Project Menu to create a new untitled project. Then choose the Retrieve option on the Project Menu. In the Retrieve window choose the archive 4-4 HAP Quick Reference Guide Energy Analysis Example Problem Chapter 4 file containing the HAP example problem and click the Open button. On the next window click the Retrieve button. Finally after data has been retrieved use the Save option on the Project Menu to save the project. Use the project name “Example Problem”. Skip to step 3 below. =OR= If you already performed the system design portion of this example problem (Chapter 3), then a project already exists containing example problem data. In this case use the Open option on the Project Menu to open the project. =OR= If you did not work through the system design portion of the example, choose New on the Project menu. This creates a new project. Then choose Save on the Project Menu. Name the project “Example Problem”. From here on, periodically save the project as you enter data. 2. Enter Weather Data Click the “Weather” item in the tree view panel in the main program window. A “Weather Properties” item appears in the list view panel. Double click on the “Weather Properties” item in the list view. The Weather input window will appear. On the General tab enter design weather parameters as shown in Figure 3.2 in Chapter 3. If you previously worked through the system design example problem in Chapter 3, this design weather data will already exist and does not need to be re-entered. Next click on the Simulation tab to define simulation weather data and operating calendar data. Press the “Select From HAP Library” button to select simulation weather data. This will display the “Select City” window listing simulation weather files in the \E20-II\Weather folder. In this folder, choose the USA_Illinois_Chicago_TMY2.HW1 file. It contains simulation weather data for Chicago. After returning to the Weather window, specify the day of the week for January 1st as Saturday. Also select the holidays shown in Figure 4.2 Finally, press the OK button to save the data and return to the HAP main window. 3. Enter Space Data If you previously worked through the system design example problem in Chapter 3, then data for spaces and associated walls, roofs, windows, doors, external shades and schedules has already been defined. Only modifications to schedule data will be required as described in step 4 below. On the other hand, if you did not work through the system design example problem, enter the space data shown in Figures 3.8 thru 3.17 in Chapter 3. Associated wall, roof, window, external shade and schedule data is shown in Figures 3.3 thru 3.7. While entering this data press F1 or the Help button if you have questions about input items or procedures. 4. Modify Schedule Data The entry of schedule data described in Chapter 3 only covered data for system design applications. For energy analyses, profiles within the schedule must be assigned to the days of the week and times of year. Repeat the following steps for each of the four schedules in this example problem: Edit the schedule. Click on the assignments tab. Assign the “School_In_Session” profile to Monday through Friday for all 12 months. Assign the “Weekend/Holiday” profile to Saturday, Sunday and Holidays for HAP Quick Reference Guide 4-5 Chapter 4 Energy Analysis Example Problem all 12 months. This data is shown in Figure 4.3. For helpful hints on quickly entering this data, please refer to the online help system by pressing “Help” or F1 while on the Schedule window. 5. Enter Air System Data If you previously worked through the system design example problem in Chapter 3 then you only need to add equipment performance data for the gas-fired preheat coil and the DX cooling apparatus. To add this data, edit the Packaged Rooftop AHU and enter the data described below. If you did not work through the system design example, enter the system data shown in sections 1 through 4 of Figure 4.4. If you have questions about input data or procedures, press F1 or the Help button on the System window. Next enter the equipment performance data as described below. Go to the Equipment Tab on the System window. Press the “Edit Equipment Data” button opposite “Preheat Unit”. On the Equipment window that appears enter data for the preheat coil shown in section 5 of Figure 4.4. Then press OK to return to the System window. Next press the “Edit Equipment Data” button opposite “Central Cooling Unit”. On the Equipment window that appears enter data for the DX cooling equipment shown in section 5 of Figure 4.4. Then press OK to return to the system window. Finally press OK to save the system inputs and return to the HAP main window. 6. Enter Electric Rate Data Click on the “Electric Rate” item in the tree view panel in the main program window. Electric Rate information will appear in the list view panel. Double-click on the <new default electric rate> item in the list view panel. The Electric Rate input window will appear. Enter data for the electric rate shown in Figure 4.6. While entering data press F1 or the Help button if you have questions about input items or procedures. The electric rate described in section 4.3.5 contains a customer charge and a minimum charge. Seasonal scheduling is used with a 4-month summer season running from June through September. The energy charge is a “declining block” type of charge with 3 steps. Modeling of this type of charge is discussed in section 6.13 of this manual. The demand charge is a “flat price” type of charge with 2 steps, one for each season. This type of charge is also discussed in section 6.13. The billing demand is equal to the measured peak demand so there are no demand determination clauses. After entering the electric rate data, press the OK button to save the data and return to the HAP main window. 7. Enter Fuel Rate Data Click on the “Fuel Rate” item in the tree view panel in the main program window. Fuel Rate information will appear in the list view panel. Double-click on the <new default fuel rate> item in the list view panel. The Fuel Rate input window will appear. Enter data for the fuel rate shown in Figure 4.5. While entering data press F1 or the Help button if you have questions about input items or procedures. The Natural Gas fuel rate described in section 4.3.6 contains a customer charge and a minimum charge. 4-6 HAP Quick Reference Guide Energy Analysis Example Problem Chapter 4 The fuel charge is a “declining block” type of charge with 3 steps. Modeling of this type of charge is discussed in section 6.13 of this manual. One wrinkle in this fuel rate is that separate “distribution” and “gas” charges are listed. These need to be combined into one set of prices. An easy way to do this by using the on-line calculator feature of the program. For example, for the first step in the fuel charge enter the value 0.2236+0.3965=. When you press the “=” key the two values will be added and the result displayed in the input cell. Finally, there is no demand charge for this fuel rate and therefore there are also no demand determination clauses. After entering the fuel rate data, press the OK button to save the data and return to the HAP main window. 8. Enter Building Data The final data entry step involves building data. As described in Chapter 1, the building is simply a container for all the system, plant and non-HVAC energy-consuming equipment in a design alternative. Because we are dealing with a rooftop unit in this example, we only have system equipment. No chilled water, hot water or steam plant equipment is involved. Therefore, the building contains only the VAV Rooftop air system and the electric and fuel rate pricing structures. To enter this data: Click on the “Building” item in the tree view panel in the main program window. Building information will appear in the list view panel. Double-click on the <new default building> item in the list view panel. The Building input window will appear. Enter data for the building shown in Figure 4.7. While entering data press F1 or the Help button if you have questions about input items or procedures. On the Plants tab, enter the reference name for the building as “Base Case Design”. In many applications plants would also be included in the building. However, this example problem does not involve plants so no further inputs are needed on this tab. On the Systems tab, select the VAV Rooftop air system to include it in the building. A system multiplier of 1 will be used. The Misc. Energy tab contains inputs for non-HVAC systems which consume energy and have not yet been accounted for. In the example problem, the only non-HVAC equipment is lighting and it has already been accounted for in space inputs. Therefore, no data needs to be entered on the Misc. Energy tab. Finally, on the Meters tab, select the “General Service Electric Rate” you defined earlier for the electric meter. Select the “General Service Gas Rate” you defined earlier for the natural gas meter. As an alternative to entering electric and fuel rates prior to entering the building (steps 7 and 8), you could create these rates at the same time as the building. To do so use the “create new...” options on the drop-down lists for electric and natural gas rates. After entering the building data, press the OK button to save the data and return to the HAP main window. At this point all input data has been entered and we’re ready to generate energy simulation reports. Procedures for generating reports will be discussed in Section 4.5. HAP Quick Reference Guide 4-7 Chapter 4 Energy Analysis Example Problem 4.5 GENERATING SIMULATION REPORTS The fourth step in the energy analysis procedure is to use the data entered in step 3 to perform energy analysis calculations and generate simulation reports. The procedure for doing this is as follows: Click the Building item in the tree view portion of the main program window. Building information will appear in the list view. Right click the “Base Case Design” item in the list view. On the menu which appears, select the “Print/View Simulation Results” item. The Building Simulation Reports window will appear. On the Building Simulation Reports window, select the “Annual Component Costs” and “Monthly Energy Use by System Component” options. The Annual Component Costs report will list the costs for each system component such as fans, cooling, heating and lights. The “Monthly Energy Use” report will list monthly energy consumption for each system component. These are just two of the many useful reports offered for building simulations. They were chosen to provide a sample of energy simulation results. The choice of simulation results depends on the information you are seeking. Some reports compare final results for multiple buildings. Others provide more detailed information for a single building and are used when investigating aspects of building performance. Press the Help button on the Building Simulation Reports Selection window for further information about report contents. After selecting the reports, press the Preview. The program will determine whether system and building calculations need to be run before generating the report. Calculations will be required the first time you generate reports and they will run automatically. A status monitor will help you keep track of the progress of the calculation. Once the calculation is finished your reports will be generated and displayed in the Report Viewer. The Report Viewer can be used to browse and print the reports. Use the scroll bar to browse each report document. Use the buttons on the Report Viewer toolbar to move from one report to the next. The Annual Component Costs and Monthly Energy Use reports are shown in Figures 4.8 and 4.9. Information about the content of these reports can be found in the program’s on-line help system. Information about intermediate results in an energy simulation can also be obtained. These reports are useful for investigating aspects of performance for a particular air system or plant included in the building. For example, the following steps can be used to generate simulation reports for the VAV Rooftop air system. 4-8 Click the Air System item in the tree view portion of the main program window. System information will appear in the list view. Right-click the “VAV Rooftop” item in the list view. On the menu which appears, select the “Print/View Simulation Results” item. The System Simulation Reports window will appear. On the System Simulation Reports window, place a check in the box in the “Table” column opposite “Monthly Simulation Results”. Then press the Preview button. Because simulation calculations were previously run, this report will be displayed immediately. It shows monthly total loads and energy use for all components in the air system. A copy of this report is shown in Figure 4.10. Many other report options are provided on the System Simulation Reports windows and can provide useful information when studying system performance. HAP Quick Reference Guide Energy Analysis Example Problem Chapter 4 Figure 4.2 Simulation Weather Data HAP Quick Reference Guide 4-9 Chapter 4 Energy Analysis Example Problem Figure 4.3 Schedule Data 4-10 HAP Quick Reference Guide Energy Analysis Example Problem Chapter 4 Figure 4.3 Schedule Data (continued) HAP Quick Reference Guide 4-11 Chapter 4 Energy Analysis Example Problem Figure 4.4 Air System Data 4-12 HAP Quick Reference Guide Energy Analysis Example Problem Chapter 4 Figure 4.4 Air System Data (continued) HAP Quick Reference Guide 4-13 Chapter 4 Energy Analysis Example Problem Figure 4.4 Air System Data (continued) Figure 4.5 Natural Gas Fuel Rate Data 4-14 HAP Quick Reference Guide Energy Analysis Example Problem Chapter 4 Figure 4.6 Electric Rate Data Figure 4.7 Building Data HAP Quick Reference Guide 4-15 Chapter 4 Energy Analysis Example Problem Figure 4.8 Annual Component Costs 4-16 HAP Quick Reference Guide Energy Analysis Example Problem HAP Quick Reference Guide Chapter 4 4-17 Chapter 4 Energy Analysis Example Problem Figure 4.9 Monthly Energy Use by System Component Figure 4.10 Monthly Simulation Results for VAV Rooftop 4-18 HAP Quick Reference Guide Chapter 5 Design Applications This chapter provides application information describing how to use the program to perform different types of system design analyses. It also provides advice on how to troubleshoot problem jobs. Material in this chapter is written assuming the reader is familiar with the program operating principles discussed in Chapter 1. 5.1 APPLICATION INFORMATION OVERVIEW This chapter explains how to use the program for common system design applications. Chapter 1 contained a general discussion of how to use the program to design systems. However, the program can be used in design work involving a wide variety of different types of HVAC systems and equipment. Procedures for using the program for these applications are not always obvious, especially for new program users. Therefore, this chapter summarizes how the program can be used for four common categories of design applications: Sizing single-zone HVAC units. Sizing terminal HVAC units such as fan coils and water-source heat pumps. Sizing multiple-zone HVAC systems. Sizing chiller and boiler systems. Discussions will dwell on modeling strategies and procedures for generating sizing information. In each case it is assumed the reader is familiar with the basic program operating procedures outlined in Chapter 1. Further, it is assumed input data has been gathered and weather, schedule, wall, roof, window, door and shading data has already been entered. Therefore, entry of this data will not be covered in the application discussions. Finally, the last section in the chapter discusses troubleshooting strategies required when investigating program results. 5.2 APPLICATIONS INVOLVING SINGLE-ZONE HVAC UNITS Introduction. Many design applications involve single-zone HVAC equipment. These include small buildings with open areas that can be properly air-conditioned with one single-zone unit, or regions of a larger building served by separate single-zone units. These applications generally fall into two categories: Applications involving rooftop or vertical packaged equipment. However, it could also involve applications with split DX units and central station air handlers. Applications involving terminal units such as hydronic fan coils, DX fan coils, packaged terminal air conditioners (PTACs) and water source heat pumps (WSHPs). Applications in the first category will be discussed in this section. Analysis of terminal units will be described in Section 5.3. Analysis Strategy. To size single-zone HVAC units with the program, each HVAC unit must be defined as a separate air system. When calculations are performed, reports will be generated with sufficient information to size the cooling and heating coils, the unit fan and any system ductwork. Considerations for this analysis are discussed below. HAP Quick Reference Guide 5-1 Chapter 5 Design Applications 1. Defining Spaces. Spaces can represent each room in the area served by the HVAC unit. This will allow load and airflow sizing data to be calculated on a room-by-room basis as well as on a zone basis. If your objectives for the design calculation do not require a room-by-room sizing analysis, then one space representing the entire region served by the unit can be defined instead. 2. Defining The Air System. One air system must be defined for each single-zone HVAC unit to be sized. Typically units will be constant volume, so the "Single Zone CAV" system option should be used and the appropriate system attributes should be defined. During air system inputs, the spaces contained in the zone served by the unit are specified. When a space is used to represent the entire building or the entire region served by the unit, the zone will include only one space. When spaces represent separate rooms in the region served by the unit, the zone will contain a group of spaces. 3. Generating System Design Reports. First choose the air systems to be sized. In cases where multiple single-zone units are involved, it may be more efficient to enter the air system data for all the HVAC units, and then generate reports all in one batch. The program provides capabilities for doing this. When choosing outputs, select the Air System Sizing Summary and the Zone Sizing Summary. The Air System Sizing Summary provides data for sizing and selecting the supply fan and central cooling and heating coils. This data includes the design supply airflow rate, the design cooling and heating coil loads, coil selection parameters and useful check figures. The Zone Sizing Summary provides information for sizing space supply diffusers, zone and space ductwork and any zone heating units or reheat coils. 5.3 APPLICATIONS INVOLVING TERMINAL UNITS Introduction. This section discusses applications involving the second category of single-zone HVAC units. This category of equipment includes packaged and split terminal air conditioners, hydronic fan coil units, induction beams, active chilled beams, and water source heat pumps (WSHPs) which are used to condition separate rooms or groups of rooms. Examples include units serving separate offices in an office building, separate guest rooms in a hotel, or classrooms in a school building. Applications involving these types of equipment typically require that a large number of units be sized. To assist in this task, the program provides special features for efficiently entering system information and producing sizing data. Analysis Strategy. Rather than defining one air system per single-zone HVAC unit as was done in Section 5.2, the program allows one "air system input" to represent multiple HVAC units. This feature is available when using the Packaged DX Fan Coil, Split DX Fan Coil, 2-Pipe Fan Coil, 4-Pipe Fan Coil, WSHP, GWSHP, GSHP, VRF, Induction Beam, or Active Chilled Beam air system types. The program also produces streamlined output for sizing this equipment. These features help minimize input effort and the quantity of output produced. Considerations for the analysis are summarized in the following paragraphs. 1. Defining Spaces. As discussed in Section 5.2, a space should represent a single room when your design analysis requires room-by-room sizing data. When this is not necessary, each space can represent the entire area served by one HVAC unit. In many applications, each HVAC terminal unit will serve a single room, such as a fan coil in a hotel room, so the space must represent a single room in these cases. A more important consideration in this analysis is minimizing the number of spaces and units that are defined in order to save time and effort. In most applications it is not necessary to define one space and one HVAC unit for every terminal unit in the building. For rooms with the same sizes and patterns of loads, it may be possible to size an HVAC unit once, and then use the same unit in multiple rooms. For example, guest rooms on the same exposure of a hotel might all be the same size, use the same wall and window construction and experience the same internal loads. One space input and system sizing calculation for a typical guest room might suffice for selecting units for 10 or even 100 guest rooms in this situation. When considering how to reduce the number of units analyzed, remember to evaluate all factors that affect loads. For example, separate calculations must 5-2 HAP Quick Reference Guide Design Applications Chapter 5 be performed for two rooms of the same size on the same exposure if one is on the top floor and the other is on an intermediate floor, since only one has a roof exposure. 2. Defining the Air System. When entering air system data, specify Equipment Type as Terminal Units and then choose the Packaged DX Fan Coil, Split DX Fan Coil, 2-Pipe Fan Coil, 4-Pipe Fan Coil, WSHP, GWSHP, GSHP, VRF, Induction Beam, or Active Chilled Beam system type. When one of these system options is chosen, the program allows multiple terminal HVAC units to be defined in one air system input. In addition, outdoor ventilation can be supplied either directly to the unit, or by a central ventilation air handling unit. When a central ventilation unit is used, the temperature and humidity of air delivered to the terminal units will affect coil loads for the terminal HVAC units. This factor is considered in program calculations. 3. Generating System Design Reports. First choose the air system containing the terminal unit data. When choosing sizing reports, select the Zone Sizing Summary report. If ventilation air is provided via a common ventilation unit, also select the Air System Sizing Summary report. The Zone Sizing Summary provides data for sizing cooling coils, heating coils, fans and airflow for each terminal unit and also airflow to individual spaces served by the terminal units. If an HVAC terminal unit serves two or more spaces, this data will be essential for sizing space diffusers and ductwork. The Air System Sizing Summary will provide sizing data for the common ventilation unit, if one is used. This includes information for sizing the airflow, fan motor, cooling coil and heating coil in the ventilation unit. 5.4 APPLICATIONS INVOLVING MULTIPLE-ZONE HVAC SYSTEMS Introduction. Many design projects involve a central packaged unit or a built-up air handling unit which provides conditioned air to many different regions in a building. Each of these regions has its own thermostat making this a multiple-zone HVAC system. These systems comprise the third category of design applications. Analysis Strategy. To design multiple-zone HVAC systems with the program, each packaged unit or AHU must be defined as a separate air system. When design calculations are performed, output data will provide sizing information for all cooling and heating coils, fans and terminals in the system. Considerations for this analysis are described below. 1. Organizing Zones & Defining Spaces. How to zone the system is one of the first decisions required when organizing the analysis. Zoning usually depends on the building use and layout, and the HVAC system controls. The goal is to provide a thermostat for each region of the building requiring specific temperature control. Since the program defines a zone as the region served by one thermostat, the location of thermostats in the system dictates how rooms will be grouped into zones. Examples: Offices on a south exposure of a building might be included in one zone since they are of similar size and experience the same patterns of loads. A conference room on the same exposure might have a separate thermostat since its pattern of loads will differ from those of the offices on the same exposure. Further, north and south offices in a building would typically be assigned to separate zones since offices on each exposure experience significantly different patterns and magnitudes of loads. Once zoning decisions have been made, all spaces included in each zone must be defined. As discussed in previous sections, each space should represent a separate room when room-by-room load and airflow sizing data is required. When a room-by-room sizing analysis is not required, each space can represent the entire area in one zone. Another important consideration when entering spaces is how to minimize input effort. When each space represents a single room, the brute force approach is to define a separate space for every room in the building. However, in many cases series of identical rooms (same size, same pattern and magnitude of loads) will exist in a zone. In these situations, one of the identical rooms can be HAP Quick Reference Guide 5-3 Chapter 5 Design Applications defined as a space once. Later during air system input, a multiplier can be applied to this space to account for the total number of rooms present in the zone. This reduces input effort. 2. Defining The Air System. One air system must be entered to represent the multiple-zone HVAC system. The program provides options for defining and sizing many different types of constant volume and variable volume multiple-zone HVAC systems. Define the appropriate attributes for the system being designed. Entering air system data also requires defining the zones served by the system. The number of zones is specified first. Next, spaces included in each zone are identified by specifying the quantity of each space included in a zone. In a simple case in which a zone contains one space, a quantity of 1 would be defined. In another case, a zone might contain six identical offices. If one space has been defined to represent one of these offices, the zone would contain one space but the space would be assigned a quantity of 6. Finally, a zone might contain a group of different rooms each defined as a separate space. In this case, the zone would contain multiple spaces. 3. Generating System Design Reports. First choose the air system to be sized. When designing multiple air systems in a large building, it may be more efficient to define all the systems and then generate reports for all in one batch. The program provides features for doing this. On the report selection screen, choose the Air System Sizing Summary and Zone Sizing Summary options. The Air System Sizing Summary lists maximum coil loads for all central cooling and heating coils in the system, required airflow rates for central supply and return fans, coil selection parameters, and useful check figures. This data can be used to select coils and fans for the system. The Zone Sizing Summary provides data for sizing zone terminals such as VAV boxes, zone reheat coils, zone baseboard or fan coil heating units and fan powered mixing boxes, as well as space diffusers and ductwork. 5.5 APPLICATIONS INVOLVING CHILLERS AND BOILERS Introduction. System design work can also require sizing central chiller and boiler plants. In these situations, a chiller and boiler might serve several central air handling units in a large building and/or a large number of hydronic fan coil units located in different rooms of a building. In either case, the program provides capabilities for sizing both the air handling and terminal units as well as the chiller and boiler equipment. This section describes the analysis procedure required. Analysis Strategy. Performing this analysis requires developing inputs for all the air systems served by the chiller and boiler first and then generating system sizing reports. Next, a chiller plant is created and systems having chilled water cooling coils are linked to it. A boiler plant is also created and systems having hot water or steam heating coils are linked to it. Finally, plant design reports for the chiller and boiler are generated. Considerations required in the analysis are discussed below. 1. Defining Air Systems. The same principles discussed earlier in this chapter for single-zone and multiple-zone systems are required when defining air systems for this application. In previous discussions the choice of an equipment type and the specification of the cooling and heating sources for coils were not critical. However, when sizing chillers and boilers, these details are important. Coils served by the chiller must have chilled water designated as the cooling source. Chilled water is the default cooling source when the systems equipment classification is Chilled Water AHU, and when using the 2-Pipe Fan Coil or 4-Pipe Fan Coil system types. When using systems in the Undefined equipment class, the cooling source is "Any" and can be used for chilled water plant design calculations. Coils served by the boiler must have hot water or steam designated as the heating source. When using systems in the Undefined equipment class, the heating source is "Any" and can be used for both hot water and steam design calculations. Special Consideration. Finally, a key requirement of the chiller and boiler analysis is that the total load imposed on equipment must be considered. Because techniques for minimizing work when 5-4 HAP Quick Reference Guide Design Applications Chapter 5 analyzing terminal equipment such as fan coils involves analyzing duplicate units only once, this can cause problems in generating correct chiller and boiler load totals. Example: A hotel contains 220 guest rooms served by 4-pipe fan coils. 100 of these rooms are on one face of the building and have identical size and load patterns. Another group of 100 are on the opposite face of the building and also have identical size and load patterns. The remaining 20 rooms must be modeled separately because each has unique characteristics. To save time, we could model this situation with one 4-pipe fan coil system having 22 zones - 1 zone representing one unit out of the first group of 100 identical zones, 1 zone representing one unit out of the second group of 100 zones and one zone each for the remaining 20 unique zones. This would vastly reduce effort required to size and select the fan coils. However, if we linked this fan coil air system to a chiller or boiler plant, we would have a problem since loads would be undercounted. We have only accounted for the loads of 22 out of the 220 fan coil units in the building. To correct this problem, an alternate approach would be used. Define three 4-pipe fan coil air systems. The first contains 20 zones, one for each of the 20 unique hotel zones. The second contains 1 zone representing a single zone in the first group of 100 identical zones. The third system contains 1 zone representing a single zone in the second group of 100 identical zones. System sizing reports can be run as before to generate data needed to select the fan coil units. To size the chiller, the three fan coil air systems would be linked to the chiller. The system containing the 20 unique zones would be assigned a system multiplier of 1. The single-zone systems representing each group of 100 identical zones would each be assigned a system multiplier of 100. In this way the total load for all 220 fan coil units would be accounted for and the chiller would be properly sized. The same sort of approach would be used when linking the fan coil air systems to the boiler plant. 2. Generating System Design Reports. Once air systems have been defined, generate system design reports for each. As discussed in earlier sections, the system design reports provide information for sizing cooling coils, heating coils, fans, diffusers and ductwork. If system sizing data is not a concern (e.g., if you are performing a preliminary block load calculation), this step can be skipped. The plant sizing calculations performed as part of step 4 will automatically run system sizing calculations first if system sizing results do not already exist. 3. Defining Plants. For a chilled water plant, create one plant and choose "Generic Chilled Water Plant" as the plant type. Then specify the air systems served by this plant. For each system linked to the plant, HAP will assume that all chilled water coils, and coils whose cooling source is "Any" are served by the plant. As mentioned in item 1 above, system multipliers can be used when an air system represents one of a number of identical systems or units served by the chiller. For a changeover plant using reversible chillers, create one plant and choose "Generic Changeover Plant" as the plant type. Then specify the air systems served by this plant. For each air system linked to the plant, HAP will assume that all cooling coils with chilled water or "any" as the source, and all heating coils with hot water or "any" as the source are served by the plant. For hot water or steam plant create one plant. For a hot water plant, choose "Generic Hot Water Plant" as the plant type. For a steam plant, choose "Generic Steam Plant" as the plant type. Then specify the air systems served by this plant. In a hot water plant HAP will assume all hot water coils and coils with a heating source of "any" are served by the plant. In a steam plant HAP will assume that all steam coils and coils with a heating source of "any" are served by the plant. For HAP users who will later run energy analyses, "Generic" plants can later be converted into specific plant types. When converting plants, system selection data is preserved. 4. Generating Plant Design Reports. Finally, generate design reports for the plants. For the chilled water plants, choose the Cooling Plant Sizing Summary report. This report lists the peak cooling plant load as well as the coincident loads for all systems served by the chiller. HAP Quick Reference Guide 5-5 Chapter 5 Design Applications For a hot water plant, choose the Heating Plant Sizing Summary report. This report lists the peak heating plant load as well as coincident loads for systems served by the plant. For changeover plants using reversible chillers select both the Cooling Plant Sizing Summary and the Heating Plant Sizing Summary to obtain both cooling and heating sizing data. 5.6 TROUBLESHOOTING STRATEGIES This section describes general strategies used to investigate load calculation and system sizing results. These investigations may be necessary when diagnosing problems with results or simply learning more about results generated by the program. Due to the wide range of situations requiring diagnosis, it is not possible to discuss troubleshooting procedures for specific applications. Rather, general strategies useful in a variety of situations will be described below. 1. Investigate Input and Output Data. When a question about results arises, first generate reports of all input data and pertinent load calculation results. Inspect and compare data on the different printouts. Sometimes unusual sizing results are caused by inadvertent input errors. 2. Research Input Definitions and Calculation Procedures. In many cases, a thorough knowledge of how the program uses certain inputs and performs its load and sizing calculations is necessary to understand program results. Topics in the on-line help system provide definitions of all program inputs and explain how inputs are used by the program. Documentation topics in the help system explain calculation procedures. 3. Perform Comparative Analysis. When a more detailed investigation is needed various types of comparative analyses can be helpful. The success of this technique depends on the user's ingenuity, knowledge of system and load behavior, and knowledge of the program. Two common applications for comparative analysis are provided below to serve as examples. Single-Hour vs Multiple Hour Data. Frequently, unusual results found on the Air System Sizing Summary or Zone Sizing Summary reports can be successfully diagnosed by comparing data with full 24-hour load profiles. Example: Suppose the Air System Sizing Summary report shows that the peak coil load occurs at 7am. Since peak coil loads usually occur in the mid to late afternoon, this is an unexpected result. One way to diagnose this result is to generate the Hourly Air System Design Day Loads report which lists cooling coil loads for all hours in a specific month. By comparing coil loads at different times of day, a user can gain insight into why the maximum load occurs in the early morning. Sometimes this type of result will be due to an unusually large pulldown load which causes loads during the first few hours of operation in the occupied period to exceed coil loads during the mid-afternoon hours. Such results could be due to legitimate system behavior or could be due to errors in modeling building heat gains or system controls. Air System Variations. When an air system containing several components and accessory controls yields unusual sizing results, a useful diagnostic strategy is to run calculations for variations of the system to determine the effect of each component or control. Example: An air system including dehumidification control, a preheat coil and a ventilation reclaim device yields unusual sizing results. To diagnose this problem, make four copies of the air system. From one copy remove all three supplemental components and controls. This system will represent a base case. For the other three copies include each of the components separately. For example, one system would only include the dehumidification control. Another would include the preheat coil only, and so forth. Finally, run sizing calculations for each for the four system variations. A comparison of results from these systems should demonstrate the individual effect of each component control. Often this points out the reason for the original results that were questioned. When it does not, it may be necessary to use 24-hour load profile reports to evaluate differences in system performance, or to run further test cases using combinations of two components at a time (e.g., dehumidification and the preheat coil together, the preheat coil and ventilation reclaim, etc...). 5-6 HAP Quick Reference Guide Chapter 6 Energy Analysis Applications This chapter explains how to use the program for common energy analysis applications. It also provides advice on how to troubleshoot unexpected energy simulation results. Material in this chapter assumes the reader is familiar with the program operating principles discussed in Chapter 1. 6.1 APPLICATION INFORMATION OVERVIEW This chapter explains how to use the program for common energy analysis applications. Chapter 1 contained a general discussion of how to use the program for energy analysis studies. However, the program can be used in studies involving a many different types of HVAC equipment. Procedures for using the program for these applications are not always obvious, especially for new program users. Therefore, this chapter covers the following ten application topics: General energy analysis strategies. Troubleshooting strategies. Simulating packaged rooftop units Simulating vertical packaged units. Simulating split DX air handlers. Simulating chilled water air handlers. Simulating packaged or split DX fan coil units. Simulating hydronic fan coil units. Simulating induction beam or active chilled beam systems. Simulating water source heat pump systems. Simulating ground water and ground source heat pump systems. Simulating chilled water plants. Simulating hot water and steam plants. Modeling utility rate structures. In all of these discussions it is assumed the reader is familiar with the basic program operating procedures outlined in Chapter 1. Further, it is assumed input data has been gathered and entered for weather, schedules, walls, roofs, windows, doors and shading geometries. Therefore, entry of this data will not be covered in the application discussions. 6.2 ENERGY ANALYSIS STRATEGIES The purpose of an energy analysis is to compare the annual energy use and energy costs of alternate system designs. To generate energy use data, the operation of all energy-consuming equipment in a building must be simulated. This includes energy use by air handling systems, plant equipment, and nonHVAC systems such as lighting and office equipment. In small buildings, the analysis is easy to organize due the relatively small number of components involved. For larger buildings, however, the analysis can be much harder to organize. In these cases it is important to consider ways to minimize input effort and calculation time. This section discusses strategies for maximizing the accuracy of energy analysis results while minimizing effort. The most accurate energy analysis results can be obtained by analyzing equipment exactly as it is installed. For example, if a building contains 400 water source heat pump (WSHP) units, the most accurate approach would be to model 400 heat pump units and the spaces they serve separately. In this HAP Quick Reference Guide 6-1 Chapter 6 Design Applications way loads experienced by each WSHP unit and the performance of each unit could be accurately evaluated. While this is conceptually the simplest approach to energy analysis, it can often require the largest amount of time for gathering and inputting data and then running simulations. In certain situations the number of spaces, zones, air systems and plants can be systematically reduced without significantly affecting the accuracy of results. Simplification of the energy analysis is achieved using two techniques. One involves combining or "lumping" together similar components in the analysis. Two identical zones in an air system, for example, can be combined without affecting system simulation results. The other is simulating identical equipment only once, and then using multipliers to account for the total number of units in the building. In a hotel, for example, packaged terminal air conditioner (PTAC) units might be used in 75 identical south-facing guest rooms. Rather than simulate all 75 PTAC units separately, one representative unit can be simulated and then multiplied by 75 to account for the total energy consumption of the equipment in energy cost calculations. Both these approaches require careful evaluation of which components in the analysis can and cannot be combined. If the analysis is oversimplified, energy use and costs can be significantly over or underestimated. Separate paragraphs below summarize considerations involved with reducing the number of spaces, zones, air systems and plants involved in the analysis. Space Data. In many situations, rooms in a zone can be combined and defined as one space. Because a zone has only one thermostat, it is the total zone load that drives air terminal operation and therefore system operation, not the individual space loads. Therefore, the same total zone loads will be calculated whether the zone is defined using one large combined space or multiple spaces representing separate rooms. In a zone containing several identical rooms, another approach is to define only one of the rooms as a space. When linking spaces to zones, a multiplier can be used to account for the total number of this type of room in the zone. These techniques reduce the number of spaces entered and the time required for the program to compute loads during the energy simulations. Note: For several reasons design considerations may prevent using this reduction technique. If a project involves both system design and energy analysis, it may be necessary to define each room as a space in order to size air diffusers for each room. Further, if design zone airflow rates are based on the sum of peak space airflow rates, then spaces in the zone cannot be combined. To properly size zone airflow rates, the individual spaces in the zone must be defined. Zone Data. A zone is defined as the region of a building served by one thermostat. Large air-handling systems which contain many zones and systems involving multiple single-zone units, such as fan coils, offer the greatest potential for simplification. In a central air-handling system serving an office building, for example, each perimeter office may contain a thermostat. However, many offices on the same perimeter exposure may experience identical or very similar patterns of loads. Rather than analyzing each room as a separate zone, many zones can be lumped together without sacrificing accuracy. For example, 20 offices on the south exposure of a building might be combined into one large south-facing zone. The same principles apply when terminal units such as fan coils serve the offices. When combining zones: 6-2 Do combine zones with identical or similar patterns of loads. Typically these zones will have the same exterior exposure and the same patterns of occupancy and internal heat gains. Don't combine zones with different exterior exposures. For example, combining north-facing and south-facing offices is a poor choice since each experiences significantly different patterns of solar loads. Don't combine zones which do have a roof exposure with those that don't. The presence of the roof causes load patterns to differ from those in zones without a roof exposure. HAP Quick Reference Guide Energy Analysis Applications Chapter 6 Don't combine interior regions with perimeter zones. For much of the year, interior heat gains will offset perimeter heat losses causing heating loads to be understated. Don't combine zones with different use patterns. For example, in a school building, a classroom zone should not be combined with a cafeteria zone since the occupancy and heat gain patterns in each differ. The advantages of reducing the number of zones are that fewer spaces need to be input, and times for load calculations and air system simulations are reduced. Air System Data. Opportunities for reducing the number of air systems in an analysis vary between central air handling systems and terminal systems such as fan coils. Opportunities for combining central air handling systems are usually limited, except in special cases where several similar or identical systems serve different parts of a building. For central air systems to be "similar", the systems must contain the same components, be sized in the same way, serve the same number of zones, and experience the same pattern of loads. This situation might occur in a multi-story building where separate air systems serve each floor, and patterns of loads on each floor are very similar. In such a case, an air system for a typical intermediate floor could be defined and simulated once. When the air system is linked a plant or a building, a multiplier can be used to account for the total number of air systems of this type in the building. Opportunities for reducing the number of terminal type air systems in an analysis are much more common. As discussed earlier, the number terminal air-conditioner units in guest rooms in a hotel can be vastly reduced analyzing typical units and using multipliers. When identifying typical units, or when lumping units together, the criteria previously described for combining zones should be used. In addition, units which use different components or controls should not be lumped together since these differences will affect performance and energy consumption. Plant Data. Opportunities for combining central plants such as chiller and boiler plants rarely exist, since buildings typically contain one of each, if plants are used at all. 6.3 TROUBLESHOOTING STRATEGIES This section describes general strategies used to investigate energy analysis results. These investigations may be necessary when diagnosing problems or simply learning more about results generated by the program. General strategies useful in a variety of situations will be described below. 1. Investigate Input and Output Data. When a question about results arises, generate and inspect printouts of pertinent input and simulation data. Checking input printouts often reveals input errors which cause incorrect results. In addition, checking and comparing printouts of simulation data often reveals the reason for results, or provides clues to simulation problems, as discussed below. Questions frequently arise about unusual building energy cost results. Energy costs are the final, bottom-line results of the energy analysis. Because costs are dependent on many factors, it is necessary to generate details showing how the costs were calculated and intermediate results showing the performance of air systems and plants contributing to building energy consumption. The strategy should be to work backward from the final results to determine how they were derived. This work can be performed in two stages. First, generate detailed building outputs. The following building simulation reports are often useful: Energy Budget by System Component: When complex rate structures are used, operating costs are not proportional to energy use due to the demand, fixed and tax charge components of the energy bill. Therefore, operating costs often do not present a clear picture of energy use by the building. Comparing only the bottom line cost figures may obscure the energy performance of the building. The Energy Budget by System Component report lists annual energy use totals in common units (kBTU in English, kWh in Metric) and can be a better basis for comparison. Monthly Energy Use By System Component: This report lists month by month energy use by both system component and energy type. It provides more detailed information than the Energy HAP Quick Reference Guide 6-3 Chapter 6 Design Applications Budget report, listing energy use in billing units (e.g., kWh for electric, Therms for gas, etc..) for each system component category. This makes it much easier to make direct comparisons between buildings and identify key differences in energy performance. Billing Details: These reports document the individual charges contributing to the total electric and fuel bills. The reports also list the monthly average price of energy, energy consumption totals, monthly demands and the time when each demand occurs. This data can be used to determine how the utility bill was calculated, and to identify factors contributing to unusual results. For example, an unusual increase in costs may be due to a large peak demand in one month. This might focus the investigation on equipment performance during the particular month with the large demand. If building reports do not reveal the cause of a problem, the second stage in the analysis is to investigate simulation results for the plants and air systems in the building. Two ways of doing this are discussed below. Monthly-Daily-Hourly Simulation Results. One approach is to first inspect the monthly report to identify months with unusual results, then inspect the daily report for that month to focus on the individual days with odd results, and finally inspect hourly reports for those days. Hourly Graphics. An alternate approach is to generate hourly graphs for long sequences of time in order to pinpoint portions of the year showing unusual behavior, and then generate graphs for shorter periods of time to investigate behavior in greater detail. For example, cooling coil loads for all 8,760 hours in the year can be included in one plot. This plot might show times of year when unusually large or small cooling loads exist. The next step would be to generate graphs for these shorter periods of time to understand this behavior. Using these strategies, problems can be efficiently investigated and diagnosed. 2. Research Input Definitions and Calculation Procedures. In many cases, thorough knowledge of how the program uses inputs and performs its energy simulations is necessary to understand program results. Material in the program's on-line help system provides this information. The operation sections of the on-line help system discuss program inputs and explain how inputs are used by the program. The documentation sections of the on-line help system explain calculation assumptions and procedures. 3. Perform Comparative Analyses. In some cases, investigating input and output data, and researching calculation procedures are not sufficient to diagnose problems with results. In these situations, various types of comparative analyses performed with the program can be helpful. The success of this technique depends on the user's ingenuity, knowledge of load, system and equipment behavior, and knowledge of the program. A common example of how comparative analysis can be used is provided below. Example: Suppose unusual energy costs results are obtained and an investigation of program outputs shows that results are due to peculiar air system behavior. The air system in question uses dehumidification control, a preheat coil and an enthalpy economizer. Careful inspection of monthly, daily and hourly simulation results does not reveal a logical reason for the results. Because it is possible behavior of one of the system components or unanticipated interaction between components is causing the results, a useful strategy is to run simulations for variations of the air system to try to identify how each component influences system performance. First make four copies of the air system. One should represent a base case without dehumidification control, a preheat coil or an economizer. The other three copies should include one of the extra components each. For example, one system would include only the dehumidification control, one would include the preheat coil, and one would include the economizer. Generate air system simulation reports for all four systems and compare results. The comparison will clearly show the effect of each component on system behavior, and may allow you to determine the reason for the original results. If not, it may be necessary to run simulations for simple combinations of components such as the economizer and dehumidification control, dehumidification control and the preheat coil, etc... Inspection of results for these simulations may reveal unanticipated interaction or conflicts between the components. 6-4 HAP Quick Reference Guide Energy Analysis Applications Chapter 6 6.4 SIMULATING PACKAGED ROOFTOP UNITS This section explains how to model packaged rooftop equipment in energy simulations. This equipment contains a supply fan, condenser fans, DX cooling apparatus and heating apparatus all in one packaged unit. Heating options are electric resistance, combustion, heat pump and, in unusual cases, hot water or steam. Modeling procedures are described below. 1. Air Systems. Define one air system per rooftop unit. If the building contains multiple rooftops which are identical, serving identical or similar areas of the building, a single rooftop unit can be modeled and a multiplier can be applied to account for the total number of these units. Modeling tips: Specify the Equipment Class as "Packaged Rooftop Unit" Specify the appropriate system type and enter system data. Define the performance characteristics of the DX cooling equipment using the Equipment Tab on the Air System window. If heat pump or combustion heating is used, define performance characteristics of the heating equipment using the Equipment Tab on the Air System window. If electric heat is used, no additional heating equipment inputs are required. 2. Plants. It is not necessary to define a plant except in the unusual cases where a hot water or steam heating coil has been added to the rooftop unit. In these cases a hot water or steam plant must be defined to serve these coils. The rooftop air system will be linked to this plant. If a heating plant serves multiple systems, a single heating plant can be defined and all systems can be linked to it. 3. Building. If electric, combustion or heat pump heating is used, the air system is linked directly to the building. A multiplier can be used if the rooftop represents one of a group of identical units. If hot water or steam heating is used, then both the heating plant and the rooftop air system must be linked to the building. 6.5 SIMULATING VERTICAL PACKAGED UNITS This section explains how to model vertical packaged (VPAC) equipment in energy simulations. The aircooled version of this equipment contains a supply fan, condenser fans, DX cooling apparatus and heating apparatus all in one packaged indoor unit; in some cases a remote condenser is used. The watercooled version of this equipment contains a supply fan, DX cooling apparatus and heating apparatus in one packaged indoor unit. The water cooled condenser is connected to a cooling tower. Heating options include electric resistance, combustion, hot water and steam. Modeling procedures are described below. 1. Air Systems. Define one air system per vertical packaged unit. If the building contains multiple VPACs which are identical, serving identical or similar areas of the building, a single VPAC unit can be modeled and a multiplier can be applied to account for the total number of these units. Modeling tips: Specify the Equipment Class as "Packaged Vertical Unit" Specify the appropriate system type and enter system data. Define the performance characteristics of the DX cooling equipment using the Equipment Tab on the Air System window. For water-cooled units, a cooling tower must be defined and linked to the air system. This is done using the "Miscellaneous Equipment" button on the Equipment Tab. If combustion heating is used, define performance characteristics of the heating equipment using the Equipment Tab on the Air System window. If electric heat is used, no additional heating equipment inputs are required. 2. Plants. Plant equipment is not needed unless hot water or steam heating is used. In these cases a hot water or steam plant must be defined and the VPAC air system is linked to this plant. If the heating plant serves multiple air systems, a single heating plant can be defined and all air systems linked to it. HAP Quick Reference Guide 6-5 Chapter 6 Design Applications 3. Building. If electric or combustion heating is used, the VPAC air system is linked directly to the building. A multiplier can be used if the VPAC represents one of a group of identical units. If hot water or steam heating is used, then both the heating plant and the VPAC air system must be linked to the building. 6.6 SIMULATING SPLIT DX AIR HANDLING UNITS This section explains how to model split DX air handling units in energy simulations. This equipment includes an indoor unit containing fans, a DX cooling coil and heating apparatus, plus an outdoor condensing unit. Heating options include electric resistance, combustion, heat pump, hot water and steam. Modeling procedures are described below. 1. Air Systems. Define one air system per split DX air handler. If the building contains multiple split units which are identical, serving identical or similar areas of the building, a single air handler can be modeled and a multiplier can be applied to account for the total number of these units. Modeling tips: Specify the Equipment Class as "Split DX AHU" Specify the appropriate system type and enter system data. Define the performance characteristics of the DX cooling equipment using the Equipment Tab on the Air System window. If heat pump or combustion heating is used, define performance characteristics of the equipment using the Equipment Tab on the Air System window. If electric heat is used, no additional heating equipment inputs are required. 2. Plants. Plant equipment is not needed unless hot water or steam heating is used. In these cases a hot water or steam plant must be defined and the split DX air system is linked to this plant. If the heating plant serves multiple air systems, a single heating plant can be defined and all the air systems linked to it. 3. Building. If heat pump, combustion or electric heat is used, the split DX air handler is linked directly to the building. A multiplier can be used if the split DX unit represents one of a group of identical units. If hot water or steam heating is used, then both the heating plant and the split DX air system must be linked to the building. 6.7 SIMULATING CHILLED WATER AIR HANDLING UNITS This section explains how to model chilled water air handling units in energy simulations. This equipment includes fans, a chilled water cooling coil and heating apparatus in a packaged or built-up unit. Heating options include electric resistance, combustion, hot water and steam. Modeling procedures are described below. 1. Air Systems. Define one air system per chilled water air handler. Typically these are larger systems which are unique. But in those situations where a building contains multiple chilled water AHUs which are identical, serving identical or similar areas of the building, a single air handler can be defined and a multiplier can be applied to account for the total number of these units. Modeling tips: Specify the Equipment Class as "Chilled Water AHU" Specify the appropriate system type and enter system data. If combustion heating is used, define performance characteristics of the equipment using the Equipment Tab on the Air System window. If hot water, steam or electric heat is used, no additional inputs on the Equipment Tab are required. Changeover Systems. If you are defining a 2-pipe changeover system, specify the type of changeover control using the Changeover Controller option on the Equipment Tab. Changeover can be based on a monthly schedule or outdoor air temperature threshold. These settings affect all cooling components using chilled water, and all heating components using hot water. 6-6 HAP Quick Reference Guide Energy Analysis Applications Chapter 6 When the monthly schedule option is selected, make sure to specify the appropriate on/off schedules in the Central Cooling, Central Heating, Precool Coil and/or Preheat Coil sections of the System Components tab, and the Supply Terminals and Zone Heating Units sections of the Zone Components tab. If the outdoor air temperature threshold option is selected, you can set all the coil schedules to ON for 12 months, unless there are also specific times of year when cooling or heating is off, in which case the on/off schedules can also be set. 2. Plants. Define a chilled water plant to provide chilled water to the air handler cooling coils. Plant options include chiller plants and remote chilled water (also known as district cooling). Typically the chilled water plant will serve two or more air handlers. When defining the plant, link to all the air systems served by the plant. When a system represents one of a group of identical systems, a multiplier can be used when linking it to the plant. If the AHUs are linked to a changeover plant with reversible chillers, define a changeover plant. If hot water or steam heating is used, define a hot water or steam plant to provide heating to air handler heating coils. Plant options include hot water plants (boilers or dedicated heat pumps), steam boiler plants and remote (district) heating. Typically the hot water or steam plant will serve two or more air handlers. When defining the plant, link to all the air systems served by the plant. A multiplier can be used if an air system represents one of a group of identical systems. 3. Building. Link the chilled water AHU air system as well as the cooling plant and the heating plant (if used) to the building. 6.8 SIMULATING PACKAGED OR SPLIT DX FAN COIL UNITS This section explains how to model packaged or split DX fan coil units in energy simulations. This equipment includes Packaged Terminal Air Conditioners (PTACs), Packaged Terminal Heat Pumps (PTHPs), Variable Refrigerant Flow (VRF), DX unit ventilators, room air conditioners, split DX fan coils, ductless split units and other similar products. The packaged version of the equipment contains a supply fan, air-cooled DX cooling apparatus and heating apparatus in one packaged unit. The split version of the equipment contains a supply fan, DX cooling coil and heating apparatus in an indoor unit plus an outdoor condensing unit. Heating options include electric resistance, combustion, heat pump, hot water and steam. Modeling procedures are described below. 1. Air Systems. Define one air system for the entire collection of DX fan coil units. HAP will model each zone in the system as containing one fan coil unit. Loads for each zone and the performance of each zone's fan coil unit will be performed separately. Loads and energy use are then summed to obtain system totals which are displayed on the simulation reports. Modeling tips: Specify the Equipment Class as "Terminal Units" Specify the System Type as "Packaged DX Fan Coil", "Split DX Fan Coil" or "Variable Refrigerant Flow" and enter system data. Define performance characteristics of the DX cooling equipment using the Equipment Tab on the Air System window. Be sure to define performance data for all zone fan coils. If heat pump or combustion heating is used, define performance characteristics of the equipment using the Equipment Tab on the Air System window. Again, be sure to define performance for all zones. If electric heat is used, no additional heating equipment inputs are required. If the number of fan coil units exceeds the number of zones permitted in a system, then an additional system will be required to accommodate the extra fan coils. 2. Plants. If heat pump, combustion or electric heat is used then no plant equipment is required. If hot water or steam heating is used, a hot water or steam plant must be defined and must link to the fan coil air system. If the heating plant serves multiple air systems, a single plant can be defined and linked to all air systems containing hot water or steam coils. 3. Building. If electric resistance, heat pump or combustion heating is used, link the air system directly to the building. If hot water or steam heating is used, link both the system and the plant to the building. HAP Quick Reference Guide 6-7 Chapter 6 Design Applications Note: Fan coil systems are good candidates for the reduction techniques discussed in section 6.2. However, if you use these techniques to reduce input and calculation time, planning is required to account for the correct number of fan coil units in the building. Example: A hotel is being studied which has 75 identical fan coil zones on the south face of the building, 62 identical fan coil zones on the north face of the building and 48 fan coil zones which are unique. In this situation it may be best to define three air systems. System #1 would contain 48 zones holding the 48 fan coil units that are unique. System #2 would contain only one zone representing the typical southfacing zone. System #3 would contain only one zone representing the typical north-facing zone. When linking systems to the building a system multiplier of 1 would be used for system #1, a multiplier of 75 would be used for system #2 and a multiplier of 62 would be used for system #3. This is necessary because multipliers are applied at the system level when linking systems to plants and buildings. An alternate approach is to lump identical fan coils together rather than defining a single typical unit for each. This means that the 75 south facing fan coil zones would be combined, using a space multiplier of 75. The cooling and heating equipment inputs would define full load capacity and input power values that are the sum of the 75 fan coil capacities and input powers rather than the actual capacity and power for one representative unit. This approach would allow the typical north and typical south zones to be included in System #1 with the 48 unique zones while still correctly accounting for the total loads and energy use of these fan coil units. 6.9 SIMULATING HYDRONIC FAN COIL UNITS This section explains how to model hydronic fan coil units in energy simulations. This equipment contains a supply fan, a chilled water coil and a heating coil in one packaged indoor unit. Heating options include hot water, steam and electric resistance. Modeling procedures are described below. 1. Air Systems. Define one air system for the entire collection of hydronic fan coils. HAP will model each zone in the system as containing one fan coil unit. Loads for each zone and the performance of each zone's fan coil unit will be performed separately. Loads and energy use are then summed to obtain system totals which are displayed on the simulation reports. Modeling tips: Specify the Equipment Class as "Terminal Units" Specify the System Type as "2-Pipe Fan Coil" or "4-Pipe Fan Coil" and enter system data. If hot water, steam or electric heat is used, no additional inputs are required on the Equipment Tab. If the number of fan coil units exceeds the number of zones permitted in a system, then an additional system will be required to accommodate the extra fan coils. For 2-Pipe Fan Coil Changeover systems, specify the type of changeover control using the Changeover Controller option on the Equipment tab. Changeover can be based on a monthly schedule or outdoor air temperature threshold. When the monthly schedule option is selected, make sure to specify the appropriate on/off schedules in the Common Data section of the Zone Components tab, and in the Cooling Coil and Heating Coil sections of the Vent System Components tab if a common ventilation system is used. If the outdoor air temperature threshold option is selected, you can set all the coil schedules to ON for 12 months, unless there are also specific times of year when cooling or heating is off, in which case the on/off schedules can also be set. 2. Plants. Define a chilled water plant to provide chilled water to the fan coil units. Plant options include chiller plants and remote chilled water (district cooling). If the fan coils are linked to a changeover plant with reversible chillers, define a changeover plant. If hot water or steam heating is used, define a hot water or steam plant to provide heat to fan coil system heating coils. Plant options include hot water plants (boilers or dedicated heat pumps), steam boiler plants and remote (district) heating. 6-8 HAP Quick Reference Guide Energy Analysis Applications Chapter 6 If electric resistance heating is used then no heating plant is required; electric heat energy use will be included in the air system calculations. 3. Building. Link the hydronic fan coil system as well as the cooling plant and the heating plant (if used) to the building. Note: Fan coil systems are good candidates for the reduction techniques discussed in section 6.2. Please refer to the note at the end of section 6.8 for a discussion of special considerations when reducing the number of fan coil units modeled. Simulating Induction Beam and Active Chilled Beam Systems 6.10 SIMULATING INDUCTION BEAM AND ACTIVE CHILLED BEAM SYSTEMS This topic explains how to model induction beam and active chilled beam systems in energy simulations. These systems consist of a dedicated outdoor air system (DOAS) which provides cooled and dehumidified air to ceiling-mounted induction terminals in each conditioned zone. Induction beams are total cooling devices which include a drain pan and therefore can serve both sensible and latent loads in the zone. Active chilled beams are sensible-only cooling devices which can only serve the zone sensible load. Both types of terminals can also provide heating. Modeling procedures are described below. 1. Air Systems. Define one air system representing the DOAS system and all the induction beam (IB) or active chilled beam (ACB) terminals it serves. HAP will model each zone in the system as containing IB or ACB terminal. Loads for each zone and the performance of each zone's IB or ACB terminal will be performed separately. Loads are then summed to obtain system totals which are displayed on the simulation reports. Modeling tips: a. Specify the Equipment Class as "Terminal Units" b. Specify the System Type as "Induction Beam" or "Active Chilled Beam" and enter system data. c. If the system is a 2-pipe cooling and heating system, specify the type of changeover control using the Changeover Controller option on the Equipment tab. Changeover can be based on a monthly schedule or outdoor air temperature threshold. When the monthly schedule option is selected, make sure to specify the appropriate on/off schedules in the Common Data section of the Zone Components tab, and in the Cooling Coil and Heating Coil sections of the Vent System Components tab if a common ventilation system is used. If the outdoor air temperature threshold option is selected, you can set all the coil schedules to ON for 12 months, unless there are also specific times of year when cooling or heating is off, in which case the on/off schedules can also be set. d. If the number of IB or ACB terminals exceeds the number of zones permitted in a system, then an additional system will be required to accommodate the extra zones. 2. Plants. a. For applications using separate cooling and heating plants, first define a chiller plant or a remote chilled water (district cooling) plant to provide chilled water to system cooling coils. Then define a hot water plant or remote hot water plant to provide hot water to system heating coils. b. For 2-pipe changeover applications using reversible chillers, define a changeover plant to provide both chilled water and hot water to coils in the system. Typically these plants will serve two or more air systems. When defining the plant, link to all the air systems served by the plant. When a system represents one of a group of identical systems, a multiplier can be used when linking it to the plant. 3. Building. Link the chilled water and hot water plants, or the changeover plant to the building. HAP Quick Reference Guide 6-9 Chapter 6 Design Applications 6.11 SIMULATING WATER SOURCE HEAT PUMP SYSTEMS This section explains how to model water source heat pump (WSHP) systems in energy simulations. These systems consist of a number of heat pump units connected to a common water loop. Heat is rejected from the loop through a cooling tower and heat is added by a hot water boiler. Modeling procedures are described below. 1. Air Systems. Define one air system for the entire collection of WSHP units. HAP will model each zone in the system as containing one WSHP unit. Loads for each zone and the performance of each zone's WSHP will be performed separately. Interaction of the WSHP units via the common water loop will also be analyzed. Loads and energy use for the individual WSHP units are then summed to obtain system totals which are displayed on the simulation reports. Modeling tips: Specify the Equipment Class as "Terminal Units" Specify the System Type as "Water Source Heat Pumps" and enter system data. Define performance characteristics of the WSHP units for both cooling duty and heating duty using the Equipment Tab on the Air System window. Be sure to define performance data for all WSHP units. Also enter system information using the "Miscellaneous Equipment" button on the Equipment tab to define the cooling tower and boiler used and the loop setpoints. When a common ventilation unit is used, it can be designated as a WSHP unit, or as an AirCooled DX unit. When used, performance of the cooling and heating apparatus in the vent unit must be defined using the Vent Cooling and Vent Heating buttons on the Equipment tab. If the number of WSHP units exceeds the number of zones permitted in a system, then an additional system will be required to accommodate the extra WSHP units. 2. Plants. No plant needs to be defined for this type of equipment. All equipment energy use is accounted for in air system calculations. 3. Building. Link the WSHP air system to the building. Note: WSHP systems are good candidates for the reduction techniques discussed in section 6.2. However, because all WSHP units in a single system are connected to a common loop, it is important to use a "lumping" technique to reduce the number of WSHP units modeled rather than modeling single "typical" units. Example: A hotel is being studied which has 30 identical WSHP zones on the south face of the building, 25 identical WSHP zones on the north face of the building and 28 WSHP zones which are unique. In this situation it may be best to still define one air system so all 83 heat pump units can be connected to a common water loop. The first 28 zones in the system could represent the WSHP zones which are unique. Zone 29 would represent a combination of the 30 identical WSHP units in south facing rooms. This means the full load capacity and input power for this WSHP unit would be the sum for the 30 identical units. Also, the space multiplier for this zone would be 30. Finally, zone 30 would represent a combination of the 25 identical WSHP units in north facing rooms. Its space multiplier would be 25. If the alternate approach of defining one typical south room WSHP and one typical north room WSHP had been used, these two WSHP units would have to be put into separate air systems so the total number of WSHP units in the building could be accounted for using system multipliers when linking to the building. But placing the WSHP units in separate systems disconnects them from the common water loop used by the 28 unique WSHP units which invalidates the system analysis for the water loop. Therefore modeling single "typical" units is not valid approach for analyzing WSHP loop systems. 6.12 SIMULATING GROUND WATER AND GROUND SOURCE HEAT PUMP SYSTEMS This section explains how to model ground water source heat pump (GWSHP) and Ground Source Heat Pump (GSHP) systems in energy simulations. These systems consist of a number of heat pump units connected to a water loop. In a GWSHP system source water is drawn from a well, river or lake. In a GSHP system the heat source/sink is a vertical borehole well or a horizontal buried heat exchanger. 6-10 HAP Quick Reference Guide Energy Analysis Applications Chapter 6 The modeling procedures for these types of equipment are nearly identical to those described in section 6.11. The exception is that instead of modeling a cooling tower and auxiliary boiler, the heat source/sink is modeled using the "river / sea / well water" option in which average source water temperatures are defined for each month of the year. Auxiliary heat is assumed to be electric. 6.13 SIMULATING CHILLED WATER PLANTS This section explains how to model chilled water plants in energy simulations. The program simulates three types of chilled water plants. In a chiller plant, a group of one or more chillers operate to provide chilled water to cooling coils in one or more air handling unit or fan coil systems. In a changeover plant, reversible air-to-water (A2W) or water-to-water (W2W) chillers provide chilled water and hot water to 2pipe coils in air handlers or fan coils. In a remote chilled water system, chilled water is supplied to air systems from an external source, such as a district cooling system. Modeling procedures are described below. 1. Air Systems. Define one or more air systems containing chilled water cooling coils using the procedures described in the previous sections. 2. Plants. Define a chilled water or changeover plant serving these air systems. Modeling tips: Specify the Plant Type as "Chiller Plant", "Changeover Plant" or "Remote Chilled Water". Chillers and cooling towers (if used) can be created while you are entering the plant via the "create new..." options or can be defined prior to entering data for a chiller plant. If steam absorption chillers are used, users have a choice of modeling a boiler to generate steam for the chillers, or using steam from a remote source such as waste steam. When using a boiler, it can be created while you are entering the plant via the "create new boiler" option or it can be defined prior to entering data for the chiller plant. Use the Systems tab in the Plant window to link the plant to the set of air systems in the building which use chilled water cooling coils. The plant will serve the combined load of all these cooling coils. A changeover plant will also serve the hot water coil loads for these systems. For chiller plants and changeover plants, use the Configuration tab in the Plant window to define the configuration and control of the plant. Use the Schedule of Equipment tab to link the necessary chillers, cooling towers and boilers to the plant. For any of the plant types use the Distribution Tab to define characteristics of the water distribution system and its pumps. If you define a chiller or a remote chilled water plant, you will need to define a separate hot water or steam plant if heating is provided from those sources. If you define a changeover plant, then that single plant will provide for both the cooling and heating needs of the air systems. If reversible chillers are used, it may be necessary to provide a source of auxiliary heat. Options for describing and controlling auxiliary heat are provided on the Configuration tab. The source of auxiliary heat is specified on the Schedule of Equipment tab and can be a hot water boiler or remote source hot water. 3. Building. Link the chilled water plant to the building. This will include its energy use in energy cost calculations. 6.14 SIMULATING HOT WATER AND STEAM PLANTS This section explains how to model hot water and steam plants in energy simulations. The program simulates four types of heating plants: In a Hot Water plant, boilers, air-to-water (A2W) or water-to-water (W2W) heat pumps or a combination of these equipment types provide hot water to one or more air handling unit or fan coil systems. In a Remote Hot Water plant, hot water is supplied to air system coils from an external source, such a district heating system. In a Steam Boiler plant, steam boilers supply steam to coils in one or more air systems. In a Remote Steam plant, steam is supplied to air system coils from an external source, such as a district steam system. HAP Quick Reference Guide 6-11 Chapter 6 Design Applications Modeling procedures are described below. 1. Air Systems. Define one or more air systems containing hot water or steam heating coils using the procedures described in the previous sections. 2. Plants. Define a hot water plant or a steam plant serving these air systems. Modeling tips: For hot water, specify the Plant Type as "Hot Water Plant" or "Remote Hot Water". For steam, specify the Plant Type as "Steam Boiler Plant" or "Remote Steam". Boilers and A2W or W2W heat pumps can be defined at the same time you create the plant using the "create new ..." option in the equipment drop-down list, or can be defined prior to entering the plant. Use the Systems tab in the Plant window to link the plant to the set of air systems in the building which use hot water heating coils or steam coils. The plant will serve the combined load of all these heating coils. A changeover plant will also supply the combined chilled water coil loads for these systems. Use the Configuration tab in the Plant window to define the number of boilers or heat pumps in the plant, the method of control and, for hot water plants, the method of hot water supply temperature control. For hot water plants use the Distribution tab to define characteristics of the hot water distribution system and its pumps. For steam plants use the Distribution tab to define the pipe heat loss factor. If heat pumps are used, it may be necessary to provide a source of auxiliary heat. Options for defining and controlling auxiliary heat are provided on the Configuration tab. The source of auxiliary heat is specified on the Schedule of Equipment tab and can be a hot water boiler or remote source hot water. 3. Building. Link the heating plant to the building. This will include its energy use in energy cost calculations. 6.15 MODELING UTILITY RATE STRUCTURES This section explains how to use the program to model utility rate structures in energy simulations. The term "utility rate" refers to the pricing structure a utility uses when billing for electric energy use or fuel use in a building. Utility rate data is used by HAP when calculating energy costs. HAP deals with two distinct types of utility rates: Electric Rates define pricing structures for electric energy use and demand. Fuel Rates define the pricing structures for natural gas, fuel oil, propane, remote chilled water, remote hot water and remote steam. While data is defined in the program in two separate data categories (one for electric and one for fuel), both types of utility rates use the same terminology and input items and the same application concepts. The following discussions will use electric rates for examples, but the concepts apply equal to electric and fuel rates. 6.15.1 Basic Concepts Individual utility companies charge for energy use, fuel use and demand in widely different ways and use vastly different terminology in stating their pricing structures. This presents a challenge for developing one consistent approach to modeling utility rate structures in the program. HAP uses a modular approach to meet this challenge. The program provides building blocks representing the common billing mechanisms for energy, demand, demand determination and miscellaneous charges. The user is able to pick and choose among these building blocks to assemble a utility rate model that best represents the pricing structure used for their building. The key elements in successfully using the utility rate modeling features in HAP are: 1. Recognizing the separate billing mechanisms used in your utility rate structure and matching them to the corresponding building blocks offered by HAP. 6-12 HAP Quick Reference Guide Energy Analysis Applications Chapter 6 2. Understanding the common terminology used by HAP and relating this to the specific terminology used by your utility company. The following subsections discuss terminology and building blocks involved with the three common components of a commercial building utility bill: energy or fuel charges, demand charges, demand determination. Each subsection below will define terms, provide examples of the common billing mechanisms and show examples of how data would be input in HAP. Further information on these subjects can be found in the program's on-line help system in the sections dealing with utility rate inputs and energy cost calculations. 6.15.2 Energy and Fuel Charges An "energy charge" is the component of the electric bill that charges for energy consumption measured in kWh. In a fuel bill, it is the component that charges for fuel consumption measured in units defined by the utility. Nearly all utility rates include an energy or fuel charge; many include nothing but an energy or fuel charge. HAP is able to model the five most common types of energy and fuel charges. Utility rates will never refer to the charges using the names shown below. Instead these are simply descriptive names that are handy when explaining the pricing structures. To decide which kind of energy or fuel charge you have, match the charge defined on your utility rate sheet with one of the following. Flat Price. This pricing structure uses a flat cost/kWh price for all times, or specific periods such as seasons or time-of-day periods. Sample Utility Rate Statement: All kWh during summer billing months ........................... 0.077 $/kWh All kWh during winter billing months.............................. 0.049 $/kWh Example: During one summer billing month 40000 kWh is used. The energy charge is calculated as: kWh Range All Block Size 40000 kWh x Price x 0.077 $/kWh Total Energy Charge = = = Cost $3080 $3080 Program Input: Use the "Standard" energy charge type. For fuel rates, all fuel charges are "standard". Specify one step for each fixed price item. For this example, the inputs would be as follows. Note that in HAP the energy or fuel quantity "9999999" is used to designate "all". Season Summer Winter Period All All Block Size 9999999 9999999 Block Units kWh kWh Price 0.07700 0.04900 Declining Block. This pricing structure uses different energy or fuel prices for different "blocks" of energy or fuel that are consumed. Generally the price declines with each succeeding block, hence the name "declining block". Sample Utility Rate Statement: For the first 8000 kWh..................................................... 0.101 $/kWh For the next 15000 kWh................................................... 0.063 $/kWh For all remaining kWh..................................................... 0.044 $/kWh Example: During one billing month 40000 kWh is used. The energy charge is calculated as: kWh Range 1-8000 HAP Quick Reference Guide Block Size 8000 kWh x x Price 0.101 $/kWh = = Cost $808 6-13 Chapter 6 Design Applications 8001-23000 23001-40000 15000 kWh 17000 kWh x 0.063 $/kWh x 0.044 $/kWh Total Energy Charge = = = $945 $748 $2501 Program Input: Use the "Standard" energy charge type. For fuel rates, all fuel charges are "standard". Specify one step for each block in the pricing structure. For this example, the inputs would be: Season All All All Period All All All Block Size 8000 15000 9999999 Block Units kWh kWh kWh Price 0.101 0.063 0.044 Demand Block. This pricing structure is the same as "Declining Block" above, except that the block sizes vary each month based on the billing demand for that month. Therefore the block sizes have units of energy/demand such as kWh/kW. In some cases the units are referred to as “hours use”. This pricing structure is rarely seen for fuel charges Sample Utility Rate Statement: For the first 150 kWh/kW demand ................................... 0.085 $/kWh For the next 100 kWh/kW demand................................... 0.062 $/kWh For all additional kWh..................................................... 0.038 $/kWh Example: During one billing month the billing demand is 200 kW and 60000 kWh is used. The energy charge is calculated as: kWh Range 1-30000 30001-50000 50001-60000 Block Size 30000 kWh 20000 kWh 10000 kWh x Price x 0.085 $/kWh x 0.062 $/kWh x 0.038 $/kWh Total Energy Charge = = = = = Cost $2550 $1240 $380 $4170 Program Input: Use the "Standard" energy charge type. For fuel rates, all fuel charges are "standard". Specify one step for each block in the pricing structure. For this example, the inputs would be: Season All All All Period All All All Block Size 150 100 9999999 Block Units kWh/kW kWh/kW kWh/kW Price 0.085 0.062 0.038 Mixed Block. The "Mixed Block" charge combines elements of both "Declining Block" and "Demand Block". It contains a mixture of blocks of fixed size and blocks with size varying based on billing demand. Therefore, in an electric rate, some blocks have kWh units and others have units of kWh/kW or “hours use”. This pricing structure is sometimes used for electric energy charges but is uncommon for fuel charges. Sample Utility Rate Statement: For the first 150 kWh/kW demand ................................... 0.075 $/kWh For the next 15000 kWh................................................... 0.050 $/kWh For the next 100 kWh/kW demand................................... 0.047 $/kWh For all additional kWh..................................................... 0.042 $/kWh 6-14 HAP Quick Reference Guide Energy Analysis Applications Chapter 6 Example: During one billing month the billing demand is 120 kW and 50000 kWh is used. The energy charge is calculated as: kWh Range 1-18000 18001-33000 33001-45000 45001-50000 Block Size 18000 kWh 15000 kWh 12000 kWh 5000 kWh x Price x 0.075 $/kWh x 0.050 $/kWh x 0.047 $/kWh x 0.042 $/kWh Total Energy Charge = = = = = Cost $1350 $750 $564 $210 $2874 Program Input: Use the "Standard" energy charge type. For fuel rates, all fuel charges are "standard". Specify one step for each block in the pricing structure. For this example, the inputs would be: Season All All All All Period All All All All Block Size 150 15000 100 9999999 Block Units kWh/kW kWh kWh/kW kWh Price 0.075 0.050 0.047 0.042 Compound Block. The "Compound Block" charge uses a two-tier block structure shown in the example below. The first tier contains demand blocks which are used with the billing demand each month to establish a series of large energy blocks. These first tier blocks are subdivided into smaller energy blocks each with a separate price. Compound Block charges are infrequently seen in electric rate structures. They are currently not used for fuel charges. Sample Utility Rate Statement: For the first 125 kWh/kW demand For the first 3000 kWh .............................................. 0.087 $/kWh For the next 87000 kWh ............................................ 0.043 $/kWh For the all additional kWh ........................................ 0.034 $/kWh For the next 200 kWh/kW demand For the first 6000 kWh .............................................. 0.060 $/kWh For the next 85000 kWh ............................................ 0.044 $/kWh For the all additional kWh ........................................ 0.042 $/kWh For all over 325 kWh/kW demand For all kWh................................................................ 0.039 $/kWh HAP Quick Reference Guide 6-15 Chapter 6 Design Applications Example: During one billing month the billing demand is 500 kW and 200000 kWh is used. The energy charge is calculated as: kWh Range First 125 kWh/kW 1-3000 3001-62500 Next 200 kWh/kW 1-6000 6001-100000 All Above 325 kWh/kW 1-37500 Block Size 62500 kWh x Price = Cost 3000 kWh 59500 kWh 100000 kWh x x 0.087 $/kWh 0.043 $/kWh = = $261.00 $2558.50 6000 kWh 94000 kWh 37500 kWh x x 0.060 $/kWh 0.044 $/kWh = = $360.00 $4136.00 = = $1462.50 $8778.00 37500 kWh x 0.039 $/kWh Total Energy Charge Program Input: Use the "Compound Block" energy charge type. Specify one step for each first tier and second tier line item in the in the pricing structure. For this example, the inputs would be: Block Type Demand Energy Energy Energy Demand Energy Energy Energy Demand Energy Season All All All All All All All All All All Period All All All All All All All All All All Block Size 125 3000 87000 9999999 200 6000 95000 9999999 9999999 9999999 Block Units kWh/kW kWh kWh kWh kWh/kW kWh kWh kWh kWh/kW kWh Price 0.087 0.043 0.034 0.060 0.044 0.042 0.039 6.15.3 Demand Charges A "demand charge" is imposed for the peak power use during a month rather than for total energy consumption. Utility companies typically impose a demand charge in addition to the energy charge. While nearly all electric and fuel rate structures contain an energy or fuel charge, only certain rates include a demand charge. Demand charges are simpler than energy charges in that there are only two types. Each is described below Flat Price. This demand charge structure uses a flat cost/demand price for all times, or specific periods such as seasons or time-of-day periods. Sample Utility Rate Statement: All kW of on-peak demand during summer months ........... 10.45 $/kW All kW of mid-peak demand during summer months ........... 8.65 $/kW All kW of on-peak demand during winter months ............... 7.40 $/kW 6-16 HAP Quick Reference Guide Energy Analysis Applications Chapter 6 Example: During one summer billing month the demand for on-peak hours is 370 kW and demand for mid-peak hours is 207 kW. The demand charge is calculated as: kW Range All All Block Size 370 kW 207 kW x Price x 10.45 x 8.65 Total Demand Charge = = = = Cost $3866.50 $1790.55 $5657.05 Program Input: The number of steps entered in the demand charge is determined by the number of flat price periods. In this example, three steps are required: Season Summer Summer Winter Period Peak Mid-Peak Peak Block Size 9999999 9999999 9999999 Block Units kW kW kW Price 10.45 8.65 7.40 Stepped. This pricing structure uses different demand prices for successive "blocks" of demand. This pricing structure is similar to the declining block energy charge. Sample Utility Rate Statement: For the first 50 kW of billing demand................................ 10.18 $/kW For the next 100 kW of billing demand ............................... 7.00 $/kW For all remaining billing demand ....................................... 5.44 $/kW Example: During one billing month the billing demand is 400 kW. The demand charge is calculated as: kW Range 1-50 51-150 151-400 Block Size 50 kW 100 kW 250 kW x Price x 10.18 $/kW x 7.00 $/kW x 5.44 $/kW Total Demand Charge = = = = = Cost $509 $700 $1360 $2569 Program Input: The number of steps entered in the demand charge is determined by the number of "steps" or "blocks" in the demand charge. In this example, three steps are required: Season All All All Period All All All Block Size 50 100 9999999 Block Units kW kW kW Price 10.18 7.00 5.44 6.15.4 Demand Determination Whenever demand charges or demand block energy charges are used in a rate structure, the peak demand must be determined for each billing period. For electric rates the integrated power use over a 15, 30 or 60 minute period is typically used. For fuel rates, the peak hourly fuel consumption, or peak daily fuel consumption is used. In the simplest cases the measured peak demand is used directly to compute the demand charge. In other cases, however, the measured demand is adjusted by one or more clauses to determine a "billing" demand used to calculate the charge. For example, some rate structures impose a minimum demand clause. The billing demand is either the measured demand or the minimum demand, whichever is larger. Clauses used to derive "billing" demand from the measured demand are referred to as "Demand Determination" clauses. Usually the utility rate sheet will include a "Demand Determination" section HAP Quick Reference Guide 6-17 Chapter 6 Design Applications that spells out these clauses. In other cases the clauses are provided as fine print below the demand charge statement Each utility company defines clauses in different ways, but most fall into one of the following five categories: * * * * * Minimum demand clauses Rachet clauses Trailing window clauses Demand multiplier clauses Power factor multiplier clauses (electric rates only). Utilities will never refer to the clauses by these names. Instead, these are simple descriptive names that make explaining the clauses easier. To determine which kind of demand clauses are used in your rate structure, match the clause defined on your utility rate sheet with the following descriptions. Minimum Demand Clause. Utilities often specify that billing demand may not be less than a certain demand level. Sample Demand Clause: The billing demand shall be the larger of: a. The maximum 30-minute integrated demand measured, or b. 50 kW. Example: In a particular month the measured demand is 35 kW. Using the sample clause above, billing demand would be determined as: Measured Demand 35 kW Minimum Demand 50 kW Billing Demand 50 kW Program Input: To model this clause in HAP, select the Minimum Demand Clause option and specify the minimum demand value. Rachet Clause. A rachet clause introduces a penalty for large swings between monthly demands. The key to recognizing the rachet clause is that it compares measured demands with a percentage of the highest demand found during a fixed set of months. Sample Demand Clause: The billing demand shall be the larger of: a. The maximum 30-minute integrated demand measured, or b. 75% of the highest demand determined during the billing months of June through August Example: The measured demand for November is 100 kW. The highest measured demand during the months of July through August was 200 kW. Using the rachet clause above billing demand is determined as follows: Measured Demand 100 kW Rachet Demand 0.75 x 200 = 150 kW Billing Demand 150 kW Program Input: To model this clause in HAP select the Rachet Clause option and then specify the months during which the rachet peak is determined ("peaking months"), the months in which the rachet applies ("Applies In") and the multiplier factor. For the sample rachet clause the following inputs would be used: 6-18 Peaking months = June to August Applies in months = January to December Multiplier = 75%. HAP Quick Reference Guide Energy Analysis Applications Chapter 6 Trailing Window Clause. A "trailing window" clause also introduces a penalty for large swings between monthly demands. The key to recognizing the trailing window clause is that it compares the measured demand in the current month with a percentage of the highest demand found within a series of preceding months. This series of months is referred to as the "trailing window". Sample Demand Clause: The billing demand shall be the larger of: a. The maximum 30-minute integrated demand measured, or b. 50% of the highest demand measured during the preceding 6 months. Example: The measured demand for November is 100 kW. The highest measured demand during the previous 6 months was 250 kW in July. Using the trailing window clause above billing demand is determined as follows: Measured Demand 100 kW Rachet Demand 0.50 x 250 = 125 kW Billing Demand 125 kW Program Input: To model this clause in HAP select the Trailing Window Clause option and then specify the size of the trailing window and the multiplier factor. For the sample rachet clause the following inputs would be used: Window = 6 months Multiplier = 50%. Demand Multiplier Clause. This clause provides a discount on demand measured during certain times of day or times of year to encourage shifting of demand to those periods. Sample Demand Clause: Billing demand during the winter months shall be 60% of the maximum 30-minute integrated demand measured. Example: The measured peak demand for one of the winter billing months is 140 kW. Using the demand multiplier clause shown above, the billing demand would be determined as follows: Measured Demand 140 kW Demand Multiplier Adjustment 140 kW x 0.60 = 84 kW Billing Demand 84 kW Program Input: To model this clause in HAP, select the Demand Multiplier option and specify the multiplier factor and the season and period in which the multiplier applies. For the example clause above the inputs would be: Multiplier = 60% Season = Winter Period = All Power Factor Multiplier Clause. This clause introduces an indirect charge for excessive reactive power use. It is only used in electric rate structures. Power used in alternating current circuits is classified as "working" and "reactive". "Apparent" power is the vector sum of working and reactive power. Working power can be measured by a wattmeter. Reactive power is used to generate the magnetic flux in inductive machinery such as electric motors. It must be measured with separate metering equipment. Rather than measure it directly, utilities sometimes spot check buildings and impose a penalty if reactive power use is excessive. The reference value for the penalty is the "power factor" which is the ratio of working power to apparent power and therefore indirectly indicates the magnitude of the reactive power component. The lower the power factor, the larger the reactive power use. HAP Quick Reference Guide 6-19 Chapter 6 Design Applications Sample Demand Clause: Customers shall maintain a lagging power factor of 90% or higher. For each 1% by which the average power factor lags below 90%, the demand charge shall be increased by 1%. Example: For a certain month the measured peak demand is 200 kW. A spot check indicates the building power factor is 80% lagging. Using the demand clause above, the building would be penalized by increasing the demand charge by 1% for each 1% the power factor is below 90%, or a total of 10%. Measured Demand 200 kW Power Factor Multiplier Adjustment 200 kW x 1.10 = 220 kW Billing Demand 220 kW Program Input: To model this clause in HAP, select the Power Factor Multiplier option and then specify the multiplier factor. For the example clause above the multiplier would be 110%. 6-20 HAP Quick Reference Guide Appendix A Performing Common Tasks with HAP This appendix describes procedures used to perform common tasks in HAP such as entering or editing data and generating reports. This information may be useful for new users learning the program and for occasional users who need a refresher on operating procedures. While designing and analyzing HVAC systems with HAP, a common set of procedures is used to enter data, modify data and generate reports. Using common procedures to operate the program makes the program easier to learn and simpler to use. Whether you are working with walls, spaces or systems, for example, the same basic procedures are used. A. 1 BASIC PROCEDURES FOR PERFORMING COMMON TASKS Common tasks such as entering, editing or deleting data use the same basic procedure which is explained in this section. This basic procedure will be applied to each common task discussed in the subsequent sections in this Appendix. The procedure for performing many common tasks involves the following steps. 1. Select the Data Category by clicking on the desired item in the tree view panel on the left-hand side of the HAP main window. For example, if you need to work with Space data, first click on the "Space" item in the tree view panel. This will cause a list of spaces in your project to appear in the list view panel on the right side of the HAP main window. 2. Select One or More Items from the list view panel on the HAP main window. For example, when working with spaces, select one or more space items from the list of spaces in your project. There are four ways to select items: a. Selecting a Single Item - Click once on the name of the item you wish to select. The name will be highlighted indicating is has been selected. b. Selecting Multiple, Consecutive Items - While pressing the [Shift] key on the keyboard, click on the name of the first and last items in the group you wish to select. The names of all items in the group will be highlighted to indicate they are selected. c. Selecting Multiple, Non-Consecutive Items - While pressing the [Ctrl] key on the keyboard, click on the name of each item in the group you wish to select. Each name will be highlighted to indicate it is selected. d. Selecting All Items in the Category - Choose the Select All option on the Edit Menu (on the menu bar). The names of all items shown in the list view will be highlighted indicating they are selected. 3. Perform the Task on the selected items. Particular tasks such as entering or editing data can usually be performed by several different methods. Users are free to choose the method that is most convenient. These methods include the following. Which methods can be used for each task will be explained in subsequent sections of this appendix. a. Menu Bar. Often an option on the Edit Menu or Report Menu on the main window menu bar can be used to perform the task. HAP Quick Reference Guide A-1 Appendix A Performing Common Tasks with HAP b. Toolbar. In many cases one of the buttons on the main window toolbar can be used to perform the task. c. Item Pop-Up Menus. Right-clicking on the group of selected items will display the item pop-up menu which usually will contain an option for performing the task. d. Category Pop-Up Menus. Right-clicking on the selected category in the tree view panel will display the category pop-up menu. Note that selecting an option on this pop-up menu will perform the task on ALL items in the category, not just those currently selected. Therefore, category pop-up menus should be used carefully. e. Direct Use of the Keyboard. In some cases the keyboard keys can be used to directly perform a task. f. Special Features. There are also cases where special additional methods are provided for performing tasks. These will be explained in the subsequent sections where they apply. A.2 CREATING A NEW ITEM There are three ways to create new items in HAP. The example below deals with wall data, but the procedure can be used for any category of data in HAP. Simply substitute your category name for "wall" in the following description. To create a new wall item: 1. Select the Wall category in the tree view pane on the left side of the main window. A list of walls in the project will appear in the right-hand list view pane. 2. Use one of the following three methods to create a new item. a. Select the "New Default…" item in the list view pane. b. Right click on the Wall item in the tree view panel to display the category pop-up menu. Then select the "New" option in this pop-up menu. c. Use a special feature to create a new wall from within one of the program input forms. See details below. 3. After creating the new wall, the input form will appear. Enter data for the wall and then press OK to save the data and return to the HAP main window. Special Feature. Certain categories of data can be created from within other input forms. For example, while entering space data on the space form, you can create a new wall as follows: 1. While editing data in the Space Input Form on the “Walls, Windows Doors” tab, choose the “create new wall” item in the wall drop-down list. The wall input form will then appear. 2. Enter the desired wall data including the wall name. 3. Click the OK button to save the wall and return to the space input form. When you return to the space form, the wall you created will automatically be selected for use in the space. A-2 HAP Quick Reference Guide Performing Common Tasks with HAP Appendix A Note that this special feature can only be used to create the following kinds of new items: While Entering Data In the Following Form: Spaces Spaces Spaces Spaces Spaces Spaces Systems Systems *Systems *Systems *Plants *Plants *Plants *Electric Rates *Fuel Rates *Buildings *Buildings *Buildings You Can Create the Following Kinds of New Data Items: Schedules (Fractional) Walls Roofs Windows Doors External Shading Schedules (Fractional) Schedules (Fan/Thermostat) Cooling Towers Boilers Chillers Cooling Towers Boilers Schedules (Time-Of-Day Utility Rate) Schedules (Time-Of-Day Utility Rate) Schedules (Fractional) Electric Rates Fuel Rates *Items marked with an asterisk are available in HAP but not HAP System Design Load. A.3 EDITING AN EXISTING ITEM There are three ways to edit existing items in HAP. The example below deals with editing an existing schedule, but the procedure can be used for any category of data in HAP. Simply substitute your category name for "schedule" in the following description. To edit an existing schedule item: 1. Select the Schedule category in the tree view pane on the left side of the main window. A list of schedules in the project will appear in the right-hand list view pane. 2. Use one of the following three methods to edit a schedule item. a. Double-click on the schedule item in the list view pane. b. Right-click on a schedule item in the list view pane to display its pop-up menu. Then select the "Properties" item on this menu. c. Use a special feature to edit an existing schedule from within one of the program input forms. See details below. 3. After displaying the data to edit, make the necessary changes. Then press OK to save the changes and return to the HAP main window. Special Feature. Certain categories of data can be edited from within other input forms. For example, while entering space data on the space form, you can edit data for any schedule linked to that space as follows: HAP Quick Reference Guide A-3 Appendix A Performing Common Tasks with HAP 1. While editing data in the Space Input Form on the "Internals" tab, press the "Schedule" button next to any one of the Schedule drop-down lists. The input form for the currently selected schedule will appear and changes can be made to that schedule. 2. Make changes to the schedule. 3. Click the OK button to save the changes and return to the space input form. Note that this special feature can only be used to edit the following kinds of items: While Entering Data In the Following Form: Spaces Spaces Spaces Spaces Spaces Spaces Systems Systems *Systems *Systems *Plants *Electric Rates *Fuel Rates *Buildings *Buildings *Buildings You Can Edit the Following Kinds of New Data Items: Schedules (Fractional) Walls Roofs Windows Doors External Shading Schedules (Fractional) Schedules (Fan/Thermostat) Cooling Towers Boilers Boilers Schedules (Time-Of-Day Utility Rate) Schedules (Time-Of-Day Utility Rate) Schedules (Fractional) Electric Rates Fuel Rates *Items marked with an asterisk are available in HAP but not HAP System Design Load. A.4 USING THE ON-LINE CALCULATOR TO ENTER DATA While entering data, you may encounter situations in which you don’t have data for an input item, but you have related information. For example, when entering the space floor area you may know the length and width of the floor but not its area. Rather than calculate the floor area by hand, you can use an on-line calculator to calculate the value and insert it into the input item. For HAP users, most numeric inputs in the energy analysis portions of the program (plants, buildings, chillers, cooling towers, boilers, electric rates and fuel rates) provide an integrated on-line calculator. To use this calculator, simply enter an equation followed by the equal sign. For example, if you want to multiply 20 by 9, type the equation 20*9=. When you press the [=] key the equation will be calculated and the result (180) will be inserted into the input item. The calculator recognizes the following mathematical symbols: Multiplication: * Division: / Addition: + Example: 46.1+85.9= Subtraction: - Example: 20*9= Example: 100/5= Example: 100-84= In addition, compound equations can be entered if necessary. For example: 100-9*8+12= A-4 HAP Quick Reference Guide Performing Common Tasks with HAP Appendix A For both HAP and HAP System Design Load users, the system design portions of the program (weather, spaces, systems, walls, roofs, windows, doors, external shades) do not yet offer this integrated on-line calculator feature. Until these portions can be upgraded to include the integrated calculator, the Windows On-Line Calculator must be used instead. The following example illustrates how to use the Windows calculator. Example: You need to enter the floor area for a space, but you only know the floor dimensions are 17 ft by 32 ft. The Windows Calculator can be used to compute the floor area and then insert it into HAP as follows: 1. Start the Windows Calculator: From the Windows desktop, press Start. On the Start Menu choose Programs. On the Programs Menu choose Accessories. On the Accessories Menu choose Calculator. If you don’t need the calculator right away, minimize the Calculator window by pressing the minimize button on the Calculator title bar. The calculator will be available for use whenever you need it. The Windows Calculator is a program supplied with the Windows operating system. For typical Windows installations it is placed in the Accessories program group. 2. While running HAP and entering space data, display the Calculator by pressing the Calculator button that appears on your taskbar. The Calculator will appear. 3 Calculate the floor area by pressing the calculator keypad buttons for the equation 17 * 32 = . The result (544) will appear in the calculator display. 4. Copy the result to the clipboard: Choose the Edit option in the Calculator menu bar. Then choose the Copy option on the Edit Menu. This copies the result of your equation (544) to the Windows clipboard. 5. Return to HAP and place the cursor in the floor area text box by clicking once on this text box so the default floor area is highlighted. 6. Finally, on your keyboard, hold the [Shift] key down and press [Ins]. This inserts the contents of the Windows clipboard into the input field. The value 544 will appear as your floor area, replacing the previous floor area value. A.5 DUPLICATING AN EXISTING ITEM While entering data, it is often useful to create new items using defaults from an existing item. For example, a series of spaces in a building might use the same wall and window constructions and the same lighting levels and schedules. Defining this series of spaces with each new space based on the last space’s data can yield a tremendous increase in productivity. You only need to change a handful of space inputs for each successive space, rather than specifying every input item for each space. The Duplicate feature in HAP is used for this purpose. For example, when you duplicate a space, a new space is created using input data from the original space as defaults. Many readers will be familiar with the Copy and Paste features commonly offered in Windows software. HAP’s Duplicate feature combines Copy and Paste into one function. So in one step, Duplicate lets you make a copy of an item and paste it into your project. There are three ways to make a duplicate of an existing item in HAP. The example below deals with duplicating an existing space, but the procedure can be used for any category of data in HAP. Simply substitute your category name for "space" in the following description. To duplicate an existing space: 1. Select the Space category in the tree view pane on the left side of the main window. A list of spaces in the project will appear in the list view pane. 2. Select the desired space in the list view pane by clicking on it once. HAP Quick Reference Guide A-5 Appendix A Performing Common Tasks with HAP 3. Use one of the following three methods to duplicate a space: a. Use the "Duplicate" option on the Edit Menu. b. Press the "Duplicate" button on the Toolbar. c. Right-click on the selected space item to display its pop-up menu. Then select the "Duplicate" item on this menu. 4. After the space has been duplicated its data will be displayed in the space input form. Edit data as necessary and then press OK to save the changes and return to the HAP main window. A.6 DUPLICATING A BUILDING (WITH SPACES AND HVAC EQUIPMENT) When performing a LEED® Energy and Atmosphere Credit 1 analysis, or a LEED® Energy and Atmosphere Prerequisite 2 (Whole Building Energy Simulation option) analysis it is sometimes necessary to make a copy of a HAP building and all the air systems, plants, spaces, chillers, cooling towers and boilers that are linked to the building. An example is after a Proposed Design has been created and you wish to make a copy of all its data as the basis for assembling the Baseline 0 deg building. The Duplicate Building (with Spaces and HVAC Eqpt) option is used for this purpose. To use this option: 1. Select the Building category in the tree view pane on the left side of the main window. A list of buildings in your project will appear in the list view pane on the right. 2. Select the desired Building in the list view pane by clicking on it once. 3. Use one of the following two methods of duplicating the Building: a. Choose the Duplicate Building (with Spaces and HVAC Eqpt) on the Edit Menu. =OR= b. Right-click on the selected Building to display its pop-up menu and then choose the Duplicate Building (with Spaces and HVAC Eqpt) on this menu. 4. A window will appear explaining what this option does and asking whether you are using this option to copy data in preparation for creating a Baseline Building or a Proposed Design. If you choose Baseline Building, the program will use the prefix [B000] for the copies it creates so you can easily identify the data. If you choose Proposed Design, the program will use the prefix [P] for the copies it creates. After making your selection press OK to duplicate the Building. 5. The program will then make a copy of the original Building and all the spaces, air systems, plants, chillers, cooling towers and boilers linked to the Building. Names of copied items will be assigned the proper prefix as described above. 6. Once the program is finished, a message will be displayed confirming completion of the work and explaining how to identify the data items that were created. A.7 COPYING ITEMS Please see section A.5, Duplicating an Existing Item. A.8 REPLACING SPACE DATA During the course of a design project, specifications for the building sometimes change. For example, the wall construction characteristics change or lighting levels are adjusted. In such a situation, its useful to be able to globally change all space data rather than modifying the spaces one at a time. The Replace feature in HAP is used for this purpose. For example, the Replace feature can be used to change the overhead lighting wattage for 45 spaces all in one step. This provides a vast time savings over modifying the 45 spaces one at a time. A Replace can be performed in two ways: A-6 HAP Quick Reference Guide Performing Common Tasks with HAP Appendix A The first is using a “search and replace” approach in which you define a “value to replace” and a “replace with” value. For example, if “value to replace” is 2.0 W/sqft of overhead lighting, and “replace with” is 1.8 W/sqft, the program will search for all occurrences of 2.0 W/sqft of overhead lighting in the spaces you choose, and will replace these with 1.8 W/sqft. The second is using a “replace all” approach in which you only specify a “replace with” value; the “value to replace” specification is left blank in this case. For example, if the “value to replace” is blank and the “replace with” value is 1.8 W/sqft of overhead lighting, the program will replace all overhead lighting inputs in the spaces you designate with 1.8 W/sqft, regardless of what the original overhead lighting values are. There are four methods for globally replacing space data in HAP. The example below deals with changing the overhead lighting W/sqft in a group of spaces from 2.0 to 1.8. The same general procedure can be used for replacing many other types of space input data. 1. Select the Space category in the tree view pane on the left side of the main window. A list of spaces in the project will appear in the list view pane. 2. In the list view pane select the spaces whose data is to be modified 3. Use one of the following four methods to replace the data: a. Use the "Replace" option on the Edit Menu. b. Press the "Replace" button on the Toolbar. c. Right-click on the group of selected spaces to display its pop-up menu. Then select the "Replace" item on this menu. d. Right-click on the Space category name in the tree view pane on the left side of the main window to display the Space category pop-up menu. Then select the "Replace" option on this menu. Note that this will apply changes to ALL spaces in the project, so this method should be used carefully. 4. After the Replace option is selected, the Replace Data form will appear. 5. On the Internals tab of this form choose "Overhead Lighting W/sqft" as the category to be changed, specify a "value to replace" of 2.0 and a "replace with" value of 1.8. 6. Then click on the OK button to run the search and replace process. The program will notify you of the number of spaces searched and the number of items replaced before returning to the HAP main window. A.9 ROTATING SPACES During the course of a design project, the orientation of the building is sometimes adjusted by the architect. In such a situation, it is useful to be able to globally change the orientations of wall exposures and roof exposures in all your spaces rather than modifying the spaces one at a time. The Rotate feature in HAP is used for this purpose. For example, suppose a building contains 100 spaces. Midway through the design process, the architect changes the building orientation by shifting it 45 degrees clockwise. The rotate feature can be used to adjust the wall and roof orientations in one step. This provides a vast time savings over modifying the 100 spaces one at a time. There are four ways to rotate space data in HAP. The example below deals with rotating the orientation of wall and roof exposures by 45 degrees clockwise. The same general procedure can be used for rotation by other amounts. 1. Select the Space category in the tree view pane on the left side of the main window. A list of spaces in the project will appear in the list view pane. 2. In the list view pane select the spaces to be rotated. 3. Use one of the following four methods to rotate the spaces: HAP Quick Reference Guide A-7 Appendix A Performing Common Tasks with HAP a. Use the "Rotate" option on the Edit Menu. b. Press the "Rotate" button on the Toolbar. c. Right-click on the group of selected spaces to display its pop-up menu. Then select the "Rotate" item on this menu. d. Right-click on the Space category name in the tree view pane on the left side of the main window to display the Space category pop-up menu. Then select the "Rotate" option on this menu. Note that this will rotate ALL spaces in the project, so this method should be used carefully. 4. After the Rotate option is selected, the Rotate Data form will appear. On this form specify the amount of rotation (45 degrees in this example). Then press the OK button to begin the rotation. The program will report the number of wall and roof exposures that were rotated before returning to the HAP main window. A.10 PERFORMING LEED (90.1 PRM) ROTATIONS When performing a LEED® Energy and Atmosphere Credit 1 analysis or a LEED® Energy and Atmosphere Prerequisite 2 (Whole Building Energy Simulation Option) analysis, it is necessary to make four copies of the Baseline Building. The first Baseline Building, using an orientation equal to the Proposed Design, is assembled by manually defining the characteristics of its spaces, systems, plants, chillers, cooling towers, and boilers, as necessary. Then it is necessary to make three further copies of this Baseline Building with spaces rotated 90 deg, 180 deg and 270 deg, respectively, from the original Baseline Building orientation. The "Perform LEED (90.1 PRM) Rotations" option is used to quickly generate these three copies of the Baseline Building. To use this option: 1. Select the Building category in the tree view pane on the left side of the main window. A list of buildings in your project will appear in the list view pane on the right. 2. Select the Baseline Building in the list view pane by clicking on it once. 3. Use one of the following two methods to perform the LEED® rotations: a. Choose the "Perform LEED (90.1 PRM) Rotations" option on the Edit Menu. =OR= b. Right-click on the selected Building to display its pop-up menu and then choose the "Perform LEED (90.1 PRM) Rotations" option on this menu. 4. A window will appear explaining what this option does. Press OK to start the rotations. 5. The program will produce three copies of the Baseline Building you selected. Copies include the building and all the spaces, air systems, plants, chillers, cooling towers and boilers linked to the building. The spaces in the first copy will be rotated 90 deg from the original orientation. The spaces in the second copy will be rotated 180 deg. The spaces in the third copy will be rotated 270 deg. HAP uses prefixes for the copied items so you can easily identify them. [B090] indicates data for the Baseline 90 deg rotation, [B180] indicates data for the Baseline 180 deg rotation, and [B270] indicates data for the Baseline 270 deg rotation. 6. When the program is finished generating this data it displays a message confirming completion and explaining how to identify the data that was produced. A.11 DELETING ITEMS There are five ways to delete existing items in HAP. The example below deals with deleting air systems, but the procedure can be used for any category of data in HAP. Simply substitute your category name for "system" in the following description. Note: If you ever accidentally delete data, you can often undo the deletion. A paragraph at the end of this section explains how. To delete two air systems from a project: A-8 HAP Quick Reference Guide Performing Common Tasks with HAP Appendix A 1. Select the System category in the tree view pane on the left side of the main window. A list of systems in the project will appear in the list view pane. 2. In the list view pane select the two air systems to be deleted. 3. Use one of the following five methods to delete the air systems: a. b. c. d. Press the Delete key on the keyboard. Use the Delete option on the Edit Menu. Use the Delete button on the Toolbar. Right-click on the selected systems in the list view pane to display the item pop-up menu. Then select the "Delete" item on this menu. e. Right-click on the System category in the tree view pane to display the pop-up menu for the system category. Then select the "Delete" item on this menu. Note that this will delete ALL systems in the project, so this option should be used carefully. 4. HAP will display a warning message listing the number of systems to be deleted and asking you to confirm the deletion before it erases the data. How to Undo Accidental Deletion of Data: When data is deleted, it is permanently erased from the working copy of your project. However, if you ever mistakenly delete data and have not yet saved the project, you can undo the deletion by re-opening the project. Use the Open option on the Project Menu. When you choose the Open option, HAP will ask if you want to save changes to your current project data. Make sure you DO NOT save the project data at this point. Then reopen the project. Data from your most recent project/save will be restored. While this will successfully undo your accidental deletion of data, any other changes you made to the project since the last project/save will also be lost. A.12 GENERATING INPUT DATA REPORTS HAP provides four ways to print or view input data for your project. When printing data, it is sent directly to your printer. When viewing data, information appears in the HAP Report Viewer. The Viewer allows you to quickly browse the data. The Viewer also provides a button for printing the data. Further information on the Report Viewer can be found in section A.18. The example below deals with viewing or printing input data for a group of spaces, but the procedure can be used for any category of data in HAP. Simply substitute your category name for "space" in the following description. To view or print input data for a group of spaces: 1. Select the Space category in the tree view pane on the left side of the main window. A list of spaces in the project will appear in the list view pane. 2. In the list view pane select the spaces whose input data is to be viewed or printed. 3. Use one of the following four methods to view or print the input data: a. Choose the "View Input Data" or "Print Input Data" options on the Reports Menu. b. Press the "View Input Data" button on the Toolbar. c. Right-click on the selected spaces in the list view pane to display the item pop-up menu. Then select the "View Input Data" or "Print Input Data" option on this menu. d. Right-click on the Space category in the tree view pane to display the pop-up menu for the space category. Then select the "View Input Data" or "Print Input Data" option on this menu. Note that this will view or print input data for ALL spaces, so this option should be used carefully. A.13 GENERATING SYSTEM DESIGN REPORTS System design reports provide information about loads and the required sizes of air system components such as coils, fans, and supply terminals. HAP provides four ways to generate these reports, all utilizing the same basic procedure. HAP Quick Reference Guide A-9 Appendix A Performing Common Tasks with HAP 1. Select the System category in the tree view pane on the left side of the main window. A list of systems in the project will appear in the list view pane. 2. In the list view pane select the desired systems. 3. Use one of the following four methods to view or print system design reports: a. Choose the "Print/View Design Results" option on the Reports Menu. b. Press the "Print/View Design Results" button on the Toolbar. c. Right-click on the selected systems in the list view pane to display the item pop-up menu. Then select the "Print/View Design Results" option on this menu. d. Right-click on the System category in the tree view pane to display the pop-up menu for the system category. Then select the "Print/View Design Results" option on this menu. Note that this will generate design reports for ALL systems in the project, so this option should be used carefully. 4. The System Design Reports Selection window will appear. Select the reports to be generated. 5. To view the reports, press the Preview button on the System Design Reports window. If system design calculations must be run before the reports can be generated, HAP will run these calculations automatically. If no calculations are needed, the reports will be displayed immediately. Reports are displayed in the HAP Report Viewer (see section A.18). After viewing the reports you can print the reports by pressing the Print button on the Report Viewer. 6. To print the reports directly, press the Print button on the System Design Reports window. If system design calculations must be run before the reports can be generated, HAP will run these calculations automatically. If no calculations are needed, the reports will be printed immediately. A.14 GENERATING PLANT DESIGN REPORTS Plant design reports provide sizing information for chiller plants and boiler plants. HAP provides four ways to generate these reports, all utilizing the same basic procedure. 1. Select the Plant category in the tree view pane on the left side of the main window. A list of plants in the project will appear in the list view pane. 2. In the list view pane select the desired plants. 3. Use one of the following four methods to view or print plant design reports: a. Choose the "Print/View Design Results" option on the Reports Menu. b. Press the "Print/View Design Results" button on the Toolbar. c. Right-click on the selected plants in the list view pane to display the item pop-up menu. Then select the "Print/View Design Results" option on this menu. d. Right-click on the Plant category in the tree view pane to display the pop-up menu for the plant category. Then select the "Print/View Design Results" option on this menu. Note that this will generate design reports for ALL plants in the project, so this option should be used carefully. 4. The Plant Design Reports Selection window will appear. Select the reports to be generated. 5. To view the reports, press the Preview button on the Plant Design Reports window. If plant or system design calculations must be run before the reports can be generated, HAP will run these calculations automatically. If no calculations are needed, the reports will be displayed immediately. Reports are displayed in the HAP Report Viewer (see section A.18). After viewing the reports you can print the reports by pressing the Print button on the Report Viewer. 6. To print the reports directly, press the Print button on the Plant Design Reports window. If plant or system design calculations must be run before the reports can be generated, HAP will run these calculations automatically. If no calculations are needed, the reports will be printed immediately. A-10 HAP Quick Reference Guide Performing Common Tasks with HAP Appendix A A.15 GENERATING SYSTEM SIMULATION REPORTS System simulation reports provide information about system operation and energy use during a typical year. These reports are offered in HAP but not HAP System Design Load. HAP provides four ways to generate these reports, all utilizing the same basic procedure. 1. Select the System category in the tree view pane on the left side of the main window. A list of systems in the project will appear in the list view pane. 2. In the list view pane select the desired systems. 3. Use one of the following four methods to view or print system simulation reports: a. Choose the "Print/View Simulation Results" option on the Reports Menu. b. Press the "Print/View Simulation Results" button on the Toolbar. c. Right-click on the selected systems in the list view pane to display the item pop-up menu. Then select the "Print/View Simulation Results" option on this menu. d. Right-click on the System category in the tree view pane to display the pop-up menu for the system category. Then select the "Print/View Simulation Results" option on this menu. Note that this will generate simulation reports for ALL systems in the project, so this option should be used carefully. 4. The System Simulation Reports Selection window will appear. Select the reports to be generated. 5. To view the reports, press the Preview button on the System Simulation Reports window. If system calculations must be run before the reports can be generated, HAP will run these calculations automatically. If no calculations are needed, the reports will be displayed immediately. Reports are displayed in the HAP Report Viewer (see section A.18). After viewing the reports you can print the reports by pressing the Print button on the Report Viewer. 6. To print the reports directly, press the Print button on the System Simulation Reports window. If system calculations must be run before the reports can be generated, HAP will run these calculations automatically. If no calculations are needed, the reports will be printed immediately. A.16 GENERATING PLANT SIMULATION REPORTS Plant simulation reports provide information about plant operation and energy use during a typical year. These reports are offered in HAP but not HAP System Design Load. HAP provides four ways to generate these reports, all utilizing the same basic procedure. 1. Select the Plant category in the tree view pane on the left side of the main window. A list of plants in the project will appear in the list view pane. 2. In the list view pane select the desired plants. 3. Use one of the following four methods to view or print plant simulation reports: a. Choose the "Print/View Simulation Results" option on the Reports Menu. b. Press the "Print/View Simulation Results" button on the Toolbar. c. Right-click on the selected plants in the list view pane to display the item pop-up menu. Then select the "Print/View Simulation Results" option on this menu. d. Right-click on the Plant category in the tree view pane to display the pop-up menu for the plant category. Then select the "Print/View Simulation Results" option on this menu. Note that this will generate simulation reports for ALL plants in the project, so this option should be used carefully. 4. The Plant Simulation Reports Selection window will appear. Select the reports to be generated. 5. To view the reports, press the Preview button on the Plant Simulation Reports window. If plant or system calculations must be run before the reports can be generated, HAP will run these calculations automatically. If no calculations are needed, the reports will be displayed immediately. Reports are HAP Quick Reference Guide A-11 Appendix A Performing Common Tasks with HAP displayed in the HAP Report Viewer (see section A.18). After viewing the reports you can print the reports by pressing the Print button on the Report Viewer. 6. To print the reports directly, press the Print button on the Plant Simulation Reports window. If plant or system calculations must be run before the reports can be generated, HAP will run these calculations automatically. If no calculations are needed, the reports will be printed immediately. A.17 GENERATING BUILDING SIMULATION REPORTS Building simulation reports provide information about annual energy use and energy cost. These reports are offered in HAP but not HAP System Design Load. HAP provides four ways to generate these reports, all utilizing the same basic procedure. 1. Select the Building category in the tree view pane on the left side of the main window. A list of buildings in the project will appear in the list view pane. 2. In the list view pane select the desired buildings. 3. Use one of the following four methods to view or print building simulation reports: a. Choose the "Print/View Simulation Results" option on the Reports Menu. b. Press the "Print/View Simulation Results" button on the Toolbar. c. Right-click on the selected buildings in the list view pane to display the item pop-up menu. Then select the "Print/View Simulation Results" option on this menu. d. Right-click on the Building category in the tree view pane to display the pop-up menu for the building category. Then select the "Print/View Simulation Results" option on this menu. Note that this will generate simulation reports for ALL buildings in the project, so this option should be used carefully. 4. The Building Simulation Reports Selection window will appear. Select the reports to be generated. 5. To view the reports, press the Preview button on the Building Simulation Reports Results window. If building, plant or system calculations must be run before the reports can be generated, HAP will run these calculations automatically. If no calculations are needed, the reports will be displayed immediately. Reports are displayed in the HAP Report Viewer (see section A.18). After viewing the reports you can print the reports by pressing the Print button on the Report Viewer. 6. To print the reports directly, press the Print button on the Building Simulation Reports window. If building, plant or system calculations must be run before the reports can be generated, HAP will run these calculations automatically. If no calculations are needed, the reports will be printed immediately. A.18 USING THE REPORT VIEWER This section describes the features and operation of the HAP Reports Viewer. The Viewer is used to display all input, design and simulation reports in HAP. It appears when you press the Preview button on any of the Report Selection windows in the program. Overview of Layout and Features. The Report Viewer consists of four key components. 1. The Title Bar appears across the top of the Report Viewer window. At the right-hand end of the title bar is a close button which is used to close the viewer and return to the HAP main window. 2. The Menu Bar appears beneath the title bar. It contains two menus which provide options for performing useful tasks with reports. A-12 HAP Quick Reference Guide Performing Common Tasks with HAP Appendix A The first menu is the File Menu. Options on this menu are as follows: Save Report As is used to save the report as a disk file in Rich Text Format (RTF). Note that a "report" is a bundle of all individual report items you selected for display. Therefore, when you save as a disk file all pages in the bundle are saved in a single file. This option is useful for incorporating report material in other documents. RTF files can be read by many popular word processor programs. Print Setup is used to adjust settings for your default printer. This option is typically used prior to printing a report. Print is used to print the report. Because a "report" is a bundle of all individual report items you selected for display, all pages in the bundle will be printed when you choose this option. Exit is used to close the Report Viewer and return to the HAP main window. The second menu is the Help Menu. It contains one option: How to Use the Report Viewer displays an overview help topic for the Viewer. 3. The Toolbar appears beneath the menu bar. It contains buttons for performing useful tasks with the reports. Many of these tasks are the same as provided by options on the Menu Bar. Working from left to right across the toolbar the buttons perform the following functions: The Save Report As button serves the same function as the Save Report As option on the File Menu, described above. The Print button prints the report document that is currently visible in the viewer. HAP Quick Reference Guide A-13 Appendix A Performing Common Tasks with HAP The Zoom In and Zoom Out buttons are used to enlarge or reduce the magnification for the currently displayed page. Zoom In increases the magnification for the page. Zoom Out decreases the magnification for the page. 4. The Report Viewing Area appears below the toolbar. It displays all pages in the bundle of reports you selected for display. Since only a portion of one page of the current report is visible at one time, you will need to use the scroll bar or the [PgUp] and [PgDn] keys to view all portions of that page. You will also need to scroll to view additional pages. A.19 CHANGING THE LIST VIEW FORMAT The list view in the main program window provides a list of items, such as spaces, walls, roofs, etc.., that you have entered and stored in your project. This list of items can be displayed in four different formats: List, Details, Large Icons and Small Icons You can change from one format to another using options on the View Menu and buttons on the toolbar. Each of the four list view formats is described below. A. List Format In List Format each item is shown as a small icon with the item name to the right of the icon. Items are listed in a column format. Once items fill the first column, additional items are shown in a second column. To switch to this list view format, choose the “List” option on the View Menu, or press the “List” toolbar button. B. Details Format In Details Format each item is shown as a small icon with the item name to the right of the icon. Additional descriptive details are listed opposite the item, as shown in the following table. Items are shown in column format. Once items fill the available display area, the list view must be scrolled to display additional items. To switch to this list view format, choose the “Details” option on the View Menu, or press the “Details” toolbar button. Data Category Details Item #1: Details Item #2: Weather Design City Simulation City Spaces Floor Area Systems System Type Sizing Status Simulation Status Plants Plant Type Sizing Status Simulation Status *Buildings Simulation Status Schedules Schedule Type Walls Overall U-Value Overall Weight Roofs Overall U-Value Overall Weight Windows Overall U-Value Shade Coefficient Doors Door U-Value Glass U-Value Ext. Shading (none) *Chillers Function *Cooling Towers Cooling Tower Type *Boilers Boiler Type *Electric Rates (none) *Fuel Rates (none) Type Details Item #3: Cooling Capacity Details Item #4: Heating Capacity Full Load Capacity *Items marked with an asterisk are available in HAP but not HAP System Design Load. A-14 HAP Quick Reference Guide Performing Common Tasks with HAP Appendix A C. Large Icons Format In Large Icon format, each item is shown as a large icon with the name positioned below the icon. Items are listed in rows from left to right across the list view panel. Once icons fill the available display area, the list view must be scrolled to view additional icons. To switch to Large Icon format, choose the “Large Icons” option on the View Menu, or press the “Small Icons” toolbar button. D. Small Icons Format In Small Icon format, each item is shown as a small icon with the item name to the right of the icon. Items are listed in rows from left to right across the list view panel. Once icons fill the available display area, the list view must be scrolled to see additional items. To switch to Small Icon format, choose the “Small Icons” option on the View Menu, or press the “Small Icons” toolbar button. A.20 SETTING USER PREFERENCES The Preferences option on the View Menu is used to specify preferences affecting program operation. When this option is selected, the Preferences window appears. This window contains two tabs. A.20.1 General Tab The General Tab is divided into two parts. The first part contains preferences applying to all Carrier programs on your computer: Measurement Units - Choose whether program input data and results are displayed using English units or SI Metric units. Email Address for Your Carrier Sales Engineer allows you to specify an e-mail address that is used with the Send Email to Sales Engineer option on the Project Menu. This option is used when collaborating with your Carrier sales engineer to archive your project data and e-mail it to the sales HAP Quick Reference Guide A-15 Appendix A Performing Common Tasks with HAP engineer so equipment selections can be run against your sizing data. See Section B.10 for further information. The second part of the General Tab contains preferences which apply only to HAP: Show Tooltips - Tooltips are the small messages that appear when you position the mouse cursor over toolbar buttons and various other portions of the main program window, or certain input windows. Tooltips will be shown when this box is checked. Show Date - When this box is checked, the current date will be shown in the right-hand portion of the status bar. Show Time - When this box is checked, the current time will be shown in the right-hand portion of the status bar. Operating Mode allows you to turn Energy Analysis features on and off. This option is only offered when running the full version of HAP. It is not offered when running HAP System Design Load. In HAP, users have the option of switching the program from full HAP mode to HAP System Design mode and vice versa. Switching to HAP System Design mode turns off all of the inputs and features for energy analysis. When using the program only for system design work, users may find it more efficient to hide the unneeded energy analysis features from view. Users can switch between operating modes at any time and for any project. For example, if you created a project while in HAP System Design mode you can later switch it to full HAP mode. All of the original project data will remain. You will only have to supply the extra energy analysis data to run energy studies. A.20.2 Project Tab The Project Tab contains preferences related to the current HAP project only. Currently this tab provides options for: A-16 Ventilation Defaults. Choose whether ventilation defaults should be based on ASHRAE Standard 62-2001, 62.1-2004, 62.1-2007, or 62.1-2010, or "User-Defined". Typically this choice is made at the start of a project since it affects how data is entered for spaces and systems. When you choose one of the ASHRAE options, you will be able to default space ventilation requirements by selecting a HAP Quick Reference Guide Performing Common Tasks with HAP Appendix A space usage type. In addition, options will be offered in system inputs for calculating ventilation airflow requirements that comply with the Standard. When you choose "User-Defined", you will always be required to specify space ventilation requirements yourself and the only ventilation calculation option will be "Sum of Space OA Airflows". Energy Standard. Choose whether the energy standard used in this project will be ASHRAE Standard 90.1-2004, 90.1-2007, or 90.1-2010. This choice affects how HAP defaults minimum efficiencies for equipment. When the "ASHRAE Minimum Eqpt Efficiency" option is selected, instead of directly specify equipment performance values like kW, EER, COP, SEER or HSPF or average efficiency (%), the program will default efficiencies based on the ASHRAE 90.1 standard you select. In addition, you choice of the ASHRAE 90.1 standard here will determine the LEED® Rating System used in the project. Because each LEED® rating system relates to a specific edition of ASHRAE Standard 90.1, the two choices must be synchronized. ASHRAE 90.1-2004 is paired with LEED NC-2.2. ASHRAE 90.1-2007 is paired with LEED 2009. LEED® Rating System. Choose whether the LEED® rating system used in this project will be LEED NC-2.2 or LEED 2009. This choice affects how the LEED EA Credit 1 Summary report is formatted. Formatting is customized to the rating system you select. As noted in the previous bullet, HAP automatically synchronizes the ASHRAE 90.1 energy standard with your LEED® Rating system choice. Currency Units. Specify the currency symbol or abbreviation to be used in this project. This input will be used for all program inputs and results involving cost. For example, if you specify "$" as the currency units, all energy and fuel prices will be based on $ and all energy cost reports will display costs in units of $. A.20.3 Command Buttons Finally, the form contains three buttons in the lower right-hand corner: Press the OK button to apply any changes you’ve made to the preferences and then exit.. Press the Cancel button to exit without applying changes you’ve made to preferences. Press the Help button to display the overview help topic for this window. HAP Quick Reference Guide A-17 [This page has been left blank intentionally]