1
Bilco Stair Stringer
Installation Instructions
Bilco Door
Note: See reverse side for stairwell dimensions and Bilco Door and Stair Stringer sizes
for various grade conditions.
Stringer
tight
against
outer wall
Vertical Door
To Install:
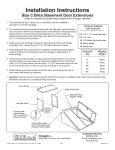
Measure up from the finished basement floor line
and draw a level line on the wall as shown in Figure 1. Place one stringer up against the wall and
line up the lower anchor holes on the stringer to the
level line on the wall. Make sure that the top of the
stringer is up tight against the outer wall, The
stringer is now in position to be anchored. Anchor
stringer to wall through the anchor holes in the
stringer using the 1-1/4” long masonry nails supplied. Use (6) masonry nails for each stringer.
Draw level
line 8-1/4”
above
finished
floor
Line up lower
anchor holes
on stringer
with level line
FINISHED FLOOR LINE
When installing the stringer against a masonry block
wall, it is necessary to anchor into the solid part of
the blocks or into the joints between the block. The
masonry nails will not hold if driven into the hollow
part of the block. If some anchor holes do not line
up with a joint or solid portion of block, you can
make your own holes by driving the masonry nails
through the steel stringer. Use (6) masonry nails
for each stringer.
Figure 1
Using standard 2 x 10 lumber (actually measures
1-5/8” x 9-1/2”) cut off the required number of pieces
to be used for treads to a length of 2” less than the
width of the masonry opening. On one piece only
(to be used for the top tread) the two rear corners
must be notched out as shown in Figure 2 to allow
the tread to fit snugly against the outer wall.
It is generally easier to install the second stringer
by leveling from the first installed stringer. Place
the second stringer against the opposite wall and
insert the top and bottom treads by sliding them
into the slots provided in the stringers. With the
treads level, and the stringer tight against the outer
wall, the second stringer is in position to be anchored to the wall following the same procedure
used to anchor the first stringer. Insert all of the
treads into the slots in the stringer and secure all
treads with the 8-penny nails provided. Use one
nail in each end of each tread utilizing the holes
supplied in the stringer, see Figure 3.
1”x 1”
notch
Note: (6) masonry nails are sufficient for anchoring
each stringer, (3) nails through top flange and (3) nails
through bottom flange. Additional mounting holes are
provided on stringer for anchoring hole location
flexibility when installing on concrete block walls.
Figure 2
Secure treads with 8-penny nails
provided. Drive nails through hole in
stringer and straight down in step
Figure 3
The Bilco Company, P.O. Box 1203, New Haven, CT 06505 • (203)934-6363 • www.bilco.com
Printed in U.S.A. 2004
©2004 The Bilco Company
SD 474 rev. 1.0
Stairway Details
Showing areaway dimensions for four Bilco Door sizes and sectional
views of Stair Stringer installations for normal grade conditions.
Size O
Size B
Size C
Size SL
Door and Stair Stringers
Door and Stair Stringers
Door and Stair Stringers
Door and Stair Stringers
Construction Guide
for building areaway to
suit various grade conditions
This chart was developed to aid builders in the construction of the masonry stairwell to the proper inside length, width and height for various grade conditions.
First, determine the approximate height that the grade will be above the finished basement floor. With this dimension, refer to the first column of the chart below
and find the range in which this grade height falls. Read across the chart to determine the dimensions of the areaway and the size and dimensions of the Bilco
Door and Stair Stringers required.