1
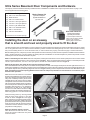
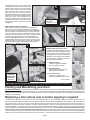
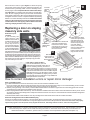
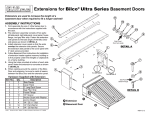
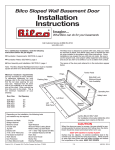
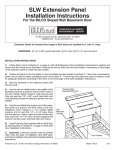
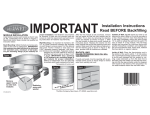
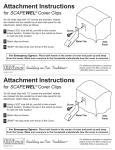
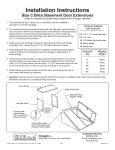
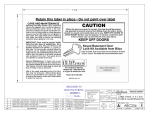
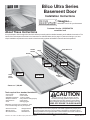
Bilco Ultra Series
Basement Door
Installation Instructions
Imagine...
What Bilco can do for your basement
Customer Service: (800)854-9724
www.bilco.com
About These Instructions
It may be helpful to look through this entire folder before proceeding with the detailed assembly and installation instructions. The
names of the various parts referred to in the instructions are indicated below and on page 2. If parts are missing or you have
unique installation requirements not covered in these instructions, please call the Bilco customer service department.
Header
Gasket
Slide Bolt Lock
Hinge
Header
Right
Door Panel
Right
Side Piece
Side
Panel
Inserts
Left
Side Piece
Left
Door Panel
Motion
Damper
Sill
Patent no. 7,356,968
Tools required for a standard installation:
• 5/16" wrench
• 1/2" wrench
• Flat blade screwdriver
• Phillips screwdriver
• Tape measure
• Level
• Electric drill
• 5/16" carbide
masonry drill bit
• Polyurethane caulk (opaque)
• Work gloves
• Safety goggles
KEEP OFF DOORS TO AVOID INJURY
Depending upon the type of installation, some
or all of the following also may be required:
• Hammer and nails
• Masonry chisel
• Shovel and trowel
• Sledge hammer
• Circular saw
• Wheelbarrow
CAUTION
When the doors are open for access, the area
should be personally guarded to prevent anyone
from falling down the stairs. Surface may be slippery.
Doors should be closed and locked when not in use.
The Bilco Ultra Series Basement Door is engineered to the highest specifications to meet
exacting tolerances. Due to the properties of the HDPE (High Density Polyethylene),
some components of the door may vary slightly in appearance compared to others
following installation and regular operation. These variations are normal and will in not
affect the performance of the product or its 10-year warranty.
Printed in U.S.A © 2010, The Bilco Company, New Haven, CT 06505
02/10
INCB-001 REV 7.0
Ultra Series Basement Door Components and Hardware
The majority of the door hardware is factory installed for ease of installation. In addition to the major components shown on page 1, the
door is supplied with the following parts:
Hardware Package Contents
(11) #12 x 1-1/2” hex head screws
(14) Plastic anchors
(5) #10 x 2-1/2” deck screws
Motion Damper Kit
(2) Motion Dampers
(4) Ball stud fasteners
(4) Lock nuts
(2) 1/2” O.D. X 1/8” nylon spacers
(11) 1/2” O.D. X 1/4” nylon spacers
(18) 1/4-20 x 1” pan head screws
(3) #10 x 1-1/2” flat head screws
(2) #10 x 1” drive screws
(13) 7/8” O.D. steel washers
Side Panel Insert Kit*
(2) Solid panel inserts
(2) Clear panel inserts
* Extra fasteners are included in package
* Louver side panel inserts with
insect screen are factory installed.
Inserts can be changed by
following Step 5 of instructions.
Installing the door on an areaway
that is smooth and level and properly sized to fit the door
The Bilco basement door will shed water in normal conditions only when installed and caulked in accordance with these instructions. If there
are no rain gutters above door, a diverter must be installed to prevent roof water from flowing directly onto door. If the foundation areaway
that you are installing the door on is not smooth and level, or does not fit the door properly, see bottom of page 3 of these instructions.
Before installing the door, verify that you have all the parts shown above and that you have the tools required for installation that are listed on
page 1 of these instructions. If you are replacing an existing door, Mix a small batch of concrete and patch any holes in the present concrete
caused by the anchors that held the old door in place.
STEP 1: Assembling the door frame. Remove side panels, header panel and sill from carton. Stand up side pieces and connect header
panel to each side piece with #10 x 1”drive screws as shown in Figure 1. Next, connect the aluminum door sill piece to each side piece with
1/4-20 x 1”pan head screws, 1/2” O.D. X 1/8” nylon spacers, and 7/8” O.D. steel washers as shown in Figure 2.
STEP 2: Anchoring the door frame to the house and areaway foundation
Move assembled door frame into place on foundation areaway. Make sure that vertical edge of side pieces are flush against the house. For
replacement applications, siding may need to be removed and replaced to position door frame properly. Place a level against side piece and
check plumb. Square door by measuring diagonals as shown in Figure 3, shifting frame as required until measurements A and B are equal.
Note: The Distance across the opening (between anchor holes in side pieces) should be no less than 53-1/2" on center for proper
basement door operation.
Mark all anchor hole locations on foundation
areaway and wall with pencil or marker. Remove
frame from areaway and drill all anchor holes
using 5/16” carbide tip masonry bit as shown
in Figure 4. Once all anchor holes are drilled,
insert plastic anchors into all anchor holes flush
with concrete and reposition frame on areaway.
Anchor side pieces to areaway foundation and
foundation wall using #12 x 1-1/2” slotted hex
head screws, 1/2” O.D. X 1/4” nylon spacers,
and 7/8” O.D. steel washers as shown in Figure 5 on next page. Anchor Sill to areaway foundation using (3) #10 x 1-1/2” flat head screws.
Finish anchoring frame by securing header
panel to house using (4) #10 x 2-1/2” deck
screws as shown in Figure 6 on next page.
Note: Indents are provided in header panel to
show proper screw location. Make sure header
panel is level before securing. When the frame
is fully anchored, caulk all around the exterior
of the frame where it meets the masonry with
polyurethane caulk (opaque).
A
B
STEP 3: Install Door Panels on Frame
Note: Because of the size of the doors, it may
require two people to attach the door panels
to the door frame.
Page 2
1
2
3
4
Starting with either door panel, position panel
on side piece so that the door is in the closed
position. Note: there are (8) hinge mounting
holes in each door panel, (4) for each hinge.
Start by attaching the top hinge to the door
panel with (1)1/4-20 x 1” pan head screw,
hand-tighten about half way. Position bottom
hinge on cover panel and hand tighten all four
mounting screws. Insert remaining three
screws into top hinge and hand tighten. Once
all eight hinge attachment screws are in place,
tighten securely with a screwdriver as shown
in Figure 8.
5
6
Plastic anchor
not shown
(Inserted in concrete)
STEP 4: Motion damper installation
Starting with either door leaf, attach ball stud fasteners to
upper and lower mounting brackets as shown in Figure 9.
Ball or round portion of fastener should be facing towards the
house as shown on both brackets. Secure nuts to ball studs
using a 1/2” wrench. Attach end of damper to lower mounting
bracket located on side panel. This is done by simply pushing
the damper onto the ball stud until it snaps into place as
shown in Figure 9A. Attach other end of damper to bracket
to upper bracket located on door leaf. Note: You may need to
push down slightly on the damper to align it with the ball stud.
Repeat damper installation instructions on other door leaf.
7
8
9
Upper Bracket
A
PUSH
Lower Bracket
STEP 5: Install side panel inserts
The Bilco Ultra Series basement door is
supplied with interchangeable side panel
inserts. Inserts allow you to add light and/
or ventilation to your basement areaway. A
description of insert options is provided below and complete installation instructions
are supplied in the insert kit.
B
1. Solid Panel Insert
Used when light and ventilation
are not required in areaway
1
2
2. Vent Panel Insert *
Adds ventilation and fresh air to
basements and areaways.
Install Damper
with large
diameter end
attached to
door leaf
3. Clear Panel Insert
Adds light to dark basement
areaways to facilitate easier access.
House
3
* Factory installed
IMPORTANT: An interior door at the bottom of the steps is required to prevent heat loss and reduce condensation.
Painting and Maintaining your Door
DO NOT PAINT DOOR. The Bilco Ultra Series basement door is made from a corrosion resistant high-density polyethylene material that
cannot be painted. The door features construction from corrosion resistant materials and is designed to be virtually maintenance free. As
required, the door can be cleaned using non-abrasive household cleaners. Occasional lubrication of all moving parts with a standard spray
lubricant is recommended.
Replacing a door where new concrete capping is required
For installations requiring a new concrete cap, start by removing the top 3" to 4" of deteriorated masonry to permit the pouring of the cap
without increasing the height of the present top step. Build a simple wood form as shown in Figure 10 on the next page, ensuring that the form
is level and square. The top of the new concrete capping should be a little higher than the surrounding grade (a height of at least 4" is
desirable). Assemble door frame per STEP 1 on page 2 of these instructions. Move the assembled frame into place over capping form as
shown in Figure 11 on next page, positioning it exactly as the door will be when the capping is poured. This is done by blocking up the frame
temporarily so bottom of side pieces are at the same height as the top of the inside form board. Note: All parts of the Bilco basement door
must rest on top of the concrete capping and must not be buried in it. The Siding above the door may need to be removed and replaced
to position door flush against the house. Place a level against each side piece and check plumb. Square door by measuring diagonals and
shifting frame as required. With the door frame in place, insert #12 x 1-1/2" slotted hex head screws with washers and spacers into anchor
Page 3
slots as shown in inset on right in Figure 11. Attach two spring
nuts to each of the screws as shown. Attach door panels to assembled frame by following STEP 3 of door assembly instructions on pages 2 and 3. Important: Do not install motion dampers at this time. Pour capping and close doors to recheck alignment. Be sure capping is level to prevent water accumulation
around base of door frame. After concrete hardens remove forms
and tighten all anchor screws. Complete installation by following
STEPS 3-5 of door assembly instructions. Caulk all around the
exterior of the frame where it meets the masonry and at the
seams between the new capping and foundation walls with
exterior grade polyurethane caulk (opaque).
Replacing a door on sloping
masonry side walls
Side walls in poor
condition
If your areaway has
sloped masonry side
walls that have loose or
crumbling masonry and
are not structurally
sound, they can be removed and an Ultra Series door can be installed
on the new flat areaway.
Remove and discard existing basement door. If sloping masonry side walls are of stone,
brick, block, or poured concrete, they can usually be removed
by striking them with a sledge hammer (see photo above). Be
sure to wear safety goggles. Once side walls are removed and
debris has been cleared, follow the above section (Replacing a
door where new concrete capping is required) to cap your areaway and install your new door.
Concrete
capping
after
pouring
Level
10
Side Panel
Set form so
capping will
be level
11
Concrete capping
after pouring
Level
Concrete
capping after
pouring
Drill three anchor holes in sill
and insert a slotted round
head screw in each. Screw
one spring nut 2-3 turns on
bottom before embedding
into wet concrete
12
Insert slotted hex head
screw with nylon spacer
and steel washer into
side piece anchor hole.
Screw two spring nuts
onto each bolt as
shown, one holding
spacer in place and one
2-3 turns from the
bottom, before embedding into wet concrete.
After lining up
bottom edges of
both doors, nail
bracing forms on
both sides
Side walls in good condition
Door can be installed on your side
walls if they are structurally solid, have no
loose or crumbling masonry, and have a
uniformly flat and level surface on which to anchor a
door. If your side walls meet these conditions, it is best
to return the Ultra Series door and use a Bilco Sloped
Wall Basement Door. The SLW Door (shown on left)
will simplify your installation by capping over your existing side walls. Note: the SLW door is only available in
prime painted steel construction.
Line up
bottom edges
of both doors
How to correct installation errors or repair minor damage*
Door not shedding water
If your Bilco basement door does not shed water, look for and correct these installation errors.
1. Doors do not fully close. Stand on steps and slowly close each door to see if the bottom edge of one or both is binding on the concrete.
Chip away or rub down excess concrete with mason's stone so flange is not obstructed.
2. Masonry not high enough. The masonry under the Bilco basement door should be 4" higher than the surrounding grade and concrete
should be level so water cannot accumulate in front of the sill.
3. Water seeping between sides and masonry. The unit should be caulked all around the exterior where the sides and masonry meet, as well
as where the unit joins the building wall. If side pieces have been buried in concrete, the unit should be removed and stairwell recapped so
assembly rests on top.
4. Blocked header. Make certain header is clear. Any blockage in this channel will cause water to overflow the header.
Doors Out of Alignment or Doors Not Seated Properly
If doors do not seat themselves properly or bounce slightly when in closed position, and bottom flanges of doors are not obstructed by
concrete in front of sill, loosen all fasteners on hinge and upper and lower motion damper brackets. Close both door leaves until properly
aligned and lying flat on the side panels. Slowly retighten all fasteners, alternating between locations, until all are fully tightened.
*The Bilco basement door is carefully and adequately packed to withstand all normal shipping abuse. This information is provided to
show how easily minor repairs can be made, thus saving the builder or homeowner much unnecessary inconvenience. For
additional information or assistance, please contact our customer service department at (800) 854-9724 (Mon- Fri).
Page 4