1
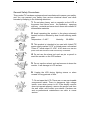
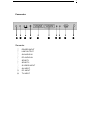
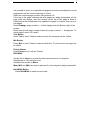
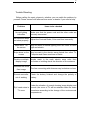
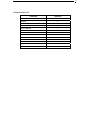
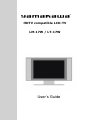
HDTV compatible LCD-TV
LM-17W / LT-17W
User’s Guide
Contents
Enhanced Features
………………………………………………………………3
General Safety Precautions ………………………………………………………4
Control
descripttion …………………………………………………………… 5
Connector
…………………………………………………………………………6
Remote Controller …………………………………………………………………7
Teletext………………………………………………………………………………10
Specifications ………………………………………………………………………12
Trouble Shooting……………………………………………………………………13
Accessories List ……………………………………………………………………14
Enhanced Features
Variable Gain Control Technology
Most LCD-TV use backlight to adjust the brightness of the picture without
considering the adjustment of the contrast level. Our LCD-TV adopts the
“Variable Gain Control” technology to adjust the brightness, which will maintain
the best possible contrast level at any brightness level chose.
3D Digital Chroma Trap Filter
The 3D Digital Chroma Trap Filter realizes the best Y/C separation to
achieve clear color differentiation around edges between different colors.
Improved-Response Circuit
This self-developed circuit improves the response time of the picture and
delivers more clear images.
Noise Reduction Technique
To fix the background noise problem, we have developed a noise
reduction technique that will minis the background noise of the TV signal.
Environmental
Low power consumption will prolong the life of the products. Standby power
consumption at 1W is also a unique design.
SRS Sound Effect
With special circuit design the SRS sound effect is enhanced under the
Nicam Stereo Sound environment and can imitate the SRS effect under the
Mono environment
1
General Safety Precautions
This monitor/TV has been engineered and manufactured to assure your safety,
and You can prevent your safety from serious electrical shock and other
hazards by Keeping in the following attentions.
1.
Do not place heavy, wet or magnetic on the LCD or
the power cord. Never cover the ventilation openings
with any material and never touch them with metallic of
inflammable materials.
2. Avoid operating the monitor in the place extremely
heated, humid or affected by dust. Avoid suffering water
drop.
Temperature : 0~40℃
Humidity : 30~80RH
3. This product is intended to be used with Listed ITE
power supply marked “LPS” or Listed power unit marked
“Class 2”, rated output 12 VDC, 4.0A. Make sure that the
power cord and the other cords are securely connected.
4.
Do not use the sharp tool such as pin or pencil to
avoid the scratch on the LCD surface.
5.
Do not use the solvent such as benzene to clean the
monitor. It will damage to LCD surface.
.
6.
Unplug the LCD during lighting storms or when
unused for long periods of time.
7. Do not open the LCD. There are no user serviceable
components inside. There is dangerous high voltage
inside, even when power is off. If the display monitor
does not operate properly, remove the power cord from
the wall outlet, and contact your dealer. Careless use
and un-professional maintenance are able to cause
serious.
2
Control Description
①
③
②
⑤
④
⑥
①: VOL②: VOL+
③: CH④: CH+
⑤: Menu
⑥: Power
OSD Control:
Step 1:
Start press the ⑤MENU key to enable the OSD MENU.
Step 2:
Press the ③CH- / ④CH+ Move menu Bar to be adjusted.
Step 3:
Press the ①VOL- / ②VOL+ key to adjust the value.
Step 4:
Press ⑤MENU key to exit.
3
Connector
①
②
③
④
Remarks:
①
POWER INPUT
②
LINE OUTPUT
③
AV AUDIO IN
④
PC AUDIO IN
⑤
SCART 1
⑥
SCART 2
⑦
S-VIDEO INPUT
⑧
AV INPUT
⑨
PC INPUT
⑩
TV INPUT
⑤
⑥
⑦
⑧
⑨
⑩
4
5 - Remote control functions
1) POWER : to switch TV on / off.
2) MUTE : to mute or restore the sound.
3) DISPLAY : to display the functions on the screen.
4) INPUT : to activate the LCD on Tuner, AV1 and AV2 mode.
5) SYSTEM : to change the reception system of the multistandard programs.
6) NICAM /A2 : To activate mono or stereo sound.
7) AUTO : automatic channel search.
8) PROG+ :to switch on channel.In MENU mode,enables to move the cursor up.
9) PROG- : to switch on channel.In MENU mode,enables to move the cursor down.
10) VOL- : to decrease the volume and also to modify the cursor direction.
11) VOL+ : to increase the volume and also to modify the cursor direction.
12) MENU :
Press once to adjust the image.
Press twice to adjust channels.
Press three times to get the generalities Menu.
13) EXIT : to exit from the MENU.
14) PAGE UP : to go to the following page.
15) PAGE DOWN :to go to the previous page.
16) TEXT : to display teletext.
17) MIX : combination of image and teletext.
18) HOLD : pause.
19) PICTURE : to return to the image.
20) INDEX : presentation page.
21) SIZE : to enlarge the picture.
22) REVEAL : to display or hide concealed information.
23) SUBPAGE : to return to the page.
24) RED-GREEN-YELLOW-CYAN : direct access to headings.
Remote Controller
Connection steps:
● Make sure that the power of the LCD-TV is off;
● Connect the SCART cable to the corresponding interface on the LCD-TV;
● Turn on the power;
● Use key INPUT to set the video input mode of the LCD-TV to SCART mode;
● You can use key
VOL/VOL
to adjust the volume directly. And you can use
key MUTE on the remote control to turn off the sound;
● You can use key POWER to turn off the LCD-TV.
5
Basic operations of LCD-TV
Turn on the LCD-TV
When the power is on, the indictor light will be orange or green(TV
mode) . Once signal is received,the light will turn green. And it will
remain orange if there is no signal. When set is on ,the input mode
will be displayed on the screen.The indicator Light will be turned off
in standby mode.
note:
The display of the input mode
will disappear in 3 seconds.
Switch among TV/SCART/CVBS/SVIDEO/RGB
Press key INPUT and choose
the input mode you want. When you press key
INPUT each time, TV,SCART, CVBS, SVIDEO,
RGB will appear on the screen in a cycle.
note:
The display of the input mode will disappear in 3 seconds.
Base operation(continue)
Audio control
1、 Press key VOL
to turn up the volume, and there is a bar with numbers on the
screen indicating the loudness.
2、 Press key
VOL to turn down the volume and also there is a bar
the screen indicating the loudness.
with numbers on
Mute :
1、 Press key MUTE to turn off the sound temporarily and a sign will appear
screen.
on the
2、 Press key MUTE again, the mute status will be cancelled and the sign will disappear.
note:
When you press key POWER, the mute status will be canceled automatically.
6
Enter a standby status
1、Press key POWER, the unit will enter a standby status and the indicator light will turn
red at the same time.
2、Press key POWER again, the unit will exit the standby status and the indicator light will
turn orange( no signal inputting ) or green(signal inputting).
Select the TV channel you want
You can use Channel Select on the remote control to select TV channels
directly.
The unit can store 199 channels (1 to 199), and you can press the keys on
the remote control or on the panel to make a selection.
1、Press the relevant key on the remote control if you want
to choose any channel from 0 to 9.(for example: if you
want to choose channel 8, just press the key number 8.)
2、If you want to choose a channel bigger than 9, please
press key -/-- at first, and then press the number you want.
(for example: select channel 45)
(1)、Press key -/--;
(2)
、Press key number 4;
(3)
、Press key number 5。
note
·Use the second way to select a channel, you should finish all steps in 4
seconds.
·Use key -/-- to switch between stations 0~9 and 10~199.
Use key CH ( )/( )on the remote control the panel to select the channel you want.
Press key CH ( ), and the channel will be changed as follows:
2→3→…→198→199→1→2→3…
Press key CH ( ), and the channel will be changed as follows:
3→2→1→199→198→…→4→3
3.Auto search TV proglams
(surely that you have Used key INPUT to set the video input mode to TV model)
You can press key menu on the remote control and use key CH+ or CH- select
Auto Scan, then press key VOL+ begin to search the TV proglams.
When you want to stop the search ,you can press key VOL-.
7
TELETEXT
·Teletext features may vary depending on the
Broadcasting Companies and is only available if the
channel selected is transmitting Teletext.
·Pressing the Picture button whilst in Teletext operation
will switch the current status to TV .
·When in Teletext mode, the volume may still be altered
to the desired listening level, after pressing
VOL/VOL
or MUTE button.
Page Selection
Pages can be selected in two ways:
a. Press Page Up or Page Down to increase or
decrease the page number by one.
b. By entering the page number, using 0-9 on the remote
control.
Size Button
Press Size to change display size : normal => large top => large bottom =>
normal.
Reveal Button
Press Reveal to reveal hidden words e.g. quiz page answers. Press again to
hide.
Red/Green/Yellow/Cyan Buttons
These four buttons correspond to the differently coloured subjects.
Hold Button
Press Hold to remain the Teletext page when viewing multi-page information
Press again to return to automatic page update.
Index Button
Press Index to return to the main index page.
Depending on the way information is transmitted, this may have to be pressed
more than once to return to the main index page.
Subpage Button
When Teletext information exceeds more than one page, it may take some
time for the automatic changing of the sub pages to reach the sub page you
require.
8
It is possible to enter your required sub page and continue watching the normal
programme until the correct sub page is found.
Select the required page number using buttons 0-9.
If the top of the page indicates that sub pages are being transmitted yet the
page does not change, then the number at the top of the page is there to
indicated that the broadcaster has updated the page’s contents, there are no
sub pages.
Press Subpage, page number/---- will be displayed at the Bottom right of the
screen.
Enter desired sub page number before the page number/---- disappears. To
select page 6 enter 0,0,0 and 6.
Text Button
Press Text to enter Teletext mode and only the text page can be visible.
Mix Button
Press Mix to enter Teletext mode and both the TV picture and text page can
be visible.
Picture Button
Press Picture to turn off the Teletext.
NICAM/A2
Usually set to stereo to provide the best reproduction,but if reception
deteriorates or if the service is not
Available then switch to Mono.
Mono(M1) and (M2) can also be selected if a mono signal is being transmitted.
NICAM/A2 Button
Press NICAM/A2 to switch sound mode.
9
Specifications
LCD Panel
Type
TFT-LCD
Screen Size
17 inch
LCD Panel Type
1280 x 768 pixels
Viewing Angle (U/D/L/R)
80/80/80/80
Display Colors
16.7m
Active Area (mm)
370.560x222.336
Contrast Ratio
400:1
Brightness
450cd/m²
Response Time
≤20ms
Resolution
1280 x 768 @ 75Hz
Features
OSD Controls
Brightness/Contrast
Horizontal & Vertical Position
Multilanguage
Program Number
Audio Volume, Tone and Balance Control
Inputs
Audio (Stereo Line in)
Composite Video: adaptive 4H comb filter
S-Video
Scart
TV
TV Tuner
75Ω Aerial Jack
Pre-set channel 100
Systems
PAL BG/DK/I
SECAM BG/DK
NTSC
Teletext
Europe 10 Page
Output
2x3W Speaker
Power
12V DC
10
Trouble Shooting
Before calling for repair, please try whether you can settle the problem by
yourself. Please contact with after-service center or dealer if you need a help.
Problem
Items to be checked
No red lighting
indication
Make sure that the power cord and the other cords are
securely connected.
The color/hue does
Adjust the Contrast Radio, Color and Hue incorrectly.
not show properly
Stain show on
the screen
May be result in disturb lighting from car motor or neon
light and electric.
Stripe show on the
screen
May be result in the electric wave disturb from other TV,
Computer and Game machine or Radio.
Double or multiple
display image
Maybe result in the radio electric wave echo from
mountain or building check the direction of the antenna.
Disturbed the snow
The line connecting with Antenna may be broken or loss.
flare image
Remote controller
out of working
Check the battery finished and change the polarity of
battery.
Under the situation of normal showing image display and
"Zip" made noise in sounds ,the cover of TV will be retractile make the noise
TV cover
sometimes according to the change of the environments
temperatures.
11
Accessories List
Contents
Amount
Power Cable
1
Adapter
1
Audio Cable
1
Remote Controller
1
User’s Manual
1
2x AAA Batteries
1