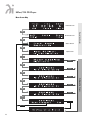
1
581se/781i CD Player
Information&Operation Manual
581se/781i CD Player
581se/781i CD Player
Information&Operation Manual
Table of Contents
Preliminaries
Wadia Digital – A Brief History . . . . . . . . . . . . . . . . . . . . . . . . . . . . . . . . . . . . . . . . . . . . . . . . . . . . . . . . . 3
Installation and Set-up
Unpacking . . . . . . . . . . . . . . . . . . . . . . . . . . . . . . . . . . . . . . . . . . . . . . . . . . . . . . . . . . . . . . . . . . . . . . . . . . . 4
Accessories . . . . . . . . . . . . . . . . . . . . . . . . . . . . . . . . . . . . . . . . . . . . . . . . . . . . . . . . . . . . . . . . . . . . . . . . . 4
Installing the Tip-Toes . . . . . . . . . . . . . . . . . . . . . . . . . . . . . . . . . . . . . . . . . . . . . . . . . . . . . . . . . . . . . . . . 4
Connecting to Your System . . . . . . . . . . . . . . . . . . . . . . . . . . . . . . . . . . . . . . . . . . . . . . . . . . . . . . . . . . . . 4
Connecting to AC Power . . . . . . . . . . . . . . . . . . . . . . . . . . . . . . . . . . . . . . . . . . . . . . . . . . . . . . . . . . . . . . 5
Connecting Directly to a Power Amplifier . . . . . . . . . . . . . . . . . . . . . . . . . . . . . . . . . . . . . . . . . . . . . . . 5
Using with a Preamplifier . . . . . . . . . . . . . . . . . . . . . . . . . . . . . . . . . . . . . . . . . . . . . . . . . . . . . . . . . . . . . 5
Optimizing the Output Level . . . . . . . . . . . . . . . . . . . . . . . . . . . . . . . . . . . . . . . . . . . . . . . . . . . . . . . . . . . . 6
Connecting Digital Sources (Wadia 581ise/781i only) . . . . . . . . . . . . . . . . . . . . . . . . . . . . . . . . . . . . . 6
Choosing a Digital Cable (Wadia 581ise/781i only) . . . . . . . . . . . . . . . . . . . . . . . . . . . . . . . . . . . . . . . . 6
Frequently Asked Questions . . . . . . . . . . . . . . . . . . . . . . . . . . . . . . . . . . . . . . . . . . . . . . . . . . . . . . . . . . . 7
General Operation
Front Panel Controls . . . . . . . . . . . . . . . . . . . . . . . . . . . . . . . . . . . . . . . . . . . . . . . . . . . . . . . . . . . . . . . . . . 8
Display Features . . . . . . . . . . . . . . . . . . . . . . . . . . . . . . . . . . . . . . . . . . . . . . . . . . . . . . . . . . . . . . . . . . . . . 9
Display Functions . . . . . . . . . . . . . . . . . . . . . . . . . . . . . . . . . . . . . . . . . . . . . . . . . . . . . . . . . . . . . . . . . . . . 9
Remote Control Operation . . . . . . . . . . . . . . . . . . . . . . . . . . . . . . . . . . . . . . . . . . . . . . . . . . . . . . . . . . . .11
Playback Options . . . . . . . . . . . . . . . . . . . . . . . . . . . . . . . . . . . . . . . . . . . . . . . . . . . . . . . . . . . . . . . . . . . .13
Theory of Operation . . . . . . . . . . . . . . . . . . . . . . . . . . . . . . . . . . . . . . . . . . . . . . . . . . . . . . . . . . . . . . . . . .14
Menu Screen Map . . . . . . . . . . . . . . . . . . . . . . . . . . . . . . . . . . . . . . . . . . . . . . . . . . . . . . . . . . . . . . . . . . .16
Digital Algorithms . . . . . . . . . . . . . . . . . . . . . . . . . . . . . . . . . . . . . . . . . . . . . . . . . . . . . . . . . . . . . . . . . . . .17
Appendices
Troubleshooting . . . . . . . . . . . . . . . . . . . . . . . . . . . . . . . . . . . . . . . . . . . . . . . . . . . . . . . . . . . . . . . . . . . . .18
Software License Agreement . . . . . . . . . . . . . . . . . . . . . . . . . . . . . . . . . . . . . . . . . . . . . . . . . . . . . . . . .18
Environmental Care . . . . . . . . . . . . . . . . . . . . . . . . . . . . . . . . . . . . . . . . . . . . . . . . . . . . . . . . . . . . . . . . . .18
Technical Specifications . . . . . . . . . . . . . . . . . . . . . . . . . . . . . . . . . . . . . . . . . . . . . . . . . . . . . . . . . . . . . .19
Safety Precautions . . . . . . . . . . . . . . . . . . . . . . . . . . . . . . . . . . . . . . . . . . . . . . . . . . . . . . . . . . . . . . . . . . 20
2
Thank You
All of us at Wadia would like to offer thanks and congratulations to you for purchasing the Wadia 581se/781i
CD Player. We sincerely believe that your Wadia 581se/781i CD Player will bring you many years of musical
pleasure and satisfaction.
While every new owner is anxious to begin listening, we encourage you to take a few minutes to read this manual
and familiarize yourself with the full capabilities of the Wadia 581se/781i CD Player.
If you are in a hurry to begin listening, please read the sections of this manual where the symbol at
right is shown.
!
Wadia Digital – A Brief History
Wadia Digital, founded in 1988, is one of the original companies dedicated to high performance digital audio
reproduction. Wadia was formed by a team of engineers from the Minneapolis based 3M Corporation (Minnesota
Mining and Manufacturing) who shared many years of experience in advanced digital telecommunications
research and development. In the early 1980’s, these engineers became intrigued by the emerging compact disc
technology. Disappointed with the sound quality of early CD players, they examined the workings and designs of
these early components and found them to be unsophisticated when compared with the technology available in
other areas of digital design. In response, they founded Wadia Digital – a company based on the philosophy of
applying advanced technology to improve the performance of digital audio components. Wadia’s first product, the
Wadia 2000 Decoding Computer, was an absolute breakthrough in digital audio. For many discerning listeners, it
proved that Digital Audio was a musically responsive, evolving, and engaging format.
Building on a tradition of excellence, Wadia continues to develop innovative technology; refining, listening,
engineering, and improving along the way. Since the Wadia 2000, new generations of industry-leading designs
have been introduced and embraced by listeners around the world. Each step of the way, Wadia has consistently
raised the standard for performance of Digital Audio playback.
Here is a brief list of the technological innovations the Wadia engineers have pioneered over the past 20 years:
• DigiMaster™ patented algorithm (filter optimized for reproducing music)
• ClockLink™ proprietary jitter reduction technology
• SwiftCurrent™ current to voltage conversion technology
• First outboard Digital-to-Analog converter
• First to apply glass fiber-optics to home audio
• First to recognize jitter as a source of audible distortion
• First to perfect digital volume control
• First high-end CD player competitive with expensive separates
• First company to provide bit perfect digital audio output from the iPod
Although Wadia’s digital expertise and track record exceed those of any audio company, technology alone does
not guarantee musical performance. Wadia designs are born of a delicate balance of technology shaped by a
passion for music.
Wadia is proud to introduce the Wadia 581se/781i CD Player, a breakthrough in sonic performance and value,
and a strong statement of our years of dedication to music.
3
581se/781i CD Player
Installation and Set-up
Unpacking
Use care in unpacking your Wadia 581se/781i CD Player. Inspect it for any shipping damage and call your dealer
immediately if any is found.
!
Do not plug your Wadia 581se/781i CD Player into an AC outlet if you find shipping damage.
We advise saving all packing materials so that the unit can be easily and safely shipped if the need arises.
Accessories
Provided with the Wadia 581se/781i CD Player are the following accessories:
• AC power cord
• Four tip-toes with threaded studs
• Four steel coasters
• RCA/BNC adapter (only included with 581ise and 781i)
• Remote Control
• Two type AAA batteries
!
Do not tip the unit onto the back panel. This can damage input and/or output connectors.
Installing the Tip-Toes
With the unit still positioned on its side, screw one of the tip-toes into the bottom of each corner post.
Position the Wadia 581se/781i CD Player where you would like it to reside in your system. We recommend
choosing a solid, non-resonant, level surface for best performance. If this surface is susceptible to damage,
place one of the steel coasters under each tip-toe.
4
Connecting to Your System
CHECK
VOLTAGE
HERE
!
Check to make sure your Wadia 581se/781i CD Player has been manufactured for operation at your
AC line Voltage. Attempting to use the Player at any voltage other than the specified on the rear of
the unit may damage the unit. Damage caused by improper operation is not covered by warranty. If
the voltage specified is different from your AC voltage, contact your Wadia dealer.
!
Connecting to AC Power
The best performance is obtained when the Wadia 581se/781i CD Player is plugged directly into the wall with
the power cord provided. The Wadia has power conditioning, surge suppression and an extremely sophisticated
overall protection scheme. It should not be necessary to use surge protectors power conditioners or aftermarket
power cords, some of which may degrade the sonic performance. If you wish to experiment with any of these
devices, work closely with your local dealer – and most of all, trust your own ears.
Connecting Directly to a Power Amplifier
Avoid allowing static shocks to be applied to the inputs or outputs. To prevent static shocks, touch any grounded
surface, such as the Wadia 581se/781i CD Player chassis, before connecting or removing a cable. It is unlikely
that a static shock will damage the unit, but it may cause the Wadia 581se/781i CD Player circuitry to “lock-up”
(see Lock-Up under Trouble Shooting).
Inputs and outputs can be safely connected to the Wadia 581se/781i CD Player
1 Before the unit is powered up
2 When the unit is in Relay-Mute mode
We strongly recommend that you use your Wadia 581se/781i CD Player connected directly to your power amplifier.
Even if you purchased your Wadia 581se/781i with the intention of connecting it to your preamplifier, we suggest
that you try direct connection to your amplifier. Many listeners are surprised by the improvement in performance
over even the most expensive preamplifiers.
To connect your Wadia 581se/781i CD Player to a power amplifier, ensure that your power amplifier is turned
off then connect your analog interconnects from the Wadia 581se/781i analog outputs to the amplifier’s inputs.
Using with a Preamplifier
While the Wadia 581se/781i CD Player was designed to be used without a preamplifier, no compromises were
made in its design that will prevent excellent operation in a conventional system with a preamplifier.
When using a preamplifier, set the Wadia 581se/781i CD Player volume control to its maximum level.
5
581se/781i CD Player
Optimizing the Output Level
Best performance is obtained when operating the Wadia Volume Control near the top of its range. If needed, the
maximum output level of your Wadia 581se/781i CD Player can be adjusted to match the overall sensitivity of your
system so that the critical listening will take place with the volume control operating near the top of its range.
The maximum output level of the Wadia 581se/781i CD Player is adjustable by means of a set of internal
switches. The Wadia 581se/781i CD Player is factory set to accommodate the most common range of system
sensitivity. If you find that your typical volume level during critical listening is below 65 on the volume display,
it will be advantageous to use a different setting. To change the output level, consult your dealer.
Connecting to Other Digital Sources (Wadia 581ise/781i only)
The Wadia 581ise/781i CD Player is equipped with digital inputs which can accept digital signals from
any of the established digital formats. (Input 1: Glass-fiber optical, Input 2: Coaxial with BNC connector,
Input 3: Plastic-optical TOSLINK, Input 4: AES/EBU with XLR connector)
The Wadia 581ise/781i CD Player digital inputs will decode any word length up to 24-bit, and any of the standard
digital audio sampling frequencies up to 96kHz.
Choosing a Digital Cable (Wadia 581ise/781i only)
While the Wadia 581ise/781i CD Player supports all currently accepted transmission formats for digital audio,
we recommend using a high quality glass-fiber cable such as the one available from Wadia. Wadia Digital was
the first company to use glass fiber-optic data transmission in digital audio. We have continually improved this
format and believe that it offers the best, most consistent performance of all the available options.
Based on our experience, here is a list of digital interface methods in descending order of performance:
1 Glass optical (as implemented by Wadia)
2 AES/EBU using XLR connector
3 Coaxial cable using BNC connector
4 Coaxial cable using RCA connector
5 TOSLINK plastic-optical cable
The quality of any of these transmission methods depends on the quality of the cable and the sophistication of
the transmitter and receiver. For example, a high quality coaxial cable can outperform a low quality AES/EBU
cable. A high quality AES/EBU cable will outperform a poorly implemented glass optical system.
If you are using a coaxial cable we recommend that you have the cable terminated with a BNC connector. This
will provide higher performance than an RCA connector. Your Wadia 581ise/781i comes with an RCA/BNC
adapter that can be used for experimentation between different types of coaxial cable.
Again, we highly recommend that you take advantage of your dealer’s experience and, most importantly,
trust your ears.
All XLR-type inputs and outputs on the Wadia 581se/581ise/781i CD Player, both digital and analog, use the
standard audio pin configuration:
Pin 1 - Ground
Pin 2 - Positive signal
Pin 3 - Negative signal
6
Frequently Asked Questions
Should I use a Balanced or Unbalanced connection?
If your amplifier has a true balanced input, we recommend you use the balanced analog output from your Wadia
581se/781i CD Player. All things being equal, properly implemented balanced (also called differential) circuitry
sounds better than unbalanced circuitry. The Wadia 581se/781i CD Player is a true balanced design. It generates
the inverted signal in the digital domain and all subsequent processing is done in balanced mode. Your Wadia
581se/781i CD Player is designed to maintain many of the advantages of true balanced design when using the
unbalanced outputs. In addition, the Wadia 581se/781i CD Player output stage is capable of driving both types
of outputs simultaneously.
Why should I bypass the Preamplifier?
A preamplifier is unnecessary when using your Wadia 581se/781i CD Player. The Wadia 581se/781i CD Player
provides all the necessary control functions of a preamp while the signal is still in the digital domain. This
avoids the sonic degradation caused by analog circuitry, switches, and wire. The Wadia 581se/781i CD Player
output stage can drive any power amplifier and any interconnects, even at very long lengths.
Does the Wadia Volume Control compromise resolution?
The Wadia 581se/781i CD Player uses the latest generation of Wadia’s proprietary digital volume control. The
volume level can be varied in the digital domain by means of mathematical manipulation of the signal, eliminating
the distortion and noise that are inevitable with even the best analog volume controls. While conventional
thinking indicates that reducing the volume digitally can sacrifice low level resolution, Wadia has created an
innovative solution. Wadia’s patented digital filtering algorithm produces a 24 bit output rather than the 16 bits
stored on the CD. This high-resolution signal is then used in the computations which in turn reduce the volume
level. This new signal is fed directly to the DAC chips. Through this innovative method, the Wadia 581se/781i
CD Player maintains high resolution even at the lowest volume control settings.
Can I bypass the Wadia Volume Control?
Because the Digital Volume control does not include any analog circuitry, there is none to be bypassed. Even the
mathematical program step that performs the Digital Volume Control calculation is an integral part of the Wadia
DigiMaster filter algorithm and therefore cannot be bypassed. If you do not need the Wadia Volume Control, set
it to its maximum level of 100 on the display.
What about Analog Sources?
In order to fully realize the potential of this type of system, Wadia has a range of Analog-to-Digital converters.
Now it is possible to use analog sources, such as a tuner, tape deck, or even a turntable (in conjunction with a
suitable phono stage) in your system without using a conventional analog preamplifier. Consult your dealer for
more information on the Wadia Analog-to-Digital products.
Should I leave the Wadia 581se/781i CD Player with the power on?
The Wadia 581se/781i CD Player is designed to be left with the power on with no harm or wear to the unit.
All motors and laser circuitry turn off when the unit stops playing. If desired, the front display can be turned off
(see Turning off the Display under Remote Operation). Leaving the power on allows the circuitry to remain in
thermally stable, which provides better performance and longer life. Careful listeners will notice that the sound of
the Wadia 581se/781i CD Player will improve steadily after the unit is powered up. A new unit will undergo more
dramatic changes when power is applied for the first time. If you turn off your Wadia 581se/781i for more than
an hour, you will find that the unit will undergo similar, but less dramatic improvement once power is reapplied.
7
581se/781i CD Player
General Operation
Using the switch located directly above the AC power input, turn the switch to the ON position.
Front Panel Controls
The front panel of the Wadia 581se/781i CD Player features basic controls that allow you to operate basic
functions without using the Remote Control.
Volume Up
Increase the volume by 1/2 dB.
Play/Next Tract
This button will cause the unit
to advance to the next track
and begin playing.
Previous Track
This button will cause the unit
to move to the previous track
and begin playing.
Open/Close/Stop
If the drawer is open, pushing this
button will CLOSE the drawer.
If the CD is playing, pushing this
button will STOP playing.
If the unit is not playing, pushing
this button will OPEN the drawer.
Example:
To open the drawer while the unit
is playing, push the button once to
stop and once more to open.
8
Volume Down
Decreases the volume by 1/2 dB.
Display Features
Track
Volume
Time
Playback Options
Format
Transport Functions
Display Functions
The Wadia 581se/781i CD Player features a large display screen. The top section shows the status of the transport.
The bottom of the display indicates preamp functions, as described below.
Turn-On Screen
This screen is displayed each time the Wadia 581se/781i CD Player is powered-up. After five seconds, the display
will change to the Input screen with internal transport selected, then change again to the Volume screen with
the volume set to Zero. (The screen on the 781i will read “781i CD Player”)
Input Screen
The Input screen shows which input is currently selected. It also indicates whether ClockLink is engaged and the
sampling frequency. If there is no signal connected to the selected input, the display will read, “No Data.”
9
581se/781i CD Player
Status Screen
The Status screen indicates whether the status is Phase Normal or Inverted, and whether the CD was recorded
using digital high frequency emphasis.
Volume Screen
The Volume screen shows the right and left channel volume level. If the output is muted, the display will indicate
this by showing, “MUTE.”
During normal listening, the display will show the default screen
Changing Between Display Screens
Anytime a button is pressed, the Wadia 581se/781i CD Player display automatically switches to the
appropriate screen to display the change. For example, pressing the balance controls on the remote control
will switch the 581se/781i CD Player display to the Balance screen. After five seconds, the display will return
to the Volume screen.
Also, pressing the enter button will cause the display to change to the next screen. Repeatedly pressing the
enter button will cause the display to continue to change to successive screens, as shown in the Menu Screen
Map on page 15.
10
Remote Control Operation
The Wadia 581se/781i CD Player remote control requires two type-AAA batteries, which you will find in the
accessories kit. To install the batteries, remove the battery cover on the back of the remote by sliding it towards
the bottom of the remote. Insert the batteries as indicated on the battery holders.
Program* / Transport Time Mode
Repeat / Single Track Repeat
Direct
Display On/Off
Balance Left/Right
Enter
Mode
Input
0
Drawer Open/Close / Search Back
+ 10** / Phase Invert
Search Forward / Mute
Pause / Play
Volume Up/Down
Stop / Track Back / Track Forward
* Not Active
** Use before selecting any track
greater than nine (see page 12)
Adjusting the Volume
Whenever the volume control buttons are pressed, the volume for both channels will be increased or decreased
by an increment of 1 on the display screen. The range of the volume control is from 1 to 100, with each step
representing 0.5 dB change in volume.
Adjusting the Balance
Relative volume of each channel can be adjusted via the balance control buttons on the remote. Pressing one
of the balance buttons increases the volume on that channel relative to the other by an increment of 0.2 on the
display. This corresponds to a 0.1dB change. The next time the button is pressed the opposite channel is decreased.
This way the overall volume level (the sum of the two channels) remains constant within 0.1 dB.
11
581se/781i CD Player
Selecting an Input
The Wadia 581ise/781i CD Player has four digital inputs, plus the internal drive. Any of the inputs can be selected
from the remote control by pressing the input button. Each time the input button is pressed, the next input is
selected. For example, if you are listening to internal drive and you press the input select, Input 1 will be selected, press it
again, and Input 2 will be selected and so on. After Input 4, the list will begin again with the internal drive.
Whenever you select a new input, the display will switch to the Input Screen.
Format Selection
The Wadia 581se/781i CD Player has CD and SACD playback capabilities. You can toggle between the CD and
SACD layer on a hybrid disc by first pressing the Stop button and then the Mode button.
Inverting Absolute Phase
The Wadia 581se/781i CD Player has the ability to invert absolute phase in the digital domain. Pressing the
Phase Invert button
on the remote control will cause the Wadia 581se/781i CD Player to invert phase;
pressing it again will switch the phase back to normal. If the Wadia 581se/781i CD Player is in Phase Invert
mode, this will be indicated on the Input Screen of the display.
Turning Display On/Off
By pressing the Display On or Off button, the Wadia 581se/781i CD Player display can be turned off completely.
Mute Modes
The Wadia 581se/781i CD Player has two mute modes that are automatically implemented under different
circumstances.
DSP-Software Mute
When the Mute button is pressed on the remote control, the Wadia 581se/781i CD Player’s DSP engine
transmits a stream of zero signal level samples to the DAC section, which results in zero output.
Output-Relay Mute
The Wadia 581se/781i CD Player has mute relay connected between the positive and negative outputs.
When this relay is engaged, it connects the positive output to the negative output, reducing the output to
zero. This relay, which produces an audible click when it engages or disengages, is not in the music signal
path. The mute relay is engaged:
• When the Wadia 581se/781i CD Player detects AC input level below its minimum operating range.
• Each time the Wadia 581se/781i CD Player power switch is turned on.
• When the volume control is set to zero AND the mute button on the remote control is pressed. When
the Wadia 581se/781i CD Player is in either Mute Mode, the Volume Screen will indicate this by displaying
the word, “MUTE.”
+10: Use before selecting any track greater than 9. For example; to select track 23 you should first press the +10
button and then press the 2 button and then the 3 button.
12
TRACK BACK/FORWARD
: Pressing these buttons allows access to the previous or next track on a CD.
SEARCH BACK/FORWARD
: Pressing these buttons allows fast reverse or fast forward access through
a track. Pressing the PLAY button to resumes normal playback.
STOP : Pressing this button while a CD is playing stops PLAY.
PAUSE : Pressing this button, while a CD is playing, suspends PLAY. Pressing the PLAY button will resume
play at the point where the pause button was pressed.
PLAY : After a CD has been loaded, pressing this button plays the CD beginning with the first track
Playback Options
TIME : This button switches between the various time modes on the display. Before play, the total time on
the CD is shown. Once a CD starts to play the elapsed time of that track will be shown. Pressing the button on
the remote control once will cause the display to indicate the remaining time in that track (remain). Pressing this
button on the remote control again will cause the display to indicate the total time elapsed for the entire CD.
Pressing the button another time will cause the display to show the total time remaining for the entire CD. Finally,
pressing the button again will cycle back to the original default setting.
REPEAT : Pressing this button will cause the entire CD to repeat continuously. Pressing this button a second
time will take the transport out of the repeat mode.
SINGLE REPEAT : Pressing this button will repeat a single track continuously. Pressing the single repeat
button a second time will take the transport out of single repeat mode.
13
581se/781i CD Player
Theory of Operation
Using ClockLink with an External Processor
ClockLink eliminates jitter added when the clock signal is recovered from the digital data stream. In a
non-ClockLink system, jitter is added when the clock signal is embedded in the data stream and transmitted
to the DAC. When the clock signal is recovered from the data stream (as shown below), and used to clock
the DAC output, this jitter degrades the sonic performance.
Data and Clock to DAC
Transport
DAC
Jitter Added
Conventional CD Player
With ClockLink, the clock is not recovered from the data. Instead, the master clock is located at the DAC. This
clock signal is transmitted to the transport to keep it synchronized with the DAC. Because the recovered clock is
ignored, any jitter on that signal does not affect the sonic performance.
Data to DAC
Transport
DAC
Clock to Transport
CD Player with ClockLink
The Wadia 581ise/781i CD Player with its digital inputs and outputs can be used with a digital signal processor
such as a digital equalizer. Digital processors allow the signal to be modified without adding analog noise and
distortion. However, digital processors can add jitter, as shown below, causing noticeable sonic degradation.
Data and Clock to DAC
Digital
Output
Digital
Processor
Jitter Added
Transport
Digital
Input
DAC
Conventional CD Player with an External Digital Processor
Using ClockLink with an external processor, the Wadia 581ise/781i CD Player ignores the incoming clock and
uses the master oscillator at the DAC. As a result, jitter added by the external digital processor does not affect
sonic performance..
Data to DAC
Digital
Output
Digital
Processor
Digital
Input
Transport
DAC
Clock to Transport
CD Player with ClockLink with an External Digital Processor
14
Configuring Digital Inputs for ClockLink (Wadia 581ise/781i Only)
To utilize ClockLink with an external processor, the Wadia 581ise/781i CD Player digital inputs must be configured
for ClockLink as described below.
Use the Enter button to scroll through the display menus until you reach the configuration menu for the input
you wish to configure. Shown below is the configuration menu for Input 1:
Use the Volume Up or Volume Down button to change to ClockLink ON. Press the Mute button to save
the configuration.
Note: Using ClockLink with a source other than the internal transport will result in unpredictable,
degraded performance.
!
ClockLink should only be used when using an external processor which is being fed by the 581ise/781i CD
Player internal transport. For all other applications, inputs should be configured with ClockLink OFF.
The Wadia 581ise/781i CD Player has several features to prevent ClockLink from being engaged when it should
not be. First, whenever the input signal is other than 44.1 kHz sampling frequency, the Wadia 581ise/781i CD
Player will automatically revert to recovered clock mode. Second, if the internal transport is not running, the
Wadia 581ise/781i CD Player will revert to recovered clock mode.
Note: All inputs on the Wadia 581ise/781i are factory configured for ClockLink OFF.
!
ClockLink Status Indication
When the Wadia 581ise/781i CD Player is operating in ClockLink mode, the Input screen will indicate as
shown below:
Even if an input is configured for ClockLink, the Status screen will only indicate ClockLink if it is currently
engaged. For example, if an input is configured for ClockLink, and the Wadia 581ise/781i CD Player’s internal
transport is turned off, then the display will not indicate ClockLink.
15
581se/781i CD Player
Menu Screen Map
Volume Screen
Enter
Enter
Status Screen
Operation Screens
Balance Screen
Enter
Input Screen
Enter
Mute
Enter
Mute
Enter
Mute
Mute
Enter
Mute
Enter
Y+Enter
N+Enter
16
Configuration Screens
Enter
Digital Algorithms
In the Wadia 581se/781i CD Player there are three user-selectable digital algorithms that can be used to optimize
the sonic performance based on system matching and personal musical priorities.
The three algorithms in the 581se/781i CD Player all upsample to 32x the input rate (at 24 bit/1.4112 MHz DAC
sample rate), but differ in their time and frequency domain characteristics. They are:
Algorithm A Digimaster v2.5. Wadia’s classic time-domain interpolation algorithm delivers a robust sound
with extraordinary image Focus and re-creation of recorded space.
Algorithm B Provides a more extended top end than Algorithm A, with superior time-domain performance
compared to conventional CD filters.
Algorithm C Retains the high frequency extension and superior detail resolution of Algorithm B, but with a
more relaxed presentation overall.
The selected algorithm is used for 44.1 kHz (CD) and 48 kHz sources, either from the internal transport or any of
the four digital inputs. For 88.2 kHz, 96 kHz and DSD (SACD) sources, Digimaster v2.5 is always used as it provides
the best performance at high-sample rates.
We encourage you to become familiar with the unique sonic performance of each of these algorithms and enjoy
the one that brings you optimum musical pleasure.
Selecting an Algorithm
To change the digital processing algorithm, press the Enter button on the remote control repeatedly to bring up
this configuration screen:
The selected algorithm is shown on the second line of the display. Use the Up and Down Volume buttons
to scroll to the desired algorithm, then either press the Mute button or the Enter button to navigate to the ‘Save
Changes?’ screen and choose ‘Yes’. The display will indicate ‘CONFIGURATION STORED’ and the output of the
581se/781i CD Player will mute for 5-10 seconds while the selected algorithm is downloaded to the two
DSP computers.
Performing an Algorithm Comparison
When comparing processing algorithms it is important to adjust the volume to compensate for the different
gains of the algorithms. Without this adjustment the one which is louder will usually sound better in a short-term
A/B comparison.
In the 581se/781i CD Player, algorithm A is approximately 1db higher output level than B and C (which are within
0.1 db of each other). To compensate for this higher output level, increase the indicated volume setting by 2
units for algorithms B and C when comparing them to A.
17
581se/781i CD Player
Appendices
Enabling/Disabling Digital Outputs
The Wadia 581se/781i CD Player is designed in such a way that the unused digital outputs can be disabled. This
can result in slightly better overall performance. See your dealer for information about these internal adjustments.
TroubleShooting: Lock-up
If the Wadia 581se/781i CD Player experiences a powerful static shock or sudden AC surge, it is possible to
“lock-up” the computer circuitry. A locked-up computer may result in erratic display, no output, and no response
to remote commands.
If your Wadia 581se/781i CD Player should lock-up, unplug the AC cord. Wait at least 30 seconds before
replugging in the unit. If the unit still does not operate normally, contact your dealer.
Software License Agreement
IMPORTANT! THIS AGREEMENT SETS FORTH TERMS AND CONDITIONS FOR THE DigiMaster SOFTWARE.
The DigiMaster software is copyrighted and patented. It is the property of Wadia Digital.
Title to Licensed Software is not transferred to the customer. The customer is granted a nonexclusive license to
use the Licensed Software only on this Wadia 581se/781i CD Player.
At Wadia’s sole Discretion, Wadia may provide customer with updates of the Licensed Software. Wadia retains
the right to provide the Licensed Software updates for a fee. The customer may refuse to accept such Licensed
Software updates.
Environmental Care
Wadia makes every effort to be an environmentally conservative company. We appreciate it if our customers
join our efforts. Please dispose of batteries in a manner that is environmentally responsible.
18
Technical Specifications
Decoding Software
3 user selectable upsampling algorithms including DigiMaster v2.5 with
proprietary DSD processing
Digital Processing Capability
1 - 24 Bits
Digital Resolution
21 Bits
Analog Outputs
One pair of Balanced (XLR); One pair of Unbalanced (RCA). Both can be
used simultaneously
Digital Outputs
(Wadia 581ise/781i only)
1 - Glass Fiber-Optic (ST), 1 - AES/EBU (XLR), 1 - SP/DIF (BNC),
1 - Plastic Optical (Toslink)
Digital Inputs
(Wadia 581ise/781i only)
1 - Glass Fiber-Optic (ST), 1 - AES/EBU (XLR), 1 - SP/DIF (BNC),
1 - Plastic Optical (Toslink)
Output Impedance
51 ohms
Power Consumption
58 watts
Weight
55 lb. (25kg) Unit itself; 62 lb. (28kg) Shipping Weight
Dimensions
17˝ Wide, 16.5˝ Deep, 7˝ High (including spiked feet)
19
581se/781i CD Player
Safety Precautions
!
! IMPORTANT SAFETY PRECAUTIONS !
To get the best performance from your Wadia 581se/781i CD Player, and for your own safety, please read and
follow these important safety instructions.
1 Before operating the Wadia 581se/781i CD Player please read all operating and safety instructions.
2 Never place the Wadia 581se/781i CD Player near heat sources such as radiators, fireplaces, stove, or other
appliances that produce heat. Avoid placing the Wadia 581se/781i CD Player where it will be subject to
direct sunlight or low temperatures.
3 This product is equipped with a three prong AC power cord which includes an earth ground connection. To
prevent shock hazard, all three connectors must always be used. If your electrical outlets will not accept this
type of plug, an adapter may be purchased. If an adapter is necessary, be sure it is an approved type and
that it is used properly, supplying an earth ground. If you are not sure of the integrity of your home’s electrical
system, contact a licensed electrician for assistance.
4 AC extension cords are not recommended for use with this product. If an extension cord must be used, be
sure it is an approved type and has sufficient current carrying capacity to power this product.
5 Before cleaning the Wadia 581se/781i CD Player, always disconnect the power supply cord. Use a soft cloth
and, if necessary, dampen with plain water. Never apply water, or any other cleaner, directly to the chassis.
6 If you smell smoke, or an abnormal smell, immediately unplug the Wadia 581se/781i CD Player from the
power supply and contact your Wadia dealer.
7 Unplug unit if it becomes wet.
8 Replace fuse only with the exact type originally included.
100 volt: (1) 1 amp Slo-Blo
120 volt: (1) 1 amp Slo-Blo
220 volt: (2) 1/2 amp Slo-Blo
240 volt: (2) 1/2 amp Slo-Blo
9 THERE ARE NO USER SERVICEABLE PARTS INSIDE THE WADIA 581se/781i CD PLAYER!
• Do not attempt to repair or modify your Wadia 581se/781i CD Player.
• All service should be performed by qualified service personnel.
• Do not open the unit while it is attached to the AC outlet.
www.wadia.com