1
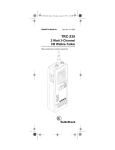
UBC73XLT Paper OM.fm Page 1 Monday, May 14, 2007 9:13 AM
UBC73XLT
UBC73XLT
SCANNER
OWNER’S
100 Channels
6 Pre-Programmed Service Banks
with Close CallTM RF Capture
OWNER’S MANUAL
UBC73XLT Paper OM.fm Page 2 Monday, May 14, 2007 9:13 AM
Precautions
Before you use this scanner, please read and
Precautions
observe the following.
EARPHONE WARNING!
Use only a genuine Uniden earphone. An incorrect
earphone may be hazardous to your hearing.
Turn down volume before connecting the earphone
and then adjust volume to suit.
WARNING!
Uniden does not represent this unit to be waterproof. To reduce the risk of fire or electrical shock,
do not expose this unit to rain or moisture.
Trademarks used throughout this manual are the
property of their respective holders.
Precautions
2
UBC73XLT Paper OM.fm Page 3 Monday, May 14, 2007 9:13 AM
UBC73XLT Controls and Display
Antenna
UBC73XLT
Controls and Display
(see “Connecting the
Antenna” on Page 20)
Headphone Jack
Squelch
Volume
Display
Keypad
UBC73XLT
DC 6V
Jack
Power
UBC73XLT Controls and Display
3
UBC73XLT Paper OM.fm Page 4 Monday, May 14, 2007 9:13 AM
Contents
Contents
Introduction ............................................................ 6
Feature Highlights .................................................. 8
About This Manual ............................................ 9
Understanding Scanning ..................................... 11
What is Scanning? .......................................... 11
What is Searching? ......................................... 11
Conventional Scanning ................................... 11
Where To Obtain More Information ................. 13
Included With Your Scanner ................................ 14
Setting Up Your Scanner ..................................... 15
Using Internal Batteries ................................... 15
Using DC power .............................................. 19
Using AC Power .............................................. 20
Connecting the Antenna .................................. 20
Connecting an Earphone/Headphone ............. 21
Connecting an Extension Speaker .................. 21
Attaching the Belt Clip ..................................... 22
About Your Scanner ............................................ 23
A Look At The Keypad .................................... 24
A Look At The Display ..................................... 27
Understanding Banks ...................................... 29
Operation ............................................................. 30
Turning On The Scanner and
Setting Squelch ............................................... 30
Storing Known Frequencies Into Channels ..... 30
Searching For and Temporarily
Storing Active Frequencies ............................. 31
Scanning the Stored Channels ....................... 32
Manually Selecting a Channel ......................... 33
Special Features .................................................. 34
Close CallTM RF Capture Technology .............. 34
Chain Search .................................................. 38
Direct Entry Search ......................................... 40
Search Skip Memory ....................................... 42
Delay ............................................................... 43
Turning Channel-Storage Banks
On and Off ...................................................... 44
Locking Out Channels ..................................... 45
Contents
4
UBC73XLT Paper OM.fm Page 5 Monday, May 14, 2007 9:13 AM
Priority ............................................................. 45
Using Keylock ................................................. 46
Using the Display Backlight ............................. 46
Troubleshooting ................................................... 47
Resetting the Scanner ..................................... 49
Care and Maintenance ........................................ 50
General Use .................................................... 50
Location ........................................................... 50
Cleaning .......................................................... 50
Repairs ............................................................ 51
Birdies ............................................................. 51
Specifications ....................................................... 52
Optional Accessories ........................................... 54
One Year Limited Warranty ................................. 55
Contents
5
UBC73XLT Paper OM.fm Page 6 Monday, May 14, 2007 9:13 AM
Introduction
Introduction
Thank you for purchasing a Uniden UBC73XLT
Handheld Scanner. The scanner is versatile,
compact, and easy to use. In addition to its
standard scanning features, your scanner also
includes Close CallTM RF capture technology
designed to help you detect and identify strong local
radio signals in your area.
You can program up to 100 frequencies into the
scanner's memory. The scanner lets you scan
transmissions and is preprogrammed with service
banks for your convenience. You can quickly search
those frequencies most commonly used by police
and other agencies, without tedious and
complicated programming.
Use your scanner to monitor:
•
Police
•
Marine band
•
Air band
•
AM CB
•
UHF CB
•
Railroad
Introduction
6
UBC73XLT Paper OM.fm Page 7 Monday, May 14, 2007 9:13 AM
This table lists the frequency ranges, default
frequency step, default mode (AM or FM), and type
of transmissions you can hear for each range.
Frequency Range Step Mode Transmission
(MHz)
(kHz)
25.0-27.995
5
AM
Citizens Band/
Business Band
28.0-69.995
5
FM
10 Meter
Amateur Band
70.0-88.0
12.5
FM
6 Meter
Amateur Band
108.0-136.9875
12.5
AM
Aircraft Band
137.0-147.995
5
FM
2 Meter
Amateur Band
148.0-174.0
12.5
FM
VHF High Band
400.0-512.0
6.25
FM
Land Mobile Band
Introduction
7
UBC73XLT Paper OM.fm Page 8 Monday, May 14, 2007 9:13 AM
Feature Highlights
Feature Highlights
Close CallTM RF Capture Technology - you can set
the scanner so it detects and provides information
about nearby radio transmissions. See “Close
CallTM RF Capture Technology” on Page 34 for
more information.
Pager Screen - lets you set the scanner so it does not
detect pager frequencies during Close Call search.
Chain Search - lets you enter personal search bands
in 10 locations and search all locations in a chain of
frequency bands.
Triple-Conversion Circuitry - virtually eliminates
any interference from IF (intermediate frequency)
images, so you hear only the selected frequency.
Channel-Storage Banks - the scanner has 10 banks.
You can store up to 10 frequencies into each bank
(for a total of 100 frequencies), so you can more
easily identify calls.
Two-Second Scan Delay - delays scanning for about 2
seconds before moving to another channel, so you can
hear more replies that are made on the same channel.
Lock-Out Function - lets you set your scanner to
skip over specified channels or frequencies when
scanning or searching.
Priority Channels - lets you program one channel
in each bank (10 in all) and then have the scanner
check that channel every 2 seconds while it scans
the bank, so you do not miss transmissions on those
channels.
Six Service Banks - frequencies are preset in
separate police, railroad, aircraft, marine, UHF CB,
and AM CB banks, to make it easy to locate specific
types of calls.
Police, railroad and AM CB preset frequencies in
the service bank are valid for Australia ONLY.
Aircraft, Marine and UHF CB preset frequencies
are valid for both Australia and New Zealand.
Feature Highlights
8
UBC73XLT Paper OM.fm Page 9 Monday, May 14, 2007 9:13 AM
Key Lock - lets you lock the scanner's keys to help
prevent accidental changes to the scanner's
programming.
Direct Access - lets you directly access any
channel.
Display Backlight - makes the scanner easy to
read in low-light situations.
Flexible Antenna with BNC Connector - provides
adequate reception in strong signal areas and is
designed to help prevent antenna breakage.
Or, you can connect an external antenna for better
reception.
Memory Backup - keeps the frequencies stored in
memory for an extended time if the scanner loses
power.
Three Power Options - let you power the scanner
using internal batteries, external DC power using the
included cigarette lighter charger or external AC
power using an optional AC adapter.
Key Confirmation Tones - the scanner sounds a
tone when you perform an operation correctly, and
an error tone if you make an error.
Battery Low Alert - warns you when battery power
gets low.
About This Manual
The screen displays used in this manual are
representations of what might appear when you use
your scanner. Since what you see depends on the
frequencies for your area and the settings you select,
you might notice some differences between what is
in this manual and what appears on your scanner.
Feature Highlights
9
UBC73XLT Paper OM.fm Page 10 Monday, May 14, 2007 9:13 AM
To get the most from this manual, review the
contents to become familiar with the basic functions
available. If you are new to scanning, be sure to
read “Understanding Scanning” on Page 11 for a
quick background on the technology behind the
hobby. The first thing you’ll need to do is install
batteries in the scanner. Then you need to connect
the included antenna to the scanner. See “Using
Internal Batteries” on Page 15 and “Connecting the
Antenna” on Page 20 if you need any help doing this.
Feature Highlights
10
UBC73XLT Paper OM.fm Page 11 Monday, May 14, 2007 9:13 AM
Understanding Scanning
This section providesScanning
you with background on how
Understanding
scanning works. You don’t really need to know all of
this to use your scanner, but some background
knowledge will help you get the most from your
UBC73XLT.
What is Scanning?
Unlike standard AM or FM radio stations, most twoway communications do not transmit continuously.
Your UBC73XLT scans programmed channels until
it finds an active frequency, then stops on that
frequency and remains on that channel as long as
the transmission continues. When the transmission
ends, the scanning cycle resumes until the scanner
receives another transmission.
What is Searching?
The UBC73XLT can search for active frequencies.
This is different from scanning because you are
searching for frequencies that have not been
programmed into the scanner. When you select
frequency bands to search, the scanner searches
for any active frequency within the lower and upper
limits you specify. When the scanner finds an active
frequency, it stops on that frequency as long as the
transmission lasts. If you think the frequency is
interesting, you can program it into one of the banks.
If not, you can continue to search.
Conventional Scanning
Conventional scanning is a relatively simple concept.
Each group of users in a conventional system is
assigned a single frequency (for simplex systems) or
two frequencies (for repeater systems). Any time one
of them transmits, their transmission always goes
out on the same frequency. Up until the late 1980’s
Understanding Scanning
11
UBC73XLT Paper OM.fm Page 12 Monday, May 14, 2007 9:13 AM
this was the primary way that radio systems
operated.
Even today, there are many 2-way radio users who
operate using a conventional system:
•
•
•
•
•
Aircraft
Amateur radio
PRS (UHF CB) users
Broadcast AM/FM/TV stations
Many business radio users
When you want to store a conventional system, all
you need to know is the frequencies they operate
on. When you are scanning a conventional system,
the scanner stops very briefly on each channel to
see if there is activity. If there isn’t, the scanner
quickly moves to the next channel. If there is, then
the scanner pauses on the transmission until it is over.
Simplex Operation
Simplex systems use a single frequency for both
transmit and receive. Most radios using this type of
operation are limited to line-of-sight operation. This
type of radio is frequently used at construction job
sites, and with inexpensive consumer radios such as
PRS (UHF CB) radios. The range is typically 1.5-12
km, depending upon the terrain and many other factors.
Repeater Operation
Repeater systems use two frequencies: one transmits
from the radio to a central repeater; the other
transmits from the repeater to other radios in the
system. With a repeater-based system, the repeater
is located on top of a tall building or on a radio tower
that provides great visibility to the area of operation.
When a user transmits (on an input frequency), the
signal is picked up by the repeater and retransmitted
(on an output frequency). The user’s radios always
Understanding Scanning
12
UBC73XLT Paper OM.fm Page 13 Monday, May 14, 2007 9:13 AM
listen for activity on the output frequency and
transmit on the input frequency. Since the repeater
is located very high, there is a very large line of
sight. Typical repeater systems provide coverage
out to about a 40 km radius from the repeater
location.
Where To Obtain More Information
By itself, this manual really only provides part of
what you need to know to have fun scanning – how
to program and use the scanner.
Information On The Internet
The Internet is a great source for current frequencies
and information about scanning.
Many web sites have lists of frequencies for your area.
You can use a search engine to find and use them.
Make a list of the agencies you want to listen to,
then look up the frequencies and systems used by
those agencies.
You may visit the Uniden websites listed below for
information regarding scanner frequencies. Click on
'Products' from the main page and then click on
'Scanning Receivers'.
For more information about Uniden and our other
products, visit http://www.uniden.com.au and
http://www.uniden.co.nz.
Understanding Scanning
13
UBC73XLT Paper OM.fm Page 14 Monday, May 14, 2007 9:13 AM
Included With Your Scanner
Included With Your Scanner
UBC73XLT
SCANNER
100 Channels
6 Pre-Programmed Service Banks
with Close CallTM RF Capture
Belt Clip
OWNER’S MANUAL
Owners Manual
Scanner and
Antenna
Frequency CD
Earphone
Cigarette Lighter
Charger
Note: If any of these items are missing or damaged,
contact your place of purchase.
Included With Your Scanner
14
UBC73XLT Paper OM.fm Page 15 Monday, May 14, 2007 9:13 AM
Setting Up Your Scanner
These guidelines
willScanner
help you install and use your
Setting
Up Your
new scanner:
•
If your scanner receives interference or electrical
noise, move the scanner or its antenna away
from the source.
•
To improve the scanner’s reception, use an
optional external antenna designed for multiband coverage. (You can purchase this type of
antenna at a local electronics store). If the
optional antenna has no cable, use 50-70 ohm
coaxial cable for lead-in. A mating plug might be
necessary for the optional antennas.
•
Use an included earphone or mono headset with
proper impedance for private listening. Read the
precautions on the inside front cover of this
Owners Manual.
•
Do not use the scanner in high-moisture
environments such as the kitchen or bathroom.
• Avoid placing the scanner in direct sunlight or
near heating elements or vents.
Using Internal Batteries
You can power your scanner using two alkaline or
rechargeable AA batteries (not supplied).
Using Non-Rechargeable Batteries
1. Make sure the power is turned off.
2. Slide the battery compartment cover.
3. Before you install alkaline or any other nonrechargeable batteries, use a pointed object
such as a ballpoint pen to set REG. ALK. BATT./
NI-MH BATT. inside the compartment to REG.
ALK. BATT..
Setting Up Your Scanner
15
UBC73XLT Paper OM.fm Page 16 Monday, May 14, 2007 9:13 AM
WARNING!
Set REG. ALK. BATT./NI-MH BATT. to NI-MH BATT.
only if you are using rechargeable batteries.
Never attempt to recharge non-rechargeable
batteries. Non-rechargeable batteries can get hot or
burst if you try to recharge them.
4. Install two batteries in the compartment as
indicated by the polarity symbols (+ and -)
marked inside.
Setting Up Your Scanner
16
UBC73XLT Paper OM.fm Page 17 Monday, May 14, 2007 9:13 AM
Cautions:
•
•
•
Use only fresh batteries of the required size and
recommended type.
Always remove old or weak batteries. Batteries
can leak chemicals that destroy electronic
circuits.
Do not mix old and new batteries, different types
of batteries (standard, alkaline, or rechargeable),
or rechargeable batteries of different capacities.
5. Replace the cover.
6. When
flashes and the scanner beeps
every 15 seconds, replace both batteries.
Using Rechargeable Batteries
You can also use two rechargeable batteries to
power your scanner. Before you use Ni-MH or Ni-Cd
batteries, you must charge them.
The scanner has a built-in circuit that lets you
recharge Ni-MH or Ni-Cd batteries while they are in
the scanner. To charge the batteries, set
REG. ALK. BATT./NI-MH BATT. inside the battery
compartment to NI-MH BATT., install the batteries in
the scanner, and connect the included external DC
adapter or optional external AC adapter to the scanner's DC 6V jack (see “Using DC power” on
Page 19 and “Using AC Power” on Page 20).
Setting Up Your Scanner
17
UBC73XLT Paper OM.fm Page 18 Monday, May 14, 2007 9:13 AM
WARNING!
Do not connect either adapter to the scanner if nonrechargeable batteries (such as alkaline batteries) are
installed in the scanner and REG. ALK. BATT./NI-MH
BATT. is set to NI-MH BATT., or if you are unsure of
the switch’s position. Non-rechargeable batteries will
get hot and can even burst if you try to recharge them.
Before you use Ni-MH or Ni-Cd batteries for the first
time, charge them for 16 hours to bring them to a full
charge.
Discharged batteries take about 16 hours to fully
recharge.
Notes:
•
Ni-MH batteries last longer and deliver more
power if you occasionally let them fully
discharge. To do this, simply use the scanner
until it beeps every 15 seconds and
flashes.
•
To prevent damage to Ni-MH batteries, never
charge them in an area where the temperature is
above 113°F (45°C) or below 40°F (4°C).
•
If you connect an external power source to the
scanner with REG. ALK. BATT./NI-MH BATT.
set to REG. ALK. BATT., the scanner does NOT
charge the batteries. Make sure that you use the
correct batteries and set REG. ALK. BATT./
NI-MH BATT. to the correct position when you
connect an external power source.
•
For longer operation, you can also use highcapacity Ni-MH batteries to power the scanner.
This type of battery takes longer to recharge.
You can get high-capacity Ni-MH batteries at
your local electronics store.
Setting Up Your Scanner
18
UBC73XLT Paper OM.fm Page 19 Monday, May 14, 2007 9:13 AM
Using DC power
To power the scanner from a vehicle's 9.0-29V
power source (such as a cigarette-lighter socket),
you need a cigarette-lighter adapter.
To connect a DC cigarette-lighter power cable, insert
its barrel plug into the DC 6V jack on the side of the
scanner, then plug the power cable into your vehicle's cigarette lighter socket.
Note: If you use a cigarette-lighter power cable and
your vehicle's engine is running, you might hear
electrical noise from the engine while scanning. This
is normal.
Caution: DC 6 V Jack can use a power source that
supplies 9.0-29V DC at least 800mA.
You must use a power source that supplies 9.0-29V
DC and delivers at least 800mA. Your standard 9.029V car battery should be sufficient. The cord connector's center tip must be set to positive and its
plug must fit the scanner's DC 6 V jack. The supplied DC power cord meets these specifications.
Using a power cord that does not meet these specifications could damage the scanner or the adapter.
•
Always connect the adapter or DC power cord to
the scanner before you connect it to the power
source. When you finish, disconnect the adapter
or DC power cord from the power source before
you disconnect it from the scanner.
•
For added safety and to protect your scanner, disconnect the cable from your
vehicle battery's negative (-)
terminal before you begin.
Setting Up Your Scanner
19
UBC73XLT Paper OM.fm Page 20 Monday, May 14, 2007 9:13 AM
Using AC Power
You can power the scanner using an optional 6V,
500 mA AC adapter.
To use the scanner on AC power, plug the AC adapter
into DC 6V on the side of the scanner then plug the
other end into a standard AC outlet.
If rechargeable batteries are installed and
REG. ALK. BATT./NI-MH BATT. is set to NI-MH BATT.,
the adapter powers the scanner and recharges the
installed batteries at the same time.
Connecting the Antenna
To attach the supplied flexible antenna to the
connector on the top of your scanner, align the slots
around the antenna's connector with the tabs on the
scanner's BNC connector. Then slide the antenna's
connector down over the scanner's connector and
rotate the antenna connector's outer ring clockwise
until it locks into place.
Setting Up Your Scanner
20
UBC73XLT Paper OM.fm Page 21 Monday, May 14, 2007 9:13 AM
Connecting an Optional Antenna
The scanner's BNC connector makes it easy to
connect a variety of optional antennas, including an
external mobile antenna or outdoor base station
antenna.
Note: Always use 50-ohm, RG-58, or RG-8, coaxial
cable to connect an outdoor antenna. If the antenna
is over 15 metres from the scanner, use RG-8 lowloss dielectric coaxial cable. You can get a BNC
adapter at your local electronics store.
Connecting an Earphone/Headphone
UBC73XLT
For private listening, you can plug a 3.5 mm miniplug earphone or mono headphones (not supplied)
into the headphone jack on top of your scanner. This
automatically disconnects the internal speaker.
Connecting an Extension Speaker
In a noisy area, an optional extension speaker,
positioned in the right place, might provide more
comfortable listening. Plug the speaker cable's 3.5mm mini-plug into your scanner's jack.
WARNING!
If you connect an external speaker to the scanner's
headphone jack, never connect the audio output line
to a power supply and ground. This might damage
the scanner.
Setting Up Your Scanner
21
UBC73XLT Paper OM.fm Page 22 Monday, May 14, 2007 9:13 AM
Attaching the Belt Clip
To make your scanner easier to carry when you are
on the go, use the supplied belt clip. Use a Phillips
screwdriver and the supplied screws to attach the
clip to the scanner.
Setting Up Your Scanner
22
UBC73XLT Paper OM.fm Page 23 Monday, May 14, 2007 9:13 AM
About Your Scanner
We use aYour
few simple
terms in this manual to explain
About
Scanner
the features of the scanner. Familiarize yourself with
these terms and the scanner's features, and you can
put the scanner to work for you right away. Simply
determine the type of communications you want to
receive, then set the scanner to scan those
communications.
A frequency, expressed in kHz or MHz, is the tuning
location of a station. To find active frequencies, you
use the search function or refer to a frequency
reference.
Besides searching within a selected frequency
range, you can also search your scanner's service
banks. Service banks are preset groups of
frequencies categorized by the type of services that
use those frequencies.
When you search and find a desired frequency, you
can store it into a programmable memory location
called a channel. Channels are grouped into
channel-storage banks. The scanner has 10
channel-storage banks and each bank has 10
channels. You can scan the channel-storage banks
to see if there is activity on the frequencies stored
there.
About Your Scanner
23
UBC73XLT Paper OM.fm Page 24 Monday, May 14, 2007 9:13 AM
A Look At The Keypad
UBC73XLT
Your scanner's keys have various functions labeled
on the key tops and below the keys.
To select the function labeled on a key, simply press
the key. To select the function labeled below a key,
first press Func then release it. F appears on the
display. Then press the next key in the function key
sequence while F appears. F appears or
disappears as you press Func.
If your scanner's keys seem confusing at first, the
following information should help you understand
each key's function.
Key Name
Description
Hold/
Hold – Holds the scan or the
frequency search. Press and
hold Hold to increment
channels continuously.
Func +
– Switches between
the three Close Call modes.
About Your Scanner
24
UBC73XLT Paper OM.fm Page 25 Monday, May 14, 2007 9:13 AM
Key Name
Description
Scan/Src
Scan – Scans the stored
channels.
Func + Src – Starts chain
search or resumes searching.
/
– Turns the display
backlight on or off.
Func +
– Locks and
unlocks the keypad.
Func
Lets you use various functions
by pressing this key in
combination with other keys.
Press and hold for more than
2 seconds to turn the scanner
on or off.
1/Pri
1 – Enters a 1.
Func + Pri – Sets and turns the
priority function on or off.
2/
2 – Enters a 2.
– Selects the search
Func +
direction.
3/Svc
3 – Enters a 3.
Func + Svc – Sets and turns
the service search function on.
4
4 – Enters a 4.
5/Dly
5 – Enters a 5.
Func + Dly – Sets and turns the
delay function on or off.
About Your Scanner
25
UBC73XLT Paper OM.fm Page 26 Monday, May 14, 2007 9:13 AM
Key Name
Description
6/PSrc
6 – Enters a 6.
Func + PSrc – Sets and turns
program band select mode on
or off.
7
7 – Enters a 7.
8/
8 – Enters an 8.
Func +
– Selects the search
direction.
9
Enters a 9.
/Clr
– Enters a decimal point.
Clr – Clears a frequency you
entered by mistake.
0/L/O
0 – Enters a 0.
Func + L/O – Lets you lock out
a selected channel or skip a
specified frequency.
E/Pgm
E – Enters frequencies into
channels.
Func + Pgm – Lets you
program the frequency.
About Your Scanner
26
UBC73XLT Paper OM.fm Page 27 Monday, May 14, 2007 9:13 AM
A Look At The Display
UBC73XLT
The display has indicators that show the scanner's
current operating status. The display information
helps you understand how your scanner operates.
BANK - appears with numbers (1-10).
- appears when you lock the keypad.
F - appears only when the function mode is on.
PGM - appears while you store a frequency into a
channel.
SRCH - appears during search mode.
or
- appears during search mode.
- alerts you when the battery power gets low.
- appears when the scanner is set to a Close Call
mode.
P - appears when you select a priority channel.
SCN - appears when you scan channels.
About Your Scanner
27
UBC73XLT Paper OM.fm Page 28 Monday, May 14, 2007 9:13 AM
HOLD - appears during scan hold mode and search
hold mode.
L/O - appears when you manually select a channel
you locked out or a skip frequency.
DLY - appears when you select a delay.
PRI - appears when the priority feature is turned on.
POL, rlr, AIR, MRN, ucb, or Acb - appears along
with an indicator that shows the current service bank
during a service search.
ALT - appears when the Close Call alert beep
sounds while the Close Call function is on.
About Your Scanner
28
UBC73XLT Paper OM.fm Page 29 Monday, May 14, 2007 9:13 AM
Understanding Banks
Service Banks
The scanner is preprogrammed with all the
frequencies allocated to the police, railroad, marine,
aircraft, UHF CB, and AM CB services.
Police, railroad and AM CB preset frequencies in
the service bank are valid for Australia ONLY.
Aircraft, Marine and UHF CB preset frequencies
are valid for both Australia and New Zealand.
Channel-Storage Banks
To make it easier to identify and select the channels
you want to listen to, the 100 channels are divided
into 10 channel-storage banks. Each bank has 10
channels. Use each channel-storage bank to group
frequencies, such as those for the railroad, police
department, or aircraft.
For example, the police department might use eight
frequencies in your town while the railroad uses an
additional four. You could program the eight police
frequencies starting with Channel 1 (the first channel
in bank 1), and program the railroad frequencies
starting with Channel 11 (the first channel in bank 2).
About Your Scanner
29
UBC73XLT Paper OM.fm Page 30 Monday, May 14, 2007 9:13 AM
Operation
Operation
Turning On The Scanner and
Setting Squelch
Note: Make sure the scanner's antenna is
connected before you turn it on.
1. Turn Squelch fully counterclockwise.
2. Press and hold
for about 2 seconds to turn
the scanner on, then turn Volume clockwise until
you hear a hissing sound.
3. If the scanner is scanning, press Hold to stop
scanning, then turn Squelch clockwise until the
hissing stops.
Storing Known Frequencies
Into Channels
1. Press Hold. Then enter the channel number
where you want to store a frequency, then press
Func and Pgm. The channel number appears.
2. Use the number keys and to enter the
frequency (including the decimal point) you want
to store.
3. Press E to store the frequency into the channel.
Notes:
•
If you entered an invalid frequency in Step 2,
Error appears and the scanner beeps three
times. Enter a valid frequency.
•
The scanner automatically rounds the entered
number to the nearest valid frequency.
For example, if you enter 151.473 (MHz), your
scanner accepts it as 151.475.
•
When you enter a frequency into a channel, the
scanner automatically turns on the delay
function and DLY appears. When delay is turned
on, the scanner automatically pauses scanning
Operation
30
UBC73XLT Paper OM.fm Page 31 Monday, May 14, 2007 9:13 AM
2 seconds after the end of a transmission before
scanning proceeds to the next channel. To turn
the function off or on, press Func + Dly.
•
If you enter a frequency that has already been
entered elsewhere, the scanner sounds an error
tone and displays the channel that was
duplicated. If you entered the frequency by
mistake, press Clr then enter the correct
frequency. To enter the frequency anyway, press
E to accept.
4. To program the next channel in sequence, press
E/Pgm then repeat Steps 2 and 3.
Searching For and Temporarily
Storing Active Frequencies
If you do not have a reference to frequencies in your
area, use a search to find a transmission.
There are two search features available. Service
Search (see below) and Chain Search on page 38.
Note: When the scanner starts searching, it automatically turns on the delay function. To turn delay
on or off, press Func + Dly.
Service Search
You can search for police, railroad, marine, aircraft,
UHF CB, and AM CB transmissions without knowing
the specific frequencies used in your area. The
scanner is preprogrammed with all the frequencies
allocated to these services. To use this feature,
press Func + Svc. SRCH appears and the scanner
searches starting with the police service bank. To
select a different service bank, repeatedly press
Func + Svc. Service mode appears on the display.
When the scanner stops on a transmission, press
Hold to stop searching and listen to the
transmission. Hold appears. In this mode, you can
Operation
31
UBC73XLT Paper OM.fm Page 32 Monday, May 14, 2007 9:13 AM
press Func +
frequencies.
or Func +
to step through the
To release the hold and continue searching, press
Hold. Or, if you did not press Hold, simply press
Func +
or Func +
to continue searching.
Note: Because there are many different frequencies
allocated to police departments, it can take several
minutes to search all the service frequencies.
Storing Frequencies into Channels
During Service Search
You can store frequencies you found during service
search or service search hold mode into channels.
1. Press Func and Pgm during service search or
service search hold mode. The frequency and
the lowest blank channel alternately appear.
2. Press E to store the frequency into the blank
channel. If you want to select another channel,
press Func +
or Func +
before you press
E. You can also use the 0-9 key to select the
bank.
If you entered a frequency that has already been
entered elsewhere, the scanner sounds an error
tone and displays the channel that was duplicated.
If you entered the frequency by mistake, press Clr
then enter the correct frequency. To enter the
frequency anyway, press E to accept.
Scanning the Stored Channels
To begin scanning channels, press Scan.
The scanner scans through all non-locked channels
in the activated banks. (See “Locking Out Channels”
on Page 45 and “Turning Channel-Storage Banks
On and Off” on Page 44). When the scanner finds a
Operation
32
UBC73XLT Paper OM.fm Page 33 Monday, May 14, 2007 9:13 AM
transmission, it stops on it. When the transmission
ends, the scanner resumes scanning.
Notes:
•
If you have not stored frequencies into any
channels, the scanner does not scan.
•
If the scanner picks up unwanted partial, or very