1
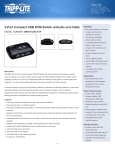
W
c r
od han eg Re
ar
uc ce iste g
i
t— to r o s ra
nt
w w nli tr
w in n a
w. a e ti y
tri F to o
pp R da n
lit EE y f :
e. T o
co rip r a
m p
/w L
ar ite
ra
nt
y
pr
Owner’s Manual
Introduction
The B004-VPA2-K-R is a 2-port compact PS/2 KVM Switch
with optional audio and microphone switching function.
It allows you to access, control, boot and reboot multiple
PS/2-enabled computers using a single keyboard, monitor,
mouse console and optional speaker set and microphone.
The B004-VPA2-K-R also offers user-programmable
simultaneous/independent switching of applications. For
users who need to use a hot key sequence other than the
pre-programmed scroll locks, it also offers five hot key
configuration alternatives.
with Audio
Model: B004-VPA2-K-R
The KVM Switch is a plug-and-play device, eliminating the
need to configure the KVM Switch before installation.
Note: Before connecting the KVM Switch to the computers,
make sure all connected computers are powered-off.
Otherwise, the computers will not be able to recognize the
connected keyboard and mouse.
Step 1. Make sure all computers that are to be connected
to the KVM Switch and their peripherals are
in a powered-off state. If not, power them off before
you proceed with the following steps.
Step 2. Connect the shared PS/2 keyboard, mouse, monitor,
speaker set and microphone to the KVM Switch.
Step 3. Connect each of your computers to the KVM
Switch using the included KVM and audio/
microphone cables.
Step 4. Power-up the connected computers. After your
computers are powered up, the keyboard and
mouse will automatically be recognized. The KVM
Switch should now be powered-up. You can now
begin operating the KVM Switch.
Operation
1
Console
1111 W. 35th Street, Chicago, IL 60609 USA
(773) 869-1234 • www.tripplite.com
(See Quick Reference Guide.)
Keyboard Hot Key Switching
A keyboard hot key sequence consists of at least three
specific keystrokes. (See Quick Reference Guide.)
Hot key sequence: [ScrLk]* + [ScrLk]* + command key(s)
* User-definable: Scroll Lock, Caps, Esc, F12 or Num Lock.
Installation
2-Port Compact
PS/2 KVM Switch
Push Button Switching
The built-in push buttons allow you to directly control
switching between computers. Simply press the button
to switch computer ports. By default, Audio/Mic and PC
Switching are simultaneous. To disable this feature, use the
hot key sequence ScrLk + ScrLk + W.
2
Hot Key Sequence Configuration
For users who want to use a sequence other than the two
consecutive Scroll Locks, the B004-VPA2-K-R offers an
additional convenient sequence configuration option.
Step 1. Hit Scroll Lock + H (two beeps will signal readiness
for new sequence selection). Or press and hold down
the last push button (Port Selection Button) until you
hear two beeps and then release the button.
Step 2. Select and press the key you would like to use as
your sequence (Scroll Lock, Caps, Esc, F12 or
Num Lock keys are available for selection) and
you’ll hear a beep for selection confirmation. Now
you can use the new sequence to execute your hot
key commands.
Each keystroke within a hot key sequence should be
pressed within 2 seconds. Otherwise, the hot key sequence
will not be valid.
For detailed hot key sequences and their corresponding
functional commands, please refer to the Quick Reference
Guide on the other side of this manual.
FCC Radio/TV Interference Notice
Quick Reference Guide
2-Port Compact PS/2 KVM Switch Operation Commands for Hot Keys/Push Buttons
Hot key sequence5: [ScrLk]* + [ScrLk]* + Command key(s)
* User-definable preceding sequence: Scroll Lock, Caps, Esc, F12 or Num Lock
Command
Hot Keys5
Push Buttons
Description
ScrLk + ScrLk + (x)¹
—
Selects PC channel
ScrLk + ScrLk + (Fx)³
—
Selects Audio/Mic channel
Select PC Channel
(Select PC port and Audio/
Mic port, if simultaneous
operation is enabled)²
Select Audio/Mic
Channel²
1 Year Limited Warranty
Enable Simultaneous
PC and Audio/Mic
Switching²
ScrLk + ScrLk + Q
—
Enables simultaneous operation of
PC and Audio/Mic Switching
Disable Simultaneous
PC and Audio/Mic
Switching²
ScrLk + ScrLk + W
—
Disables simultaneous operation of
PC and Audio/Mic Switching
Press the push button to switch
to the next PC channel
Selects next PC channel
Choosing Next
PC Channel
ScrLk + ScrLk + (arrow up)
or
(Select PC port and Audio/
Mic port, if simultaneous
operation is enabled)²
ScrLk + ScrLk + (arrow down)
Choosing the Previous
PC Channel
ScrLk + ScrLk + (Backspace)
—
Selects the previous PC channel
ScrLk + ScrLk + H + (y)4
Press and hold down the last push
button (Port Selection Button) until
you hear two beeps, release the
button and then press the (y)4 key
Sets the hot key sequence using
1 of 5 alternative keys
ScrLk + ScrLk + End6
—
Resets keyboard and mouse on the
console side
ScrLk + ScrLk + S
—
Autoscans through every connected
channel for quick screen browsing of
each channel (scan delay = 5 sec.)
Define Hot Key
Sequence
Console
Mouse/Keyboard Reset6
Autoscan
Autoscan with
Programmable Delay
Time
Stop Autoscan
Note: This equipment has been tested and found to comply with
the limits for a Class A digital device, pursuant to Part 15 of the FCC
Rules. These limits are designed to provide reasonable protection
against harmful interference when the equipment is operated in
a commercial environment. This equipment generates, uses and
can radiate radio frequency energy and, if not installed and used
in accordance with the instruction manual, may cause harmful
interference to radio communications. Operation of this equipment
in a residential area is likely to cause harmful interference in which
case the user will be required to correct the interference at his own
expense. The user must use shielded cables and connectors with
this product. Any changes or modifications to this product not
expressly approved by the party responsible for compliance could
void the user’s authority to operate the equipment.
ScrLk + ScrLk + S + (x)
x = 0~9
1 10”; 2 20”; 3 30”; 4 40”;
5 50”; 6 60”; 7 70”; 8 80”;
9 90”; 0 100”
Press any key on keyboard
—
Autoscans with a user-defined delay
time within a range of 5-100 seconds
TRIPP LITE warrants its products to be free from defects in
materials and workmanship for a period of one (1) year from the
date of initial purchase. TRIPP LITE’s obligation under this warranty
is limited to repairing or replacing (at its sole option) any such
defective products. To obtain service under this warranty, you must
obtain a Returned Material Authorization (RMA) number from
TRIPP LITE or an authorized TRIPP LITE service center. Products
must be returned to TRIPP LITE or an authorized TRIPP LITE
service center with transportation charges prepaid and must be
accompanied by a brief description of the problem encountered
and proof of date and place of purchase. This warranty does
not apply to equipment, which has been damaged by accident,
negligence or misapplication or has been altered or modified
in any way. EXCEPT AS PROVIDED HEREIN, TRIPP LITE
MAKES NO WARRANTIES, EXPRESS OR IMPLIED, INCLUDING
WARRANTIES OF MERCHANTABILITY AND FITNESS FOR A
PARTICULAR PURPOSE. Some states do not permit limitation
or exclusion of implied warranties; therefore, the aforesaid
limitation(s) or exclusion(s) may not apply to the purchaser.
EXCEPT AS PROVIDED ABOVE, IN NO EVENT WILL TRIPP LITE
BE LIABLE FOR DIRECT, INDIRECT, SPECIAL, INCIDENTAL OR
CONSEQUENTIAL DAMAGES ARISING OUT OF THE USE OF
THIS PRODUCT, EVEN IF ADVISED OF THE POSSIBILITY OF
SUCH DAMAGE. Specifically, TRIPP LITE is not liable for any costs,
such as lost profits or revenue, loss of equipment, loss of use of
equipment, loss of software, loss of data, costs of substitutes,
claims by third parties, or otherwise.
Warranty Registration
Visit www.tripplite.com/warranty today to register the warranty for
your new Tripp Lite product. You’ll be automatically entered into a
drawing for a chance to win a FREE Tripp Lite product!*
* No purchase necessary. Void where prohibited. Some restrictions apply.
See website for details.
Press any button
Terminates Autoscan activity
Notes:
1. Note that (x) denotes a number key for the selected port (x = 1~2).
2. By default, PC and Audio/Mic switching are simultaneous.
3. (Fx) denotes a function key (F1 or F2) at the top of the keyboard.
4. (y) denotes your choice of hot key command. Choose from ScrLk, CapsLock, Esc, F12 or NumLock.
5. Hot key convention: The hot key notation ScrLk + ScrLk + key, denotes that you should hit the individual key consecutively one at a time, not simultaneously.
6. Mouse Troubleshooting: If your mouse locks up or behaves abnormally, you can hit the following hot key commands to reset the mouse:
A) When using a PnP OS such as Windows 98 Second Edition, Wink2k, Win XP, etc., hit ScrLk + ScrLk + End for mouse reset.
B) When using a non-PnP OS such as Linux, NT4.0, etc., hit one of the following hot key commands for mouse reset according to your mouse configuration
on the non-PnP OS. ScrLk + ScrLk + M + 1 for a 2-key mouse setting; ScrLk + ScrLk + M + 2 for a 3-key wheel mouse setting; ScrLk + ScrLk + M + 3
for a 5-key wheel mouse setting.
Use of this equipment in life support applications where failure of
this equipment can reasonably be expected to cause the failure
of the life support equipment or to significantly affect its safety or
effectiveness is not recommended. Do not use this equipment in
the presence of a flammable anesthetic mixture with air, oxygen or
nitrous oxide.
The policy of Tripp Lite is one of continuous improvement.
Specifications are subject to change without notice.
Copyright© 2007. All rights reserved.
All trademarks are the property of their respective owners.
200710180 93-2713