1
®
Fruit & Vegetable Juicer
®
MANUAL
MAN
SAVE
THISTHIS MANUAL.
SAVE
KEEP
IT HA
KEEP
IT HANDY FOR QUICK
REFERENC
REFERENCE AND PROPER CARE.
Fruit & Vegetable Juicer
"6(&34$3&&/'3".&
"6(&3)064*/(
N
©2012 Tribest Corporation v1
Ultem
S
DI
IN
ER
FEE
G
CH
UTE
A SSE MBLY &
CO
A
NT
#1"'3&&
GSPNFBTUNBO
7*356"--:#1"'3&&
CONTENTS
03
Important Safeguards
04
Safety warning/precaution
06
Features
07
Parts
08
How to assemble
10
How to use
12
How to disassemble
13
How to clean and store
14
Tips for extracting
15
Tips for silicone parts
16
Recipes for Juice
Troubleshooting
all18
instructions
ReadRead
all instructions
19
Safety
warning/precaution
safety
warning/precaution
Registration Form
Features
Features20
PartsParts 21
Warranty
HowHow
to assemble
to assemble
HowHow
to use
to use
HowHow
to dissemble
to disassemble
HowHow
to clean
andand
store
to clean
store
Tips for extracting.
Tips for extracting
Tips for silicone parts
Tips for silicone parts
Recipes for Juice
Recipes for Juice
Q&A
Trouble Shooting
cations
7cbhYbhg
03
WZ
04
W[
06
W]
W^
07
W_
08
XW
10
XY
12
XZ
13
X[
14
X\
15
X]
16
X_
18
YW
19
20
21
Registration Form
Warranty
When using electrical appliances,
Whensafety
using
electrical should
appliances,
basic
precautions
always be followed including the following:
basic safety precautions should always be followed including the following:
1. Read all instructions.
1. Read all instructions.
c part or parts in question)
2. in
Towater
protect
against
risk of electrical shock do not put Main Body of Fruitstar in water or other liquid.
or other
liquid.
3. Close
Closesupervision
supervision
is necessary
when
any appliance
by or
near children.
3.
is necessary
when
any appliance
is usedisbyused
or near
children.
4. Unplug the unit from outlet when not in use, before assembly or disassembly
ofbefore
parts,cleaning.
and
parts, and
before cleaning.
parts,
5. and
Avoid
contact
with moving parts.
before
cleaning.
6. Avoid
Do not
operate moving
any appliance
5.
contacting
parts. with a damaged power cord or plug. Do not operate if appliance
malfunctions,
oroperate
if unit isany
dropped
orwith
damaged
in any
manner.
theappliance
nearest malfunctions,
authorized service
6. Portable
– Do not
appliance
a damaged
cord
or plugContact
or after the
facility
for examination,
repair,
and/or Return
electrical/mechanical
adjustments.
or is dropped
or damaged in
any manner.
appliance to the nearest
authorized service facility for
7. examination,
Do not use parts
recommended
or sold
by the manufacturer with the Fruitstar, as it may cause
repairnot
or electrical
or mechanical
adjustment.
re,
8. electric
Do notshock
use outdoors.
or injury.
9. Do
Donot
notuse
letoutdoors
power cord
over
the edge
of a table
or counter.
8.
(thishang
may be
omitted
if it is specially
designed
for outdoor use).
10.Portable
Do not–let
come
contact
withof
hot
surfaces,
including the stove.
9.
Docord
not let
cord in
hang
over edge
table
or counter.
11.Hand-held,
Always make
sure
that
the Feeding
Chute
Assembly
is locked
in securely
in place
before turning on
10.
other
than
cordless
types – Do
not let
cord contact
hot surface,
including
the stove.
the machine.
Dojuicer
not unfasten
the Feeding
Chute
Assembly
whileisjuicer
in operation.
11. Always
make sure
cover is clamped
securely
in place
before motor
turnedison.
12.Do
Benot
sureunfasten
to turnclamps
the switch
use. Make sure the motor stops completely before
whileOFF
juicerafter
is in each
operation.
disassembling.
12. Be
sure to turn switch to OFF position after each use of your juicer. Make sure the motor stops completely
before disassembling.
lodged in the openings,
use the
plunger
or juicer
another
piecewhile
of fruit
vegetable to push it down. When
ngers or other
objects
into the
opening
it is or
in operation.
If food becomes lodged in opening, use food pusher or another piece of fruit or vegetable to push it
remaining food.
and disassemble juicer to remove the
14. Do
not usefood.
the appliance if the pulp wiping assembly is damaged.
remaining
14. Do not use the appliance if the rotating sieve is damaged.
15. When a separable pulp container is provided, Do not operate without the pulp container in place.
SAFETY PRECAUTIONS
PRECAUTIONS
The
informationisisintended
intended
prevent
damage
to the
or injury to the user.
The following
following information
soso
asas
toto
prevent
damage
to the
unitunit
or injury.
Please
read the
thefollowing
followingpages
pagesand
anduse
use
the
appliance
properly.
Please read
the
appliance
properly.
Warning: This sign warns risk of death or severe injuries.
Caution: This sign warns risk of injuries or product damage.
Prohibited
Must unplug
unplugelectric
electriccode
cord
Must take action
Must follow instructions
Do not dissemble
disassemble
Prevention of electric shock
Safety
SAFETYWarning
WARNING
Do not plug multiple cords into a single
re may result.
Safety
SAFETYprecaution
PRECAUTION
Do not
not plug
plug in
in the
the cord
cord with
with wet
wet hands
hands or
oryou
you
Do
may incur
an electrical
shock.
could
receive
an electrical
shock.
Do
a dishwasher
nororvery
Donot
notput
putthe
theparts
partsinin
a dishwasher
veryhot
hot water.
water.
*Otherwise, parts will wear faster.
*Otherwise, parts will wear faster.
Please unplug the cord when not in use.
Usedry
drytowel
toweltoto
clean.
Use
clean.
*Otherwise, you may cause
re or harm to yourself
*Otherwise, it may change the color of the appliance or
*Otherwise, it may
re. change the color of the
Please
toto
unplug
thethe
outlet.
Pleasedo
donot
notpull
pullthe
thecord
cord
unplug
outlet.
Do
anan
uneven
surface.
Donot
notuse
usethe
theappliance
applianceonon
uneven
*Otherwise the cord can break and may cause electrical
*The cord
re. may break, which may result in
*surface.
Otherwise, the appliance
can fall or cause
*Otherwise, the
a malfunction.
Do
or twistthe
the power
cord or cord
put pressure
Donot
notcurve
curve/twist
or put on
pressure
the
cord. on the power cord.
harm to yourself.
electrical
malfunction.
*Otherwise, an electrical shock will occur.
*Otherwise, an electrical shock may occur.
.
appliance can fall or
cause a malfunction.
ngers into the appliance
while the cord is plugged in.
*Otherwise, the appliance may
change color.
Do
toto
clean
thethe
Donot
notuse
useany
anycleaning
cleaningchemicals
chemicals
clean
appliance.
appliance.
*Otherwise, it may cause an electrical shock.
*note: Otherwise the appliance
*Otherwise,
the appliance may
may
malfunction.
*Otherwise, the appliance can change color.
Do
base,
orBody,
customize
Do not
notrepair,
repair,disassemble
disassemblethe
the
Main
or
customize
the appliance.
the
appliance.
*Otherwise, it may cause an explosion or electrical shock.
Do
oror
subject
thethe
appliance
Donot
notdrop
dropthe
theappliance
appliance
subject
appliance
to any impact.
to
any impact.
Do not use the appliance near any heat source.
re or harm to yourself.
harm to yourself.
Do not keep or operate the appliance near
infants or small children.
ammable
sprays on or near the appliance.
*Otherwise, it may
*Otherwise, it may injure them.
injure them.
*Otherwise, it may cause
an explosion or electrical
an explosion
shock. or electrical
shock.
*Otherwise, it may cause
FEATURES
Features
PARTSname
NAME
Parts
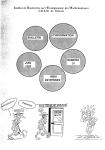
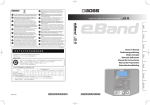
Feeding Chute Assembly
Slow juicing of approximately 80 RPM
<Additional Safety Switch>
The Main Body and Auger Housing Lid
step safety
device
mustTwo
be assembled
properly
before
Theswitch
base and
basket must
be assembled
the
is turned
on (otherwise
the
properly,
then
turn
switch
Fruitstar
will
notthe
turn
on).on.
Hopper
Low speed extraction method
Fruitstar extracts juice by a slow juicing mechanism to retain the maximum amount of nutrients
and enzymes for a healthier, natural juice every time.
The Juicer extracts juice instead of grinding, to retain all the nutrients and enzymes
for a healthier, natural juice every time.
Excellently Juices Fruits and Also Vegetables Well
Excellently extracts all kinds of fruit juice and also juices vegetables well if the vegetables are
properly
prepared.
Multi-purpose
for food preparation and cooking
Hopper
(Lid)
Feeding Chute
Auger
Drum(Lid)
Housing
Lid
Plunger
Pusher
Extract
juice,&soy
juice, fruit juice, homemade tofu and more for convenience and speed.
Easy
tovegetable
Assemble
Disassemble
Vertical
Auger
Juicing Screw
Easy to use
Additional Safety Switch
The juicing
and the base
come and
apartthe
easily
for cleaning
assembly.
All parts
must bowl
be assembled
properly
Feeding
Chuteand
Assembly
must be locked securely in
place in order for the juicer to turn on. This assures a safe operation.
Juicing
Screen
Strainer
Power switch
Convenient
Grip
Two-stepHand
safety
start system
Handgrip feature makes it easier to use and move around.
All parts must be assembled properly and the lid must lock securely into place to start the juicer. This
assures a safe operation.
Powerful Motor with 240 Watts
Rotation wiper
Silicone
Blade
Handgrip for ease of use
Pulp Wiping
Assembly
Handgrip feature makes it easier to use and move.
Quiet Operation- Approximately 55 dB
Auger
Juicing
bowl
Housing
Powerful motor, no heat build-up
Easy to Clean
Juice Outlet
brous fruits and vegetables
completely.
Simply pour water into the appliance after each use for self-cleaning. This will shorten cleaning time.
Pulp Outlet
Quiet
operation
HD
Ultem
Vertical Auger & Juicing Screen
The motor is quiet and extracts juice fast.
Stainless Steel Juicing Screen w/ HD Ultem Frame
Convenient
auto purifying
Full
10-year Warranty
Simply pour water into the appliance after each use for self-cleaning. The juice will taste fresher each time you
make it.
Main Body
Base
Juice cup
Juicing
Container
Pulp
Pulp cup
Container
Cleaning Brush
HOW to
TOassemble
ASSEMBLE
How
Assemble the entire juicing unit [Vertical Auger + Juicing Screen + Pulp Wiping Assembly +
Vertical
Auger
into of
thestrainer.
center of
Place the screw
into
a center
Then
place
Juicing
*the
SpinJuicing
and pushScreen.
the juicing
screw
whilethe
inserting
into
Screen
into
the
Pulp
Wiping
Assembly.
the strainer.
Auger housing
+Feeding
Chute
to shown
the Main
Body.assemble
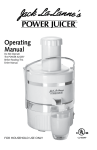
Locate the
Assemble
the entire
top set
ontoAssembly]
the base. As
above,
thesmall
bowlwhite
ontoarrow
the on
the rear side of the Auger Housing Lid and set it to meet the arrow at “Open” position on the
base
andoftwist
the bowl
so that the lid edge in pointing to ⶼ‘close’ sign.
rear top
the Main
Body.
ⶸclose
Turn
the
lid towards
mark.
row at
“Close”
position
of the
Main Body. Make sure the aligning mark at “Close” position on
Place
the juice
cup properly.
and Pulp
Container
at the base of the
Vertical
ScrewAuger
Turn and push down the Juicing Screen
while inserting it into the Pulp Wiping
Assembly.
Juicing
Screen
Strainer
Pulp Wiping
Rotation
Wiper
Assembly
Insert (Vertical
+ Juicing
Screen
Screw
+ StrainerAuger
+ Rotation
wiper
+ Pulpsure
Wiping
Assembly)
intoaligned.
the Auger
Make
the red
dots are
Red
Dotassemble
on
Strainer
Juicing
mark Screen
Housing.
Make sure the red dot on the Juicing
Screen and the red dot on the Auger
Housing are aligned.
3
Connect the
the Feeding
Chute
Assembly
Connect
lid and the
bowl
throughto
the Auger Housing. Align the mark of the
the
red spot
assembles
mark and
“OPEN”
position on the
Auger Housing
Lid
assemble
to the red it.
dot on the Auger housing.
Turn the Auger Housing clock-wise until the arrow on the Auger Housing Lid aligns to the arthe Auger Housing lid and the red dot on the Auger Housing are exactly aligned.
Red
Dotbowl
on
Juicing
Auger
Housing
assemble
mark
4
Turn
the Feeding
Chute Assembly
By
turning
it the clock-wise,
makeclockwise
sure
until the mark of the “CLOSE” position aligns
the spot on the lid and the red spot
to the red dot on the Auger Housing.
on the bowl is aligned.
Auger
Housing
Lid
Drum Lid
Properly place the Juice Container
juice/pulp spouts.
Align mark
at
Assembly
position
“OPEN”
position
mark
on the Auger
Housing Lid
Auger
Drum
Housing
Red Dot
on
Juicing
bowl
Auger Housing
assemble
mark
HOWto
TOuse
USEthe
THEjuicer
JUICER
How
Wash and clean the juicing ingredients, then cut them into the right size.
then plug the cord into the outlet to turn it on.
*Cut the ingredients in a maximum length of 4-5 inches and width of 1 inch.
the machine
When
If the Fruitstar
useproduct.
you stopsuddenly
suddenlystops
whileduring
using the
nished. When lid does not open well, see the instruction
page 12 on “how to dissemble”
⻱
the cord into the outlet to turn it on.
then plug
⻱Do not turn on power switch without anything to extract more
Checkdown
the power
switch
at the
OFF position.
Push
the switch
toisstart
operating.
than 1 minute. (It may cause a malfunction)
Then plug the cord into the outlet to turn it⻱Check
on.
if juice bowl and pulp bowl are set up properly to prevent
leaking juice or pulp.
Forward: Pushes down the materials to extract.
⻱While in use, the appliance might be making a beep noise. The
*Do not run the juicer without any juicing foods for
noise is the screw cleaning up the juicing bowl and it will
more than 1 minute. (It may cause a malfunction)
disappear right after inserting materials.
REVERSE
FORWARD
*While operating ‘FORWARD’ switch, please press ‘OFF’ switch and wait until the appliance stops completely
'FORWARD'switch,
please press 'OFF'switch and wait until the appliance stops completely
beforeWhile
usingoperating
the ‘REVERSE’
switch.
*Please insert the foods one by one, and when
to use the 'REVERSE'switch.
Clean the food and cut it in right amount
fullythen
extracts
the other
food.appliance.
and
insert
into the
*If ‘REVERSE’
switch is pressed
before
thebeing
appliance
stops
completely,
it appliance
may causetothe
appliance to malfunction.
If 'REVERSE'switch
is press
without
stopped,
it may
cause the
malfunction.
*Cut length 4-5inch and width 1inch
*Please
insert thePlease
food one
whento
inserting
the appliance.
useby
theone,
plunger
push
down
thefood,
food.
erent
wait until appliance extracts the other
ngers or
food.
any silverware into the appliance. Please
use the pusher to push down the food. Use
the push bar, when needed.
operating
'REVERSE'the
hopper(lid)
may
would disassemble,
so please hold
on thehold
hopper
with
*While While
operating
in ‘REVERSE’
the Feeding
Chute
Assembly
may be disassembled,
so please
onto
theon
hand
when
operating
reverse
switch.
Feeding Chute Assembly with one hand when pressing the reverse switch.
If the appliance still does not work,OFF
then please disassemble the
parts and clean the frutisFORWARD
or vegetables to
REVERSE
*If the appliance
still does not work, please disassemble the parts and clean the machine parts to use again.
use it again.
the machine
ngers or
any silverware into the appliance. Please
use the pusher to push down the food. Use
the push bar, when needed.
OFF
problem with operation.
page 12 on “how to dissemble”
When you stop suddenly while using the product.
⻱REVERSE : reverting back to the ingredients.('REVERSE' button only works while holding the switch)
Push the switch to ‘FORWARD’ position to
Cleanoperation.
the food and
it in right
amount
start
Pushcut
down
the foods
to exand
then
insert
into
the
appliance.
tract juice. Do not operate with wet hands.
(It
may
cause
anand
electrical
shock.)
*Cut
length
4-5inch
width 1inch
to disassemble.
3 times)
⻱REVERSE : reverting back to the ingredients.('REVERSE' button only works while holding the switch)
If the
appliance stops in the middle of operation, then please press the 'OFF'switch and press
the
'REVERSE'switch to push back the fruits or vegetables that have been stuck between the
screw and the juicing bowl. Then please press the 'FORWARD' switch.(Repeat the procedures
3 times)
Do not operate with wet hands. (It may
Forward: Pushes down the materials to extract.
cause an explosion or electrical shock.)
the 'REVERSE'switch to push back the fruits or vegetables that have been stuck between the
might have gotten stuck between the Vertical Auger and the Auger Housing. Press the switch
screwthen
and to
the‘FORWARD’
juicing bowl.
Then please
press the3'FORWARD'
switch.(Repeat the procedures
‘OFF”
. (Repeat
the procedures
times).
*Check if the Juice Pitcher and Pulp Collector are
properly placed at the base of the spouts to prevent
Push
down
switch to start operating.
juice or
pulp the
leakage.
Do not
operate
with
(It may
*Please
insert
the food
onewet
by hands.
one, when
inserting
*While
in food,
use,
the
may make
a noise.
cause
an explosion
electrical
shock.)
erent
waitappliance
untilorappliance
extracts
the other
This does not constitute that the appliance has a
food.
IfIf the
middle of
of operation,
operation, then
please
presspress
the switch
to ‘OFF’ position
the appliance
appliance stops
stops in
in the
the middle
please
the 'OFF'switch
and press
nished. When lid does not open well, see the instruction
While operating 'FORWARD'switch, please press 'OFF'switch and wait until the appliance stops completely
to use the 'REVERSE'switch.
If 'REVERSE'switch is press without being stopped, it may cause the appliance to malfunction.
While operating 'REVERSE'the hopper(lid) may would disassemble, so please hold on the hopper with on
hand when operating reverse switch.
If the appliance still does not work, then please disassemble the parts and clean the frutis or vegetables to
use it again.
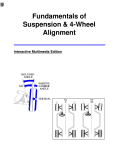
HOW to
TOclean
CLEANand
ANDstore
STORE
How
HOWto
TOdisassemble
DISASSEMBLE
How
How
to
dissemble
Todissemble
disassemble
turn thethe
feeding
To
thethe
lid lid,
by turning
chute assembly counter-clockwise.
counter-clockwise.
Twistthe
thedrum
AugerbyHousing
Twist
turningby
liketurning
arrow
counter-clockwise
1 and
and
lift it by pickinglike
likearrow
arrow
to lift it
like arrow 2 to disassemble.
dissemble.
” and then unplug
the cord.
by pouring 1 or 2 cups of water into the
bers
in theeach
juicing
bowl
before
Feeding Chute
after
use
(selfstopping
the appliance.
cleaning).
Dissemble the parts reverse way of
the cord.
assemble.
*see the instruction page 12 on “how to dissemble”
Reverse
the assembly
instructions
toto
disassemble
parts, then use running water to wash
Use
running
water dissembled
parts
wash with the brush.
the disassembled parts with the cleaning brush.
*The strainer wash will be easier if you use a pot cleaner.
*see page 12 on “how to disassemble”
When feeding chute assembly does not
When lid does not open well, Do "Stop" ->
“Forward”
repeat and
steps
over again
"Reverse"
->and
"forward"
repeat
steps for
over
1 minute
extract
fruit particles
again
for 1 to
minute
toleftover
extract leftovers
inside
that might’ve been left inside of the juicof the drum.
ing system.
Verticalstrainer
Auger, and
Juicing
Screen
and
Pulpout
Screw,
wiper
will be
taken
Wiping Assembly will be taken out
together.
Disassemble
Auger,
Screw,
strainerVertical
and wiper
areJuicing
dissembled.
Screen and Pulp Wiping Assembly.
together.
Juicing Screw
Vertical
Auger
Mainunit
Body
with
a damp,
soft
Clean the base
with
wet
soft towel.
towel.
TIP
After
use, if thedoes
appliance
not properly
get cleaned,
If
the appliance
not getdoes
cleaned
after
cult to clean as well as the
Strainer
Juicing
Screen
Neglecting
to properly
clean the
machine may
reason of the
performance
resistance.
possibly result in a gradual decline in prime performance
of the
appliance.
The color
of Beta-Carotene
which is in Carrots and
ect the
color
of theand
juicer
drum.
The color of vegetables
such
as carrots
spinach
rst and then use
soap.
Pulp Wiping
Rotation
wiper
Assembly
water.
Dissemble silicones from wiper and wash them.
Disassemble
the15)
silicone blades from Pulp Wiping
(See the page
Assembly and wash them. *See the page 15.
TIPS for
FOR
EXTRACTING
Tips
extracting
Note
TIPS
SILICONE
PARTS
Tips FOR
for silicone
parts
Silicone
parts
tips
5*1
Please
readbefore
before juice
the extraction.
Please
read
extraction.
ⴘInserting the food one by one could extract properly
1. Feed the foods into the Feeding Chute piece by piece in order to properly
extract juice without clogging.
ⴙ
ber materials(celery or water parsley) into right amount to get the good
result(4-5inch).
For better
result,
cut the
material
1inch
andtoinsert
one of
by1one.
optimal results.
For even
better
results,
cutby
the
foods
a width
inch and
insert the pieces one by one.
Silicone
Dry the
parts
after washing.
checkparts
if theafter
Silicone parts
parts are
are able
ableto
tobe
bewashed.
disassembled
and
washed.
Fully dry Please
the silicone
washing.parts
Please
the silicone parts are placed correctly.
silicone
arecheck
placedif correctly.
*Juice might be leaking if you do not place the silicone correctly.
*Juice may leak if you do not assemble the silicone parts properly.
<Silicone Wiper Blade>
1. Disassemble
Hold the Tail portion (2 in the drawing) of the silicone blade and push upward
to the middle of the blade slot, then pull outward.
Hold the Head portion (1 in the drawing) of
the silicone blade and slide downward to the
<Silicone brush>
middle of the blade slot, then pull outward.
ⴚ
erent
with
a lot
of moisture
to get more
3. When extracting carrot juice, please
cut fruits
carrots
into
halves
or quarters
in
Face down the tail of silicone brush and put it in
ber. Please cut carrot into quarters before
erent amount of juice to
4. While in use, the appliance may make a noise. This does not constitute that
extract.)
the appliance has a problem with operation.
5. You must remove seeds from foods such as peaches and plums.
ⴛIf the food is not fresh, the amount of juice will be less. To get more juice, dip it in the
6.clean
Fullywater
defrost
fruits gets
when
you
make
fruit
sorbet.
Feeding
untilfrozen
the material
wet.
Then,
thefrozen
food will
have
more juice
to behard
extract.
frozen fruit may damage the juicing system.
ⴜ
7.Some
Do not
overfeed
avoid
theextracted.
machine.
food
does notto
have
juiceclogging
that can be
tail
2. Assemble
like the picture next to it.
Insert the Head portion into the blade slot
in the middle of the bracket, slide the Head
upward. Insert the Tail portion into the blade
slot in the middle of the bracket, slide the Tail
downward.
<Pressure Plug of Auger Housing>
After washing, put the Pressure Plug in correctly
as shown in the picture.
<Silicone Extraction>
After washing, put the silicone in correctly with
arrow in the picture.
8. Some portion of grounded fruit or vegetable may splash out occasionally if
ⴝWthe
not in use.
hile plunger
in use, theisappliance
might be making a noise. However, the appliance has no
problem with operation.
ⴞThere might be a kick-back from the extraction of fruits and vegetables. Be aware.
ⴟMaterials like Peach, Plum, or persimmon need to be removed the seed. Defrost
frozen fruits and you use with milk or beverages slowly.
<Sealing Ring of the Auger Housing>
Sealing Ring can be easily disassembled by
pushing
fromRing>
the bottom side of the Auger
<Silicone
Housing (smaller silicone ring) for easy cleanSilicone
ring
can
be washed.
Put put
the silicone
ring
ing. After it is thoroughly
dried,
the sealing
backproperly
to the place
ring
backproperly.
in its place. Push the sealing
ring
(with
the larger
sideup
facing
up) back
Bigger
silicone
side, face
and place
it in
place
from the inside of the Auger Housing.
correctly.
RECIPES
FOR
JUICE
Recipesfor
for
juice
Recipe
Juice
5*1
Based on Material’s density, boundary layer might be seen.
t#BTFEPOUIFfood’s freshness and amount of moisture, juice extraction results may vary.
Based on Material’s freshness and amount of moisture, juice extraction results may vary.
Appropriateness of fruits temperature.
Apple 41 F
Tomato 53.6-55.4 F
Grape 39.2-41 F
Orange 33.8-41 F
Carrots 33.8-41 F
Peach 46.4-55.4 F
Tomato Juice
Carrot Juice
is a refreshing
and which
nutritious
juice
that
is typically
round.
ATomato
tomato Juice
is a typical
vegetable juice
itself is
a very
refreshing
juice.consumed
Lycopene isall-year
a red pigment
Lycopene
is a red pigment
antioxidant
that causes
the inhibition
ofsour
celltaste
aging
alsoupthe
which
is an antioxidant
that causes
the inhibition
of cell aging
and also the
willand
boost
the
erent tomatoes such as yellow tomatoes or green
tomatoes such as yellow tomatoes or green tomatoes.
tomatoes.
Carrot isisone
best
vegetables
for high
nutrition
and has
a great
which
is awhich
favorable
juice to
Carrot
oneofofthe
the
best
vegetables
for high
nutrition
and
has ataste
great
taste
makes
it a favorable juice to many people. Carrots have a special sweet taste which can
cover
the
erent
vegetable
when they are mixed. Carrots contain high pro-vitamin A and carotene. However, consuming 2 carrots
A
and
carotene.
Consuming
2 Vitamin
carrots A.
has enough of 4 times of RDA for Vitamin A.
has
enough
of 4 times
of RDA for
If juicing
organic
tomatoes,
rinse
them
with water.
1.1.For
organic
tomato,
just rinsejust
them
with
running
running water.
2. Insert the tomatoes into the appliance
2.when
Feed they
the tomatoes
into the appliance after
are prepared.
1. Non chemically treated carrots are good enough for cleaning with running water and
1. Non-chemically treated carrots may be cleaned simply with running
chemical
treated
carrots must
be carrots
cleanedshould
with soap.
water, but
chemically
treated
be cleaned well using
food safe soap.
2. Please cut the carrot into the right size to
insert.
they are sliced into quarters.
into the
the appliance
appli3. Insert the prepared carrots into
ance
reinsert
extracted
carrot
andand
reinsert
the the
extracted
carrot
juicejuice
into the
into the appliance to decrease the amount
appliance to make it decrease the amount
of residue in the appliance.
of residue
in the
This
also make
the juice
appliance,
it also
clearer
and fresher.
makes the juice clear
and fresher.
Well-being prescription
Well-being prescription
ectively prevents cancer, stroke, and heart disease. The
disease.acid
Theistomato
is great
for recovering
and
also for relieving queasiness.
tomato
great foracid
recovering
fatigue
and also forfatigue
relieving
queasiness.
(Cherry tomatoes has a higher nutrition and higher density with high calories which people use often for
ingredients of juice)
Carrot juice has a high vitamin-A content which prevents skin aging and also makes eyesight better
ber which is great for diet. One carrot juice
per day can normalize the body as well as decrease the chance of getting lung cancer. Carrot juice is
one the best drinks for a woman skin.
Troubleshooting
TROUBLESHOOTING
Q&A
Check list
Status
⻱Check
is plugged
properly in properly
- Checkififthe
thecord
power
cord is plugged
- Checkififall
allparts
partsare
areassembled
assembled
correctly
⻱Check
correctly.
-
may not
juicing materials
are inserted
at the
same time.
⻱
IItt might
notwork
workififlots
lots of
of materials
are inserted
at the same
time.
- When appliance stops in the middle of operation then turn the switch to “OFF”
⻱When appliance stops in middle of operation then turn the switch to “OFF” and
and press “REVERSE” switch to unclog the materials in the Vertical Auger. Then
press
“REVERSE” switch to unclog the materials in the juicing screw. Then press
press the “FORWARD” switch to push the materials down.
the
“FORWARD”
switch
to push the materials down the screw. (Repeat the steps 3
(Repeat
this step
3 times)
times)
- Turn the switch to “OFF” and place the Main Body in a cool area. Let appliance
⻱Trest
urnfor
thean
switch
place
motor
cool temperature area. Let
hourto
to“OFF”
cool and
down
thethe
motor
andaround
work again.
rest
forhard
an hour
in in
order
work again.
- appliance
Remove all
the
seeds
theto
juicing
materials before juicing. Hard seeds
may
the juicing
⻱W
henbreak
usingdown
the materials
withscreen.
the hard seed in it, please remove all the seeds in
the materials to use. It may break down the juicing strainer.
Boundary
appears
Juice is spilled
out in
onjuice.
Status
When
stops inuse.
Motormotor
stops during
middle of using.
Amount
Amountof
ofjuice
juiceisislittle
too little.
Juicing
bowl is shaking
Juice Container
is in the
shaking
in the middle
middle
of operation.
⻱
erent amount of juice depends on how fresh they are.
- TTo
extractmore
morejuice
juiceout
outofofthe
the
refrigerated
materials,
foods
in clean
⻱
o extract
refrigerated
materials,
putsoak
it in the
clean
water and
water
before
juicing. are most enough to be extracted.
wait
until
the materials
- Check if the Pressure Plug is assembled properly.
⻱
ber which it is hard to extract, to get a best result extract carrot
ber materials. Such as, pears and oranges. Please cut the
carrots into quarterly to get a best result.
⻱Check if the pressure silicon is assembled properly.
⻱When you extract a lot of amount juice with seeded fruits, wash the bowl in the
middle of extraction.
Check list
the appliance body.
⻱
be ifa boundary
in juice
of material’s
density after extraction.
- TIthere
maymight
happen
the Pressure
Plugbecause
is not assembled
properly.
erentiffrom
highplug
speedis extraction
that juice is normal condition.
Please check
pressure
assembledsoproperly.
Spilled
out on thethe
After extraction,
appliance
body.
color of the
Juicing
⻱It might happen if the pressure silicon is not assembled properly.
Please
check
if pressure
silicon
is assembled properly.
clean and
may
even result
in performance
resistance.
parts and Juice Container
are changed.
After the extraction, the
parts and bowl color are
changed.
and warm water.
- Disassemble Silicone Wiping Blades and wash them separately.
⻱
cult to clean as
well as the reason of the performance resistance.
⻱
ect the color of
rst and then use soap.
⻱Dissemble silicones from wiper and you are able to wash them separately.
Place
Stamp
Here
- Itisiscompletely
completelynormal
normalthat
if the
juicebowl
container
is shaking
little
bit during
⻱It
juicing
is shaking
little bita in
operation.
operation.
of operation.
Seems
Seemslike
likejuicing
Verticalscrew is
Auger is grinding.
grinding.
Hearing
Hearingaalot
lotofofnoises.
sounds coming from
the machine.
⻱
uicing screw
strainer
is Screen
stick together,
so do
not operate
a long
timefor
when
- JVertical
Augerand
and
Juicing
are stuck
together,
so dofor
not
operate
a
long is
time
without
feeding
there
nothing
to be
extract.any foods.
⻱
if the
parts
areare
assembled
properly.
- Turn
Turnthe
theswitch
switchtoto“OFF”
“OFF”then
thencheck
check
if the
parts
assembled
properly
- CCheck
theappliance
applianceisisonoperating
on an uneven surface.
⻱
heck ififthe
uneven surface.
- There may be squeaky friction noise while in use. This is a normal sound that
⻱
There might be friction noise while in use. This is the sound of wiping in the juicing
occurs, and user should not worry about it.
bowl. After inserting materials, noise will disappear.
- Check if juicing materials are cut in the right sizes.
⻱Check if materials are cut in right portion.
Fruitstar Juicer Registration
Tribest Corp.
P.O. Box 4089
Cerritos, CA 90703
U.S.A.
‘LIFE TASTES GOOD’
GLOBAL COMPANY
Warranty
WARRANTY
Memo
SPECIFICATIONS
cation
Product
Juicer
Model No.
Electricity
Voltage
FS-610
UL-510, FS-600
We warrant to you, the end-user customer who has properly registered after purchasing the Fruitstar Juice Extractor
(hereinafter referred to as “Fruitstar”) for a valuable consideration, that the Fruitstar will be free from defects in materials and workmanship for a period of 10 years from the date of purchase. Some parts of Fruitstar are considered to
be consumable, and therefore not subject to normal warranty. These parts include but are not limited to the Juice
Container, Pulp Container, Cleaning Brush, Wiper Blade, Pressure Plug, Sealing Ring and Plunger.
In order for you to receive the benefits of this warranty, you are required to register for warranty service by completing
and mailing the warranty registration card to us within ten (10) days following the purchase of your Fruitstar.
120V,
120V~,60Hz
60Hz
1. No warranty will be provided until after we have actually received the proper registration, with all of the requested
information, within ten (10) days of the date of the original purchase. The warranty is only good for the original purchaser for value. This warranty is non-transferable.
Power
consumption
240W
Maximum use
Less than 30 min
Weight
7kg
Dimension
184mmX245mmX414mm
Manufacture
Tribest
Corporation
NUC Electronics
Co.,Ltd.
Compress type.
Low speed compression
2. If the Fruitstar exhibits defects while in normal household use, we will, upon our actual receipt of a written notice
of such defects from you during the warranty period, either repair or replace, at our option, the Fruitstar that has
verifiable manufacturing defects. However, we have no such obligation to repair or replace the machine until after
you have, by insured mail and in properly protective packaging*, delivered the Fruitstar to the location of your service
center. Replacement Fruitstar may be either new or like new. Repaired Fruitstar may contain re-manufactured or reconditioned parts, which are equivalent to new in performance or may have been subject to incidental use.
3. We do not warrant that the operation of the Fruitstar will be uninterrupted or error-free. In no event shall our liability exceed the retail value of the Fruitstar.
Fruitstar Registration Form
Please fill out and return within 10 days to register your product. Registration ensures that
you receive timely service should any warranty service be needed for your machine.
1. Users Information
Mr. [ ]
Mrs. [ ]
First Name:
Address:
City:
Telephone: (
)
E-mail:
Ms. [ ]
Month
Miss [ ]
Last Name:
State:
Zip:
State:
Zip:
-
2. Dealer Information
Dealer Name:
Address:
City:
3. Product Information
Model Number: FS-610
Serial Number:
Date of Purchase:
/
/
Date
(Pleaseread
readcarefully)
carefully)
(Please
4. All warranty and repair services must be performed at a warranty service center that is located in the country where
the Fruitstar was originally purchased. However, in the event that: [I] the machine must be serviced at a service center
that is not located within the country where the machine was purchased; or [II] there is no service center within the
country where the machine is located and must be shipped to a service center in another country, then those service
centers are responsible for the parts and service only, and any and all costs relating to the shipping, delivery and handling of the machine to and from those service centers shall be the sole responsibility of the Fruitstar owner.
5. This Warranty does not cover;
(1) damages resulting from: (a) failure to operate the Fruitstar in accordance with the instructions (b) use of parts or
supplies not provided or authorized by the manufacturer (c) negligent, improper or inadequate maintenance
(d) service performed or attempted by unauthorized service person (e) damages, accidental or otherwise to the
Fruitstar, which are not directly caused by the manufacturer (f) damages resulting from abuse, tampering, misuse,
commercial use, or unauthorized modification of the Fruitstar.
(2) damages caused by improper electrical connections.
(3) consumable parts including but are not limited to the Juice Container, Pulp Container, Cleaning Brush, Wiper Blade,
Pressure Plug, Sealing Ring and Plunger.
(4) ordinary ware and tear.
Year
Warranty
WARRANTY
cation
(Please
read
carefully)
(Please
read
carefully)
WE MAKE NO OTHER EXPRESS OR IMPLIED WARRANTY OR CONDITION WHETHER WRITTEN OR ORAL. TO THE EXTENT
ALLOWED BY LOCAL LAW, ANY IMPLIED WARRANTY OF FITNESS FOR A PARTICULAR PURPOSE OR IMPLIED WARRANTY
OR CONDITION OF MERCHANTABILITY IS LIMITED TO ONE (1) YEAR. In the event that such limitation or exclusion on
the duration of an implied warrantyJuicer
is not allowed in the state or county wherein you reside, the above limitation or
exclusion may not apply. This warranty gives you specific legal rights and protection, and you may also have other
rights that vary from state to state,UL-510,
or county FS-600
to county.
Product
Model No.
Voltage
TO THE EXTENT ALLOWED BY LOCAL
LAW, THE
REMEDIES IN THIS WARRANTY STATEMENT ARE YOUR SOLE AND
120V~,
60Hz
EXCLUSIVE REMEDIES. EXCEPT AS INDICATED ABOVE, IN NO EVENT WILL WE BE LIABLE FOR DIRECT, SPECIAL,
INCIDENTAL, CONSEQUENTIAL (INCLUDING LOST PROFIT), OR OTHER DAMAGE, WHETHER BASED IN CONTRACT, TORT,
OR OTHERWISE. Some states or counties
240Wmay not allow the exclusion or limitation of incidental or consequential damages. If you reside in such a state or county, the above limitation or exclusion may not be applicable.
Power
consumption
Maximum use
Do not send your Fruitstar back to Less
the warranty
service
than 30
mincenter without return authorization. For a return authorization
number (RMA No.), please contact us via email at [email protected] or call 888-254-7336 in the USA or 714-879-7150
from oversea countries.
7kg
Weight
*Save Original Shipping Box 184mmX245mmX414mm
Dimension
When You Need Service
Manufacture
NUC Electronics Co.,Ltd.
In the unlikely event that you need service on your Fruitstar, or if it fails to function properly while within the warranty
Low speed
compression
period during normal household operation,
contact
the Fruitstar Warranty Service Center. For all service inquiries,
please first contact the Fruitstar Warranty Service Center for a return merchandise authorization (RMA) number and
proper routing instructions.
Compress type.
Fruitstar Warranty Service Center
Tribest Corporation
1143 N. Patt St.
Anaheim, CA 92801
TEL: 888-254-7336, FAX: 714-879-7140
If you need service:
Call the Fruitstar Warranty Service Center (888-254-7336) to get a Return Merchandise Authorization (RMA)
number to send your Fruitstar to the service center. Returns will NOT be accepted without an RMA number
clearly written on the box.
Pack your Fruitstar securely in the original shipping box. Make sure all affected parts are enclosed.
Fill out the service request form below, detach it and enclose it in the shipping box.
Seal the shipping box securely with packing tape.
Address the box to the Fruitstar Warranty Service Center. Be sure to put your return address on the outside of
the package.
It is always wise to insure the package against possible damages or loss in transit. Ship prepaid.
t
t
t
t
t
t
Detach form on dotted line
SERVICE REQUEST FORM
First Name:
Last Name:
Address:
City:
State:
Telephone: (
)
Serial #:
Date of Purchase:
Model #:
Name of parcel/post carrier (in case of damage during delivery):
Zip:
Reason for service request (use additional paper if more space is needed):
MEMO