1
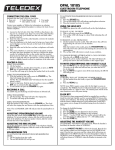
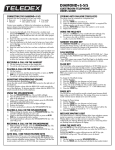
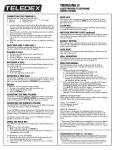
PEARL S
Guestroom Speakerphone
Users Guide (Pan Euro)
PACKAGE CONTENTS
Check to be sure that you have all of the following components in
your package (see figure below) :
• Telephone base unit
• Handset
• Handset coil cord
• Line cord
• User guide
INSTALLATION
1) Plug one end of the handset coiled cord into the handset. Plug
the other end of the cord into the handset jack located on the
left side of the phone base. (Refer to diagram on reverse.)
2) Place the handset in the handset cradle. Plug one end of the line
cord into the LINE jack on the back of your phone.
3) Plug the other end of the modular cord into the wall jack.
WALL MOUNTING
The Pearl S telephone can easily be attached to a wall mount plate.
1) Remove the wall mount clip (located on the front of the
telephone, above the speaker grill) by firmly pushing upward
(toward the hook switch.)
2) Rotate the clip 180 degrees, so that the side with the protruding
edge is towards the top of the telephone. This edge will help
hold the handset on the cradle.
3) Place the handset in the handset cradle.
4) Connect the line cord into the LINE jack on the back of your
phone. Route the line cord through channel on the bottom of
the telephone. Connect the other end of the line cord to the
jack on the wall mount plate.
5) Slip the phone onto the wall plate; slide the telephone down
so it is firmly in place.
USING THE DATA PORT
The data port is located on the right hand side of the telephone. Use
this jack to connect a computer or fax machine in parallel to the
same phone line to which the telephone is connected.
ADJUSTING THE RINGER VOLUME
Your Pearl S telephone has two ringer volume levels: “Low” and
“High.” To adjust the ringer volume, slide the ringer volume switch
(located on the backside of the telephone) to the desired level.
HANDSET VOLUME CONTROL
USING HOLD
To place a call on hold, press the HOLD key. The HOLD LED flashes.
You may now hang up the handset without disconnecting the call.
To resume the call, press the HOLD key again, or press the SPEAKER key.
The call will once again be active.
USING MUTE
Pressing the MUTE key will silence the handset or speakerphone microphone. You will be able to hear the other party, but they will not be
able to hear you. The MUTE LED will light. Press the MUTE key again to
resume your conversation.
PROGRAMMING GUEST SERVICE KEYS
Follow these steps to program a number into one of the three memory locations, for one-touch access to guest services, or for accessing
special PBX/Centrex services or features. Each memory location can
store up to sixteen (16) digits.
1) Lift the handset, listen for dial tone, and press the STORE key
(For key location, refer to diagram on reverse.)
2) Using the dial pad, enter the number you wish to store (up
to 16 digits in length.)
3) Press the guest service key where you would like the number
to be stored.
4) Press the STORE key again to complete. Repeat as necessary for
subsequent guest service keys.
DIALING A STORED NUMBER
Pick up the handset or press the SPEAKER key, wait for a dial tone,
then press the desired memory (guest service) key. The telephone will
automatically dial the stored number.
PROGRAMMING FLASH TIMING
NOTE – The following procedure should only be attempted by a
trained technician. If you are unsure of your ability to carry out this
procedure, please refer the procedure to such a trained technician.)
The flash timing on the Pearl S phone can be set at 100ms, 300ms
or 600ms, by using a jumper. This jumper is located under a hidden
cover at the top of the telephone. To access this cover, remove the
plastic overlay, undo the two screws, and remove the cover.
There are three (3) volume levels for the handset volume. To increase
or decrease the handset volume, slide the handset volume switch
(located on the right hand side of the telephone) to the desired setting.
1) For 100ms flash, set the jumper at location J100/300.
2) For 300ms flash, set the jumper at location J100/300 and J300.
3) For 600ms flash, do not set any jumpers.
SPEAKER VOLUME CONTROL
MESSAGE WAITING
To increase or decrease the speakerphone volume, move the speaker
volume slider control (located on the right hand side of the telephone)
until speaker volume is at a satisfactory level.
The message waiting indicator flashes to indicate that there is a
message waiting. Consult your system administrator or service
provider for instructions on how to access these messages.
PLACING AND ANSWERING CALLS
To make a call, pick up the handset or press the SPEAKER key. When
you hear the dial tone, dial the desired phone number. To answer an
incoming call, pick up the handset or press the SPEAKER key. To end a
call, place the handset back on the base, or press the SPEAKER key
again.
SWITCHING BETWEEN HANDSET AND SPEAKERPHONE
To switch from the handset to the speakerphone during a call, press
the SPEAKER key, and place the handset on the base. To switch from
the speakerphone to the handset, lift the handset; the speakerphone
will automatically turn off.
PACKAGE CONTENTS
USING REDIAL
The redial function allows you to redial the last dialed number. Pick
up the handset, or press the SPEAKER key, and press the REDIAL key. The
number will be dialed automatically.
COIL CORD
USING FLASH
Flash supports custom calling services, such as call waiting. For
example, if you have subscribed to call waiting, press FLASH to answer
an incoming call, without disconnecting the current call. Press FLASH
again to return to the first call.
BASE UNIT
HANDSET
LINE CORD
USER GUIDE
CARE AND MAINTENANCE
IMPORTANT SAFETY INSTRUCTIONS
Your Pearl S telephone has been designed to provide years of trouble
free service. To ensure its longevity, please follow these maintenance
instructions:
WHEN USING YOUR TELEPHONE EQUIPMENT, BASIC SAFETY PRECAUTIONS SHOULD
ALWAYS BE FOLLOWED TO REDUCE THE RISK OF FIRE, ELECTRIC SHOCK AND INJURY
TO PERSONS, INCLUDING THE FOLLOWING:
1. READ AND UNDERSTAND ALL INSTRUCTIONS.
2. FOLLOW ALL WARNINGS AND INSTRUCTIONS MARKED ON THE PRODUCT.
3. UNPLUG THE PRODUCT FROM THE WALL OUTLET BEFORE CLEANING. DO NOT USE
LIQUID CLEANER OR AEROSOL CLEANERS. USE A DAMP CLOTH FOR CLEANING.
4. DO NOT USE THIS PRODUCT NEAR WATER, FOR EXAMPLE: NEAR A BATHTUB, WASH
BOWL, KITCHEN SINK OR LAUNDRY TUB, IN A WET BASEMENT, OR NEAR A SWIMMING POOL.
5. DO NOT PLACE THIS PRODUCT ON AN UNSTABLE CART, STAND OR TABLE. THE PRODUCT MAY FALL, CAUSING SERIOUS DAMAGE TO THE PRODUCT.
6. SLOTS AND OPENINGS IN THE CABINET AND THE BACK OF BOTTOM ARE PROVIDED
FOR VENTILATION. THESE OPENINGS MUST NOT BE BLOCKED OR COVERED. THE
OPENINGS SHOULD NEVER BE BLOCKED BY PLACING THE PRODUCT ON A BED, SOFA,
RUG OR ANY OTHER SIMILAR SURFACE. THIS PRODUCT SHOULD NEVER BE PLACED
NEAR OR OVER A RADIATOR OR HEAT REGISTER. THIS PRODUCT SHOULD NOT BE
PLACED IN A BUILT-IN INSTALLATION UNLESS PROPER VENTILATION IS PROVIDED.
7. NEVER PUSH OBJECTS OF ANY KIND INTO THIS PRODUCT THROUGH CABINET SLOTS
AS THEY MAY TOUCH DANGEROUS VOLTAGE POINTS OR CAUSE A SHORT CIRCUIT THAT
COULD RESULT IN A FIRE OR ELECTRIC SHOCK. NEVER SPILL LIQUID OF ANY KIND ON
THE PRODUCT.
8. TO REDUCE THE RISK OF ELECTRIC SHOCK, DO NOT DISASSEMBLE THIS PRODUCT.
IF SERVICE IS NECESSARY, SEND OR TAKE THE TELEPHONE TO A QUALIFIED SERVICE
FACILITY. OPENING OR REMOVING COVERS MAY EXPOSE YOU TO DANGEROUS VOLTAGES OR OTHER RISKS. INCORRECT REASSEMBLY CAN CAUSE ELECTRIC SHOCK
WHEN THE APPLIANCE IS SUBSEQUENTLY USED.
9. UNPLUG THIS PRODUCT FROM THE WALL OUTLET AND REFER SERVICING TO QUALIFIED SERVICE PERSONNEL UNDER THE FOLLOWING CONDITIONS:
•
IF THE POWER SUPPLY CORD OR PLUG IS DAMAGED OR FRAYED
•
ID LIQUID HAS BEEN SPILLED INTO THE PRODUCT
•
IF THE PRODUCT HAS BEEN EXPOSED TO RAIN OR WATER
•
IF THE PRODUCT DOES NOT OPERATE NORMALLY BY FOLLOWING THE
OPERATING INSTRUCTIONS. ADJUST ONLY THOSE CONTROLS THAT ARE
COVERED BY THE OPERATING INSTRUCTIONS, AS IMPROPER ADJUSTMENT OF
OTHER CONTROLS MAY RESULT IN DAMAGE AND WILL OFTEN REQUIRE
EXTENSIVE WORK BY A QUALIFED TECHNICIAN TO RESTORE THE PRODUCT TO
NORMAL OPERATION.
•
IF THE PRODUCT HAS BEEN DROPPED OR THE CABINET HAS BEEN DAMAGED.
•
IF THE PRODUCT EXHIBITS A DISTINCT CHANGE IN PERFORMANCE.
10. AVOID USING THE TELEPHONE DURING AN ELECTRICAL STORM. THERE MAY BE A
REMOTE RISK OF ELECTRIC SHOCK FROM LIGHTNING.
11. DO NOT USE THE TELEPHONE TO REPORT A GAS LEAK IN THE VICINITY OF THE
LEAK.
1) Keep the Pearl S away from heat, as high temperatures can shorten
the life of the electrical components, and distort or melt plastic
parts.
2) The telephone should be kept free of dust and moisture. If it
gets wet, wipe it dry immediately. Liquids may contain minerals
that can corrode electronic circuits.
3) Handle your telephone gently and carefully. Dropping it can
cause serious damage to internal circuitry or the plastic case,
which may result in malfunction.
4) Do not use any type of chemical or abrasive powder to clean the
outer casing. Use only mild detergents on a soft, damp cloth to
clean the telephone.
5) In case of trouble with the telephone, do not attempt to repair
the telephone yourself. Contact your distributor for assistance.
If the trouble is affecting the telephone lines, the phone company
or service provider may ask you to disconnect the telephone
until the problem is resolved.
APPROVALS
The Pearl S telephone has been approved to the following standards:
•
•
•
•
•
•
•
•
•
iCTR37 and TBR38
EN 60950: 2000
EN 55022: 1998 Class B
EN61000-4-2 1995 as required by EN 55024: 1998
EN61000-4-3 1996 as required by EN 55024: 1998
EN61000-4-4 1995 as required by EN 55024: 1998
EN61000-4-5 1995 as required by EN 55024: 1998
EN61000-4-6 1996 as required by EN 55024: 1998
EN61000-4-8 1995 as required by EN 55024: 1998
IF YOUR PRODUCT USES BATTERIES, FOLLOW THESE ADDITIONAL PRECAUTIONS:
1. USE ONLY THE TYPE AND SIZE OF THE BATTERY SPECIFIED.
2. DO NOT DISPOSE OF BATTERIES IN A FIRE. THE BATTERIES CAN OR MAY EXPLODE.
CHECK LOCAL CODES FOR PROPER BATTERY DISPOSAL INSTRUCTIONS.
MAIN DIAGRAM
Line Jack
RIGHT VIEW
Ringer Volume
Data Port
Handset Volume
Data Port
Speaker Volume
LEFT VIEW
Store Key (hidden)
Speaker Volume
Teledex, LLC
6311 San Ignacio Avenue
San Jose, CA 95119
Handset Volume
Wall Mount Clip
(under handset)
Guest Service Keys
Handset Jack
Telephone:
Fax:
email:
Internet:
(408) 363-3100
(408) 363-3136
[email protected]
www.teledex.com
Mute Key
Redial Key
Flash Key
Handset Coil Cord
WALL MOUNTING
Handset
Dial Pad
Wall Jack
Copyright © 2002 Teledex LLC
All Rights Reserved.
Part Number: 600-0480-63
Speakerphone Key
Hold Key
Message Waiting Indicator
Cord Channel