1
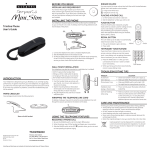
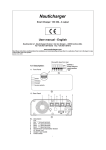
Model EX29350
Speakerphone
User s Guide
INTRODUCTION
7. Plug the telephone line cord into the modular jack and
into the TEL. LINE jack on the back of the base.
Your Caller ID phone stores and displays specific
information, provided by your local telephone company, to
subscribers of Caller ID or similar caller identification
services. You must subscribe to one of these services in
order to use this unit.
Your Caller ID phone enables you to:
Identify callers before you answer the phone.
Record up to 60 Caller ID messages sequentially.
Know who called while you were away.
To get the most from your new phone, we suggest that
you take a few minutes right now to read through this
user’s guide.
IMPORTANT: In order to use this unit, you must subscribe to
either the standard Number Caller ID Service.
BEFORE YOU BEGIN
NOTE: The phone automatically defaults to touch-tone dialing.
To change to pulse (rotary) dialing, see "Tone/Pulse Dialing". If
you don't know which type of service you have, check with the
phone company.
Make sure your package includes the items:
1.
Handset Coiled Cord
2.
Corded Handset
3.
Base
4.
Telephone Line Cord
MODULAR JACK REQUIREMENTS
You need an RJ11 type modular phone jack, which is the
most common type of phone jack. If you don’t have a
modular jack, call your local phone company to find out
how to get one installed.
INSTALLING THE PHONE
DESKTOP INSTALLATION
1. Press “MENU” button, LCD displays “set 1 date”.
2. Press “ < ” or “ > ” button, LCD displays “set 2 code”.
3. Press “MENU” button to enter local area code setting.
4. Press 0~9 button to input local area code.
5. Press “DEL” button to save the setting and exit setting
mode.
RINGER LEVEL SETTING
LCD Display Icons
There are total 3 ring levels. (HI/MID/LO)
1.
: SPEAKERPHONE
2.
: LOW BATTERY INDICATOR
3. MUTE : MUTE
4.
: NUMBER OF CALLS
5. NEW : NEW CID
6.
: VOICE MAIL
7. REP : REPEAT
8.
: TIME
9.
: DATE
10. AM : MORNING
11. PM : AFTERNOON
Move ring volume switch in the back of the base to set
Ringer level.
M
PARTS CHECKLIST
LOCAL AREA CODE SETTING
RECEIVE VOLUME
There are total 3 receive volume levels. (HI/MID/LO)
While on the phone, press the “VOL” button to adjust the
receive volume of handset or speaker.
(Volume “Lo” displays “ ”, “Mid” displays “
”, “Hi”
displays “
”.)
D
FUNCTION KEY
1. SPEAKER
2. REDIAL
3. VOL
4. CONTRAST
5. STORE
6. DIAL
7. FLASH
8. MUTE
9. DEL
10. <REVIEW>
11. MENU
FLASH TIME SETTING
There are three flash timings for selection.
Move the hard switch for selecting flash timing on the
bottom to select proper flash timing .100ms ,300ms ,or
600ms.
PHONE BASICS
SET UP
TONE/PULSE DIALING SELECTION
Use a tooling to move T/P switch in the bottom to set
dialing mode. (T: tone or P: pulse.)
IN USE INDICATOR
The “IN USE” indicator will light up when the phone is on the line.
NOTE: The phone is shipped in Tone Dialing Mode from the
manufacturer.
Thomson Asia Limited
3/F.,Delta House,3 On Yiu Street ,
Siu Lek Yuen,Shatin,Hong Kong
is a trademark of General Electic company used under license
to Thomson Inc.Indianapolis,IN 46290
1. Plug the coiled cord into the corded handset and the base.
2. Push the switch on the battery door to unlock the
battery door.(Push the switch to “
”position.)
3. Remove the battery compartment door.
4. Insert 3 sized AA batteries. (Not include in package)
The unit will be at its optimal performance provided that
you have installed the 3 pieces AA sized dry batteries.
5. Put the compartment door back on.
6. Push the switch on the battery door to lock the battery
door.(Push the switch to “ ”position.)
FLASH TIME SETTING
Using a tooling to move FLASH switch in the bottom to
set FLASH timing. (100ms/300ms/600ms.)
DATE AND TIME SETTING
1.
2.
3.
4.
Press “MENU” button, LCD displays “set 1 date”.
Press “MENU” button to enter date/time setting mode.
Press 0~9 button to input the year, date and time.
Press “DEL” button to save the setting and exit setting
mode.
SPEAKER INDICATOR
The SPEAKER indicator will light up when the speaker is
activated.
RECEIVING A CALL
1. Check the display to see who is calling.
2. Press the “SPEAKER” button or pick up the handset to
answer the phone.
3. Press the “SPEAKER” button again or put the handset
on cradle to hang up.
MAKING A CALL
To make a call, press the “SPEAKER” button or pick up
the handset before you dial and press “SPEAKER” button
again or put the handset on cradle to hang up.
OR Pre-dialing
Input the telephone number (no more than 32 digits), then
press “SPEAKER” button or pick up the handset, the
number will be dialed out automatically.
REDIAL
1. Press "REDIAL" button while the phone is off.
2. Press the "REDIAL" button repeatedly to review redial
telephone list.
3. Press "SPEAKER" button or pick up the handset to dial
out the number.
OR
1. Press "SPEAKER" button or pick up the handset.
2. Press "REDIAL" button to dial the last number redial.
CONTRAST
Press “CONTRAST” button repeatedly to adjust LCD
contrast. There are total 5 contrast levels can be adjusted.
FLASH
Use the “FLASH” button to activate custom calling
MUTE
To prevent the person you are speaking from hearing you
while on a call.
1. Press “MUTE” button, LCD display “MUTE”. The phone
on mute and send out the music.
2. Press “MUTE” button again to cancel mute mode. Or press
“SPEAKER” button to switch handset or speaker mode.
3. Press other buttons will cancel the music.
When you receive a call, the information is transmitted
by the phone company to your Caller ID telephone
between the first and the second ring.
When the memory is full, a new call automatically
replaces the oldest call in memory.
REVIEWING RECORDS
As calls are received and stored, the display is updated
to let you know how many calls have been received.
1. Press the “ < ” button to get into CID mode and to
scroll through the call records from the most recent to
the oldest.
2. Press the “ > ” button to scroll through the call records
from the oldest to the newest.
TRANSFERRING CID RECORDS TO MEMORY
You may transfer a Caller ID record to your phone’s
memory.
1. Press “STORE” button, LCD displays “input code”.
2. Press “ < ” or “ > ” button to scroll your desired record.
3. Press “STORE” button again, LCD displays “press 0~9”.
4. Press 0-9 button to select a desired memory location.
5. The unit generates a tone to confirm the CID is stored
in memory.
DELETING THE CURRENT CID RECORD
1. Press “ < ” or “ > ” button to scroll the desired record.
2. Press “DEL” button, LCD displays “del one”.
3. Press “DEL” button again to confirm to delete the
current record.
phone is excessively noisy.
The person is calling from a number that has been blocked from
transmission.
Call is from out of area
4. Press a numeric key (0,1,2,3,4……or 9) of desired
memory location . The unit generates a tone to
confirm the number is stored in memory.
P
CHANGING A STORED NUMBER
O
Use the same procedure to change a stored number as
you do to store a number that you’re just replacing the
phone number with a different one.
TROUBLE SHOOTING TIPS
STORING A REDIAL NUMBER
1. Press “STORE” button, LCD displays “input code” .
2. Press “REDIAL” button to get into redial record menu
3. Press “REDIAL” button repeatedly to select a dialed
number.
4. Press “STORE” button again, display “press 0~9”.
5. Press a numeric key (0,1,2,3,4……or 9) of desired
memory location. The unit generates a tone to confirm
the number is stored in memory.
CALLER ID
Problem
No Display
Caller ID Error
sage
DIALING A STORED NUMBER
1. When the phone is off.
2. Press “DIAL” button, display “press 0~9”.
3. Press Number Keypad <0...9> to enter the phonebook.
4. Press “DIAL” button or press “SPEAKER” button or
pick up the handset, then the number will be dialed out
automatically.
OR
1. When the phone is on the line.
2. Press “DIAL” button, display “press 0~9”.
3. Press Number Keypad <0...9> to select a memory
location.
4. The unit will dial out the number stored in the memory.
This unit receives and displays information transmitted by
your local phone company is running with FSK or DTMF system.
The unit can store up to 60 calls (16 digits) for later review.
CALLER ID
While you have a caller ID, the display will show as follow:
Number of calls
1. Press “ < ” or “ > ” button to display the CID records.
2. Press and hold “DEL” button for 3 seconds, LCD
displays “del all”.
3. Press “DEL” button again to confirm to delete all CID
records.
DIALING A CALLER ID NUMBER
1. Press the “ < ” or “ > ” button to display the desired Caller
ID record.
2. Press “SPEAKER” button or press “Dial” button or pick
up the handset. The number is dialed out automatically.
MEMORY
Store up to ten 16-digit numbers in memory for quick dialing.
Caller ID phone number
IMPORTANT: In order to use the Caller ID functions with this
unit, you must subscribe to Number Caller ID Service.
STORING A NUMBER IN MEMORY
1. Press “STORE” button, LCD displays “input code”.
2. Use the number keypad to enter the telephone number
you want to store (up to 16 digits).
3. Press “STORE” button again, LCD displays “press
0~9”.
IMPORTANT: If you make test calls to emergency numbers stored
in memory, remain on the line and briefly explain the reason for
the call to the dispatcher. Also, it's a good idea to make these
calls in off-peak hours, such as early morning or late evening.
GENERAL PRODUCE CARE
To keep your telephone working and looking good, follow
these guidelines:
DO NOT expose to direct sunlight or moisture.
Avoid dropping and other rough treatment to the phone.
Clean with a soft cloth.
Never use a strong cleaning agent or abrasive
powder because this will damage the finish.
Retain the original packaging in case you need to ship
the phone at a later date.
MESSAGE INDICATORS
The following indicators show the status of a message or of
the unit.
--E-Caller information has been interrupted during transmission or the
Solution
Try replacing the batteries. Make sure
the batteries are properly installed.
Did you order Caller ID service from
your local telephone company?
The unit displays this message if it Mesdetects anything other than valid
Caller ID information during the silent period after the first ring. This
message indicates the presence of
noise on the line.
TELEPHONE
Problem
No dial tone
Dial tone is OK,
but can't dial out
Solution
Check installation:
Is the telephone line cord connected
to the base unit and the wall jack?
Disconnect the base from the wall
jack and connect another phone to
the same jack. If there is no dial tone
in the second phone, the problem
might be your wiring or local service.
Make sure the battery is properly full.
Are the batteries installed correctly?
Make sure the tone/pulse setting is
correct.
Does not ring
Try to set the Ringer to a higher level.
DELETING ALL CID RECORDS
CALLER ID FEATURES
CID
RECEIVING AND STORING CALLS
You may have too many extension
phones on your line. Try unplugging
some phones.
See solutions for
No dial tone.
MEMORY DIALING
Did you program the memory location keys correctly?
Did you follow proper dialing sequence?
Make sure the tone/pulse setting is correct.
Used equipment must be disposed of in compliance with current environmental protection
regulations. You should return it to your reseller or
dispose of it in an approved recycling centre.