1
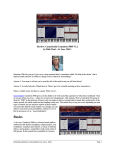
Owner's Manual
QuickEdit and GigaPulse Addendum
100206
CHAPTER 12: QUICKEDIT VIEW ........................................................................................................ 3
Instrument Select Drop-Down Menu.................................................................................................... 3
Undo/Redo ............................................................................................................................................ 3
EDIT MODES AND SELECTIONS.................................................................................................... 4
MIDI SELECT.................................................................................................................................. 4
EDIT MODE..................................................................................................................................... 5
KEYBOARD SELECT DROP-DOWN MENU .............................................................................. 5
DIMENSION SELECT DROP-DOWN MENU .............................................................................. 6
QUICKEDIT ARTICULATION TABS............................................................................................... 7
GVI GENERAL TAB....................................................................................................................... 7
VOLUME MODULATION SECTION............................................................................................ 8
VELOCITY RESPONSE SECTION................................................................................................ 8
INSTRUMENT GLOBAL SECTION............................................................................................ 11
GVI AMPLITUDE/PITCH TAB........................................................................................................ 11
AMPLITUDE ENVELOPE SECTION .......................................................................................... 12
PITCH ENVELOPE SECTION...................................................................................................... 13
AMP ENVELOPE MODULATION SECTION ............................................................................ 13
AMPLITUDE LFO SECTION ....................................................................................................... 14
PITCH LFO SECTION................................................................................................................... 15
GVI FILTER TAB .............................................................................................................................. 16
FILTER SECTION ......................................................................................................................... 16
FILTER ENVELOPE SECTION.................................................................................................... 18
MIDI CONTROL SECTION.......................................................................................................... 19
FILTER ENVELOPE MODULATION SECTION ....................................................................... 19
KEY RESPONSE SECTION ......................................................................................................... 19
FILTER LFO SECTION................................................................................................................. 20
GVI LOOP TAB ................................................................................................................................. 21
SAMPLE START SECTION ......................................................................................................... 21
LOOP SECTION ............................................................................................................................ 21
QUICKEDIT WAVEFORM VIEW ................................................................................................... 22
WAVEFORM VIEW ZOOM TOOLS ........................................................................................... 22
WAVEFORM DISPLAY WINDOW............................................................................................. 23
Envelope and LFO Selection: ......................................................................................................... 23
CHAPTER 13: GIGAPULSE VIEW...................................................................................................... 24
GIGAPULSE IN THE MIDI MIXER ................................................................................................ 25
OPENING THE GIGAPULSE UI.................................................................................................. 25
INPUT SECTION ........................................................................................................................... 26
ACOUSTIC SPACE SECTION ..................................................................................................... 26
MIC GROUP SECTION................................................................................................................. 27
MIC REPLACEMENT SECTION ................................................................................................. 30
MIC TO FX BUS ROUTING SECTION ....................................................................................... 33
2
CHAPTER 12: QUICKEDIT VIEW
QuickEdit is a powerful tool that provides easy access to instrument/dimension specific synth
parameters like attenuation, pan, tuning, envelopes, filters, LFO’s, and loop points. Edits made in
QuickEdit are non-destructive, meaning they do not alter the original GIG files. Instead, instrument
specific QuickEdit modifications are stored and recalled by saving either a preset or GSI file.
The QuickEdit view can be opened using either the global EDIT button located on the GVI
navigation toolbar or the green, channel specific EDIT buttons located on MIDI Mixer
channel strips that contain loaded instruments.
Instrument Select Drop-Down Menu
Once in the QuickEdit View, it is possible to select any instrument currently attached to a MIDI
channel or Stack Sub-channel using the QuickEdit instrument select drop-down menu. The menu is
located just beneath the GVI File Management toolbar and above the waveform display. Only one
instrument may be edited at a time.
Undo/Redo
GVI allows ninety-nine levels of Undo/Redo. The Undo/Redo buttons are located just
above the Zoom Bar navigation buttons.
3
EDIT MODES AND SELECTIONS
In a Giga instrument, every keyboard region has its own parameter settings for envelopes, LFOs,
filters, and the like. The keyboard regions, each covering one or more keys, are displayed in the
horizontal strip just above the virtual keyboard. You'll notice that one of the regions is always
highlighted in bright yellow. This is the region whose parameters are displayed in the upper sections of
the Editor. When you change a parameter, you'll be modifying this region plus any other regions
highlighted in dim yellow.
Keyboard regions are further subdivided into splits. For example, a piano might be sampled at 12
different velocity levels, yielding 12 velocity splits, each with its own audio sample and its own
parameter settings. The same piano might have been sampled with the sustain pedal in both the up and
down positions, for a total of 24 splits per region. In fact, if the samples are stereo, there are even
separate parameter values for the left and right sides, making a total of 48 complete parameter sets per
region. To show which split you are currently editing, the instrument's "dimensions" are displayed as
horizontal strips just below the editing tabs. In the example above, you'd find three strips, for velocity,
sustain pedal, and stereo. (This is only an example: every Giga instrument has its own structure.) One
segment in each strip is highlighted in bright yellow to indicate the split whose parameters are currently
on display. Again, when you change a parameter, you'll be editing this split plus any other splits
highlighted in dim yellow (more about this below).
Several buttons just above the keyboard influence how the selection process works:
MIDI SELECT
When this button is enabled (green), MIDI note on and controller messages will change the current
region and split selections. This can be a convenient way of selecting a particular split for editing. But
if you're playing a piece, you may want to disable this feature, to avoid a frenzy of screen updates
which may tax your CPU.
4
EDIT MODE
This affects how changes are applied when more than one region or split is selected for editing.
Absolute: When you change a value in the QuickEdit, every selected (bright or dark yellow)
region and split is set to exactly the value shown. If the selected regions were originally set to
various unique values, they'll all be changed to the same value for any parameter that you edit.
Relative: In this mode, every selected split is changed by an offset. For example, if you change
and LFO rate from 4 Hz to 6 Hz, every selected split gets a 2 Hz increase.
Proportional: This similar to Relative mode but uses multiplication rather than addition. If you
change an LFO rate from 4 Hz to 6 Hz, every selected split gets a 50% increase.
Note that if a relative or proportional edit tries to push a parameter outside its legal range, the parameter will be
set to its minimum or maximum legal value.
KEYBOARD SELECT DROP-DOWN MENU
We noted above that a GVI instrument can contain a large number of regions, each subdivided into
many independent splits. Often you will want to apply an edit globally across an entire instrument. At
other times, you may need to edit only a particular region or group of regions. The "Keyboard Select"
setting helps make either kind of editing possible. The options are:
All regions: In this mode, all of the keyboard regions are locked into the selected state. Clicking
on any keyboard region will make it the current region, highlighted in bright yellow. But all
other regions will retain the dark yellow highlight, and any edits you make will always be
applied to all regions across the keyboard.
Individual regions: In this mode it's possible to select any set of keyboard regions you like.
Click on a region to select that region. Click while holding down the CTRL key to add
individual regions to the selection, or click with the SHIFT key to select a range of regions.
Note that while this mode allows more detailed editing, it requires you to be aware of the region
selection at all times.
5
DIMENSION SELECT DROP-DOWN MENU
This is similar to the Keyboard Select menu, but it governs the selection of splits within each keyboard
region, as displayed in the dimension strip area just below the editing tabs. The options are:
All splits: Edits will always be applied to every split within a region. In the dimension selector
strips, you can click any split to give it the bright yellow highlight and display its parameters.
But all other splits will retain the dark yellow highlight, indicating that they will also be
modified if you change a value.
Stereo pairs: In this mode, splits can be selected in any combination. As an illustration, recall
our piano instrument with the 24 splits per region (12 velocity levels times 2 sustain pedal
positions). In "Stereo pairs" mode you could, for example, select only the three loudest velocity
levels for editing, by highlighting the last three segments in the velocity strip. The sustain pedal
strip would control whether you're editing the three loudest pedal-up splits, the three loudest
pedal-down splits, or both (six splits in all). To select multiple splits in any dimension, click in
that dimension strip while holding down the CTRL or SHIFT keys.
Individual splits: When viewing a stereo instrument, you'll notice an additional dimension strip
labeled Stereo". Stereo GVI instruments have independent parameter settings for the left and
right sides of every split. In practice, it's rare to find any parameter set differently for the two
sides of the same split, so edits are normally applied to both sides simultaneously. If you do
need to apply an edit to only the left or right side of a region, "Individual splits" mode will let
you do it. We suggest you use this mode only when you absolutely need to - otherwise you may
find yourself applying more general edits accidentally to only one stereo channel.
6
QUICKEDIT ARTICULATION TABS
GVI GENERAL TAB
Volume: The Volume knob simply attenuates a region’s playback level between 0 and 98
decibels. A Volume value of 0.0 indicates that the region will play back un-attenuated.
Pan: This setting sets the pan position by a value from -64 (hard left) to +63 (hard right).
Tune: The Tune knob adjusts a region’s fine-tuning between – 49 and + 50 cents.
Self-mask: When checked, this causes high velocity notes to terminate lower velocity voices.
This feature conserves polyphony and should be tried on all samples with percussive attacks
and releases (pianos, guitars, cymbals, etc.).
Sustain Defeat: This setting enables or disables the sustaining action of the sustain pedal. This
allows the sustain pedal to simply be used as a dimension switch without sustaining the
samples.
7
VOLUME MODULATION SECTION
Controller Drop-Down: This menu allows you to assign a MIDI
continuous controller for real-time volume attenuation control.
By assigning the same attenuation controller to groups of related
notes or samples, a MIDI controlled sub mix capability can be
designed into the instrument so that individual sounds can have
discrete MIDI volume control.
Attenuation Controller Invert: This option reverses the MIDI
controller. This is necessary when creating a simple MIDI
controller cross-fade layer. Both layers would be set to the same MIDI controller for
attenuation but one would be inverted using this parameter. The result would be a cross-fade
between both layers.
Attenuation Controller Threshold: This parameter allows you to assign a minimum threshold
to the external volume attenuation controller. This is useful for volume crescendo/decrescendo
and expressive dynamics. It is very similar to the threshold knob found on controller/volume
pedals. For example, this allows a MIDI controller to set the volume from “full volume to soft”
instead of “full volume to silent”.
VELOCITY RESPONSE SECTION
The velocity response section specifies how an instrument region’s volume responds to
incoming MIDI velocity values. Once you have chosen a basic velocity curve, you can further
modify that curve using the velocity range and scale parameters.
Keep in mind that if you are also filtering, the overall volume velocity response is affected by
the response of the filter.
8
Velocity Curve: There are three general response curves available: Linear, Non-Linear, and
Special. See the diagrams below for a graphical representation of each curve class.
Linear Curve:
Non-Linear Curve:
9
Special Curve:
Velocity Range: Use the velocity range slider to select one of five velocity response offsets for
the specified velocity response curve (Linear, Non-Linear, Special). The velocity range is set
from High to Low, High producing the largest dynamic range (softer) and Low producing the
smallest dynamic range (louder).
Scale: This knob works in conjunction with the Velocity Range setting to give even finer
control of the velocity response curve. Find a Dynamic Range setting that works best and then
use this to fine tune the feel.
Release Curve: The Release Curve setting affects the release note decay time based on the
Note On Velocity. This becomes more noticeable with longer Amplitude Envelope release
times. Basically, this feature allows you set longer or shorter release times depending on how
hard you hit the note.
Release Range: Use the Release Range slider to select one of five velocity release range offsets
for the specified Release Curve (Linear, Non-Linear, Special). Like Velocity Range, the release
range is also set from High to Low, High producing the most dynamic release curve, and Low
producing the least dynamic release curve.
Release Trigger Decay: This parameter determines the rate of attenuation for the amplitude of
an existing release-triggered sample. In other words, when using a Release Trigger dimension,
this parameter allows you to control the volume of its playback depending on how long you
hold down a key before releasing.
With slower decay values, you can sustain a note longer and still get the release trigger sample
to play at full volume. With faster settings, the release trigger sample will be quiet or even silent
unless you release a note quickly.
10
INSTRUMENT GLOBAL SECTION
Pitch Bend Range: Instrument Global settings apply to all regions
and dimensions of the instrument currently being edited. You can set
the Pitch Bend Range between 0 and 12 semitones (half-steps). The
Pitch Bend Range value represents both the upward and downward
transposition boundaries.
Piano Release Mode: This option is intended for Acoustic Piano
sample libraries. On an actual acoustic piano, you can step on the
sustain pedal very quickly after releasing a note and hear some string
resonance. Enabling this option emulates that phenomenon within
GVI using an instrument’s pedal down samples. This option is only needed for piano libraries
that use actual pedal down samples.
GVI AMPLITUDE/PITCH TAB
11
AMPLITUDE ENVELOPE SECTION
Preattack: The Pre-attack level is adjusted with percentage numbers (0-100).
It is the very first point of a sample’s ADSR envelope and sets the initial volume level of the
attack. For example, a Preattack level of 50.00 sets the beginning of the attack envelope to half
the potential volume of the sample. This allows for a sample to begin at any level from silent to
full volume.
Attack: The amplitude Attack time is measured in seconds (0-10). This value sets the amount
of time that it takes for a sustained sample attack to reach its full volume. For most acoustic
instrument samples, this time will range from zero to any value yielding a natural sounding
attack. However, extreme settings can be used for musical effects like crescendos.
Decay1: The Decay1 time is measured in seconds (0-60). This parameter defines the amount of
time it takes to decay from the peak level of the attack down to the sustain level.
Sustain: The Sustain level is adjusted with percentage numbers. (0-100). After the first decay
completes, the sample will sustain for a period of time dependant on the Decay2 setting. The
Sustain setting determines the volume level of the sustain portion of the ADSR that occurs
between Decay1 and Decay2.
Hold: If a sample has a loop point, the Hold function will prevent the first Decay (Decay1)
from happening until the sample has played through its entire loop one time.
Hold is handy for natural decaying instruments like Piano or Guitar that have small looped
samples. When Hold is enabled, the sample will hold its peak volume until it plays through the
loop once. The envelope will then start the first decay down to the sustain level. This can help to
create for a more realistic ADSR envelope for short, looped samples. It can give them a little
more of a natural personality despite the artificial looping.
Decay2: The Decay2 time is either measured in seconds (0-60), or set to Infinite, which
overrides the time setting. Decay2 determines how long the Sustain section of the envelope will
last before going into the release section of the ADSR envelope, even without letting go of the
note. Setting Decay2 to Infinite will cause the sample to sustain indefinitely until you release the
note.
Release: Release time is measured in seconds (0-60). This value determines how long it will
take for the sample volume to ramp down depending on the Decay2 setting. If Decay2 is set to
Infinite, the release will begin when the note is released. If Decay2 is set to an amount of time,
the release will begin either after that amount of time passes or if you release the note before the
Decay2 time passes.
12
PITCH ENVELOPE SECTION
Attack: The pitch Attack time is measured in seconds (0-60). This value determines the amount
of time that it takes for a sustained note to be tuned from the specified pitch Depth value back to
its original pitch.
Depth: Pitch Envelope Depth is measured in cents and represents the Attack or Note On pitch
of a sample. In other words, when a note is played, the sample begins playback with the
specified Depth offset and is then bent back to its original pitch over the time interval specified
in the Attack parameter.
AMP ENVELOPE MODULATION SECTION
Controller: The amplitude modulation controls allow real-time MIDI control of the Attack,
Decay and Release of a samples amplitude envelope. Use the Controller drop-down menu to
choose the MIDI controller from the list of standard MIDI controllers.
Invert: When enabled, this setting reverses the incoming MIDI controller data values.
Attack, Decay, and Release depth: These sliders allow you to enable MIDI control of
amplitude envelope parameters. Enabling these parameters allows the specified MIDI
Modulation Controller to affect one, two, or all three parameters at once, with varying intensity
for each.
The overall audible effect of the MIDI controller will depend on the region’s amplitude
envelope settings. For example, if the amplitude envelope Attack time is set to zero, you will
not hear any effect by altering the Modulation Controller. With an envelope Attack higher than
zero, the Modulation Controller will start working; smaller Attack time settings will result in
subtle changes while larger Attack time settings result in more dramatic changes. The same
paradigm also applies similarly to the Decay and Release values.
13
AMPLITUDE LFO SECTION
LFO Frequency: The Amplitude LFO Frequency value can be set between 0.1 and 10 Hz and
controls the rate at which the Amplitude LFO oscillates.
Control Source: The Control Source selects between Internal LFO, Mod Wheel, Breath
Control, or a combination of either Internal LFO and Mod Wheel or Internal LFO and Breath
Control.
Invert: When enabled, this setting reverses the incoming MIDI controller data values.
Synch: This option provides a single, synchronized LFO across all regions. When Synch is
enabled, the LFO will be constant no matter what note is played or when it is struck. When
Synch is disabled, the LFO begins at the point in time when each individual note is struck and
will have its own “out of synch” and independent cycle. When Synch is enabled, the LFO cycle
will stay in synch for all the notes no matter when they are triggered.
Internal Depth: This parameter applies a fixed Amplitude LFO depth that is always present
when “Internal” is selected as a Control source.
External Depth: An external MIDI continuous controller can also be used to control LFO
Depth. This setting works the same way as the Internal depth settings but you won’t hear its
effect until the assigned MIDI controller is engaged.
Note: The Amplitude LFO works completely independent of the Amplitude Envelope settings
14
PITCH LFO SECTION
LFO Frequency: The Pitch LFO Frequency value can be set between 0.1 and 10 Hz and
controls the rate at which the Pitch LFO oscillates.
Control Source: The Control Source selects between Internal LFO, Mod Wheel, Aftertouch, or
a combination of either Internal LFO and Mod Wheel or Internal LFO and Aftertouch.
Synch: This option provides a single, synchronized Pitch LFO across all regions. When Synch
is enabled, the LFO will be constant no matter what note is played or when it is struck. When
Synch is disabled, the LFO begins at the point in time when each individual note is struck and
will have its own “out of synch” and independent cycle. When Synch is enabled, the LFO cycle
will stay in synch for all the notes no matter when they are triggered.
Internal Depth: This parameter applies a fixed Pitch LFO depth that is always present when
“Internal” is selected as a Control source.
External Depth: An external MIDI continuous controller can also be used to control LFO
Depth. This setting works the same way as the Internal depth settings but you won’t hear its
effect until the assigned MIDI controller is engaged.
Note: The attack of the Pitch LFO is determined by the Pitch Envelope Attack time. In other
words, the Pitch LFO will not begin to oscillate until the Pitch Envelope has completed.
15
GVI FILTER TAB
FILTER SECTION
Filter Type: This drop-down menu allows you to enable/disable filtering and select which type
of filter will be used from the following list:
None –
The Filter mode is completely bypassed
Lowpass –
This option filters out high frequencies above the Cutoff point
Highpass –
This option filters out low frequencies below the Cutoff point
Bandpass –
This option filters out frequencies above and below the Cutoff point
Bandreject – This option performs inverse filtering of mid frequencies
Turbo: Enabling the Turbo option adds additional poles of attenuation to the Lowpass filter
algorithm. This creates a more intense analog filter effect. This option is only audible when the
selected Filter type is set to “Lowpass”.
Note: When used with certain resonance settings, Turbo LPF can generate high amplitude
resonant frequency oscillations. Proceed with caution when editing at loud volumes. This could
be damaging to your ears or speakers.
Cutoff: This parameter behaves differently for each Filter type. For Lowpass, Cutoff sets the
maximum filter cutoff frequency. For Highpass, Cutoff sets the minimum filter cutoff
frequency. For Bandpass and Bandreject, Cutoff sets the Filter’s center frequency.
16
Note: This parameter is only available if the Cutoff Controller is set to “None”.
Minimum (Min) Cutoff: This value places a limit on the lowest filter cutoff frequency when
using a MIDI Cutoff Controller. The low range of the MIDI controller will start with this value.
Resonance (Res): Resonance, also referred to as Q, creates a peak in amplitude at the specific
Cutoff frequency and is used to generate classic analog synth textures. The maximum resonance
is set close to the point of self-oscillation and will resonate according to the frequency content
of the waveform that is being filtered.
Dynamic (Dyn): Enabling Dynamic increases the overall resonance by dynamically scaling the
Q in addition to the cutoff frequency of the filter over changes of envelope and/or external
control.
17
FILTER ENVELOPE SECTION
Preattack: The Filter Pre-attack value is adjusted with percentage numbers (0-100).
Preattack offsets the initial Filter Cutoff value for the attack of the Filter Envelope. For
example, a Preattack offset of 50.00 sets the envelope’s initial Filter Cutoff value to halfway
between the lowest Cutoff value (0) and the user specified Cutoff Value.
Attack: The Filter Attack time is measured in seconds (0-60). This value sets the amount of
time that it takes for a sustaining sample’s Filter envelope to morph between the lowest Cutoff
value (0) and the user specified Cutoff Value
Decay1: The Decay1 time is measured in seconds (0-60). This parameter defines the amount of
time it takes for the Filter Cutoff to morph from the peak Cutoff value down to the Filter
Sustain value.
Sustain: The Filter Sustain value is also adjusted with percentage numbers. (0-100). The
Sustain setting determines the Filter Cutoff value during the sustain portion of the Filter ADSR
that occurs between Decay1 and Decay2.
Decay2: The Decay2 time is either measured in seconds (0-60), or set to Infinite, which
overrides the time setting. Decay2 determines how long the Sustain section of the Filter
envelope will last before releasing, even without letting go of the note. Setting Decay2 to
Infinite will cause the Filter Cutoff to remain at the specified Sustain value until you release the
note.
Release: Filter Release time is measured in seconds (0-60). This value determines how long it
will take for the Filter Cutoff to ramp down from the Filter Sustain value to zero. If Decay2 is
set to Infinite, the release will begin when the note is released. If Decay2 is set to an amount of
time, the release will begin either after that amount of time passes or if you release the note
before the Decay2 time passes.
18
MIDI CONTROL SECTION
Cutoff Controller: This parameter allows you to assign a MIDI
controller to the Filter Cutoff Frequency for real-time continuous
control. This assignment overrides the Cutoff Frequency value,
which will be disabled once you assign a MIDI controller here.
Invert: When enabled, this setting reverses the incoming MIDI controller data values.
Resonance Controller: This parameter allows you to assign a MIDI controller to the Filter
Resonance for real-time continuous control. This assignment overrides the Filter Resonance
value, which will be disabled once you assign a MIDI controller here.
FILTER ENVELOPE MODULATION SECTION
Controller: The Filter Envelope Modulation controls
allow external MIDI control of the Attack, Decay and
Release of a regions Filter envelope. Use the
Controller drop-down menu to choose the MIDI
controller from the list of standard MIDI controllers.
Invert: When enabled, this setting reverses the incoming MIDI controller data values.
Attack, Decay, and Release depth: These sliders allow you to enable MIDI control of Filter
Envelope parameters. Enabling these parameters allows the specified MIDI Modulation
Controller to affect one, two, or all three parameters at once and with varying intensity for each.
KEY RESPONSE SECTION
Velocity (Vel) Curve: This parameter allows you to
select how filter parameters respond to the incoming
Note On velocity of each region. You can choose
between Linear, Non-Linear and Special curves.
Velocity (Vel) Dynamic Range: With this setting, you can lower or raise the dynamic range of
the response of the Filter Velocity Curve.
Note: Please see the Velocity Response Section for diagrams of each Velocity Curve type.
Key Tracking: Enabling Key Tracking scales the Filter Cutoff frequency based on key position
relative to the assigned Breakpoint value. With this feature, you can have the filter go from dark
to bright as you play from one end of the keyboard to the other.
Break Point: Adjust this value to set the breakpoint for the filter Keyboard Tracking. Range is
from 0-127 with a default value of 60 (Middle C).
19
FILTER LFO SECTION
Frequency: The Filter LFO frequency value can be set
between 0.1 and 10 Hz and controls the rate at which the
LFO oscillates.
Control Source: The Control Source selects between
Internal LFO, Mod Wheel, Foot Control, or a
combination of either Internal LFO and Mod Wheel or Internal LFO and Foot Control.
Invert: When enabled, this setting reverses the incoming MIDI controller data values.
Synch: This option provides a single, synchronized LFO rate across all regions. When Synch is
enabled, the LFO will be constant no matter what note is played or when it is struck. When
Synch is disabled, the LFO begins at the point in time when each individual note is struck and
will have its own “out of synch” and independent cycle. When Synch is enabled, the LFO cycle
will stay in synch for all the notes no matter when they are triggered.
Internal Depth: This parameter applies a fixed LFO depth that is always present when
“Internal” is selected as one of the Control sources.
External Depth: An external MIDI continuous controller can also be used to control LFO
Depth. This setting works the same way as the Internal depth settings but you won’t hear its
effect until the assigned MIDI controller is engaged.
20
GVI LOOP TAB
SAMPLE START SECTION
Sample Start: This option alters the sample attack to start after the beginning of the wave
sample. The value is measured in samples and has maximum limit of 2000 samples. This is
useful to soften the attack of a sample or to eliminate/create pops at the beginning of a sample.
LOOP SECTION
This section is only available for samples that already have a loop enabled.
Loop Start: Adjusts a defined loop’s start point
Loop End: Adjusts a defined loop’s end point
Note: The loop points are also visible and adjustable in the Waveform View window.
The Green marker is the loop start and the Red marker is the loop end.
21
QUICKEDIT WAVEFORM VIEW
The Waveform view provides valuable visual feedback when adjusting Envelope, LFO, and sample
loop points. There are three basic sections to the waveform display including the zoom tools, a time
display, and the actual waveform window.
WAVEFORM VIEW ZOOM TOOLS
Zoom Bar: The purple rectangle located just above the time display can be used to scroll
through a sample as well as to zoom in and out. The light purple section of the Zoom Bar
represents the visible section of the waveform; the dark purple section represents sample data
beyond the waveform display window.
When you roll over the Zoom Bar with your mouse, a unique scroll icon replaces the usual
mouse pointer. To scroll, simply click within the light purple (visible) Zoom Bar area and drag
to the left or right. You can also scroll by clicking in the Zoom Bar, either to the left or right of
the light purple Zoom Bar area.
To zoom in and out, simply click on one of the outside edges of the light purple Zoom Bar area
and drag to the left or right. The direction of zoom depends on whether you grab the left or right
boundary of the light purple Zoom Bar area.
You can also double-click the Zoom Bar in order to zoom to the full waveform, which frames
the full length of the sample within the waveform display window.
Zoom Buttons: To the right of the Zoom bar are a group of four buttons that can alternatively
be used to zoom and scroll:
(<)
Click to scroll left
(+)
Click to zoom in
(-)
Click to zoom out
(>)
Click to scroll right
Time Display: The Ruler located above the waveform window is a scalable time readout
measured in seconds.
When looping is enabled for a sample, loop start and end points handles will appear within this
time display, as well as a handle for Sample Offset. To adjust loop points or sample offset,
22
simply click and drag one of the handles.
WAVEFORM DISPLAY WINDOW
In addition to being a simple graphical display for the sample waveforms, the Waveform
Display window can be used to make changes to Amplitude, Filter, and Pitch Envelopes as well
as LFO’s. Once an Envelope or LFO has been selected (see below), an editable envelope
appears superimposed over the waveform that contains a handle for each available parameter.
Envelope and LFO Selection:
In addition to the Loop Points and Sample Offset discussed in the previous section, the
following Envelopes and LFO parameters are made available for graphical editing within the
Waveform Display window:
Amplitude Envelope: Preattack, Attack, Decay1, Sustain, Decay2, and Release
Filter Envelope: Preattack, Attack, Decay1, Sustain, Decay2, and Release
Pitch Envelope: Attack
Amplitude LFO: Frequency
Filter LFO: Frequency
Pitch LFO: Frequency
To edit a parameter simply highlight the desired Envelope/LFO from the menu located to the
right of the waveform display, then click and drag one of the graphical parameter handles. As
you move a handle, you will see the corresponding parameter knob update with the new value.
23
CHAPTER 13: GIGAPULSE VIEW
GigaPulse is a world class Convolution Modeling and Reverb Plug-in that has been integrated directly
into GVI for automatic processing of instruments that are embedded with GigaPulse convolution
presets. An embedded convolution preset is a GIG/Instrument file that is loaded or stacked into the
MIDI Mixer just like other sampled instruments. Instead of samples, however, embedded convolution
presets contain IR’s (impulse responses) that are automatically routed through an FX Bus when loaded
onto a MIDI channel. It is also possible to load an instrument such as GigaPiano II, which uses
convolution to model the instruments resonance and natual decays.
For extensive documentation on GigaPulse, you can download the full GigaPulse VST manual from the
following link: http://www.tascamgiga.com/support.html
24
GIGAPULSE IN THE MIDI MIXER
GigaPulse Convolution can be used to model environments, instrument bodies, signal paths,
digital reverbs, and pretty much anything else you can send audio through. It is up to the library
or soundware developer as to how these impulse responses appear to the end-user within GVI.
For instance, in the case of GigaPiano II, a piano soundboard resonance IR was embedded
directly into the GIG instrument that the actual piano sample data is stored in. Because of this
integration, the GigaPiano II appears as a single instrument when loaded into GVI; the
illuminated “FX” button indicates that the instrument also contains embedded convolution.
(Integrated Sample and GigaPulse instrument)
Alternatively, a developer might choose to leave their GigaPulse content and Sample content
separate, or modular. In these cases, the GigaPulse convolution appears as its own instrument
on a Stacked Instrument Sub-Channel. This kind of Stack contains two types of instruments,
those containing traditional sample data and those containing encoded GIG Instrument Banks
(Impulse Responses). Again, the illuminated “FX” button indicates that the instrument subchannel contains embedded convolution.
(Modular Sample and GigaPulse instrument)
OPENING THE GIGAPULSE UI
There are two methods by which the GigaPulse UI can be opened from within the MIDI Mixer:
FX Button: The FX button is located on the channel strip or sub-channel strip that
contains the instrument with embedded convolution. Clicking on the green FX button
will open a menu that lists all of the GigaPulse Instances and encoded GIG Instrument
Banks available for that particular channel. From this FX menu, select “Edit” to open the
GigaPulse UI (when only one bank is available, simply click on the bank name).
GigaPulse Button: This global GigaPulse button is located in the GVI Navigation
toolbar. The GigaPulse Button only becomes active when a channel containing an
embedded GigaPulse instrument is selected. Clicking on this button will then open the
GigaPulse instance that exists on the selected channel.
25
INPUT SECTION
Bypass: Use the Bypass Button to quickly enable or disable the GigaPulse effect. When Bypass
is enabled, the button will be lit up green.
Note: If you bypass convolution that is an integral part of the instrument’s sound, such as that
used in GigaPiano-II, the instrument may essentially become unplayable sonically.
Master, Left and Right: The input levels adjust the amount of signal that passes through
GigaPulse. You can adjust the left and right signal levels independently or set them both at once
using the master input knob. If the Master is moved such that it forces one (but not both) of the
Left/Right faders to the maximum or minimum value, the Master will maintain the average of
the two faders trajectory (the position of the fader if it had NOT been limited by the maximum
or minimum). As such, a maximized Left/Right (slave) fader will not move until the master has
pulled the slave’s trajectory below the maximum value.
ACOUSTIC SPACE SECTION
The overall graphics in the Acoustic Space
Section show display graphics provided by
the soundware developer. In most cases,
the soundware developer creates the
graphics in order to give the user a visual
idea of what they are listening to.
Alternate view button:
The Alternate View Button changes the overall graphic to an alternate picture, if one has been
provided by the soundware developer. Quite often this will be a credit for somebody, perhaps
the recording engineer or information about the impulse library. It can also be relevant
information about using the impulse set.
Note: You can also toggle the view by simply clicking on the picture itself.
26
Acoustic Space Bank Menu: The Bank Menu
brings up a drop-down list of all the available
GIG Instrument Banks (GIB) that were encoded
into the loaded GigaPulse instance by the
instrument designer. Note that [ctrl]+clicking on the Bank Menu will toggle between the
internal embedded preset name and the original bank file name that was used to create the GIB.
Acoustic Space Impulse Set: Displays the GIG file where the impulse set was retrieved.
Preset: Displays the name of the currently selected preset.
Instrument: Displays the GIG instrument into which the active preset was encoded.
MIC GROUP SECTION
GigaPulse is capable of loading Stereo, 5.1 Surround, and 7.1 Surround Impulse sets. When a
multi-channel impulse set has been loaded, it becomes possible to switch which mic group is
being used as well as combine mic groups for a thicker sound. Changing the GigaPulse mic
group is effectively the same thing as moving the position of the microphone relative to the
performer and can have dramatic effects on perceived distance and timbre.
Mic Group Selection Menu:
Each Mic Group has a unique set of controls that are updated as you switch positions. Click on
the small black arrow at the top left corner of the Mic Group section to choose from the
available Mic Group positions.
27
Mid-Side Decode: MSDEC stands for Mid-Side Decoding, which is a common
method of recording mono-compatible stereo sound. This technique also offers
custom control of the stereo width and volume levels. This button will illuminate
if the soundware developer has employed this technique in the recording of their IRs.
Mute: Silences the Master or the individual channels, but the processing is still
occurring, using CPU resources. The button is yellow when the signal is muted.
On: The On button turns off the individual microphone placements, freeing up CPU
resources. The mics can also be enabled & disabled by clicking on them in the Placement
Selection window. When a mic is enabled, it will be highlighted in the Placement Selection
window and its “On” button will be lit yellow (a disabled mic is unlit or gray).
Sum to Mono: This option is only available for the “Center” (Mono) Mic Group
channel. Enabling this option will output identical information on both the left and
right channels. When disabled, audio is routed only to the output channel specified in the FX
Bus Routing section.
Mic Level: Adjusts the volume of the Master or individual Left/Right mic
channel relative to all other available Mic Groups. A center channel (Mono) Mic
Group only contains a single level fader.
Perspective: Adjusts the relative perspective of the Master or individual mic
channels. Perspective is the relative distance of the performer to the
microphone, and is simulated by subtle variations of timing and resonance.
Perspective is most often used in rooms & halls to modify the front to back
distance between stage positions.
A positive Perspective value is perceived as a greater distance between performer and
microphone. Conversely, a negative Perspective value creates a tighter, more intimate sound,
emphasizing the early transient information over the impulse decay.
Wet/Dry Mix: Adjusts the ratio (balance) of wet versus dry signal for the
Master or individual mic channel. This option is used most often when an
impulse bank is of a digital processor; in other words, when an accurately
modeled acoustical environment is not the ultimate goal.
Pre-Delay: Adjusting the Pre-Delay nudges the impulse start point forward or
backward in time. A positive Pre-Delay value adds silence to the beginning of
the Impulse Response whereas a negative value cuts directly into the attack of
the Impulse Response sample by sample.
Note: In cases where an Impulse Response has been edited directly to it’s peak transient, a
negative Pre-Delay value can have dramatic effects on the timbre and volume of the convolved
audio.
28
29
MIC REPLACEMENT SECTION
The Mic Replacement section is Mic Group specific, meaning that original and replacement
Mic selections only affect the currently selected Mic Group.
Different microphones have different sonic characteristics. Microphones come in different
quality levels and they also have different directional characteristics (Omni directional,
Cardioid, Wide Cardioid, Hyper Cardioid, Figure 8…), They may also give different responses
according to the pitch or timbre of the source audio. To cover all these possibilities, GigaPulse
includes a generous selection of Microphone impulse models. You can use these to remove the
characteristics of one microphone and replace it with the characteristics of another.
Experimentation can lead to unique and interesting results.
Note: Using original (inverse) and/or replacement mics (as well as Pattern and Filter
selections) will cause GigaPulse to pause and run a short calculation when the mic models are
chosen, but they do not require additional CPU when processing audio.
Original Mic: This drop-down menu provides a list
of microphones that might have been used in the
original recording being processed by GigaPulse. By
selecting the appropriate mic, you apply the inverse
impulse response, which effectively removes the
character of the selected mic model from the original audio. This is why (inv) is at the
beginning of these choices.
Replacement Mic: This drop-down menu provides a
similar list as the Original Mic list, but these
microphones are used to apply the character of the
selected mic model that will effectively replace the
original.
It is important to understand that the matching a microphone is not an absolutely perfect
process. The impulse characteristics employed by GigaPulse are those of good condition,
unmodified models, and there may be variations according to age and wear. The match should
be fairly close in most cases though.
30
Pattern: Most microphones have a choice of polarity patterns. Some have just one pattern
while others have up to 5 patterns. Click on the Pattern Button dropdown to see what is
available for each mic. The choice of pattern can dramatically affect the sonic
character of a microphone.
Omni: Short for Omni-directional, this type of microphone records fairly evenly
from any direction around it. Typically, this choice provides an open sound with
clear highs.
Cardioid: This is a unidirectional microphone; a graphic representation of its
recording pattern resembles a heart, hence the name (Cardio-).
Variations include Wide Cardioid
and Hyper Cardioid
.
Figure-8: This is a bi-directional microphone, often used to record two
performers while rejecting off axis sound. The Figure 8 pattern is also used to
creating Mid-Side recordings.
Filter: The type of microphone roll-off filter is selected here. While some mics
have only a flat response, others have the ability to select a roll-off. The roll-off
filters out all the frequencies below the roll-off frequency. The roll-off is often used to
reduce the excess low-end sound of a bass instrument or the boominess in a close proximity
vocal recording. The roll-off frequencies or cutoff points are microphone specific.
31
GVI PLACEMENT SECTION
There are two types of buttons present in the Placement Section window, the source placement
(where the performer is located on the sound stage) and the microphone placements. The source
placement button is square by default and labeled numerically while the microphone placements
are round and labeled according to which Mic Group they belong to (surround, wide, etc.).
The Placement Section Window provides a quick and easy way to enable and disable
microphone placements. This is especially useful for Impulse sets that contain multiple Mic
Groups or placements. Microphone placements that are enabled appear yellow while disabled
microphones appear gray.
All encoded GIG Instrument Banks are comprised of single source placement Impulse Sets.
This means that only one stage or source placement is possible while up to seven microphone
placements may be available.
Grid: The Grid Button turns the grid pattern in the Placement Selection window on and
off. The button appears green when Grid is on.
32
MIC TO FX BUS ROUTING SECTION
The FX Bus Routing Matrix allows you to
independently route each microphone placement
contained within an impulse set to either the left or
right channel of the FX Bus. The routing section
also allows you to create simulated stereo signal
from a mono impulse response.
True Stereo: Limits the number of Mic Placements
to two and assigns one to the Left output channel
and the other to the Right output channel.
7-Channel: Allows for independent routing of each
mic placement within the FX Bus channels.
Simulated Stereo: Simulates a stereo signal from a mono source audio stream passing through
GigaPulse. When simulated stereo is enabled, GigaPulse will disable all but one microphone
placement. Because only one channel of convolution is used for Simulated Stereo, less CPU
resources are used than with Stereo Banks.
Width - Simulates the perceived width of the convolved signal from left to right.
Image - Simulates the perceived depth of the convolved signal from front to back by
creating extra voices and shifting them slightly temporally.
33