1
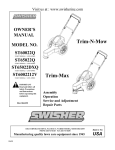
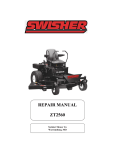
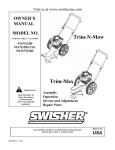
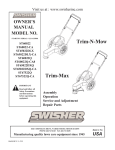
swisherinc.com
OWNER’S
MANUAL
STARTING SERIAL #:
L505-160001
MODEL NO.
LV5537
LV5537S
LAWN VACUUM
Wand Adaptor Kit sold
separately. Part Number 5473
IMPORTANT
Read and follow all Safety
Precautions and Instructions
before operating this
equipment.
Rev. 05-160
Assembly
Operation
Service and Adjustment
Repair Parts
1602 CORPORATE DRIVE, WARRENSBURG, MISSOURI 64093
8183 FAX 660-747-8650
PHONE 660-747-
Manufacturing quality lawn care equipment since 1945
ONLV
Made In The
USA
LIMITED WARRANTY
The manufacturer’s warranty to the original consumer purchaser is: This product is free from defects in
materials and workmanship for a period of one (1) year from the date of purchase by the original
consumer purchaser. We will repair or replace, at our discretion, parts found to be defective due to
materials or workmanship. This warranty is subject to the following limitations and exclusions:
1) Engine Warranty
All engines utilized on our products have a separate warranty extended to
them by the individual engine manufacturer. Any engine service
difficulty is the responsibility of the engine manufacturer and in no way is
Swisher Mower Co., Inc. or its agents responsible for the engine
warranty. The Briggs & Stratton Engine Service Hot-Line is 1-800-2333723. The Tecumseh Engine Service Hot-Line is 1-800-558-5402.
2) Commercial Use
The warranty period for any product used for commercial or rental is
limited to ninety (90) days from the date of original purchase.
3) Limitations
This warranty applies only to products which have been properly
assembled, adjusted, and operated in accordance with the instructions
contained within this manual. This warranty does not apply to any
product of Swisher Mower Co., Inc., that has been subject to alteration,
misuse, abuse, improper assembly or installation, shipping damage, or to
normal wear of the product.
4) Exclusions
Excluded from this warranty are normal wear, normal adjustments, and
normal maintenance.
In the event you have a claim under this warranty, you must return the product to an authorized service
dealer. All transportation charges, damage, or loss incurred during transportation of parts submitted for
replacement or repair under this warranty shall be borne by the purchaser. Should you have any
questions concerning this warranty, please contact us toll-free at 1-800-222-8183. The model number,
serial number, date of purchase, and the name of the authorized Swisher dealer from whom you
purchased the mower will be needed before any warranty claim can be processed.
THIS WARRANTY DOES NOT APPLY TO ANY INCIDENTAL OR CONSEQUENTIAL
DAMAGES AND ANY IMPLIED WARRANTIES ARE LIMITED TO THE SAME TIME PERIODS
STATED HEREIN FOR ALL EXPRESSED WARRANTIES. Some states do not allow the limitation
of consequential damages or limitations on how long an implied warranty may last, so the above
limitations or exclusions may not apply to you. This warranty gives you specific legal rights and you
may have other rights, which vary from state-to-state. This is a limited warranty as defined by the
Magnuson-Moss Act of 1975.
Please fill in the serial numbers and model numbers for both the engine and the lawn vacuum on the
back of this manual.
2
SAFETY PRECAUTIONS
This Safety Alert Symbol indicates important messages in this
manual. When you see this symbol, carefully read the message that
follows and be alert to the possibility of personal injury.
Read this manual completely. This machine can amputate hands, feet, and throw
objects. Failure to observe the following safety instructions could result in serious
injury or death.
WARNING: The engine exhaust from this product contains chemicals known to the
state of California to cause cancer, birth defects or other reproductive harm.
DANGER: Your lawn vacuum is intended to be operated according to the rules for
safe operation in this manual. As with any type of power equipment, carelessness or
error on the part of the operator can result in serious injury. If you violate any of
these rules, you may cause serious injury to yourself or others.
•
•
•
•
•
•
•
•
•
•
•
•
•
Read the manual. Learn to operate this equipment in a safe manner.
Do not under any circumstances alter this lawn vacuum. This equipment was
designed and engineered in accordance with operating instructions. Altering this
equipment, or using this equipment in such a way as to circumvent its design
capabilities and capacities, could result in serious injury or fatality and WILL
VOID THE WARRANTY.
Allow only responsible adults who have read this manual to operate this machine.
Never allow children to operate this machine.
Inspect turf for any rocks, string, toys, wire, etc. that may cause an obstruction; and
remove them.
Identify all in-ground objects that will need to be avoided, such as, sprinkler heads,
stakes, water valves, etc.
Stop the engine if you pick up a foreign object and after all moving parts have
stopped; inspect the vacuum for any damage.
Use the proper boot for your mower deck.
Only use vacuum for turf collection.
When crossing gravel areas, stop the vacuum and mower blades.
Only a single operator is to operate the lawn vacuum. Keep all others, including pets
and children, a minimum of 20 feet away from your work area.
Always disconnect the spark plug wires and place them where they cannot contact
the spark plug, to prevent accidental starting the engine when setting up,
transporting, adjusting or repairing.
Always wear protective gear such as safety goggles, protective hearing device.
Never wear loose clothing or jewelry that can be caught by moving parts of the
vacuum and pull you into it. Keep hair away from moving parts. There are
rotating blades inside these opening.
3
•
•
•
•
•
•
•
•
Familiarize yourself with all of the controls in a safe environment
before starting to work with this machine.
Keep hands and feet away from moving parts.
Only operate vacuum on slopes of 35% grade or less.
Never operate or allow someone to operate this equipment while
under the influence of alcohol or drugs.
Never make adjustments or repairs with the engine running.
Do not remove top cover or attempt to empty contents or make any
adjustments of cart while engine is running.
Do not use lawn vacuum if any guards, hoses, adapters, boot or any
other damage or repairs are needed.
Vehicle braking and stability are affected by the addition of this
equipment. Do not fill the lawn vacuum to its full capacity without
checking the towing capacities of the tow vehicle.
SAFETY AND OPERATIONAL DECALS
Replace decal immediately if damaged. Order by part number from Swisher Mower and Machine Co. Inc.
OD55-TRIANGLE DANGER DECAL
OD70142-DANGER STOP ENGINE
DECAL
OD38-CAUTIONS DECAL
4
ASSEMBLY INSTRUCTIONS
1.
2.
3.
4.
5.
6.
7.
8.
9.
10.
11.
12.
13.
14.
15.
16.
17.
18.
19.
Remove outside crate and set parts aside.
Remove small components and identify each piece.
Raise front hitch, using caution to prevent latch from being bent. (Figure 1)
Latch hitch to wagon.
Align holes in frame and install 3/8-16X1” Hex Head bolt and lock nuts.
Tighten all four of the hitch bolts securely. (Figure 2)
Insert hitch tube into the front of the hitch and lock in place with the snap pin (H11).
Lower trailer down on the wheels and roll off of the pallet.
Align fan/engine/pump assembly on lower slots of motor base with the rivets, pushing
down and rearward to align the front holes. (Figure 3)
Install 3/8-16X1” bolts in front holes and tighten.
Unfold fabric bag frame and place into pockets at the corner of the bed. (Figure 5)
Install tailgate by sliding downward into the rear channels.
Open fabric bag and spread over the top frame stretching downward and slipping the
plastic edge under the edge of the trailer bed rail.
Attach the Velcro tabs around the rear frame section and zip the rear flap closed.
Insert the bag adaptor into the bag sleeve at the front upper left hand corner
Install upper tube onto blower and lock into place.
Install hose onto the front of the blower housing and secure clamp.
Cut boot to fit deck and install to deck. (Figure 4)
Assemble end of hose and a hose clamp over the round opening of boot and tighten
clamp.
PREPARING THE DECK BOOT
• View the boot templates that are provided. Select the template that corresponds with the
discharge opening of mowing deck. If a template does not exist for your mower, then one
will need to be created.
• To create a custom template, mark around your discharge opening on a piece of cardboard.
• Tape the template to the face of the boot, locating the template approximately ½” from the
front edge and ¼” down from the top. Keep as close to the top as possible. Mark outline of
template onto the face of the boot using a white crayon, nail or scribe.
• Drill a starting hole inside the outline, and then use a key-hole saw or equivalent to cut out
the opening. Be sure not to cut the hole too big the first time.
• Position the boot over the deck opening and check for fit of cutout. If necessary, trim
cutout. Keep the fit as close as possible for best vacuum suction.
• A selection of boot brackets is provided. Some bending may be required. Drilling of holes
into your existing deck may be necessary, as well as drilling into the top of the boot.
ATTENTION!
WE HAVE MADE EVERY ATTEMPT TO PROVIDE HARDWARE
TO MOUNT THE DECK BOOT TO VARIOUS LAWN MOWING
MANUFACTURERS. DUE TO CONSTANT CHANGES IN DESIGNS
OF MOWING DECKS SOME ADAPTATION MAY BE NECESSARY.
5
Be careful while
lifting, not to bend
latch.
Install 4 bolts
and nuts.
Insert tongue
and pin.
Figure 2
Move components off
of pallet and identify.
Bag adapter fits into
bag and over blower
tube.
Figure 1
Assemble frame into
corner holes.
Blower tube slides
over debris exhaust.
Figure 3
Figure 5
Figure 4
6
OPERATING YOUR LAWN VACUUM
The operation of any mower can produce foreign objects to be thrown into the
eyes, resulting in severe eye damage. Always wear certified safety glasses or
wide-vision safety goggles over spectacles before starting any cutting machine
and while operating such a machine.
The operation of any engine produces sound waves that are damaging to the
human ear. Ear protection is recommended.
CAUTION!
Tragic accidents can occur if the operator is not alert to the presence of
children. Children are often attracted to the machine and the mowing
activity. Never assume that children will remain where you last saw them.
INTENDED USE
The Lawn Vacuum is designed to vacuum grass clippings and leaves from yards. It is not
intended to vacuum over gravel, sand, rock, etc., or any other material that will damage the
impeller blades. The Lawn Vacuum is not designed to exceed 5 MPH. It should be towed by an
approved lawn tractor only. It is not designed to tow behind our patented Trail Mowers.
TO START ENGINE
See engine manufacturer’s recommendations for the type and amount of oil and fuel used.
• Make sure the tow vehicle parking brake is set and vacuum is level. Engine must be
level to accurately check and fill oil. Do not overfill.
• Check spark plug wire, oil, and fuel.
• Set engine idle to CHOKE position.
• Grasp pull-rope handle and pull out slowly until engine reaches start of compression
cycle. Pull the rope with a single fluid motion. Let the rope recoil slowly. Repeat
instruction 4 or 5 times until engine fires.
• Once engine is running, move CHOKE control to RUN position.
TO STOP ENGINE
• Move the throttle control lever to the OFF position.
• Disconnect spark plug wire from plug to prevent accidental starting while equipment is
unattended or is being worked on.
7
VACUUM AND EMPTY
• Inspect the Lawn Vacuum to make sure all covers, tailgate, deck adapter, elbow, hose
adapter, and hose are properly attached.
• Check tires for proper inflation.
• Check oil and gas in vacuum and lawn tractor engines.
• Begin operation at low speed, adjust forward speed to match grass height and/or moisture
condition to prevent clogging. Should your Lawn Vacuum become clogged, shut off tractor
and vacuum engines. Before attempting to unclog, remove spark plug wire to prevent
accidental starting.
• To empty cart, shut off tractor engine and set brake.
• Shut off Lawn Vacuum engine.
• Unzip the fabric cover and remove the tailgate. Unhooking the fabric from the sides and
front of the cart is not necessary.
• Release the latch holding the cart to the tongue by lifting up on the handle.
• Unhook the plastic elbow from the fabric adapter attached to the fabric.
• Tilt the cart backwards.
• Using a rake or other suitable tool, pull the grass clippings from the cart.
• After cart is emptied, return cart to tongue and reattach plastic elbow to the boot. Put
tailgate back on and attach fabric.
CAUTION!
VEHICLE BRAKING AND STABILITY MAY BE AFFECTED WITH THE
ADDITION OF AN ACCESSORY OR AN ATTACHMENT. BE AWARE OF
CHANGING CONDITIONS ON SLOPES. DO NOT OVER FILL CART.
TWO – IN – ONE APPLICATION
Your Swisher Lawn Vacuum has been designed to perform two capabilities in one product.
While you are not using your Lawn Vacuum to sweep up leaves and grass clippings the
engine assembly, fabric cover and upper frame may be disassembled to leave you with a
utility trailer.
• Empty all fuel from engine.
• Remove engine assembly and the plastic elbow from tongue and store in a ventilated
area.
• Remove bag by un-clipping it from the lip of the cart and releasing the Velcro straps
from the frame. Shake out loose debris, fold and store in a dry area.
• Lift the frame out of the cart, fold and store with the fabric covering.
DANGER!
DO NOT USE THE LAWN VACUUM WITH JUST THE ENGINE AND THE
BLOWER TUBE. THIS IS VERY DANGEROUS.
8
VACUUM MAINTENANCE
CAUTION!
ALWAYS STOP ENGINE AND DISCONNECT SPARK PLUG WIRE
BEFORE MAKING ANY ADJUSTMENTS AND/OR REPAIRS.
• Replace the spark plug at the beginning of each mowing season.
• Keep the air cleaner free of debris.
• Change the oil after the first 5 hours of operation then change the oil every 25
hours of operation.
• Rotate hoses from end to end after every 25 hours of use and rotate each hose
¼ turn after every mowing season. This keeps debris from building up in one
area.
• Regular cleaning and scheduled maintenance will prolong the life and
performance of your Lawn Vacuum.
• Remove debris as it accumulates, paying special attention to the hoses.
• Replace or repair any damaged or worn parts immediately.
• Check the fabric covering periodically for any tears, rips or deterioration.
• Lubrication may be needed to keep the release latch functioning smoothly.
ATTENTION:
GRASS CATCHER COMPONENTS ARE SUBJECT TO WEAR,
DAMAGE, AND DETERIORATION, WHICH COULD EXPOSE
MOVING PARTS OR ALLOW OBJECTS TO BE THROWN.
FREQUENTLY CHECK COMPONENTS AND REPLACE WITH
SWISHER’S RECOMMENDED PARTS, WHEN NECESSARY.
STORAGE
•
•
•
•
•
Clean the vacuum.
Before storing be sure Lawn Vacuum is thoroughly dried, especially
the fabric covering. Mildew can cause the fabric to deteriorate.
Remove fuel from the gas tank.
Change oil and air filters.
Store vacuum in a dry covered area or indoors.
ONLY A QUALIFIED MECHANIC SHOULD MAKE ANY
ADJUSTMENTS, DISASSEMBLY OR OTHER KINDS OF REPAIRS.
9
SERVICE PARTS
Please have Model and Serial Numbers ready when ordering parts.
Color cannot be guaranteed upon service parts.
ITEM NUMBER
1
2
3
4
5
6
7
8
9
10
11
12
13
14
15
16
17
18
19
20
21
22
23
24
25
26
27
28
29
30
31
32
33
34
35
36
37
38
39
40
NOT SHOWN
NOT SHOWN
NOT SHOWN
NOT SHOWN
NOT SHOWN
DESCRIPTION
MOTORBASE
BAG FRAME WELDMENT
TRAILER
REAR FRAME SECTION
FRONT FRAME SECTION
LATCH
LATCH LOCK
TONGUE
IMPELLER
BAG
BAG FRAME SPREADER
TAILGATE
AXLE
TIRES
KNOB
FRONT RING
ENGINE
BAG ADAPTOR
TUBE - BLOWER ASSEMBLY
BLOWER FRONT
1/4 - 20 X 1 1/2 BOLT
1/4 - 20 NYLOK NUT
3/4ID X 1 1/4OD WASHER
1/8 X 1 1/2 COTTER PIN
3/8 - 16 X 1 BOLT
3/8 - 16 NYLOK NUT
3/8 - 16 X 1 1/4 BOLT
SPRING FOR IDLER ARM
SAFETY HITCH PIN
5/16 - 18 X 1 1/4 SERRATED FLANGE BOLT
5/16 - 18 SERRATED FLANGE NUT
BELLEVILLE WASHER
3/8 - 24 X 1 BOLT W/ LOCKTITE
5/16 - 18 X 6 1/2 BOLT
5/16 - 18 NYLOK NUT
1/4 X 1 Key Stock
WIRING HARNESS LAWN VAC
PLATE SWITCH MOUNTING
INTERLOCK SWITCH
5/16-18 X 1/2 Serr. Flg Bolt
HOSE
CLAMP
BOOT
SUSPENSION ARM
ADAPTOR PLATE
11
PART NUMBER
5443
5412
5400
5437
5433
5439
5468
5421
5426
5420NL
5414
5463
5462
F44157LV
2079
5410
N/A
5407
5470
5405
NB162
NB180
NB195
NB126
NB604
NB182
NB618
BRS6
H11
NB253
NB170
699
NB238N
NB680
NB181
9031
10784
5487TK
10885
NB252
5402
5403
5404
5467
5471
LAWN VACUUM
OWNER’S
MANUAL
HOW TO ORDER
REPAIR PARTS:
MODEL NO.
LV5537
LV5537S
Each Lawn Vacuum has its own serial number. Each engine
has its own serial number. The serial number for the Lawn
Vacuum will be found on the left hand side of the motorbase.
The serial number for the engine will be found on the top of the
blower fan housing.
All Lawn Vacuum parts listed herein may be ordered directly
from Swisher Mower & Machine Co. Inc., your nearest
Swisher dealer, or from our website. www.swisherinc.com
All engine parts may be ordered from the nearest dealer of the
engine supplied with your mower.
WHEN ORDERING PARTS, PLEASE HAVE THE
FOLLOWING INFORMATION AVAILABLE:
*
*
*
*
PRODUCT – LAWN VACUUM
SERIAL NUMBER - _______________
MODEL NUMBER - _______________
ENGINE MODEL NUMBER - _______________
TYPE - _______________
* PART NUMBER
* PART DESCRIPTION
www.swisherinc.com
TELEPHONE - 1-800-222-8183
FAX - 1-660-747-8650
SWISHER MOWER & MACHINE CO. INC.
1602 CORPORATE DRIVE
WARRENSBURG, MO 64093
SWISHER MOWER & MACHINE CO. INC.