1
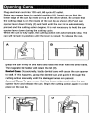
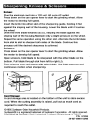
Adjustable
Can Ot3ener
instruction
-
Model #3108/M6del#3138
31
When using electrical appliances, basic safety
precautions should always be followed including the
following:
l
Read all instructions before using the can opener.
l
To protect against the risk of electrical shock, do not
put can opener in water or other liquid.
l
Close supervision is necessary when any can opener
is used by or near children:
l
Unplug from outlet when not in use, before putting on
or taking off parts, and before cleaning.
l
Avoid contacting moving parts.
l
Do not operate can opener with a damaged cord or
plug or after the appliance malfunctions, or is
dropped or damaged in any manner. Return can
opener to the authorized Sunbeam Appliance Service
Station for examination, repair or electrical or
mechanical adjustment.
l
The use of attachments not recommended or sold by
the manufacturer may cause fire, electrical shock or
injury.
l
Do not use outdoors.
l
Do not let cord hang over edge of table or counter or
touch hot surfaces.
l
Do not open pressurized [aerosol-type] cans.
l
Do not open cans of flammable liquids such as lighter
fluids.
l
Do not use can opener for other than intended use or
leave unattended while in use.
l
Do not operate this appliance in the presence of explosive
and/or flammable fumes.
SAVETHESEINSTRUCTIONS
FORHOUSEHOLDUSEONLY
Read the following instructions before using the unit for the first time.
This appliance has a polarized plug (one blade is wider than the other).
To reduce the risk of electric shock, this plug is intended to fit in a
polarized outlet only one way. If the plug does not fully fit in the outlet,
reverse the plug. If it still does not fit, contact a qualified electrician.
Do not attempt to defeat this safetyfeature.
1
Plug electrical cord into 120 volt, 60 cycleAC outlet.
Raise can opener lever to upright position (A). Insert can so that the
lower edge of the can lip rests on top of the drive wheel. Be certain that
the cutting edge is on the inside of the can lip as shown (B).Push can
opener lever down firmly (C) and hold until the can lid is automatically
pierced and the cutting action begins. It is not necessary to hold the can
opener lever down during the cutting cycle.
When the can is fully open, the cutting action will automatically stop. The
can will remain in position until the lever is raised. To release the can,
grasp the can firmly in one hand and raise the lever with the other hand.
The magnetic lid holder will retain the lid (D).
Dented Cans: Occasionally, badly dented cans will cause the can opener
to stall. If this happens, grasp the dented can and guide it through the
cutting action manually until the damaged areas are passed.
Jammed Cans: To open a can that has become jammed, raise the can
opener lever and release the can. Begin the cutting action again in a new
place on the can lip.
C
To insure proper sanitation, all removable parts on the can opener should
be detached and cleaned thoroughly in warm, sudsy water at regular
intervals. Before cleaning, UNPLUGTHE CORDFROM OUTLET.The
motor housing easily wipes clean using a damp cloth. Never immerse the
motor housing in water.
Removing the Lid litter:
Lift up to slide out as pictured (E).
Removing the Cutting Unit:
Raise can opener lever to its fullest upright position.
Push can opener lever to the right to remove it from the recessed
area (F).
Drive Wheel
Wipe off drive wheel with a damp cloth. To thoroughly clean drive
wheel, use small brush to remove accumulated dirt (G).
Replacing the Cutting Unit
With can opener lever in raised position, place knob in recessed area.
Push lever to the left to snap it into position (H).
Replace the lid lifter
Twist the knob to raise and lower the cutting assembly. To adjust the
height of the cutting assembly follow these directions:
1. Twist the knob in a counter-clockwise direction until the knob clicks
into place. The cutting assembly Is raised for
opening extra tall cans.
2. Twist the knob in a clockwise direction to
lower the cutting assembly for opening regular
size cans and for compact storage.
The motor and internal gears of your can opener unit are permanently
lubricated at the factory for lifetime service and require no further
attention. The cutting blade is made of hardened steel and is a special
design. It will last for years under normal use. Do not attempt to
sharpen.
2 YEAR LIMITED WARRANTY
Sunbeam-Oster Household Products warrants that, for a period of two years from
date of purchase, this product shall be free of mechanical and electrical defects in
material and workmanship. Our obligation hereunder is limited to repair or
replacement, at our option, of this product during the warranty period, provided
the product is sent postage prepaid directly to our factory service center:
SUNBEAM-OSTERHOUSEHOLDPRODUCTS
APPLIANCE SERVICE STATION
117 Industrial Central Row
Purvis, Ms 39475
Hattiesburg, MS 39401
DO NOT RETURN THIS PRODUCT TO THE PLACE OF PURCHASE: THIS MAY
DELAY THE PROCESSING OF YOUR WARRANTY CLAIM. This warranty does not
cover normal wear of parts, damage resulting from any of the following: negligent
use of the product, use with improper voltage or current, use contrary to
operating instructions, or disassembly, repair, or alteration by any person other
than our factory service center. Product repair or replacement as provided under
the above warranty is your exclusive remedy. Sunbeam Corporation (of which
Sunbeam-Oster Household Products is a division), shall not be liable for any
incidental or consequential damages for breach of any express or implied
warranty on this product. Except to the extent prohibited by applicable law, any
implied warranty of merchantability or fitness for a particular purpose on this
product is limited in duration to the duration of the above warranty. Some states
do not allow the exclusion or limitation of incidental or consequential damages, or
allow limitations on how long an implied warranty lasts, so the above limitations
or exclusion may not apply to you. This warranty gives you specific legal rights,
and you may also have other rights which vary from state to state.
31
Knives:
Plug the electrical cord into a 120 volt, 60 cycle AC outlet.
Press down on the can opener lever to start the grinding wheel. Allow
the motor to develop full speed.
Insert the knife into either slot of the sharpening guide, holding it flat
against the sloping wall of the housing. Lower the blade until it touches
the wheel.
Draw the knife blade towards you (I), keeping the blade against the
sloping wall of the housing.Maintain only a slight pressure on the wheel.
Repeat the same operation using the other slot. Alternate the knife blade
from slot to slot to sharpen both sides of the blade. Continue this
process until the desired sharpness is achieved.
SCiSSOrJ:
Press down on the can opener lever to start the grinding wheel. Allow
the motor to develop full speed.
Open scissors, hold blade to be sharpened with the other blade on the
bottom. Pull blade through slot from left to right (Jj.
Turn scissors over and repeat with other blade. Use light pressure and
continuous motion when sharpening.
Cord Storage:
A cord storage area is located on the bottom of the unit to store excess
cord. When the cutting assembly is raised, pull out as much cord as
required to reach the outlet.
01995 Sunbeam-OsterHouseholdProducts.
Sunbeam@is a registeredtrademarkof SunbeamCorporation. All rightsreserved.
DistributedbySunbeam-OsterHouseholdProducts,Schaumburg.IL 60173
P.N.61659
38637~OWli-SUNS