1
M
NX-I
8082
0340
.
00011
U
,
,—
,
MULTI-FONT
—
1
.—
NX-I
00011
USERSMANUAL
I
I
-
NOT INTENDED FOR SALE
i
‘L
Federal Communications
Commission
Radio Frequency
Interfarenea
Statement
—
llrisqoiprnem generatesandusesradiofreqoeneyenergyand ifrtotinsttdled andused prcperly,that
is, in strict aCco&nce with the marmfauorer)sinstructions,may cause intesfersstceto radio and
televiaionreceptim. Ithasbeentypeteated andformaltocutr ly withtbelimits fora ~ss B computing
device in accordance with the specifiatiesrs in Su
to providereasonablepmtrAoo %@?@- aA2t?A?2F2z2L?2&:::’E:
;
is no gUamnteethatintorfarertceWillrtotmxtrrm a particrdariostallaticat.If this quipment does cause
interferatce
to radioortdeviaim’rccqiqto which,c+nbedqterminrdby
tumin ~ quipnem off ~d
by one or moreof i e fokwrng measures:
q the user is atcouragedto tryto eorrect the,@terfemarce
● Reorientthe reedingantenna
,.
Re.krMte
theeanpotetorprinter
withrqt?ettoti”mceiver
Movethecomputer
orprinter
awayfmm the receiver
● Plug
themnrputerorprirrterirrto
adiffercntoutlet
sothatitand
there&veramorr
differuttbrartch
Circuits.
mrtsrdtthedakr or anexperienced
rsdiohekvisiorr
teduticiert
for
If necessary, the usershould
additiortal
suggestions.
‘llteuaer
mayfindthefollowing
bookle~
tionsCarrmi
asker
helpful:
“How to Identify and RCSC4W
●
.
—
●
—
Rxw2L%R5%&%YG
bookkt
is
availablefromthe U.S. Ggwwmmmt.Priotiog-Offiae,
Wasbirrg@rt,
D.C.. m.
wt4attl-tM345-4.
SUXJC
No.
—
Forcompliarrcewiththe FederalNoise InterferertceStandard,thisquipmertt tequiresa shieldedcable.
The above siaterneti applies only to printers marketed in the USA.
Statement
d
The Canadian Departmentof Communkations
Radio InterferenceRegulations
mtusdoeanotcxceedtheCiassBlimitsforradiortoise
“
%’%%’&%dioInterfe
rutce
Regulatiomofthe Cans&n _%%m&-9E%.~”us
b#-ta~mdnmtriquenThetps
de bruitsrsdio&ctriques d@traaarttleslirnites
applicablesaux
“que&iict6
US delaclasse BprescritesclansleRi@mxmt surle.bmuillageradic+lectn
appare~ ~&i
perle rmmsti%3es CommunicatiaIsdu Canada.
Tk above sratenwat ap@s
only toprhers
marketed in Cana&.
—
.
—
—
—
Trademark Acknowledgements
—
NX.l(K)OH, NL-10, NP.1O,NX.1W15, ND-10/15, NR.10/15: StarMiCtUttiCS Co., hi
IBM K, Proprintar X24, Proprintar II, PC-DOS: ImematiamlBusinessMachinesCorp.
Microsoft BASIC, MS.DOS: MicrosoftCo
LQ-~
LQ-1OOO,
LQ-1500: %kO Epson ?7’”rp.
NOTICE
● All rights reserved. Reproduction
of artypsrt of this manualin artyform whatsoeverwithout
—
. %YJ=%sK%X8&f;~%Yo*.ge
ti*@tim.
● All effortshave beersmadeto ensurethe ●ecuraeyof the amttattsof this manualat the time of
press. However,shotddany errrxsbe detected,STAR would greatlyappreciatebeing informed
of thurt.
● llte above notwithstanding,~AR cartassumeno responsibilityfor artyerrorsin this manual.
—
@ Copyright 1989 Star Mic~nics Co., Ltd.
—
.
—
HOWTO USE THIS MANUAL
This manual is organizedinto five chapters and four appendixes. To
learn how to make the best use of your printer you are urged to read all
of chapters 1 through 5. The appendixes can be referred to as necessary.
Chapter1 explains how to get the printer unpacked and set up. Read this
chapter before you do anything else.
Chapter2 explains the control panel. After getting set up, read this chapter
and try out the procedures in it to find out how the printer works.
Chapter3 gives tips on using word-processing programs and other commercial software with this printer. Read this chapter in conjunction with
your software manual.
Chapter4 is addressed to do-it-yourself programmers. It shows simple
programming examples using DOS commands and BASIC.
Look through this
Chapter5 covers maintenance and troubleshooting.
chapter to see what it contains, then refer to it as necessary later.
AppendixA lists the printer’s technical specifications.
i“ —
!
AppendixC presents a BASIC program you can use to defineand download
new characters.
AppendixD presents tables of the printer’s character sets.
1‘
i
Appedix B &tails the functions of escape sequences and other printer
commands.
L
L.
E.
t-
FEATURESOF THE PRINTER
This printer is a compact, convenient,monochrome printer without frills
but with a fidl complement of features, making it an excellent partner for
a personal computer. It supports the IBM/Epson printer commands and
character sets, enabling it to print just about anything your computer can
generate, both text and graphics. Some of its main features are the following:
. Extensivesoftware support
—-
Since it is compatible with the Epson and IBM printers, it works with
any software that supports those printers. That includes most word-processing and graphics programs, spreadsheets, and integrated software
packages.
● Easy operation
Clearly understandable lamp displaysand beep tones provideimmediate
feedbackwhen you press the switcheson the control panel. The four switches
can operate in combinations to”perform a surprising variety of fimctions,
including margin setting and micro-alignment.
. Easy care and maintenance
The ribbon cartridge can be replaced in seconds;the print head in a few
minutes.
● Ver=tile paper handling
Single sheets, fanfold forms, and multi-copy forms (up to triple-ply)
are all accepted, and you can use either tractor or friction feed. A special
feature enables you to keep fanfold forms parked in readinesswhileprinting
on other paper.
. High-resolution near-letter-quality printing
When you selectan NLQ type style,the printer slowsdown and employs
a densematrix of up to 18by 23 dots to print clear, well-formedcharacters.
● Large variety of type styles and sizes
The printer has one draft style and four NLQ styles(Courier, Sanserif,
and Orator with small capitals or lower case), plus italics for all styles,plus
condensed print, bold print, double-sizedprint, quadruple-sizedprint —see
the samples on the next page:
—
—
—
.
—
—
—
Type styles
are:
J.11””’i!”f:”k
C:hal”
””actel’””s?
Courier
characters,
SanSerif
characters,
ORATOR WITH SMALL CAPITALS,
with
and ITALICS
Print
pitches
OR
lower case characters,
FOt- all
isfY”Iziw:.
are:
Pica pitch,
Elite pitch,
Condensed
pica pitch,
Cortdensedelite
pitch,
proportional
spacing
for
all pitches,
lloulie-height,
IhxikI
1e–s ized,
Expand.~d.
Quad– s iz~d
Various
1 ine
and
character
spacings:
Other
features:
Ernphas i zed,
Double-strike,
Under1ininq, Wer 1InIng,
6UPERSCR
IPT’
6UESCRI
Download
ch~racters:
Dot graphics:
PT ,
ctc’:’~~’.J:iWfttWWb
s&s
●
TABLE OF CONTENTS
Chapter 1
Chapter 2
SETTING UP THE PRINTER
Locating the printer
Unpacking and inspection
Check the carton contents
Setting up
Mount the platen knob
Remove the top cover
Install the ribbon cartridge
Replace the top cover
Connect the printer to the computer
Connect the printer’s power cord
Loading single sheets
Mount the paper guide
Semiautomatic loading
Manual loading
Loading and parking fanfold forms
Paper parking
Paper unparking
Test printing
Short self test
Long selft test
Interface test
Adjusting the printing gap
DIP switch settings
CONTROL PANEL OPERATIONS
Switchesand indicators
Power indicator
On Line switch
Paper Feed switch
Print Pitch switch
NLQ Type Style switch
Power-up functions
Short test pattern
Long test pattern
Stay in panel pitch
Stay in panel style
Hexadecimal dump
Switch combination functions
Paper parking
Page feed
1
1
1
3
6
9
—
12
14
14
19
19
—
—
—
23
—
.
26
—
Top of form
Forward micro-feed
Reverse micro-feed
Left margin
Right margin
Clearing the buffer
USING THE PRINTER WITH
Chapter 3
COMMERCIAL SOFTWARE
Installing your software
Printer menu
Printer command options
Type styles
Page width
Initialization sequence
Setting the DIP switches
Using your software
Page alignment
Type style and pitch selection
Other printer commands
Chapter 4
USING THE PRINTER
WITH DOS AND BASIC
Hard-copyingthe screen
Prograrnming the printer with DOS commands
Programming the printer with BASIC
MAINTENANCE AND TROUBLESHOOTING
Chapter 5
Cleaningthe printer
Replacingthe ribbon
Replacingthe printhead
Troubleshooting
Appendix A TECHNICAL SPECIFICATIONS
Appendix B PRINTER CONTROL COMMANDS
Font controlco~ands
Characterset commands
Charactersize and pitch commands
Verticalpositioncommands
Horizontal position commands
Graphics commands
Download character commands
Macro instruction commands
Other printer contrcd commands
31
31
33
33
37
37
38
40
47
47
47
47
50
53
59
59
63
66
70
76
80
82
85
86
.-
Appendix C DOWNLOAD CHARACTER GENERATOR
Draft character
NLQ character
Appendix D CHARACTER SETS
Standard character set
IBM character set #2
IBM character set #1
Additional character set
International character sets
INDEX
REFERENCE CARD
91
99
100
102
104
105
106
107
Insidethe cover
—
—
—
—
—
—
—
—
—
—
chapter 7
SETTINGUPTHEPRINTER
Subjects
covered
in Chapter1 include–
●
●
●
●
●
●
●
●
Locating the printer
Unpacking and inspection (names of parts)
Setting up
Loading single sheets
Loading and parking fanfold forms
Test printing
Adjusting the printing gap
Setting the DIP switches
LOCATINGTHE PRINTER
Give some thought to the best place to put the printer. Both the printer
and computer should be used in a normal indoor environment. For best
performance, we recommend:
● Place the printer on a flat surface.
● Keep it out of direct sunlight and away from heat-producing appliances.
● Use it only in temperatures where you are comfortable.
● Avoid locations with dust, grease, or high humidity.
● Supplyit “clean” electricity.Don’t connect it to the samecircuitas a large,
noise-producingappliance such as a refrigerator.
● Make sure the line voltage is within 10Yoof the voltage specifiedon the
identification plate.
● If you will be using fanfold forms, place the printer where the forms can
fe~d up to it from-below, with at least a full page hanging free.
UNPACKINGAND INSPECTION
Checkthe carton contents
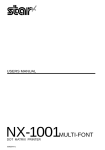
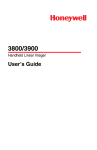
Open the carton and check each item in the box against Figure 1-1 to
make sure that you have everything (there should be five items).
-
—
—
—
—.
.
—
—
—
—
Igure 1-1. Check to make sure you have all five items: 1) Printer, 2) Paper guide, 3) Platen
knob, 4) Ribbon cartridge, and 5) User’s manual.
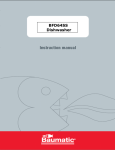
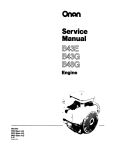
Make an external inspection of the printer. Note the locations of the
followingparts:
Bail lever:
.4
opensandclosesthe paperbailwhichholdsthepaper
againstthe platen.
I
.
.
lever
Powe
Connector
Figure 7-2. The printer’s external parts
releases the platen. This lever must be down for
printing on single sheets, and up for fanfold forms.
Top cover:
protects the print head and other parts.
Rear cove~
protects the sprocket feed mechanism.
for inserting single sheets of paper.
Entry slot:
Control panel: controls various printer functions.
Power switch: switchespower on and off.
for connecting the computer to the printer.
Conneetor:
Release leven
SETTING UP
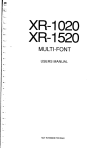
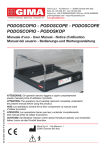
Mount the platen knob
The platen knob is packed into a recess of the white foam packing
material which held your printer insidethe packing box. Becareful to remove
the knob before disposing of the packing.
Mount the platen knob on its shaft on the right side of the printer. Turn
it until you can push it in all the way.
Power should always be off when you turn the platen knob.
3
...
Figure 1-3. Mounting the platen knob
Remove the top cover
Lift the front edgeof theprinter’s clear plastictop cover. Then disengage
the tabs at the back of the cover and remove the cover completely.
T
—
—
—
—
-.
a
.
-
.
. .
.——
Ffgure W4. ttemovmg me Iop cover
4
Install the ribbon ciwtridge
The top side of the ribbon cartridge has a handle for turning the ribbon.
Turn this handle in the direction of the arrow to tighten the ribbon.
Next place the ribbon cartridge on the print head carnage, guiding the
ribbon between the print head and the platen, Press down firmly on the
cartridgeuntil it snaps into place.
. ..
I
-..
L
J
Figure 1-5. Installing the ribbon cartridge
Replace the top cover
Hold the cover upright and engage the tabs at the back. Then swing
the front edge down until the cover is closed.
Leave the cover closed during normal operation. It keeps out dust and
dirt and reduces the printer’s operating sounds. Open the cover only to
change the ribbon or make an adjustment.
Connect
the printer
to the computer
Connect the printer end of the interface cable to the connector socket
on the right side of the printer as shown in Figure 1-6.
Make sure the computer is turned OFF, then connect the other end
of the cable to your computer as described in the computer manual.
5
k.
.
—
.
. .=--- .-
wu,,,, ow,,,,
~
,,s0
I*lLwllavw
WI(3
—
Connect the printer’s power cord.
Check that the printer’s power switch (located at the left front) is OFF.
Then plug the printer’s power cord into an AC wall outlet.
Never plug or unplug the power cord while the printer is turned on.
—
LOADINGSINGLESHEETS
This section will take you through the procedures for loading single
sheets of paper.
—
If you are using the optional automatic sheet feeder (ASF), read the
ASF instruction booklet.
Mount the paper guide
The paper guide fits into the two holes on top of the rear cover. Mount
the guide and raise it to the upright position.
—
igure 1-7. Mounting the paper guide for single sheets
Semiautomatic loading
Single sheets can be loaded manually with power off, or semiautomatically with power on. We will start the easy way with semiautomatic
loading.
1. Check that the releaseleveris down and the bail lever back (bail closed),
then switch power on. You will hear a short beep tone and the Power
indicator on the control panelwillflash. Theseare the printer’spaper-out
signals.
2. Place a singlesheet on the paper guide and insert it down into the entry
slot. You will feel a slight resistance as the paper engages the paper
detector lever. Work the paper past this resistance and insert it down
as far as it will go.
3. Move the bail lever forward. When the bail opens, the printer feeds
the paper automatically.
4. Move the bail lever back, The paper will feed slightly forward again,
ending in position to print with a top margin of about one inch.
.
—
lcver
—
—
—
—
Figure 1-8. Loading a single sheet
—
Manual loading
Itis also possible to load paper manually while the printer’s power is
off. The procedure is:
—
1. Check
that
printer power is off and the release lever at the back of the
printer is down.
2. Insert a single sheet of paper into the entry slot as far as it will go, the
same way as for semiautomatic loading.
3. Move the bail lever on top of the printer forward to open the paper
bail.
4. Turn the platen knob clockwiseuntil the front edge of the paper comes
out from under the top cover.
5. If the paper is not straight, move the release lever to the up position,
straighten the paper by hand, then move the release lever back down.
6. Move the bail lever back to close,the paper bail.
–
–
-
—
—
—
—
8
,—
LOADINGAND PARKINGFANFOLDFORMS
‘___
Fanfold forms have holes along the sides and perforations between the
sheets. They are also called sprocket forms, punched forms, or just plain
“computerpaper”. Thisprinter acceptsformsup to 10”wide. Fanfold forms
are loaded, parked, and unparked as explained next.
L
.
1. Place a stack of fanfold paper behind and at least one page-lengthbelow
the printer.
2. Turn the printer’s power OFF.
3. Set the release lever to the up position. If there is paper in the printer,
remove it. (Sincethe platen is released, you can just pull the paper out.)
4. Move the bail lever forward to open the bail.
.
.
5. Remove the paper guide and put it aside for the moment.
6. Remove the rear cover. Grip it by its front edge and lift upwards and
backwards as in Figure 1-9.-
Figure 1-9. Opening the rear cover
L
\
.
:—
(
..
7. Open the sprocket covers on the right and left sprocket units, as shown
in Figure 1-10.
8. Flip the clamp leversdown. This allows the two sprocket units to move
freely right and left so you can align them with the holes in the paper.
9. Insert the front edge of the paper over the paper detector lever and tuck
it in under the platen.
9
—
.
plever
—
—
—
—
Figure f-10. Opening the sprocket covers to expose the sprocket teeth
—
—
—
—
—
—
igure 1-11. Closing the sprocket covers
10. Fit the holes in the paper over the sprocket pins. Check that the paper
is even.
11. Close the sprocket covers (Figure i-n).
12. Raise one of the clamp levers to lock one sprocket unit in place.
—
10
—
..
13. Turn the platen knob to feed the paper forward until it comes out from
under the top cover.
14. Move the bail lever back to close the bail.
15. Check that the paper is feedingin flat, then raise the other clamp lever
to lock the other sprocket unit.
16. Replace the rear cover. Hold it tilted upward and insert the two tabs
at the bottom into their slots. Then rotate the cover forward, pressing
down on the thumb pads on the left and right to snap it into place.
17. Mount the paper guidein the horizontal position shown in Figure 1-12,
so that it will-separate the printed from the unprinted paper.
.
..
L
. . .
.
lgure 1-12. Mounting the paper guide tor Tanrola terms
-.
Now you are ready to switch power on and print.
Paper parking
After loading fanfold paper; you do not have to unload it when you
want to print on a single sheet. The printer will “park” it for you if you
follow the procedure below.
1. Paper parking starts with power ON, fanfold paper loaded in printing
position, the release lever up, and the bail lever back.
2. Press the On Line switch on the control panel to set the printer off-line
(On Line indicator otT).
11
,,
3. Tear off the printed form at the last perforation, leaving not more than
about half a page showing above the top cover. If necessary,press the
Paper Feed switch to feed paper forward until a perforation is located
just above the top cover, and tear there.
4. Press the Print Pitch switch on the control panel and hold it down.
5. Still holding the Print Pitch switch down, press the Paper Feed switch.
The printer will automatically feed the fanfold form backward until the
paper is completely free of the platen.
6. Move the release lever to the down position.
7. Mount the paper guide in the upright position.
Now you can load single sheets either semiautomatically or manually,
as explained previously. The fanfold paper remains parked at the back of
the printer.
—
—
—
When you want to resume using fanfold paper, the procedure is as
follows.
Paper unparking
—
1.
2.
3.
4.
—
Remove all sin~ sheets from the printer and close the paper bail.
Mount the paper guide in the horizontal position.
Move the release lever to the up position.
With power ON, move the bail lever forward. The printer will automatically feed the parked fanfold paper into position for printing.
5. Move the bail lever back to close the bail. Now you are ready to print.
—
TEST PRINTING
After loading paper, you can test the printer as described next.
k
r
Short se/f test
.
This procedure prints a six-line “barber-pole” test pattern. The lines
are eight inches wide, so the paper should be at least that wide.
—
1. Check that paper is in position for printing.
2. With power off, press the On Line switch on the control panel and hold
it down.
3. Still holding the On Line switch “down,turn the printer’s power on.
—
The printer will automatically start printing its short test pattern. You
can release the On Line switch after printing starts. To remove the paper
at the end of the test; switch power OFF, then turn the platen knob. (Don’t
turn the platen knob while power is on.)
12
.
L
I 41#*~~, ( ) *+, -. /(,~~345~7~9:
! ,t#$%&,
‘#*7:&~
#5%.%,
$>:8, . !
%%, ( )
~ ~ *+,
-- /O I~Z4S67B9:;
; .:=;. ? @&BCDEFGHIJKLMNOPCJRSTUVWXVZ
[ \ 1’,,,, ‘a bcdefghi
<:=>7QAECDEFGHI
JKLWWOPORSTUVW XYZt\
1’ .– ‘abcde+ghi
j k lmno
jklmnap
- 71@
A
WXYZ L \ 1,,,, abcde+ghi
jk lmnopq
( ) *+, -. ;012T45A769:
;,.:-:.
_BCDEFGHIJ KLMNOPG!RST!JV
( J K+, -. /0123456789:
; ..=>? @ABCDEFGHI JKLMNOPt2RSTUVWXYZ
[\ 1‘abcdef
FIhi jk lmnopqr
; <:=:, ?mABCDEFGH IJ~:LHNopQRsTuvw
Xyz [ \ ]’
! *+ , -. ,,0 I 2s4~67S9:
‘a bcdc<gl,i
j}.: lmrmpqr-~
IJKLMNOPQRSTUVWXV
Z C\l’.. yabcdefqh,
i k lrnnopqt. st
*+. –. /1.812345b7e9:
: :=:, ?I%BCDEFGH
.-
Figure 7-13. Short test pattern
Long self test
To see the printer’s variety of type styles,you can run the long version
of the printer’s self test.
1. Check that paper is in position for printing.
2. With power off, press the Paper Feed switch on the control panel and
hold it down.
3. Still holding the Pap Feed wvitd down, turn the printer’s power ON.
The printer will automatically start printing a test pattern of its full
character wt in various type styles. Watch the lights on the control panel;
they indicate which type style is printing. The test pattern varies depending
on the setting of DIP switch 1-6(ON —Standard mode, OFF —IBM mode),
but more about that later.
This test repeats indefinitely in a cycle of 30 or 70 lines. To stop the
test, switch power off.
.
-.
L
Interface test
After confirming that the printer works by itself, it is time to test the
interface with the computer. The simplest way to do this is with a direct
command. Power up both the printer and computer, load paper, then try
a command like one of the following:
MS-DOS or PC-DOS command:
A>ECHO THE INTERFACE WORKS>PRN
Microsoft BASIC command:
LPRINT “THE INTERFACEWORKS”
Or you can try any other command understood by your computer to
print a line of text. Consult your computer manual if you need help. If you
repeat the command a few times, the printout will come into view.
.
Next you may want to try a test printout with word-processingsoftware,
but for this to succeed you will have to set the printer’s DIP switches (see
the end of this chapter) and install your software to support the printer
correctly (see Chapter 3).
13
“L
ADJUSTINGTHE PRINTINGGAP
The distance between the print head and the platen can be adjusted to
accommodate different paper thicknesses. To make this adjustment, remove
the top cover. The adjustment lever is located near the left end of the paper
bail. Pulling the adjustment lever towards you widens the gap; pushing it
away from you narrows the gap.
There are four positions;you can feelthe leverclickinginto each position.
The first position (narrowest gap) is the one most commonly used for single
sheetsof paper. Try differentpositions until you get the best printing results.
—
—
—
1
—.
—
—
—
—
Figure7-14. Adjusting for different thicknesses of paper
—
DIP SWITCH SEITINGS
—
When you remove the printer’s cover and look inside, you will see on
the green board at the bottom of the printer two groups of small white
switchesmarked DSW1 and DSW2. Theseare the printer’sDIP (Dual In-line
Package) switches. DSW1 has eight switches, named 1-1 to 1-8 from left
to right. DSW2 has four switchesnamed 2-1 to 2-4.
For all switches,the ON position is towards the back of the printer and
the OFF position is towards the front. To set a DIP switch, use a ballpoint
pen or other smallimplementto move the switchto the ON or OFF position.
Theprinter’s power shouldbe off whenyousetthe DIP switches. Settings
made while power is on do not take effect until power is switched off, then
on again, becausethe printer reads the DIP switchesonly at power-up.
14
—
.—
L-
L-
1!
L
‘igure 1-15. DIP switches
I Switch ,I Function
I ‘-
I
L
I
1-7
1-8
2-1
2-2
2-3
ON
I
OFF
I
11inches 12inches
Pagelength
Yes
No
Auto CR
Smallcaps Lowercase
Orator lowercase
Inactive Active
Auto sheetfeeder
Enabled Disabled
Paper-outdetector
Standard IBM
Printermode
Cbmcterset
(Std.Mode) I Italics I Graphics
I Set #1
Chameterset(IBMMode)I Set #2
Yes
No
Auto LF
Download
Buffer
Usageof RAM
1-1
1-2
1-3
1-4
1-5
1-6
I
I
]In@~ationalcha~ter~t
l(see~e~~w)
,
I
I
1
I
I
The printer is deliveredwith all DIP switchset to the ON position. These
are the standard settings. By changing the settings, you can alter various
printer functions to match your requirements. The followingquestions will
help you make the right settings.
Is the page length of your paper 11 inches or 12 inches?
Leave this switch ON if you will be using 1l-inch forms. Move it to the
OFF position if you will be using 12-inchforms.
Switch 1-2: Do you want an automatic carriage return?
Leave this switch ON. The printer will automatically perform a carriage
return by moving to the left margin at each line feed. Even if your software
sendsa separate carriage-return code, an extra carriage return does no harm
because two consecutive carriage returns are the same as one. Very few
programs require this switch to be OFF.
Switch 1-3: When you select the Orator type style on the control panel,
do you want lower-case letters to print as lower case (OFF)
or as small capitals (ON)?
Take your pick from the samples below. Note that lower-caseOrator does
not have descenders for the letters g, j, p, q, and y.
ORATOR PRINTS THIS WAY WITH SWITCH 1-3 ON.
Orator prints
this way with switch 1-3 OFF.
Are you going to use the automatic sheet feeder (ASF)?
Switch 14:
To use the automatic sheet feeder, move this switch to the OFF position.
Otherwise leave it ON.
Switch 1-5: Do you want the printer to stop printing about an inch from
the end of the paper, or to keep printing to the bottom?
Leave this switch ON except when you need to print very close to the end
of the paper. When this switch is OFF the printer ignores the paper-out
detector and prints down to (and beyond) the bottom edge.
Switch 1-6: Do, you want to use the printer in standard mode or IBM
mode?
Selectthe mode compatible with your computer and software. In standard
mode the printer operates like the Epson LX-800. In IBM mode it operates
like the IBM Proprinter II. The ON position selects standard mode. The
OFF position selects IBM mode.
Switch 1-7: The action of this switch depends on the mode chosen with
switch 1-6.
Switch l-l:
If you selectedstandard mode, do you want italicsor graphiccharactes?
Leave this switch ON to print italics in the standard character set. If you
set this switchto the OFF position, in place of italicsyou willget the graphic
characters, international characters, and mathematical symbols of IBM
character set #2. See Appendix D, character codes 128 to 254.
If you selected IBM mode, do you want IBM character set #1 or #2?
16
—-
—
—
—
—
—
—
—
,’
.,
ON selectscharacter set #2, which is for computers with an 8-bit interface
(the most common kind). OFF selectscharacter set #1, for computers with
a 7-bit interface.
Switch 1-8: Do you want an automatic line feed?
If you leave this switch at the ON position, a separate line-feed code is required to obtain a line feed.
If you move this switch to the OFF position, the printer performs both a
carriage return and line feed each time it receivesa carriage-return code.
Most computer systemssend a line feed code, or both a carriage return and
line feed, at the end of each line, so this switch should be left ON.
If you get double line spacing when you expect single spacing, or if lines
overprint each other, try changing the setting of this switch.
Switch 2-1: Does your software download new characters to the printer?
To download characters this switch must be OFF. The printer then uses
its RAM memory for storing character patterns and providesonly a one-line
print buffer. If you leave this switch ON the printer usesits RAM memory
as an input buffer, allowingthe computer to send data faster than the printer
prints.
Do you want an international character set?
International character sets differ in their assignmentof 14character codes.
See the character tables at the back of this manual. With the DIP switches
you can select one of eight character sets as follows:
Switches 2-2 to 2-4:
Country
U.S.A.
France
Germany
England
*
2-2
2-3
ON ON
OFF ON
ON OFF
OFF OFF
2-4
Country
ON
ON
ON
ON
Denmark I *
Sweden
Italy
Spain I
2-2
2-3
24
ON ON OFF
OFF ON OFF
ON OFF OFF
OFF OFF OFF
Denmark/Norway when switch 1-6 is OFF and switch 1-7 is ON.
:’..
.
,.,
.
—
—
—
—
—
18
r
‘L.
—
.
chapter2
CONTROLPANELOPERATIONS
—
This chapterexplains how to use the control panel to:
●
●
●
●
●
●
L.._
●
●
●
●
●
Pause printing
Feed paper (fast and slow, forward and reverse)
Select the print pitch
Select a type style
Print test patterns
Prevent software from changing the panel pitch and style selections
Print a hexadecimal dump
Park fanfold forms
Set the top-of-form position
Set the left and right margins
Clear the printer’s buffer
SWITCHESAND INDICATORS
The control panel has four switchesmarked:
L
●
●
.
●
On Line
Paper Feed
Print Pitch
NLQ Type Style
The On Line, Print Pitch, and NLQ Type Style switchesrespond with
a beep tone when pressed, and indicators beside them indicate their current
status. There is also a Power indicator that lights when power is on.
1-
i -
19
The control panel switchescan be pressed singly to perform the operations indicated by their names. Other functionscan be obtained by holding
these switches down when you turn the printer’s power on. Still further
functions can be executed by pressing the control panel switches in cornbination. This chapter explains all the switch and indicator functions.
---
Power indicator
The power indicator lights (yellow)when power is on.
When paper is not present, the power indicator flashes. A beep tone
also alerts you to the need to load paper.
—
--
On Line switch
The On Line switchsetsthe printer on-lineand off-line.The state changes
each time you press the switch.
In the on-line state the printer receives data from the computer and
prints the data. In the off-linestate the printer stops printing and sends the
computer a signal indicating that it cannot accept data.
The printer powers up in the on-line state if paper is present. If paper
is not present, the printer powers up off-line with the Power indicator
flashing. When you load paper the Power indicator stops flashing, but the
printer remains off-line.To start printing you must press the On Line switch
go on-line.
—
—
—
—
The two main times when you will want to press the On Line switch
are:
. Before and after any other panel operation
The other panel switchesoperate only in the off-line state. First press
the On Line switch to go off-line, then perform the panel operation, then
press the On Line switch again to go back on-line.
. To pause during printing
—
If you pressthe On Line switchduring printing, the printer stops printing
and goes off-line, allowing you to check the printout or change a control
panel setting. Printing resumes when you press the On Line switch again
to go back on-line.
Paper Feed switch
This switch operates only when the printer is off-line. If you press it
once the paper feeds forward by one line. If you hold this switch down, the
printer performs consecutiveline feeds.
.-
1!
\.[
,.
i..
While you are feeding lines, if you also press the On Line switch, the
paper will fked to the top of the next page. This is explained later.
When power is on, alwaysuse the Paper Feed switchinstead of the platen
knob to feed paper. Turn the platen knob only when power is off.
PrintPitch switch
This switch operates off-lineto selectthe print pitch: the spacingbetween
characters. The indicators to the left light (green) to indicate the selected
pitch.
The printer powers up in pica pitch. To change to another pitch, press
the On Line switch to go off-line,then press the Print Pitch switchrepeatedly
until the indicators show the pitch you want.
In Standard mode (when DIP switch 1-6 is ON), the pitch selections
cycle as follows:
Pica
Elite
Condensed pica
Condensed elite
Proportional pica
Proportional elite
(10 characters per inch)
(12 characters per inch)
(17 characters per inch)
(20 characters per inch)
This is pica (10 characters p= inch)
Thisis elite(12characters
per inch)
.
.
This is condensedpica (17 characters per inch).
Thisis mdensedelite (20
characters
perinch).
This is proportional pica.
This is proportional elite.
Figure 2-2. Print pitches selectable from tfre control panel
Samples of these pitches are shown in Figure 2-2. Note that with
proportional pitch different letters occupy different widths. (For example,
“i” and “1”are narrower than other letters.) Proportional pitch is attractive
and spaceefflcient, though not always convenient when column alignment
is required.
Note that you cannot selectcondensedproportional pitch on the control
panel. Youcanmake thisselectionby theprintercommands < S1s <ESCs
“p” 1 – see Appendix B.
21
In IBM mode (when DIP switch 1-6is OFF), the pitch selectionscycle
as follows:
Pica
(10 characters per inch)
Elite
(12 characters per inch)
Condensed pica (17 characters per inch)
Proportional pica
Proportional elite
There is no condensed elite pitch in the IBM mode.
NLQ Type Style switch
This switch selects the type style. Draft style is always selected at
power-up. To change to one of the NLQ (near letter quality) styles, set the
printer off-line, then press the NLQ Type Style switch repeatedly until the
indicators beside the desired selection light. The selectionscycle in the following order:
Draft (all indicators off)
Courier (NLQ)
Courier italic (NLQ)
SanSerif(NLQ)
SanSerifitalic (NLQ)
Orator (NLQ)
Orator italic (NLQ)
Samples are shown in Figure 2-3.
cl
l“’”
a+:’l:. (:]L.ta 1,i.‘1:.
y.
-/” l-~ ‘j, c}
‘j, c:.
This
is near– 1etter–qua
1ity
Courier.
This is Courier ita 1ic.
This
is Sanser i +.
This
is Sanseri f ita 1ic.
THIS
THIS
IS ORATOR WITH SMALL CAPITALS.
WITH SMALL CAPITALS.
IS ORATOR ITALIC
This is Orator
This is Orator
with l“ower case.
ita 7ic with lower case.
Figure 2-2. Type styles selectable from the control panel
I
The Orator style is unique in two ways. First, it is a dot larger (higher)
than the other styles. This makes it a good choice for labels and other text
requiring high visibility.A little extra line spacinghelpswhen Orator is used.
I
l—
jI ..
Second, there are two versionsof the Orator type style:one prints small
capitals in place of lower-case letters; the other prints lower-case letters,
but without descenders. The version you get when you select Orator from
the control panel depends on the DIP switches.If DIP switch 1-3 is OFF,
lower-case Orator will print as lower case. Otherwise it will print as small
capitals.
The other type styles do not have a small-capitals option. Lower case
always prints as lower case.
The type style can also be selected by printer commands given in Appendix B. Printer commands enable you to select both Orator styles, and
also draft italic, which cannot be selected from the control panel.
POWER-UPFUNCTIONS
In addition to their normal functions,all the control panel switcheshave
specialfunctions that operate if you hold them down whileswitchingpower
on.
ORATOR
❑
I
I
w
❑ COND
❑ PROP
Stay
in panel pitch
Stay in panel style
1
Longtest
❑ –POWER
ON UNE
❑
?
Short test
Hexadecimaldump
gure 2-4. Power-up functions of control panel
Short test pattern: On Line switch
1
!—
1
I
.
1
If held down during power-up, this switch prints a short test pattern
(shown in Chapter 1).
Long test pattern: Paper Feed switch
If held down during power-up, this switch prints a long test pattern.
The test cyclesendlessly.To stop the test you must switch power off.
Stay in panel pitch: Print Pitch switch
By holding this switch down during power-up, you can prevent software
interference with the print pitch selected from the control panel. You will.
hear an acknowledgingbeep as power comes on. After the beep tone, you
can set the printer off-line, select a print pitch, then return to on-line and
start printing. The pitch you selectedwill not be reset or otherwisechanged
by any commands your software may issue.
Stay in pane] Sty/e: NLQ Type Style switch
If held down during power-up, this switchpreventssoftwareinterference
with the type style selected from the control panel. There will be an acknowledgingbeep, after which you can set the printer off-line, selecta type
style, then return to the on-line state and start printing. The selected type
style will not be changed by any commands sent by software.
If you want to protect both the Print Pitch and NLQ Type Stylesettings
from software changes, press both switches during power-up. There will
be two acknowledgingbeeps.
Pressing these switches during power-up does not prevent you from
making any number of changes later from the control panel.
Hexadechnal dump: Paper Feed and Print Pitch switches
This feature is useful for programmers who are debugging printing
programs and want to see the actual codes the printer is receiving. (Some
computers change the codes the programmer intended.)
1. Holding both the Paper Feed and Print Pitch switchesdown, turn power
ON. A beep tone will be heard.
2. Start printing. In place of the usual printout you will get a formatted
dump showingexactly what data the printer receives.Each line presents
sixteen characters, their hexadecimal codes to the left and printable
characters printed on the right.
3. At the end of the hexadecimal dump, set the printer off-line with the
On Line switch. This is necessary to print the last line.
—
.
24
~
,1;:...
The followingBASIC program is a simple test you can run in hexadecimal mode:
-
10
20
30
40
50
L
-
FOR 1=0 TO 255
LPRINT CHR$(I) ;
NEXT I
LPRINT
END
If your system passes the codes directly to the printer without changing
them, you will get a printout like Figure 2-5.
00
10
20
30
40
50
60
70
so
90
AO
BO
CO
DO
EO
FO
OD
-.
—
L
‘-
,-.
L
-.
01 02
11 12
21 22
31 32
41 42
51 52
61 62
71 72
81 S2
91 92
Al A2
B1 B2
Cl C2
D1 D2
El E2
F1 F2
Ofi
--
ttgurez-a.
a
03
13
2S
33
43
53
63
73
S3
93
A3
B3
C3
D3
E3
F3
. .
(:)S09 C)A (IE UC
IB 19 1A IB IC
2B 29 26 28 2C
SS 39 ?A 3EI 3C
4B 49 4A 4B 4C
50 59 5A SB SC
66 69 66 6B 6C
70 79 7A 7EI 7C
SS 89 8A EIB EC
98 9$’ 9A 9B 9C
AS A9 AA AH AC
BE B9 HA BB BC
CS C9 CA CEI CC
D&l D9 I’M De DC
E8 E9 E6 EB EC
FE F9 F& FB FC
0.4 05 (36 <17
14 15 16 17
24 .25 26 27
34 :s % 37
44 45 46 47
54 5S 56 57
64 ’55 b6 67
74 75 76 77
B: 85 S6 S7
94 95 9& 97
A4 (35 66 67
!34 S5 B& B7
C4 C5 C6 C7
04 D5 D4 Q7
E4 E3 Eb E7.
F4 FS F6 F7
. . .
-–..—>—
—,..
—,
OD
ID
2D
SD
4D
SD
6D
7D
ED
9D
AD
BD
CD
DD
ED
FD
OE
IE
2E
3E
4E
SE
6E
7E
SE
9E
AE
BE
CE
DE
EE
FE
OF
IF
2F
3F
4F
SF
bF
7F
SF
9F
AF
EF
CF
DF
EF
FF
................
................
!“#$.
L&’ ( ) *+, -. /
o1234~6789:;<=>?
@ABCDEFGHIJKLMNO
PQRSTUVWXYZC\l”‘abcde+qhijklmno
pqrstuvwxyz{!lw.
................
................
................
................
................
................
................
................
..
J
sample nexaaecmmaump
MostBASICs,however,arenotquitethatstraightforward.
the IBM-PC prints the following.
00 01 02 03 04 05 06 07
OF 10 11 12 13 14 15 16
202122232425
2627
3031 323334353637
40 41 42 43 44 4S 46 47
50 51 52 53 54 55 56 57
bO 61 b2 43 64 65 66 67
70 71 72 73 74 75 76 77
so SI 82 83 84 S5 86 87
90 91 92 93 94 95 96 97
Ao Al AZ 6Z 44 fi5 46 A7
BO Hi B2 B3 E4 ES E6 S7
co cl C2 C3 C4 C5 C6 C7
DO D1 D2 D3 D4 DS D6 D7
EO El E2 E3 E4 ES E6 E7
FOF1 F2F3F4F5F6F7
OD OA
OS 09 OA OB OC OD 0!4 OE
17 18 19 IB IC ID IE IF
28292A2B2C
2D2E2F
38 39 3A 3B 3C 3D 3E 3F
48 49 4A 4B 4C 4D 4E 4F
58 59 5fl SE! 5C SD 5E SF
M 69 6A 6B bC 6D 6E 6F
78 79 7A 7B 7C 7D 7E 7F
SS89SASBSCEJDSEEF
9S 99 9A 9R 9C 9D 9E ‘?F
4S A9 M AEi fiC AD AE fiF
BS B9 BA BB EC ED BE SF
CS C9 C& CB CC CD CE CF
DS D9 DA DB DC DD DE DF
ESE9EAEBECEDEE
EF
FE F9 FA FE FC FD FE FF
Forexample,
................
................
!“#$Z&’ ()*+,-./
01234567S9:;<=>?
rn&BCDEFGHIJKLMNO
PQRSTUVWXYZ[\l”–
‘abcdefghijklmna
pqrstLlvwxyz{ l}”-.
................
................
................
................
................
................
................
................
..
igure2-6. Sampie hexadecimal dump with lBM-PC
ii
25
Notice that the printer receivesdecimal code 13 (hex OD)together with
hex OA,which is really decimal 10. In addition, the printer does not receive
decimal code 26 (hex 1A). To avoid this problem, change line 20, and add
lines 100 to 120as shown in either of the followinglists.
20 GOSUB 100
100 O=INP (&H379 )
110 OUT &H378, I
120 RETURN
: IF 0<128 THEN 100
:OUT &H37A, 4
: OUT &H37?t, 5
20 GOSUB 100
100 O=INP (&H3BD)
110 OUT &H3BC , I
120 RETURN
: IF 0<128 THEN 100
: OUT&H3BE, 5
: OUT &H3BE ,4
—
—
—.
—
—
SWITCH COMBINATION FUNCTIONS
Several additional functions can be obtained by pressing the control
panel switchesin combinations.
—
Reversemicro-feed
—
ORATOR
.-
❑
—
❑
Right
margin
Topof form
Figure2-7.Switchcombination
Paper
functions of control panel
parking: Print Pitch and Paper Feed switches
This procedure feeds the paper backward. It parks the fanfold form
at the back of the printer so that you can switch to single-sheetfeeding (by
moving the release lever to the down position).
26
—
Before parking fanfold forms, tear off all but the last page, leaving less
(at least three inches less) than a full page showing above the top cover.
1. Press the On Line switch to set the printer off-line.
2. Press the Print Pitch switch and hold it down.
3. Press the Paper Feed switch. The paper will be fed out backward.
Page feed: Paper Feed and On Line switches
If you are using single sheets, this operation ejects the current page. If
you are using fanfold forms, it feeds to the top of the next page.
1. Press the On Line switch to set the printer off-line.
2. Press the Paper Feed switch and hold it down. The printer will start
performing successiveline feeds.
3. Stillholding the Paper Feed switchdown, press the On Line switch,then
release both switches.The printer will smoothly eject the current page.
Top of form: NLQ Type Style and On Line switches
When you turn on printer power, the top-of-form position is automatically set to the current position. If this is not where you want the top
of the page to be, you can change the top-of-form position as follows.
1. Press the On Line switch to set the printer off-line.
2. Move the paper to the desiredtop-of-form position by pressingthe Paper
Feed switch, or by performing a forward or reverse micro-feed.
3. Press the NLQ Type Style switch and hold it down.
4. Press the On Line switch. The printer will beep to indicate that the
top-of-form position has been set.
Forward micro-feed: On Line and Paper Feed switches
For fine alignment, you can feed the paper forward in very small increments as follows:
1. Press the On Line switch to set the printer off-line.
2. Press the On Line switch again and hold it down.
3. Press the Paper Feed switch. The paper will start advancing in a series
of small steps. When you want to stop, release both switches.
Reverse micro-feed: On Line and Print Pitch switches
You can also feed the paper in small increments in reverse, to return
to a higher position on the same page.
Note: With fanfold forms, do not try to return to a previous page. The
perforation may catch inside the printer.
1. Press the On Line switch to set the printer off-line.
2. Press the On Line switch again and hold it down.
3, Press the Print Pitch switch. The paper will start moving backwards in
a series of small steps. When you want to stop, release both switches.
Leff margin:
NLQ Type Style and Print Pitch switches
Softwarealmost alwaysprovidescommands for controlling the margins,
so you will not usually have to set them from the control panel. When
necessary,however, you can set the left margin as follows.
1. Press the On Line switch to set the printer off-line.
2. Press the NLQ Type Style switch and hold it down.
3. Press the Print Pitch switch. The print head willmake a short excursion
from the left end, then start advancing from left to right in a series of
steps, each equal to one pica character width (1/10”). When the print
head reaches the desired left margin position, release both switches.
The printer will beep to indicate that the margin has been set.
Right margin: NLQ Type Style and Paper Feed switches
—
—
You can also set the right margin.
1. Press the On Line switch to set the printer off-line.
2. Press the NLQ Type Style switch and hold it down.
3. Press the Paper Feed switch. The print head will travel to the right end
of the carriage, then start advancing from right to left in a seriesof 1/10”
steps. When it reaches the desired right margin position, release both
switches.The printer will beep to indicate that the margin has been set.
—
.-
Clearing the buffer: Print Pitch, On Line and Paper Feed switches
When DIP switch 2-1 is ON, the printer stores received data in a large
memory buffer. This creates a problem when you want to abandon a printing
job and restart: the printer may be holding much more data in its buffer
than it has actually printed, and this unprinted data must be cleared out
before restarting. Turning power off is one way to clear the buffer, but there
is another way:
- 1. Halt the printing program on the computer. If printing stops immediately, the buffer is clear and the rest of this procedure is unnecessary.
If printing does not stop, continue as follows:
2. Press the On Line switch to set the printer off-line. Printing will now
stop, but there may be data remaining in the buffer.
3. Press the Print Pitch switch and hold it down.
4. Press the On Line switch and hold it down.
—
—
—
28
—
5. Press the Paper Feed switch and hold it down. Continue holding all
three switchesdown. In about three seconds you will hear a beep tone
simalimz that the buffer has been cleared.
6. R;lease-all three switches, make any necessary control panel settings,
then set the printer back on-line.
It is essential to halt the printing program on the computer before you
go off-line. Otherwise, when you go back on-line the computer will start
sending data again and the printer will continue printing, with missingdata
where the buffer was cleared.
.
L
k
‘L
L-
,
—
—
—
—
—
—
.
.
—
—
—
~:
chapter 3
I
USING THEPRINTER
WITHCOMMERCIALSOFTWARE
L
.
-.
. .
There is an abundance of commercial software available: spreadsheet
programs, word-processing programs, graphics programs, and more. This
printer will work with any program that supports a Star, Epson or IBM
dot-matrix printer. Before using the printer with commercial software,
however, there are two things you must da
● Install the software so that it supports the printer
. Set the printer’s DIP switchesto match the software
INSTALLING YOUR SOFTWARE
Most commercial software includes an installation program or routine
that you can run to customize the software to fit your hardware system.
Start by reading the explanation of the installation program in your software
manual.
Printer menu
-.
L
L
.
‘—
.
The installation program usually offers a menu of printers from which
to choose. If you find this printer on the menu, select it.
If this printer is not listed,look for the Epson LX-800or IBM Proprinter
II. If these are not listed, look for another Star, Epson or IBM printer. A
few of the choices you may see are given below in order of preference:
Star
NL-10
NP-10
Nx-lo/15
ND-lo/15
NR-lo/15
Epson LX-800
FX-86e
EX-800
Lx-86
LX-80
IBM Proprinter II
Proprinter
Graphics Printer
Some menus are less explicit about model names but offer general descriptionssuchas “Star printer’’;’’Epsonprinter”, “IBM dot-matrix printer”,
“dot-matrix ASCII printer”, “Centronics-type printer”, “Draft printer”,
or “Standard printer”. Any of these selectionsshould work. If you are not
sure of the right selection, it does not hurt to experiment. If you choose
wrong, you will get strange printing results, but don’t worry; just try a
different selection.Don’t pick any printer described as a daisywheelprinter
or laser printer.
31
A few installation programs may ask you not to select a printer but to
describe what your printer can do. The answers to the most often asked
questions are: Yes, this printer can do a backspace; and Yes, it can do a
hardware form feed.
Selecting (or describing) a printer is the main step in the installation
process and frequently the only step necessary. If you selected this printer
or any Star, Epson or IBM printer you should be able to use software
commands for all the standard printer functions, including bold or double-strike printing, underlining, subscripts, superscripts, margin control,
line-spacingcontrol, and graphics.
—
—
Printer command options
Besidesthe standard printer functions, however, your printer has some
capabilities your software may not be aware of, including double- and
quadruple-size printing and the printing of special characters assigned to
control codes. Some software enables you to definethese capabilitiesas user
options in the installation process. Read your software manual to find out
whether you can do this and if so, how.
—
—
—
The most useful thing you can do is to define a way to enter the escape
code < ESC >, which is the control character with decimal character code
27 (hexadecimal IB). This code usuallycannot be keyed in directly (pressing
the ESC key will not work). As an installation option, however, you may
be able to assign it to a function key or a special key combination. Doing
so will put the full power of the printer at your disposal.
Type styles
Some word-processing software has commands that enable you to
change type styles in the middle of a document without a printing pause.
To use these commands you must generally define the printer’s type styles
(fonts) during installation, by assigning them numbers for example. Read
your software manual for details, and refer to Appendix B for the relevant
printer commands.
Page width
Spreadsheet programs in particular may ask you to specifythe printer’s
column width. The column width of this printer depends on the character
pitch used:
Pica
80 columns
Elite
96 columns
Condensed pica 137columns
Condensed elite 160columns (Standard mode only)
—
—
—
.
—
32
—
The character pitch can be selected from the control panel before you
start printing, or possibly by an initialization sequenceas described next.
1-.
.
\
1—
1-
hitialization sequence
One of the installation options may be to specify the commands your
software sends at the beginning of each printing job. These commands are
called the “initialization sequence” or “setup string.” If necessary,you can
use the initialization ,sequenceto adjust the margins to your paper size or
select a particular type style or pitch. You can look up the commands you
want in Appendix B.
Forexarnple, if you selected96-columnwidth for a spreadsheetprogram,
it would be convenient to add an elite pitch command to the initialization
sequence. Appendix B indicates that this command consists of the two
characters:
Esc > “M”
<
which have decimal character codes 27 and 77 (hexadecimal IB and 4D).
Your software manual or an on-screen prompt will explain how to place
these codes in the initialization sequence.
SETTING THE DIP SWITCHES
,—
L,
After completing the installation of your software, check the setting
of the printer’s DIP switches,in particular DIP switch 1-6. If you selected
a Star or Epson printer on the installation menu, switch 1-6 should be ON
(the factory setting). If you selected an IBM printer, switch 1-6 should be
OFF.
DIP switches 1-2 (auto CR), 1-7(character set), 1-8 (auto LF), and 2-1
(RAM usage) are also related to your software. Read what your software
manual has to say about carriage returns, line feeds, character sets, and
downloading characters, and refer to the explanation at the end of Chapter
1.
L-
II
—
\
‘—
1~~
,—.
USING YOUR SOFTWARE
With the installation and DIP switch settings correctly completed, you
are ready to entrust most of the control of your printer to your software.
However, there will still be some things you have to do yourself.
Page alignment
If you are printing on fanfold forms, the first thing to do before you
start printing is to align the top of the forms so that printing will start at
the right position on the page, a short distance below the perforation. With
power off, you can align the forms by turning the platen knob. When power
is on, use the Paper Feed switch on the control panel.
—
Type style and pitch selection
If your software does not control the type style and pitch, you must
make these selectionson the control panel. The default selectionsare draft
styleand pica pitch. If you want a differentstyleor pitch, proceed as follows:
1. Hold the NLQ Type Style or Print Pitch switch down when you turn
the printer’s power on. Hold both switchesdown if you intend to make
both settings. The printer will beep in acknowledgement as it powers
up.
2. Press the On Line switch to set the printer off-line.
3. To select a type style, press the NLQ Type Style switch one or more
times.
4. To select a print pitch, press the Print Pitch switch one or more times.
5. Press the On Line switch to set the printer back on-line.
.—
—
—
—
—
Most programs begineach printingjob by sendinga command that resets
the printer. That is why you must press the NLQ Type Style and/or Print
Pitch switches as you power up. If you do not press these switchesduring
power-up, the reset command will reset your panel selectionsto draft style
and pica pitch.
If you want to change the type style or pitch in the middle of a printing
job, one way to do this is to insert a printing pause command in your file
at the point of the change. When the printer pauses, press the On Line switch
to go off-line. If the change occurs in the middle of a line, the printer will
print the first part of the line. Now make the change with the control panel
switches,set the printer back on-line,then command your softwareto resume
printing.
If yvu were able to define software commands for print pitch and type
style, changes like these can be inserted in your text file and made on the
fly without a printing pause.
—
—
Other printer commands
If your software enables you to place the escape code in your files, or
if you were able to define this as a user option during installation, you are
in a very powerful position: you can embed almost any printer command
in your files. The printer commands are explained in detail in Appendix
B.
—
—
—
34
—
I
,..
..
-..
Most printer commands consist of the escape code followed by one or
more letters or numbers. Some examples are:
< ESC > WI Double-width characters
c ESC > W() Normal width
< ESC >4
Italic
< ESC >5
Upright
Two lines with these commands embedded are shown below, together
with the printed result.
-..
File:
<ESC >WIPRINT’ER COMMANDS<ESC>WO
cun he 1P you to use <ESC )4ita 1i c<ESC >5 print.
-.
L
Printout:
I?R
can
1 NZZZR
he 1p you
to
COIYllWANDS
use ~ ta 1 ic print.
You will probably not see the symbol < ESC > on the screen, but a
different symbolsuch as “E or ‘[, or perhaps no symbolat all. This depends
on your software.
\
-
—.
After printing the first page of a long job, you may want to pause to
check that the printing is correctly formatted. Press the On Line switch,
setting the printer off-line. Printing will stop immediately. To resume
printing, press the On Line switch again.
k-
If you need to abandon a printingjob before it is finished,your software
should provide a command for this purpose. Another simple expedient is
to switch the printer’s power off.
!.-
.
\
L
\
L
$
,’
‘.
..
—
—
—
—
—
—
—
—
36
—
I
1“
i chapter 4
l’-.
,.
,,.
USING THEPRINTER
WITHDOS AND BASIC
Although you will probably do most of your printing with the aid of
commercial software, at times you will want to employ direct commands
or programs of your own. This chapter will give you some ideas. Three
subjects are covered:
● Hard-copying the screen
. Programming the printer with DOS commands
● Programming the printer with BASIC
HARD-COPYING THE SCREEN (MS-DOS AND PC-DOS)
If your computer has a PRTSC (or PrtSc) key, there is an easy way to
get hard copy of the screen. Press the SHIFT and PRTSC keys. The printer
will print the c-urrentscreen contents. The PRTSC key works both at the
system command level and while you are running application software.
Normally the PRTSC key prints only text data, but if your DOS system
includes a file named GRAPHICS.COM, you can hard-copy graphics displays by first typing the command:
AX+RAPHICS
You will find that graphics printing takes considerably more time than
text printing. See your DOS manual for further information on the
GRAPHICS command.
At the DOS command level,there is also a simpleway to have the printer
print hard copy continuously,instead of one screenat a time. Pressthe CTRL
key, hold it down, then also press the PRTSC key. If your computer does
not have a PRTSC key, press the CTRL and P keys. Nothing visible will
happen, but you have just switched on the print-screen function. After this,
the printer will hard-copy all text displayed. For example, try typing the
directory command:
A )DIR
You will obtain a printed directory.
—
To switch printer output off, press CTRL-PRTSC or CTRL-P again.
Each time you press this key combination, hard copy toggles from on to
off or from off to on.
—
PROGRAMMING THE PRINTER WITH DOS COMMANDS
If your system includes the file PRINT.COM you can use the main
DOS printing command. Simplytype the word PRINT followedby the name
of the file you want to print. To print a file named README.DOC, for
example, type:
—
—
—
A>PRINT
README. DOC
—
The computer may respond with the followingmessage, asking which
printer to use:
Name of
1 ist
device
IPRNI :
If your computer is connected to only one printer, press RETURN to
select the default choice @N). Printing will begin and the A > prompt
will reappear. You can execute other commands or programs while the file
is being printed.
—
.—
—
—
A singlePRINT command can print two or more files.List the filenames
consecutivelyon the same line, or use wild-card characters (* and ?). Each
file will be printed starting on a new page. The PRINT command also has
control options. For example, you can terminate a printing job in progress
with the /T option. (The printer may not stop printing immediately;it may
have considerable data stored ahead in its buffer.) For the /T option, type:
—
A>PRINT\T
See your DOS manual for further information about the PRINT
command. If your systemdoes not includePRINT.COM, you can print files
by using the PRN device name in COPY or TYPE commands such as the
following:
—
A)COPY README. DOC PRN
AYIYPE README. DOC ) PRN
COPY and TYPE do not permit you to execute other commands while
the file is printing.
38
—
—
—
—
-.
-.
i
L
(
L
i-
L
,
L
(
‘L
I
9-
,,
I
,.
L
If you want a particular type style, print pitch, or right or left margin,
you can make these settingsfrom the control panel before you start printing.
See Chapter 2.
If you print from the DOS command level very often, it will be advantageous to create a printer setup file. Then instead of setting margins
etc. manually each time, you can complete the setup with a singlecommand
from your computer. For example, you can create a file containing printer
commands to set the right and left margins, select near letter quality, and
select elite pitch. You can find the commands in Appendix B. We suggest
the following:
< ESC > “x” “1”
● Near letter quality
< ESC > “!” <1>
. Elite pitch
● Left and right margins
< ESC > “X” <12> <92>
< ESC > “!” <1> is a powerfulcommand that, in addition to selecting
elite pitch, cancels unwanted features such as underlining which might be
left from previouscommands. The angle brackets around the <1> indicate
character code 1, which is a control code, not the printable digit “l”.
< ESC > “X” <12> <92> sets the left margin in column 12 and the
right margin in column 92. This will give a 6.7-inch,80-columnprinted line
with a one-inch left margin. (Elite has 12 characters per inch). <12> is a
control code; <92> is the character “\”, as you can verify in Appendix
D.
You may want to place additional commands in this file, such as line
spacingand bottom margin commands. Or you may want to create a variety
of setup files with a different set of commands in each.
To avoid excessline feeds, you should place the commands on one line
in the setup file. You may or may not be able to generate a setup file with
word-processingsoftware;it dependson whether your softwareletsyou enter
control codes. If your system includes the file EDLIN.COM, however, you
can easily create a setup file with the DOS line editor.
An appropriate name for this setup file would be NLQELITE.DAT.
To use the DOS line editor, type the command EDLIN NLQELITE.DAT,
then type the underlined parts of the following display. Press RETURN
at the end of each line. Don’t type the symbol “A”. This symbol means to
hold the CTRL key down while pressing the next key: for example, ‘V
means to type CTRL-V. ‘C means to type CTRL-C, which indicates the
end of the input.
A>EDLIN
New file
NLQELITE . DAT
l:WAV[xlAv[!AvA-v[xAvL\
2:*-(-J
.
—
“V indicates that the followingcharacter is a control code. ‘V[ enters
the < ESC > code. < ESC > has character code 27, and “[” is the 27th
character in ASCII sequence from A. Similarly, ‘VA enters the control
code z 1> and *VL enters the control code <12>. See your DOS manual
if you need further information about EDLIN.
You can now set up the printer by sendingit the fileNLQELITE.DAT.
To avoid unnecessary logging of commands, switch hard-copy output off
(by pressing CTRL-PRTSC if hard copy is on). To print the file
README.DOC in NLQ elite type, give the followingtwo commands:
—
—
—
A>COPY NLQELITE . DAT PRN
A)PRINT README. DOC
For greater convenienceyou can make a batch file that will set up the
printer and print any specified tile with a singlecommand. To create such
a batch filewith the name NLQPRINT. BAT, typein the firstfour linesshown
next. ‘Z means to press the CTRL and Z keys simultaneously.To use this
file to print README.DOC, type the fifth line.
A)COPY CON NLQPRINT . BAT
COPY NLQELITE . DAT PRN
PRINT %1
“z
A>NLQPRINT
—
—
—
REA~ME . DOC
The first above line is a copy command from the CONsole screen to
a file named NLQPRINT. BAT. The next two lines are the contents of this
file. The
a dummy parameter: whatever file name you type after
NLQPRINT will be substituted for %1 and printed.
‘XO1
—
is
PROGRAMMING THE PRINTER WITH BASIC
As an example of programming the printer in Microsoft BASIC, we
have listed the program for the IBM-PC that printed the sample of features
shown at the beginning of this manual. This program runs in the printer’s
Standard mode (DIP switch 1-6 ON).
—
—
—
—
—
40
1““
1’
i
1000 ‘ Set control
codes
‘Escape code
1010 E$=CHR$(27)
‘Draft quality
1020 D$=E$+’’xO”
‘Near letterquality
1030 N$-E$+’’x1°
‘Couriercharacters
1040 C$=E$+’’kO’’+N$
‘Sanserifcharacters
1050 S$=E$+’’kl’’+N$
1060 Ol$==E$+’’k2’’+N$ ‘Orator with small capital
‘Orator with lower case
1070 02$=E$+’’k3’’+N$
‘Horizontal
tab
1080 H$=CHR$(9)
‘Pica pitch
1090 P$=E$+”P”
1100 ‘ Start printing
1110 WIDTH “LPT1:’’,255
1120 LPRINT E$;’’D’’;CHR$(3)
;CHR$(13);CHR$(0)‘SetHT
1130 LPRINT C$;’’Typestyles are:”
1140 LPRIN’TH$;D$;’’Draft
characters.“
1150 LPRINT H$;C$;’’Courier
characters,”
1160 LPRINT H$;S$;’’Sanserif
characters,
”
1170 LPRINT H$;Ol$;’’Orator
with small caPitals,or “
with lower case characters,
”
1180 LPRINT H$;02$;”
‘Selectitalics
1190 LPRINT E$;”4”;
1200 LPRINT H$;02$;’’and
“;Ol$;’’italics
“;S$;’’for
“;
1210 LPRINT C$;’’all“;D$;’’styles.”
‘Cancelitalics
1220 LPRINT E$;”5”
1230 LPRINT C$;’’Print
pitches are:”
1240 LPRINT H$;P$;’’Pica
pitch,”
1250 LPRINT H$;E$;’’M’’;”Elite
pitch,”
1260 LPRINT H$;CHR$(15);‘Condensedpitch
1270 LPRINT P$;’’Condensed
pica pitch,”
“Condensedelite pitch,”;
1280 LPRINT H$;E$;’’M”;
‘Picapitch
1290 LPRINT P$;
‘Cancelcondensedprint
1300 LPRINT CHR$(18)
‘Select proportional
spacing
1310 LPRINT H$;E$;’’P1”;
1320 LPRINT “proportional
spacing for all pitches, ”
133o LPRINT E$;’’PO”
‘Cancel proportional
spacing
1340 LPRINT H$;E$; ’’Wl’’Expanded,ed, “;E$;’’WO”;
1350 LPRINT E$; ’’wl’’Doublebheightght,
“;E$;’’wO”
1360 LPRINT H$;E$; ’’h’’;CHR$(l) ;“Double–sized,
“
1370 LPRINT H$;E$; ’’h’’;CHR$(2) ; “Quad-sized. “;
1380 LPRINT E$;’’h’’;CHR$(O)
1390 LPRINT :LPRINT
1400 LPRINT E$;’’Q’’;CHR$(47) ‘Set right margin
1410 LPRINT C$;’’Various line and character
Spacings:”
‘Center text
1420 LPRINT E$;’’al”
1430 FOR 1=1 TO 10
1440 LPRINT E$;’’A’’;CHR$(I); ‘Set line Spacing
1450 LPRINT E$;” ‘;CHR$(I);
‘Increase
character
Space
1460 LPRINT “THE SPACINGSARE CHANGED”
1470 NEXT I
1480 FOR 1=10 TO 1 STEP –1
41
1490 LPRINT E$;“A“;CHR$(I);
1500 LPRINT E$;“ “;CHR$(I);
1510 LPRINT “THE SPACINGSARE CHANGED”
1520 NEXT I
‘Left justify
1530 LPRINT E$;“aO”
‘Set 1/6” line spacing
1540 LPRINT E$;’’3’’;CHR$(36);
space
1550 LPRINT E$;” “;CHR$(0); ‘Normal character
1560 LPRINT :LPRINT
1570 LPRINT C$;”Other features:M
1580 LPRINT H$;E$; ’’E”; “Emphasized”;E$;’ ’F”;”, “;
1590 LPRINT E$;”G”; “Double-strike’’; E$; “H’’;’’,”
1600 LPRINT H$;E$; ’’-1”; “Underlining’’; E$;’’-O”; “, “;
1610 LPRINT E$; ”–l”; .@er~lnlng’’ ;E$;’’-O. ;ti,u
1620 LPRINT H$;E$; ’’SO”;“SUPERSCRIPT’’;E$;”T” ;“, “:
1630 LPRINT E$;’’S1”; “SUBSCRIPT’’;E$;“T’’;’’,”
1640 GOSUB 2020
1650 LPRINT H$;C$;’’Download
characters:“;
1660 LPRINT D$;E$;’’%1”; ‘Selectdownload character
1670 FOR 1=1 TO 5
‘Printd~wnload character
1680 LPRINT CHR$(60);
1690 NEXT I
‘Selectnormal character
1700 LPRINT E$;’’%O”:
1710 GOSUB 2120
1720 LPRINT C$;E$;’’%1”; ‘Selectdownload character
1730 FOR 1=1 TO 5
‘Printdownloadcharacter
1740 LPRINT CHR$(60);
1750 NEXT I
‘Selectnormal character
1760 LPRINT E$;’’%O”
1770 LPRIN’TH$;C$;“Dot graphics:”
1780 DIM LOGO$(4)
1790 RESTORE 2630
1800 FOR ROW-1 TO 4
1810 FOR COL=l”TO 100
1820 READ DG
=LOGO$(ROW)
+CHR$(DG)
1830 LOGO$(ROW)
1840 NEXT COL
1850 NEXT ROW
; ‘Set 8/72” line spacing
1860 LPRINT E$;’’A’’;CHR$(8)
1870 FOR ROW==lTO 4
1880 LPRINT H$;H$;
1890 LPRINT E$;“*’’;CHR$(O);‘Selectnormal density
;
1900 LPRINT CHR$(1OO);CHR$(O)
1910 LPRINT LOGO$(ROW)
1920 NEXT ROW
‘Initializeprinter
1930 LPRINT E$;’’f!”
1940 END
2000
2010 ‘ SUBROUTINES
2020 ‘ Define draft download character
—
—
—
—
—
—
—
—
—
—
—
-.
L
L.
.
L-
,—
L
L-
,
L.
L.
—.
L
L.
2030 LPRINT D$;E$;“:“;CHR$(O);CHR$(O);CHR$(O);
“&”;CHR$(0);CHR$(60);CHR$(60);
2040 LPRINT IZ$;
2050 RESTORE 2520
2060 FOR M=O TO 11
2070 READ MM
2080 LPRINT CHR$(MM);
2090 NEXT M
2100 RETURN
2110
2120 ‘ Define NLQ download character
CHR$(0);CHR$(O)
;CHR$(0);
2130 LPRINT C$;E$;’’:”;
;CHR$(60);CHR$(60)
;
2140 LPRINT E$;’’&’’;CHR$(O)
2150 RESTORE 2560
2160 FOR M-O TO 46
2170 READ MM
2180 LPRINT CHR$(MM);
2190 NEXT M
2200 RETURN
2500
2510 ‘ DATA
2520 ‘ Draft download characterdata
2530 DATA 139,124, 0, 66, 4, 64, 36, 16, 2, 16
2540 DATA 12, 0
2550
2560 ‘ NLQ download characterdata
2570 DATA 128, 14, 16, 38, 1, 70, 1, 70, 0,126
2580 DATA O, 0, 70, 0, 38, 0, 22, 9, 6, 9
2590 DATA 6, 8, 6, 0, 28, 32, 14, 64. 14, 0
2600 DATA 14, 0,124. 0, 0. 12, 64, 12, 32, 14
2610 DATA 16, 14, 0, 14, 0, 12, 0
2620
2630 ‘ Dot graphicsdata
2640 DATA O, 0, 0, 0, 1, 3, 7, 7, 7, 15
2650 DATA 14, 14, 14, 14. 14, 7, 7, 3, 3, 15
2660 DATA 15, 15, 0, 0, 0, 0, 0, 0, 0, 0
2670 DATA O, 1, 3, 3, 7, 7, 15, 14, 14, 14
2680 DATA 14, 15, 7, 7, 7, 3, 0, 0, 0, 0
2690 DATA O, 0, 0, 0, 0, 0, 0, 0, 0, 0
2700 DATA O, 0, 0, 0, 0, 0, 0, 0, 0, 0
2710 DATA 1, 3, 7, 7, 7. 15, 14, 14, 14, 14
2720 DATA 14, 7, 7, 3, 3, 15, 15, 15, 0, 0
2730 DATA O, 0, 0, O; O. 0. 0. 0. 0. 0
2740 DATA o, 0, 60.255,255,255,255:255;143;15
2750 DATA 7. 7. 7. 7. 3. 3, 3,131,193,241
2760 DATA 240;240; O; O; 0
0
0, 0, 0, 1
2770 DATA 121,253,253,255,
255:255:143, 7, 7, 7
2780 DATA 31,253,252,248,248,240
,192, 0, 7, 15
2790 DATA 31, 31, 15, 7, 3, 0, 0, 0, 0, 0
2800 DATA O, 0, 0, 0, 0, 0, 0, 0, 60,255
1
43
L
—’
2810 DATA 255,255,255,255,143,
15, 7, 7. 7, 7
, 0, 0
2820 DATA 3, 3, 3,131,193,241,240,240
2830 DATA 0, 0, 0, 0> 0, 0, or o, 0, 0
192
2840 DATA o, 31, 31, 3,129,128,192,192,192.
2850 DATA 192,224,224,224r224.240,
255,255,255.255
2860 DATA 255,127, 0, 0, 0, 0, 63,127,255,255
2870 DATA 255,255,193,128,128,128,
128,192,224,240
2880 DATA 252,255,255)255>127s63, 31, 7, 7, 31
2890 DATA 254,252,248,224,128,0, 0. 3, 7. 7
2900 DATA 7, 3, 0. 0> 0, 0, 0, 31, 31, 3
2910 DATA 129,128,192,192,192,192,
192,224,224.224
2920 DATA 224,240,255,255>255,255
,255,127, 0, 0
2930 DATA O. 0. 0. or O, 0, 0, 0, 0. 0
112,112,56, 56
2940 DATA 0,248,248,240,224,224>
224,192
2950 DATA 56, 56, 56,120,120,240,240,224,
2960 DATA 128, 0, 0, 0, 0, 0,192,224,240,240
2970 DATA 240,248,248,248,120,120
, 56, 56, 56, 56
2980 DATA 48,112,224,224>224,224,
240,240,248,248
2990 DATA 120,120. 56, 56, 56, 56,120>240,224,224
3000 DATA 192,128, 0, 0, 0, 0, 0,248,248,240
3010 DATA 224,224,112,112,56. 56. 56. 56. 56,120
3020 DATA 120,240,240,224,224>192.
128, 0, 0, 0
3030 DATA O, 0> 0, 0, 0> 0, 0, 0, 0, 0
Howtheprogram
works
—
—.
—
—
—
—
This program begins by assigning a number of printer commands to
BASIC string variables (lines 1000to 1090). Youcan find most ofthese
commands near the beginning ofAppendix B.
The WIDTH “LPT1:” 255 statement in line lllOmeansintinite line
width. It prevents the IBM-PC from inserting unwanted carriage returns
and line feeds in graphics data.
Actual printing begins in line 1120.Using the preassigned commands,
the program prints samples of its different type styles, including a line
showing all styles in italics, followed by samples of the print pitches, then
some double and quadruple-sized printing.
Next comes the central attraction oftheprogram: aline oftext printed
twenty times in expanding and contracting loops to give a barrel effect.
Thework isdone by four printer commands: acommand setting the right
margin (line 1400);a centering command (line 1420);acommand to vary
the line spacing (lines 1440and1490); and acommand to micro-adjust the
space between characters (lines 1450and 1500).
44
.
—
—
—
—
—
—
Nexttheprogram
returns
tonormalspacing
andgives
ademonstration
oftheprinter’s
word-processing
abilities:
boldprinting,
underlining,
subscripts,
etc.
.—
—
..%..
L
L
L
i
L
1
L
L
—
The row of automobilesin the next printed lineiscreated by downloading
two new character patterns, which are printed in place of the character”<”
(character 60). Details can be found in Appendix C.
The final part of the program uses dot graphics to print an “S&S”logo.
The dot pattern of the logo was originally laid out on graph paper, then
converted to the data in lines 2640 to 3030 with the help of a calculator.
Each number represents eight vertical dots. (See “Graphics commands” in
Appendix B for details. See also Figure C-1 in Appendix C.)
The pattern is printed in four rows, each eight dots high and 100 dots
wide. Lines 1800to 1850read the dot data into a string array variable named
LOGO$. Line 1860sets theline
spa@gto8/72 inch so that the rows will
connect vertically. The loop in lines 1870to 1940does the printing in four
passes of the print head.
This program can also be run in IBM mode (DIP switch 1-6 OFF) if
you change a few of the linesas shown below to allow for differencein some
of the commands. You will get a cylinderinstead of a barrel effect, becuase
the IBM mode does not have any command to micro-adjust the character
spacing.
Modifications for IBM mode:
‘Pica pitch
1090 P9KHR$(181
‘8elect italics
1190 l-PRINf CNR$(28); “4”;
‘Cancel italics
1220 LPRI~ CHI?$(28);“5”
1280 ‘ LPRIIWH$;E$;“M”;“Cordeneed elite pitch,”;
1400 LPRItWCHRS(28);“Q”;CHR$(47) ‘Set right margin
1440 LPRIIWE$; “A’’;
CI-IR$(I);E$; “2”: ‘Line spacing set
1450 I LPRINTE$; ” “;CHR$(l): ‘Increase character Space
1490 LPRItWE$; “A’’;
CHR$(I) ;=; “2”;
1500 ‘ LFRIIW~; “ “;CHR$(I);
1860 I.PRI~ ~; “A’’;
UR$(8) ;=; “2”; ●
’Set 8/72”
2030 LPRIIWD$;CHR$(28); “ : ‘:;CHR$(OI;_(O)
;-(o)
;
2130 WIUI?f C$;CHR$(28); “ : “;CHR$(0);-(O)
;H(0)
;
—
45
-
MEMO
—
.
—
—
—
—
—.
—
—
—
—
46
—.
1:“
chapter 5
MAINTENANCE
AND TROUBLESHOOTING
Subjeetscovered in Chapter5
●
●
●
●
include–
Cleaning the printer
Replacing the ribbon
Replacing the print head
Troubleshooting
Dust and heat will make any mechanism wear more quickly. The best
maintenance is preventive,and the first step is correct location of the printer.
This is covered in greater detail in Chapter 1, but in general an environment
comfortable for humans is best for both the computer and the printer.
CLEANING THE PRINTER
L
Cleaning the printer regularly will prolong its servicelife. Use a damp
cloth on the exterior every week or so. For stubborn dirt, you may moisten
the cloth with alcohol or water containing a mild detergent, but be careful
not to spill any liquid into the interior of the printer.
r
L
~
Use a soft brush to remove paper dust and lint from the interior. A small
vacuum cleaner can also make this task easier, but be very careful not to
bend or injure any electronic parts or wiring. The printer coniains delicate
electronic parts, so only clean those places where you have easy access.
:
L
i-
L
f;
L
REPLACING THE RIBBON
The printer uses an endless-typeribbon cartridge in which the ribbon
is recycledautomatically. When the print becomesfaint, it is time to replace
the ribbon cartridge.
To remove the old cartridge, take off the top cover, grasp the ribbon
cartridge by the two arms at the front and lift straight up. To fit the new
cartridge, guide the ribbon between the print head and platen, then press
down until the cartridge snaps into place. See Figure 5-1.
REPLACING THE PRINT HEAD
“-.
!
;
E
.,
;.
,..
.,,,
;j
.
.,;
:.,..,
.
,:,
,..
i
.:
..”
.,,
:.
,.
The dot matrix print head has a life of about 200 million dots, or years
of normal use. When printing is too light even after replacing the ribbon,
47
—
.
.
igure5-1. Replacing
the ribbon cartridge
You’llknow that the print head has reached the end of its service life. To
~eplacethe print headl follow the procedure below.
As you remove the old print head, note carefully how the cable is
threaded, so that you can thread the new cable in the same way.
—
Wa.rnimr: The mint head becomes hot during operation. If you have been
using the printer, wait awhile so ~hat the print head can cool
off.
1. Turn power OFF and unplug the power cord.
2. Remove the top cover and ribbon cartridge.
3. Move the print head carriage toward the right until you can see the
connector cover. Remove the connector cover and pull the cable free
from the connector.
4. Unscrew the two screws that hold the print head in place and set them
aside.
5. Disengage the cable from the tabs holding it down, then remove the
print head.
6. For easy installation of the new print head, move the carriage toward
the left end of the rail.
7. Place the new print head on its support, seating it on the two pins.
8. Thread the new cable the same way as the old, securing it under the
three tabs on the print head carriage.
9. Plug the cable into the connector, inserting it as far as it will go.
—
.
—
—
—
.
48
...
Screws
fI
-..
1
k
I}.-
1
“-”
i -igure 5-2. Replacing the print head
10. Fasten the print head down with the two screws.
11. Move the carriage back toward the right and replacetheconnectorcover.
Slide the connector cover to the left until it locks into place.
12. Replace the ribbon cartridge and top cover, and plug the power cord
back in.
49
TROUBLESHOOTING
■ H the printer doesn’t print:
●
●
●
Check the Power and On Line indicators. Both must be on.
Check that the interface cabk is securelypluggedin at the computer and
printer ends.
Make a test print. (Turn power OFF, hold the On Line or Paper Feed
switchdown,”thenturn power ON.) If the test print succeeds,the-problem
is not with the printer; try a different printing command, or try using a
differentcable. If the test print fails,have the printer checkedby a qualified
serviceman.
.
■ If fanfo/d paper becomes stuck:
. Turn power off, take off the rear cover, remove the paper, and reload
the paper as described in Chapter 1.
. Make sure the paper is placed so that it feeds into the printer straight.
■ If label paper becomes stuck:
Have a qwlified serviceman remove any label
paperthat adheres inside
●
the printer. Do not attempt to remove it yourself.
. Avoid using label paper with any exposed adhesive areas.
■ If printing is faint, incomplete, or unclear:
●
●
●
Checkthat & ribboncartridge k installed correctly. If the ribbon
cartridge is old, replace it.
Adjust the printing gap. See Chapter 1.
If ribbon replacement or gap adjustment does not solve the problem,
replace the print head.
■ If all text1sprinted on the came line:
. SetDIP switch 1-8 to the OFF (front) position.
—
■ If line spacing is twice as wide as expected:
. Set DIP switch 1-8 to the ON (back) position.
■ If you can’t print to the end of the page:
. This is normal.
The printer’s paper-out detector detects the end of the
paper and stops printing about an inch above the end.
. You can make the printer ignore the paper-out detector by setting DIP
switch 1-5to the OFF (front) position, or by usingthe < ESC > “8” printer
command.
—
50
—
:.
■ If the printed characters don’t match the characters on the
k
screen:
Check DIP switches2-2 to 2-4.When theseswitchesare not all ON (back),
an international character set is selected and some ASCII symbols are
changed to other characters. See Appendix D.
Somesoftwareis notable to displayinternational characters on the screen.
If you use an international character set you may want to paste labels
on the keyboard.
If you are using the IBM mode, check DIP switch 1-7.Someinternational
cfiracters and-symbols do not print when this switch is OFF (front).
.-
L
‘L-
,
‘-
.
.
L.
■ If some printer commands are ignored or executed incor-
rectly:
. Check that the setting of DIP switch 1-6matches the type of printer your
software supports: ON (back) for Star or Epson; OFF (front) for IBM.
● A few commands are mutually exclusive.For example, you cannot get
emphasized condensed printing.
■ If you have problems with horizontal tabulation:
●
●
,-
L
L
■ If you have problems with graphics:
●
●
L
L
,
L
(
-
‘-
Don’t Change
the margins after setting tabs.
Don’t change the print pitch after setting tabs. The physical positions
of the tab stops do not adjust to the new print pitch.
●
If you are using commercial software, check that it supports this printer,
or a Star, Epson or IBM printer, and that DIP switch 1-6is set correctly:
ON (back) for Star or Epson; OFF (front) for IBM.
Use a hex dump to verifythe codesthe printer is receiving.Seethe graphics
command descriptionsin Appendix B. Some computers insert unwanted
commands (such as carnage returns and line feeds) in graphics data, or
change the values of certain codes.
BASIC programs may require a WIDTH statement. Check your BASIC
manual.
■ If you have problems with download characters:
● checkthatDIP switch 2-1 is OFF (front).
. Make the same checks as for graphics problems.
—
.
—
—
..
—-
—.
—
I,..‘
i
Appendix A
TECHNICALSPECIFICATIONS
—.
—
■ Printing Mechanism
Printing method
Serial impact dot matrix
Printing speed
150characters per second (draft pica)
38 characters per second (NLQ pica)
Printing direction
Draft: bi-directional or unidirectional
(selectable),logic seeking
NLQ and graphics: unidirectional, logic
seeking
—
Print head
9 Pins
Life: 200 million dots
L
Ribbon
Black fabric ribbon cartridge
Life: 1 million draft characters
L._
Paper feed
Friction and push-tractor feed
Semiautomatic sheet loading
L
Paper feed speed
2.7 inches/second(during page feed)
—
I
—
I
[
k
I~
‘k-
h-
1’
1—
9 Interface and
Emulation
Interface
Centronics-compatible, 7 or 8 bit,
TTL-level
Data buffer
4K bytes when not used for download
characters
l-Line buffer when using download
Emulation modes
Epson LX-800 and IBM ProprinterII
i
1-
1-
Power switch
Rocker switch
)
Control panel
4 Membrane switches, 10 LED indicators
DIP switches
12 pins
1’
-
i-
i.
.,.
,,
■ Switches and Indicators
53
—.
Specialfeatures
Panel pitch/style lock-in
Forward and reverse micro-f-d
Paper parking
Hexadecimal dump
■ Dot Matrix Size
dots (Draft pica)
18 x 23 dots (Courier and Orator pica)
18 x 18 dots (Sanserif pica, elite)
12 x 11 dots (IBM block graphics, pica)
18 x 19 dots (Courier and Orator elite)
18x 12 dots (Condensed pica)
18 x 10 dots (Condensed elite)
Character matrix
9x9
Bit-imagegraphics
dots at 60 dpi (Singledensity)
9 x 480 dots at 60 dpi (Singledensity)
8 x 576 dots at 72 dpi (Plotter mode)
8 x 640 dots at 80 dpi (CRT I)
8 x 720 dots at 90 dpi (CRT II)
8 x 960 dots at 120dpi (Double density)
9 x 960 dots at 120 dpi (Double density)
8 x 960 dots at 120dpi (High speed)
8 x 1920dots at 240 dpi (Quadruple density)
8 x 480
■ Character Sets
Standard character set
96 ASCII characters
IBM character set
244 characters (ASCII, international
characters, symbols,block graphics)
Download characters
Max. 192 (draft) or 78 (NLQ)
International character sets
14sets (USA. France. Germany. Emdand.
Denma~k I, ‘Denmark II, Sw~den,-Italyi
Spain I, Spain II, Japan, Norway, Latin
America, Denmark/Norway)
■ Type Styles and Pitches
54
Draft type styles
Draft, draft italic
NLQ type styles
Courier, SanSerif,Orator (with lowercase
or small capitals), and italic versions of
these
—
L-.
Extra-1arge
characters
Doublewidth,
double
height,
double
width
andheight,
quadruple
widthandheight
Print pitches
Pica (10 cpi)
Elite (12 cpi)
Condensed pica (17 cpi)
Condensed elite (20 cpi) (Standard mode
only)
Proportional spacing can be selected for
each of the above
L.
Line spacing
1/6 inch (standard)
1/8, n/72, or n/216 inch (programmable)
L.
Column width
8 inches
Pica: 80 characters
Elite: 96 characters
Condensed pica: 137characters
Condensed elite: 160characters
,-
,■ Paper Specifications
L
-.
Single sheets
140 to 216 mm (5.5 to 8.5 inches) wide,
0.07 to 0.10 mm thick
Fanfold paper
102 to 254 mm (4 to 10 inches) wide
0.07 to 0.10 mm thick (single-ply)
Max. 0.28 mm thick (3-ply)
Numberofcopies
Max.3 (original
+ 2 copies)
■ Dimensions and Weight
Dimensions
Width 384 mm (15.1 inches)
Depth 287.5 mm (11.3 inches)
Height 108mm (4.3 inches)
Weight
4.7 kg (10.3 pounds)
■ Electrical Specifications
Line voltage
120VAC f 10VO
220 VAC * 10Yo
240 ~AC * 10%
(varies according to the country of purchase)
Line frequency
50 or 60 Hz
Power consumption
TyP. 36 W, Max. 80 W
..
.
.-
e
Insulation resistance
10 megohms between AC power line and
chassis
Dielectric strength
Withstands 1 kVAC rrns at 50 or 60 Hz
between AC power line and chassis for
at least 1 minute
■ Environmental Requirements
Operating temperature
Operating humidity
Storage temperature
Storage humidity
5 to 40”C (41 to 104”F)
10% to 80?4.(no condensation)
–30 to 65°C (–22 to 149”F)
10VOto 95% (at 40”C) (no condensation)
■ option
Automatic sheet feeder
—.
■ Interface Signa/s
Pin No.
1
Signal
Name
s TROBE
Direetion
IN
2
3
4
5
6
7
8
9
10
DATA1
DATA2
DATA3
DATA4
DATA5
DATA6
DATA7
DATA8
11
BUSY
OUT
12
PAPER
OUT
OUT
AL
[7
1
CHASSIS
GND
m
IN
IN
I-N
IN
IN
IN
IN
OUT
Function
Goes from High to Low (for at least 0.5
microseconds)when data are valid.
.—
Eight-bit character data. DATA8 is the
rnos~ugrdicant bit; .DATA1 1s the least
slgmficantbit. H@ ]s logic 1 and Low is
logico.
—
5-Microsecond Low pulse acknowledges
receipt of data.
Low when the printer is ready to accept
I data.
I Goes Hick..1if the printer runs out of paper.
Can be geld Low rrnanently by turning
~T’Pswitch 1-50 ? .
1when the printer is on-line.
Unused
Signalground.
Printer’schassisground, isolated from signal ground.
.
—
—
—
56
—
p..
r-
Pin No.
Signal
N=
Direction
+ 5VDC
18
19-30 GND
31
m
OUT
32
OUT
ERROR
IN
33
EXT GND
34, 35 ~N/C
I
IN
~36
Function
External supply of + 5VDC.
Twisted pair return signalground level.
Low input resetsthe printer to its power-up
condition.
GWSLow to signalthat the.printer cannot
print due to an error conchtion.
External ground.
I Unused.
I AlwaysHigh.
—
—
.—
58
Appenciix B
PRINTERCONTROLCOMMANDS
This appendix describes the printer’s control commands. The commands are
arranged by function. The name of each command is followed by a table like the
one below:
Mode
I
ASCII
< ~~~ >
IBO’hl
<Esc>
“XX
~,,
Mode:
“,>!
<,>
Decimal
I
I 27 120 49
Hexadecimal
I
I IB 78 31
I 27 120 1
I IB 78 01
I
Indicates the mode in which the command is recognized.
Standard mode (DIP switch 1-6 on)
Std.
IBM
IBM mode (DIP switch 1-6 off)
Both
Both standard and IBM modes
ASCII:
Indicates the ASCII coding of the command. Control
characters are enclosed in pointed brackets: For example,
<() > means character code ().
Decimal:
Gives the command in decimal character codes.
Hexadecimal:Gives the command in hexadecimal character codes.
Parameters for which values must be supplied are indicated by italic letters
such as n.
Many commands have alternative forms. Some commands use < ESC>
(character code 27) in Standard mode and < FS> (character code 28) in IBM
mode. Other commands have parameters that can be specified as either character
codes or digit characters, like the parameter 1 in the sample command above.
FONT CONTROL COMMANDS
Select draft quality characters
Mode
Both
IBM
Decimal
ASCII
< ESC >
“x”
<ESC>
<Esc >
<ESC>
“x“ <()>
“1”
“o”
-0”
“I” <0>
27
27
27
27
120
120
73
73
48
0
48
0
Hexadecimal
IB
IB
IB
IB
78
78
49
49
30
00
30
00
Changesfrom near letter qualityto draft quality.Ignoredif the NLQ
TypeStyleswitchwaspressedduringpower-up.
59
Select draft elite characters
Mode
IBM
ASCII
< ~~~ >
Decimal
“~.!
Hexadecimal
c’,>.
IB 49 31
27 73 49
<ESC>
“I” <1>
IB 49 01
2’7 73 1
Changes to draft quality characters with elite pitch (12 cpi). Ignored if
the NLQ Type Style switch was pressed during power-up.
Both
ASCII
< ~~~ >
< ESC >
—
—
Select IVf.Q characters
Mode
—
Hexadecimal
Decimal
“ >7
x
“,,!
27 120
49
IB
78
31
“x “’
<1>
27 120
1
IB
78
01
—
—
Changes from draft quality to near letter quality. Ignored if the NLQ
Type Style switch was pressed during power-up.
Se/ect M& type style
Mode
Both
Hexadecimal
Decimal
ASCII
IB 6B n
Selects an NLQ type style according to the value of n. In draft mode,
this command remains dormantand takeseffectlater when NLQ is se-
< ESC >
“k”
n
27 107
n
—
lected by < ESC> “x” 1. Ignored if the NLQ Type Styleswitchwas
pressedduringpower-up.
n
O
1
2
3
Type style
Courier (initial value)
Sanserif
Orator with small capitals
Orator with lower case
—
Select Sanserif characters
Mode
Decimal
ASCII
Hexadecimal
IB 49 32
“2”
<ESC>
“I” <2>
IB 49 02
27 73 2
Changes to the Sanserif NLQ font. Ignored if the NLQ Type Style switch
was pressed during power-up.
< ESC >
IBM
—
“1”
27
73
50
—
60
—
Select Courier characters
IModel
IBM
I
ASCII
Esc >
I I<
<Esc >
<~s~ >
I I <Esc >
4’1”
“y,
<3>
‘q!. UT,.
“1”
“1”
<7>
Decimal
I 27
73
51
I 27 73 3
I 27 73 55
I 27 73 7
,
I
Hexadecimal
I IB
49
I
33
I IB 49 03
I IB 49 37
! IB 49 07
,
I
I
Changesto the CourierNLQ font.Ignoredif the NLQTypeStyleswitch
waspressedduringpower-up.
Select italic characters
Mode
Decimal
ASCII
Hexadecimal
“4”
“4”
I 27 52
I IB 34
] 28 52
IIC 34
IBM I <Fs >
I
Causes subsequent characters to be printed in italics. Ignored if the NLQ
std.I < Esc >
TypeStyleswitchwaspressedduringpower-up.
Select upright characters
Mode
ASCII
Decimal
I
Hexadecimal
I
I
“5”
j 2-1 53
] IB 35
Std. I <Esc >
1
“5”
I 28 53
1IC 33
IIBM I <Fs >
I
Stops italic printing and causes subsequent characters to be printed upright. Ignored if the NLQTypeStyleswitchwaspressedduringpower-up.
Emphasized printing
Mode
Both
Decimal
ASCII
< ESC >
“E”
27
Hexadecimal
69
IB
45
Causes subsequent draft characters to be emphasized by adding extra
thickness to vertical strokes.
Cancel emphasized printing
Mode
ASCII
“F,.
Both I <ESC>
Cancels emphasized printing.
I
Decimal
I 27 70
I
Hexadecimal
i IB 46
61
Double-strike printing
Mode
Both
-Decimal
ASCII
Hexadecimal
27 71
IB 47
<ESC> “G”
Causes subsequent characters to be printed in double-strike mode with
a slight vertical paper motion in between, causing a thickening of horizontal strokes.
For bold print, use of double-strike is recommended in NLQ mode, and
combined use of emphasized and double-strike is recommended in draft
mode.
Double-strike cannot be used with superscripts or subscripts.
Cancel double-strike printing
Mode
Both
..—
Decimal
ASCII
<ESC> “H”
Cancels double-strike printing.
—
27 72
Hexadecimal
IB 48
Start underlining
Mode
Both
Decimal
ASCII
‘<,>,
27
“0,,
27 45 48
27 45 0
Hexadecimal
IB 2D 31
<ESC>
‘$-” <1>
27 45 1
IB 2D 01
Causes subsequent characters to be underlined. IBM block graphics
characters and spacesskipped by horizontal tabulation are not underlined.
< ESC >
C*.”
45
49
Stop underlining
Mode
Both
1
Decimal
ASCII
< ~sc >
‘.-,!
<ESC>
CC-”<0>
Hexadecimal
IB 2D 30
IB 2D 00
—
—
Stops underlining.
Start overlining
Mode
Both
ASCII
< Esc >
Decimal
‘, ,.
“~!!
Hexadecimal
IB 5F 31
<1>
27 95 1
IB 5F 01
<ESC> “-”
Causes subsequent characters to be overlined. Spaces skipped by horizontal tabulation are not overlined.
27
95
—
49
—
—
62
—
I1-~~•
I’
~~•
.-
Stop over/ining
Mode
< ESC >
Both “
I
L
Decimal
ASCII
I
“-”
“O”
<Esc > “-” <()>
Stopsoverlining.
27
95
Hexadecimal
IB 5F 30
IB 5F MI
48
27 95 II
Superscript
Mode
Decimal
ASCII
L
Hexadecimal
“s” “0”
27 83 48
IB 53 30
< ESC >
-s,, <0>
27 83 0
IB 53 00
<ESC>
Causes subsequent characters to be printed as superscripts. Does not
change the character pitch.
Both
..-
,,
L-
Subscript
L
Mode
ASCII
I
“s” “l”
.—
IBOthl
L
i
i
Cance/ aaperscript or subscript
Mode
Both
t
L
Hexadecimal
Decimal
I IB 53 31
tt 27 83 49
I IB 53 01
I
<Esc>
-y <,>
I 27 83 1
Causes subsequent characters to be printed as subscripts. Does not change
the character pitch.
< ESC >
1
Decimal
ASCII
< ESC >
“T”
27
84
Hexadecimal
IB
54
Stops printingsuperscriptsor subscriptsand returnsto normalprinting.
CHARACTER SET COMMANDS
Select standard character set
Mode
Std.
,!
ASCII
< ESC >
“t,!
Decimal
<ESC>
“t” <(J>
,,0?$
27 116
48
27 116 0
Hexadecimal
IB 74 30
IB 74 00
Selects thestandardcharacterset.Thisisthepower-updefaultinStandard
mode if DIP switch 1-7 is ON. The standard character set cannot be
selected in IBM mode.
i
.,—
63
L
-..
[
Se/ect/BM character set
Mode
ASCII
<~~~>
—
Decimal
‘,t,,
‘.~>,
Hexadecimal
IB 74 31
<ESC>
“t” <1>
27 116 1
IB 74 01
Selects an IBM character set (character set #2 unless an <ESC> “7”
command has been received). Ignored in IBM mode, since the IBM
character set is selected automatically.
Std.
27 116
49
Select IBM character set #l
Mode
—
—
—
Decimal
ASCII
Hexadecimal
<ESC>
“7“
27 55
IB 37
Selects IBM character set #1. If the standard character set is currently
selected, this command remains dormant and takes effect at the next
< ESC > “t” 1command. In IBM mode, character set #1 is the power-up
default if DIP switch 1-7 is OFF.
Both
—
—
Select IBM character set #2
Mode
Decimal
I
I 27 54
ASCII
Both I
I
—
Hexadecimal
IB 36
{
Selects IBM character set #2. If the standard character set is currently
selected, this command remains dormant and takes effect at the next
< ESC > “t” 1command. In IBM mode, character set #2 is the power-up
default if DIP switch 1-7 is ON.
-=ESC >
“6”
I
Select international character set
Mode
Std.
IBM
Decimal
ASCII
I <ESC>
I
Hexadecimal
n
I IB 52
I 27 82 n
“R” n
] 28 82 n
IIC 52 n
< FS>
“R” n
Selects an international character set according to the value of n.
n Character set
O
1
2
3
4
5
6
U.S.A
France
Germany
England
DenmarkI
Sweden
Italy
n Character set
7 Spain I
8 Japan
9 Norway
10 Denmark II
11 Spain II
12 Latin America
13 Denmark/Norway
I
—
{
—
—
—
—
—
—
64
The first eight of these character sets (from U.S.A. to Spain I) can be
selected as power-up defaults by DIP switches 2-2 to 2-4.
Enable printing of all character codes
Mode
ik
r
Decimal
ASCII
I
Hexadecimal
IB SC nl n2
27 92 nl n2
n2
<ESC>
“\” nl
Enables printing of all characters in the IBM character set, including those
assigned to character codes which are normally considered control codes.
This command remains in effect for the next nl + n2 x 256 characters,
where nl and n2 are numbers between O and 255. During this interval
no control functions are executed. If a code with no assigned character
is received, the printer prints a space.
IBM
Enable printing of all character codes on next character
Mode
Decimal
ASCII
Hexadecimal
I IB 5E
I 27 94
IBM I <~~~ > “.3,
I
This command operates like < ESC > “\” except that it remains in effect
for only one character.
Select s/ash zero
Mode
Decimal
ASCII
< ESC >
Both
“-”
“1”
27 126
49
Hexadecimal
IB 7E 31
IB 7E 01
27 126 1
<ESC> “-” <1>
Causes subsequent zero characters to be overprinted with a slash (0).
Select normal zero
Mode
Both
I
Decimal
ASCII
I
Hexadecimal
IB 7E 30
27 126 48
“w”
<o>
< ES(7 >
IB 7E 00
27 126 0
Causes subsequent zero characters to be printed normally (0), without
a slash.
< ESC >
— --
“-”
“0“
,
!
65
CHARACTER SIZE AND PITCH COMMANDS
—
Pica pitch
IModel
I
ASCII
Decimal
I
Hexadecimal
I
I 27 80
IIB
50
IStd. I <ESC>
“P”
I
18
I 12
IBM I <DC2>
In Standard mode, changes from elite to pica pitch (10 cpi) or from
condensed elite to condensed pica (17 cpi). In IBM mode, changes from
either elite or condensed to pica (10 cpi). Ignored if the Print Pitch switch
was pressed during power-up.
Elite pitch
..—
ASCII
< ESC >
“M”
Decimal
I
I 27 77
Hexadecimal
I
I IB 4D
I
“:”
I 27 58
I IB 3A
IBM ] <ESC>
In Standard mode, changes from pica to elite pitch (12 cpi) or from
condensed pica to condensed elite (20 cpi). In IBM mode, changes from
either pica or condensed to elite (12 cpi). Ignored if the Print Pitch switch
was pressed during power-up.
.
—
Condensed printing
Mode
Both
I
Decimal
ASCII
i
< SI >
I 15
Hexadecimal
] OF
I 27 15
I IB OF
<ESC> <SI>
In Standard mode, changes from pica to condensed pica (17 cpi) or from
elite to condensed elite (20 cpi). In IBM mode, changes from either pica
or elite to condensed (17cpi). Ignored if the Print Pitch switchwas pressed
during power-up.
—
Cancel condensed printing
Mode
Both I
ASCII
< DC2 >
I
Decimal
I 18
Hexadecimal
I
I 12
I
In Standard mode, changes from condensed pica to normal pica or from
condensed elite to normal elite. In IBM mode, always changes to normal
pica. Ignored if the Print Pitch switch was pressed during power-up.
—
—
—
—
66
—
“-
Expanded printing
Mode
Both
Hexadecimal
Decimal
ASCII
‘.~,,
<’,.>
IB 57 31
IB 57 01
27 87 1
<ESC> “w” < I >
Causes subsequent characters to be expanded to double width.
< ESC >
27
87
49
Cancel expanded printing
Mode
ASCII
I
Decimal
I
Hexadecimal
I <F.sc>
I IB 57 30
I, 27 87 48
“w” “0”
—-Both
I IB 57 00
I 27 87 0
<ESC> “w” <rJ>
Stops expandedprintingand returnsto normalwidth.
1
Expanded printing for one line
Mode
Decimal
ASCII
<so >
Both
Mode
OE
14
IB OE
Causes subsequent characters in the current line to be expanded to double
width. Characters return to normal width after the next line feed ( < LF > ).
The < DC4 >, <VT>, < FF >, and < ESC > “W” O commands also
cancel expanded printing.
< ESC >
<so >
Cancel one-he
Both
Hexadecimal
27
14
expanded printing
ASCII
Decimal
Hexadecimal
20
14
<DC4>
Stops one-line expanded printing set with < SO> or < ESC > < SO>.
Does not cancel < ESC > “W” 1.
Select proportional spacing
Mode
Both
IBM
ASCII
< ESC >
Decimal
{’ ,?
P
“~,,
27 112
49
Hexadecimal
IB 70 31
IB 70 01
IB 50 01
< ESC>
“P“ <1>
27 112 1
27 80 1
<ESC>
“P” <1>
Causes subsequent characters to be proportionally spaced. Ignored if
the Print Pitch switch was pressed during power-up.
Select fixed spacing
~Mode
—
ASCII
Hexadecimal
Decimal
IB 70 30
<ESC>
“P“ <()>
27 112 0
IB 70 00
<()>
“P”
27
80
0
IB
50 00
<ESC>
Causes subsequent characters to be printed with fixed character spacing.
Ignored if the Print Pitch switch was pressed during power-up.
< ESC >
Both
IBM
“P “
“o”
27 112
48
Se/ect master print mode
IModel
ASCII
I
Decimal
Function
Underline
Italic [*1]
Expanded
Double strike
Emphasized
Condensed [*2]
Proportional [*2]
Elite [*2]
I
Hexadecimal
I
n value
128
64
32
16
8
4
2
1
Std.
I
—
—
—
—
—
Increase character spacing
I
—
—
[*1] Ignored if the NLQ Type Style switch was pressed during
power-up.
[*2] Ignored if the Print Pitch switch was pressed during
power-up.
ASCII
—
—
‘c,!! n
Both I <ESC>
27 33
n
IB 21 n
Selects a combined print mode according to the value of n, The value
of n is the sum of the values given below for the desired characteristics.
Examples: n = 1 gives elite; n = 9 (1 + 8) gives emphasized elite; n
= 137 (1 + 8 + 128)gives underlined emphasized elite.
Mode
—
Decimal
I
I 27 32
n
Hexadecimal
—
IB 20 n
1
Increases the space between characters by n/240 inches, where n is a
number from Oto 127. Used in microjustification.
< ESC >
“ “
n
I
,
—
—
-.
68
—
Select double or quadruple size
IMode!
-.
Both
,—
—.
I
ASCII
—
n
O
1
2
3
4
5
6
Print
Decimal
I
Hexadecimal
I
27104 n
IB 68 n
<ESC>
“hn
I
Selects the size of subsequent characters as shown below. Extra-high
characters align akmg the cap-line of normal characters, with the base
iine temporarily moving down. Line spacing is temporarily doubled when
n = 1, 5 or 6 and quadrupled when n = 2. To print correctly when n
= 3,4,5 or 6, set the line spacing to 24/216(1/9) of an inch with < ESC>
twice, upper half on one line,
“3” <24>, and print
thesamecharacters
lower half on the next. For accurate alignment of the two halves, select
unidirectional printing with < ESC > “U” <1>.
Effect
Normal size
Double-high, double-wide
Quadruple-high, quadruple-wide
Double-high, double-wide (Lower half only)
Double-high, double-wide (Upper half only)
Quadruple-high, quadruple-wide (Lower half only)
Quadruple-high, quadruple-wide (Upper half only)
double-height characters
.
Mode
Both
—
.
L.L-
~-
,—
-.
Hexadecimal
IB 77 31
27 119 1
IB 77 01
<ESC> “w” <1>
Prints subsequent characters at double height without moving the base
line, and without changing the line spacing. Temporarily cancels
super/subscript and condensed printing modes.
“w”
“l”
27 119
49
Return to normal height
Mode
—
Decimal
ASCII
< ESC >
Both
ASCII
Decimal
Hexadecimal
27 119 48
IB 77 30
“o”
“w”
< ESC >
27 119 0
IB 77 00
<ESC> “w” <0>
Terminates double-height printing and prints subsequent characters at
normal height. Resumes super/subscript and condensed printing if these
modes were in effect before double height was selected.
Select character height, width, and line spacing
Mode
ASCII
[
6’ “
“@”
<4>
<0> <0> <1)>
Both
Decimal
I
< Esc >
27
91
n
64
I
Hexadecimal
I
IB 5B 40 04
4
Ooon
m
—
00 00 00
m
n
—
m
Selects a combination of character height, width, and line spacing according to the value of n and m, as below. Does not move the base line.
n
m
1
2
Line spacing
Unchanged
Unchanged
Unchanged
Single
Single
Single
Double
Double
Double
I
Character height
Unchanged
Single height
Double height
Unchanged
Single height
Double height
Unchanged
Single height
Double height
—
I
—
—
—
—
—
Character width
Single width (same as < ESC > “W” O)
Double width (same as < ESC > “W” 1)
—
Double-height characters are alwaysprinted at near letter quality. Double
height printing temporarily cancels the super/subscript and condensed
printing modes, but these modes resume when the printer returns to
normal height.
—
VERTICAL POSITION COMMANDS
Set line spacing to 1/8 inch
Mode
ASCII
I
Decimal
I
I
Hexadecimal
“0”
IB 30
] 27 48
Both ] <ESC>
Sets the distance the paper advances or reverses in subsequent line feeds
to 1/8 inch.
—
.-.
—
—
—
Set line spacing to 7172 inch
Mode
Both
Decimal
ASCII
Hexadecimal
IB 31
Sets the distance the paper advances or reverses in subsequent line feeds
to 7/72 inch.
< ESC >
“]”
2’749
Set line spacing to 1/6 inch
Mode
std.
Decimal
ASCII
,’y
Hexadecimal
IB 32
Sets the distance the paper advanmx or reverses in subsequent line feeds
to 1/6 inch.
< Esc >
27 50
Set line spacing to n1216inch
*
Mode
Both
ASCII
<ESC>
Hexadecimal
Decimal
“~,,
~
27 51 n
IB 33 n
Sets the distance the paper advances or reverses in subsequent line feeds
to n/216 inch, where n is between Oand 255. If n = O,in Standard mode
the line-feeddistance is set to O,but in IBM mode this command is ignored.
Set line spacing to n172inch
Mode
Both
Decimal
ASCII
< ESC >
,c~n
~
27
65
Hexadecimal
IB
n
41
n
In Standard mode, sets the distance the paper advances or reverses in
subsequent line feeds to n/72 inch, where n is between O and 85. If n
= O,the line spacing is set to O.
In IBM mode this command does the same except that (1) the new Iine
spacing does not take effect until the next < ESC > “2” command, and
(2) if n = O,the < ESC > “A” command is ignored.
Execute < ESC> “A”
IModel
ASCII
I
Decimal
I
Hexadecimal
I
Sets the line spacing to the value defined by the last preceding < ESC>
“A” command. Sets the line spacing to 1/6 inch if there is no preceding
< ESC > “A” command.
71
Line feed
Mode
ASCII
Both
< LF>
Hexadecimal
Decimal
I
OA
] 10
Prints the current line and feeds the paper to the next line. If DIP switch
1-2 is ON, also moves the next print position to the left margin. See the
preceding commands for the line spacing.
Reverse line feed
Mode
Both
—
Hexadecimal
Decimal
ASCII
IB OA
27 10
< LF>
Prints the current line and feeds the paper in the reverse direction to the
preceding line. If DIP switch 1-2is ON, also moves the next print position
to the left margin. See the preceding commands for the line spacing.
Ignored when friction feed is used.
< ESC >
—
Perform one n/216-inch line feed
Iklodel
Both
ASCII
I
“J”
~
Decimal
I
Hexadecimal
I
IB 4A n
Feeds the paper once by n/216 inches, where n is between 1 and 255.
Does not move the print position right or left when DIP switch 1-2 is
OFF. Does not change the line-spacing setting. Ignored when friction
feed is used.
<ESC>
27 7’4
n
—
—
Perform one n/276-inch reverse line feed
—
Mode
ASCII
I
Decimal
I
Hexadecimal
“i”
n
I 27 106 n
I IB 6A n
Both I <ESC>
Feeds the paper once by n/216 inches in the reverse direction, where n
is between 1 and 255. Does not move the print position right or left when
DIP switch 1-2is OFF. Does not change the line-spacingsetting. Ignored
when friction feed is used.
—
Feed paper n /ines
Mode
Both
Decimal
ASCII
Hexadecimal
IB 66 31 n
27 102 1 n
IB 66 01 n
<ESC>
“F’ <1>
Feeds the paper n lines from the current line, where n is between Oand
127.
< ESC >
“f’
“l”
n
n
27 102
49
n
—
—
IL
—
!’
Set top of page at current position
Mode
IBM
Decimal
ASCII
Hexadecimal
27 52
IB 34
<ESC>
“4”
Sets the current position as the top-of-page position. Note that this can
also be done from the control panel.
Set page length ton lines
Mode
Both
Decimal
ASCII
Hexadecimal
27 67 n
IB 43 n
“c” n
Sets the page length ton linesin the current line spacing, wheren is between
1and 127in Standard mode or between 1and 255in IBM mode. Changing
the line spacing later does not alter the physical page length. The current
line becomes the top of the page.
< ESC >
L
Set page length to n inches
L
Model
L
Both
ASCII
I
Decimal
I
Hexadecimal
27 67 0 n
I IB 43 00
n
<ESC> “c” <0> n
Sets the page lengthton inches, where n is between 1 and 22 in Standard
mode or between 1 and 127in IBM mode. The current line becomes the
top of the page.
Set top margin
Mode
L.
Both
Decimal
ASCII
<ESC>
Hexadecimal
IB 63 n
Sets the top margin to(n–1) lines, where n is between 1 and 255. Printing
begins on the nth line on the page. The power-up default is n = 1, giving
no top margin.
“c”
n
27 99
n
Set bottom margin
Mode
Both
“-.
ASCII
Decimal
Hexadecimal
IB 4E n
<ESC> “N” n
27 78 n
Sets the bottom margin ton lines, where n is between Oand 127in Standard
mode or between Oand 255 in IBM mode. The bottom margin is reset
when you change the page length.
Cancel top and bottom margins
Mode
Both i
I
ASCli
< ESC >
..*,,
Decimal
127
79
Hexadecimal
I
I IB 4F
Cancels both the top margin and the bottom margin.
Form feed
—
Decimal
ASCII
I
< FF >
I 12
I
Hexadecimal
Ioc
I
Feeds the paper to the top of the next page according to the current page
length, and moves the print position to the left margin. When the automatic sheet feeder (ASF) is selected (DIP switch 1-4 is OFF), this command ejects the current page.
Return to top
Mode
Both i
of current page
Decimal
I
I 27 12
ASCII
< ESC >
—
< FF >
Hexadecimal
I
/ IB OC
Feeds the paper backward to the top of the current page. Ignored when
friction feed is used.
Disable paper-out detector
Mode
Both &I
ASCII
< =C
>
Decimal
I
] 27 56
“8”
L
Hexadecimal
I
! IB 38
(
Causes the printer to disregard the signal sent by the paper-out detector,
enabling printing to the bottom of the paper. Overrides the setting of
DIP switch 1-5.
—.
Enable paper-out detector
—
Mode
Both t
ASCII
< ESC >
Decimal
I
“9”
[ 27
57
Hexadecimal
I
i IB 39
Causes the printer to stop printing about an inch before the end of the
paper. Overrides the setting of DIP switch 1-5.
Set vertical tab stops
Mode
Both i
74
ASCII
< ESC >
Decimal
I
-B,,
~*
n2
... <0~
27
66
n]
I
n2 ...0 I
Hexadecimal
IB
42
nl
n2...00
-.—
Cancels all current vertical tab stops and sets new vertical tab stops at
lines nl, n2, etc., where nl, n2, etc. are numbers between 1 and 255. A
maximum of 16 vertical tab stops can be set. The tab stops must be
specified in ascending order; any violation of ascending order terminates
the tab stop list. Standard termination is by the <0> control code. The
vertical tab stops are set in terms of the current line spacing and do not
move if the line spacing is changed later.
Set vertical tab stops every n /ines
Mode
Both
ASCII
< EWJC
>
Decimal
“e,,
“1,.
n
Hexadecimal
IB 65 31 n
101 49 n
<Esc >
“e” <1> n
27 101 1 n
IB 65 01 n
Cancels all current vertical tab stops and sets new tab stops every n lines,
where n is between 1 and 127.
27
Set vertical tab stops in channel
IModel
Both
n2
nO
. ~O~
Decimal
]
27 98 nO id
nl
Hexadecimal
I
IB 62 nO nl
n2 ...0
n2 ...00
Select vertical tab channel
IModel
:.
“b”
Cancels all current vertical tab stops in channel nO,(where no is between
Oand 7) and sets new vertical tab stops in this channel. (A channel is a
set of vertical tab stops selected by the < ESC > “/” command.) See
< ESC > “B” for parameters nl, n2, ... <0>.
P
i. —.
k
I
ASCII
<ESC>
ASCII
I
Decimal
I
Hexadecimal
I
IBothI <ESC>
“/” nO
I 27 47 nO
I IB 2F nO
I
Selects a set of vertical tab stops designated by a channel number (no)
from Oto 7. The tab stops in each channel are set by < ESC> “b”.
Vertical tab
IMode!
Both
—
—
ASCII
I
Decimal
I
Hexadecimal
I
<VT>
I 11
1 OB
1
Feeds the paper to the next vertical tab stop and moves the print position
to the left margin. Performs a line feed if no vertical tabs are set, as at
power-up. Feeds to the top of the next page if vertical tabs are set but
the current line is at or below the last vertical tab stop.
...
HORIZONTAL POSITION COMMANDS
Set left margin
—
Mode
ASCII
Both
< ESC>
I
Decimal
Hexadecimal
I
IB 6C n
Sets the left margin at column n (where n is between O and 255) in the
current character pitch (pica pitch if proportional spacing is seleeted).
The left margin does not move if the character pitch is changed later.
The left margin must beat least two columns to the left of the right margin
and within the limits below:
“]”
n
27 108
n
Pica
Elite
Condensed pica
Condensed elite
Expanded pica
Expanded elite
Expanded condensed pica
Expanded condensed elite
Os
OS
o s
O<
O<
05
Os
Os
n s 76
n
n
n
n
S
<
<
s
91
130
152
38
n 545
n s 64
n s 76
-...
b
The left margin can also be set from the control panel.
—
Set right margin
Mode
ASCII
std.
IBM
<ESC>
<Fs >
Decimal
Hexadecimal
IB 51 n
“Q” n
28 81 n
IC 51 n
W“
n
Sets the right margin at column n in the current character pitch (pica
pitch if proportional spacing is currently selected). Column n becomes
the last character position in the line. The right margin does not move
if the character pitch is changed later. The right margin must be within
the limits below:
27 81
n
-.
-.
Pica
Elite
Condensed pica
Condensed elite
Expanded pica
Expanded elite
Expanded condensed pica
Expanded condensed elite
:,.
L
The right margin can also be set from the control panel.
-.
76
---
,,
,_.
:,’
Set left and right margins
L
—
Mode
ASCII
Both
< ESC>
Decimel
“X”
nl
I
Hexadecimal
IB 58 nl n2
27 88 nl n2
n2
Sets the left margin at column nl and the right margin at column n2. See
the preceding comrnands for margin restrictions and other notes.
Carriage return
—
Mode
ASCII
Decimal
Hexadecimal
Both
<CR >
13
OD
Prints the current line and returns the next print position to the left margin.
If DIP switch 1-8 is ON, also performs a line feed.
-.
b
Set automatic line feed
Mode
Decimal
ASCII
Hexadecimal
“5” <1>
IB 35 01
27 53 1
IBM I <Efjc>
Causes the printer to perform both a carriage return and line feed each
time it receives a <CR> code. This command takes priority over DIP
switch 1-8.
Cancel automatic line feed
Mode
ASCII
IBM
<Esc >
k –
p
Hexadecimal
Decimal
“5” <()>
IB 35 00
27 53 0
Causes the printer to perform only a carriage return when it receives a
<CR > Wje. ThiS CO remand takes priority over DIP switch 1-8.
Backspace
Mode
ASCII
Both
-=@=-
I
Decimal
8
I
Hexadecimal
08
Moves the print position one column to the left. Ignored if the print
position is at the left margin. This command can be used to overstrike
or combine characters.
Left justify
IModel
Both
ASCII
I
Decimal
I
Hexadecimal
I
c ESC>
“a” syy,
27 97 48
IB 61 30
<l)>
<ESC>
“a”
27 97 0
IB 61 00
Aligns subsequent text with the left margin, leaving the right margin
ragged.
Center text
Mode
Both
ASCII
I
Decimal
I
Hexadecimal
<ESC>
“a” “1”
27 97 49
IB 61 31
<ESC>
“a” <1>
27 97 1
IB 61 01
Centers subsequent text between the left and right margins.
Right justify
Mode
Both
&
ASCII
Decimal
Hexadecimal
27 97 50
IB 61 32
2’7 97 2
[B 61 02
Aligns subsequent text with the right margin, leaving the left margin
ragged.
c ESC>
“a”
“2”
< ESC>
“a” <2>
Set horizontal tab stops
Model
ASCII
I
Decimal
I
Hexadecimal
1
Both I <ESC> ‘.~n ~~ n2 ...<0> 27 68 nl d ...0 IB 44 nl n2...00
Cancels all current horizontal tab stops and sets new tab stops at columns
nl, n2, etc. in the current character pitch (picapitch if proportional spacing
is currently selected), where nl, n2, etc. are numbers between 1 and 255.
The maximum number of horizontal tab stops allowed is 32 in Standard
mode and 28 in IBM mode. The tab stops must be specified in ascending
order; any violation of ascending order terminates the tab stop list.
Standard termination is by the <O> control code. To clear all tab stops,
specify < ESC > “D” <0 ~.
Set horizontal tab stop every n cohrmns
Model
ASCII
<
Both
Esc
I
>
< Esc >
-e!*
“(),?
“e” <()>
~
n
Decimal
27 101 48 n
27 101 0 n
I
Hexadecimal
IB 65 30 n
IB 65 00 n
I
..
~,:
Cancels all current horizontal tab stops and sets new tab stops every n
columns, where n is between 1 and 127.
I
Reset all tab stops
*
L—.—
Mode
ASCII
IBM
27 82
IB 52
<ESC>
Resets the horizontal tab stops to their power-up values in which a tab
stop is set every 8 column starting at column 9. Also clears all vertical
tab stops.
I
..
,——
1
Decimal
Hexadecimal
‘.R9,
Horizonta/ tab
I
,
Mode
ASCII
Both
<HT>
Decimal
Hexadecimal
9
09
Moves the print position to the next horizontal tab stop. Ignored if there
is no next horizontal tab stop in the current line. Note that when underlining is selected, spaces skipped by horizontal tabulation are not
underliried.
Re/ative horizontal tab
Mode
ASCII
std.
<ESC>
IBM
b
Decimal
Hexadecimal
“\“ nl
n2
27 92 nl n2
IB SC nl n2
< FS>
“\“ nl
n2
IC SC nl n2
28 92 nl n2
Moves the print position right or left a specified distance (maximum 6
inches). Ignored if the resulting position is beyond the right or left margin.
The formulas for the distance and direction are as follows:
If n2is between Oand 63, the print head moves right by (n] + n2x 256)/120
inches
If n2 is between 64 and 127, the print head moves left by (nl +
[n2– 64] x 256)/120 inches
Absolute horizontal tab in inches
Mode
ASCII
Both
< ESC>
Decimal
Hexadecimal
27 36 nl n2
IB 24 n] n2
Sets the next print position to (nl + n2 x 256)/60 inches from the left
margin on the current line. Ignored if this position is beyond the right
margin. The maximum position is 8 inches.
“$“
ni
n2
.
. .’ “, ,.
,, .
Absolute horizontal tab in columns
Model
Both
ASCII
Decimal
I
I
Hexadecimal
1
[lB 66 30 n
27102 48 n
“f’ “o” n
<ESC>
<0>
n
IB 66 00 n
27102 0 n
“r’
<ESC>
Moves the next print position to column n from the left margin, where
n is between Oand 127.
GRAPHICS COMMANDS
.
Print single-density 8-bit graphics
IModel
Both
I
ASCII
<ESC>
“K”
ml
nl
m2
n2
Decimal
I
27 75 nl n2
IB 4B n] n2
+!
—
ml m2
ml m2
.
Hexadecimal
Prints bit-image graphics at 60 dots per inch horizontally. The graphic
image is 8 dots high and nl + n2 x 256 dots wide. Maximum width is
8 inches (480 dots). ml, m2, . are the dot data, each a l-byte value from
Oto 255 representing 8 vertical dots, with the most significant bit at the
top and the least significant bit at the bottom. The number of data bytes
must be nl + n2 x 256. Dots beyond the right margin are ignored. At
the end of bit-image printing the printer returns automatically to character
mode.
Print double-density 8-bit graphics
Mode
Both
Hexadecimal
Decimal
ASCII
“L”
< ESC>
ml
nl
n2
27 76 nl
n2
ml m2
ml m2
m2
IB 4C nl n2
Prints bit-image graphics at 120 dots per inch horizontally (maximum
960 dots wide). See < ESC > “K” for other information.
Print double-density, double-speed 8-bit graphics
Mode
Both
Hexadecimal
Decimal
ASCI!
“Y”
< ESC>
ml
m2
n2
nl
...
27 89 nl n2
ml m2
...
IB 59 nl n2
ml m2
—
Prints bit-image graphics at 120 dots per inch horizontally (maximum
960 dots wide), skipping every second dot in the horizontal direction.
See < ESC > “K” for other information.
—
80
Print quadruple-density 8-bit graphics
Mode
,-.
Both
.-
Decimal
< ESC>
ml
Hexadecimal
IB 5A nl n2
27 90 nl n2
ml m2
“Z” nl
n2
m2
...
ml m2
Prints bit-image graphics at 240 dots per inch horizontally (maximum
1920 dots wide), skipping every second dot in the horizontal direction.
See < ESC> “K” for other information.
Select graphics mode
.Mode
Both
ASCII
Decimal
< ESC>
“*”
n2
n(l
ml
m2
Hexadecimal
IB 2A nO nl
27 42 nO nl
nj
...
n2 ml m2
..
n2 ml m2
...
Selects one of seven graphics modes depending on the value of no and
prints bit-image graphics in this mode. See < ESC > “K” for information
on nl, n2, ml, m2, ...
no Graphics mode
O
1
2
3
4
5
6
.
..
i
Normal-density
Double-density
Double-density, double-speed
Quadruple-density
CRT graphics, mode I
Plotter graphics
CRT graphics, mode H
(60 dots per inch)
(120 dots per inch)
(240 dots per inch)
(80 dots per inch)
(72 dots per inch)
(90 dots per inch)
Convert graphics density
1-
L
1
I
ASCII
..
Decimal
Hexadecimal
Mode
ASCII
Both
IB 3F n m
27 63 n m
m
<ESC>
“T’ n
Converts graphics defined by subsequent < ESC> “K”, < ESC > “L”,
< ESC > “Y” or < ESC > “Z” commands to a density mode defined
by < ESC> C’*”.n is “K”, “L”, “Y” or “Z”, indicating the mode to be
converted. m is a code from <0> to <6> indicating one of the modes
of < ESC > “*”.
Print 9-pin graphics
Mode
std.
Decimal
ASCII
Hexadecimal
27 94 nO nl
IB 5E nO nl
n2 ml m2 ...
n2 ml m2 .
n2 ml m2 ...
Prints bit-image graphics at 60 dots per inch if no = Oor 120 dots per
inch if no = 1. The graphics image is 9 dots high and nl + n2 x 256 dots
wide. Maximum width is 8 inches. Dots beyond the right margin are
ignored. ml, m2, ... are byte pairs representing 9 vertical dots each. In
the leftmost position, the most significant bit of ml is the top dot; the
least significant bit of ml is the second dot from the bottom; the most
significantbit of m2 is the bottom dot; and the other bits of m2 are ignored.
Other byte pairs are similar. The number of data bytes must be 2 x (nl
+ n2 x 256). At the end of bit-image printing the printer returns automatically to character mode.
< ESC>
“A”
no
nl
—
—
DOWNLOAD CHARACTER COMMANDS
.
Copy standard characters from ROM into RAM
Mode
ASCII
std.
<Esc>
IBM
Deeimal
“:” <()> <cl> <()> 27
58
Hexadecimal
000
IB 3A 00 00 00
“:” <t)> <(1> <()> 28 58 000
<FS>
IC 3A 00 00 00
Copies all the standard characters to the corresponding download character RAM area, overwriting any download data already present. Ignored
when DIP switch 2-1 is ON.
Define draft download characters
Mode
< ESC>
Both
Decimal
ASCII
“&”
<(J>
n2 mO ml
m3... mll
nl
27 38
m2
0 nl
n2 mO ml m2
m3...mll
Hexadecimal
IB 26 00 nl
—
n2 mO ml m2
m3...mll
Defines one or more new draft characters and stores them in RAM for
later use. DIP switch 2-1 must be OFF; otherwise RAM is used as an
input buffer, not for downloading characters, and this command is ignored. Draft mode must be selected before this command is executed.
nl is the character code of the first character defined and n2 is the character
code of the last character defined. ni and n2 must both be between 32
and 127or both be between 160and 255. nl must be equal to or less than
n2. Use of character codes 32 (space) and 127 (delete code) should be
avoided if possible.
Each character is defined by an attribute byte (mo) and 11 data bytes
(ml, m2,..... roll).
—
—
The most significant bit of the attribute byte is 1 if the character is an
ascender (positioned entirely above the baseline) or Oif it is a descender
(descending below the baseline). The attribute byte also indicates the
amount of white space to the left of the character (Oto 7 dots, specified
by bits 4 to 6), and the width of the character cell, including this space
(4 to 15 dots, specified by bita O to 3). The left space and cell width attributes are used only in proportional spacing.
Each data byte indicates eight vertical dots, with the MSB being the top
dot and the LSB the bottom dot. These correspond to pins 1 to 8 or 2
to 9 of the print head, depending on whether the character is an ascender
or descender.
For further details, please refer to the Appendix C.
Define ML(2 download characters
Mode
< ESC>
Both
Decimal
ASCII
“&”
<0>
n2
mO ml
m3... m46
nl
0 nl
n2 mO ml m2
m3...m46
27 38
m2
Hexadecimal
IB 26 00 nl
n2 mO ml m2
m3...m46
Defines one or more new NLQ characters and stores them in RAM for
later use. DIP switch2-1must be OFF. NLQ mode must be selectedbefore
this command is executed. The parameters are the same as for the draft
download character command except that the attribute byte specifiesright
space instead of character width and the dot density is doubled in each
direction, so each character consists of 16 dots vertically and 23 dots
horizontally and requires 46 data bytes. Dots defined by ml to m23 are
printed on the first pass of the head. Dots detined by m24 to m46are printed
on the second pass, the paper being scrolled up half a dot between the
two passes. For further details, please refer to the Appendix C.
I
Define cfown/oacfcharacters
Mode
ASCII
< ESC>
IBM
“=”
nl
n2
<DC4> aO
ml
al
a2
m2 ...mll
—
Decimal
Hexadecimal
27 38 nl
IB 26 n] n2
n2
20 aO al a2
ml m2 ...mll
.
14 aO al a2
ml m2 ...mll
Defines one or more new draft characters and stores them in RAM for
later use. Draft mode must be selected before this command is executed.
nJ and n2 give the number of bytes of character data that will follow.
ao is the character code of the first character defined. al and a2 are attributes bytes. m] to mll are the character data, and are the same as in
< ESC > ‘c&.” The attribute byte a] indicates whether the character is
an ascender (not using the lowest of the nine vertical dots) or a descender
(not using the highest dot) and whether it has a downward extension to
12 dots.
The attribute byte a2 gives proportional-spacing information. Bit 7 is
ignored. Bits 4 to 6 specify the offset to the first byte printed (Oto 7),
enabling leading spaces in the character to be ignored. Bits Oto 3 specify
the width of the character cell (maximum 11 dots). The character will
be followed by a man&tory blank dot column which is not included in
this width.
—
—
Characters defined by this command can be selected by < ESC> “%”
1, < ESC > “I” 4, < ESC > “I” 5, or < ESC > “l” 6. This command is
ignored when DIP switch 2-1 is ON.
Se/ect download character set
Mode
Both
ASCII
Decimal
Hexadecimal
“l”
27 37 49
IB 25 31
<1>
< ESC> “%”
27 37 1
IB 25 01
Selects the download character set. Ignored when DIP switch 2-1 is ON.
< ESC>
“?40”
Select draft download character set
Mode
IBM
ASCII
< ES(J>
Decimal
“1”
Hexadecimal
IB 49 34
<Esc >
“I” <4>
IB 49 04
27 73 4
Selects the download character set and draft quality. Ignored if the NLQ
Type Style switch was pressed during power-up or if DIP switch 2-1 is
ON.
“4”
27 73 52
—
—
. ..
84
Select draft elite download character set
1
i-
IModel
I
IBM
ASCII
< ESC>
I
“I”
Decimal
!
Hexadecimal
I
“5”
27 73 53
I IB 49 35
27 73 5
<ESC>
“I” <5>
IB 49 05
selects the download character set, draft quality, and elite pitch (12 cpi).
Ignored if the NLQ Type Style switch was pressed during power-up or
if DIP switch 2-1 is ON.
Select NLQ download character set
Model
IBM
ASCII
I
Decimal
I
Hexadecimal
1
27 73 54
I IB 49 36
< ESC>
27 73 6
IB 49 06
Seleets the download character set and near letter quality. Ignored if the
NLQ Type Style switch was pressed during power-up or if DIP switch
2-1 is ON.
< ESC>
“I” “6”
“I” <6>
Select ROM character set
Mode
i
Both
L.
,
L
Decimai
ASCII
“o”
$’O/.”<()>
27 37 48
“%”
f-
MACRO INSTRUCTION COMMANDS
.
Define macro instruction
Model
L
Both
1
1-
Hexadecimal
IB 25 30
27
37
0
IB 25 00
<ESC>
Stops using the download character set and returns to the built-in ROM
character set. Ignored when DIP switch 2-1 is ON.
< ESC>
ASCil
I
Decimal
I
Hexadecimal
I
.. < RS>
27 43
30 I IB 2B ... IE
< ESC> “+“
Cancels any existing macro instruction and replaces it with the defined
instruction. The defined macro instruction consists of the characters
between the “+” and < RS >. These can be any printable characters
or control characters excep”t< RS >, up to a maximum of 16 characters.
L
!
Execute macro instruction
L.
!
L_
Mode
ASCil
Both I
< ESC >
“ + “ <1>
I Decimal
I 27 43
1
Executes a previously defined macro instruction.
‘,
L,
f
‘L
F-
,:
.;.
.
.,,
,:,
.,
~,.
.
;,:.
,;,:
.“,.
.;,;
.
,,
,,.
I Hexadecimal
I IB 2B 01
I
OTHER PRINTER CONTROL COMMANDS
Set MS13to 1
Mode
ASCII
Both
<E% >
Decimal
Hexadecimal
IB 3E
Sets the most significantbit of each subsequent byte receivedto 1,allowing
users with a 7-bit interface to access characters with ASCII codes greater
than 127.
“>“
27 62
Set MSB to O
Mode
Std.
ASCII
< ESC>
IBM
<FS>
Decimal
Hexadecimal
-=“
IB 3D
27 61
IC 3D
28 61
Sets the most significant bit of each subsequent byte received to O.
n= **
Accept MSB as is
Mode
ASCII
I
Decimal
I
Hexadecimal
I 27 35
i IB 23
“#”
.,
#Both ,i <ESC>
Cancels the preceding commanda and accepts the most significant bit as
it is sent to the printer.
1
-/eta
Mode
last character sent
ASCII
i
Decimal
I
Hexadecimal
[127
17F
Deletes the last character received. Ignored if the last character received
has already been printed, or if the last character received was all or part
of a command.
Both I < DEL>
—
Cancel last line
Mode
ASCII
I
Decimal
I
Hexadecimal
I 24
I 18
Deletes the last line currently present in the print buffer.
Both 1i < CAN>
I
86
4
t
hnfnediate print
Mode
Both
Hexadecimal
Decimal
ASCII
< ESC >
-i,,
c ES(J>
“i” <1>
“~,,
69 31
IB 69 01
27 105 1
Selects the immediate print mode, in which the printer prints each
character as soon as received. At every pause in the incoming data stream
the printer scrolls the paper up about 2 inches so that the current line
can be seen. When the next character is received the paper is scrolled
back down and printing continues. This commandosignored when friction
feed is used.
IB
27 105 49
Cancel immediate print
IModel
ASCII
<
Both
I
Decimal
I
Hexadecimal
I
27 105 48
IB 69 30
IB 69 00
27 105 0
Cancds the immediate print mode. The printer waits for each line to be
completed before printing it, and does not scroll the paper up and down.
This command is ignored when friction feed is used.
~s~
>
<ESC>
q>>
‘,0>>
“i” <()>
Set printer off-line
Mode
ASCII
I
Decimal
I
Hexadecimal
I
113
I 19
Std. I <DC3>
I
I 27 81 3
I IB 51 03
IBM [ <ESC> “Q” <3>
1
Sets the printer off-line. The printer disregards all subsequent characters
and commands except < DC1 >, which returns it to the on-line state.
The printer’s On Line indicator does not go off.
Set printer on-line
Mode
Both
ASCII
I
Decimal
I
Hexadecimal
I
17
I 11
<DC1>
I
Returns the printer to the on-line state, allowing it to receive and process
all subsequent characters and commands. This command is ignored if
the printer was set off-line by pressing the On Line switch on the control
panel.
Bell
—
Decimal
Hexadecimal
Mode
ASCII
Both
<BEL>
‘7
07
Sounds a brief beep tone from the printer’s beeper.
—
Bidirectional printing
Mode
Both
ASCII
Decimal
Hexadecimal
27 85 48
IB 55 30
27 85 0
IB 55 00
<ESC> “u” <0>
Causes subsequent printing to be done in the normal bidirectional mode,
which is faster than unidirectional printing.
< ESC>
“u”
“o”
Unidirectional printing
Mode
ASCII
I
Decimal
I
Hexadecimal
1
<Esc >
I 27 85 49
I IB 55 31
“u,,
<1>
] 27 85 1
I IB 55 01
<ESC>
Causes subsequent printing to be done unidirectionally, ensuring maximum vertical alignment precision.
“u,>
Both
—
“1,
>
One-line unidirectional printing
Mode
ASCII
I
Decimal
I
Hexadecimal
“ <“
I
I 27 60
I IB 3C
Both I <ESC>
I
Immediately returns the print head to the left margin, then prints the
remainder of the line from left to right. Normal bidirectional printing
resumes on the next line.
Manual feed
Mode
Both
—
Decimal
ASCII
< ESC>
—
Haxadacimal
<EM><0>
,,(,, ,60,, ,,),,
27 25 0
IB 19 00
,,(,,
“)” 40 40 48 41 41 28 28 30 29 29
selects manual sheet feeding even when the optional automatic sheet
feeder is mounted. Ignored if DIP switch 1-4 is ON (ASF inactive).
88
—
.—
Auto feed
Mode
Decimal
ASCII
Hexadecimal
IB 19 04
,, ,,
“(,, ,64,, ,6,,
)
“)” 40 40 52 41 41 28 28 34 29 29
(
Selects the automatic sheet feeder. Ignored if DIP switch 1-4is ON (ASF
inactive).
< ESC>
Both
<EM ><4>
27 25
4
Eject paper from ASF
Mode
l—
Hexadecimal
<EM > “R”
‘, ,,
27 25 82
IB 19 52
“R” “)“ “)” 40 40 82 41 41 28 28 52 29 29
(
Ejects the current page. Ignored if DIP switch 1-4 is ON (ASF inactive).
< ESC>
“(n
Both
,-
Decimal
ASCII
Set print start position on ASF
Mode
In,.th I
u“..,
i
1.
I
ASCII
Decimal
Hexadecimal
I
I
] 2725 84 n
I IB 19 54 n
< ESC> <EM> “T” n
1
“T” “)” “)” n I 40408441 41 n I 2828 542929 n I
(
(
Skips n/6 inches at the top of the page, where n is equal to or greater than
1. Ignored if DIP switch 1-4 is ON (ASF inactive).
‘.
,?
,’
,,
Reset printer
..
Mode
ASCII
Both
< ESC>
Decimal
“@”
27 64
Hexadecimal
IB
40
Reinitializes the printer. Clears the print buffer and returns settings to
their power-up values. Does not clear the input buffer or change ASF
selections.
L
.
.—
.,.
MEMO
..
—
—
—
—
—
—
—
—
—
—
—
—
90
—
Appendix C
DOWNLOAD
CHARACTERGENERATOR
With this printer you can create new characters and symbols download
their dot data, and have them pz-inted in place of selected characters in the
regular character set. Characters that can be generated in this way range
from simple but usefid symbols like the check mark through complex Chinese
or Japanese characters.
The process of designing new characters with paper and pencil is
somewhat ti.LW
~n&The
lmxgramlistedin-thisappeadix e~blesym
to do everything on the compukz acmm. U also enables you to maintain
disk files of character data for downloading when required.
near-letter-quality.@aracder ( * ) is..ex@tinedbcknv.
Draft character
ml m2 nr3 m4 rrr.5d
m7 d
m9m10mli
128
ASCII Code
Descender
Stert column
End column
64
32
33
I
O
II
rr@= Descenderx 128
16
+ (Startx 16)
+ End
8
4
—
2
—
1
Dot
data 124 0 66 4
.
,—...Igure b-I.
A
-
a--
-..—L-,
J--l.
64 36 16 2
-.
16 12 0
.-,:..
war symur. n,❑ ran quzumy
91
The dot matrix for a draft-quality character is 8 cells high and 11 cells
wide. Figure C-1 shows the matrix with the car symbol filled in. Note that
there are no pairs of horizontally adjacent dots. The pins in the print head
cannot tire fast enough to print adjacent dots in the horizontal direction.
To the printer, a draft character is represented by 11 bytes of dot data,
one byte for each column. If you are working by hand, you can calculate
the data as shown in Figure C-1 and enter them via the z ESC > “&” <0>
printer command. If you use the program in this appendix, proceed as
follows.
The program starts by asking whether you want to read characters from
an existing file. If you are going to add the car symbol to a file of download
characters you have already generated, answer yes; if you are going to create
a new file, answer no. The arrow on the screen toggles between Yes and
No when any key except Return is pressed. The Return key enters your
choice.
In the same way the program asks you to select Standard or IBM mode
and draft or near letter quality, then to confirm whether to continue or start
over. Continuing, on the next screen the program asks what character you
want to redefine, offering the exclamation mark (!) as a suggestion. If you
want to print the car symbol in place of the exclamation mark, press Return.
If you want to assign the car symbol to another character, press the key
of that character.
—
—
—
—
—
—
Next you must choose whether to make the car symbol an ascender
or a descender. This determines how the character is seated on the line:
Ascender CM:
Descender CIM3
After you press Return for the ascender/descenderchoice, the cursor enters
the character box. You can move the cursor with the numeric keypad. For
example, pressing the “6” key moves to the right; pressing the “3” key
moves diagonally down to the right. The function keys control the setting
and clearing of dots. After F1 is pressed the cursor clears the dot in each
position it is moved to. F3 causesthe cursor to set dots. F2 allowsthe cursor
to pass over dots without either setting or clearing them.
In draft mode a dot position is a 2x2 character block with the cursor
located in the upper left comer of the block. When a dot is set, a 2x3 block
of sharp signs is displayed, partly overlapping the dot position to the right.
This reflectsthe fact that the printer cannot print horizontally adjacent dots.
The program automatically censors adjacent dots.
—
—.
—
92
—
—
—
t
I
r
By moving the cursor and pressing the Fl, F2, and F3 keys you can
quicklybuild up the dot pattern. If necessaryyou can clear alldots by pressing
F4 and start over. When the character is complete, press Return to store
the dot data in the computer’smemory. The program willclear the character
box and ask you to select the next character to design.
When you have finished designing characters, press the F6 key. The
program will ask you whether you want to save, download, ad print the
characters you have designed.If you answer Yes to all three questions,your
characters will be saved on a disk file and downloaded to the printer, and
the entire character set from character 33 (!) to character 126 (*) will be
printed out.
At any point while you are selecting or designing characters you can
press F5 to skip the current character and proceed to the next character.
The program does not allow you to redefine the space character, or to
define any other character as an all-blank character. Nor can you assign
character codes lessthan 33 or greater than 126to the characters you define.
NLQ character
First ml...
nas~
--- m24...
r-1128
...m23
...m46 pass
64
.—
,,,
..,
-I.,—.
,
,*
32
16
,28 ASCII Code 33
Descender
I
64 Left space:
o
Right spece:
0
32
mO= Descender x 128
+ (Left x 16) + Right
16
8
4
8
4
2
2
1
1
Dot data
Ist: 14 36 m 70 r26 o 0 0 9 9 8 0
16 I I O 0 70 36 22 6 6 6
2nd: Z?3 14 M 14 24 0 64 32 16 0 0 0
32 64 0 0 0 12 12 14 14 14 12
fgure C-2.Car aymbol, near letter quality
93
—
If you select near letter quality, the character box is the same size but
now has 16 (high) x 23 (wide)dot positions. Each dot is represented by two
adjacent sharp signs,occupyingits own position and the positionto the right.
This reflectsthe fact that the printer still cannot print horizontally adjacent
dots, but that even skipping every other dot, the dots appear joined when
printed.
A near-letter-quality character is represented by 46 bytes of dot data,
two bytes for each column. Near-letter-quality characters are printed in two
passesof the print head, the paper scrollinghalf a dot up between the passes.
The first 23 bytes of dot data represent the first pass; the next 23 bytes
represent the second pass. In each column the first, third, fifth, ... dots belong
to the first-pass byte and the second, fourth, sixth, ... dots belong to the
second-passbyte.
—
—
A maximum of 78 near-letter-quality characters can be defined.
The file created by this program contains the following printer commands:
1. <Esc > “:” <() > <()> <()> (standard mode) or < Fs > “:” <0>
<() > <0> (IBM mode) to COpythe printer’s regular characters into
download memory. If you leave a download character undefined, the
regular character will be printed.
<
>
< E
> “
<
s
draft or near letter
2. < ESC > “
quality,
3. One < ESC > “&” <O> <cc> <cc> <a> < pl > ... command for
each character defined. <cc> is the character code, < a > is the attribute
byte, and <PI > ... are the 11 (draft) or 46 (near letter quality) bytes
of dot data. This program uses only the most significant bit of the attribute byte. It does not set the other bits, which are concerned with
proportional spacing.
This program is coded in Microsoft BASIC for IBM-PC. The WIDTH
255 command in line 1010 means infinite line width and prevents the
computer from inserting unwanted line feeds in the character data. Some
versionsof BASIC do not need the WIDTH command. Check your BASIC
manual and make any changes necessary.
—
.
94
—
t
I
I. .
k-
,—
1.
1000
1010
1020
1030
1040
1050
1060
1070
1080
1090
1100
1110
1120
1130
1140
11s0
1160
1170
1180
1190
1200
1210
1220
1230
1240
12s0
1260
1270
1280
1290
1300
1310
1320
1330
1340
13s0
1360
1370
1380
1390
1400
1410
1420
1430
1440
1450
1460
1470
1480
1490
1500
1510
1520
1530
1540
1s50
1560
1570
1580
1590
1600
1610
1620
1630
1640
1650
1660
1670
1680
1690
! ““. .,,”..”.,,...,.”
““,
-~~*J)
cH~~~~~~ ~EN~~A~~~ ,,, ..,,”.”,
.,, .,,...,
WIDTH “LPT1:“,255 :KEY OFF :C!LS
DIM A(126), P(126.23), Q(126,23). DT(16,24) :E$-CHRS(27) :R$-CHR$(2S)
:KEY 2, CHR$(8)
,KSY 3, CHR$(9)
KEY 1, CHR$(7)
KEY 4. CHRS(10) :KEY 5, CHR$(lI) :KEY 6. CHR$(12)
FOR I-33 TU 126 :A(I)--1 :WEXT I
,_______________________________________________________________________
LOCATE 1,1 :PRINT SITIING$(25,62);
“;STRING$(25,60)
PRINT “ DOWHLOADCHARACTSRGBNERATOR
LOCATE 3,1 :PRINT “READ CHARACTERS FROM EXISHNG FILE?”
SO$-”Yes” :Sl$-”NO” :S--1 :PX-4 :PY-1 :GOSUB 3020 :IF S THEN 1320
‘----- Open existing file –----------–--—---–-–-–-------–-––-——----—LOCATE 4.20
INPUT “File name’’;FI$
OPEN “R’’,#l,FI$,48
FISLD #1,48 AS AS
‘----Read 2 initial comnds
--–-–-––---–--–------------------––-----—G~ #1,1
IF MID$(A$,4,1)-E$ THEN ISM-O ELSE IBM--1
IF MID$(A$,3,1)-”0” THEN NLQ-O ELSE NLQ--l~
IF NLQ THEN WI-23 :HI-16 ELSE WI-11 :HI-8
‘----- Read data for 1 character ----------------------------------------FOR CC-33 TO 126 :M-CC–31
GET #1.M :IF LEIT$(As,l)-CHR$(0) THEN A(CC)--1 :GOTO 1310
A(CC)-ASC(MIDS(A$,2,1))
FOR Y-1 TO WI
P(CC,Y)-A9C(MID$(A$,Y+2 ,1)) :NEXT Y
IF NLQ-O THEN 1310
FOR Y-1 TO WI
Q(CC,Y)-ASC(MIDS(A$.Y+25.1)) :NEXT Y
NEXT CC :CLOSE 1
‘--––- Select Std./ISJ!--------------------------------------------------LOCATE 6,1 :PRINT “SELECT MODE”
SO$-”Standard mode (DIP SW. 1-6 ON )“
S1$-’’IBMmode
(DIP SW. 1-6 OFF)H
S-ISN :PX-7 :PY-1 :GOSUB 3020 :IBM-S
IF ISM THSN HD$-Rs+’’:’’+STRING$(3,O)ELSE HD$-E$+’’:’’+STRING$(3,O)
‘----- Select Draft/NLQ -------------------------------------------------LOCATE 9,1 :PRINT “SELECT QUALITY”
SOS-’’Draftquality” :Sl$-’’Nearletter quality”
S-NLQ :PX-10 :PY-1 :GOBUB 3020 :NLQ-S
IF NLQ THEN HD$-CHR$ (27)+’’X1”+HD$:WI-23 :HI-16 :GOTO 1440
HD$-CHR$(27)+’’XO’’+HDS:WI-11 :HI-8
PLS-STRINGS(24,”+“) :HY$-~ING$(24, ‘-,,)
CC-33 ,CH$-.!.
‘----- Select Continue/Start over --–-–-------–----------––-––-—----——–
LOCATS 12,1 :PRINT “CONTINUE?”
SO*-’’C0ntinue” :SIS-’’Starto
S-O :PX-13 :PY-I :GOSUB 3020 :IF S THEN CLS :GOTO 1070
‘----- DRAW SOX ------------------------------------------------=--------cLS :IF NLQ THEN 1540
“ :GOTO 1550
LOCATE 1,3-:PRINT”l 2345678901
LOCATE 1,3 :PRINT “123456789012345678901234”
LOCATS 2.3 :PRINT “++++++++++++++++++++++++”
FOR N-1 TO 16
IF NLQ THEN LOCATE N+2.1 zPRINT RIGHT$(STR$(N),l) ;:GOTO 1590
IF N MOD 2 -1 THEN LOCATE N+2,1 :PRINT RIGHT$(STRS( (N+l)/2).1);
’;SPC(24);
”I” ,NEXT N
LOCATE N+2.2 :PRINT “;’
LOCATE 19.3 :PRINT “++++++++++++++++++++++++”
‘----- Select character ------------------------------------------------CH$-CHRS(CC)
LOCATE 1.40 :PRINT “SELECT CHARACTER [“:CHS:’,1”:
1$-INPti$(l) :IF “ “<Is AND I$<CHR$(127) Tikt-CH$-l$ ELSE GOTO 1660
CC-ASC(CH$)
LOCATE 1.40
:PRINT “SELECTBD CHARACTSR : “;CHS:” “
‘----- Ascender or demcender? -------------------------------------------SOS-”Ascender” :SIS-”Deacender”
S-(A(CC)-O) :PX-3 :PY-40 :GOSUB 3020 :DES-S
,
i
i
I
I
,
!
I
I
I
[
I
i
k
—
1700 ‘----- Key explanations ----------------------------------------------------1710 LOCATE 10,40 :PRINT “Fl: Clear dot”
1720 LOCATE 11,40 :PRINT “F2: Pass over”
1730 LOCATE 12,40 :PRINT “F3: Set dot”
1740 LOCATE 13,40 :PRINT “F4: Clear all dots”
1750 LOCATS 14,40 :PRINT “F5: Skip character”
1760 LOCATE 15,40 :PRINT “F6: End”
1770 LOCATE 16,40 :PRINT “RET Record character”
1780 ‘––––- Get character ----------------------------------------------------1790 IF A(CC)<O THEN GOSUB 3220 :GOTO 1950
1800 IF NLQ THEN 1870
1810 ‘----- Draft character
1820 FoR Y-1 TO 11 :WT-128 :FOR X-1 TO 8
1830 IF (P(CC,Y) AND WT)-O THEN 1S50
1840 DT(X,Y)-l :DTIX,Y+l)-2 :BX=X :BY-Y :CS$=’’###”:GOSUB 3700
1850 WT-.5*WT :NEXT X,Y :GOTO 1940
1860 ‘--–-– NLQ character
1870 FOR Y-1 TO 23 :WT-1213:FOR X-1 TO 15 STEP 2
1S80 IF (P(CC,Y) AND WT)-O THEN GOTO 1900
1890 DT(X,Y)-1 :DT(X,Y+1)=2 :BX-X :BY-Y :CS$-’’##”:GOSUB 3730
1900 IF (Q(CC,Y) AND wT)-O THEM GOTO 1920
1910 DT(X+l.Y)-1 :DT(X+l,Y+l)-2 :BX-X+l :BY-Y :CS$-’’##”:GOSUB 3730
1920 tW-.5*WT :NEXT X.Y
1930 ‘----- Modify F.plot character ------------------------------------------1940 x-1 :Y-1
1950 FOR Z-10 TO 12 :LOCATE 2.38 :PRINT “ “ :NEXT Z
1960 ST-2 :LOCATE 11,38 :PRINT ““ :IF NLL2THEN 2180
1970 ‘----- Draft character
1980 IF DT(x.Y)-2 THEN CS$-CHR$(2)+” “ :GOTO 2050
1990 IF DT(X:Y)-O THEN 2020
2000 IF ST-1 THEN DT(X.Y)-O :DT(X,Y+l)-O :CS$-STRING$(3.1)+” “ :GOTO 2050
2010 CS$-STRING$(3,2)+U “ :GOTO 2050
2020 IF ST<3 THSN CS$-STRING$(2,1) :GOTO 2050
2030 IF DT(X,Y+l)-1 THEN CS$-STRING$(2.1) :GOTO 2050
2040 DT(X,Y)-1 :DT(X.Y+l)-2 :CS$-STRING$(3r2)+” “
2050 GOSUB 3680
2060 SS-ST :BX-X :BY-Y :GOSUB 3110 :IF SS-ST THEN 2140
2070 IF sT>3 THEN 2100
2080 FOR Z-10 TO 12 :LOCATE 2,38 :PRINT “ “ :NEXT Z
2090 LOCATE 9+ST,38 :PRINT ““ :GOTO 1980
2100 IF ST-4 THEN GOSUB 3220 :GOTO 1950
2110 IF ST-5 THEN GOSUB 3220 :GOTO 1520
2120 IF ST-6 THEN 2410
2130 IF ST-7 THEN 3260
2140 IF DT(BX,BY)-2 THEN CS$-”# “ :GOTO 2170
2150 IF DT(BX,BY)-1 THEN CS$-’’###“ :GOTO 2170
“ ELSE CS$-” “
2160 IF DT(BX,BY)-O AND DT(BX,BY+l)-O THSN CS$-”
2170 GOSUB 3700 :GOTO 1980
2180 ‘----- NLQ character
2190 IF DT(X,Y)-2 THEN CS$-CHR$(2) :GOTO 2260
2200 IF DT(X.Y)-O THEN 2230
2210 IF ST-1 THEN DT(X,Y)-O :DT(X,Y+l)-O :CS$-STRING$(2,1) :GOTO 2260
2220 CS$-STRING$(2,2) :GOTO 2260
2230 IF ST<3 THEN CS$-CHR$(l) :GOTO 2260
2240 IF DT(X,Y+I)-l THEN CS$-CHR$(l) :GOTO 2260
2250 DT(X.Y)-1 :DT(X,Y+l)-2 :CS$-STR1NG$(272)
2260 GOSUif3720
2270 SS-ST :BX-X :BY-Y :GOSUB 3110 :IF SS-ST THEN 2360
2280
2290 IF ST>3 THEN 2320
2300 FoR Z-10 TO 12 :LOCATE 2,38 :PRINT “ “ :NEXT Z
2310 LOCATE 9+ST,38 :PRINT ““ :GOTO 2180
2320 IF ST-4 THEN GOSUB 3220 :GOTO 1950
2330 IF ST-5 THEN GOSUB 3220 :GOTO 1520
2340 IF ST-6 THEN 2410
2350 IF ST-7 THEN 3260
2360
2370 IF M(BX,BY)-2 THEN CS$-”#” :GOTO 2400
2380 IF DT(BX,BY)-l THEN CS$-’’##” :GOTO 2400
2390 IF DT(BX,BY+l)-O THEN CS$-” U ELSE CS$-” “
—
—
—
—
—
I
,.,.,[“
}!
1;
2400
2410
2420
2430
2440
2450
2460
2470
2480
2490
2500
2510
2520
2530
2540
2550
2560
2570
2580
2590
2600
2610
2620
2630
2640
3000
3010
3020
3030
3040
3050
3060
3070
3080
3090
3100
3110
3120
3130
3140
3150
3160
3170
31eo
3190
3200
3210
3220
3230
3240
3250
3260
3270
3280
3290
3300
3310
3320
3330
3340
3350
3360
3370
3380
3390
3400
3410
3420
3430
3440
GOSUB 3730 :GOTO 2180
‘----- Wrap-up ---------------------------------------------------------CLS :LOCATE 1,1 :PRINT “SAVE TO FILE?”
S-–1 :PX-2 :PY-1 :SOS-”Yes” :51$--No” ;GOSUB 3020
IF S THEN 2530
LOCATE 5,10 :PRINT “Output file name [“;FIS;”l “;
INPOT FO$
I FOS-”U AND FI$-”” THEN 2450
IF FO$-”” THEN FOS-FI$
OPEN “R’’,*1,FO$.48
FIELD #1,48 AS AS
LSET A$-HD$+STRING$(48-LEN(HD$).0) :PUT *1,1
GOSUB 3420 :CLOSE 1
LOCATE 7.1 :PRINT “DOWNLOAD TO PRINTER? (DIP SWITCH 2-1 NUST BE OFF)”
s-O :PX-8 :PY-l :SOS-’’Yes”:S1$-’’NO”:GOSOB 3020
IF S THEN END
LOCATE 11.1 ,PRINT “PRINT CHARACTER S=?”
S-O :PX-12 :PY-1 :SO$-’’Yes”:S1$-’’NO”:GOSUB 3020
IF S THEN SND
LOCATE 15,1 :PRINT “WHICH MONITOR ARE YOU USING?U
S-O :S1$-’’COLOR”:SO$-’’MONOCRO”:PX-16 :PY-1 :GOSUB 3020 :PB-S
GOSUB 3500 :LPRINT E$;’’3’’;CHR$(5O);
FOR CC-33 TO 126 :LPRINT CHR$(CC);” “;:NEXT CC
LPRINT STRING$(1O.1O) :PRINT STRING$(5.1O) :END
‘----- SUBRO~INES .......................................................
‘----- Selector rOutine-------------------------------------------------“;s0$
LOCATS PX,PY :PRINT “
“;s1$
LOCATS PX+l,PY :PRINT “
IF NOT S THEN 3060 ELSE 3070
“ :LOCATE PX,PY
LOCATE PX,PY :PRIAT “-->” :LOCATE PX+l.PY :PRINT “
IF
S THEN 3080 ELSE 3090
LOCATE PX,PY :PRINT “
“ :LOCATE PX+l,PY :PRINT “-->” :LOCATE PX,PY
1$-INP~$(l) :IF 1.9<>CHR$(13)TNSN S-NOT S :GOTO 3050
RElwRN
‘----- Input check ------------------------------------------------------1$-INPUTS(l) :SK-ASC(I$) :FK-VAL(IS)
IF SK>6 AND SK<14 THEN ST-SK-6 :GOTO 3210
IF FK-O OR FK-5 THEN 3120
IF PK ~D 3 - 0 THEN Y-Y+l
IF PK BE3D3 - 1 THEN Y-Y-l
IF FK >6 ~
X-X-1
IF FK <4 THEW X-X+1
IF YXfI THEN Y-WI ELSE IF Y<l THSN Y-1
IF X>HI THBN X-HI ELSE IF X<l THEN X-1
—
.
—
—
1
i
E
k“
‘----- Clear all dots --------------------------------------------------FOR N-1 TO 16 :LOCATE N+2,3 :PRINT SPC(24) :NEXT N
FOR X-1 TO HI :FOR Y-1 TO WI :DT(X,Y)-O :NEXT Y.X
SI’-2 :x-1 :Y-1 :RETuRN
‘----- Store character data ---------------------------------------------FL-O
IF DSS THSN A(CC)-O ELSE A(CC)-128
IF NLQ THEN ZA-15 :ZB-2 ELSE ZA-8 :ZB-1
FOR Y-1 TO WI :WT-128 :P(CC>Y)-O :Q(CC,Y)-O
FOR X-1 TO ZA STEP ZB
IF NLClTHEN Q(CC,Y)-Q(CC,Y)+WT* (DT(X+lY) AND 1)
P(cc,Y)-P(CC,Y)+WT* (DT(X,Y) AND 1)
WT-.5*WT
NEXT x
FL-FL+P(CC,Y)+Q(CC,Y)
NEXT Y
IF FL-O THEN A(CC)--1
BESP
CC-CC+l :IF CC-127 THEN CC-33
GOSUB 3220 :GOTU 1510
‘---–- Output to Diskette -----------------------------------------------FOR CC-33 TO 126 :li-CC-31
IF A(CC)--1 THEN BS-STRING$(48.0) :GOTO 3480 ELSE B$-CHRS(l)+CHR$[A(CC))
97
—.
3450 FOR Y-1 TO WI :B$-B$+CHR$(P(CC,YJ) :NEXT Y
3460 IF NOT NLQ THEN BS-B$+STRING$(35,0) :GOTO 348o
3470 FOR Y-1 TO WI :B$-B$+CHR$(Q(CC,Y)) :NEXT Y
-,----JqO” LSI?TA$-B$ :PuT #l,M
3490 NEXTCC :RI?IIJRN
3500 ‘----- Output to Printer -----------------------------------------------3510 LPRINT HD$;
3!320FOR CC-33 TO 126
3530 IF A(CC)<O THEN 3580
3540 LPRINT E$;-&’’;CHR$(0)
;STRING$(2,CC);:Z-A(CC) :GOSUB 36OO
3550 FOR Y-1 TO WI :Z-P(CC,Y) :GOSUB 3600 :NEXT Y
3560 IF NOT NLQ THEN 3580
3570 FOR Y-1 TO WI :Z-Q(CC,Y) :GOSUB 3600 :NEXT Y
3580 NEXT CC
3590 LFRINT E$;’’%l’’;
:RETURN
36oO
3610 IF PB THEN 3640
3620 PP-INP(6H3BD) :IF PP<12S THEN 3620
3630 OUT &H3BC,Z :OUT $4H3BE,5 :OliT6H3BE.4 :GOTO 3660
3640 PP-INP(&H379) :IF PP<128 THEN 3640
3650 OUT &H378,z :OLiT&li37A.5 :OUT &H37A.4
3660 RFT’URN
3670 ‘----- Plot character ---------------------------------------------------3680 LOCATE X*2+1,Y*2+1
:PRINT CS$
3690 LOCATE X*2+2,Y*2+1
:PRINT CS$ :
37OO LOCATE BX*2+1,BY*2+1 :PRIWT CSS
3710 LOCATE BX*2+2.BY*2+1 ,PRINT CS$ :R3TURN
3720 LOCATE X+2,Y+2
:PRIWT CS$ :REllJRN
373o LOCATE BX+2.BY+2
:PRINT CS$ :RETURN
—
.
—
—
—
—
-.
—
—
—
—
—
.
A
p
D p
e
n
d
This appendix givestables of the printer’s standard and IBM character
sets.
The decimal character code of each character is shown in an inset to
the lower right of the character.
The hexadecimal code can be found by reading the entries at the top
and left edges of the table. For example, the character “A” is in column 4
and row 1, so its hexadecimal character code is 41. This is equivalent (4 x
16 + 1 = 65) to decimal 65, the number in the inset.
Control codes recognized by this printer are indicated by abbreviations
inside pointed brackets < >.
<Sample>
r
Ir
Character
I
➤ c~n~~l
— Hexadecimalvalue
(low order)
~de
I
➤ Decimal value
i
—
CHARACTER SET
Hexadechml
0
1
2
3
4
5
6
7
&
6
<BEL>
m
22
(5
38
I
m
IT
F
v
54
7
G
F
8
I
. .
f
70
1
w
Ix_
I
v
86
1
102
9
F
I
-.
118
w
m
m
I
9
A
B
c
m’ z
z
+?!+4-%
:
1
1
I
I
‘l-AKIA
I
1
I
. .
I
%--l’
1
1
1
,06
,22
# 107 { m
1
1 ---
I
D
E
F
1
<s
.
126
‘
r
3
I
0
o
G
F
F
130
F
I
E
< JXq> t
1
“
161
I.-J
162
146
F
I
I.
m
I
I
.
&
134
<BEL>
+t 135
1
I
.
.
I .,.
I
F
182
I
. .
G
>
N
I
-..
h
m
...
I
f
214
“
242
s
-.
I
w
l-m m
r
226
c
E
v
198
7
I-E l-iiim
<so >
r
241
b
210
s
q
225
R
194
c
r
6
166
I
209
B
178
3
a
193
2
< DC3> #
Q
A
177
<N2 > II
3
7
x,
X
128
2
6
w
b
<
1
I
u
n
7
v
230
246
9
w
bi- lm-
n
“
158
< SI>
143
0
<DJjL>
~
101
IBM CHARACTER SET #2
—
I
t
I
1
1<
9
6
1
.
1
-
p
4
I
< HT
B
c
D
E
F
1
“
I
>1<
Y
A
1~
“
<
I
I
DC3>1&
I
E
.-
1
7
I
> I \
I
I
Y
i
73
< LF>
*
I-F
K
F
1
1
1
<w> <Esc> +
:
E
;
~
<FF> <FS> ,
J
I
F
z
1
K
Fii-
y
105
j
1
[
m
[ -
k
\
121
z
1
123
:
108
92
rim
{
107
91
44
<CR>
89
124
.
125
<so >
.
14
< SI>
>
N
/
78
46
?
o
n
94
“
1
1
<
0
1
1
I[i
i::.;:,.
,.
—
,—
1
—
IBM CHARACTER SET #1
o
<
N
<D
1
>
1
< X2>
2
3
>
3
<D
4
4
5
I
>
2
I
<D
&
2
2
<D
1
3
4
F
>
1
1
< DC2
1
1
<D
>
1
1
<D
1
>
1
<SI>
Other characters are identical to IBM character set #2.
The duplication of control codes enables systemswith a 7-bit interface
to obtain control functions when the most significantbit is set to 1 by the
< ESC > “ >” command.
1
,.
I‘
ADDITIONAL CHARACTER SET
Hexadecimal 01
0
1
1
I
a d
0)
16
0
In IBM mode, additionalcharacterscan
be printedby specialcommands.
i
2
3
4
5
6
7
8
9
l
A
1
c
B
D
E
F
-.
8+
3
’
$
-
I
INTERNATIONAL CHARACTER SETS
—
When an international character set is selected by DIP switches2-2 to
2-4 or by a command from software, the followingchanges are made in the
character set:
..
I
I
—
See page 17 for the DIP switch settings.
The commands for selectingthe international character sets are:
Standard mode: < ESC > “R” n
—
IBM mode: < FS > “R” n
Where n means character code n, i.e. CHR$ (n) in BASIC. The values of
n are:
O U.S.A
5 Sweden
10 Denmark II
1 France
6 Italy
11 Spain II
2 Germany
7 Spain I
12 Latin America
8 Japan
3 England
13 Denmark/Norway
4 Denmark I
9 Norway
—
—
—
—
.
106
—
I
: ....
-.
INDEX
‘
I
1-
~
I -.
Absolute horizontal tab, 79,80
Ascender,83,84,92
Auto feed, 89
Automatic carriage return, 16
Automatic line feed, 17, 77
Automatic sheet feeder,6, 16,56,89
m
Backspace, 77
Bail lever, 2, 7,8,9, 11, 12
BASIC,25,40, 94
Beeper,20,24-29,88
< BEL>, 88
Bidirectionalprinting, 88
Bit-imageprinting, 37,45,51,80-82
Bold printing, 62
Bottom margin, 73, 74
Buffer, 17,28, 53
a
Cancel command, 86
Carriage return, 77
Centering, 78
Channels of vertical tab stops, 75
Character codes, printing of ail, 65
Character sets, 54,63-64,99-106
Character size.and pitch commands, 66
Character spacing,68
Cleaning,47
Column width, 32, 55
Commercialsoftware, 31-35
Condensedpitch, 21,51
Connector, 3,5
Control panel, 19
Courier type style, 22,60, 61
m
Delete, 86
Descender,83,84,92
Dimensionsof printer, 55
DIP switches, 14-17,33, 50, 51, 53, 63, 64,
65, 72, 74,82-85,88,89
DOS commands, 37-40
Dot matrix size, 54
Double-sizecharacters, 69, 70
Double-strikeprinting, 62
Download characters, 27, 51, 54, 82-84,
91-98
Draft quality, 22,59,60,82,84, 91-93
m
Electricalspecifications,55-56
Elite pitch, 22,60,66,85
Emphasizedprinting, 51,61
Emulation, 16,31,53
Entry slot, 3
Environmentalrequirements, 2, 56
Epson printers, 31
Escape code, 32, 35
Escape sequences,59
Expandedprinting, 67
m
Fanfold forms:
loading, 9, 50
parking, 11,26
specifications,55
unparking, 12
Fixed spacing,68
Font control commands, 59
Form feed, 74
m
Gap, 14
Graphics, 37,45, 51,80-82
m
Hard copy, 37
Hexadecimaldump, 24-26
Horizontal position commands, 76
Horizontal tabulation, 51, 79
CKl
IBM character sets, 64, 102-105
IBM mode, J6, 22,46
IBM-PC, 25, 26
IBM printers, 31
Immediate print, 87
Initialization sequence,33
Installing software, 31
—.
Interface:
specifications,53
signals,56
test, 13
International characters,
17,51,64, 106
Italic printing, 22, 61
m
Justification, 78
m
Label printing, 50
Left margin, 28, 76, 77
Line feed, 72
Line spacing, 50,55, 70-72
Locating the printer, Z
Parking, 11-12,26
Pause, 20, 35
Pica pitch, 21,66
Pitch, 21,24, 34,55,66
Platen knob, 2,3
Power cord, 6
Power indicator, 20
Power switch,3
Print Pitch switch, 2J, 24-28
Print head, 47-49,50, 53
Printer commands, 39,51,59
Printing gap adjustment, 14
Printing mechanism,53
Proportional pitch, 21, 67
Programming,38-46
PrtSc key, 37
m
Macro instruction, 85
Maintenance,47
Manual feed, 88
Margins:
bottom, 73, 74
left, 28, 76, 77
right, 28, 76, 77
top, 7, 73, 74
Master print mode, 68
Micro-feed,27-28
Microjustification,68
Most significantbit, 86
m
Quadruple-sizecharacters, 69
m
Near letter quality, 22, 60,83, 85,93-94
NLQ Type Style switch,22, 24
Sanserif type style, 22, 60
Self tests, 12, 13,23-24
Settingup, 3
Singlesheets:
manual loading, 8
semiautomaticloading, 7
specifications,55
Slash zero, 65
Small capitals, 16,22
Software,31-35
Specifications,53-57
Sprocket feed, 9-12,53
Standard character set, 17, 63, 100-101
Standard mode, 16, 17,21,46
Star printers, 31
Subscripts,63
Superscripts,63
m
Off-lin%20,87
On Line switch, 20, 24,87
Orator type style, 16,22,60
Overlining,62
m
Page feed, 27, 74
Page length, Z6,73
Page width, 32,55
Panel pitch, 24
Panel style, 24
Paper Feed switch, 20,24,26,27,28
Paper feed, 7-12,53
Paper guide, 6, 1
Paper specifications,55
Paper-out detester, 16,50, 74
—
m
Rear cover, 3, 10
Releaselever, 3, 7,9
Reset printer, 89
Reverseline feed, 72
Reversemicro-feed,27-28
Ribbon cartridge, 5,47, 53
Right margin, 28, 76, 77
ROM character set, 85
—
—.
m
Tabulation, 51, 73, 75, 76, 77
Test patterns, 12, 13,23,24
Top cover, 3, 4, 5
108
—
L
Tractor feed, 9-13,53
Troubleshooting,50,51
Type style, 22, 34,54,60,61
-.
Underlining,62
Unidirectional printing, 88
Unpacking and inspection, 1
Unparking, 12
L
w
Vertical tabulation, 75
L
Zero (
or normal), 65
L
L
L-
L.
109
L
,.
L
ConsumerResponse
.
Star MicronicsCo., Ltd. invitesyour suggestionsand commentson your
printerand this manual.Pleaseaddressyour correspondenceto:
W
H
STAR MICRONICSCO., LTD.
194Nakayoshida
Shizuoka,JAPAN 422-91
Attn: ProductManager
A
M
STAR MICRONICSAMERICA INC.
Pan Am Bldg., Suite 3510
200 ParkAvenue
New York, NY 10166
Attn: ProductManager
.
E
M
STAR MICRONICSDEUTSCHLAND GMBH
Westerbachstrde59
P. O. Box 940330
D-6000 Frankfurt/Main90
F. R. of Germany
Attn: ProductManager
U
M
STAR MICRONICSU.K., LTD.
CravenHouse
40 UxbridgeRoad
Ealing,London,W52BS, U.K.
Attn: ProductManager
F
M
STAR MICRONICSFRANCE S.A.R.L.
25, rue MichaSlFaraday
78180Montigny-le-Bretonneux
Attn: ProductManager
A
M
STAR MICRONICSASIA LTD.
Room 2409-10SincereBuilding;
173 Des Voeux Road Central,HONG KONG
Attn: ProductManager
,..... ..... .,
(.., ,..
P
P
. .
,.
S
!
.. ”,’...
. ..... ..
..
:.
..
,,
,.,:,
.,
..
. . . ...
Elite
12S4567890
1234!567890
1234567890
1234567890
h
<
4
<
“
1
2
2
1
I
C
1
123456789012
123456789012
c
4 I
C
C
v
C
H
:
T
i
l~34567g90:~34567
< ESC > “M”
12345678901234567
I
l~34~73901~3437~
<
12345678901234567090;
12345b789012345b7
12345b7E9012345b7E90
+
l13456789011j4567<ESC> ~cp” 1234567m12345678!ll &
:
Condensed Elite
~.
Condensed ,Pica
f
~.
mode
~.
Pica
Elite
.< ESC > “:”
<E
> “
j,‘J;;l!,:
:
1
~
* 123456789012
;
1234567890
123456789012
~
1234567090
4
12345678~1 2
:;
1234567890
CHR$(18)
12345bE?W12345b7
1234567fJ901234567
1
1
Condensed Pica
2
2
3
?
:. ,~.
,
Standard mode
Pica
.’:,.
, ,,
DIP SWITCHES
Switch
:
I
1-1
1-2
1-3
1-4
1-5
1-6
ON
Function
1-8
2-1
I 2-2
2-3
2-4
L
OFF
11 inches
! Factorv I
I
12 inches
Yes
I No
I
Small carol Lowercase]
Inactive I Active
I
Disabled
Enabled
Standard IBM
Italics
I Graphics
Set #2
I Set #l
Internationalcharacter set
‘Seebe’ow)
%-i
E
1-7
I
Page length
Auto CR
Orator lower case
Auto sheet feeder
Paper-out detector
Printer mode
Chamcterset CM. Mode)
Characterset flBM Mode)
Auto LF
Usage of RAM
ON
ON
ON
ON
ON
ON
I
I
ON
International character sets:
Country
U.S.A.
France
Germany
England
2-2
ON
OFF
ON
OFF
* Denmark/Norway
2-3
ON
ON
OFF
OFF
2-4
ON
ON
ON
ON
Country
Denmark I *
Sweden
Italy
Spain I
2-2
2-3
2-4
ON
OFF
ON
OFF
ON
ON
OFF
OFF
OFF
OFF
OFF
OFF
when switch 1-6 is OFF and switch 1-7 is ON
Note: DIP switchesare read only at power-up. Switch power off
before changing a DIP switch setting.
MULTI-FONT
NX-I
00011
REFERENCE CARD
POWER-UPFUNCTIONS
In addition to their normal functions, all the control panel switches
have special functions that operate if you hold them down while switching
power on.
❑
SANSEMF ❑
QRATQR ❑
COURIER
mu
‘ NLQ
TYPE
n
llPICA
m-r=
STYLEnu c,=-,.
PAPER
FEED
I-PAFISR
PARK-I
~:~
❑ –POWER
QN LINE
I
❑ CQND
A J
❑
L!l!z?l-
■
Stay in panel
style & pitch
l“+ pitch‘
Stay m panel
B
Stay in panel style
Y
Lo”gLest
Shorttest
Hexadecimal dump
SWITCH COMBINATION FUNCTIONS
Several additional functions can be obtained by pressing the control
panel switches in combinations.
Reverse micro-feed
==E-
❑ PICA
❑ EUTE
Rightmargin
Top of form
,.
COMMANDSUMMARY IN NUMERICORDER
MODE
CONTROLCODE
< BEL >
< BS >
< HT >
< LF>
<VT>
<FF>
<cR>
<so >
<SI>
<DC1>
<DC2>
IBM <DC2>
STD
STD
-==
DC.3>
< DC4 >
< CAN >
<LF>
cm B
<so >
<SI>
<EM> <0>
<EM> <4>
<EM> “R”
<EM> ‘“f”“
,,>.n
,’!.! ~
“#”
“$” nl n2
“%’” o
“%” 1
‘<k”<0> nI n2 mO ml,
“a” M nl n2 ml m2....
“ + ‘“ .,,..,.,,. < US>
“ + “ <[>
‘, —!. o
.’—.31
STD
IBM
STD
IBM
STD
IBM
IBM
“/”no
“0”
.. !.
,’2.,
“2”
-3” n
-4”
“4”
,.5!,
-5” <() >
‘$57’< ] >
“6”’
.’7.!
,,
FUNCTION
Bell
Backspace
Horizontal tab
Line feed
Vertical tab
Form feed
Carriage return
Expanded printing for one line
Condensed printing
Set printer on-line
Cancel condensed printing
Pica pitch
Set printer OtT-line
Cancel one-line expanded printing
Cancel last line
Delete last character sent
Reverac line feed
Return to top of current page
Expanded print for one line
Condensed printing
Manual feed
Auto feed
Eject paper from ASF
Set print start position on ASF
Increase character spacing
Select master print mode
Accept MSB as is
Absolutehorizontal
tabininches
Select
ROM character set
Select download character set
Define download characters
Select graphics mode
Define macro instruction
Execute macro instruction
Stop underlining
Start underlining
Select vertical tab channel
Set line spacing to 1/8 inch
Set line spacing to 7/72 inch
Set line spacing to 1/6 inch
Execute < ESC > ‘CA”
Set line spacing to n/216 inch
Select italic characters
Set topofpageat current position
Select uprigbt characters
Cancel automatic line feed
Set automatic line feed
Select IBM character set #2
Select IBM character set #1
88
77
79
72
75
74
77
67
66
87
66
66
87
67
86
86
72
74
67
66
88
89
89
89
68
68
86
79
85
84
82
81
85
85
62
62
75
70
71
71
71
71
61
73
61
77
77
64
64
CONTROLCODE
IBM
STD
< ESC
< ESC
< ESC
< ESC
STD
IBM
< ES.C >
< ESC >
< ESC >
>
>
>
>
<Esc
>
< ESC >
< Esc >
IBM
IBM
IBM
IBM
IBM
IBM
IBM
IBM
<ESC
< ESC
< ESC
< ESC
< ESC
< ESC
< ESC
< ESC
< ESC
< ESC
< ESC
< ESC
< ESC
>
>
>
>
>
>
>
>
>
>
>
>
>
< Esc >
ESC
< ESC
< ESC
< ESC
< ESC
< ESC
<
>
>
>
>
>
>
< Esc >
I
STD
IBM
IBM
IBM
STD
IBM
STD
< ESC
< ESC
< ESC
< ESC
< ESC
< ESC
< ESC
< ESC
< ESC
< ESC
< ESC
< ESC
< ESC
< ESC
< ESC
< ESC
< ESC
>
>
>
>
>
>
>
>
>
>
>
>
>
>
>
>
>
“8”
’“9”
“:”
“:” <0>
Disable paper-out detector
Enable paper-out detector
Elite pitch
<f)> <()>
COPY standard characters from
ROMinto RAM
‘-< “
One-line unidirectional printing
“=“
Set MSB to O
“=” nl n2 ~ DC4 > aO al a2 ml,,.
Define download characters
‘< > “
Set MSB to 1
“?” n m
Convert graphics density
“@”
Reset printer
“A” n
Set line spacing to n/72 inch
Set vertical tab stops
“B” nl n2.. ..... <0>
“C” <0> n
Set page length to n inches
Set page length to n lines
“C” n
“D” nl n2....., <0>
Set horizontal tab stops
Emphasized printing
“E”
“F”
Cancel emphasized printing
“G”
Double-strike printing
“H”
Cancel double-strike printing
Select draft quality characters
“1” O
“I” 1
Select draft elite characters
“I” 2
Select Sanserif characters
“I” 3
Select Courier characters
“1” 4
Select draft download character set
Select draft elite download character set
‘“I” 5
“I” 6
Select NLQ download character set
Select Courier characters
“I” 7
Perform one n/216-inch line feed
“J” n
Print single-density 8-bit graphics
“K” nl n2 ml m2
Print douhle-density 8-bit graphics
“L” nl n2 ml m2
“M”
Elite pitch
“N” n
Set bottom margin
Cancel top and bottom margins
“O”
“P”
Pica pitch
“P” <(1 >
Select fixed spacing
Select proportional spacing
“P” <1>
“Q” <3>
Set printer off-line
Set right margin
“Q” n
Reset all tab stops
“R”
Select international character set
“R” n
“S” ()
Superscript
Subscript
“S” 1
“T”
Cancel superscript or subscript
Bidirectional printing
“U” O
“U” 1
Unidirectional printing
“W” 1)
Cancel expanded printing
Expanded printing
“W” 1
“X” nl n2
Set left and right margins
74
74
66
82
88
86
84
86
81
89
71
74
73
73
78
61
61
62
62
59
60
60
61
84
85
“’
tr>
61
72
80
80
66
73
74
66
68
67
87
76
79
64
63
63
63
88
88
67
67
77
i
MODE
FUNCTION
CONTROLCOOE
PAGE
IBM
S’m
IBM
< ESC>
< ESC ~
-==
ESC >
Print double-density,
80
double-speed 8 bit graphics
Print quadruple-density 8-bit graphics 81
“Z” d n2 ml m2...
“r’ “@” <4> <O> <0> .,. Select character height, width,
and line spacing
70
Enable printing of all charactercndes 65
“~” nl n2
79
Relative horizontaltab
“/” nl n2
Enable printing of all character
“ ‘“
STD
< ESC >
<ESC>
< ESC>
< Esc >
< Esc >
< ESC>
< ESC >
< Esc >
< ESC >
“““
“_”
“-”
“a”
“a”
“a”
“b”
“c”
“e”
< ESC >
< ESC>
< ESC >
< ESC >
< ESC >
< ESC >
< ESC >
< ESC >
< ESC >
< ESC >
< ESC >
“e” 1 n
“r’ On
“f” 1 n
“h” n
“i” 1)
“i” 1
“j” n
“k” rI
“l” n
“p” O
“p” ]
cESC ~ “Y” nl n2 ml m2...
<
<
ESC >
ESC >
nO nl n2 ml m2
O
1
o
1
2
nO nl n2.
n
On
<0>
STD <Esc> “t”f)
STD
< ESC > “t” 1
< ESC > ‘SW” O
< WC
>
“w”
< ES(2
>
“x”
O
1
< ESC
>
“x”
1
IBM
IBM
IBM
ESC > “-” O
< ESC > “-” 1
< FS > “4”
< FS > “’5”
< FS > “:” <0 > <0>
IBM
IBM
IBM
IBM
<Fs> “=“
<Fs> “Q”~
<Fs> “~”n
<R3> “~”nl n2
<
“(” “(” “o” “)” “)”
“(” “(”’ “4” “)” “)”
“(” “(” “R” “)” “)”
“(” “(” “T” “)” “)” n
<()>
cndes on next character
65
Print 9-pin graphics
82
63
62
78
78
78
75
73
Stop overlining
Start overlirring
Left justify
Center text
Right justify
Set vertical tab stops in channel
Set top margin
Set horizontal tab stop every
n columns
Set vertical tab stops every n lines
Absolute horizontal tab in columns
Feed paper n lines
Select double or quadruple size
Cancel immediate print
Immediate print
perform one n/21&inch reverse fine feed
Select NLQ type style
Set left margin
Select fixed spacing
Select proportional spacing
Select standard character set
select IBM character set
Return to normal height
Print dnuble-height characters
Select draft quality characters
Select NLQ characters
Select normal zern
Select slash zero
Select italic characters
Select upright characters
Copy standard characters from
ROM.into RAM
Set MSB to O
Set right margin
Select international character set
Relative horizontal tab
Manual feed
Auto feed
Eject paper from ASF
Set print start position on ASF
———
—.——...—.
78
75
80
72
69
87
87
72
60
76
68
67
63
64
69
69
59
60
65
65
61
61
82
86
76
64
79
88
89
89
89
.———.
.—-
r
,.
Printed in Japan ’89